Chain FIAT FULLBACK 2017 Owner handbook (in English)
[x] Cancel search | Manufacturer: FIAT, Model Year: 2017, Model line: FULLBACK, Model: FIAT FULLBACK 2017Pages: 312, PDF Size: 12.31 MB
Page 77 of 312
82)For safety reasons, the bonnet must
always be properly closed while the car is
travelling. Therefore, make sure that the
bonnet is properly closed and that the lock
is engaged. If you discover that the bonnet
is not perfectly closed during travel, stop
immediately and close the bonnet in the
correct manner.
IMPORTANT
30)Note that the support bar may
disengage the bonnet if the open bonnet is
lifted by a strong wind.
31)After inserting the support bar into the
slot, make sure the bar supports the
bonnet securely from falling down on to
your head or body.
CARGO AREA
CARGO LOADS
83) 84)
Cargo loads precautions
When loading luggage, be careful to the
following.
Stow cargo and luggage in the cargo
area whenever possible.
Distribute cargo or luggage evenly
not to be unbalanced in weight of a
load.
Do not place cargo or luggage on
the instrument panel. Also, do not stack
up cargo or luggage on the front
passenger’s seat or the rear seat.
Having the driver’s vision blocked, and
your cargo being thrown inside the
cabin if you suddenly have to brake can
cause a serious accident or injury.
HIGH-LOAD SYSTEM,
PROTRUDING LOADS
Check that the load is distributed evenly
on the flatbed and that the rear side
panel is correctly closed, so that the
load, or part of it, cannot fall onto the
road surface.
Some simple suggestions can improve
driving safety, comfort and vehicle
duration:
distribute the load evenly over the
platform: if it must be concentrated it in
a single area, choose an area mid-way
between both axles;
remember that the dynamic
behaviour of the vehicle is affected by
the transported weight: in particular, the
stopping distances are longer,
especially at high speed.
Bumpy roads and heavy braking may
cause unexpected load shifting with
consequently hazardous situations:
before setting off, secure the load tightly
using the partition and appropriate
hooks, steel cables, ropes or chains
strong enough to hold the items to be
secured.
83) 84) 85) 86) 87) 88)
WARNING
83)If the vehicle is parked on a very steep
slope or side gradient, opening the rear
flap of the flatbed or a side door may
cause any objects or luggage which is not
fixed to spill out.
84)If you wish to carry a reserve of petrol
in a can, observe the legal restrictions and
only use a can that is type-approved and
properly secured to the load anchorage
eyebolts. Anyway, by doing so, you
increase the risk of fire in the event of an
accident with your vehicle.
85)Respect the maximum permitted
vehicle loads also shown on the
registration certificate. The user is
responsible for arranging goods in the
luggage compartment and/or on the load
platform within the maximum permitted
loads.
75
Page 140 of 312
Anti-lock brake system (ABS)
(where provided)
The anti-lock brake system (ABS) helps
prevent the wheels from locking up
when braking. This helps maintain
vehicle drivability and steering wheel
handling.
Driving hints
Always keep a safe distance from the
vehicle in front of you. Even if your
vehicle is equipped with the ABS, leave
a greater braking distance when:
Driving on gravel or snow-covered
roads.
Driving with tyre chains installed.
Driving on roads where the road
surface is pitted or has other
differences in surface height.
Driving on uneven road surfaces.
Operation of ABS is not restricted
situations where brakes are applied
suddenly. This system may also prevent
the wheels from locking when you drive
over manholes, steel roadwork plates,
road markings, or any uneven road
surface.
When the ABS is in use, you may feel
the brake pedal pulsation and the
vibrations of the vehicle body and
steering wheel. It may also feel as if the
pedal resists being pressed.In this situation, simply hold the brake
pedal down firmly. Do not pump the
brake, which will result in reduced
braking performance.
An operation noise is emitted from the
engine compartment or feel a shock
from the brake pedal when start driving
immediately after starting the engine.
These are normal sound or operation
that the ABS makes when performing a
self-check. It does not indicate a
malfunction.
The ABS can be used after the vehicle
has reached a speed over
approximately 10 km/h. It stops
working when the vehicle slows below
7 km/h.
202) 203) 204) 205) 206) 207) 208) 209) 210)
After driving on icy roads
After driving on snow or icy roads,
remove any snow and ice which may
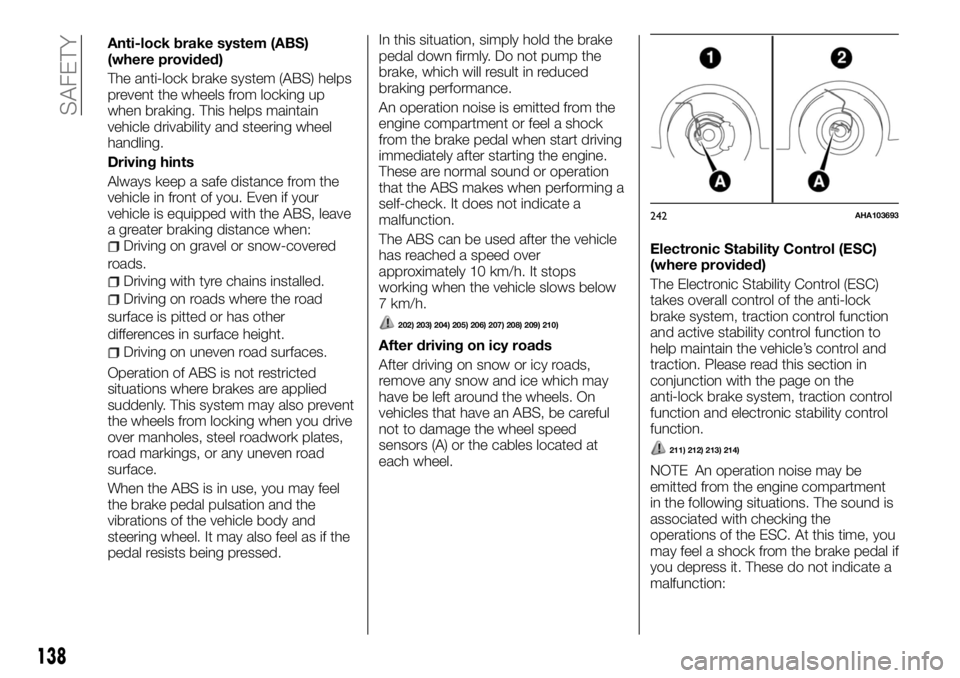
have be left around the wheels. On
vehicles that have an ABS, be careful
not to damage the wheel speed
sensors (A) or the cables located at
each wheel.Electronic Stability Control (ESC)
(where provided)
The Electronic Stability Control (ESC)
takes overall control of the anti-lock
brake system, traction control function
and active stability control function to
help maintain the vehicle’s control and
traction. Please read this section in
conjunction with the page on the
anti-lock brake system, traction control
function and electronic stability control
function.
211) 212) 213) 214)
NOTE An operation noise may be
emitted from the engine compartment
in the following situations. The sound is
associated with checking the
operations of the ESC. At this time, you
may feel a shock from the brake pedal if
you depress it. These do not indicate a
malfunction:
242AHA103693
138
SAFETY
Page 180 of 312
139)Use the rear differential lock only as an
emergency measure when the vehicle is
stuck and cannot be freed with the drive
mode-selector in “4L” or “4H” position
(Easy select 4WD) or in “4LLc” or “4HLc”
position (Super select 4WD II). Deactivate
the rear differential lock immediately after
using it.4 WHEEL DRIVE
OPERATION
By selecting 4-wheel drive, both axles
of the vehicle are rigidly connected with
each other. This improves the traction
characteristics. When turning sharp
corners or moving forward and
backward repeatedly, however, the
drive line is stressed, which is felt as a
braking effect. A 4-wheel drive vehicle
can accelerate more quickly and
smoothly.
However, note that the braking distance
is not shorter than that of a rear-wheel
drive vehicle.
When using 4-wheel drive on rough
roads (snow, mud, sand, etc.), it is
important to operate the vehicle
correctly.
NOTE The driving posture should be
more upright and closer to the wheel
than usual; adjust the seat to a good
position for easy steering and pedal
operation. Be sure to wear the seat
belt.
NOTE After driving on rough roads,
check each part of the vehicle and
wash it thoroughly with water. Refer to
“Vehicle care” and “Inspection and
maintenance following rough road
operation”.Driving on dry paved road and
highway
Select “2H” position (Easy select 4WD),
“2H” or “4H” position (Super select
4WD II) to drive on the dry paved road.
Especially on dry highway, never select
the “4H” or “4L” position (Easy select
4WD), “4HLc” or “4LLc” position (Super
select 4WD II).
140)
Driving on snowy or icy roads
Set the drive mode-selector to “4H”
position (Easy select 4WD), “4H” or
“4HLc” position in accordance with the
road conditions (Super select 4WD II)
and then gradually depress the
accelerator pedal for a smooth start.
Keep the pressure on the accelerator
pedal as constant as possible, and
drive at low speed.
NOTE The use of snow tyres and/or
tyre chains is recommended.
NOTE Maintain a safe distance
between vehicles, avoid sudden
braking, and use engine braking
(downshifting).
141)
Driving on sandy or muddy roads
Set the drive mode-selector to “4H” or
“4L” position (Easy select 4WD), “4HLc”
or “4LLc” position (Super select 4WD II)
and then gradually depress the
accelerator pedal for a smooth start.
Keep the pressure on the accelerator
178
STARTING AND DRIVING
Page 181 of 312
pedal as constant as possible, and
drive at low speed.
142) 143)
232)
NOTE Avoid sudden braking,
acceleration, and turning; such
operations could result in the vehicle
becoming stuck.
NOTE If the vehicle becomes stuck in
sandy or muddy roads, it can often be
moved a rocking motion. Move the
selector lever rhythmically between the
“D” (DRIVE) and “R” (REVERSE)
position (with manual transmission,
between 1st and Reverse), while
applying slight pressure to the
accelerator pedal.
NOTE It is recommended to start the
vehicle with parking brake partially, but
not completely, applied by slightly
pulling the parking brake lever. After the
vehicle has become free, do not forget
to release the parking brake.
NOTE If it is necessary to drive in
extremely muddy conditions, the use of
tyre chains is recommended. Because
the extent of muddy conditions is
difficult to judge and the vehicle could
become bogged down very deeply,
operation should be at a low speed. If
possible, get out of the vehicle and
check the conditions ahead before
proceeding.NOTE Driving over roads in coastal
areas or roads on which anti-skid
preparations have been spread can
cause rust on the vehicle; wash the
vehicle thoroughly as soon as possible
after such use.
Climbing sharp grades
Set the drive mode-selector to “4L”
position (Easy select 4WD), “4LLc”
position (Super select 4WD II) to
maximize the engine torque.
233) 234)
NOTE Choose as smooth a slope as
possible with few stones or other
obstacles.
NOTE Before attempting to drive up
the slope, walk up it to confirm that the
vehicle can handle the grade.
Descending sharp grades
Set the drive mode-selector to “4L”
position (Easy select 4WD), “4LLc”
position (Super select 4WD II), use the
engine brake (downshifting) and
descend slowly.
235)
NOTE When descending a sharp
grade, if the brakes are applied
suddenly because of an obstacle
encountered, control of the vehicle
could be lost. Before descending the
slope, walk down it and confirm the
path.NOTE Before descending a grade, it is
necessary to choose the appropriate
gear. Avoid changing gears or
depressing the clutch while descending
the grade.
NOTE Fiat is not responsible to the
operator for any damage or injury
caused or liability incurred by the
improper and negligent operation of a
vehicle. All techniques of vehicle
operation described herein depend on
the skill and experience of the operator
and other participating parties and any
deviation from the recommended
operation instructions above is at their
own risk.
Turning sharp corners
When turning a sharp corner in “4H” or
“4L” position (Easy select 4WD), “4HLc”
or “4LLc” position (Super select 4WD II)
at low speed, a slight difference in
steering may be experienced similar to
as if the brakes were applied. This is
called tight corner braking and results
from each of the 4 tyres being at a
different distance from the corner.
Crossing a stream
4-wheel drive vehicles are not
necessarily waterproof. If the electrical
circuits become wet, further operation
of the vehicle will be impossible;
therefore, avoid crossing streams
unless absolutely necessary. If crossing
a stream is unavoidable, use the
following procedure:
Check depths of a stream and
179
Page 200 of 312
IMPORTANT
154)LDW has its performance limitations.
Do not over-rely on the system.
155)LDW is not designed to lessen risks
associated with not looking ahead carefully
(attention drawn to something on the side,
absentmindedness, etc.) or poor visibility
caused by bad weather etc. Keep steering
your vehicle correctly and drive safely.156)The system may not be able to detect
the lane correctly in the following
conditions. If required, set the LDW switch
to “OFF.”: when driving on a road whose
lane markings (white or yellow) are worn
out or smeared with dirt to an extent not
recognizable by the system; when lane
markings are vague, typically during a drive
in the rain, snow or fog, or when running
against the sun; when the vehicle is moving
in a place where lane markings are
interrupted, such as a toll booth entrance
and motorway junction; when running on a
road portion with incompletely removed old
lane markings, shadows, lingering snow,
truck-like puddles mistakable for lane
markings (especially after the rain when
road surface is reflecting light) or similar
confusing factors; when running in a lane
other than the cruising lane and passing
lane; when running beside a closed lane
section or in a provisional lane in a traffic
work zone; when running in an extremely
narrow lane; when the following distance
between your vehicle and a vehicle in front
becomes extremely reduced (especially
when a marking is hidden by a vehicle in
front this is running too close to the
marking); when entering a junction or other
point of road where lanes are laid out
complicatedly;when passing a road section where the
number of lanes increases/decreases or
multiple lanes are crossing each other;
when the lane is marked by double or
otherwise special lines; when driving on a
winding or rough road; when driving on a
slippery road covered by rain water, snow,
ice, etc.; when passing through a place
where the brightness suddenly changes,
like the inlet or outlet of a tunnel; when
turning steep curves; when the road
surface is reflecting the light shining from
the direction opposite to the running
direction; vehicle largely lurches when it is
running over steps or other irregularities of
the road surface; when the headlamp
illumination is inadequate because of
contaminated or deteriorated lenses or
improperly aimed headlamps; when the
vehicle is leaning much to one side due to
heavy luggage on it or improperly adjusted
tyre pressures; when oncoming vehicles’
headlamps shine the LDW camera; when
the vehicle is equipped with nonstandard
tyres (including excessively worn tyres and
temporary spare tyre), uses snow traction
device (tyre chains), or has nonspecified
components such as a modified
suspension; when the windscreen is
covered with rain water, snow, dust, etc.
198
STARTING AND DRIVING
Page 219 of 312
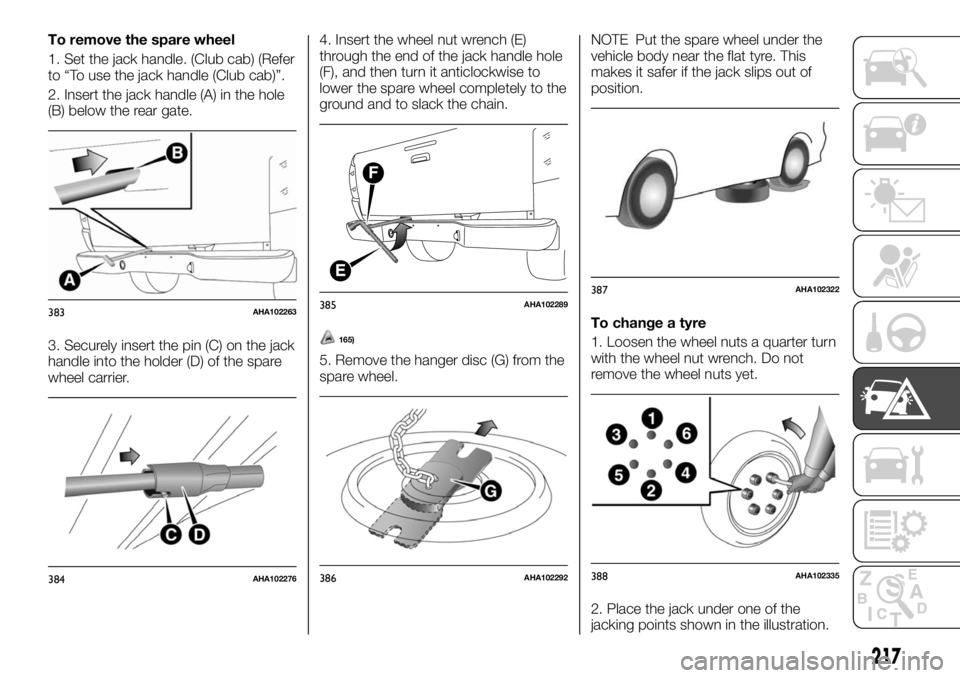
To remove the spare wheel
1. Set the jack handle. (Club cab) (Refer
to “To use the jack handle (Club cab)”.
2. Insert the jack handle (A) in the hole
(B) below the rear gate.
3. Securely insert the pin (C) on the jack
handle into the holder (D) of the spare
wheel carrier.4. Insert the wheel nut wrench (E)
through the end of the jack handle hole
(F), and then turn it anticlockwise to
lower the spare wheel completely to the
ground and to slack the chain.
165)
5. Remove the hanger disc (G) from the
spare wheel.NOTE Put the spare wheel under the
vehicle body near the flat tyre. This
makes it safer if the jack slips out of
position.
To change a tyre
1. Loosen the wheel nuts a quarter turn
with the wheel nut wrench. Do not
remove the wheel nuts yet.
2. Place the jack under one of the
jacking points shown in the illustration.
383AHA102263
384AHA102276
385AHA102289
386AHA102292
387AHA102322
388AHA102335
217
Page 222 of 312
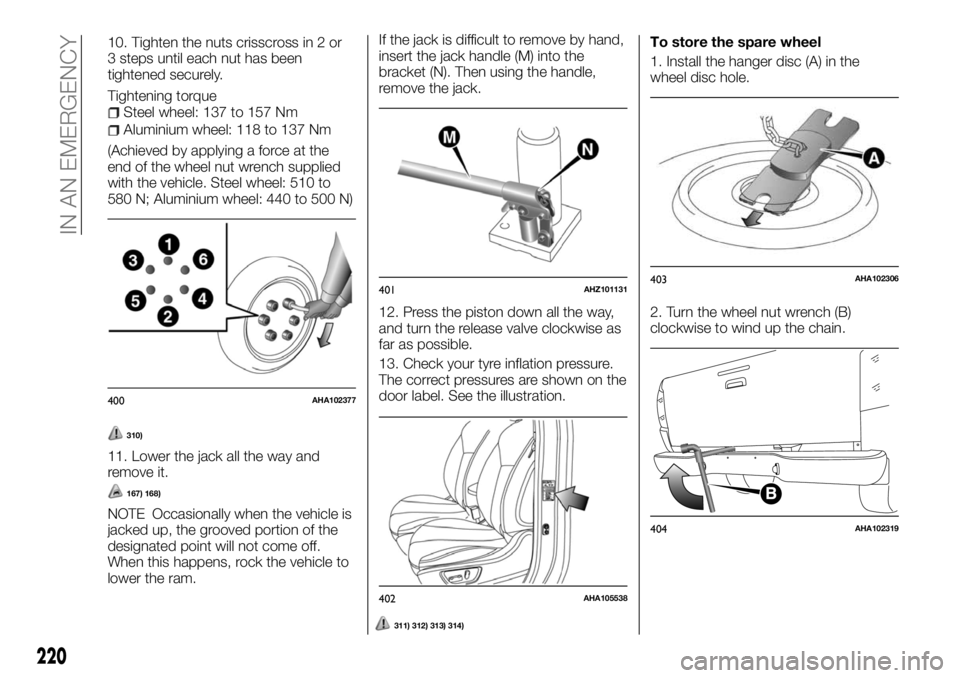
10. Tighten the nuts crisscross in 2 or
3 steps until each nut has been
tightened securely.
Tightening torque
Steel wheel: 137 to 157 Nm
Aluminium wheel: 118 to 137 Nm
(Achieved by applying a force at the
end of the wheel nut wrench supplied
with the vehicle. Steel wheel: 510 to
580 N; Aluminium wheel: 440 to 500 N)
310)
11. Lower the jack all the way and
remove it.
167) 168)
NOTE Occasionally when the vehicle is
jacked up, the grooved portion of the
designated point will not come off.
When this happens, rock the vehicle to
lower the ram.If the jack is difficult to remove by hand,
insert the jack handle (M) into the
bracket (N). Then using the handle,
remove the jack.
12. Press the piston down all the way,
and turn the release valve clockwise as
far as possible.
13. Check your tyre inflation pressure.
The correct pressures are shown on the
door label. See the illustration.
311) 312) 313) 314)
To store the spare wheel
1. Install the hanger disc (A) in the
wheel disc hole.
2. Turn the wheel nut wrench (B)
clockwise to wind up the chain.
400AHA102377
401AHZ101131
402AHA105538
403AHA102306
404AHA102319
220
IN AN EMERGENCY
Page 226 of 312
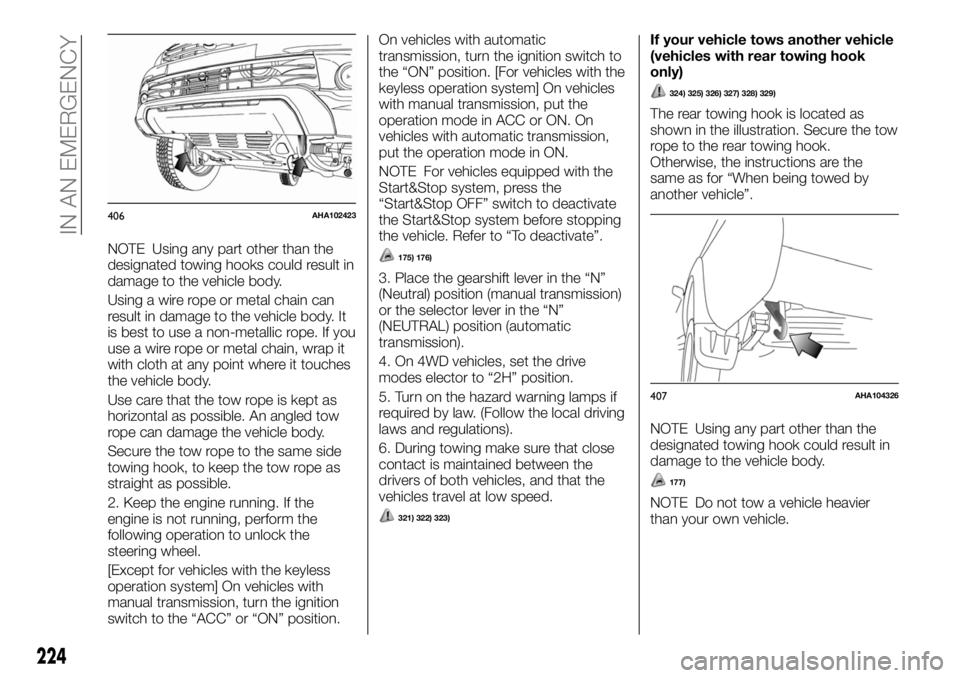
NOTE Using any part other than the
designated towing hooks could result in
damage to the vehicle body.
Using a wire rope or metal chain can
result in damage to the vehicle body. It
is best to use a non-metallic rope. If you
use a wire rope or metal chain, wrap it
with cloth at any point where it touches
the vehicle body.
Use care that the tow rope is kept as
horizontal as possible. An angled tow
rope can damage the vehicle body.
Secure the tow rope to the same side
towing hook, to keep the tow rope as
straight as possible.
2. Keep the engine running. If the
engine is not running, perform the
following operation to unlock the
steering wheel.
[Except for vehicles with the keyless
operation system] On vehicles with
manual transmission, turn the ignition
switch to the “ACC” or “ON” position.On vehicles with automatic
transmission, turn the ignition switch to
the “ON” position. [For vehicles with the
keyless operation system] On vehicles
with manual transmission, put the
operation mode in ACC or ON. On
vehicles with automatic transmission,
put the operation mode in ON.
NOTE For vehicles equipped with the
Start&Stop system, press the
“Start&Stop OFF” switch to deactivate
the Start&Stop system before stopping
the vehicle. Refer to “To deactivate”.175) 176)
3. Place the gearshift lever in the “N”
(Neutral) position (manual transmission)
or the selector lever in the “N”
(NEUTRAL) position (automatic
transmission).
4. On 4WD vehicles, set the drive
modes elector to “2H” position.
5. Turn on the hazard warning lamps if
required by law. (Follow the local driving
laws and regulations).
6. During towing make sure that close
contact is maintained between the
drivers of both vehicles, and that the
vehicles travel at low speed.
321) 322) 323)
If your vehicle tows another vehicle
(vehicles with rear towing hook
only)
324) 325) 326) 327) 328) 329)
The rear towing hook is located as
shown in the illustration. Secure the tow
rope to the rear towing hook.
Otherwise, the instructions are the
same as for “When being towed by
another vehicle”.
NOTE Using any part other than the
designated towing hook could result in
damage to the vehicle body.
177)
NOTE Do not tow a vehicle heavier
than your own vehicle.
406AHA102423
407AHA104326
224
IN AN EMERGENCY
Page 228 of 312
174)Never tow an automatic transmission
vehicle with the front wheels up (and the
rear wheels on the ground) (Type B) when
the automatic transmission fluid level is low.
This may cause serious and expensive
damage to the transmission.
175)When the engine is not running, the
brake booster and power steering pump do
not operate. This means higher brake
depression force and higher steering effort
are required. Therefore, vehicle operation is
very difficult.
176)Do not leave the ignition switch in the
“LOCK” position or the operation mode in
OFF. The steering wheel will lock, causing
loss of control.
177)On vehicles with super select 4WD II,
when you are going to tow another vehicle,
set the drive mode-selector to “4H”
position. Selecting “2H” drive may increase
the differential oil temperature, resulting in
possible damage to the driving system.
Further, the drive train will be subjected to
excessive loading possibly leading to oil
leakage, component seizure, or other
serious faults.OPERATION UNDER
ADVERSE DRIVING
CONDITIONS
On a flooded road
Avoid flooded roads. In the event
driving flooded roads, doing so may
cause the following serious damage to
the vehicle.
Engine stalling
Short in electrical components
Engine damage caused by water
immersion
After driving flooded roads, be sure to
have an inspection at a Fiat Dealership
and take the necessary measures or
repair.
When driving in rain, or water-covered
roads, or through a car wash, water
could enter the brake discs, resulting in
temporarily ineffective brakes. In such
cases, lightly depress the brake pedal
to see if the brakes operate properly. If
they do not, lightly depress the pedal
several times while driving in order to
dry the brake pads.
On a wet road
When driving in rain or on a road with
many puddles a layer of water may
form between the tyres and the road
surface. This reduces a tyre’s frictional
resistance on the road, resulting in loss
of steering stability and braking
capability.To cope with this, observe the following
items:
(a) Drive your vehicle at a slow speed.
(b) Do not drive on worn tyres.
(c) Always maintain the specified tyre
inflation pressures.
On a snow-covered or frozen road
When driving on a snow-covered or
frozen road, it is recommended that you
use snow tyres or snow traction device
(tyre chains). Refer to the “Snow tyres”
and “Snow traction device (tyre chains)”
sections.
Avoid high-speed operation, sudden
acceleration, abrupt brake application
and sharp cornering.
Depressing the brake pedal during
travel on snowy or icy roads may cause
tyre slippage and skidding. When
traction between the tyres and the road
is reduced the wheels may skid and the
vehicle cannot readily be brought to a
stop by conventional braking
techniques. Braking will differ,
depending upon whether you have
anti-lock brake system (ABS). If you do
have ABS, brake by pressing the brake
pedal hard, and keeping it pressed. If
you do not have ABS, pump the brake
pedal with short rapid jabs, each time
fully applying and fully releasing for
greatest effect.
Allow extra distance between your
vehicle and the vehicle in front of you,
and avoid sudden braking.
226
IN AN EMERGENCY
Page 271 of 312
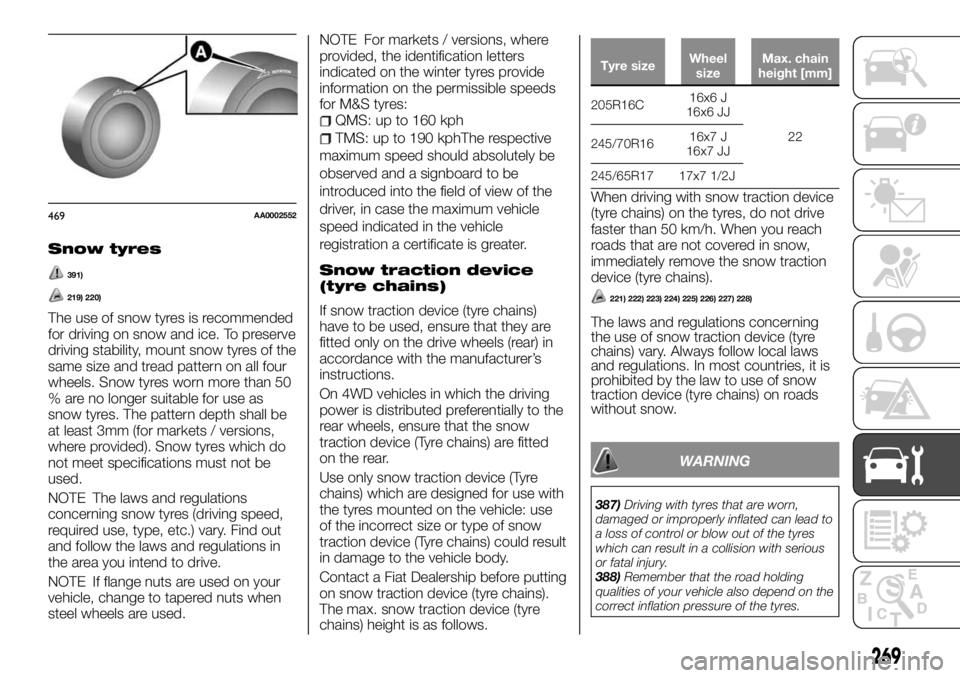
Snow tyres
391)
219) 220)
The use of snow tyres is recommended
for driving on snow and ice. To preserve
driving stability, mount snow tyres of the
same size and tread pattern on all four
wheels. Snow tyres worn more than 50
% are no longer suitable for use as
snow tyres. The pattern depth shall be
at least 3mm (for markets / versions,
where provided). Snow tyres which do
not meet specifications must not be
used.
NOTE The laws and regulations
concerning snow tyres (driving speed,
required use, type, etc.) vary. Find out
and follow the laws and regulations in
the area you intend to drive.
NOTE If flange nuts are used on your
vehicle, change to tapered nuts when
steel wheels are used.NOTE For markets / versions, where
provided, the identification letters
indicated on the winter tyres provide
information on the permissible speeds
for M&S tyres:
QMS: up to 160 kph
TMS: up to 190 kphThe respective
maximum speed should absolutely be
observed and a signboard to be
introduced into the field of view of the
driver, in case the maximum vehicle
speed indicated in the vehicle
registration a certificate is greater.
Snow traction device
(tyre chains)
If snow traction device (tyre chains)
have to be used, ensure that they are
fitted only on the drive wheels (rear) in
accordance with the manufacturer’s
instructions.
On 4WD vehicles in which the driving
power is distributed preferentially to the
rear wheels, ensure that the snow
traction device (Tyre chains) are fitted
on the rear.
Use only snow traction device (Tyre
chains) which are designed for use with
the tyres mounted on the vehicle: use
of the incorrect size or type of snow
traction device (Tyre chains) could result
in damage to the vehicle body.
Contact a Fiat Dealership before putting
on snow traction device (tyre chains).
The max. snow traction device (tyre
chains) height is as follows.
Tyre sizeWheel
sizeMax. chain
height [mm]
205R16C16x6 J
16x6 JJ
22
245/70R1616x7 J
16x7 JJ
245/65R17 17x7 1/2J
When driving with snow traction device
(tyre chains) on the tyres, do not drive
faster than 50 km/h. When you reach
roads that are not covered in snow,
immediately remove the snow traction
device (tyre chains).
221) 222) 223) 224) 225) 226) 227) 228)
The laws and regulations concerning
the use of snow traction device (tyre
chains) vary. Always follow local laws
and regulations. In most countries, it is
prohibited by the law to use of snow
traction device (tyre chains) on roads
without snow.
WARNING
387)Driving with tyres that are worn,
damaged or improperly inflated can lead to
a loss of control or blow out of the tyres
which can result in a collision with serious
or fatal injury.
388)Remember that the road holding
qualities of your vehicle also depend on the
correct inflation pressure of the tyres.
469AA0002552
269