key FIAT IDEA 2007 1.G Owner's Manual
[x] Cancel search | Manufacturer: FIAT, Model Year: 2007, Model line: IDEA, Model: FIAT IDEA 2007 1.GPages: 314, PDF Size: 4.78 MB
Page 58 of 314
57
SAFETY
DEVICES
CORRECT USE
OF THE CAR
WARNING
LIGHTS AND
MESSAGES
IN AN
EMERGENCY
CAR
MAINTENANCE
TECHNICAL
SPECIFICATIONS
INDEX
DASHBOARD
AND CONTROLS
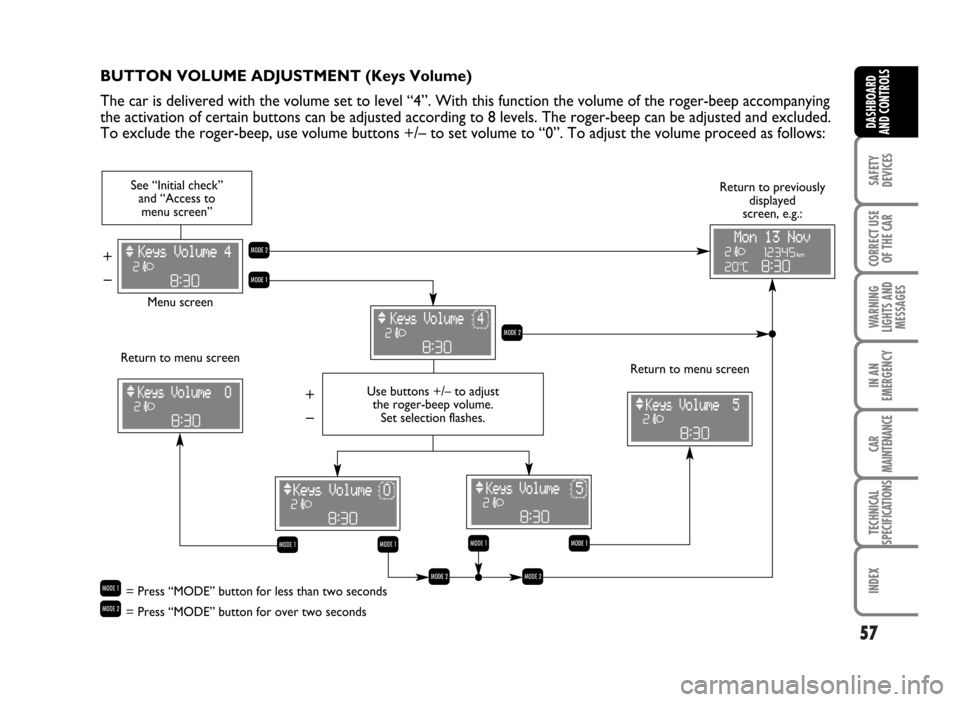
BUTTON VOLUME ADJUSTMENT (Keys Volume)
The car is delivered with the volume set to level “4”. With this function the volume of the roger-beep accompanying
the activation of certain buttons can be adjusted according to 8 levels. The roger-beep can be adjusted and excluded.
To exclude the roger-beep, use volume buttons +/– to set volume to “0”. To adjust the volume proceed as follows:
Menu screen See “Initial check”
and “Access to
menu screen”
Use buttons +/– to adjust
the roger-beep volume.
Set selection flashes.
Return to menu screenReturn to previously
displayed
screen, e.g.:
R
Q
Q
Q
– + – +
R
Return to menu screen
Q= Press “MODE” button for less than two seconds
R= Press “MODE” button for over two seconds
Q
Q
RR
Page 60 of 314
59
SAFETY
DEVICES
CORRECT USE
OF THE CAR
WARNING
LIGHTS AND
MESSAGES
IN AN
EMERGENCY
CAR
MAINTENANCE
TECHNICAL
SPECIFICATIONS
INDEX
DASHBOARD
AND CONTROLS
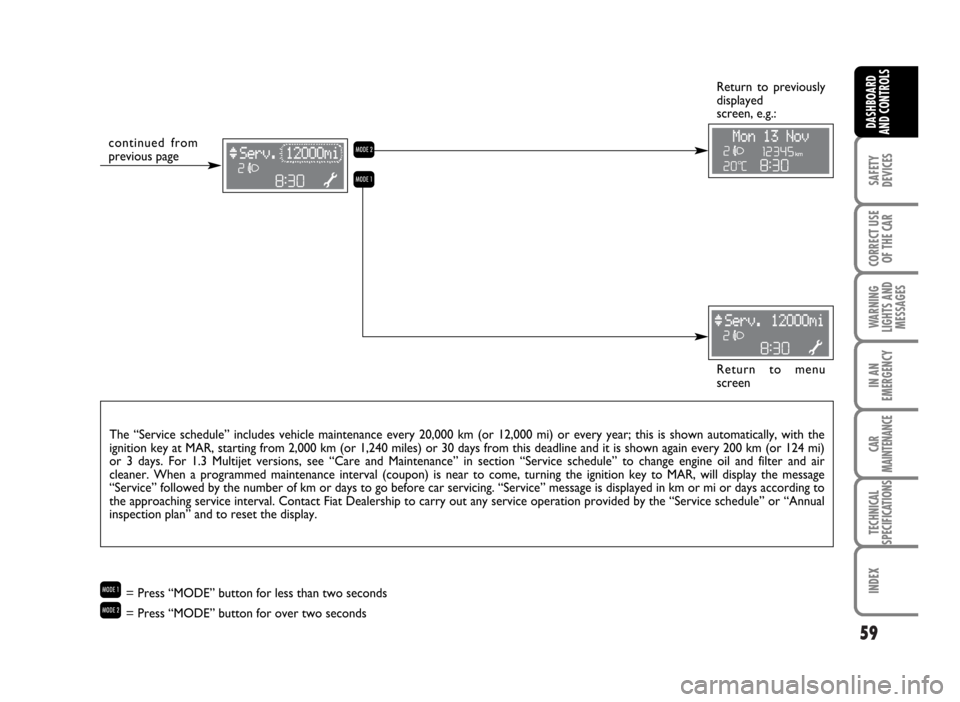
The “Service schedule” includes vehicle maintenance every 20,000 km (or 12,000 mi) or every year; this is shown automatically, with the
ignition key at MAR, starting from 2,000 km (or 1,240 miles) or 30 days from this deadline and it is shown again every 200 km (or 124 mi)
or 3 days. For 1.3 Multijet versions, see “Care and Maintenance” in section “Service schedule” to change engine oil and filter and air
cleaner. When a programmed maintenance interval (coupon) is near to come, turning the ignition key to MAR, will display the message
“Service” followed by the number of km or days to go before car servicing. “Service” message is displayed in km or mi or days according to
the approaching service interval. Contact Fiat Dealership to carry out any service operation provided by the “Service schedule” or “Annual
inspection plan” and to reset the display.
Return to menu
screen Return to previously
displayed
screen, e.g.:
continued from
previous page
R
Q
Q= Press “MODE” button for less than two seconds
R= Press “MODE” button for over two seconds
Page 62 of 314

61
SAFETY
DEVICES
CORRECT USE
OF THE CAR
WARNING
LIGHTS AND
MESSAGES
IN AN
EMERGENCY
CAR
MAINTENANCE
TECHNICAL
SPECIFICATIONS
INDEX
DASHBOARD
AND CONTROLS
TRIP COMPUTER
The “Trip computer” displays information relating to the operating status of the car. This function comprises the
“General trip”, concerning the complete mission of the car and “Trip B”, concerning the partial car mission. The car is
delivered with “Trip B” set to “ON”. This function (as shown in the graph below) is contained within the complete
mission. Both functions are resettable. The “General trip” displays the figures relating to Cruising Range, Travelled
Distance, Average fuel consumption, Current fuel consumption, Average speed, Travel time (driving time). “Trip B”
displays information concerning Travel Distance B, Average fuel consumption B, Average speed B, Travel time B
(driving time). The “Trip B” function can be excluded.
Start of journey procedure (reset)
To start a new journey monitored by the “General Trip”, with the key to MAR, press button
{on right steering
column stalk with mode
&(see paragraph “Display control buttons”).
The reset operation in the presence of the screens concerning the “General trip” makes it possible to reset also the
“Trip B”. The reset operation in the presence of the screens concerning only the “Trip B” makes it possible to reset
only the information associated with this function.
IMPORTANT The “Cruising range” information cannot be reset.
Reset TRIP B
End of partial mission
Start of new partial mission
End of partial mission
Start of new partial mission
Reset TRIP B
End of partial mission
Start of new partial mission Reset GENERAL TRIP
End of complete mission - Start of new missionReset GENERAL TRIP
End of complete mission - Start of new mission
End of partial mission
Start of new partial mission Reset TRIP B
Reset TRIP B
TRIP B
TRIP B
TRIP B GENERAL TRIP˙
˙
˙
˙˙
˙
˙ ˙
%= Press “TRIP” button for less than two seconds - &= Press “TRIP” button for over two seconds
Page 80 of 314
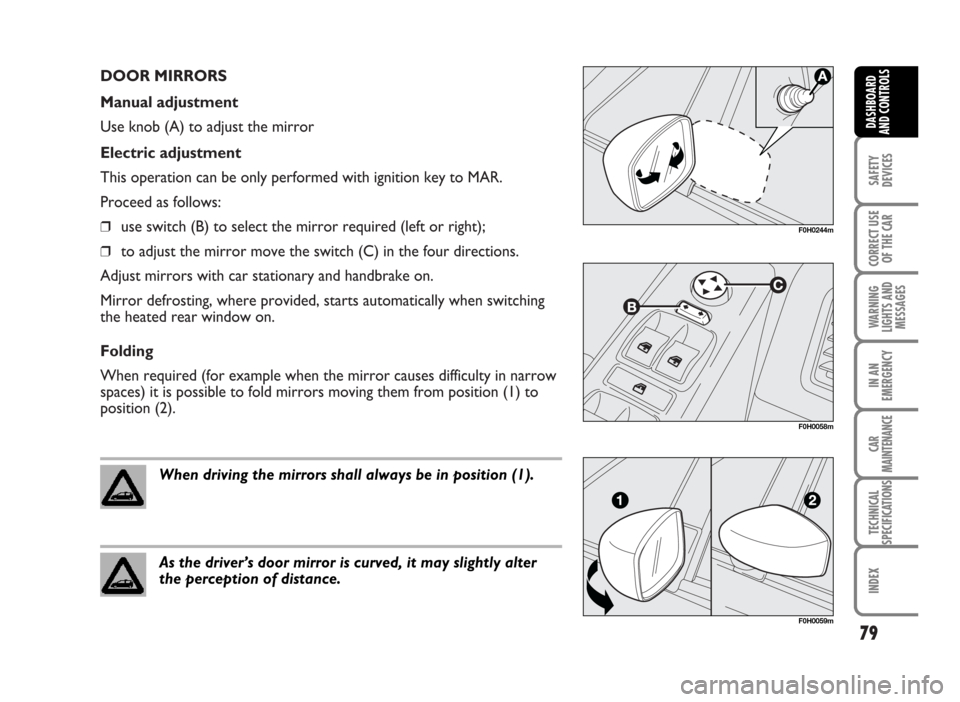
DOOR MIRRORS
Manual adjustment
Use knob (A) to adjust the mirror
Electric adjustment
This operation can be only performed with ignition key to MAR.
Proceed as follows:
❒use switch (B) to select the mirror required (left or right);
❒to adjust the mirror move the switch (C) in the four directions.
Adjust mirrors with car stationary and handbrake on.
Mirror defrosting, where provided, starts automatically when switching
the heated rear window on.
Folding
When required (for example when the mirror causes difficulty in narrow
spaces) it is possible to fold mirrors moving them from position (1) to
position (2).
79
SAFETY
DEVICES
CORRECT USE
OF THE CAR
WARNING
LIGHTS AND
MESSAGES
IN AN
EMERGENCY
CAR
MAINTENANCE
TECHNICAL
SPECIFICATIONS
INDEX
DASHBOARD
AND CONTROLS
F0H0058m
F0H0059m
When driving the mirrors shall always be in position (1).
As the driver’s door mirror is curved, it may slightly alter
the perception of distance.
F0H0244m
Page 101 of 314
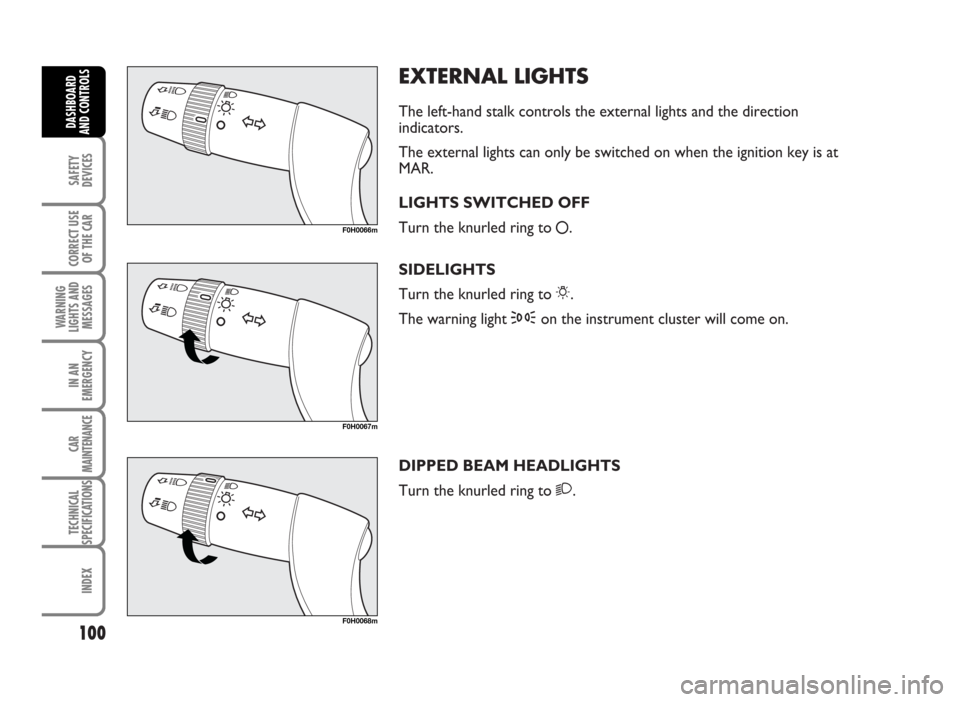
EXTERNAL LIGHTS
The left-hand stalk controls the external lights and the direction
indicators.
The external lights can only be switched on when the ignition key is at
MAR.
LIGHTS SWITCHED OFF
Turn the knurled ring to
å.
SIDELIGHTS
Turn the knurled ring to 6.
The warning light 3on the instrument cluster will come on.
DIPPED BEAM HEADLIGHTS
Turn the knurled ring to 2.
100
SAFETY
DEVICES
CORRECT USE
OF THE CAR
WARNING
LIGHTS AND
MESSAGES
IN AN
EMERGENCY
CAR
MAINTENANCE
TECHNICAL
SPECIFICATIONS
INDEX
DASHBOARD
AND CONTROLS
F0H0066m
F0H0067m
F0H0068m
Page 103 of 314
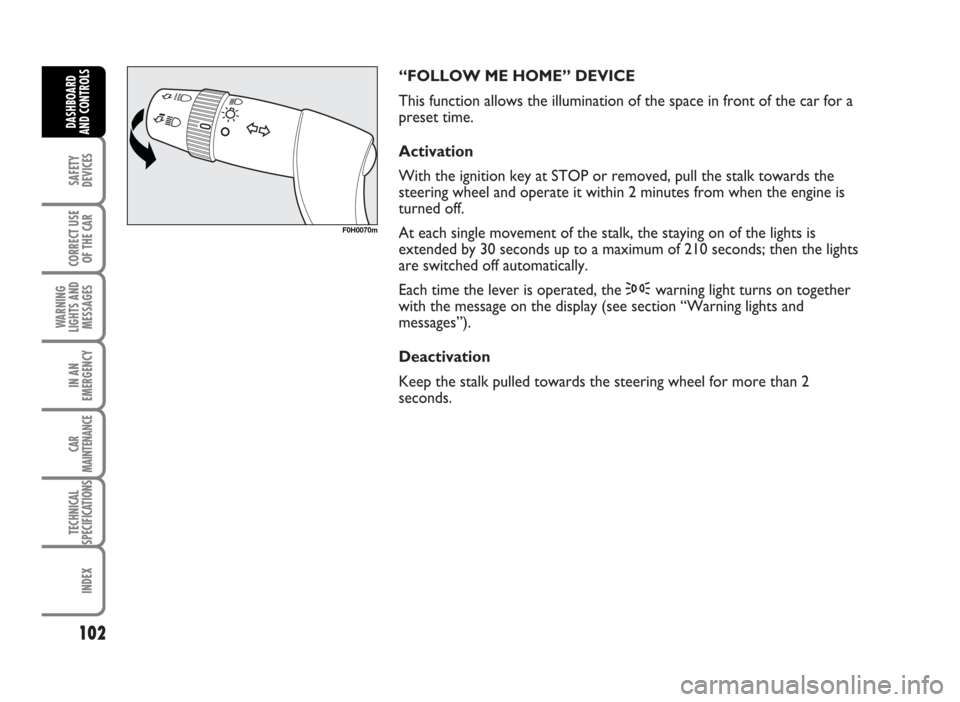
“FOLLOW ME HOME” DEVICE
This function allows the illumination of the space in front of the car for a
preset time.
Activation
With the ignition key at STOP or removed, pull the stalk towards the
steering wheel and operate it within 2 minutes from when the engine is
turned off.
At each single movement of the stalk, the staying on of the lights is
extended by 30 seconds up to a maximum of 210 seconds; then the lights
are switched off automatically.
Each time the lever is operated, the 3warning light turns on together
with the message on the display (see section “Warning lights and
messages”).
Deactivation
Keep the stalk pulled towards the steering wheel for more than 2
seconds.
102
SAFETY
DEVICES
CORRECT USE
OF THE CAR
WARNING
LIGHTS AND
MESSAGES
IN AN
EMERGENCY
CAR
MAINTENANCE
TECHNICAL
SPECIFICATIONS
INDEX
DASHBOARD
AND CONTROLS
F0H0070m
Page 105 of 314
WINDOW WASHING
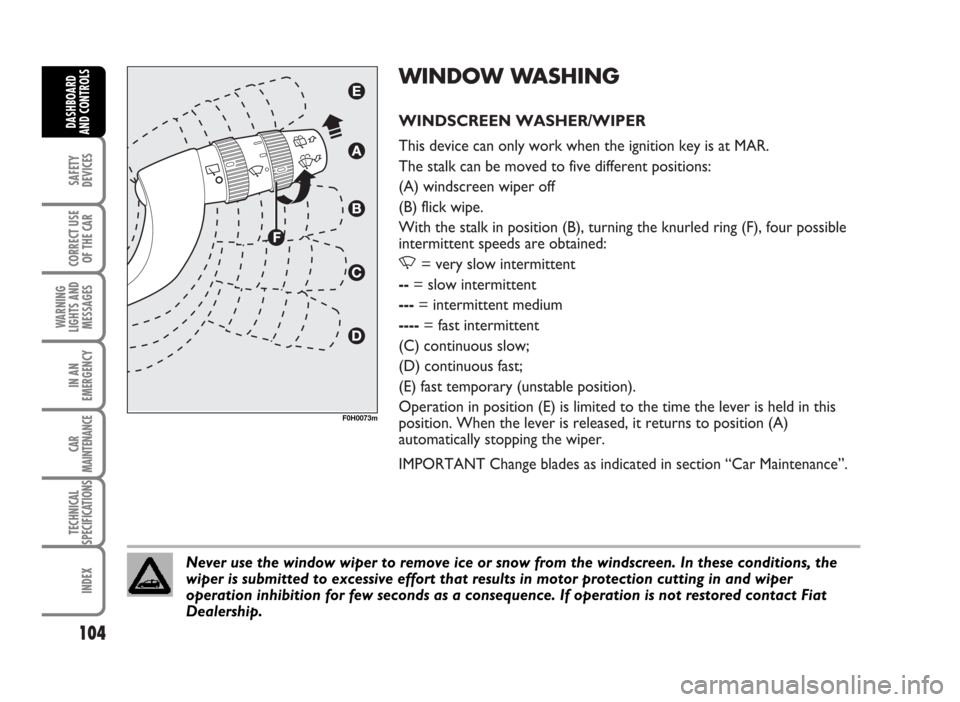
WINDSCREEN WASHER/WIPER
This device can only work when the ignition key is at MAR.
The stalk can be moved to five different positions:
(A) windscreen wiper off
(B) flick wipe.
With the stalk in position (B), turning the knurled ring (F), four possible
intermittent speeds are obtained:
,= very slow intermittent
--= slow intermittent
---= intermittent medium
----= fast intermittent
(C) continuous slow;
(D) continuous fast;
(E) fast temporary (unstable position).
Operation in position (E) is limited to the time the lever is held in this
position. When the lever is released, it returns to position (A)
automatically stopping the wiper.
IMPORTANT Change blades as indicated in section “Car Maintenance”.
104
SAFETY
DEVICES
CORRECT USE
OF THE CAR
WARNING
LIGHTS AND
MESSAGES
IN AN
EMERGENCY
CAR
MAINTENANCE
TECHNICAL
SPECIFICATIONS
INDEX
DASHBOARD
AND CONTROLS
F0H0073m
Never use the window wiper to remove ice or snow from the windscreen. In these conditions, the
wiper is submitted to excessive effort that results in motor protection cutting in and wiper
operation inhibition for few seconds as a consequence. If operation is not restored contact Fiat
Dealership.
Page 107 of 314
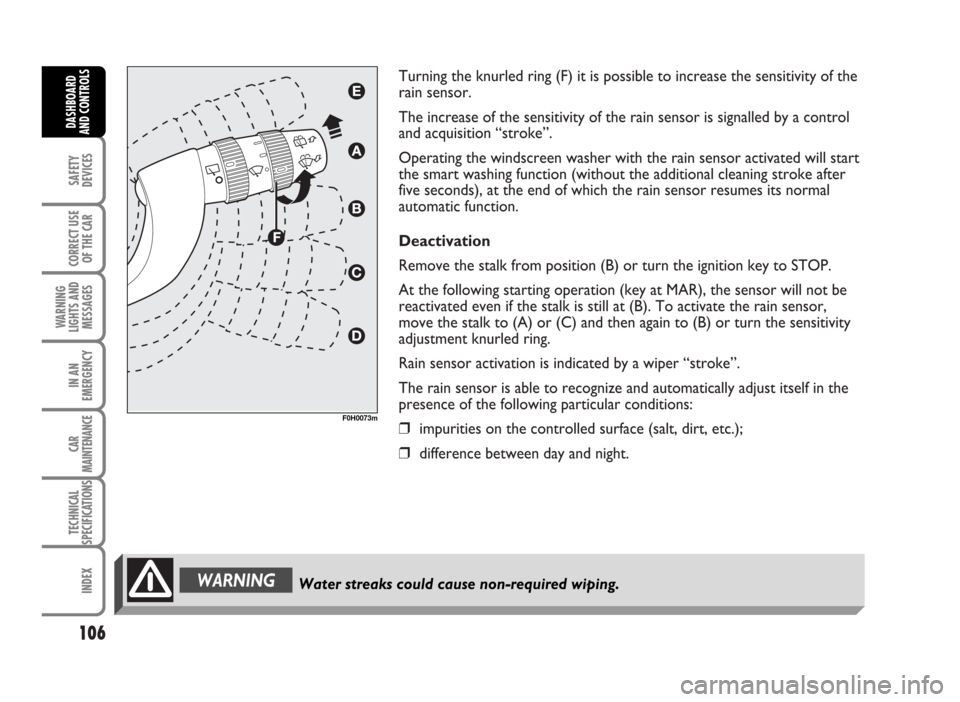
Turning the knurled ring (F) it is possible to increase the sensitivity of the
rain sensor.
The increase of the sensitivity of the rain sensor is signalled by a control
and acquisition “stroke”.
Operating the windscreen washer with the rain sensor activated will start
the smart washing function (without the additional cleaning stroke after
five seconds), at the end of which the rain sensor resumes its normal
automatic function.
Deactivation
Remove the stalk from position (B) or turn the ignition key to STOP.
At the following starting operation (key at MAR), the sensor will not be
reactivated even if the stalk is still at (B). To activate the rain sensor,
move the stalk to (A) or (C) and then again to (B) or turn the sensitivity
adjustment knurled ring.
Rain sensor activation is indicated by a wiper “stroke”.
The rain sensor is able to recognize and automatically adjust itself in the
presence of the following particular conditions:
❒impurities on the controlled surface (salt, dirt, etc.);
❒difference between day and night.
106
SAFETY
DEVICES
CORRECT USE
OF THE CAR
WARNING
LIGHTS AND
MESSAGES
IN AN
EMERGENCY
CAR
MAINTENANCE
TECHNICAL
SPECIFICATIONS
INDEX
DASHBOARD
AND CONTROLS
F0H0073m
Water streaks could cause non-required wiping.WARNING
Page 108 of 314
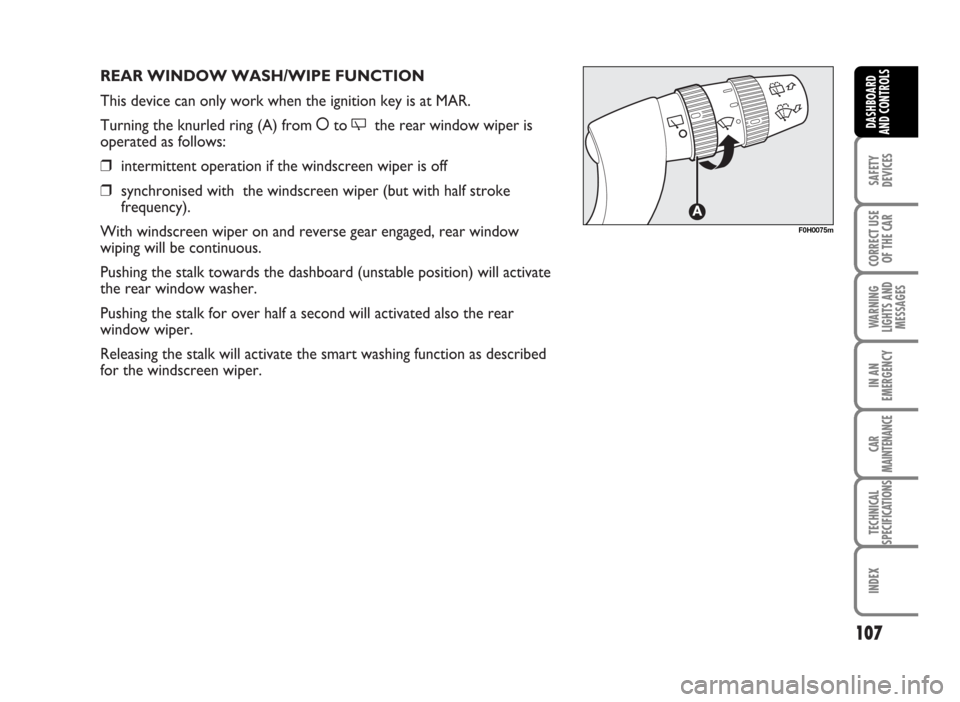
REAR WINDOW WASH/WIPE FUNCTION
This device can only work when the ignition key is at MAR.
Turning the knurled ring (A) from åto
'the rear window wiper is
operated as follows:
❒intermittent operation if the windscreen wiper is off
❒synchronised with the windscreen wiper (but with half stroke
frequency).
With windscreen wiper on and reverse gear engaged, rear window
wiping will be continuous.
Pushing the stalk towards the dashboard (unstable position) will activate
the rear window washer.
Pushing the stalk for over half a second will activated also the rear
window wiper.
Releasing the stalk will activate the smart washing function as described
for the windscreen wiper.
107
SAFETY
DEVICES
CORRECT USE
OF THE CAR
WARNING
LIGHTS AND
MESSAGES
IN AN
EMERGENCY
CAR
MAINTENANCE
TECHNICAL
SPECIFICATIONS
INDEX
DASHBOARD
AND CONTROLS
F0H0075m
Page 111 of 314
TO REDUCE MEMORISED SPEED
The speed memorised can be increased in two ways:
❒disengaging the device and then memorising the
new speed;
or
❒moving the stalk downwards (–) until reaching the
new speed which will be memorised automatically.
Each operation of the stalk will correspond to a slight
reduction in speed (about 1 km/h), while keeping the
stalk downwards continuously will correspond to a
continuous speed reduction.DEVICE DISENGAGEMENT
Turn the ring (A) to OFF or the ignition key to STOP.
The device is automatically deactivated also in one of
the following cases:
❒pressing the brake or clutch pedal.
110
SAFETY
DEVICES
CORRECT USE
OF THE CAR
WARNING
LIGHTS AND
MESSAGES
IN AN
EMERGENCY
CAR
MAINTENANCE
TECHNICAL
SPECIFICATIONS
INDEX
DASHBOARD
AND CONTROLS
WARNING
In the event of device malfunction or failure, turn the knurled ring (A) to OFF and
contact a Fiat Dealership after checking the protective fuse integrity.WARNING
When travelling with the device on, do not put the gearbox lever in neutral.