navigation system FIAT MULTIPLA 2004 1.G Connect NavPlus Manual
[x] Cancel search | Manufacturer: FIAT, Model Year: 2004, Model line: MULTIPLA, Model: FIAT MULTIPLA 2004 1.GPages: 202, PDF Size: 2.22 MB
Page 108 of 202
107
CONNECT NAV
NAVIGATOR
PLAYING A CD WITH THE
INTERNAL CD PLAYER
(with CD-Changer,
if installed)
Proceed as follows:
1) press SRC (17) button.
2) turn the knob/button (11) to se-
lect CD-C.
3) press the knob/button (11) to
confirm.
IMPORTANT If you accidentally
select a CD that is not inserted, the
system will automatically play the next
CD. Removing the CD loader
from the player
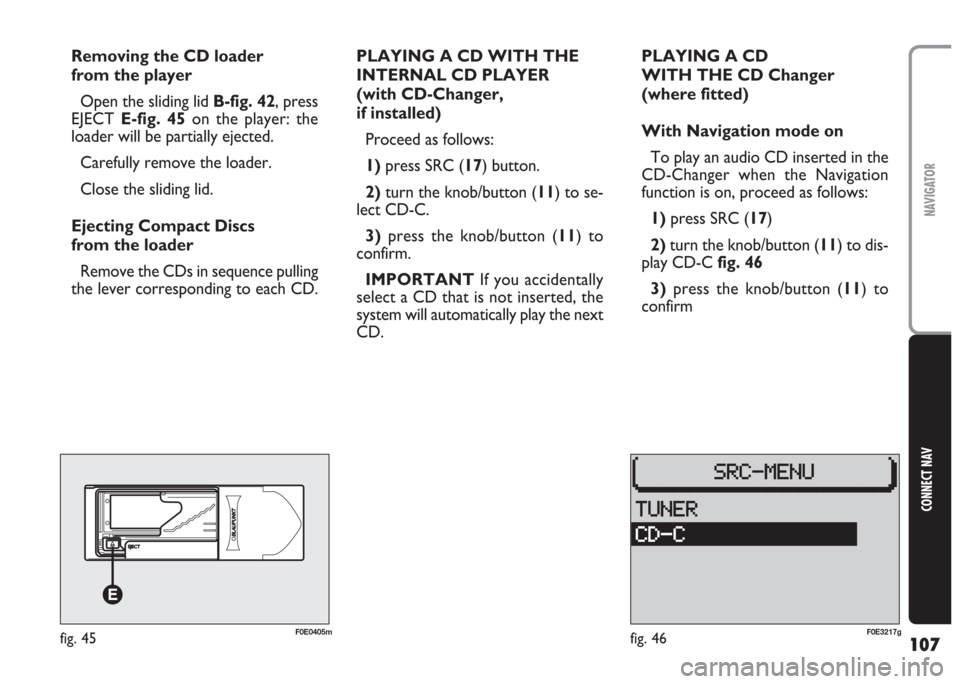
Open the sliding lid B-fig. 42, press
EJECT E-fig. 45on the player: the
loader will be partially ejected.
Carefully remove the loader.
Close the sliding lid.
Ejecting Compact Discs
from the loader
Remove the CDs in sequence pulling
the lever corresponding to each CD.PLAYING A CD
WITH THE CD Changer
(where fitted)
With Navigation mode on
To play an audio CD inserted in the
CD-Changer when the Navigation
function is on, proceed as follows:
1) press SRC (17)
2)turn the knob/button (11) to dis-
play CD-Cfig. 46
3)press the knob/button (11) to
confirm
fig. 46F0E3217gfig. 45F0E0405m
Page 118 of 202
117
CONNECT NAV
NAVIGATOR
S S
A A
T T
E E
L L
L L
I I
T T
E E
N N
A A
V V
I I
G G
A A
T T
I I
O O
N N
The system will help you reach desti-
nations rapidly and safely. After switch-
ing the navigation function on, voice
messages will guide you to your desti-
nation. Driving advice, distances and es-
timated time required to reach the des-
tination will be shown on the display.
The car’s position is defined on the
basis of the electronic speedometer
signal, of a gyroscope and of the sig-
nals transmitted by the GPS (Global
Positioning System) satellites.
The system compares the data
against the maps stored on the navi-
gation CD-ROM and calculates both
the position and the routes to reach
the destination.ROUTE GUIDANCE
Proceed as follows:
1) insert the CD ROM specific to the
country you are travelling in
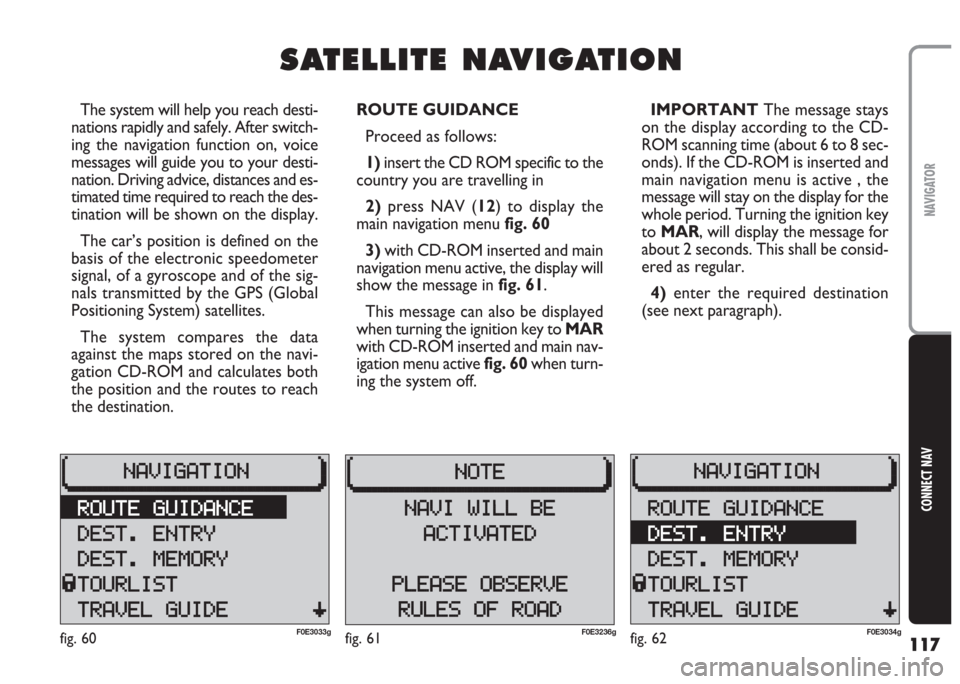
2)press NAV (12) to display the
main navigation menu fig. 60
3) with CD-ROM inserted and main
navigation menu active, the display will
show the message in fig. 61.
This message can also be displayed
when turning the ignition key to MAR
with CD-ROM inserted and main nav-
igation menu active fig. 60when turn-
ing the system off.IMPORTANT The message stays
on the display according to the CD-
ROM scanning time (about 6 to 8 sec-
onds). If the CD-ROM is inserted and
main navigation menu is active , the
message will stay on the display for the
whole period. Turning the ignition key
to MAR, will display the message for
about 2 seconds. This shall be consid-
ered as regular.
4) enter the required destination
(see next paragraph).
fig. 60F0E3033gfig. 62F0E3034gfig. 61F0E3236g
Page 122 of 202
121
CONNECT NAV
NAVIGATOR
6)press the knob/button (11) to
confirm. The selected character is dis-
played in the editing field 3-fig. 64
7) repeat the procedure for the oth-
er letters in the name
8)when entering the name, the list
of destinations matching the entered
letters will appear in the editing list 2-
fig. 64.
9) position the cursor on the symbol
jand press the knob/button (11) or
hold the knob/button (11) pressed for
longer than two seconds. The alpha-
betical list of destinations will appear
10)turn the knob/button (11) to
seek the required town destination
name in the editing list
11) confirm the destination by press-
ing the knob/button (11).Press ESC (9) to not confirm the
destination and return to the editing
menu (Speller) fig. 64.
After selecting the destination, the
sound/navigation system offers the fol-
lowing options: STREET, CENTRE,
DEST. SURROUND)
IMPORTANT Only the options
for which data is available on the nav-
igation CD are offered. A lock symbol
Swill appear next to the unavailable
options.
“STREET” The destination street
can be entered. This option depends
on the size of the town and data
stored on the navigation CD.Confirm the street. The entering
procedure will continue with the fol-
lowing options:
– CONTINUE: select this item to
continue;
– INTERSECTION: select this item
to define an intersection with the pre-
viously selected street as a destination.
In this case, an alphabetical list where
to select the required intersection will
be displayed;
– HOUSE NUMBER: select this item
to define a house number on the pre-
viously selected street as a destination.
“CENTRE” The town centre or
district (for big cities) can be entered
as a destination.
Page 123 of 202
122
CONNECT NAV
NAVIGATOR
“P.O.I.” Special destinations in the
surroundings of the town - e.g.: mo-
torways, railway stations, shopping
centres, etc. - can be directly select-
ed
The system will automatically return
to the main navigation menu after the
entry.
Select ROUTE GUIDANCE and
confirm by pressing the knob/button
(11).
The system will calculate the route
in a few seconds and start providing
visual instructions (drawings) and
voice messages to guide you to your
destination.
Press ESC (9) to return to the pre-
vious menu.Entering the destination
“STREET”
You can specify a street as a desti-
nation in the previously selected town
as follows:
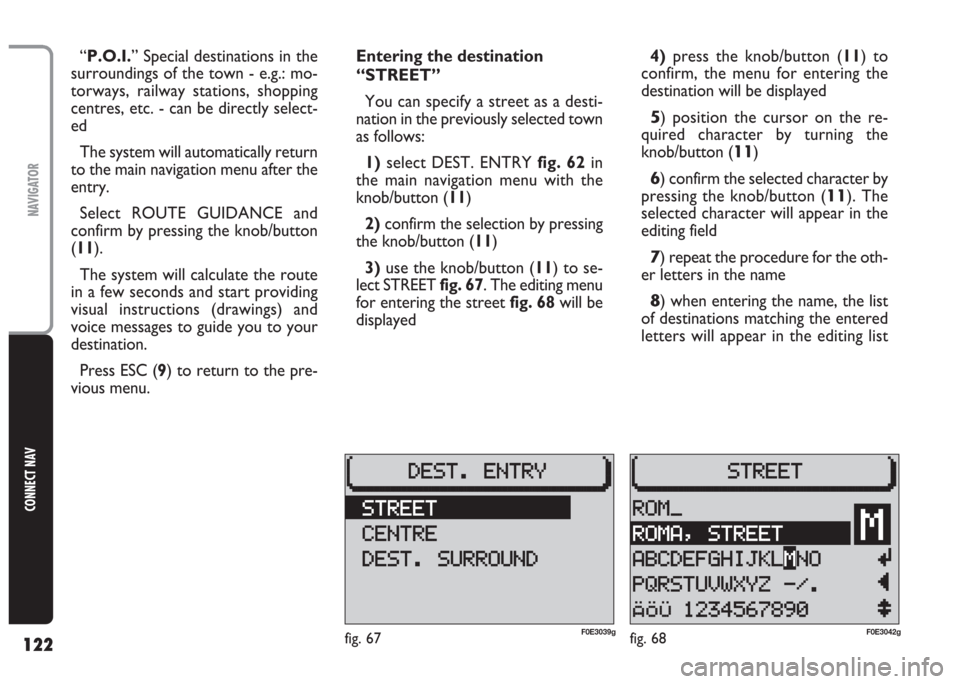
1)select DEST. ENTRY fig. 62in
the main navigation menu with the
knob/button (11)
2) confirm the selection by pressing
the knob/button (11)
3)use the knob/button (11) to se-
lect STREET fig. 67. The editing menu
for entering the street fig. 68will be
displayed4)press the knob/button (11) to
confirm, the menu for entering the
destination will be displayed
5) position the cursor on the re-
quired character by turning the
knob/button (
11)
6) confirm the selected character by
pressing the knob/button (
11). The
selected character will appear in the
editing field
7) repeat the procedure for the oth-
er letters in the name
8) when entering the name, the list
of destinations matching the entered
letters will appear in the editing list
fig. 68F0E3042gfig. 67F0E3039g
Page 131 of 202
130
CONNECT NAV
NAVIGATOR
ROUTE GUIDANCE
Active navigation requires an entered
destination (see “Entering the desti-
nation” in section “Satellite naviga-
tion”) and route options settings.
Proceed as follows:
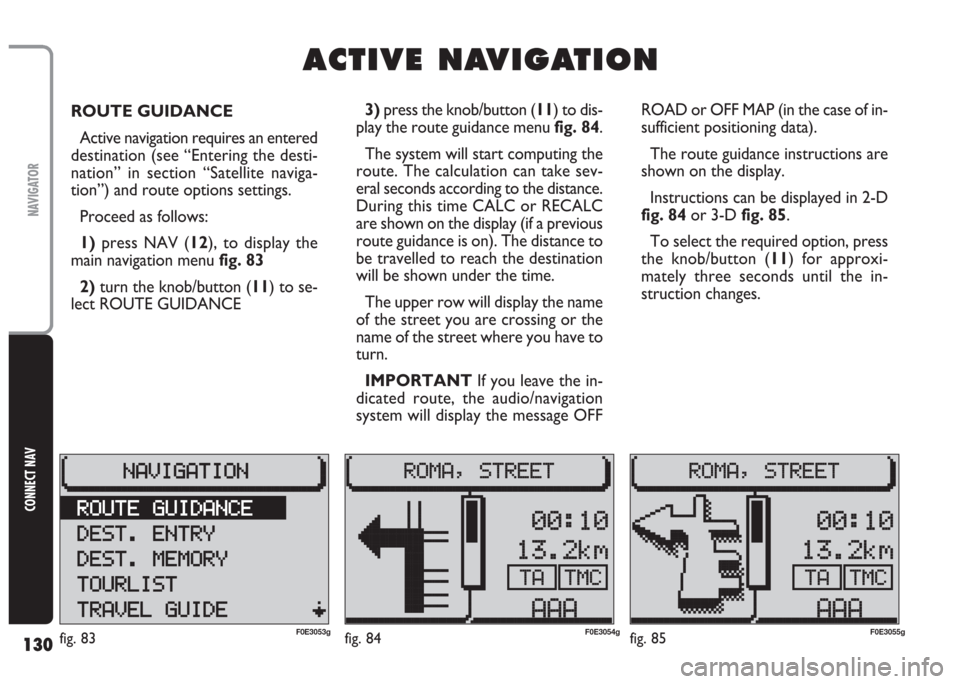
1) press NAV (12), to display the
main navigation menu fig. 83
2)turn the knob/button (11) to se-
lect ROUTE GUIDANCE ROAD or OFF MAP (in the case of in-
sufficient positioning data).
The route guidance instructions are
shown on the display.
Instructions can be displayed in 2-D
fig. 84or 3-D fig. 85.
To select the required option, press
the knob/button (11) for approxi-
mately three seconds until the in-
struction changes.
A A
C C
T T
I I
V V
E E
N N
A A
V V
I I
G G
A A
T T
I I
O O
N N
3) press the knob/button (11) to dis-
play the route guidance menu fig. 84.
The system will start computing the
route. The calculation can take sev-
eral seconds according to the distance.
During this time CALC or RECALC
are shown on the display (if a previous
route guidance is on). The distance to
be travelled to reach the destination
will be shown under the time.
The upper row will display the name
of the street you are crossing or the
name of the street where you have to
turn.
IMPORTANT If you leave the in-
dicated route, the audio/navigation
system will display the message OFF
fig. 83F0E3053gfig. 84F0E3054gfig. 85F0E3055g
Page 132 of 202
131
CONNECT NAV
NAVIGATOR
“PHONE” will appear on the display
when the telephone Mute function is
on.
During NO MAP navigation it will be
possible to play an audio CD using the
internal player. In this case the display
will show the number of the track be-
ing played and the playback time. The distance before the turning point
and the time required to reach the
destination or the estimated arrival
time are shown on the display (see
“Switching route time information on
and off” in this section).
Furthermore, the traffic announce-
ment status (TA function) and the
TMC status (Traffic Message Channel)
are shown on the display.
The active audio source is shown on
the display along with the name or the
frequency of the station tuned to (see
paragraph “RDS function” in section
“Radio”).
When the CD-Changer (where fit-
ted) is on, the number of the current
CD, the track name or number and
the track playing time are shown on
the display.STOPPING NAVIGATION
Proceed as follows to interrupt nav-
igation:
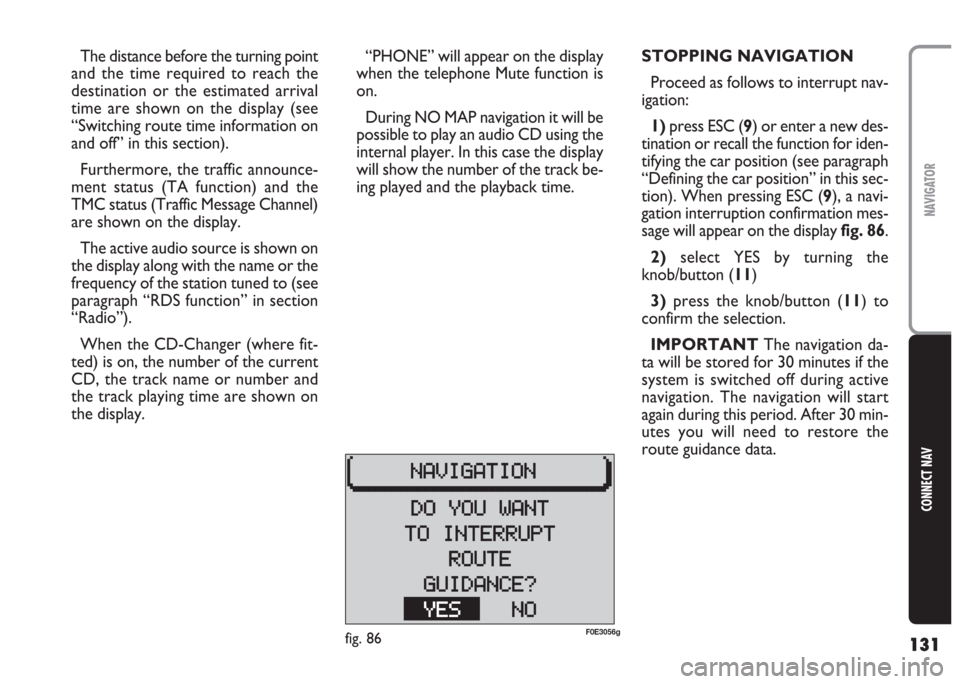
1)press ESC (9) or enter a new des-
tination or recall the function for iden-
tifying the car position (see paragraph
“Defining the car position” in this sec-
tion). When pressing ESC (9), a navi-
gation interruption confirmation mes-
sage will appear on the displayfig. 86.
2)select YES by turning the
knob/button (11)
3)press the knob/button (11) to
confirm the selection.
IMPORTANT The navigation da-
ta will be stored for 30 minutes if the
system is switched off during active
navigation. The navigation will start
again during this period. After 30 min-
utes you will need to restore the
route guidance data.
fig. 86F0E3056g
Page 134 of 202
133
CONNECT NAV
NAVIGATOR
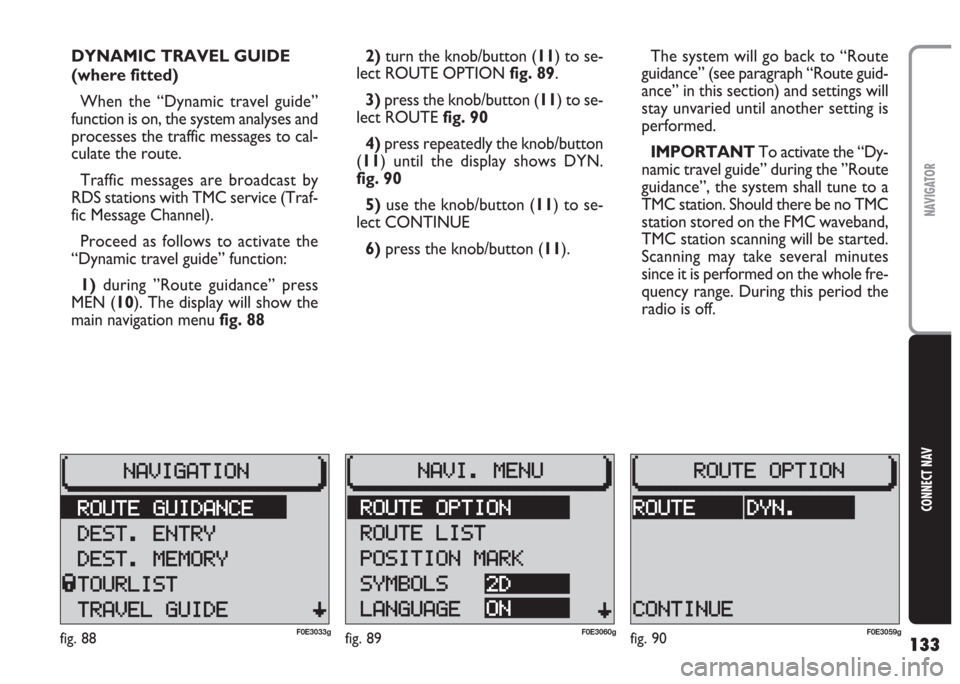
2) turn the knob/button (11) to se-
lect ROUTE OPTION fig. 89.
3)press the knob/button (11) to se-
lect ROUTE fig. 90
4) press repeatedly the knob/button
(11) until the display shows DYN.
fig. 90
5) use the knob/button (11) to se-
lect CONTINUE
6) press the knob/button (11).The system will go back to “Route
guidance” (see paragraph “Route guid-
ance” in this section) and settings will
stay unvaried until another setting is
performed.
IMPORTANT To activate the “Dy-
namic travel guide” during the ”Route
guidance”, the system shall tune to a
TMC station. Should there be no TMC
station stored on the FMC waveband,
TMC station scanning will be started.
Scanning may take several minutes
since it is performed on the whole fre-
quency range. During this period the
radio is off. DYNAMIC TRAVEL GUIDE
(where fitted)
When the “Dynamic travel guide”
function is on, the system analyses and
processes the traffic messages to cal-
culate the route.
Traffic messages are broadcast by
RDS stations with TMC service (Traf-
fic Message Channel).
Proceed as follows to activate the
“Dynamic travel guide” function:
1) during ”Route guidance” press
MEN (10). The display will show the
main navigation menu fig. 88
fig. 89F0E3060gfig. 90F0E3059gfig. 88F0E3033g
Page 136 of 202
135
CONNECT NAV
NAVIGATOR
ROUTE LIST
The display can show the route list
TOURLIST calculated by the system.
Proceed as follows to display this in-
formation:
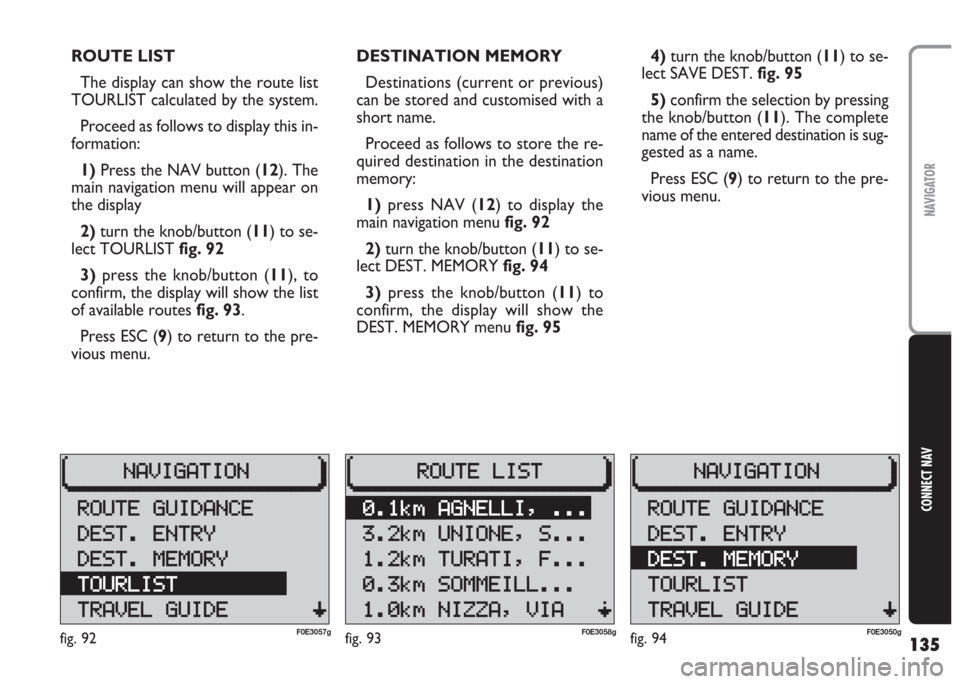
1) Press the NAV button (12). The
main navigation menu will appear on
the display
2) turn the knob/button (11) to se-
lect TOURLISTfig. 92
3) press the knob/button (11), to
confirm, the display will show the list
of available routes fig. 93.
Press ESC (9) to return to the pre-
vious menu.DESTINATION MEMORY
Destinations (current or previous)
can be stored and customised with a
short name.
Proceed as follows to store the re-
quired destination in the destination
memory:
1)press NAV (12) to display the
main navigation menu fig. 92
2) turn the knob/button (11) to se-
lect DEST. MEMORY fig. 94
3) press the knob/button (11) to
confirm, the display will show the
DEST. MEMORY menu fig. 954) turn the knob/button (11) to se-
lect SAVE DEST. fig. 95
5)confirm the selection by pressing
the knob/button (11). The complete
name of the entered destination is sug-
gested as a name.
Press ESC (9) to return to the pre-
vious menu.
fig. 92F0E3057gfig. 93F0E3058gfig. 94F0E3050g
Page 143 of 202
142
CONNECT NAV
NAVIGATOR
CUSTOMISING THE ROUTE
Routes can be customised at any mo-
ment, even during navigation by en-
tering the following parameters:
– ROUTE: you can choose between
the fastest or shortest route or select
the “Dynamic travel guide” (DYN.)
with TMC (see paragraph “Dynamic
travel guide” in this section). When
this function is on, all the other op-
tions (MOTORWAY, FERRY and
TOOL) are not displayed. The system
tunes automatically to a TMC station
and calculates the fastest/shortest
route on the basis of the traffic mes-
sages;
– MOTORWAY: during navigation,
you can choose whether to use mo-
torways;
– FERRY: you can choose whether
to use ferries;
– TOOL: you can exclude toll roads
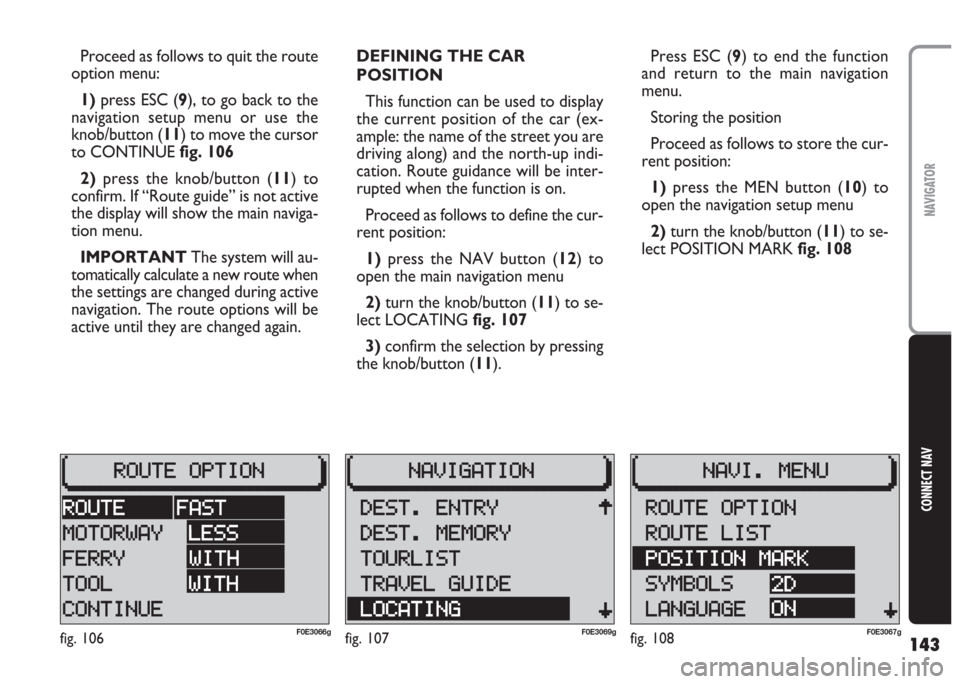
from the route.IMPORTANT For instance, setting
MOTOR WAY LESS fig. 106, you
avoid motorways but you have to cov-
er long route sections, the system will
therefore programme motorways in
the calculated route. The same stands
valid for FERRY and for TOOL roads.
Proceed as follows to select the
route options:
1)press the MEN button (10) to
open the navigation setup menu
2)turn the knob/button (11) to se-
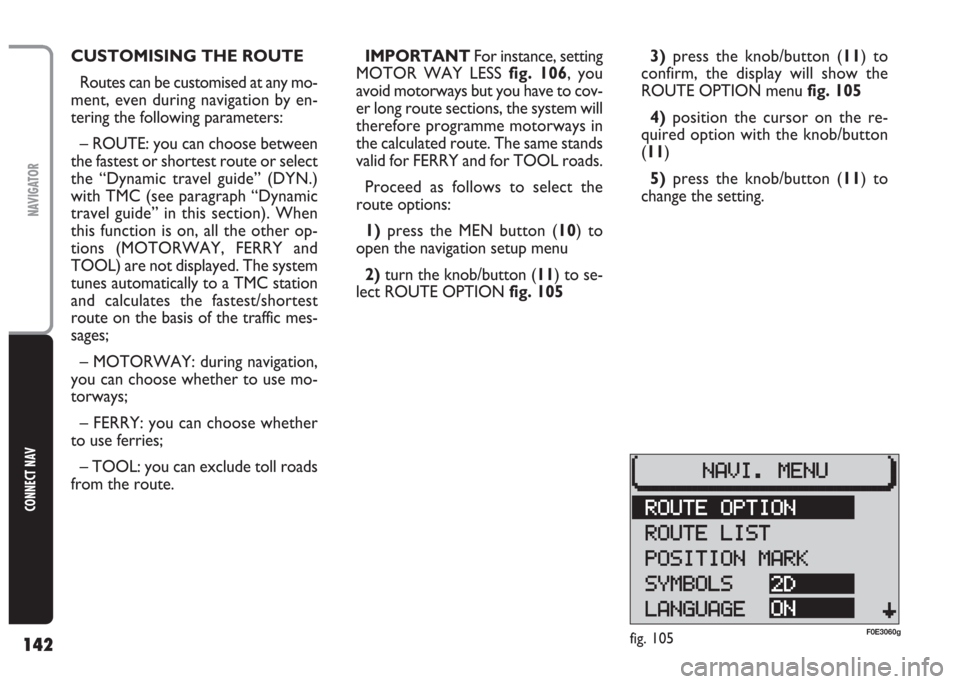
lect ROUTE OPTION fig. 1053) press the knob/button (11) to
confirm, the display will show the
ROUTE OPTION menu fig. 105
4)position the cursor on the re-
quired option with the knob/button
(11)
5) press the knob/button (11) to
change the setting.
fig. 105F0E3060g
Page 144 of 202
143
CONNECT NAV
NAVIGATOR
Proceed as follows to quit the route
option menu:
1) press ESC (9), to go back to the
navigation setup menu or use the
knob/button (11) to move the cursor
to CONTINUE fig. 106
2)press the knob/button (11) to
confirm. If “Route guide” is not active
the display will show the main naviga-
tion menu.
IMPORTANT The system will au-
tomatically calculate a new route when
the settings are changed during active
navigation. The route options will be
active until they are changed again.DEFINING THE CAR
POSITION
This function can be used to display
the current position of the car (ex-
ample: the name of the street you are
driving along) and the north-up indi-
cation. Route guidance will be inter-
rupted when the function is on.
Proceed as follows to define the cur-
rent position:
1) press the NAV button (12) to
open the main navigation menu
2)turn the knob/button (11) to se-
lect LOCATING fig. 107
3) confirm the selection by pressing
the knob/button (11).Press ESC (9) to end the function
and return to the main navigation
menu.
Storing the position
Proceed as follows to store the cur-
rent position:
1)press the MEN button (10) to
open the navigation setup menu
2)turn the knob/button (11) to se-
lect POSITION MARK fig. 108
fig. 108F0E3067gfig. 107F0E3069gfig. 106F0E3066g