warning light FIAT MULTIPLA 2006 1.G User Guide
[x] Cancel search | Manufacturer: FIAT, Model Year: 2006, Model line: MULTIPLA, Model: FIAT MULTIPLA 2006 1.GPages: 266, PDF Size: 4.61 MB
Page 14 of 266

13
SAFETY
DEVICES
CORRECT USE
OF THE CAR
WARNING
LIGHTS AND
MESSAGES
IN AN
EMERGENCY
CAR
MAINTENANCE
TECHNICAL
SPECIFICATIONS
INDEX
DASHBOARD
AND CONTROLS
WHEN THE ALARM IS TRIGGERED
When the system is on, the electronic alarm comes
into action in the following cases:
❒One of the doors, the bonnet or the tailgate are
opened.
❒The battery is disconnected or the electronic alarm
power supply cables are cut.
❒Something moves in the passenger compartment
(volumetric surveillance).
❒The key is turned to MAR.
When the alarm is triggered, the siren sounds for
about 26 seconds (for a maximum of 3 cycles at 6
second intervals if the cause of the alarm persists) and
the direction indicators will flash for about 5 minutes
(only in countries where legislation permits it).
Once the alarm situation has been resolved, the alarm
system continues its surveillance. To cut off the alarm
before this, press the remote control button.
HOW TO DEACTIVATE THE ALARM
To switch the alarm off, press the remote control
button on the key.
In countries where admitted by law regulations, the
system is preset for an emergency procedure to be
carried out when the alarm does not turn off (due to
flat remote control battery or system fault):❒open the door after unlocking the lock with the key,
❒fit the key into the ignition switch,
❒turn the key to MAR.
To reactivate the alarm after the emergency
procedure, turn the key to STOP and remove it. Then,
press twice the remote control button: first press will
re-align the system (this because the last operation for
excluding the alarm was performed using the key and
not the remote control), the second press will
reactivate the alarm.
When using the key, if the remote control battery is
flat the key led will flash once.
Flat battery condition is also indicated by the
dashboard led glowing steadily for 2 minutes each time
the alarm is deactivated.
In this event the key battery should be replaced by a
new one of the equivalent type on sale c/o normal
retailers.
If it is not possible to switch on the alarm with a new
remote control battery, contact Fiat Dealership to
have the system checked.
IMPORTANT If the car is to remain inactive for a
prolonged length of time (over three weeks) and
security conditions permitting, it is advisable to
operate central locking turning the key in the door
lock to avoid engaging the alarm and draining the
battery.
Page 15 of 266
14
SAFETY
DEVICES
CORRECT USE
OF THE CAR
WARNING
LIGHTS AND
MESSAGES
IN AN
EMERGENCY
CAR
MAINTENANCE
TECHNICAL
SPECIFICATIONS
INDEX
DASHBOARD
AND CONTROLS
Since the electronic car alarm absorbs electricity, if you will not be using your car for more than a month,
switch the system off with the remote control.HOW TO KNOW WHETHER THE ALARM HAS GONE OFF
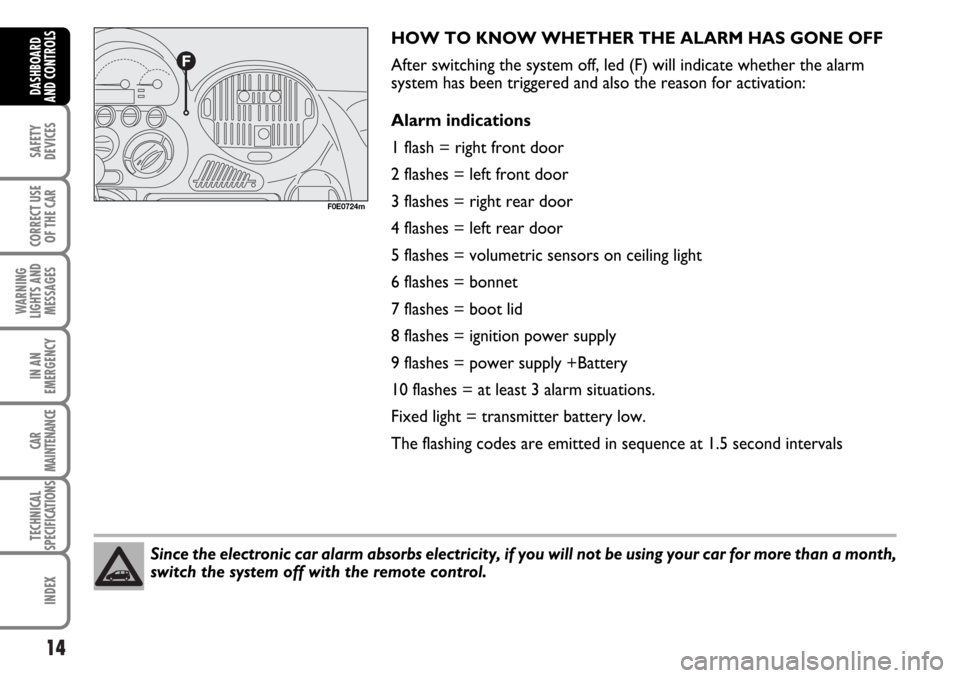
After switching the system off, led (F) will indicate whether the alarm
system has been triggered and also the reason for activation:
Alarm indications
1 flash = right front door
2 flashes = left front door
3 flashes = right rear door
4 flashes = left rear door
5 flashes = volumetric sensors on ceiling light
6 flashes = bonnet
7 flashes = boot lid
8 flashes = ignition power supply
9 flashes = power supply +Battery
10 flashes = at least 3 alarm situations.
Fixed light = transmitter battery low.
The flashing codes are emitted in sequence at 1.5 second intervals
F0E0724m
Page 16 of 266
15
SAFETY
DEVICES
CORRECT USE
OF THE CAR
WARNING
LIGHTS AND
MESSAGES
IN AN
EMERGENCY
CAR
MAINTENANCE
TECHNICAL
SPECIFICATIONS
INDEX
DASHBOARD
AND CONTROLS
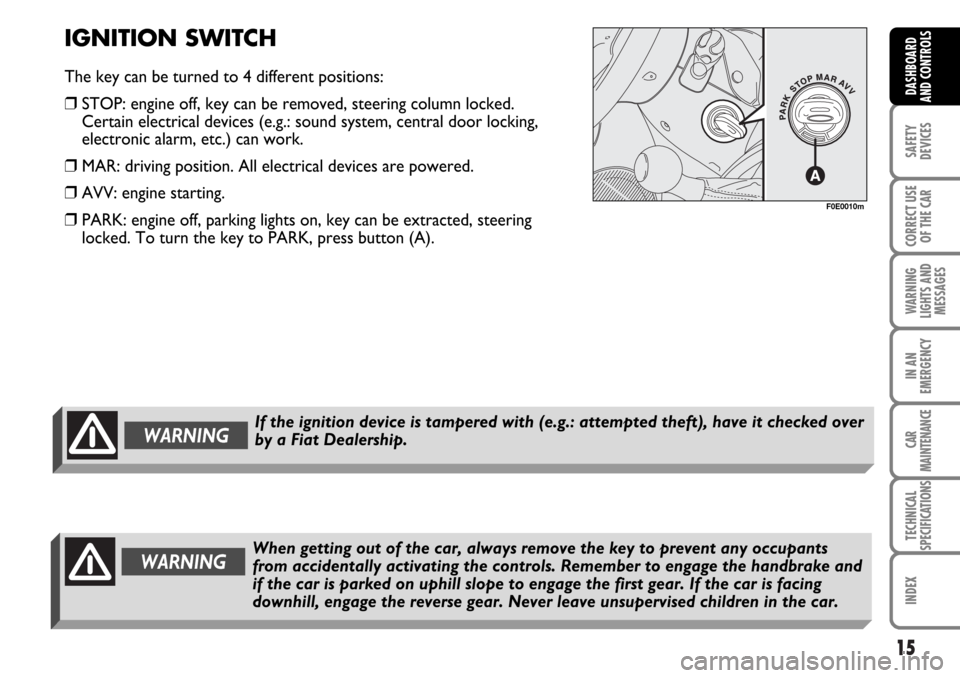
IGNITION SWITCH
The key can be turned to 4 different positions:
❒STOP: engine off, key can be removed, steering column locked.
Certain electrical devices (e.g.: sound system, central door locking,
electronic alarm, etc.) can work.
❒MAR: driving position. All electrical devices are powered.
❒AVV: engine starting.
❒PARK: engine off, parking lights on, key can be extracted, steering
locked. To turn the key to PARK, press button (A).
F0E0010m
WARNINGWhen getting out of the car, always remove the key to prevent any occupants
from accidentally activating the controls. Remember to engage the handbrake and
if the car is parked on uphill slope to engage the first gear. If the car is facing
downhill, engage the reverse gear. Never leave unsupervised children in the car.
If the ignition device is tampered with (e.g.: attempted theft), have it checked over
by a Fiat Dealership.WARNING
Page 17 of 266
16
SAFETY
DEVICES
CORRECT USE
OF THE CAR
WARNING
LIGHTS AND
MESSAGES
IN AN
EMERGENCY
CAR
MAINTENANCE
TECHNICAL
SPECIFICATIONS
INDEX
DASHBOARD
AND CONTROLS
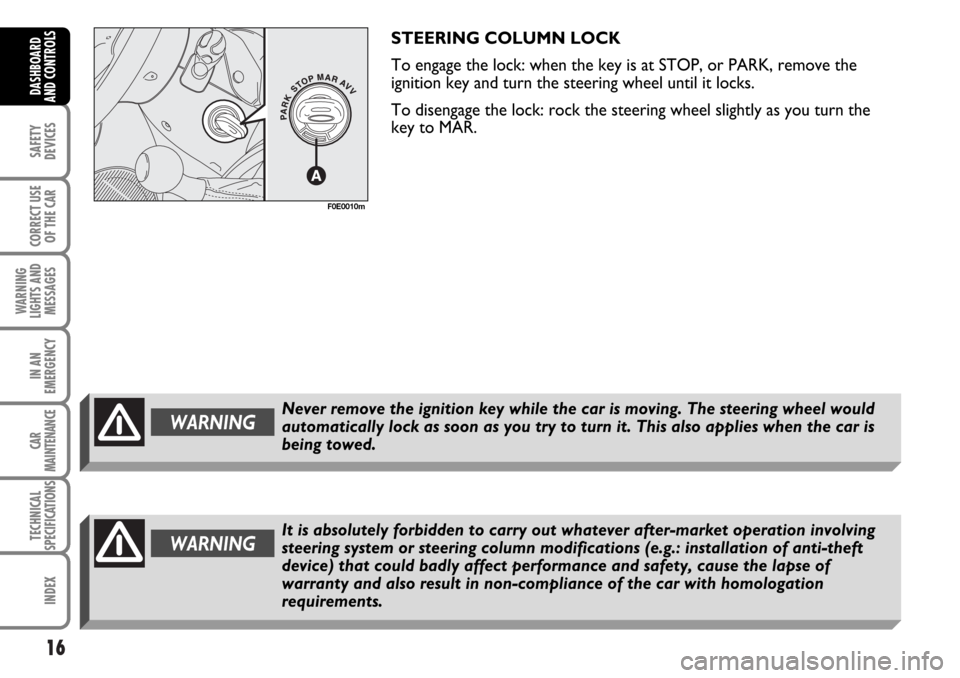
STEERING COLUMN LOCK
To engage the lock: when the key is at STOP, or PARK, remove the
ignition key and turn the steering wheel until it locks.
To disengage the lock: rock the steering wheel slightly as you turn the
key to MAR.
Never remove the ignition key while the car is moving. The steering wheel would
automatically lock as soon as you try to turn it. This also applies when the car is
being towed.WARNING
F0E0010m
WARNINGIt is absolutely forbidden to carry out whatever after-market operation involving
steering system or steering column modifications (e.g.: installation of anti-theft
device) that could badly affect performance and safety, cause the lapse of
warranty and also result in non-compliance of the car with homologation
requirements.
Page 18 of 266
17
SAFETY
DEVICES
CORRECT USE
OF THE CAR
WARNING
LIGHTS AND
MESSAGES
IN AN
EMERGENCY
CAR
MAINTENANCE
TECHNICAL
SPECIFICATIONS
INDEX
DASHBOARD
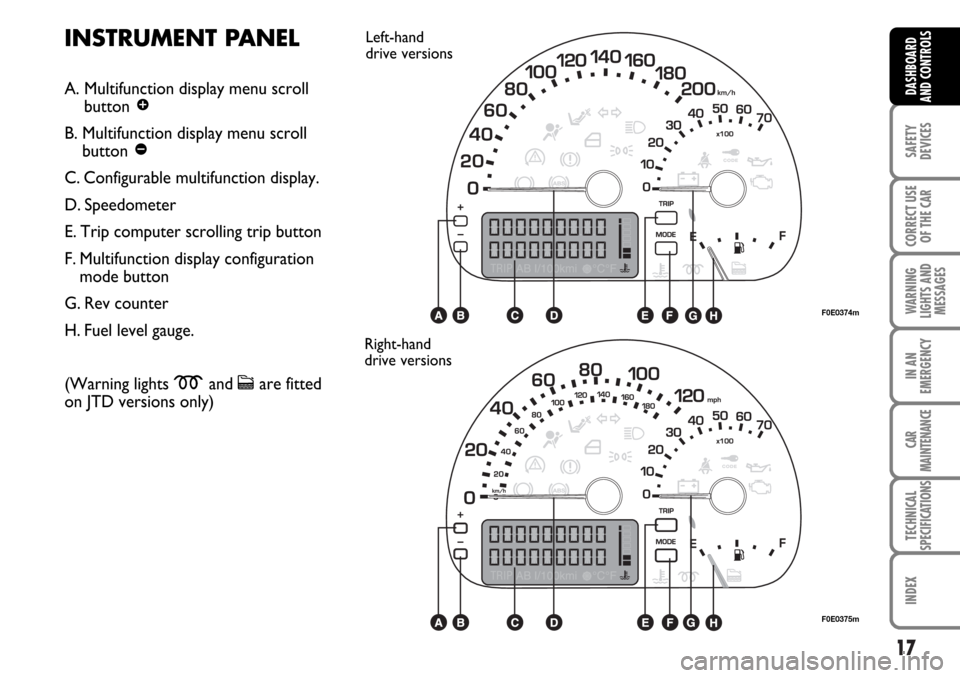
AND CONTROLSA. Multifunction display menu scroll
button
â
B. Multifunction display menu scroll
button
ã
C. Configurable multifunction display.
D. Speedometer
E. Trip computer scrolling trip button
F. Multifunction display configuration
mode button
G. Rev counter
H. Fuel level gauge.
(Warning lights
mand care fitted
on JTD versions only)
INSTRUMENT PANEL
F0E0374m
F0E0375m
Right-hand
drive versionsLeft-hand
drive versions
Page 19 of 266
18
SAFETY
DEVICES
CORRECT USE
OF THE CAR
WARNING
LIGHTS AND
MESSAGES
IN AN
EMERGENCY
CAR
MAINTENANCE
TECHNICAL
SPECIFICATIONS
INDEX
DASHBOARD
AND CONTROLS
F0E0376m
F0E0377m
F0E0378m
INSTRUMENTS
SPEEDOMETER
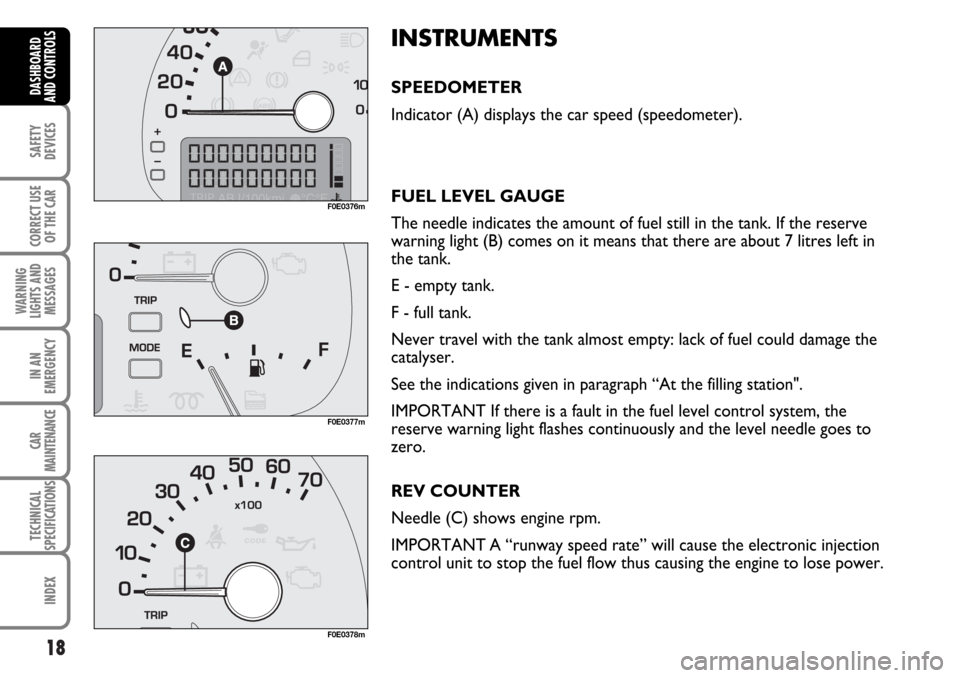
Indicator (A) displays the car speed (speedometer).
FUEL LEVEL GAUGE
The needle indicates the amount of fuel still in the tank. If the reserve
warning light (B) comes on it means that there are about 7 litres left in
the tank.
E - empty tank.
F - full tank.
Never travel with the tank almost empty: lack of fuel could damage the
catalyser.
See the indications given in paragraph “At the filling station".
IMPORTANT If there is a fault in the fuel level control system, the
reserve warning light flashes continuously and the level needle goes to
zero.
REV COUNTER
Needle (C) shows engine rpm.
IMPORTANT A “runway speed rate” will cause the electronic injection
control unit to stop the fuel flow thus causing the engine to lose power.
Page 20 of 266
19
SAFETY
DEVICES
CORRECT USE
OF THE CAR
WARNING
LIGHTS AND
MESSAGES
IN AN
EMERGENCY
CAR
MAINTENANCE
TECHNICAL
SPECIFICATIONS
INDEX
DASHBOARD
AND CONTROLS
CONTROL BUTTONS
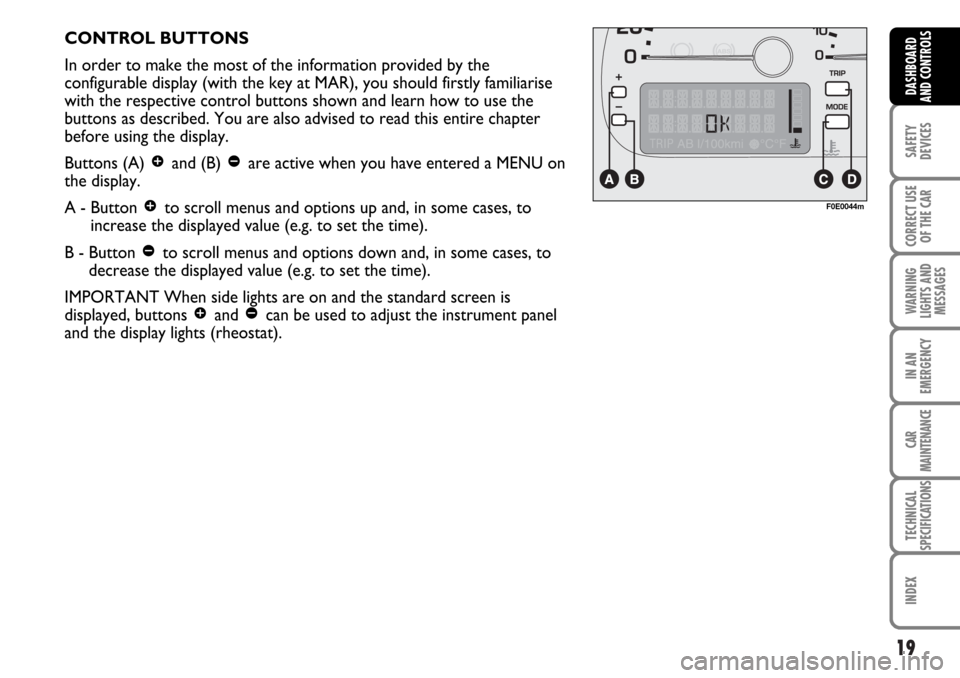
In order to make the most of the information provided by the
configurable display (with the key at MAR), you should firstly familiarise
with the respective control buttons shown and learn how to use the
buttons as described. You are also advised to read this entire chapter
before using the display.
Buttons (A)
âand (B) ãare active when you have entered a MENU on
the display.
A - Button
âto scroll menus and options up and, in some cases, to
increase the displayed value (e.g. to set the time).
B - Button
ãto scroll menus and options down and, in some cases, to
decrease the displayed value (e.g. to set the time).
IMPORTANT When side lights are on and the standard screen is
displayed, buttons
âand ãcan be used to adjust the instrument panel
and the display lights (rheostat).
F0E0044m
Page 21 of 266
20
SAFETY
DEVICES
CORRECT USE
OF THE CAR
WARNING
LIGHTS AND
MESSAGES
IN AN
EMERGENCY
CAR
MAINTENANCE
TECHNICAL
SPECIFICATIONS
INDEX
DASHBOARD
AND CONTROLS
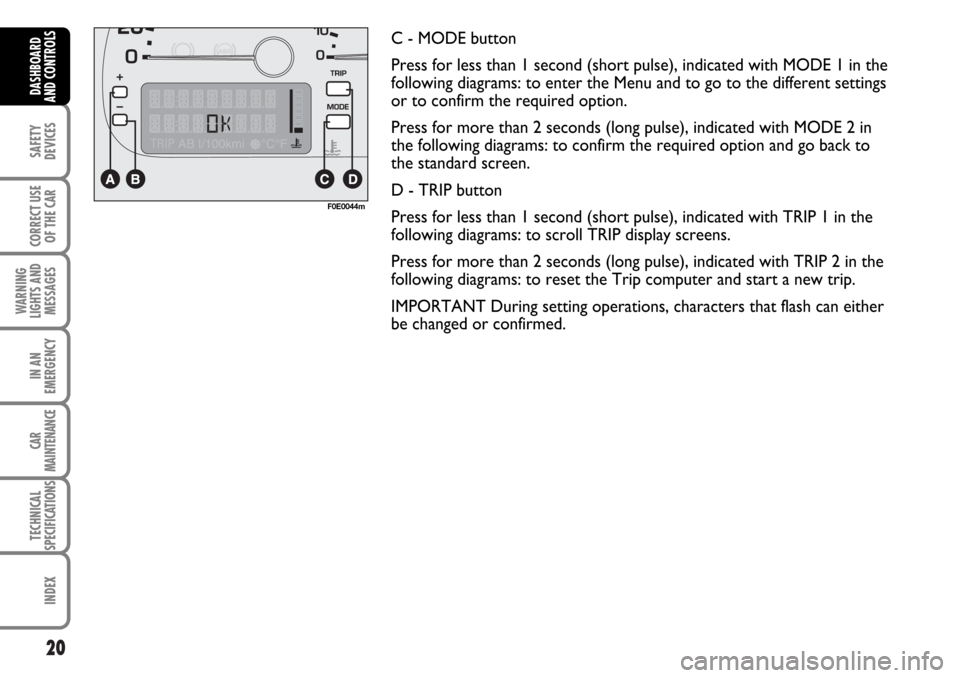
C - MODE button
Press for less than 1 second (short pulse), indicated with MODE 1 in the
following diagrams: to enter the Menu and to go to the different settings
or to confirm the required option.
Press for more than 2 seconds (long pulse), indicated with MODE 2 in
the following diagrams: to confirm the required option and go back to
the standard screen.
D - TRIP button
Press for less than 1 second (short pulse), indicated with TRIP 1 in the
following diagrams: to scroll TRIP display screens.
Press for more than 2 seconds (long pulse), indicated with TRIP 2 in the
following diagrams: to reset the Trip computer and start a new trip.
IMPORTANT During setting operations, characters that flash can either
be changed or confirmed.
F0E0044m
Page 22 of 266
21
SAFETY
DEVICES
CORRECT USE
OF THE CAR
WARNING
LIGHTS AND
MESSAGES
IN AN
EMERGENCY
CAR
MAINTENANCE
TECHNICAL
SPECIFICATIONS
INDEX
DASHBOARD
AND CONTROLS
TIME
For operation and instructions on how to set the time, see the “Time”
paragraph in this section.
KILOMETRE COUNTER
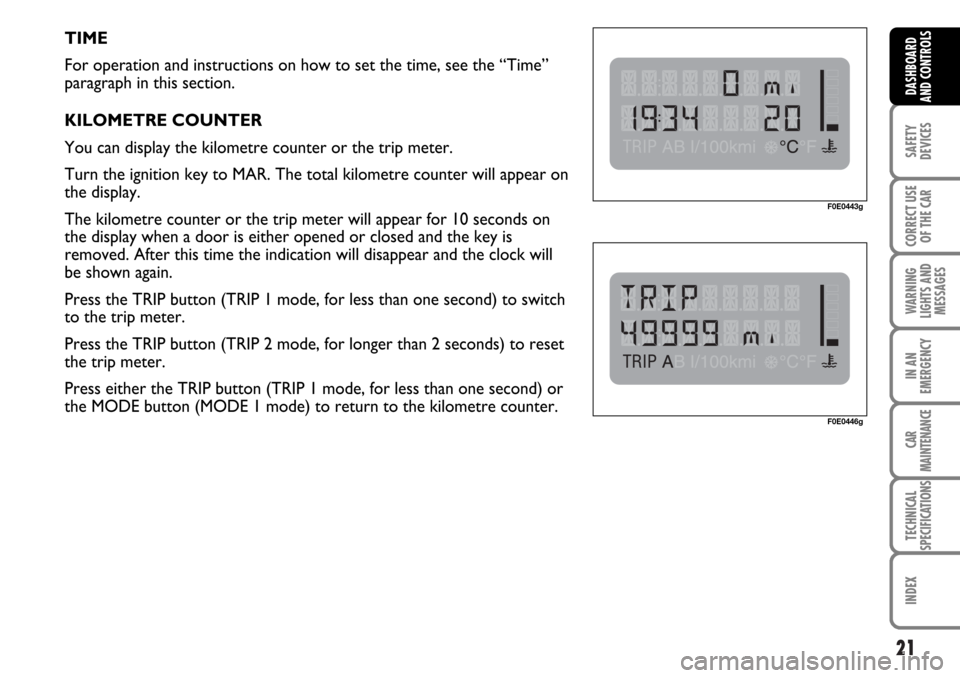
You can display the kilometre counter or the trip meter.
Turn the ignition key to MAR. The total kilometre counter will appear on
the display.
The kilometre counter or the trip meter will appear for 10 seconds on
the display when a door is either opened or closed and the key is
removed. After this time the indication will disappear and the clock will
be shown again.
Press the TRIP button (TRIP 1 mode, for less than one second) to switch
to the trip meter.
Press the TRIP button (TRIP 2 mode, for longer than 2 seconds) to reset
the trip meter.
Press either the TRIP button (TRIP 1 mode, for less than one second) or
the MODE button (MODE 1 mode) to return to the kilometre counter.
F0E0443g
F0E0446g
Page 23 of 266
22
SAFETY
DEVICES
CORRECT USE
OF THE CAR
WARNING
LIGHTS AND
MESSAGES
IN AN
EMERGENCY
CAR
MAINTENANCE
TECHNICAL
SPECIFICATIONS
INDEX
DASHBOARD
AND CONTROLS
RICONFIGURABLE
MULTIFUNCTION DISPLAY
The configurable multifunction display shows useful
information necessary when driving and a Menu to be
used for the following settings:
❒TIME;
❒KILOMETRE COUNTER;
❒OUTSIDE TEMPERATURE (If the car is fitted with
climate control with automatic temperature control,
the kilometre counter on the instrument panel,
which in standard version displays the total km and
the digital clock, will also display the outside
temperature);
❒VEHICLE INFORMATION:
❒Trip computer;
❒Instrument panel and display dimmer;
❒Failure messages, when the respective warning light
appears on the instrument panel;
❒Event messages.Configurable multifunction display menu
TRIP B: to switch the respective function on and off
(ON/OFF).
TIME: to set the time (hours and minutes).
DAYL. SAV.: to switch daylight saving time on and off.
CLOCKMODE 12/24: to select the clock mode, 12
hour or 24 hour.
LANGUAGE: to set the language of the messages on
the display.
UNIT: to select the following units of measure: km, mi,
°C, °F, km/l, l/100km, mpg, km/h, mph.
BUZZER: to adjust the buzzer volume.
SERVICE: to display information concerning correct
car maintenance operations, strictly following the
Service Schedule.
MENU OFF: to quit the menu.