warning light FIAT MULTIPLA 2006 1.G Service Manual
[x] Cancel search | Manufacturer: FIAT, Model Year: 2006, Model line: MULTIPLA, Model: FIAT MULTIPLA 2006 1.GPages: 266, PDF Size: 4.61 MB
Page 44 of 266
43
SAFETY
DEVICES
CORRECT USE
OF THE CAR
WARNING
LIGHTS AND
MESSAGES
IN AN
EMERGENCY
CAR
MAINTENANCE
TECHNICAL
SPECIFICATIONS
INDEX
DASHBOARD
AND CONTROLS
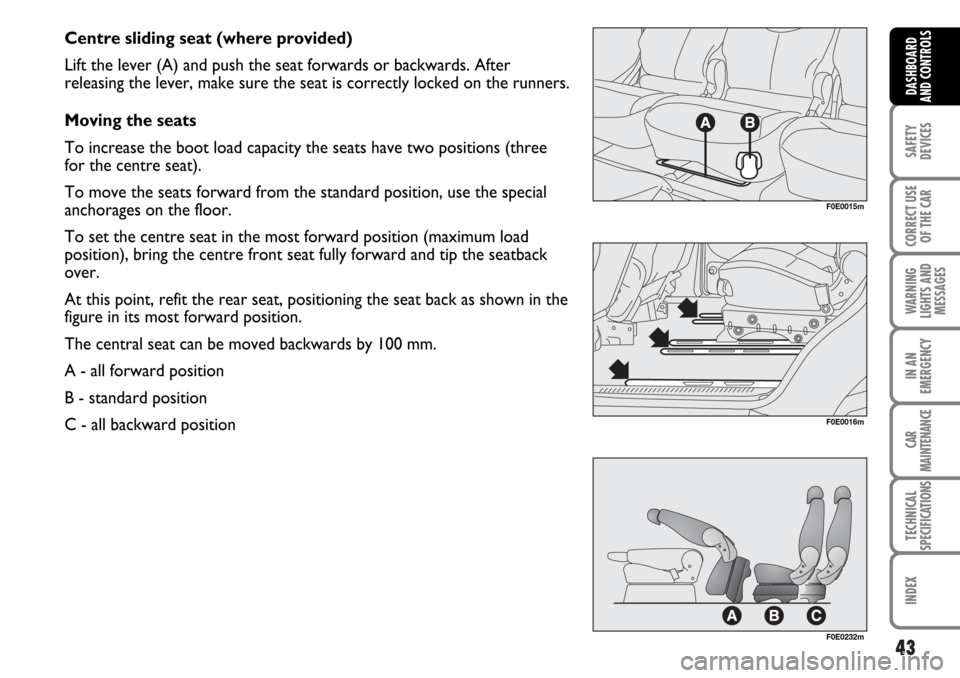
Centre sliding seat (where provided)
Lift the lever (A) and push the seat forwards or backwards. After
releasing the lever, make sure the seat is correctly locked on the runners.
Moving the seats
To increase the boot load capacity the seats have two positions (three
for the centre seat).
To move the seats forward from the standard position, use the special
anchorages on the floor.
To set the centre seat in the most forward position (maximum load
position), bring the centre front seat fully forward and tip the seatback
over.
At this point, refit the rear seat, positioning the seat back as shown in the
figure in its most forward position.
The central seat can be moved backwards by 100 mm.
A - all forward position
B - standard position
C - all backward position
F0E0016m
F0E0232m
F0E0015m
Page 45 of 266
44
SAFETY
DEVICES
CORRECT USE
OF THE CAR
WARNING
LIGHTS AND
MESSAGES
IN AN
EMERGENCY
CAR
MAINTENANCE
TECHNICAL
SPECIFICATIONS
INDEX
DASHBOARD
AND CONTROLS
HEAD RESTRAINTS
FRONT SEATS
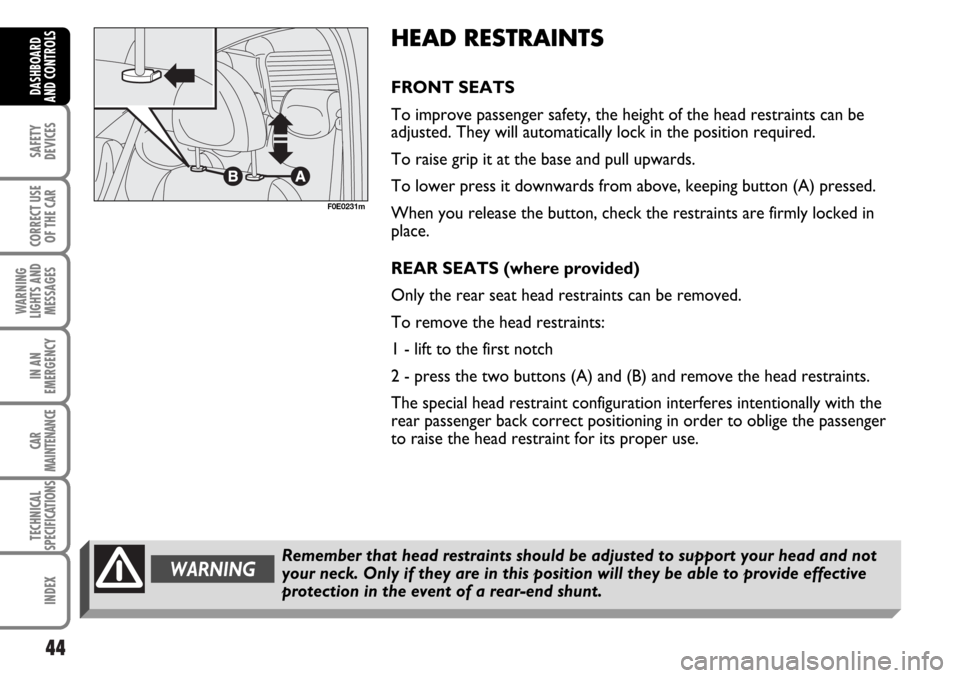
To improve passenger safety, the height of the head restraints can be
adjusted. They will automatically lock in the position required.
To raise grip it at the base and pull upwards.
To lower press it downwards from above, keeping button (A) pressed.
When you release the button, check the restraints are firmly locked in
place.
REAR SEATS (where provided)
Only the rear seat head restraints can be removed.
To remove the head restraints:
1 - lift to the first notch
2 - press the two buttons (A) and (B) and remove the head restraints.
The special head restraint configuration interferes intentionally with the
rear passenger back correct positioning in order to oblige the passenger
to raise the head restraint for its proper use.
Remember that head restraints should be adjusted to support your head and not
your neck. Only if they are in this position will they be able to provide effective
protection in the event of a rear-end shunt.WARNING
F0E0231m
Page 46 of 266
45
SAFETY
DEVICES
CORRECT USE
OF THE CAR
WARNING
LIGHTS AND
MESSAGES
IN AN
EMERGENCY
CAR
MAINTENANCE
TECHNICAL
SPECIFICATIONS
INDEX
DASHBOARD
AND CONTROLS
STEERING WHEEL
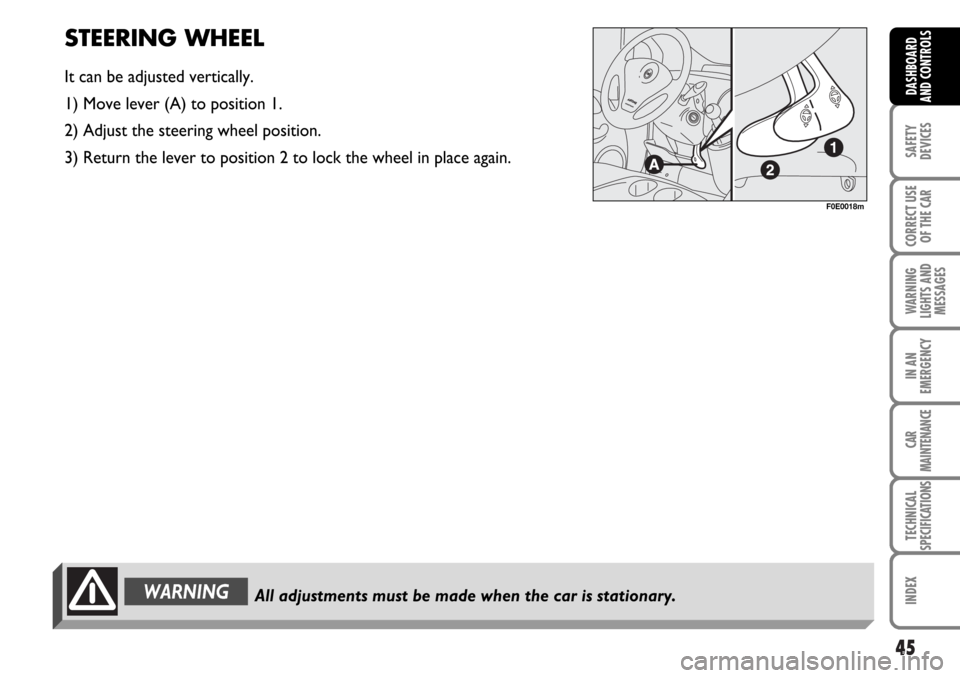
It can be adjusted vertically.
1) Move lever (A) to position 1.
2) Adjust the steering wheel position.
3) Return the lever to position 2 to lock the wheel in place again.
F0E0018m
All adjustments must be made when the car is stationary.WARNING
Page 47 of 266
46
SAFETY
DEVICES
CORRECT USE
OF THE CAR
WARNING
LIGHTS AND
MESSAGES
IN AN
EMERGENCY
CAR
MAINTENANCE
TECHNICAL
SPECIFICATIONS
INDEX
DASHBOARD
AND CONTROLS
REARVIEW MIRRORS
DRIVING MIRROR
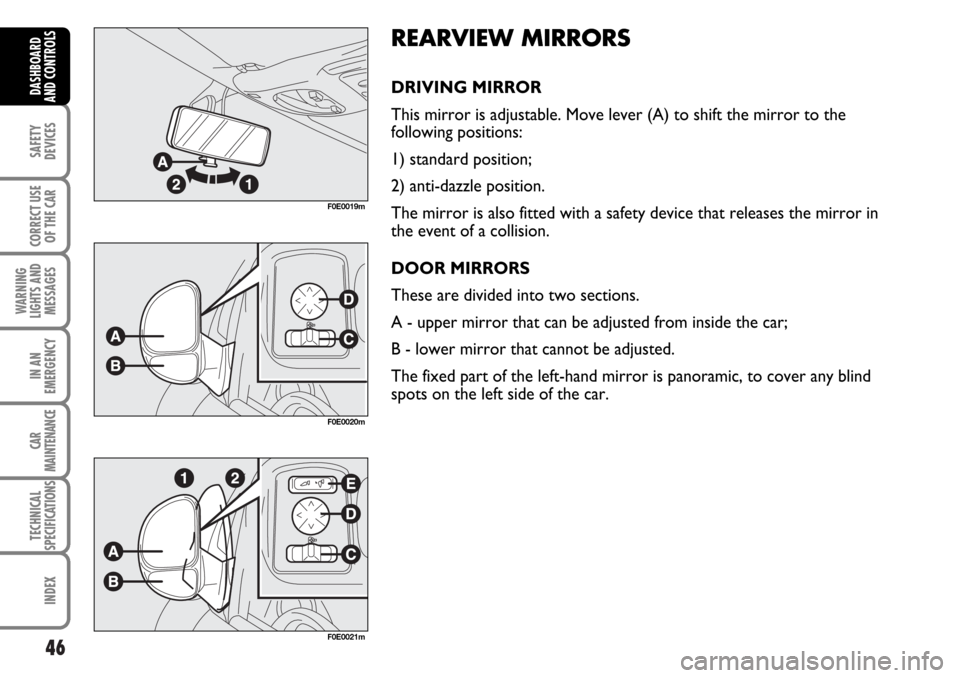
This mirror is adjustable. Move lever (A) to shift the mirror to the
following positions:
1) standard position;
2) anti-dazzle position.
The mirror is also fitted with a safety device that releases the mirror in
the event of a collision.
DOOR MIRRORS
These are divided into two sections.
A - upper mirror that can be adjusted from inside the car;
B - lower mirror that cannot be adjusted.
The fixed part of the left-hand mirror is panoramic, to cover any blind
spots on the left side of the car.
F0E0020m
F0E0021m
F0E0019m
Page 48 of 266
47
SAFETY
DEVICES
CORRECT USE
OF THE CAR
WARNING
LIGHTS AND
MESSAGES
IN AN
EMERGENCY
CAR
MAINTENANCE
TECHNICAL
SPECIFICATIONS
INDEX
DASHBOARD
AND CONTROLS
When driving the mirrors shall always be in position (1).
As the door mirrors are curved, they may slightly alter the perception of distance. The fixed part of the right-hand mirror reflects the
rear right wheel when parking.
This can only be adjusted with the ignition key at MAR.
Use switch (C) to select the mirror (left, neutral, right)
for adjustment.
Press any of the four directions on switch (D) located
on the ceiling light.
Switch (E) electrically controls the movement of the
folding mirrors from position 1 to position 2.
Electrically folding mirrors have a demisting device that
comes on automatically when rear window heating is
turned on.The mirrors can tilt in both directions in the event of a
collision.
To reset the mirror in the correct position, first set it
in the fully closed position by keeping the control
pressed until the mirror stops, then open it.
If the mirror is moved out of its position manually, it is
possible to set it back to the correct position
manually, although it is preferable to move it
electrically. If the mirror is moved out of its position
electrically, it is COMPULSORY to set it back
electrically to its correct position.
If the open mirror makes it difficult to pass through
narrow gaps, fold it from position 1 to position 2.
Page 49 of 266
48
SAFETY
DEVICES
CORRECT USE
OF THE CAR
WARNING
LIGHTS AND
MESSAGES
IN AN
EMERGENCY
CAR
MAINTENANCE
TECHNICAL
SPECIFICATIONS
INDEX
DASHBOARD
AND CONTROLS
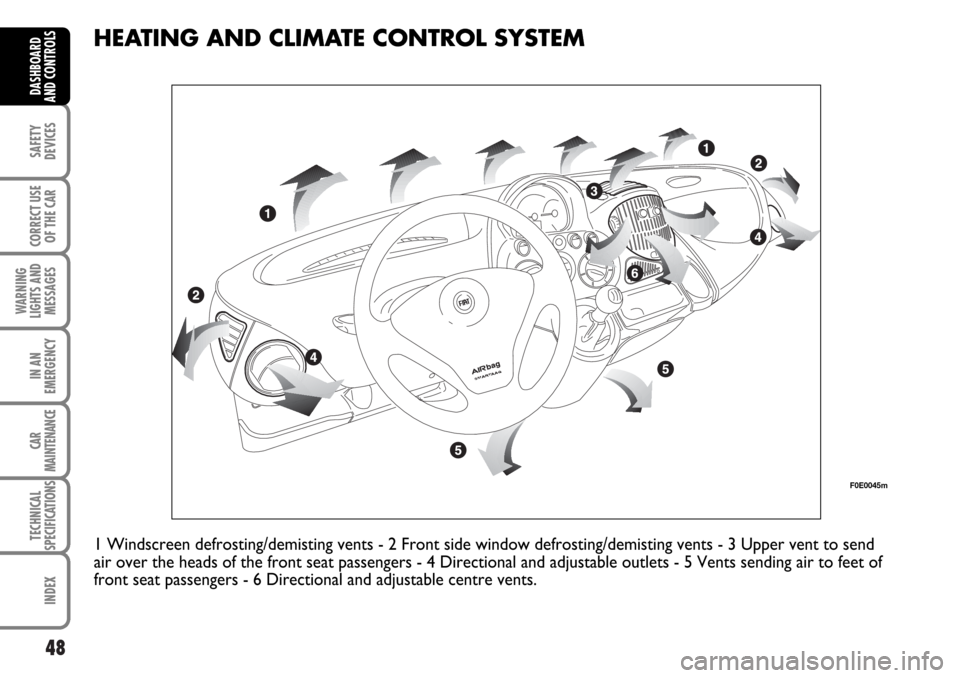
HEATING AND CLIMATE CONTROL SYSTEM
F0E0045m
1 Windscreen defrosting/demisting vents - 2 Front side window defrosting/demisting vents - 3 Upper vent to send
air over the heads of the front seat passengers - 4 Directional and adjustable outlets - 5 Vents sending air to feet of
front seat passengers - 6 Directional and adjustable centre vents.
Page 50 of 266
49
SAFETY
DEVICES
CORRECT USE
OF THE CAR
WARNING
LIGHTS AND
MESSAGES
IN AN
EMERGENCY
CAR
MAINTENANCE
TECHNICAL
SPECIFICATIONS
INDEX
DASHBOARD
AND CONTROLS
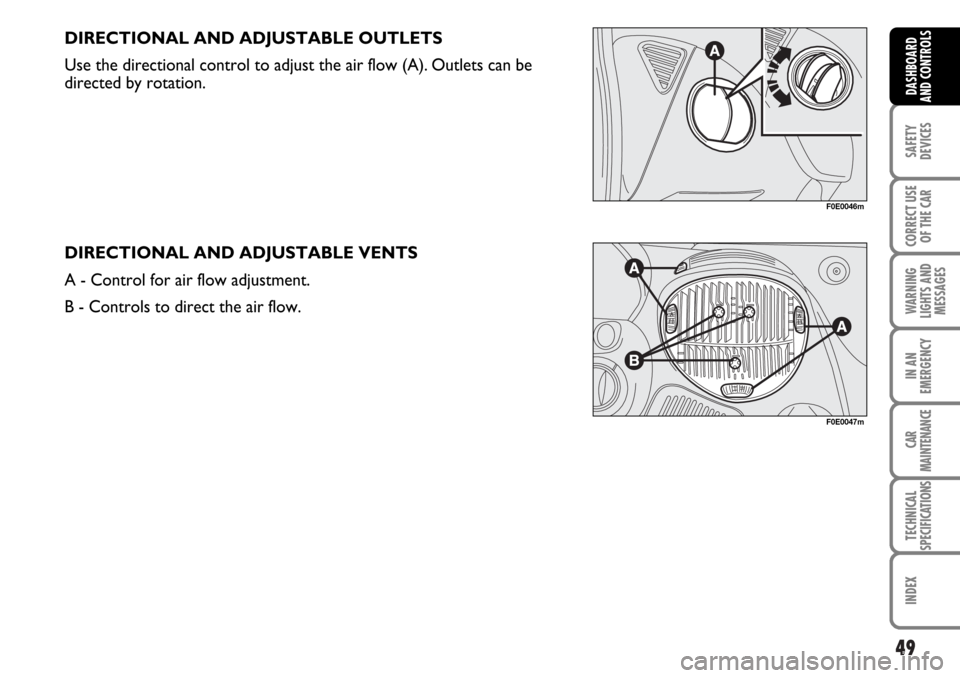
DIRECTIONAL AND ADJUSTABLE OUTLETS
Use the directional control to adjust the air flow (A). Outlets can be
directed by rotation.
DIRECTIONAL AND ADJUSTABLE VENTS
A - Control for air flow adjustment.
B - Controls to direct the air flow.
F0E0046m
F0E0047m
Page 51 of 266
50
SAFETY
DEVICES
CORRECT USE
OF THE CAR
WARNING
LIGHTS AND
MESSAGES
IN AN
EMERGENCY
CAR
MAINTENANCE
TECHNICAL
SPECIFICATIONS
INDEX
DASHBOARD
AND CONTROLS
HEATING AND VENTILATION
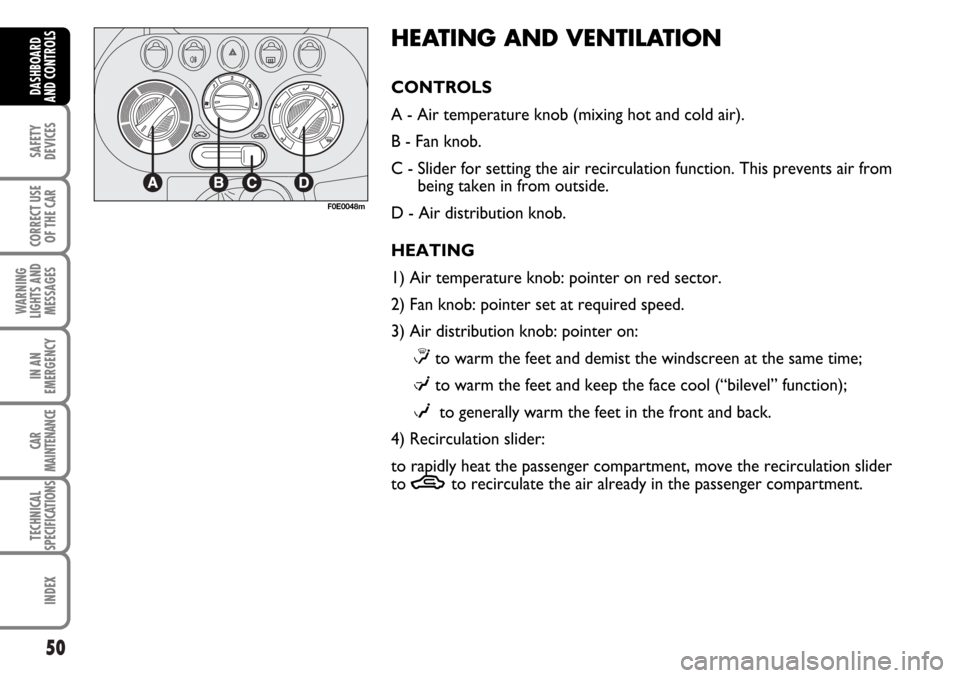
CONTROLS
A - Air temperature knob (mixing hot and cold air).
B - Fan knob.
C - Slider for setting the air recirculation function. This prevents air from
being taken in from outside.
D - Air distribution knob.
HEATING
1) Air temperature knob: pointer on red sector.
2) Fan knob: pointer set at required speed.
3) Air distribution knob: pointer on:
≤to warm the feet and demist the windscreen at the same time;
μto warm the feet and keep the face cool (“bilevel” function);
wto generally warm the feet in the front and back.
4) Recirculation slider:
to rapidly heat the passenger compartment, move the recirculation slider
to
Tto recirculate the air already in the passenger compartment.
F0E0048m
Page 52 of 266

51
SAFETY
DEVICES
CORRECT USE
OF THE CAR
WARNING
LIGHTS AND
MESSAGES
IN AN
EMERGENCY
CAR
MAINTENANCE
TECHNICAL
SPECIFICATIONS
INDEX
DASHBOARD
AND CONTROLS
FAST DEMISTING AND/OR DEFROSTING
Windscreen and side windows
1) Air temperature knob: pointer on red sector
(turned fully to the right).
2) Fan knob: pointer at maximum speed.
3) Air distribution knob: pointer at
-.
4) Air recirculation slider on
H, outside air enters the
passenger compartment.
In brief, to demist/defrost quickly, bring all the
pointers on the symbol
-.
When the windscreen and windows have been
demisted, adjust the controls to maintain the required
degree of comfort and visibility.
Rear window
Press button
(. The electric mirror demisting device
also comes on.
As soon as the rear window is clear, switch off the
button.VENTILATION
1) Centre and side vents: fully open.
2) Air temperature knob: pointer on blue sector.
3) Fan knob: pointer on required speed.
4) Air distribution knob: pointer on
¥.
5) Air recirculation slider on
H, outside air enters the
passenger compartment.
Extra heater
For very cold climates the diesel version can be fitted
with an extra heater that is fully automatic and ensures
maximum comfort inside the passenger compartment.
RECIRCULATION
With slider on
Tonly the inside air is circulated.
IMPORTANT This function is particularly useful when
the outside air is heavily polluted (in a traffic jam,
tunnel, etc.) However, it is better not to use it for long
periods, especially if there are several people in the
car.
IMPORTANT Do not use the air recirculation function
on rainy/cold days as it would considerably increase
the possibility of the windows misting inside.
Page 53 of 266
52
SAFETY
DEVICES
CORRECT USE
OF THE CAR
WARNING
LIGHTS AND
MESSAGES
IN AN
EMERGENCY
CAR
MAINTENANCE
TECHNICAL
SPECIFICATIONS
INDEX
DASHBOARD
AND CONTROLS
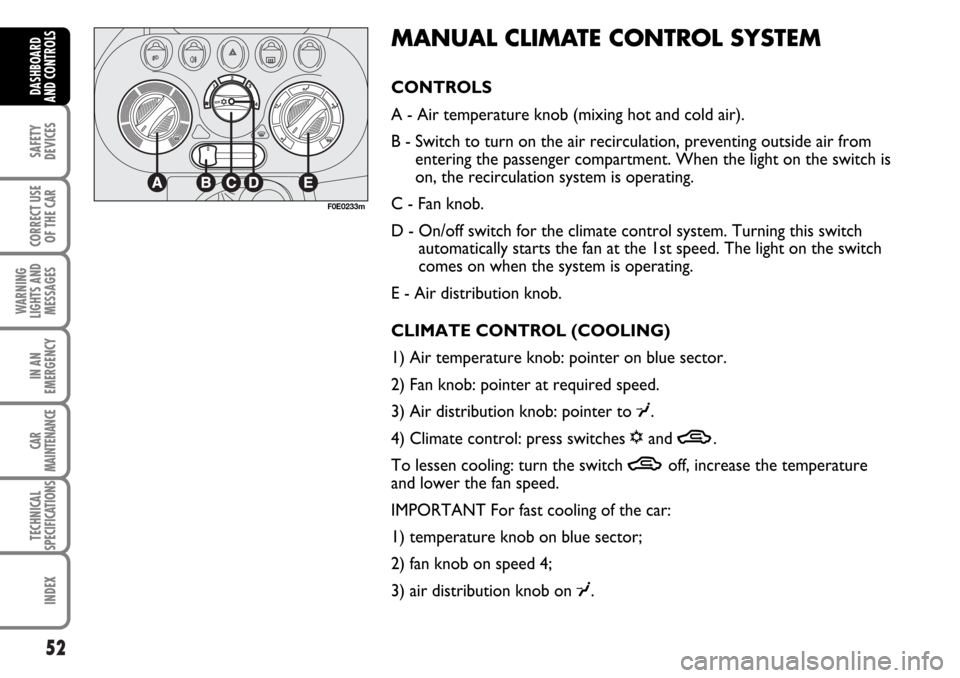
MANUAL CLIMATE CONTROL SYSTEM
CONTROLS
A - Air temperature knob (mixing hot and cold air).
B - Switch to turn on the air recirculation, preventing outside air from
entering the passenger compartment. When the light on the switch is
on, the recirculation system is operating.
C - Fan knob.
D - On/off switch for the climate control system. Turning this switch
automatically starts the fan at the 1st speed. The light on the switch
comes on when the system is operating.
E - Air distribution knob.
CLIMATE CONTROL (COOLING)
1) Air temperature knob: pointer on blue sector.
2) Fan knob: pointer at required speed.
3) Air distribution knob: pointer to
¥.
4) Climate control: press switches
√and T.
To lessen cooling: turn the switch
Toff, increase the temperature
and lower the fan speed.
IMPORTANT For fast cooling of the car:
1) temperature knob on blue sector;
2) fan knob on speed 4;
3) air distribution knob on
¥.
F0E0233m