seal FIAT PANDA 2009 169 / 2.G Owners Manual
[x] Cancel search | Manufacturer: FIAT, Model Year: 2009, Model line: PANDA, Model: FIAT PANDA 2009 169 / 2.GPages: 226, PDF Size: 5.29 MB
Page 90 of 226
89
F0Z0041m
fig. 96
F0Z0042m
fig. 97
KNOW YOUR
VEHICLESAFETY
CORRECT USE
OF THE CAR
WARNING LIGHTS
AND MESSAGES
IN
AN EMERGENCY
CAR
MAINTENANCE
TECHNICAL
SPECIFICATIONS
INDEX
Do not place naked flames or lit cigarettes
near to the fuel filler: fire risk. Keep away
from the fuel filler to avoid breathing in harmful
vapours.
WARNING
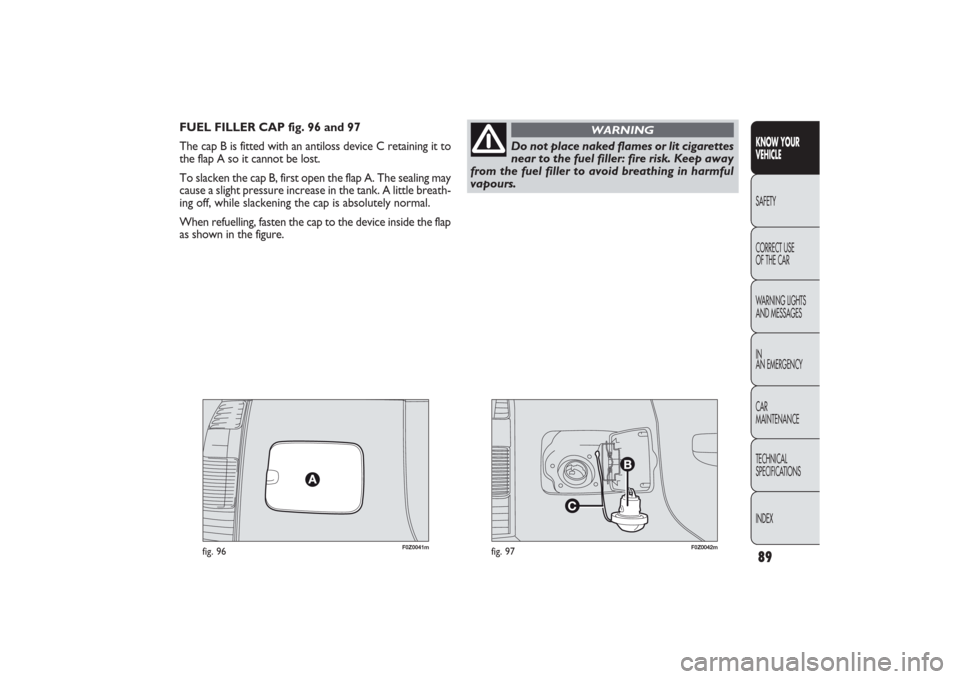
FUEL FILLER CAP fig. 96 and 97
The cap B is fitted with an antiloss device C retaining it to
the flap A so it cannot be lost.
To slacken the cap B, first open the flap A. The sealing may
cause a slight pressure increase in the tank. A little breath-
ing off, while slackening the cap is absolutely normal.
When refuelling, fasten the cap to the device inside the flap
as shown in the figure.
065-090 PANDA EN 7-10-2009 13:45 Pagina 89
Page 120 of 226
119KNOW
YOUR VEHICLE
SAFETYCORRECT USE
OF THE CARWARNING LIGHTS
AND MESSAGES
IN
AN EMERGENCY
CAR
MAINTENANCE
TECHNICAL
SPECIFICATIONS
INDEX
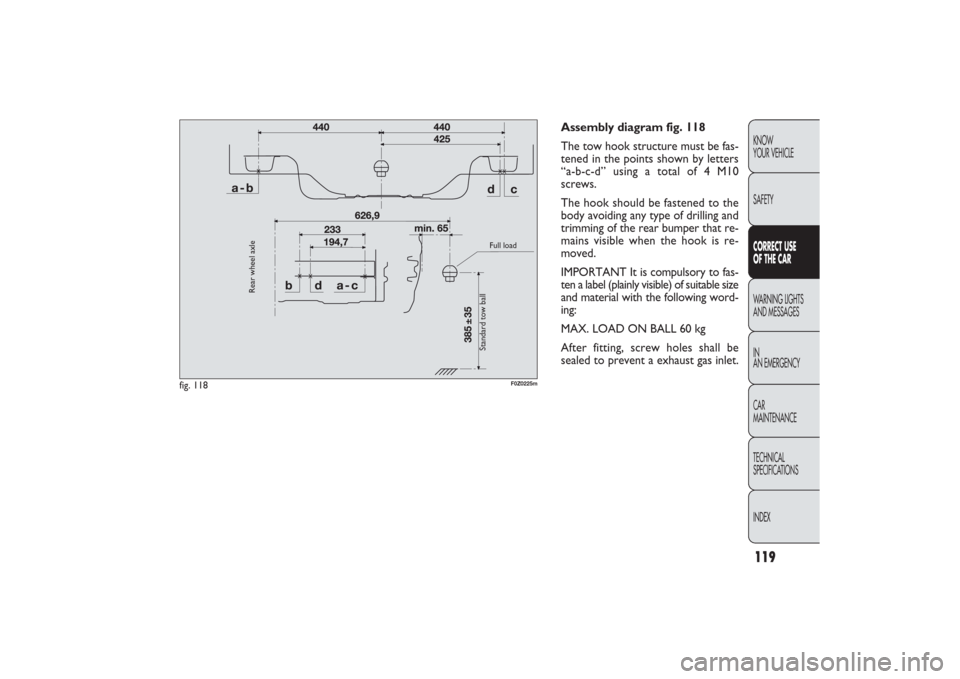
Assembly diagram fig. 118
The tow hook structure must be fas-
tened in the points shown by letters
“a-b-c-d” using a total of 4 M10
screws.
The hook should be fastened to the
body avoiding any type of drilling and
trimming of the rear bumper that re-
mains visible when the hook is re-
moved.
IMPORTANT It is compulsory to fas-
ten a label (plainly visible) of suitable size
and material with the following word-
ing:
MAX. LOAD ON BALL 60 kg
After fitting, screw holes shall be
sealed to prevent a exhaust gas inlet.
fig. 118
F0Z0225m
Rear wheel axle
Standard tow ball
Full load
111-122 PANDA EN 7-10-2009 15:01 Pagina 119
Page 121 of 226
120
KNOW YOUR
VEHICLE
SAFETYCORRECT USE
OF THE CARWARNING LIGHTS
AND MESSAGESI
IN
AN EMERGENCY
CAR
MAINTENANCE
TECHNICAL
SPECIFICATIONS
INDEX
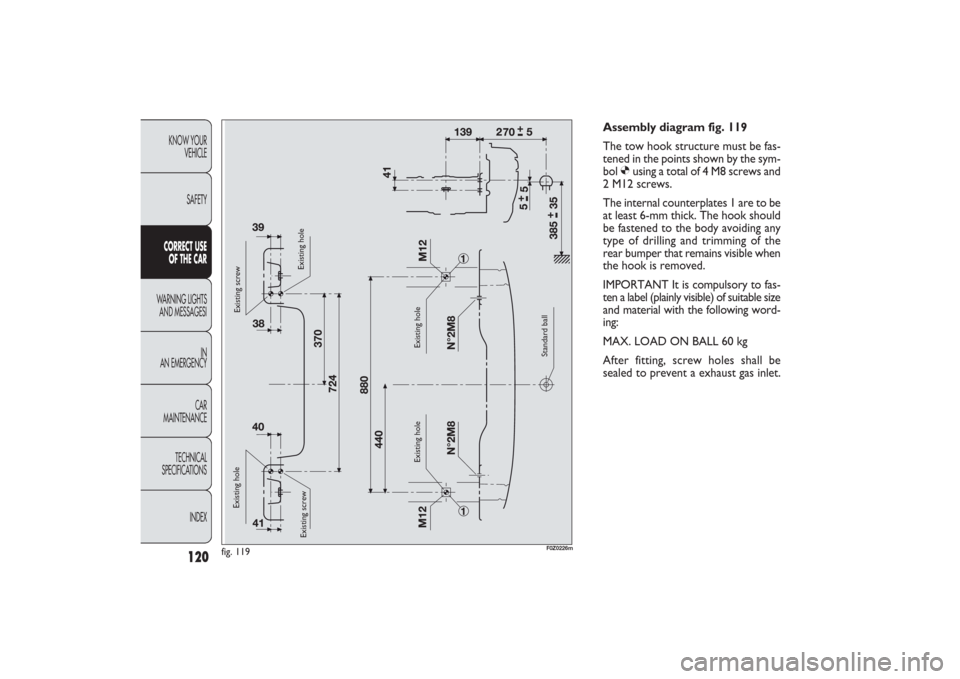
Assembly diagram fig. 119
The tow hook structure must be fas-
tened in the points shown by the sym-
bol
Ø
using a total of 4 M8 screws and
2 M12 screws.
The internal counterplates 1 are to be
at least 6-mm thick. The hook should
be fastened to the body avoiding any
type of drilling and trimming of the
rear bumper that remains visible when
the hook is removed.
IMPORTANT It is compulsory to fas-
ten a label (plainly visible) of suitable size
and material with the following word-
ing:
MAX. LOAD ON BALL 60 kg
After fitting, screw holes shall be
sealed to prevent a exhaust gas inlet.
fig. 119
F0Z0226m
Existing hole
Existing hole
Existing hole Existing hole
Standard ballExisting screw
Existing screw
111-122 PANDA EN 7-10-2009 15:01 Pagina 120
Page 144 of 226
143KNOW
YOUR VEHICLE
SAFETY
CORRECT USE
OF THE CAR
WARNING LIGHTS
AND MESSAGESIN
AN EMERGENCYCAR
MAINTENANCE
TECHNICAL
SPECIFICATIONS
INDEX
At the end of the procedure❒
stow the space-saving wheel D-fig. 122 in the space pro-
vided in the boot;
❒
fit the partially-open jack in its box C by forcing it slight-
ly to prevent it from vibrating when travelling;
❒
put the tools back into their locations;
❒
arrange the container and tools in the spare wheel and
secure the clamping device B;
❒
correctly reposition the boot stiff cover.
IMPORTANT Do not use inner tubes with tubeless tyres.
Check the inflation pressure of the tyres and the space-
saving wheel regularly.
IMPORTANT You will need to change the set of bolts if
you want to change the type of wheels fitted (alloy rims
instead of steel rims, and vice versa).The whole set of fas-
tening bolts must be replaced by another set of suitably
sized bolts and use a special space-saving wheel having dif-
ferent building characteristics.
You should keep the bolts and space-saving wheel in case
you decide to use the original type of wheel later on.
F0Z0607m
fig. 131
QUICK TYRE REPAIR KIT FIX & GO
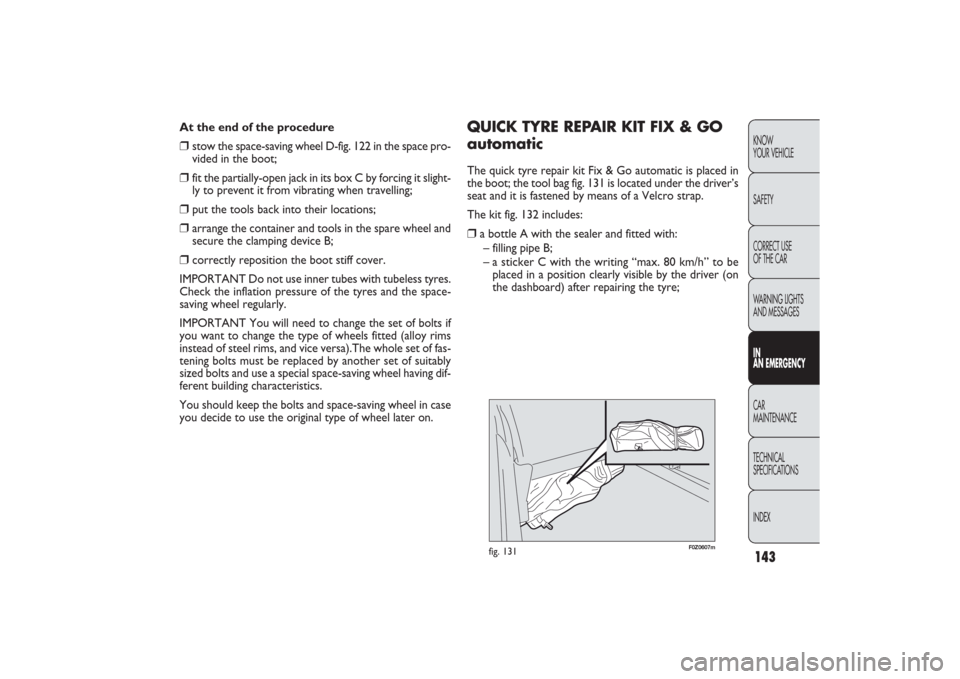
automaticThe quick tyre repair kit Fix & Go automatic is placed in
the boot; the tool bag fig. 131 is located under the driver’s
seat and it is fastened by means of a Velcro strap.
The kit fig. 132 includes:❒
a bottle A with the sealer and fitted with:
– filling pipe B;
– a sticker C with the writing “max. 80 km/h” to be
placed in a position clearly visible by the driver (on
the dashboard) after repairing the tyre;
135-168 PANDA EN 7-10-2009 14:06 Pagina 143
Page 146 of 226
145KNOW
YOUR VEHICLE
SAFETY
CORRECT USE
OF THE CAR
WARNING LIGHTS
AND MESSAGESIN
AN EMERGENCYCAR
MAINTENANCE
TECHNICAL
SPECIFICATIONS
INDEX
Tyre side wall holes and punctures cannot
be repaired. Do not use the quick repair
kit if the tyre is damaged as the vehicle has run on
a flat tyre.
WARNING
If the wheel rim is damaged (bad groove
distortion causing air leakage) it cannot
be repaired. Do not remove the foreign body
(screws or nails) from the tyre.
WARNING
PLEASE REMEMBER THAT:
The sealing fluid of the quick tyre repair kit is effective with
external temperatures between −20 °C and +50 °C.
The sealing fluid has a limited life.
Never not operate the compressor for
longer than 20 consecutive minutes. Risk
of overheating. The quick repair kit is not suitable
for definitive repairs. Tyres may only be repaired
temporarily.
WARNING
The bottle contains ethylene glycol. It con-
tains latex that might cause allergic reac-
tions. It is harmful if swallowed. It is irritant for the
eyes in case of contact. It may cause sensitisation
by inhalation or contact. Avoid contact with your
eyes, skin and clothes. In the event of contact, wash
immediately with plenty of water. Do not induce
vomit if swallowed. Rinse your mouth and drink
plenty of water. Call a doctor immediately. Keep
away from children. The product must not be used
by asthmatics. Do not inhale the vapours during in-
sertion and suction. Call a doctor immediately if al-
lergic reactions are noted. Store the bottle in the
specific compartment, away from sources of heat.
The sealant fluid has a limited life.
WARNING
135-168 PANDA EN 7-10-2009 14:07 Pagina 145
Page 147 of 226
146KNOW
YOUR VEHICLE
SAFETY
CORRECT USE
OF THE CAR
WARNING LIGHTS
AND MESSAGES
IN
AN EMERGENCYCAR
MAINTENANCE
TECHNICAL
SPECIFICATIONS
INDEX
F0Z0697m
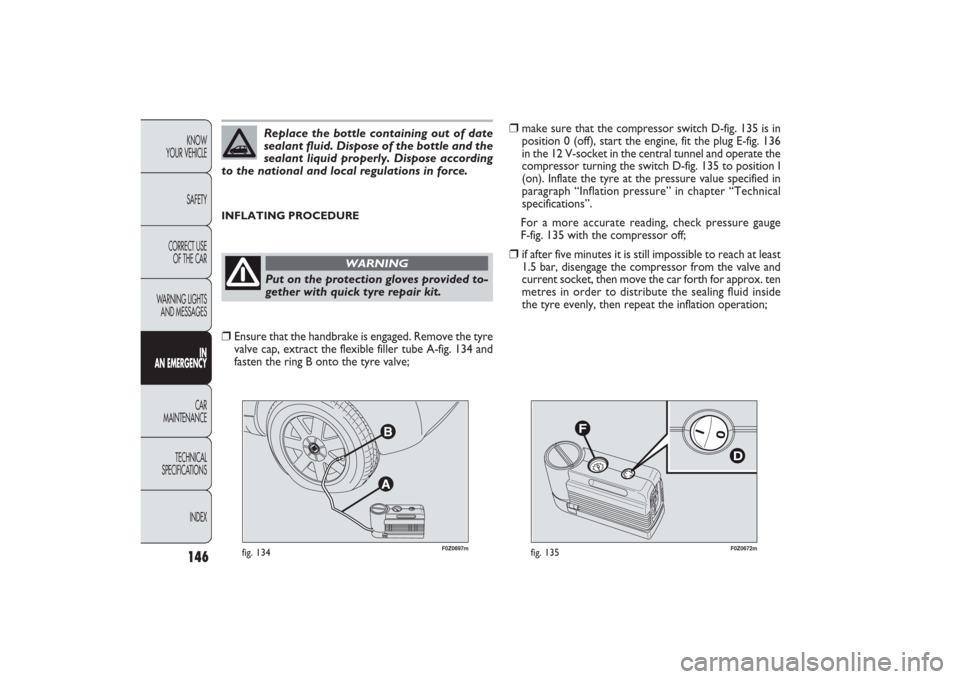
fig. 134
F0Z0672m
fig. 135
❒
make sure that the compressor switch D-fig. 135 is in
position 0 (off), start the engine, fit the plug E-fig. 136
in the 12 V-socket in the central tunnel and operate the
compressor turning the switch D-fig. 135 to position I
(on). Inflate the tyre at the pressure value specified in
paragraph “Inflation pressure” in chapter “Technical
specifications”.
For a more accurate reading, check pressure gauge
F-fig. 135 with the compressor off;
❒
if after five minutes it is still impossible to reach at least
1.5 bar, disengage the compressor from the valve and
current socket, then move the car forth for approx. ten
metres in order to distribute the sealing fluid inside
the tyre evenly, then repeat the inflation operation;
INFLATING PROCEDURE
Replace the bottle containing out of date
sealant fluid. Dispose of the bottle and the
sealant liquid properly. Dispose according
to the national and local regulations in force.Put on the protection gloves provided to-
gether with quick tyre repair kit.
WARNING
❒
Ensure that the handbrake is engaged. Remove the tyre
valve cap, extract the flexible filler tube A-fig. 134 and
fasten the ring B onto the tyre valve;
135-168 PANDA EN 7-10-2009 14:07 Pagina 146
Page 148 of 226
147KNOW
YOUR VEHICLE
SAFETY
CORRECT USE
OF THE CAR
WARNING LIGHTS
AND MESSAGESIN
AN EMERGENCYCAR
MAINTENANCE
TECHNICAL
SPECIFICATIONS
INDEX
F0Z0673m
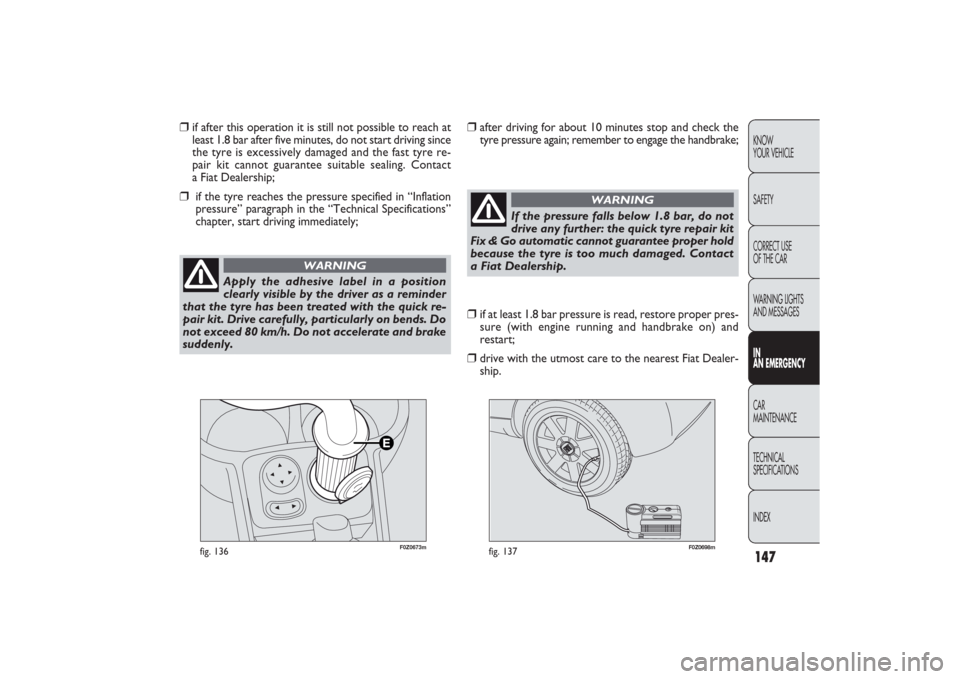
fig. 136
F0Z0698m
fig. 137
❒
if after this operation it is still not possible to reach at
least 1.8 bar after five minutes, do not start driving since
the tyre is excessively damaged and the fast tyre re-
pair kit cannot guarantee suitable sealing. Contact
a Fiat Dealership;
❒
if the tyre reaches the pressure specified in “Inflation
pressure” paragraph in the “Technical Specifications”
chapter, start driving immediately;
Apply the adhesive label in a position
clearly visible by the driver as a reminder
that the tyre has been treated with the quick re-
pair kit. Drive carefully, particularly on bends. Do
not exceed 80 km/h. Do not accelerate and brake
suddenly.
WARNING
❒
after driving for about 10 minutes stop and check the
tyre pressure again; remember to engage the handbrake;
If the pressure falls below 1.8 bar, do not
drive any further: the quick tyre repair kit
Fix & Go automatic cannot guarantee proper hold
because the tyre is too much damaged. Contact
a Fiat Dealership.
WARNING
❒
if at least 1.8 bar pressure is read, restore proper pres-
sure (with engine running and handbrake on) and
restart;
❒
drive with the utmost care to the nearest Fiat Dealer-
ship.
135-168 PANDA EN 7-10-2009 14:07 Pagina 147
Page 149 of 226
148KNOW
YOUR VEHICLE
SAFETY
CORRECT USE
OF THE CAR
WARNING LIGHTS
AND MESSAGES
IN
AN EMERGENCYCAR
MAINTENANCE
TECHNICAL
SPECIFICATIONS
INDEX
F0Z0699m
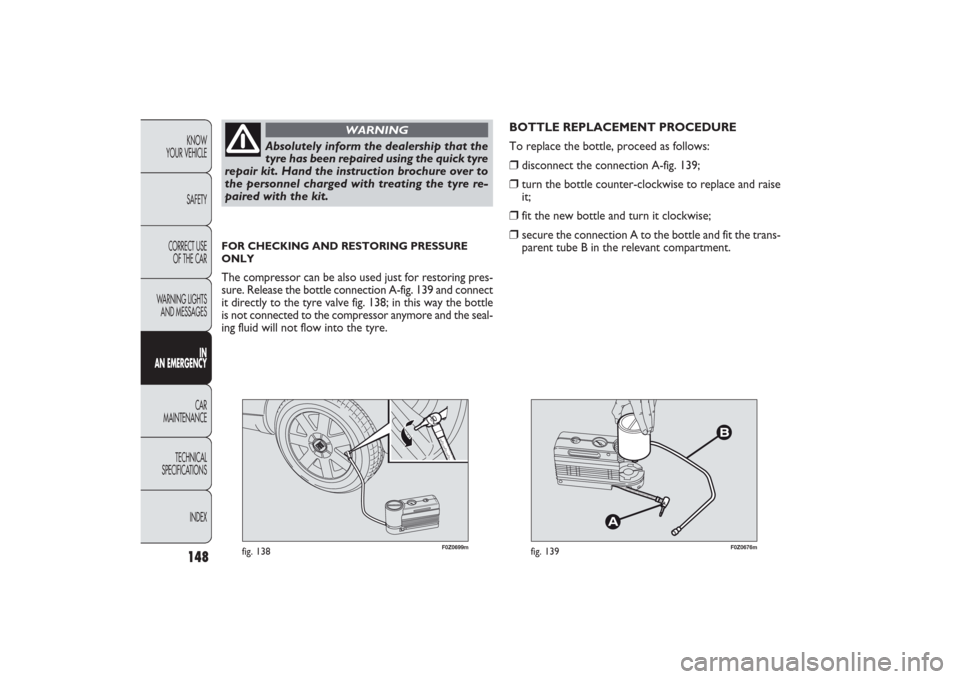
fig. 138
F0Z0676m
fig. 139
BOTTLE REPLACEMENT PROCEDURE
To replace the bottle, proceed as follows:❒
disconnect the connection A-fig. 139;
❒
turn the bottle counter-clockwise to replace and raise
it;
❒
fit the new bottle and turn it clockwise;
❒
secure the connection A to the bottle and fit the trans-
parent tube B in the relevant compartment.
Absolutely inform the dealership that the
tyre has been repaired using the quick tyre
repair kit. Hand the instruction brochure over to
the personnel charged with treating the tyre re-
paired with the kit.
WARNING
FOR CHECKING AND RESTORING PRESSURE
ONLYThe compressor can be also used just for restoring pres-
sure. Release the bottle connection A-fig. 139 and connect
it directly to the tyre valve fig. 138; in this way the bottle
is not connected to the compressor anymore and the seal-
ing fluid will not flow into the tyre.
135-168 PANDA EN 7-10-2009 14:07 Pagina 148
Page 181 of 226
180KNOW
YOUR VEHICLE
SAFETY
CORRECT USE
OF THE CAR
WARNING LIGHTS
AND MESSAGES
IN
AN EMERGENCYCAR
MAINTENANCE
TECHNICAL
SPECIFICATIONS
INDEX
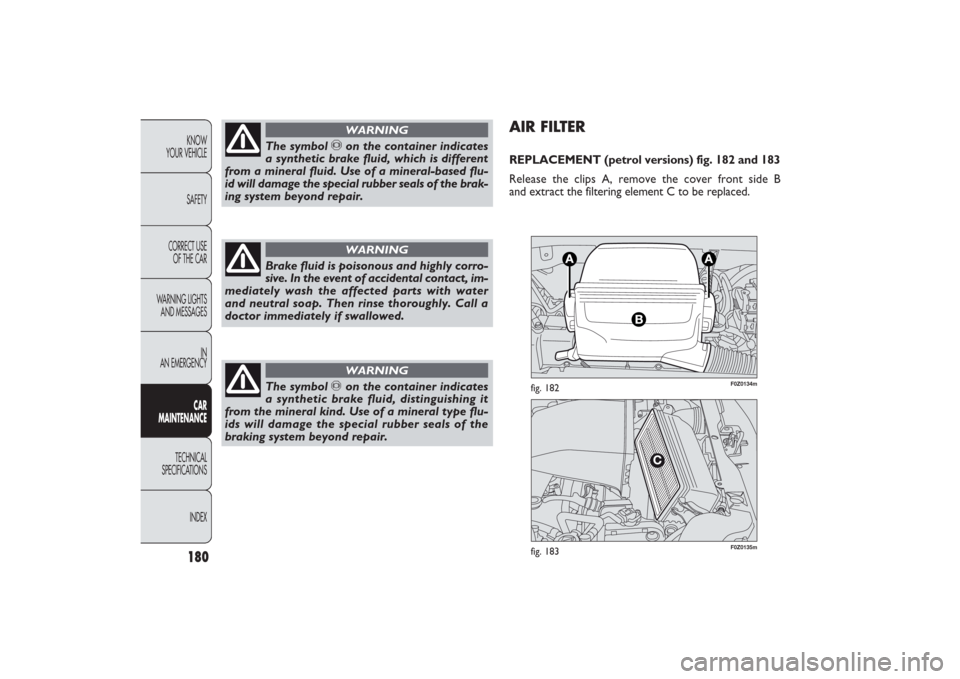
F0Z0135m
fig. 183
F0Z0134m
fig. 182
AIR FILTERREPLACEMENT (petrol versions) fig. 182 and 183
Release the clips A, remove the cover front side B
and extract the filtering element C to be replaced.
Brake fluid is poisonous and highly corro-
sive. In the event of accidental contact, im-
mediately wash the affected parts with water
and neutral soap. Then rinse thoroughly. Call a
doctor immediately if swallowed.
WARNING
The symbol
π
on the container indicates
a synthetic brake fluid, distinguishing it
from the mineral kind. Use of a mineral type flu-
ids will damage the special rubber seals of the
braking system beyond repair.WARNING
The symbol πon the container indicates
a synthetic brake fluid, which is different
from a mineral fluid. Use of a mineral-based flu-
id will damage the special rubber seals of the brak-
ing system beyond repair.
WARNING
169-190 PANDA EN 7-10-2009 14:15 Pagina 180