key FIAT SCUDO 2010 Owner handbook (in English)
[x] Cancel search | Manufacturer: FIAT, Model Year: 2010, Model line: SCUDO, Model: FIAT SCUDO 2010Pages: 210, PDF Size: 3.32 MB
Page 61 of 210
60
SAFETY
DEVICES
CORRECT USE
OF THE
VEHICLE
WARNING
LIGHTS AND
MESSAGES
IN AN
EMERGENCY
VEHICLE
MAINTENANCE
TECHNICAL
SPECIFICATIONS
INDEX
DASHBOARD
AND
CONTROLS
CEILING LIGHTS
FRONT CEILING LIGHT
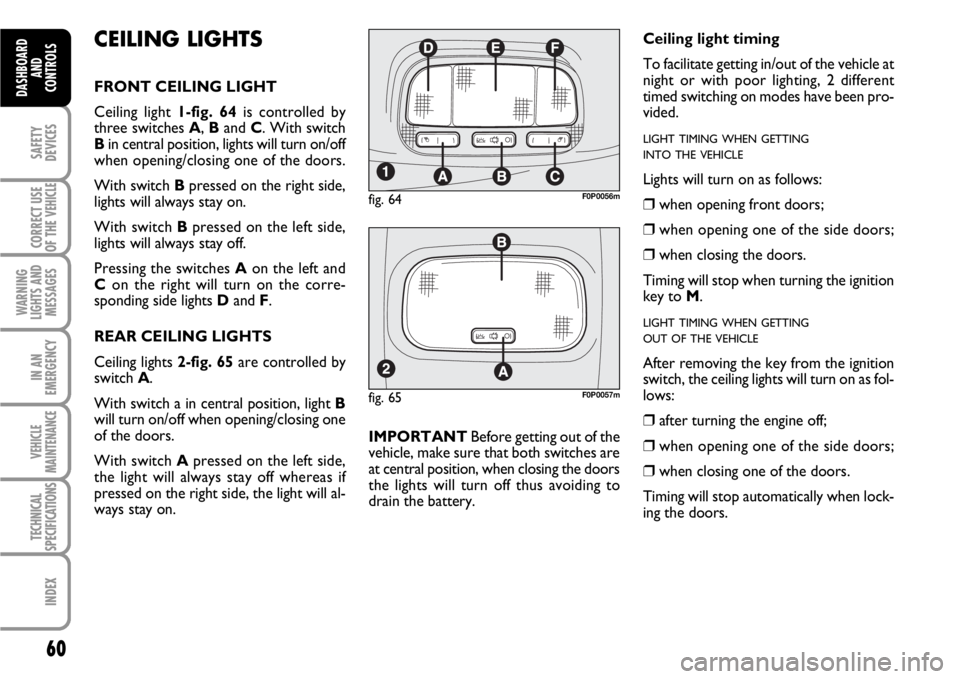
Ceiling light 1-fig. 64is controlled by
three switches A, Band C. With switch
Bin central position, lights will turn on/off
when opening/closing one of the doors.
With switch Bpressed on the right side,
lights will always stay on.
With switch Bpressed on the left side,
lights will always stay off.
Pressing the switches Aon the left and
Con the right will turn on the corre-
sponding side lights Dand F.
REAR CEILING LIGHTS
Ceiling lights 2-fig. 65are controlled by
switch A.
With switch a in central position, light B
will turn on/off when opening/closing one
of the doors.
With switch Apressed on the left side,
the light will always stay off whereas if
pressed on the right side, the light will al-
ways stay on.IMPORTANTBefore getting out of the
vehicle, make sure that both switches are
at central position, when closing the doors
the lights will turn off thus avoiding to
drain the battery.
fig. 65F0P0057m
Ceiling light timing
To facilitate getting in/out of the vehicle at
night or with poor lighting, 2 different
timed switching on modes have been pro-
vided.
LIGHT TIMING WHEN GETTING
INTO THE VEHICLE
Lights will turn on as follows:
❒when opening front doors;
❒when opening one of the side doors;
❒when closing the doors.
Timing will stop when turning the ignition
key to M.
LIGHT TIMING WHEN GETTING
OUT OF THE VEHICLE
After removing the key from the ignition
switch, the ceiling lights will turn on as fol-
lows:
❒after turning the engine off;
❒when opening one of the side doors;
❒when closing one of the doors.
Timing will stop automatically when lock-
ing the doors.
fig. 64F0P0056m
Page 62 of 210
61
SAFETY
DEVICES
CORRECT USE
OF THE
VEHICLE
WARNING
LIGHTS AND
MESSAGES
IN AN
EMERGENCY
VEHICLE
MAINTENANCE
TECHNICAL
SPECIFICATIONS
INDEX
DASHBOARD
AND CONTROLS
fig. 66F0P0287m
CONTROLS
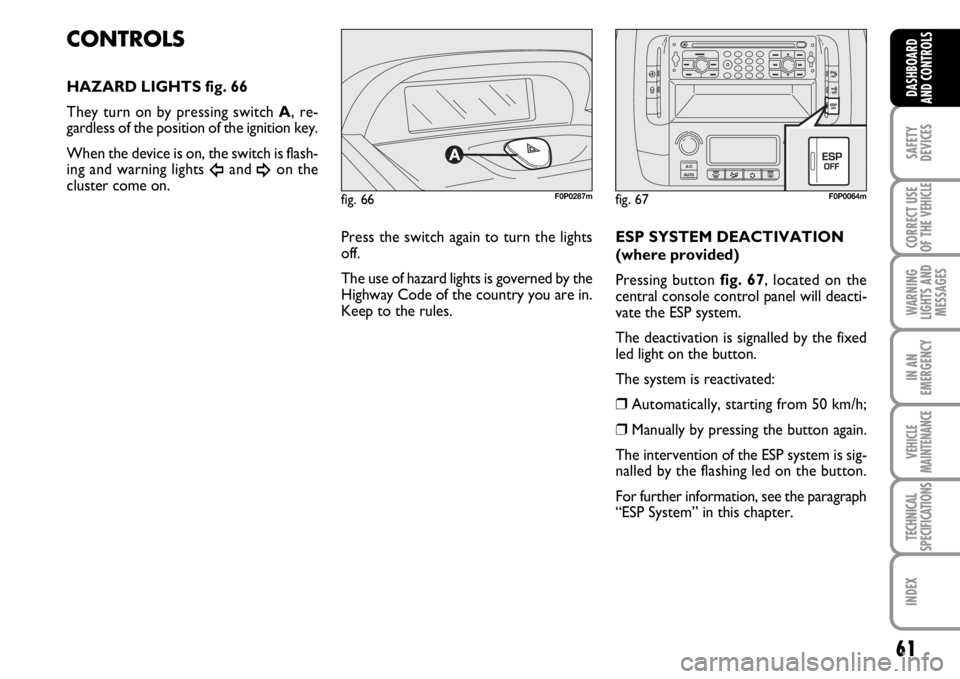
HAZARD LIGHTS fig. 66
They turn on by pressing switch A, re-
gardless of the position of the ignition key.
When the device is on, the switch is flash-
ing and warning lights
Îand ¥on the
cluster come on.
ESP SYSTEM DEACTIVATION
(where provided)
Pressing button fig. 67, located on the
central console control panel will deacti-
vate the ESP system.
The deactivation is signalled by the fixed
led light on the button.
The system is reactivated:
❒Automatically, starting from 50 km/h;
❒Manually by pressing the button again.
The intervention of the ESP system is sig-
nalled by the flashing led on the button.
For further information, see the paragraph
“ESP System” in this chapter.
fig. 67F0P0064m
Press the switch again to turn the lights
off.
The use of hazard lights is governed by the
Highway Code of the country you are in.
Keep to the rules.
Page 63 of 210
62
SAFETY
DEVICES
CORRECT USE
OF THE
VEHICLE
WARNING
LIGHTS AND
MESSAGES
IN AN
EMERGENCY
VEHICLE
MAINTENANCE
TECHNICAL
SPECIFICATIONS
INDEX
DASHBOARD
AND
CONTROLS
HEATED REAR WINDOW
(where provided)
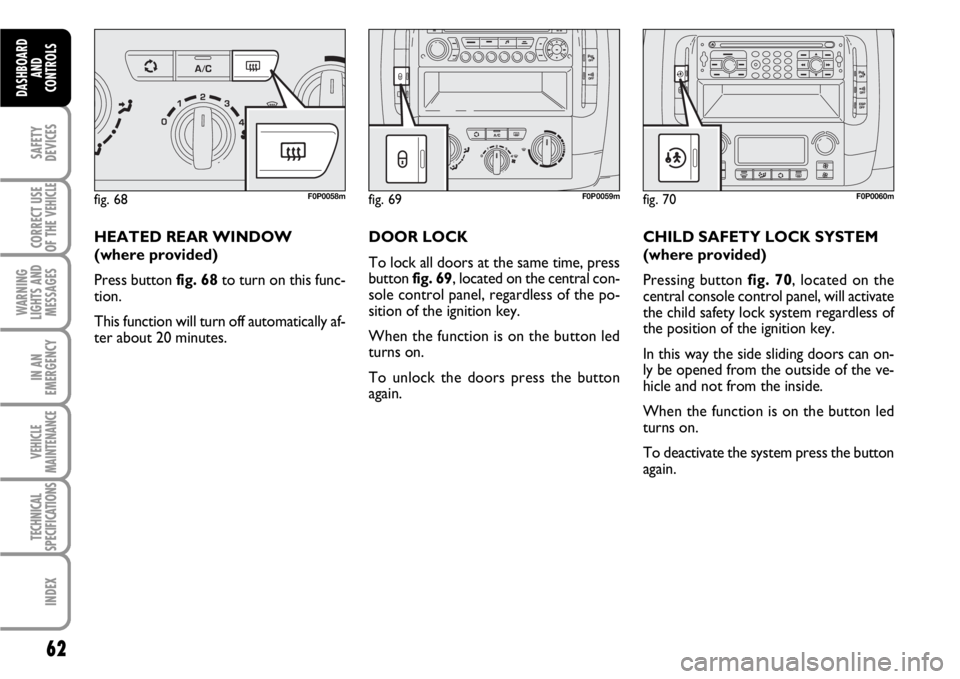
Press button fig. 68to turn on this func-
tion.
This function will turn off automatically af-
ter about 20 minutes.DOOR LOCK
To lock all doors at the same time, press
button fig. 69, located on the central con-
sole control panel, regardless of the po-
sition of the ignition key.
When the function is on the button led
turns on.
To unlock the doors press the button
again.CHILD SAFETY LOCK SYSTEM
(where provided)
Pressing button fig. 70, located on the
central console control panel, will activate
the child safety lock system regardless of
the position of the ignition key.
In this way the side sliding doors can on-
ly be opened from the outside of the ve-
hicle and not from the inside.
When the function is on the button led
turns on.
To deactivate the system press the button
again.
fig. 68F0P0058mfig. 69F0P0059mfig. 70F0P0060m
Page 64 of 210
63
SAFETY
DEVICES
CORRECT USE
OF THE
VEHICLE
WARNING
LIGHTS AND
MESSAGES
IN AN
EMERGENCY
VEHICLE
MAINTENANCE
TECHNICAL
SPECIFICATIONS
INDEX
DASHBOARD
AND CONTROLS
DEACTIVATION OF THE
VOLUMETRIC ALARM
(where provided)
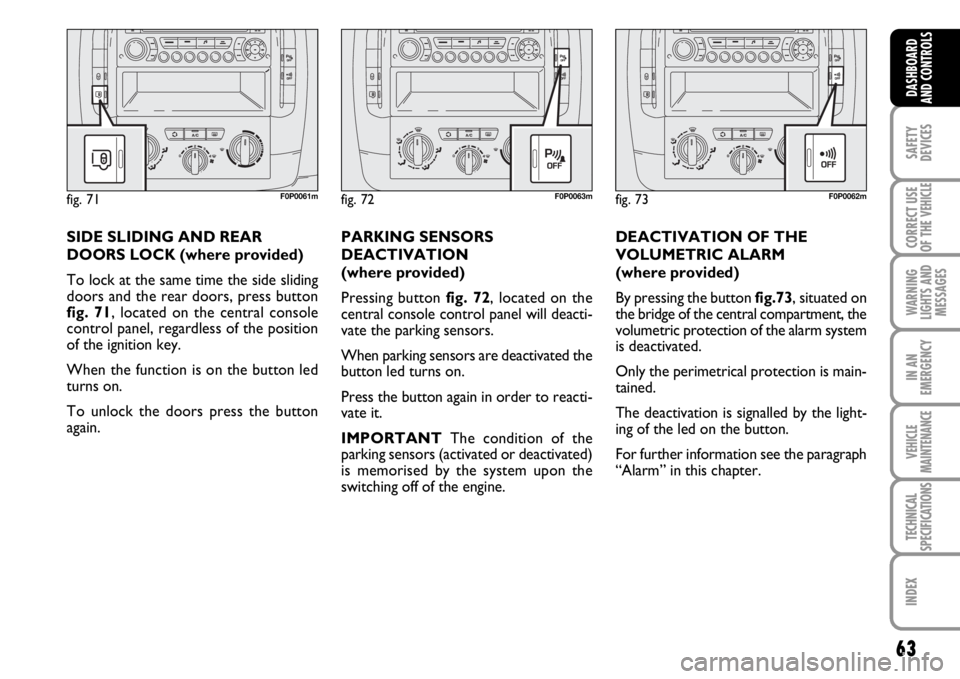
By pressing the button fig.73, situated on
the bridge of the central compartment, the
volumetric protection of the alarm system
is deactivated.
Only the perimetrical protection is main-
tained.
The deactivation is signalled by the light-
ing of the led on the button.
For further information see the paragraph
“Alarm” in this chapter.
fig. 72F0P0063m
PARKING SENSORS
DEACTIVATION
(where provided)
Pressing button fig. 72, located on the
central console control panel will deacti-
vate the parking sensors.
When parking sensors are deactivated the
button led turns on.
Press the button again in order to reacti-
vate it.
IMPORTANTThe condition of the
parking sensors (activated or deactivated)
is memorised by the system upon the
switching off of the engine.
fig. 73F0P0062m
SIDE SLIDING AND REAR
DOORS LOCK (where provided)
To lock at the same time the side sliding
doors and the rear doors, press button
fig. 71, located on the central console
control panel, regardless of the position
of the ignition key.
When the function is on the button led
turns on.
To unlock the doors press the button
again.
fig. 71F0P0061m
Page 65 of 210
If, after a crash no fuel leaks are found and
the vehicle can be started again, reset the
fuel cut-off switch as follows:
❒turn the key to S;
❒remove the ignition key; refit the key
into the ignition switch and then start
the engine.
FUEL CUT-OFF SWITCH
It is a safety switch controlled by air bag
electronic control unit that in the event of
a serious crash (in any direction) comes
into operation by cutting off fuel and turn-
ing off the engine as a consequence.
Fuel cut-off switch activation is indicated
by a dedicated message on the reconfig-
urable multifunction display.If, after a crash, you smell fu-
el or see leaks from the fuel
system, do not reset the switch to
avoid fire risk.
WARNING
64
SAFETY
DEVICES
CORRECT USE
OF THE
VEHICLE
WARNING
LIGHTS AND
MESSAGES
IN AN
EMERGENCY
VEHICLE
MAINTENANCE
TECHNICAL
SPECIFICATIONS
INDEX
DASHBOARD
AND
CONTROLS
Page 66 of 210
65
SAFETY
DEVICES
CORRECT USE
OF THE
VEHICLE
WARNING
LIGHTS AND
MESSAGES
IN AN
EMERGENCY
VEHICLE
MAINTENANCE
TECHNICAL
SPECIFICATIONS
INDEX
DASHBOARD
AND CONTROLS
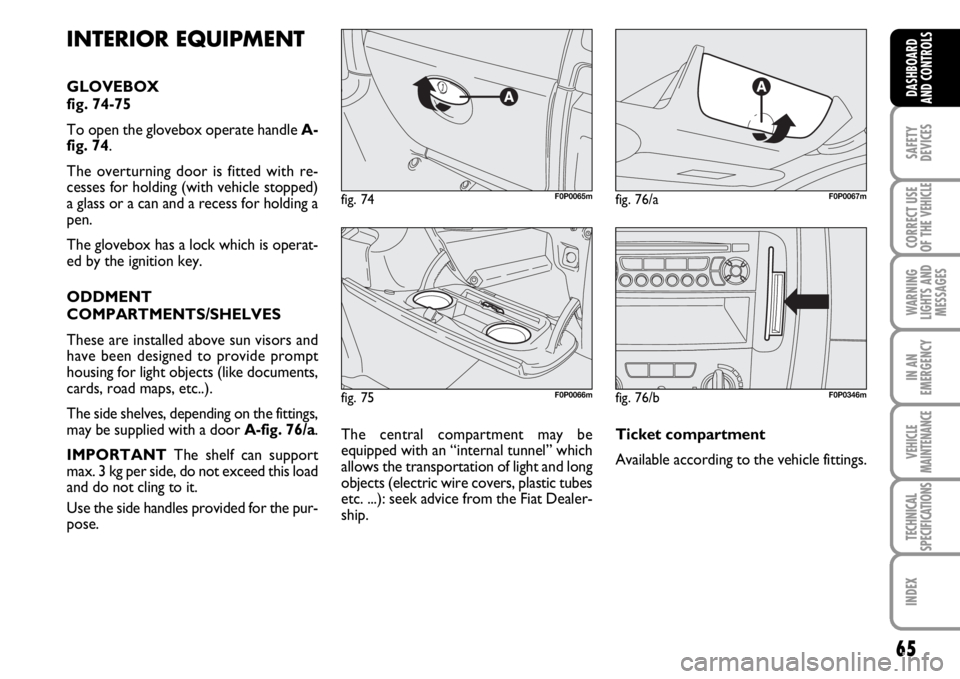
fig. 75F0P0066m
fig. 74F0P0065mfig. 76/aF0P0067m
INTERIOR EQUIPMENT
GLOVEBOX
fig. 74-75
To open the glovebox operate handle A-
fig. 74.
The overturning door is fitted with re-
cesses for holding (with vehicle stopped)
a glass or a can and a recess for holding a
pen.
The glovebox has a lock which is operat-
ed by the ignition key.
ODDMENT
COMPARTMENTS/SHELVES
These are installed above sun visors and
have been designed to provide prompt
housing for light objects (like documents,
cards, road maps, etc..).
The side shelves, depending on the fittings,
may be supplied with a doorA-fig. 76/a.
IMPORTANT The shelf can support
max. 3 kg per side, do not exceed this load
and do not cling to it.
Use the side handles provided for the pur-
pose.The central compartment may be
equipped with an “internal tunnel” which
allows the transportation of light and long
objects (electric wire covers, plastic tubes
etc. ...): seek advice from the Fiat Dealer-
ship.
fig. 76/bF0P0346m
Ticket compartment
Available according to the vehicle fittings.
Page 68 of 210
67
SAFETY
DEVICES
CORRECT USE
OF THE
VEHICLE
WARNING
LIGHTS AND
MESSAGES
IN AN
EMERGENCY
VEHICLE
MAINTENANCE
TECHNICAL
SPECIFICATIONS
INDEX
DASHBOARD
AND CONTROLS
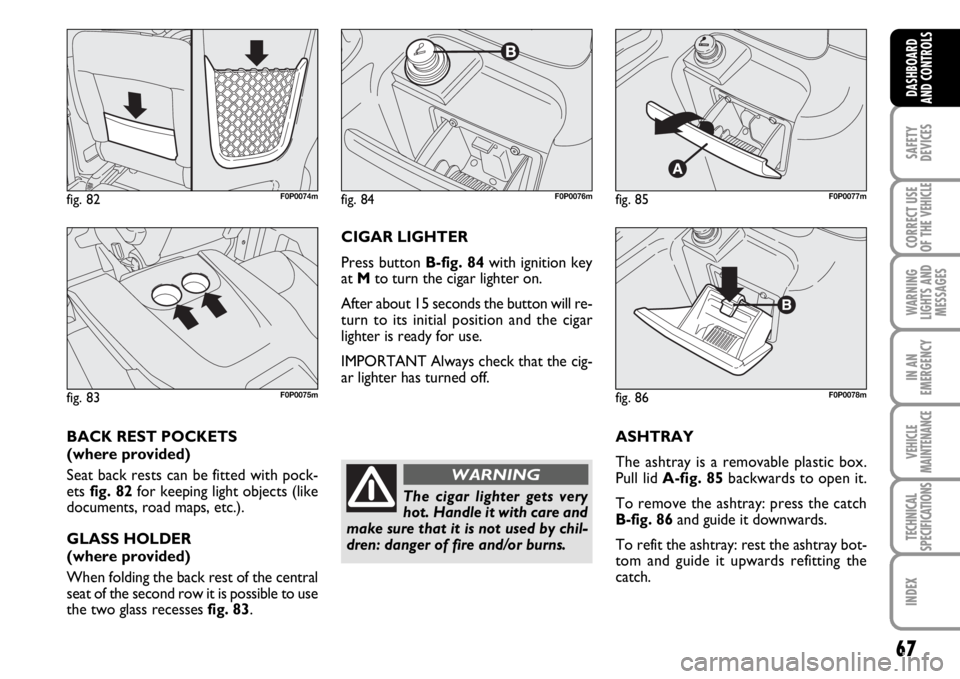
ASHTRAY
The ashtray is a removable plastic box.
Pull lid A-fig. 85backwards to open it.
To remove the ashtray: press the catch
B-fig. 86and guide it downwards.
To refit the ashtray: rest the ashtray bot-
tom and guide it upwards refitting the
catch.
fig. 85F0P0077m
fig. 86F0P0078m
fig. 84F0P0076m
The cigar lighter gets very
hot. Handle it with care and
make sure that it is not used by chil-
dren: danger of fire and/or burns.
WARNING
CIGAR LIGHTER
Press button B-fig. 84with ignition key
at Mto turn the cigar lighter on.
After about 15 seconds the button will re-
turn to its initial position and the cigar
lighter is ready for use.
IMPORTANT Always check that the cig-
ar lighter has turned off.
fig. 82F0P0074m
fig. 83F0P0075m
BACK REST POCKETS
(where provided)
Seat back rests can be fitted with pock-
ets fig. 82for keeping light objects (like
documents, road maps, etc.).
GLASS HOLDER
(where provided)
When folding the back rest of the central
seat of the second row it is possible to use
the two glass recesses fig. 83.
Page 70 of 210
69
SAFETY
DEVICES
CORRECT USE
OF THE
VEHICLE
WARNING
LIGHTS AND
MESSAGES
IN AN
EMERGENCY
VEHICLE
MAINTENANCE
TECHNICAL
SPECIFICATIONS
INDEX
DASHBOARD
AND CONTROLS
DOORS
MANUAL OPENING/CLOSURE
fig. 91F0P0083mfig. 90F0P0082m
Make sure it is safe to open
a door before doing so.
WARNING
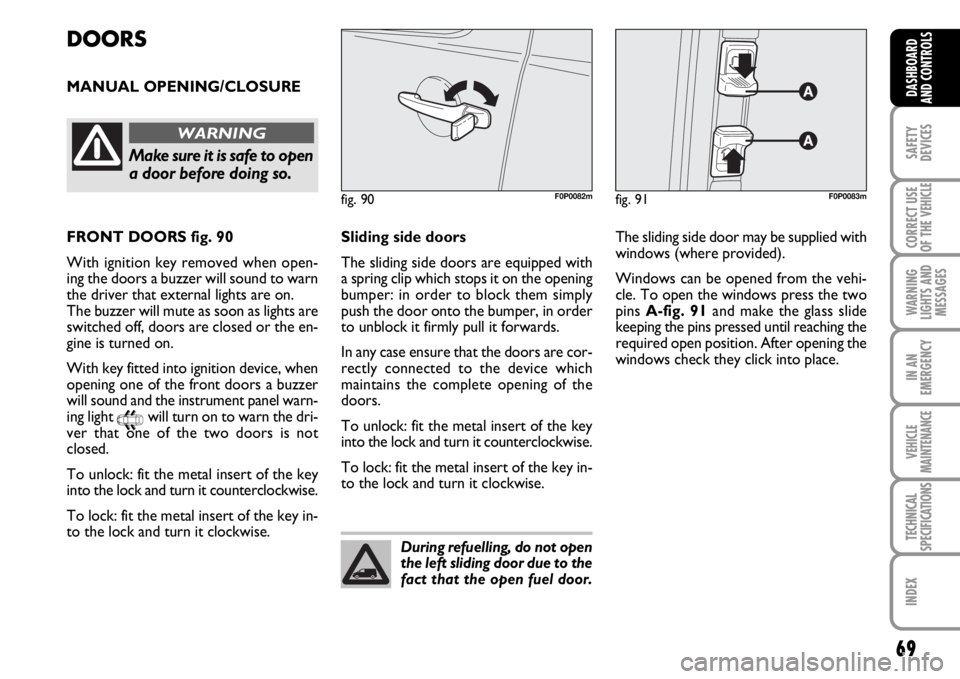
FRONT DOORS fig. 90
With ignition key removed when open-
ing the doors a buzzer will sound to warn
the driver that external lights are on.
The buzzer will mute as soon as lights are
switched off, doors are closed or the en-
gine is turned on.
With key fitted into ignition device, when
opening one of the front doors a buzzer
will sound and the instrument panel warn-
ing light
9will turn on to warn the dri-
ver that one of the two doors is not
closed.
To unlock: fit the metal insert of the key
into the lock and turn it counterclockwise.
To lock: fit the metal insert of the key in-
to the lock and turn it clockwise.Sliding side doors
The sliding side doors are equipped with
a spring clip which stops it on the opening
bumper: in order to block them simply
push the door onto the bumper, in order
to unblock it firmly pull it forwards.
In any case ensure that the doors are cor-
rectly connected to the device which
maintains the complete opening of the
doors.
To unlock: fit the metal insert of the key
into the lock and turn it counterclockwise.
To lock: fit the metal insert of the key in-
to the lock and turn it clockwise.The sliding side door may be supplied with
windows (where provided).
Windows can be opened from the vehi-
cle. To open the windows press the two
pins A-fig. 91and make the glass slide
keeping the pins pressed until reaching the
required open position. After opening the
windows check they click into place.
During refuelling, do not open
the left sliding door due to the
fact that the open fuel door.
Page 71 of 210
70
SAFETY
DEVICES
CORRECT USE
OF THE
VEHICLE
WARNING
LIGHTS AND
MESSAGES
IN AN
EMERGENCY
VEHICLE
MAINTENANCE
TECHNICAL
SPECIFICATIONS
INDEX
DASHBOARD
AND
CONTROLS
Do not leave the vehicle
parked on a steep slope with
the sliding door open. An involuntary
knock could release the door and
make it slide.
WARNING
When leaving the vehicle
parked with the sliding doors
open, always check they are proper-
ly locked into place.
WARNING
The catch system is designed
to ensure the best comfort in
use. An accidental knock or gust of
wind could release the doors and
make them close.
WARNING
In case the vehicle is sta-
tionary with the rear doors
open at 90°, these hide the rear lights.
In order to signal your position to oth-
er drivers who are travelling in the
same direction and may not have no-
ticed the stationery vehicle, use a tri-
angular signal or any other device
prescribed by the enforced legislation
in your country.
WARNING
REAR DOUBLE
DOORS
The double rear doors are fitted with a
catch which stops the opening at an an-
gle of approximately 90°.
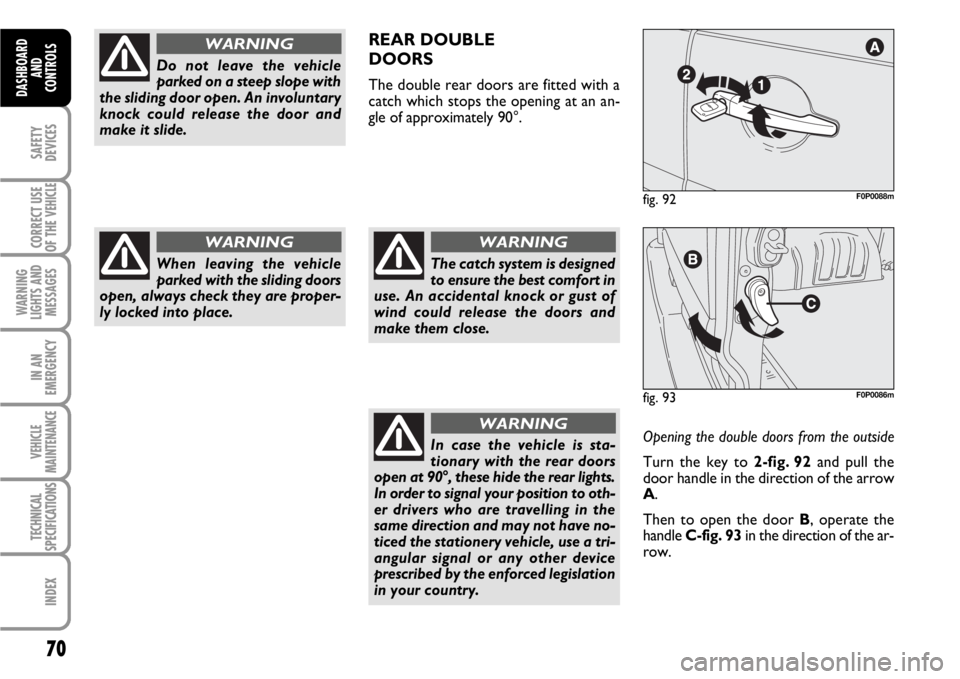
Opening the double doors from the outside
Turn the key to 2-fig. 92 and pull the
door handle in the direction of the arrow
A.
Then to open the door B, operate the
handle C-fig. 93in the direction of the ar-
row.
fig. 93F0P0086m
fig. 92F0P0088m
Page 72 of 210
71
SAFETY
DEVICES
CORRECT USE
OF THE
VEHICLE
WARNING
LIGHTS AND
MESSAGES
IN AN
EMERGENCY
VEHICLE
MAINTENANCE
TECHNICAL
SPECIFICATIONS
INDEX
DASHBOARD
AND CONTROLS
fig. 94F0P0087mfig. 95F0P0602mfig. 96F0P0293m
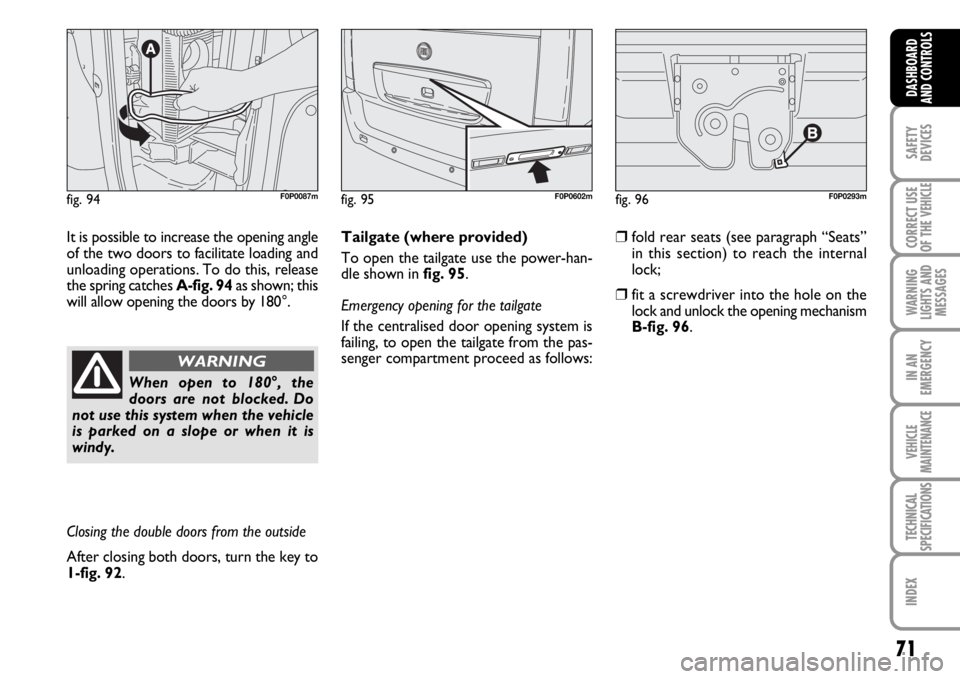
It is possible to increase the opening angle
of the two doors to facilitate loading and
unloading operations. To do this, release
the spring catches A-fig. 94as shown; this
will allow opening the doors by 180°.
When open to 180°, the
doors are not blocked. Do
not use this system when the vehicle
is parked on a slope or when it is
windy.
WARNING
Closing the double doors from the outside
After closing both doors, turn the key to
1-fig. 92.Tailgate (where provided)
To open the tailgate use the power-han-
dle shown in fig. 95.
Emergency opening for the tailgate
If the centralised door opening system is
failing, to open the tailgate from the pas-
senger compartment proceed as follows:
❒fold rear seats (see paragraph “Seats”
in this section) to reach the internal
lock;
❒fit a screwdriver into the hole on the
lock and unlock the opening mechanism
B-fig. 96.