brake light FIAT SCUDO 2016 Owner handbook (in English)
[x] Cancel search | Manufacturer: FIAT, Model Year: 2016, Model line: SCUDO, Model: FIAT SCUDO 2016Pages: 227, PDF Size: 4.46 MB
Page 125 of 227
121
WARNING
LIGHTS AND
MESSAGESIN AN
EMERGENCYVEHICLE
MAINTENANCETECHNICAL
SPECIFICATIONSINDEXDASHBOARD
AND CONTROLSSAFETY
DEVICESCORRECT USE
OF THE VEHICLE
If the engine does not start at the first at-
tempt, return the ignition key to Sbefore
repeating starting.
If, when the ignition key is at M, the dis-
play warning light
m
remains lit, turn the
key to Sand then back to M; if the warn-
ing lights remain on, try with the other
keys provided with the vehicle.
IMPORTANT Never leave the ignition key
to Mwhen the engine is off.
The warning light m will flash
for 60 seconds at start-up or
during prolonged cranking to
indicate a fault in the glow
plug heating system. You can use the
vehicle as usual if the engine starts but
you should contact Fiat Dealership as
soon as possible.
HOW TO WARM UP THE
ENGINE AFTER IT HAS JUST
STARTED
Proceed as follows:❒
Drive off slowly, letting the engine turn
at medium revs. Do not accelerate
abruptly;
❒
Do not drive at full performance for the
initial kilometres. Wait until the coolant
temperature gauge starts moving.
Remember that the servo-
brake and power steering are
not operational until the en-
gine has been started, there-
fore much effort than usual is required
on the brake pedal and steering wheel.
Never bump start the engine
by pushing, towing or coast-
ing downhill as this could
cause fuel to flow into the
catalytic exhaust system and damage
it beyond repair.
STOPPING THE ENGINE
Turn the ignition key to Swhile the en-
gine is idling.
IMPORTANT After a taxing drive, you
should allow the engine to “catch its
breath” before turning it off by letting it
idle to allow the temperature in the en-
gine compartment to fall.
A quick burst on the acceler-
ator before turning off the en-
gine serves absolutely no
practical purpose, it wastes
fuel and is damaging especially to tur-
bocharged engines.
119-128 SCUDO LUM GB 18/11/13 14.26 Pagina 121
Page 126 of 227
122WARNING
LIGHTS AND
MESSAGESIN AN
EMERGENCYVEHICLE
MAINTENANCETECHNICAL
SPECIFICATIONSINDEXDASHBOARD
AND CONTROLSSAFETY
DEVICESCORRECT USE
OF THE VEHICLE
HANDBRAKE fig. 1
The handbrake lever is located next to the
driver’s seat.
Pull the handbrake lever upwards until the
vehicle cannot be moved. Four or five
clicks are generally enough when the ve-
hicle is on level ground while nine or ten
may be required if the vehicle is on a steep
slope or laden.
IMPORTANT If this is not the case, con-
tact Fiat Dealership to have the handbrake
adjusted.
When the handbrake lever is pulled up
and the ignition key is at M, the instrument
panel warning light
x
will turn on.
PARKINGProceed as follows:❒
Stop the engine and engage the hand-
brake;
❒
Engage a gear (on a slope, engage first
gear if the vehicle is faced uphill or re-
verse if it is faced downhill) and leave
the wheels steered.
Block the wheels with a wedge or a stone
if the vehicle is parked on a steep slope.
Do not leave the key in the ignition switch
to prevent draining the battery. Always
remove the key when you leave the ve-
hicle.
Never leave children unat-
tended in the vehicle. Always
remove the ignition key when leaving
the vehicle and take it out with you.
WARNING
fig. 1
F0P0118m
To release the handbrake:❒
slightly lift the handbrake and press re-
lease button A;
❒
keep button Apressed and lower the
lever. Warning light
x
will turn off.
Press the brake pedal when carrying out
this operation to prevent the vehicle from
moving accidentally.
If pneumatic suspensions are
fitted when parking always
make sure there is enough
space above the roof and
around the vehicle. The vehicle could
actually raise (or lower) automatical-
ly according to changes in temperature
or load.
119-128 SCUDO LUM GB 18/11/13 14.26 Pagina 122
Page 130 of 227
126WARNING
LIGHTS AND
MESSAGESIN AN
EMERGENCYVEHICLE
MAINTENANCETECHNICAL
SPECIFICATIONSINDEXDASHBOARD
AND CONTROLSSAFETY
DEVICESCORRECT USE
OF THE VEHICLE
INSTALLING THE TOW HOOK
The towing device should be fastened to
the body by specialised personnel accord-
ing to any additional and/or integrative in-
formation supplied by the Manufacturer of
the device. Engage a low gear when driving downhill,
rather than constantly using the brake.
The weight the trailer exerts on the vehi-
cle tow hook reduces by the same amount
the actual vehicle loading capacity.
To make sure the maximum towable
weight is not exceeded (given in the log
book) account should be taken of the ful-
ly laden trailer, including accessories and
personal belongings.
Do not exceed the speed limits of the
country you are driving in. In any case do
not exceed 100 km/h.
The ABS system with which
the vehicle may be fitted
does not control the trailer braking
system. Therefore be cautious on slip-
pery roads.
WARNING
Under no circumstances
should the vehicle brake sys-
tem be altered to control the trailer
brake. The trailer braking system
must be fully independent of the ve-
hicle’s hydraulic system.
WARNING
119-128 SCUDO LUM GB 18/11/13 14.26 Pagina 126
Page 132 of 227
128WARNING
LIGHTS AND
MESSAGESIN AN
EMERGENCYVEHICLE
MAINTENANCETECHNICAL
SPECIFICATIONSINDEXDASHBOARD
AND CONTROLSSAFETY
DEVICESCORRECT USE
OF THE VEHICLE
VEHICLE INACTIVITYIf the vehicle is to be left inactive for longer
than a month, the following precautions
should be noted:❒
park the vehicle in covered, dry and if
possible well-ventilated premises;
❒
engage a gear;
❒
check that the handbrake is not en-
gaged;
❒
disconnect the battery negative termi-
nal and check the battery charge. This
check is to be repeated every three
months. Recharge if the optical indica-
tor shows a dark colour without the
central green area;
❒
clean and protect the painted parts us-
ing protective wax;
❒
clean and protect the shiny metal parts
using special compounds readily avail-
able;
❒
sprinkle talcum powder on the rubber
windscreen and rear window wiper
blades and lift them off the glass;
❒
slightly open the windows;
❒
cover the vehicle with a cloth or per-
forated plastic sheet. Do not use sheets
of non-perforated plastic as they do not
allow moisture on the vehicle body to
evaporate;
❒
inflate tyres to +0,5 bar above the nor-
mal specified pressure and check it at
intervals;
❒
if you don’t disconnect the battery from
the electric system, check its charge
every month and recharge it if the op-
tical indicator shows a dark colour
without the central green area;
❒do not drain the engine cooling system.
IMPORTANT Where relevant, switch off
the vehicle alarm with the remote control.
Keep your speed down when
snow chains are fitted. Do
not exceed 50 km/h. Avoid
potholes, steps and pave-
ments and avoid also to dri-
ve for long distances on
roads not covered with snow to pre-
vent damaging the vehicle and the
roadbed.
WARNING
119-128 SCUDO LUM GB 18/11/13 14.26 Pagina 128
Page 133 of 227
129
IN AN
EMERGENCYVEHICLE
MAINTENANCETECHNICAL
SPECIFICATIONSINDEXDASHBOARD
AND CONTROLSSAFETY
DEVICESCORRECT USE
OF THE VEHICLEWARNING
LIGHTS AND
MESSAGES
GENERAL WARNINGS .................................................... 130
LOW BRAKE FLUID .......................................................... 130
HANDBRAKE ON .............................................................. 130
AIR BAG FAILURE .............................................................. 131
ENGINE COOLANT
HIGH TEMPERATURE ....................................................... 131
LOW BATTERY CHARGE ............................................... 132
LOW PRESSURE/HIGH TEMPERATURE OF
ENGINE OIL ......................................................................... 132
ELECTRIC POWER STEERING FAILURE .................... 133
INCOMPLETE DOOR LOCKING .................................. 133
SEAT BELTS NOT FASTENED ........................................ 134
EBD SYSTEM FAILURE ...................................................... 134
INJECTION SYSTEM FAILURE ........................................ 134
FRONT PASSENGER AIR BAG DEACTIVATED ....... 135
ABS SYSTEM FAILURE ....................................................... 135
STOP ........................................................................................ 135
FUEL RESERVE ..................................................................... 135
REAR FOGLIGHTS ............................................................. 136
GENERIC FAILURE ............................................................. 136ESC SYSTEM ........................................................................ 136
iTPMS SYSTEM ................................................................... 136
BRAKE PAD WEAR ........................................................... 137
FRONT FOG LIGHTS ........................................................ 137
DIPPED HEADLAMPS ........................................................ 137
REAR PNEUMATIC SUSPENSIONS ................................ 137
LEFT-HAND DIRECTION INDICATOR ...................... 137
RIGHT-HAND DIRECTION INDICATOR .................. 137
MAIN BEAM HEADLIGHTS ............................................. 137
CRUISE CONTROL ........................................................... 138
SPEED RESTRICTOR ........................................................... 138
GLOW PLUG WARMING................................................. 138
WATER IN DIESEL FUEL FILTER .................................... 138
SCHEDULED SERVICING.................................................. 138
W W
A A
R R
N N
I I
N N
G G
L L
I I
G G
H H
T T
S S
A A
N N
D D
M M
E E
S S
S S
A A
G G
E E
S S
129-138 SCUDO LUM GB 27/03/14 11:47 Pagina 129
Page 134 of 227
130IN AN
EMERGENCYVEHICLE
MAINTENANCETECHNICAL
SPECIFICATIONSINDEXDASHBOARD
AND CONTROLSSAFETY
DEVICESCORRECT USE
OF THE VEHICLE
WARNING
LIGHTS AND
MESSAGES
WARNING LIGHTS
AND MESSAGESGENERAL WARNINGS
Turning on of warning light is accompa-
nied by specific message and/or by buzzer
sound where provided by instrument pan-
el. These indications are concise and
cautionaryand shall not be considered
as exhaustive and/or as an alternative to
the specifications contained in this Own-
er Handbook which shall always be read
through carefully and thoroughly. In case
of failure indication always refer to the
specifications contained in this sec-
tion.
IMPORTANT Failure indications displayed
are divided into two categories: very se-
riousand less seriousfailures.
Very seriousfailures are indicated by a
repeated and prolonged warning “cycle”.Less seriousfailures are indicated by a lim-
ited warning “cycle”.
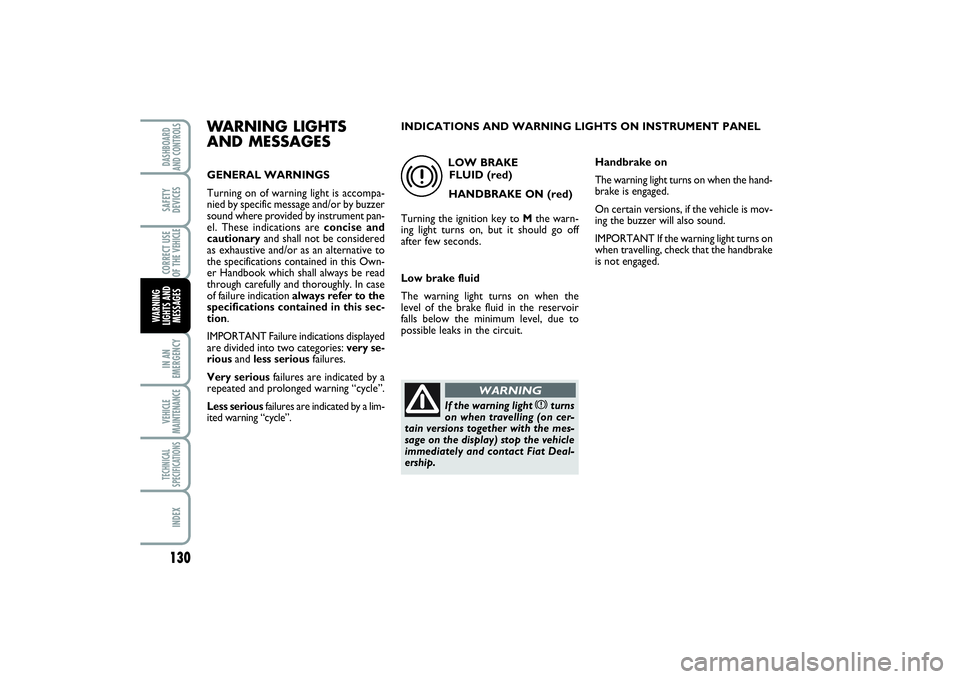
LOW BRAKE
FLUID (red)
HANDBRAKE ON (red)
Turning the ignition key to Mthe warn-
ing light turns on, but it should go off
after few seconds.
Low brake fluid
The warning light turns on when the
level of the brake fluid in the reservoir
falls below the minimum level, due to
possible leaks in the circuit.
x
If the warning light
x
turns
on when travelling (on cer-
tain versions together with the mes-
sage on the display) stop the vehicle
immediately and contact Fiat Deal-
ership.
WARNING
Handbrake on
The warning light turns on when the hand-
brake is engaged.
On certain versions, if the vehicle is mov-
ing the buzzer will also sound.
IMPORTANT If the warning light turns on
when travelling, check that the handbrake
is not engaged. INDICATIONS AND WARNING LIGHTS ON INSTRUMENT PANEL
129-138 SCUDO LUM GB 27/03/14 11:47 Pagina 130
Page 141 of 227
137
IN AN
EMERGENCYVEHICLE
MAINTENANCETECHNICAL
SPECIFICATIONSINDEXDASHBOARD
AND CONTROLSSAFETY
DEVICESCORRECT USE
OF THE VEHICLEWARNING
LIGHTS AND
MESSAGES
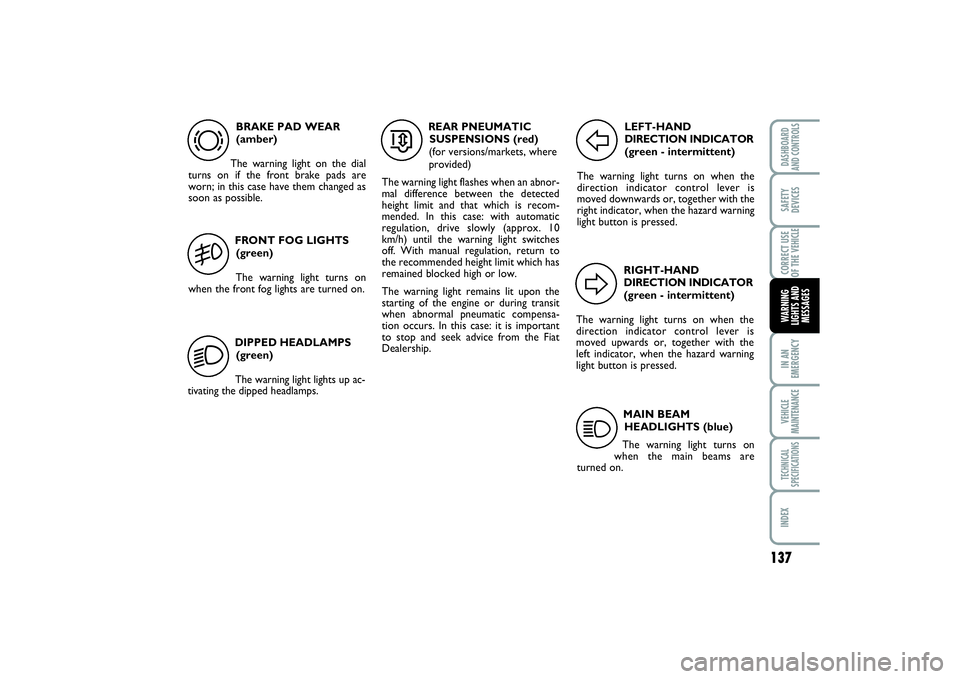
BRAKE PAD WEAR
(amber)
The warning light on the dial
turns on if the front brake pads are
worn; in this case have them changed as
soon as possible.
d
REAR PNEUMATIC
SUSPENSIONS (red)
(for versions/markets, where
provided)
The warning light flashes when an abnor-
mal difference between the detected
height limit and that which is recom-
mended. In this case: with automatic
regulation, drive slowly (approx. 10
km/h) until the warning light switches
off. With manual regulation, return to
the recommended height limit which has
remained blocked high or low.
The warning light remains lit upon the
starting of the engine or during transit
when abnormal pneumatic compensa-
tion occurs. In this case: it is important
to stop and seek advice from the Fiat
Dealership.
…
FRONT FOG LIGHTS
(green)
The warning light turns on
when the front fog lights are turned on.
5
MAIN BEAM
HEADLIGHTS (blue)
The warning light turns on
when the main beams are
turned on.
1
LEFT-HAND
DIRECTION INDICATOR
(green - intermittent)
The warning light turns on when the
direction indicator control lever is
moved downwards or, together with the
right indicator, when the hazard warning
light button is pressed.
F
RIGHT-HAND
DIRECTION INDICATOR
(green - intermittent)
The warning light turns on when the
direction indicator control lever is
moved upwards or, together with the
left indicator, when the hazard warning
light button is pressed.
D
DIPPED HEADLAMPS
(green)
The warning light lights up ac-
tivating the dipped headlamps.
2
129-138 SCUDO LUM GB 27/03/14 11:47 Pagina 137
Page 144 of 227
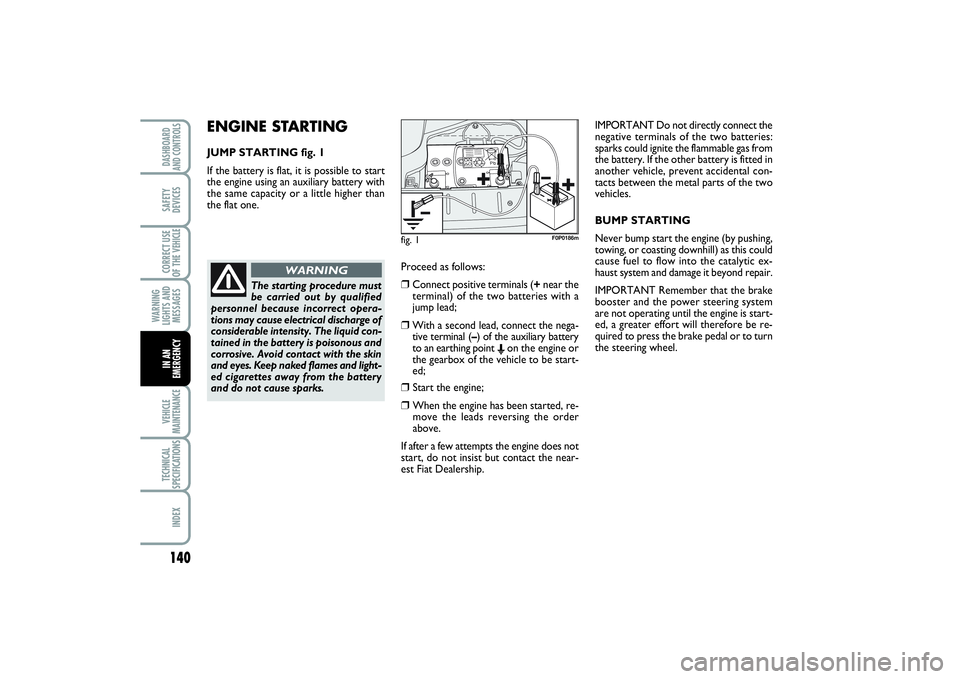
ENGINE STARTINGJUMP STARTING fig. 1
If the battery is flat, it is possible to start
the engine using an auxiliary battery with
the same capacity or a little higher than
the flat one.
140WARNING
LIGHTS AND
MESSAGESVEHICLE
MAINTENANCETECHNICAL
SPECIFICATIONSINDEXDASHBOARD
AND CONTROLSSAFETY
DEVICESCORRECT USE
OF THE VEHICLEIN AN
EMERGENCY
Proceed as follows:❒
Connect positive terminals (+near the
terminal) of the two batteries with a
jump lead;
❒With a second lead, connect the nega-
tive terminal (–) of the auxiliary battery
to an earthing point
Eon the engine or
the gearbox of the vehicle to be start-
ed;
❒
Start the engine;
❒
When the engine has been started, re-
move the leads reversing the order
above.
If after a few attempts the engine does not
start, do not insist but contact the near-
est Fiat Dealership.IMPORTANT Do not directly connect the
negative terminals of the two batteries:
sparks could ignite the flammable gas from
the battery. If the other battery is fitted in
another vehicle, prevent accidental con-
tacts between the metal parts of the two
vehicles.
BUMP STARTING
Never bump start the engine (by pushing,
towing, or coasting downhill) as this could
cause fuel to flow into the catalytic ex-
haust system and damage it beyond repair.
IMPORTANT Remember that the brake
booster and the power steering system
are not operating until the engine is start-
ed, a greater effort will therefore be re-
quired to press the brake pedal or to turn
the steering wheel.
fig. 1
F0P0186m
The starting procedure must
be carried out by qualified
personnel because incorrect opera-
tions may cause electrical discharge of
considerable intensity. The liquid con-
tained in the battery is poisonous and
corrosive. Avoid contact with the skin
and eyes. Keep naked flames and light-
ed cigarettes away from the battery
and do not cause sparks.
WARNING
139-158 SCUDO LUM GB 07/03/14 08.47 Pagina 140
Page 145 of 227
141
WARNING
LIGHTS AND
MESSAGESVEHICLE
MAINTENANCETECHNICAL
SPECIFICATIONSINDEXDASHBOARD
AND CONTROLSSAFETY
DEVICESCORRECT USE
OF THE VEHICLEIN AN
EMERGENCY
IF A TYRE
IS PUNCTURED GENERAL INSTRUCTIONS
Wheel changing and correct use of the
jack and spare wheel call for some pre-
cautions as listed below.
Alert other drivers that the
vehicle is stationary in com-
pliance with the regulations in force:
hazard warning lights, warning trian-
gle etc. Any passengers on board
should leave the vehicle, especially if
it is heavily laden. Passengers should
stay away from oncoming traffic
while the wheel is being changed on.
Pull the handbrake.
WARNING
Before starting to change
the wheel, deactivate the
pneumatic suspension system (for
versions/markets, where provided).
See paragraph “Pneumatic suspen-
sions” in this section.
WARNING
The spare wheel is specific to
your vehicle, do not use it on
other models, or use the spare wheel
of other models on your vehicle.
Wheel bolts are specific to your vehi-
cle: do not use them on other models
and do not use bolts of other models.
WARNING
Have the punctured wheel
repaired and refitted as soon
as possible. Do not grease the threads
of bolts before installing them: they
might slip out.
WARNING
The jack shall only be used
for changing wheels on the
vehicle with which it is provided or on
vehicles of the same model. It must
not be used for other purposes such
as for instance raising vehicles of oth-
er models. In no case should it be used
for repairs under the vehicle. Incor-
rect positioning of the jack may cause
the jacked vehicle to fall. Do not use
the jack for higher capacities than
stated on its label.
WARNING
Fasten the wheel cap cor-
rectly to prevent the wheel
from coming free in motion.
Never tamper with the inflation
valve. Never place tools between the
rim and tyre. Check and restore, if re-
quired, the pressure of tyres and
spare wheel to the values given in sec-
tion “Technical Specifications”.
WARNING
Please note:❒
the jack weight is 1.76 kg;
❒
the jack requires no adjustment;
❒
the jack cannot be repaired. If it breaks
it must be replaced with a new jack;
❒
no tool other than its cranking device
may be fitted on the jack.
139-158 SCUDO LUM GB 07/03/14 08.47 Pagina 141
Page 146 of 227
142WARNING
LIGHTS AND
MESSAGESVEHICLE
MAINTENANCETECHNICAL
SPECIFICATIONSINDEXDASHBOARD
AND CONTROLSSAFETY
DEVICESCORRECT USE
OF THE VEHICLEIN AN
EMERGENCY
To change a wheel proceed as
follows:❒
Stop the vehicle in a position that is not
dangerous for oncoming traffic where you
can change the wheel safely. The ground
should be flat and adequately firm;
❒
Turn the engine off and pull up the
handbrake;
❒
Engage first gear or reverse;
❒
Wear the reflecting safety jacket (com-
pulsory by law in certain countries) be-
fore getting out of the vehicle;
❒
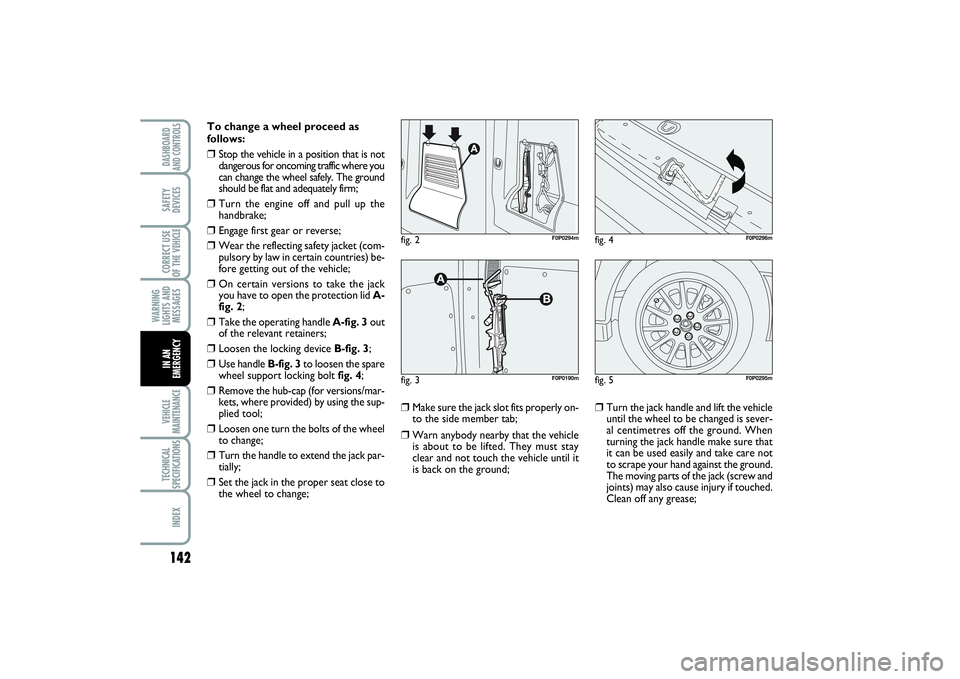
On certain versions to take the jack
you have to open the protection lid A-
fig. 2;
❒
Take the operating handle A-fig. 3 out
of the relevant retainers;
❒
Loosen the locking device B-fig. 3;
❒
Use handle B-fig. 3to loosen the spare
wheel support locking bolt fig. 4;
❒
Remove the hub-cap (for versions/mar-
kets, where provided) by using the sup-
plied tool;
❒
Loosen one turn the bolts of the wheel
to change;
❒
Turn the handle to extend the jack par-
tially;
❒
Set the jack in the proper seat close to
the wheel to change;
❒
Make sure the jack slot fits properly on-
to the side member tab;
❒
Warn anybody nearby that the vehicle
is about to be lifted. They must stay
clear and not touch the vehicle until it
is back on the ground;
❒
Turn the jack handle and lift the vehicle
until the wheel to be changed is sever-
al centimetres off the ground. When
turning the jack handle make sure that
it can be used easily and take care not
to scrape your hand against the ground.
The moving parts of the jack (screw and
joints) may also cause injury if touched.
Clean off any grease;
fig. 4
F0P0296m
fig. 5
F0P0295m
fig. 2
F0P0294m
fig. 3
F0P0190m
139-158 SCUDO LUM GB 07/03/14 08.47 Pagina 142