FIAT SEICENTO 2007 1.G Owner's Guide
Manufacturer: FIAT, Model Year: 2007, Model line: SEICENTO, Model: FIAT SEICENTO 2007 1.GPages: 154, PDF Size: 3.68 MB
Page 31 of 154
30GETTING TO KNOW YOUR CAR
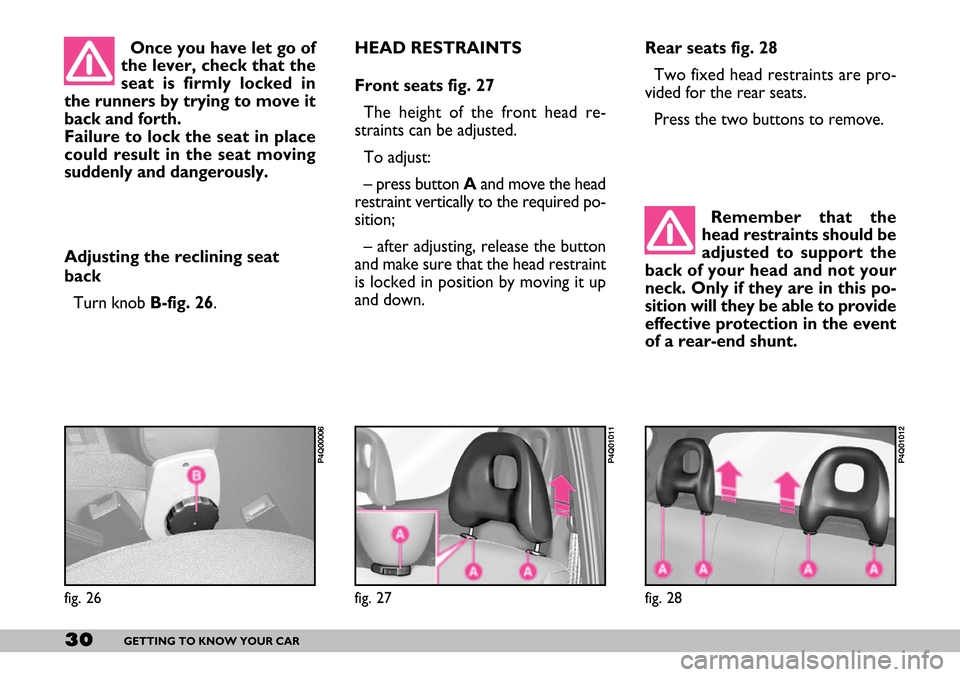
Rear seats fig. 28
Two fixed head restraints are pro-
vided for the rear seats.
Press the two buttons to remove.
Remember that the
head restraints should be
adjusted to support the
back of your head and not your
neck. Only if they are in this po-
sition will they be able to provide
effective protection in the event
of a rear-end shunt.
fig. 28
P4Q01012
Once you have let go of
the lever, check that the
seat is firmly locked in
the runners by trying to move it
back and forth.
Failure to lock the seat in place
could result in the seat moving
suddenly and dangerously.
Adjusting the reclining seat
back
Turn knob B-fig. 26.
fig. 26
P4Q00006
HEAD RESTRAINTS
Front seats fig. 27
The height of the front head re-
straints can be adjusted.
To adjust:
– press button Aand move the head
restraint vertically to the required po-
sition;
– after adjusting, release the button
and make sure that the head restraint
is locked in position by moving it up
and down.
fig. 27
P4Q01011
Page 32 of 154
31GETTING TO KNOW YOUR CAR
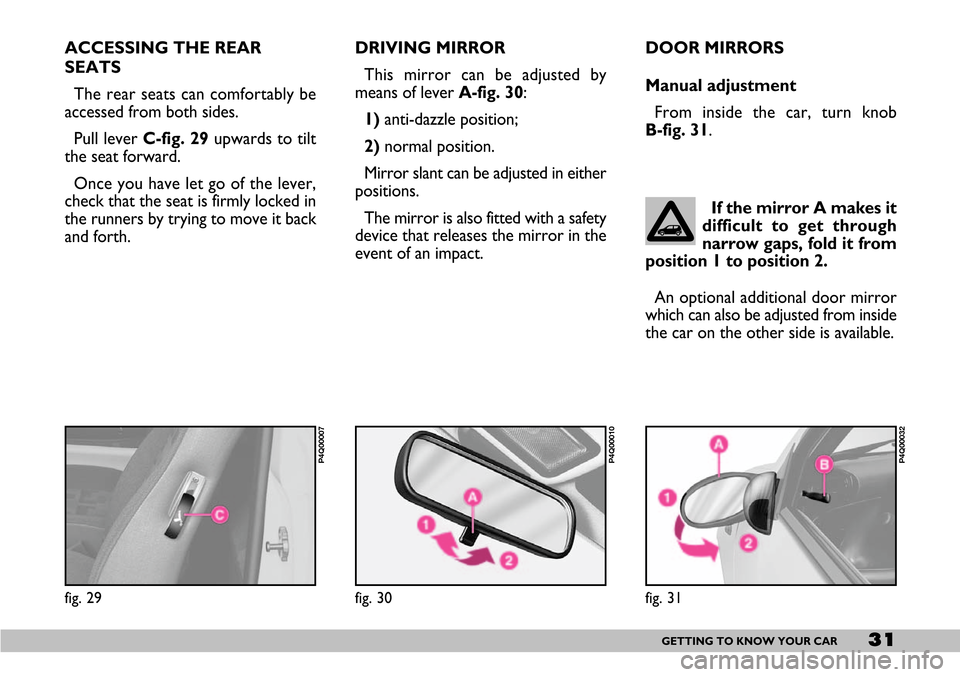
DRIVING MIRROR
This mirror can be adjusted by
means of lever A-fig. 30:
1)anti-dazzle position;
2)normal position.
Mirror slant can be adjusted in either
positions.
The mirror is also fitted with a safety
device that releases the mirror in the
event of an impact.
fig. 30
P4Q00010
fig. 29
P4Q00007
ACCESSING THE REAR
SEATS
The rear seats can comfortably be
accessed from both sides.
Pull lever C-fig. 29upwards to tilt
the seat forward.
Once you have let go of the lever,
check that the seat is firmly locked in
the runners by trying to move it back
and forth. DOOR MIRRORS
Manual adjustment
From inside the car, turn knob
B-fig. 31.
fig. 31
P4Q00032
If the mirror A makes it
difficult to get through
narrow gaps, fold it from
position 1 to position 2.
An optional additional door mirror
which can also be adjusted from inside
the car on the other side is available.
Page 33 of 154
32GETTING TO KNOW YOUR CAR
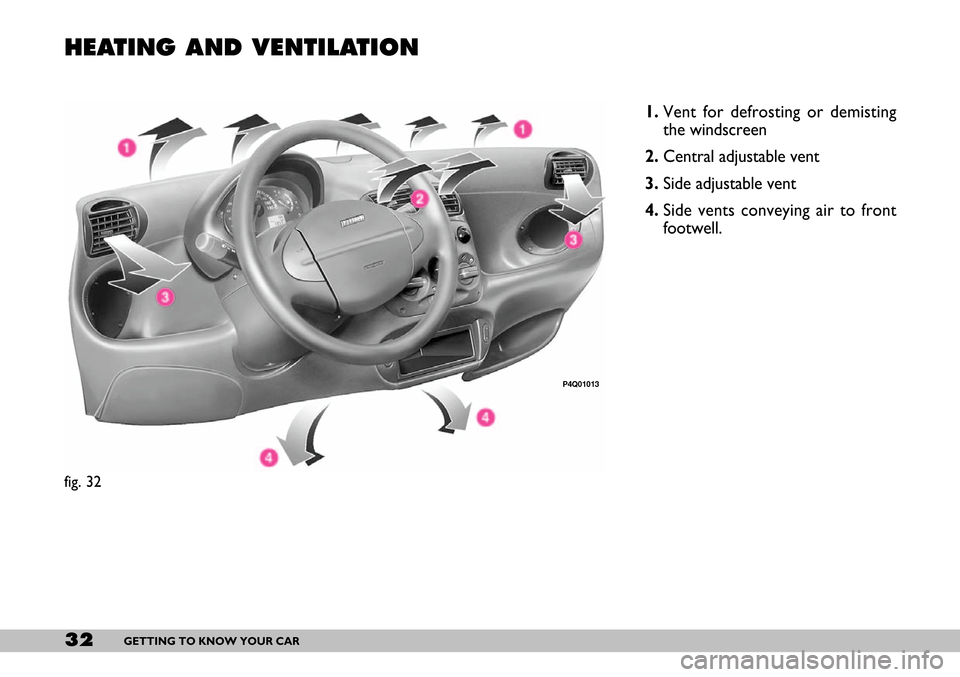
HEATING AND VENTILATION
1.Vent for defrosting or demisting
the windscreen
2.Central adjustable vent
3.Side adjustable vent
4.Side vents conveying air to front
footwell.
fig. 32
P4Q01013
Page 34 of 154
33GETTING TO KNOW YOUR CAR
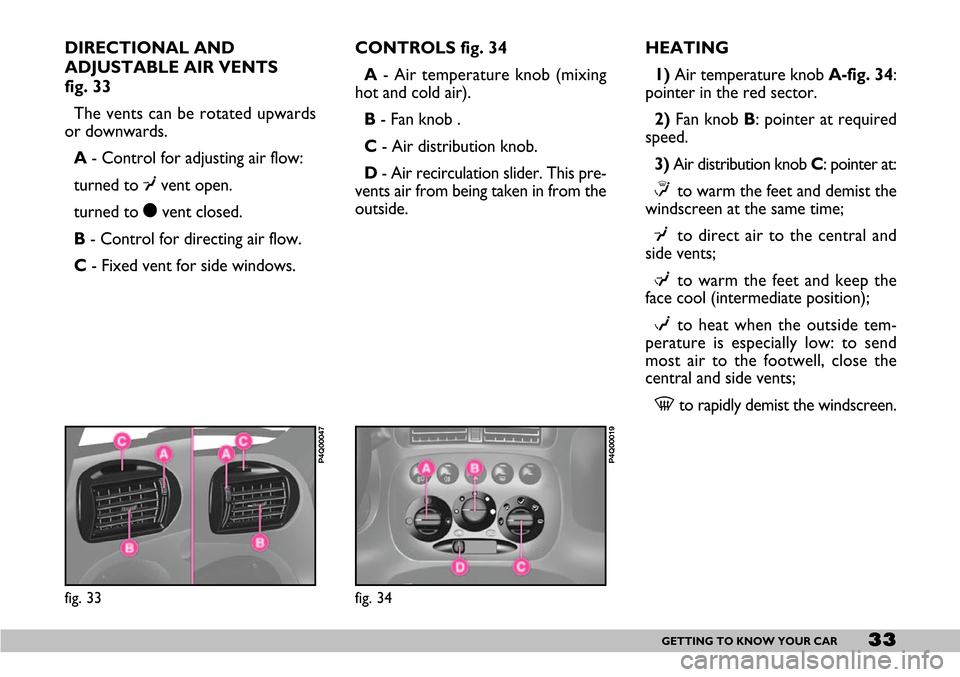
DIRECTIONAL AND
ADJUSTABLE AIR VENTS
fig. 33
The vents can be rotated upwards
or downwards.
A- Control for adjusting air flow:
turned to ¥vent open.
turned to çvent closed.
B- Control for directing air flow.
C- Fixed vent for side windows.CONTROLS fig. 34
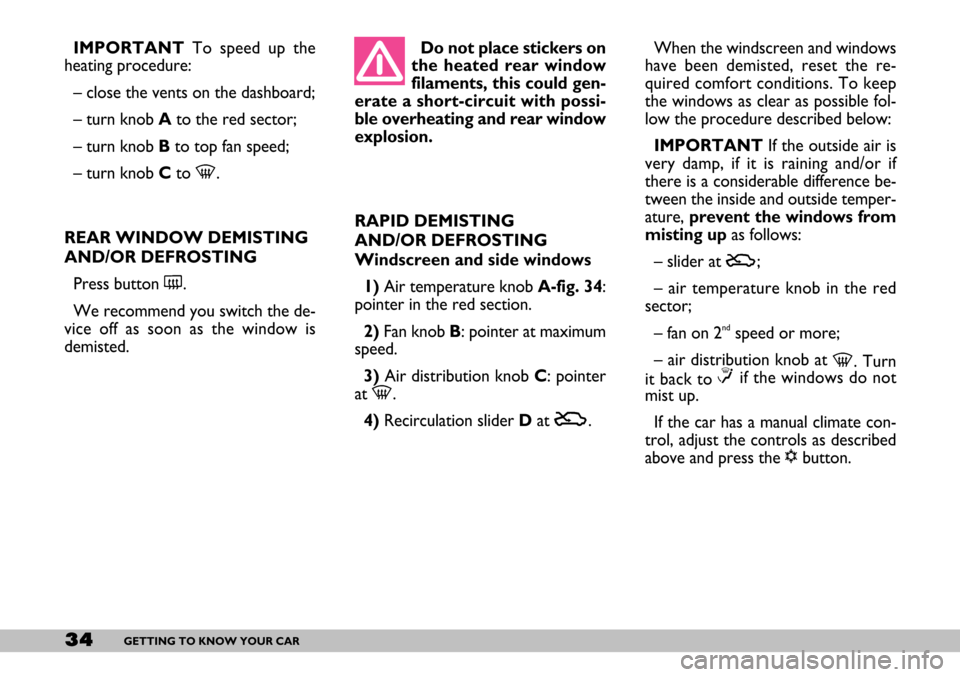
A- Air temperature knob (mixing
hot and cold air).
B- Fan knob .
C- Air distribution knob.
D- Air recirculation slider. This pre-
vents air from being taken in from the
outside.HEATING
1)Air temperature knob A-fig. 34:
pointer in the red sector.
2)Fan knob B: pointer at required
speed.
3)Air distribution knob C: pointer at:
≤to warm the feet and demist the
windscreen at the same time;
¥to direct air to the central and
side vents;
µto warm the feet and keep the
face cool (intermediate position);
wto heat when the outside tem-
perature is especially low: to send
most air to the footwell, close the
central and side vents;
-to rapidly demist the windscreen.
fig. 33
P4Q00047
fig. 34
P4Q00019
Page 35 of 154
34GETTING TO KNOW YOUR CAR
IMPORTANTTo speed up the
heating procedure:
– close the vents on the dashboard;
– turn knob Ato the red sector;
– turn knob Bto top fan speed;
– turn knob Cto -.
REAR WINDOW DEMISTING
AND/OR DEFROSTING
Press button (.
We recommend you switch the de-
vice off as soon as the window is
demisted.Do not place stickers on
the heated rear window
filaments, this could gen-
erate a short-circuit with possi-
ble overheating and rear window
explosion.
RAPID DEMISTING
AND/OR DEFROSTING
Windscreen and side windows
1)Air temperature knob A-fig. 34:
pointer in the red section.
2)Fan knob B: pointer at maximum
speed.
3)Air distribution knob C: pointer
at -.
4)Recirculation slider Dat U. When the windscreen and windows
have been demisted, reset the re-
quired comfort conditions. To keep
the windows as clear as possible fol-
low the procedure described below:
IMPORTANTIf the outside air is
very damp, if it is raining and/or if
there is a considerable difference be-
tween the inside and outside temper-
ature, prevent the windows from
misting up as follows:
– slider at
U;
– air temperature knob in the red
sector;
– fan on 2
ndspeed or more;
– air distribution knob at
-. Turn
it back to≤if the windows do not
mist up.
If the car has a manual climate con-
trol, adjust the controls as described
above and press the √button.
Page 36 of 154
35GETTING TO KNOW YOUR CAR
VENTILATION
1)Central and side vents: com-
pletely open.
2)Air temperature knob A-fig. 34:
pointer in the blue sector.
3)Slider Dat
U.
4)Fan knob B: pointer at required
speed.
5)Air distribution knob C: pointer
at ¥.
RECIRCULATION
When the slider Dis in position
Tonly air already inside the pas-
senger compartment is recirculated.
IMPORTANTThis function is par-
ticularly useful when the outside air is
heavily polluted (in a traffic jam, tun-
nel etc.). You are advised against us-
ing this function for long periods how-
ever, especially if there are a lot of
people in the car. Do not use the re-
circulation function during cold/wet
weather as this will increase the like-
lihood of the windows misting up.
MANUAL CLIMATE
CONTROL SYSTEM
The climate control system is ad-
justed manually.
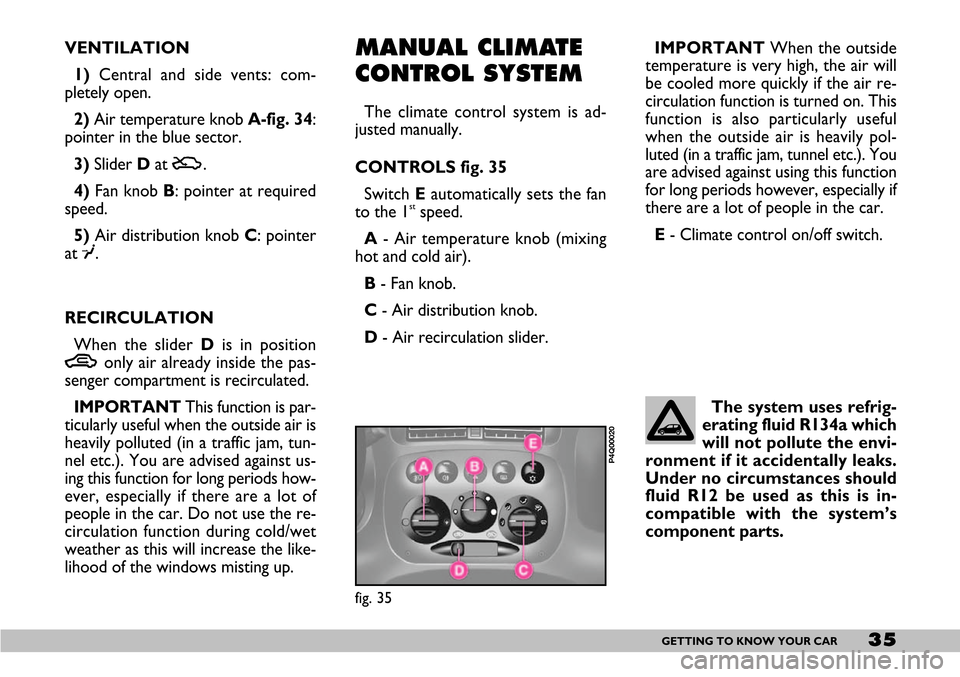
CONTROLS fig. 35
Switch E automatically sets the fan
to the 1
stspeed.
A- Air temperature knob (mixing
hot and cold air).
B- Fan knob.
C- Air distribution knob.
D- Air recirculation slider. IMPORTANTWhen the outside
temperature is very high, the air will
be cooled more quickly if the air re-
circulation function is turned on. This
function is also particularly useful
when the outside air is heavily pol-
luted (in a traffic jam, tunnel etc.). You
are advised against using this function
for long periods however, especially if
there are a lot of people in the car.
E- Climate control on/off switch.
The system uses refrig-
erating fluid R134a which
will not pollute the envi-
ronment if it accidentally leaks.
Under no circumstances should
fluid R12 be used as this is in-
compatible with the system’s
component parts.
fig. 35
P4Q00020
Page 37 of 154
36GETTING TO KNOW YOUR CAR
CLIMATE CONTROL
(Cooling)
1)Air temperature knob A-fig. 35:
pointer in the blue sector.
2)Climate control: press button √E.
3)Slider D: at T.
4)Fan knob B: pointer at required
speed.
5)Air distribution knob C: pointer
at ¥.
To decrease cooling effects: set
pointer to
U, increase temperature
and decrease fan speed.
For normal heating and ventila-
tion , do not use the manual climate
control system. Use the normal heat-
ing and ventilation system instead (see
following chapter).IMPORTANTThe manual climate
control system is very useful for
speeding up the demising process be-
cause it dries the air. Simply adjust the
controls for the demistingfunction
(see previous section) and switch the
manual climate control system on by
pressing knob √. SYSTEM MAINTENANCE
During the winter, the climate con-
trol system must be turned on at least
once a month for about ten minutes.
Have the system and pollen filter ef-
ficiency checked before the summer
at a Fiat Dealership.
The system is filled with
R134a refrigerant which
will not pollute the envi-
ronment in the event of leakage.
Under no circumstances should
R12 fluid be used as it is incom-
patible with the system compo-
nents and contains CFC.
Page 38 of 154
37GETTING TO KNOW YOUR CAR
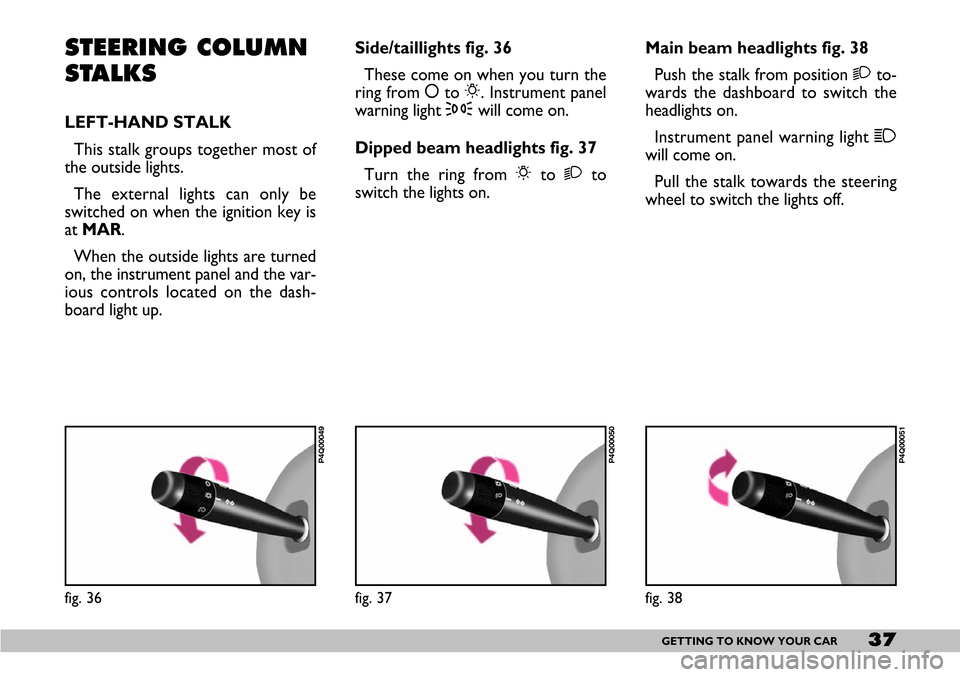
Side/taillights fig. 36
These come on when you turn the
ring from åto 6. Instrument panel
warning light 3will come on.
Dipped beam headlights fig. 37
Turn the ring from 6to 2to
switch the lights on.Main beam headlights fig. 38
Push the stalk from position 2to-
wards the dashboard to switch the
headlights on.
Instrument panel warning light 1
will come on.
Pull the stalk towards the steering
wheel to switch the lights off.STEERING COLUMN
STALKS
LEFT-HAND STALK
This stalk groups together most of
the outside lights.
The external lights can only be
switched on when the ignition key is
at MAR.
When the outside lights are turned
on, the instrument panel and the var-
ious controls located on the dash-
board light up.
fig. 36
P4Q00049
fig. 37
P4Q00050
fig. 38
P4Q00051
Page 39 of 154
38GETTING TO KNOW YOUR CAR
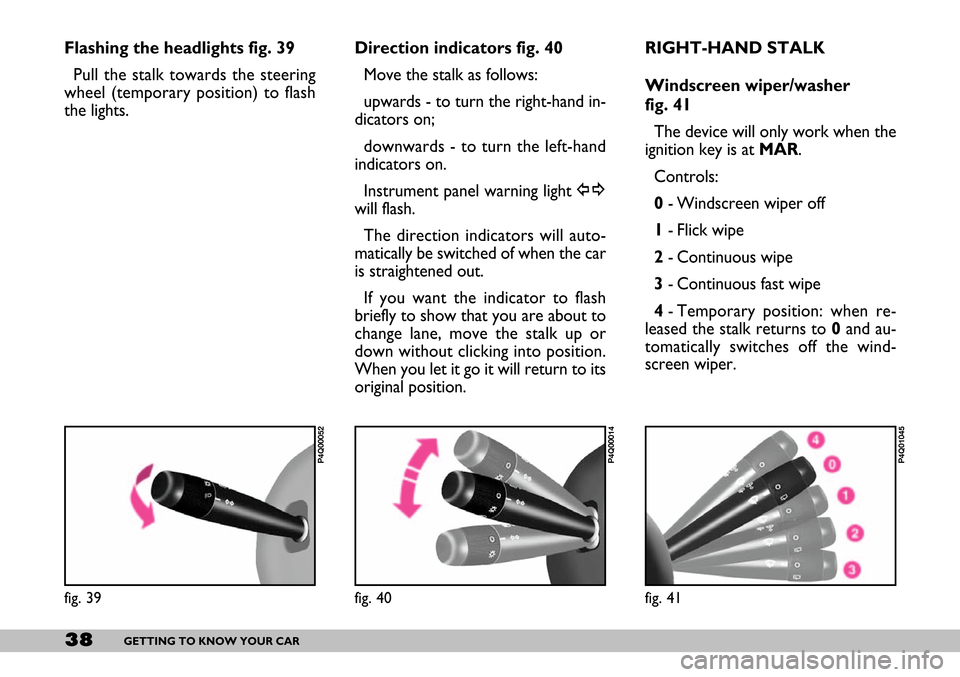
Flashing the headlights fig. 39
Pull the stalk towards the steering
wheel (temporary position) to flash
the lights.Direction indicators fig. 40
Move the stalk as follows:
upwards - to turn the right-hand in-
dicators on;
downwards - to turn the left-hand
indicators on.
Instrument panel warning light y
will flash.
The direction indicators will auto-
matically be switched of when the car
is straightened out.
If you want the indicator to flash
briefly to show that you are about to
change lane, move the stalk up or
down without clicking into position.
When you let it go it will return to its
original position. RIGHT-HAND STALK
Windscreen wiper/washer
fig. 41
The device will only work when the
ignition key is at MAR.
Controls:
0- Windscreen wiper off
1- Flick wipe
2- Continuous wipe
3- Continuous fast wipe
4- Temporary position: when re-
leased the stalk returns to 0and au-
tomatically switches off the wind-
screen wiper.
fig. 39
P4Q00052
fig. 40
P4Q00014
fig. 41
P4Q01045
Page 40 of 154
39GETTING TO KNOW YOUR CAR
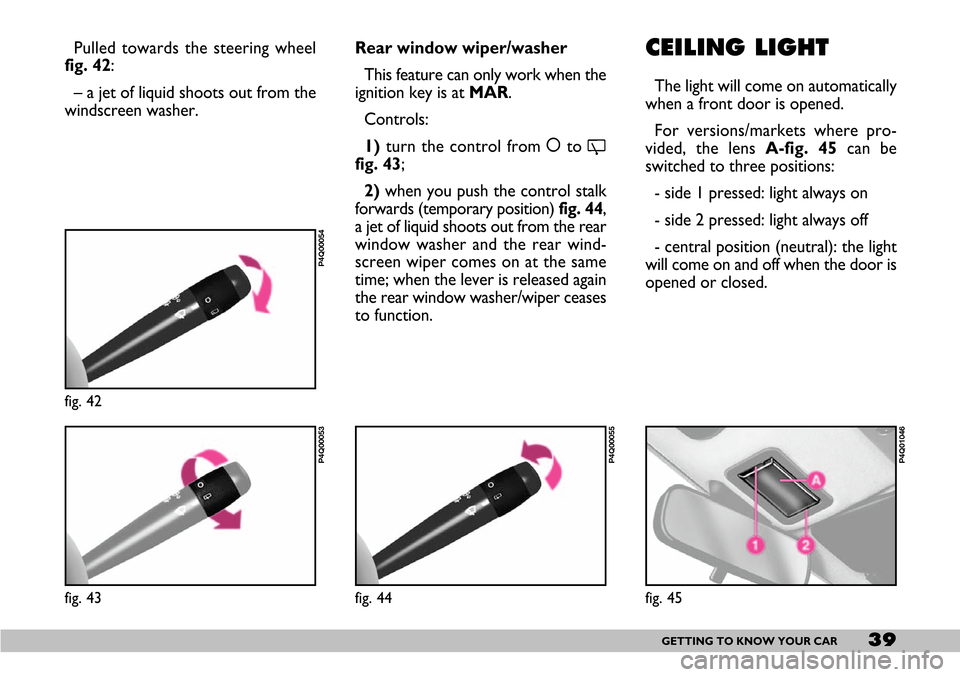
CEILING LIGHT
The light will come on automatically
when a front door is opened.
For versions/markets where pro-
vided, the lens A-fig. 45can be
switched to three positions:
- side 1 pressed: light always on
- side 2 pressed: light always off
- central position (neutral): the light
will come on and off when the door is
opened or closed. Pulled towards the steering wheel
fig. 42:
– a jet of liquid shoots out from the
windscreen washer.Rear window wiper/washer
This feature can only work when the
ignition key is at MAR.
Controls:
1)turn the control from åto
'fig. 43;
2)when you push the control stalk
forwards (temporary position) fig. 44,
a jet of liquid shoots out from the rear
window washer and the rear wind-
screen wiper comes on at the same
time; when the lever is released again
the rear window washer/wiper ceases
to function.
fig. 43
P4Q00053
fig. 42
P4Q00054
fig. 44
P4Q00055
fig. 45
P4Q01046