radio FIAT STILO 2004 1.G Connect NavPlus Manual
[x] Cancel search | Manufacturer: FIAT, Model Year: 2004, Model line: STILO, Model: FIAT STILO 2004 1.GPages: 166, PDF Size: 3.8 MB
Page 128 of 166

CONNECT Nav+
127
VOICE COMMANDS
Voice commands, identified as “key-
words”, that the system is able to rec-
ognize are organised according to four
increasing levels: 1
stlevel, 2ndlevel, 3rd
level, 4thlevel. 1stlevel keywords acti-
vate the following main system func-
tions: Memo; Radio; CD player; CD
Changer; Navigator, Telephone.
When a 1st level keyword is pro-
nounced, the system will activate 2nd
level keywords; when a 2nd level key-
word is pronounced, the system will
activate 3rd level keywords; when a3rd level keyword is pronounced, the
system will activate 4th level key-
words.
If the user pronounces a 1st level
keyword, then the submenu relevant
to that command will remain active
until another 1st level keyword is giv-
en; the same rule applies for the oth-
er lower levels (2, 3 and 4).
If too much time passes between a
command and another of lower level
the system will invite the user to con-
tinue by voice message “Can I help
you?”.1st level keywords are the following:
– Memo
– Radio
– CD player
– CD changer
– Navigator
– Call
– Dial
– Redial
– PIN code
– Address book
– Abort.
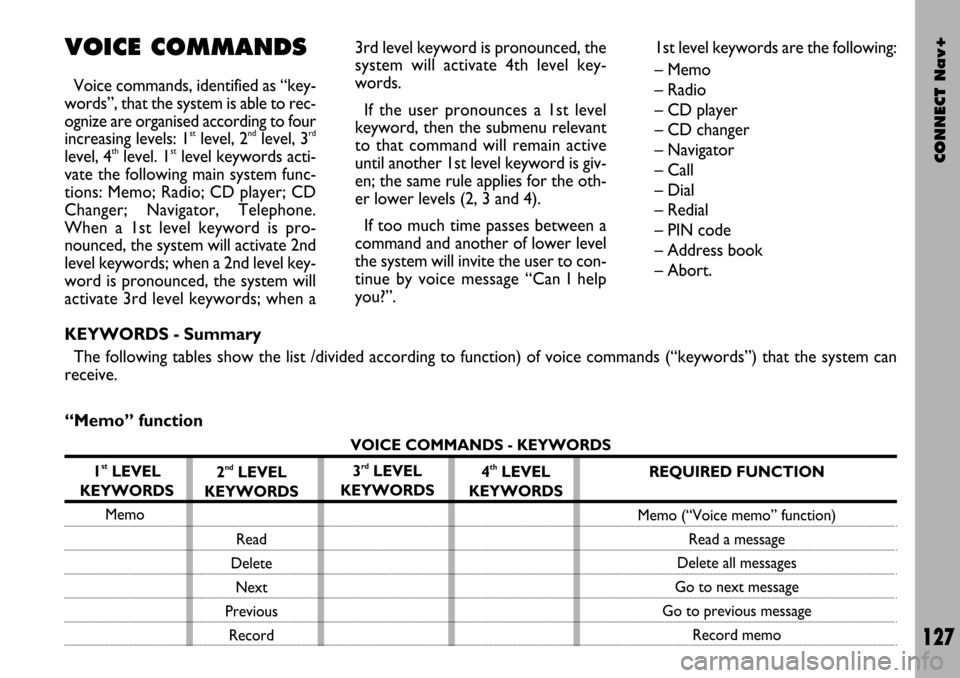
KEYWORDS - Summary
The following tables show the list /divided according to function) of voice commands (“keywords”) that the system can
receive.
“Memo” function
VOICE COMMANDS - KEYWORDS
1
stLEVEL
KEYWORDS
Memo
2ndLEVEL
KEYWORDS
Read
Delete
Next
Previous
Record3rdLEVEL
KEYWORDS4thLEVEL
KEYWORDSREQUIRED FUNCTION
Memo (“Voice memo” function)
Read a message
Delete all messages
Go to next message
Go to previous message
Record memo
Page 129 of 166

CONNECT Nav+
128
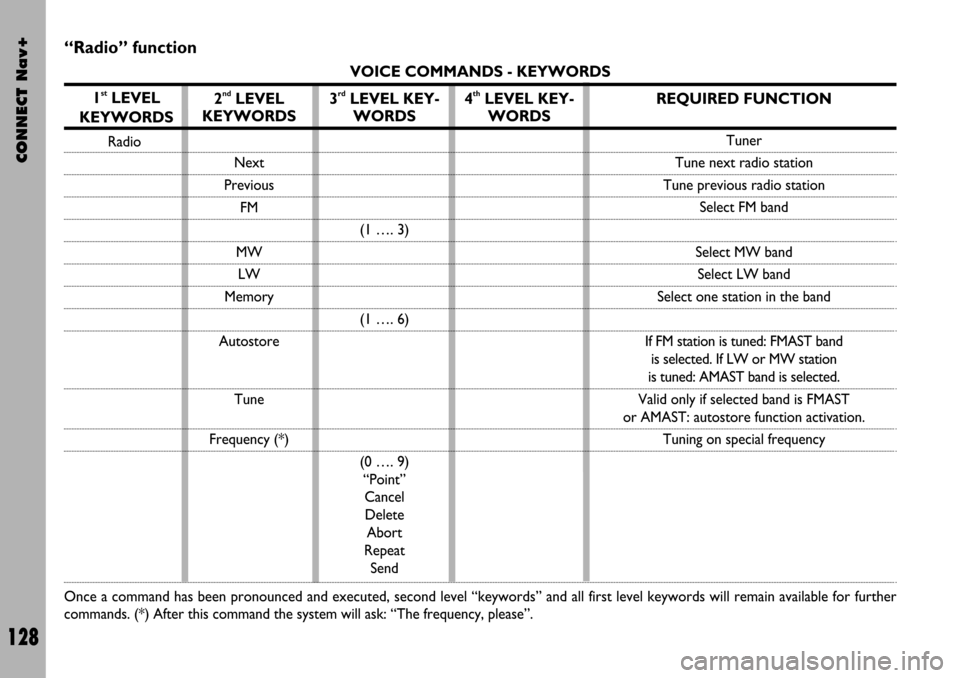
“Radio” function
VOICE COMMANDS - KEYWORDS
1
stLEVEL
KEYWORDS
Radio
Once a command has been pronounced and executed, second level “keywords” and all first level keywords will remain available for further
commands. (*) After this command the system will ask: “The frequency, please”.
2ndLEVEL
KEYWORDS
Next
Previous
FM
MW
LW
Memory
Autostore
Tune
Frequency (*)
3rdLEVEL KEY-
WORDS
(1 …. 3)
(1 …. 6)
(0 …. 9)
“Point”
Cancel
Delete
Abort
Repeat
Send
4thLEVEL KEY-
WORDSREQUIRED FUNCTION
Tuner
Tune next radio station
Tune previous radio station
Select FM band
Select MW band
Select LW band
Select one station in the band
If FM station is tuned: FMAST band
is selected. If LW or MW station
is tuned: AMAST band is selected.
Valid only if selected band is FMAST
or AMAST: autostore function activation.
Tuning on special frequency
Page 135 of 166

CONNECT Nav+
134
VOICE COMMAND
EXAMPLES
Tuning a radio frequency
Pronouncing 1st level keyword “Ra-
dio” and then the 2nd level one “Fre-
quency”, opens a dialogue enabling the
following keywords:
– [0..9]
– Point
– Cancel
– Delete
– Abort
– Repeat
– Send.First example:
User: Radio - Frequency
CONNECT: The frequency,
please?
User: 1-0-5-Point-5
CONNECT: 1-0-5-Point-5
User: Send
CONNECT: The frequency is
being tuned.
Second example:
User: Radio - Frequency
CONNECT: The frequency,
please?
User: 9-6
CONNECT: 9-6
User: Point-5-0
CONNECT: Point-5-0
User: Send
CONNECT: The frequency is
being tuned.Third example:
User: Radio - Frequency
CONNECT: The frequency,
please?
User: 1-0-6
CONNECT: 1-0-6
User: Point-7
CONNECT: Point-7
User: Delete
CONNECT: 1-0-6
User: Point-6
CONNECT: Point-6
User: Repeat
CONNECT: 1-0-6-Point-6
User: Send
CONNECT: The frequency is
being tuned.
Page 158 of 166

CONNECT Nav+
157
To turn this function on/off, select
“Autoclose” by rotating the encoder
14-fig. 1and then press “ENTER” 15-
fig. 1.
When “✓” is displayed the function
is active.
OK
To activate and to store settings, se-
lect “OK” by rotating the encoder 14-
fig. 1and then press “ENTER” 15-
fig. 1.CONNECT (settings)
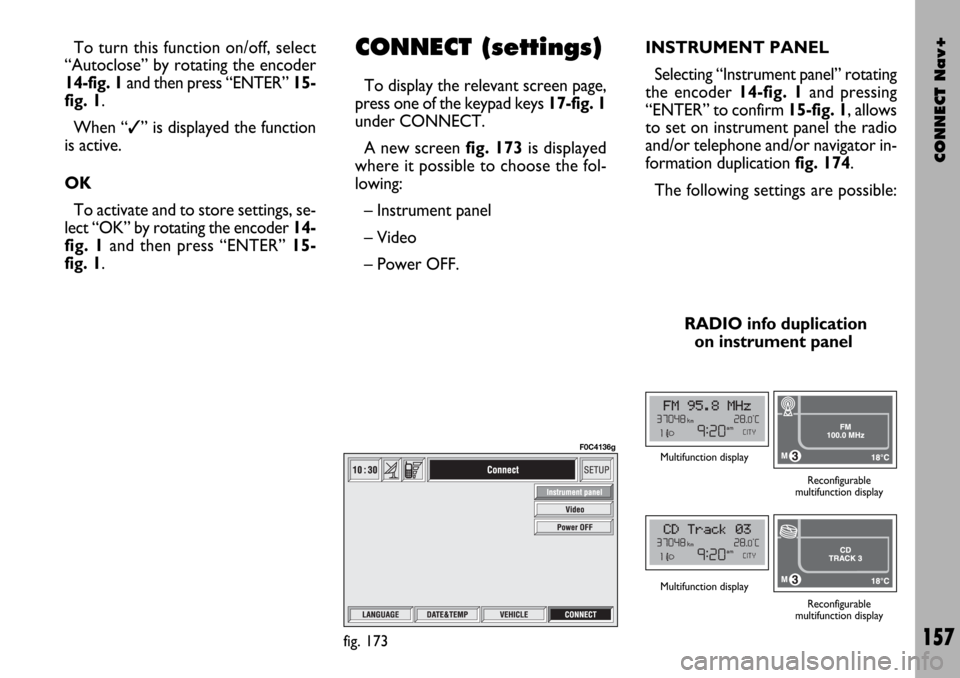
To display the relevant screen page,
press one of the keypad keys 17-fig. 1
under CONNECT.
A new screen fig. 173is displayed
where it possible to choose the fol-
lowing:
– Instrument panel
– Video
– Power OFF.
fig. 173
F0C4136g
INSTRUMENT PANEL
Selecting “Instrument panel” rotating
the encoder 14-fig. 1and pressing
“ENTER” to confirm 15-fig. 1, allows
to set on instrument panel the radio
and/or telephone and/or navigator in-
formation duplication fig. 174.
The following settings are possible:
RADIO info duplication
on instrument panel
Multifunction display
Reconfigurable
multifunction display
Multifunction display
Reconfigurable
multifunction display
Page 162 of 166

CONNECT Nav+
161
Hardware module
Audio
CD player
Telephone
CONNECT Nav+
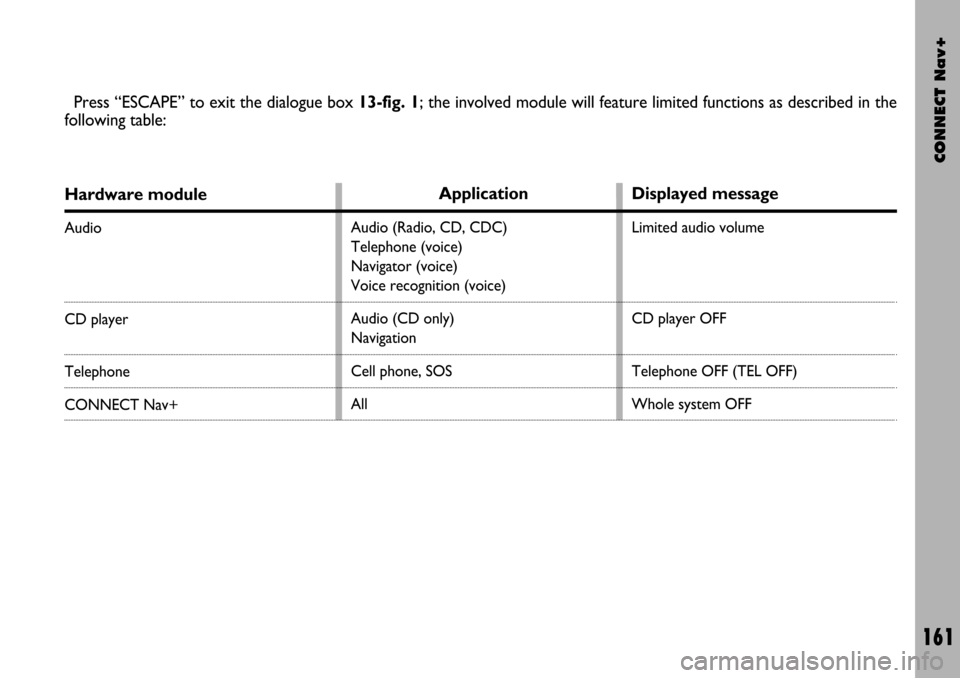
Press “ESCAPE” to exit the dialogue box 13-fig. 1; the involved module will feature limited functions as described in the
following table:
Application
Audio (Radio, CD, CDC)
Telephone (voice)
Navigator (voice)
Voice recognition (voice)
Audio (CD only)
Navigation
Cell phone, SOS
All
Displayed message
Limited audio volume
CD player OFF
Telephone OFF (TEL OFF)
Whole system OFF
Page 163 of 166

CONNECT Nav+
162
“Audio” module overheating
In case of “Audio” module over-
heating, current audio volume is au-
tomatically limited regardless of the
current audio source (radio, CD, CD
Changer).
The display will show a proper warn-
ing message.“CD player” module
overheating
In case of “CD player” module over-
heating, no CD will be played: no au-
dio CD or MP3 CD will be played and
the navigation functions will not be
guaranteed (unless navigation without
CD has been previously activated).
The display will show a proper warn-
ing message.
“Telephone” module
overheating
In case of “Telephone” module over-
heating, the module is deactivated
(TEL OFF), thus inhibiting information
and assistance functions (SOS).
The display will show a proper warn-
ing message.CONNECT Nav+ auto-off
In case of excessive overtempera-
ture, a warning message will inform
the user that the auto-off procedure
has been activated. The system can be
switched on normally when regular
operating temperature values are re-
stored.