P button FIAT STILO 2006 1.G Owner's Manual
[x] Cancel search | Manufacturer: FIAT, Model Year: 2006, Model line: STILO, Model: FIAT STILO 2006 1.GPages: 274, PDF Size: 4.76 MB
Page 36 of 274
35
SAFETY
DEVICES
CORRECT USE
OF THE CAR
WARNING
LIGHTS AND
MESSAGES
IN AN
EMERGENCY
CAR
MAINTENANCE
TECHNICAL
SPECIFICATIONS
INDEX
DASHBOARD
AND CONTROLS
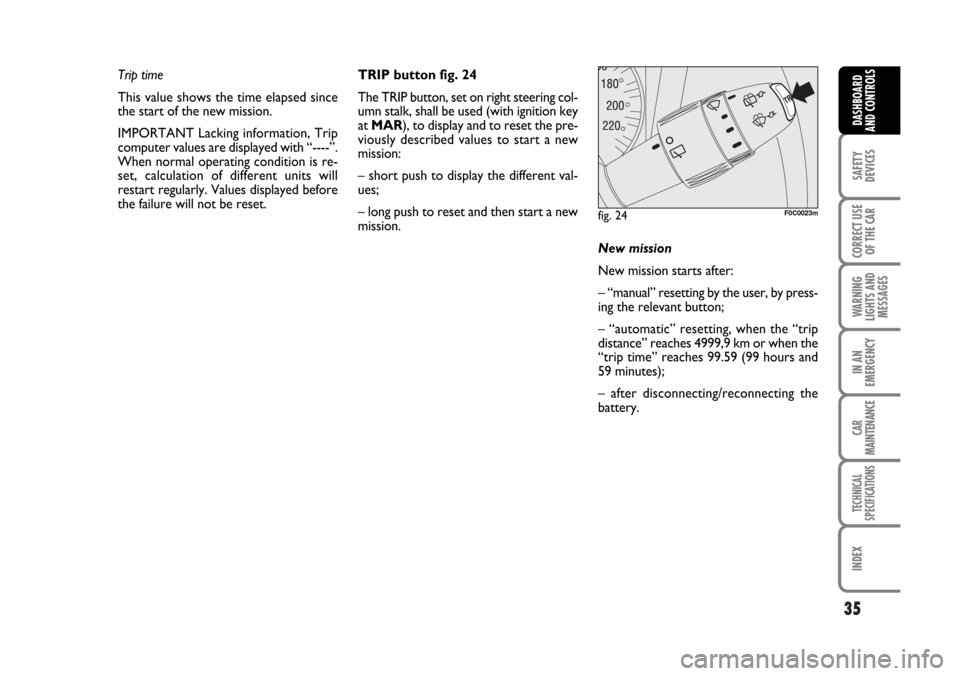
fig. 24F0C0023m
Trip time
This value shows the time elapsed since
the start of the new mission.
IMPORTANT Lacking information, Trip
computer values are displayed with “----”.
When normal operating condition is re-
set, calculation of different units will
restart regularly. Values displayed before
the failure will not be reset.TRIP button fig. 24
The TRIP button, set on right steering col-
umn stalk, shall be used (with ignition key
at MAR), to display and to reset the pre-
viously described values to start a new
mission:
– short push to display the different val-
ues;
– long push to reset and then start a new
mission.
New mission
New mission starts after:
– “manual” resetting by the user, by press-
ing the relevant button;
– “automatic” resetting, when the “trip
distance” reaches 4999,9 km or when the
“trip time” reaches 99.59 (99 hours and
59 minutes);
– after disconnecting/reconnecting the
battery.
Page 37 of 274

36
SAFETY
DEVICES
CORRECT USE
OF THE CAR
WARNING
LIGHTS AND
MESSAGES
IN AN
EMERGENCY
CAR
MAINTENANCE
TECHNICAL
SPECIFICATIONS
INDEX
DASHBOARD
AND CONTROLS
IMPORTANT The reset operation in the
presence of the screens concerning the
“General Trip” makes it possible to reset
also the “Trip B”. The reset operation in
the presence of the screens concerning
only the “Trip B” makes it possible to re-
set only the information associated with
this function.Start of journey procedure
With ignition key at MAR, press and keep
TRIP button pressed for over 2 seconds
to reset.
Reset TRIP B
End of partial mission
Start of new partial mission
End of partial mission
Start of new
partial mission
Reset TRIP B
End of partial mission
Start of new
partial mission Reset GENERAL TRIP
End of complete mission
Start of new missionReset GENERAL TRIP
End of complete mission
Start of new mission
End of partial mission
Start of new
partial mission Reset TRIP B
Reset TRIP B
TRIP B
TRIP B
TRIP B GENERAL TRIP
˙
˙
˙
˙
˙
˙
˙
˙
fig. 25
Page 39 of 274
38
SAFETY
DEVICES
CORRECT USE
OF THE CAR
WARNING
LIGHTS AND
MESSAGES
IN AN
EMERGENCY
CAR
MAINTENANCE
TECHNICAL
SPECIFICATIONS
INDEX
DASHBOARD
AND CONTROLS
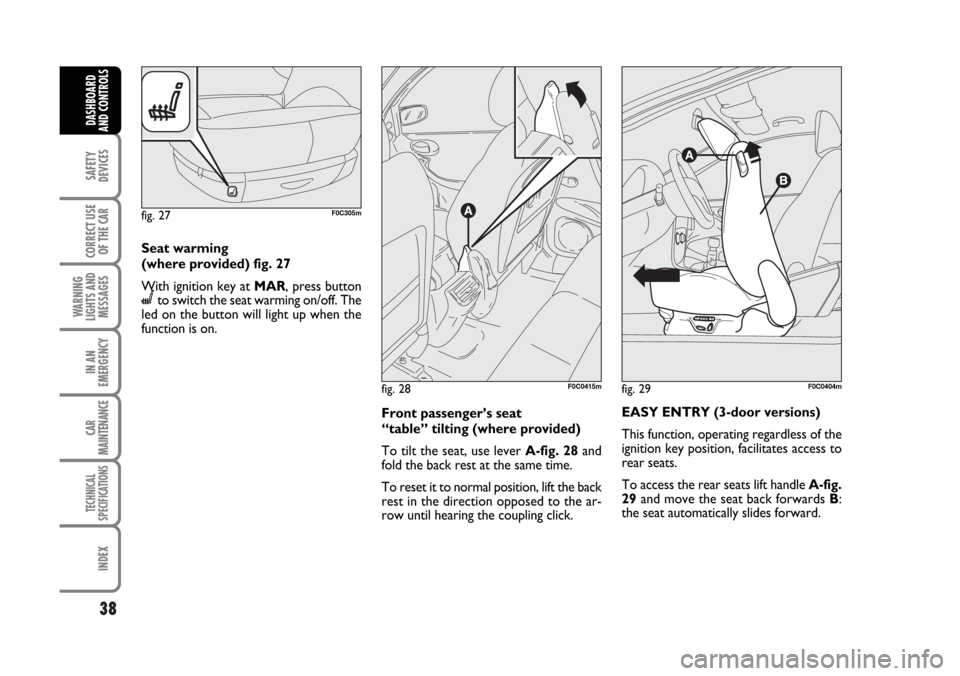
Seat warming
(where provided) fig. 27
With ignition key at MAR, press button
Cto switch the seat warming on/off. The
led on the button will light up when the
function is on.
Front passenger’s seat
“table” tilting (where provided)
To tilt the seat, use lever A-fig. 28and
fold the back rest at the same time.
To reset it to normal position, lift the back
rest in the direction opposed to the ar-
row until hearing the coupling click.EASY ENTRY (3-door versions)
This function, operating regardless of the
ignition key position, facilitates access to
rear seats.
To access the rear seats lift handle A-fig.
29and move the seat back forwards B:
the seat automatically slides forward.
fig. 27F0C305m
fig. 28F0C0415mfig. 29F0C0404m
Page 42 of 274
41
SAFETY
DEVICES
CORRECT USE
OF THE CAR
WARNING
LIGHTS AND
MESSAGES
IN AN
EMERGENCY
CAR
MAINTENANCE
TECHNICAL
SPECIFICATIONS
INDEX
DASHBOARD
AND CONTROLS
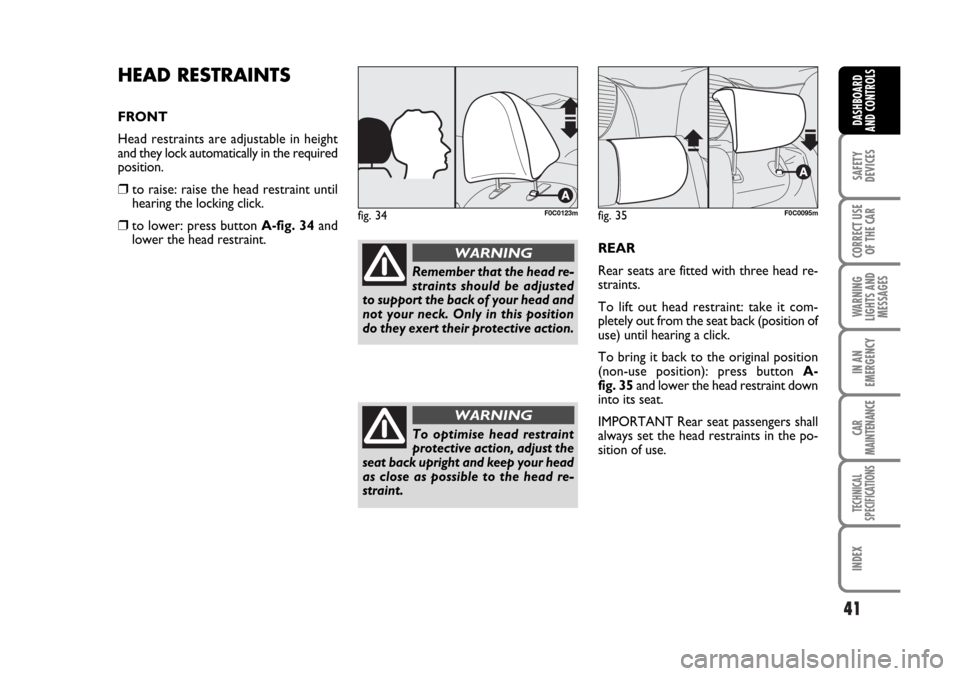
HEAD RESTRAINTS
FRONT
Head restraints are adjustable in height
and they lock automatically in the required
position.
❒ to raise: raise the head restraint until
hearing the locking click.
❒to lower: press button A-fig. 34and
lower the head restraint.
REAR
Rear seats are fitted with three head re-
straints.
To lift out head restraint: take it com-
pletely out from the seat back (position of
use) until hearing a click.
To bring it back to the original position
(non-use position): press button A-
fig. 35and lower the head restraint down
into its seat.
IMPORTANT Rear seat passengers shall
always set the head restraints in the po-
sition of use.fig. 34F0C0123m
Remember that the head re-
straints should be adjusted
to support the back of your head and
not your neck. Only in this position
do they exert their protective action.
WARNING
To optimise head restraint
protective action, adjust the
seat back upright and keep your head
as close as possible to the head re-
straint.
WARNING
fig. 35F0C0095m
Page 47 of 274
46
SAFETY
DEVICES
CORRECT USE
OF THE CAR
WARNING
LIGHTS AND
MESSAGES
IN AN
EMERGENCY
CAR
MAINTENANCE
TECHNICAL
SPECIFICATIONS
INDEX
DASHBOARD
AND CONTROLS
HEATING AND
VENTILATION
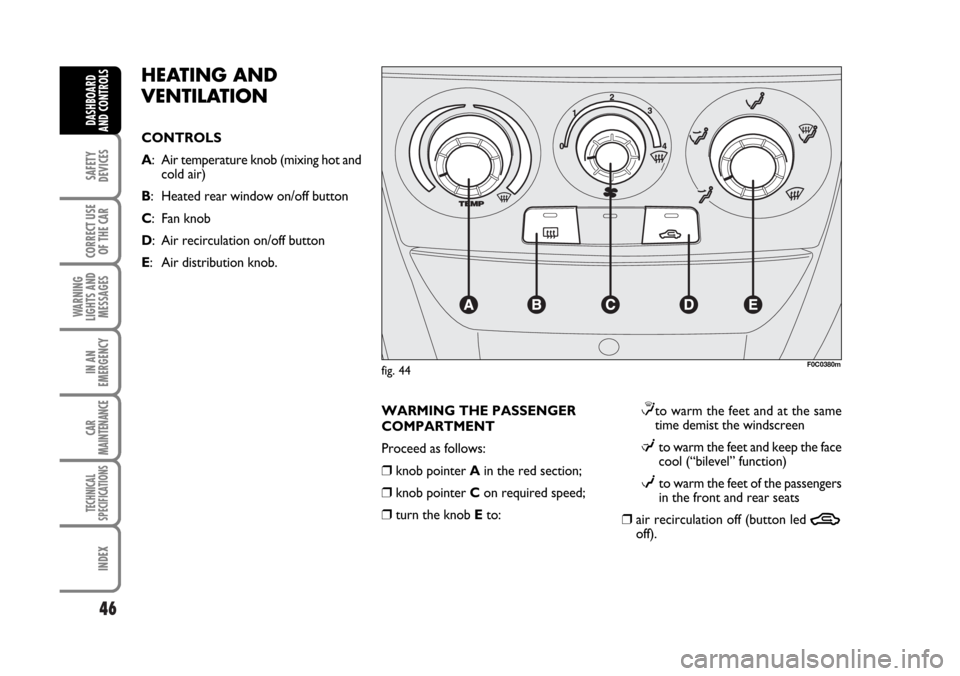
CONTROLS
A: Air temperature knob (mixing hot and
cold air)
B: Heated rear window on/off button
C: Fan knob
D: Air recirculation on/off button
E: Air distribution knob.
WARMING THE PASSENGER
COMPARTMENT
Proceed as follows:
❒knob pointer Ain the red section;
❒knob pointer Con required speed;
❒turn the knob Eto:
≤to warm the feet and at the same
time demist the windscreen
μto warm the feet and keep the face
cool (“bilevel” function)
wto warm the feet of the passengers
in the front and rear seats
❒air recirculation off (button led Toff).
F0C0380mfig. 44
Page 48 of 274

47
SAFETY
DEVICES
CORRECT USE
OF THE CAR
WARNING
LIGHTS AND
MESSAGES
IN AN
EMERGENCY
CAR
MAINTENANCE
TECHNICAL
SPECIFICATIONS
INDEX
DASHBOARD
AND CONTROLS
FRONT WINDOW
FAST DEMISTING/DEFROSTING
Proceed as follows:
❒rotate completely (pointer on -)
knob Ato the right;
❒turn knob Cto -;
❒turn knob Eto -;
❒air recirculation off (button led Toff).
After demisting/defrosting use common
controls to maintain the optimum condi-
tions of visibility and comfort.
Window demisting
In the event of considerable outside mois-
ture and/or rain and/or considerable dif-
ferences in temperature inside and out-
side the passenger compartment, perform
the following preventive demisting proce-
dure:
❒air recirculation off (button led Toff);
❒turn knob Ato red section;
❒turn knob Cto 2ndspeed;
❒turn knob Eto -or to ≤if the win-
dows do not demist.HEATED REAR WINDOW
AND DOOR MIRROR
DEMISTING/DEFROSTING
Pressing button
(turns on this function
which is shown by the turning on of the
led on the button
(.
This function is timed and switches off au-
tomatically after 20 minutes. To cut out
this function press again button
(.
IMPORTANT Do not apply stickers on
the inside of the rear window over the
heating filaments to avoid damage that
might cause it to stop working properly.
FAN SPEED ADJUSTMENT
To ventilate the passenger’s compartment
properly, proceed as follows:
❒Central and side vents: completely
open;
❒Knob pointer Aon blue section;
❒knob pointer Con required speed;
❒Knob pointer Eto ¥;
❒air recirculation off (button led Toff).RECIRCULATION
Pressing button
Tturns on this func-
tion which is shown by the turning on of
the led on the button. This function is par-
ticularly useful when the outside air is
heavily polluted (in a traffic jam, tunnel,
etc.). However, it is better not to use it
for long periods, especially if there are sev-
eral people in the car.
IMPORTANT The inside air recirculation
system makes it possible to reach the re-
quired “heating” or “cooling” conditions
faster. Do not use the air recirculation
function on rainy/cold days as it would
considerably increase the possibility of the
windows misting inside.
Page 49 of 274
48
SAFETY
DEVICES
CORRECT USE
OF THE CAR
WARNING
LIGHTS AND
MESSAGES
IN AN
EMERGENCY
CAR
MAINTENANCE
TECHNICAL
SPECIFICATIONS
INDEX
DASHBOARD
AND CONTROLS
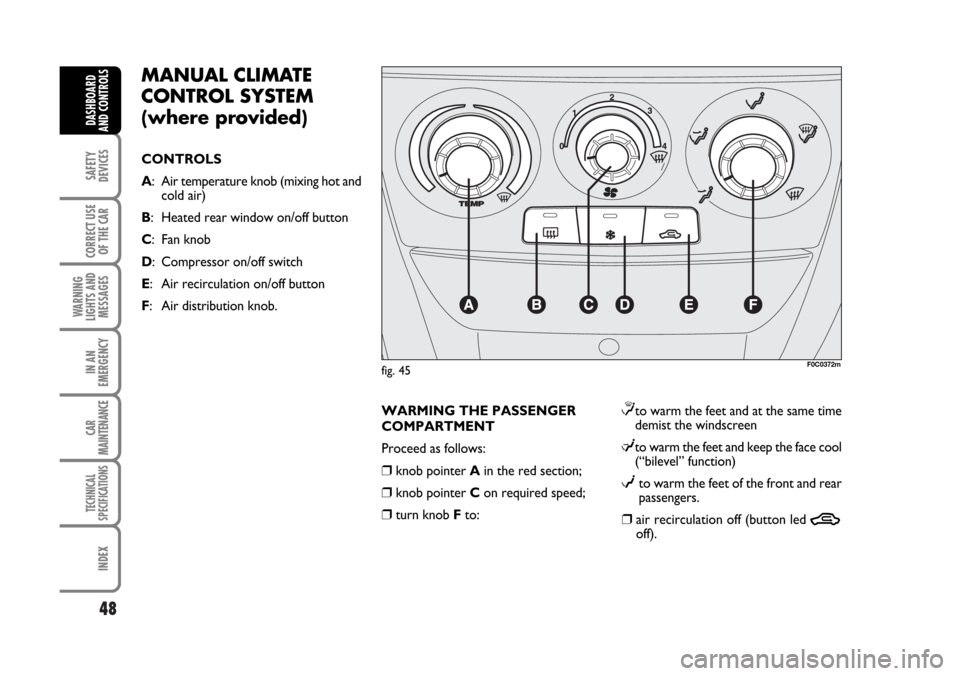
MANUAL CLIMATE
CONTROL SYSTEM
(where provided)
CONTROLS
A: Air temperature knob (mixing hot and
cold air)
B: Heated rear window on/off button
C: Fan knob
D: Compressor on/off switch
E: Air recirculation on/off button
F: Air distribution knob.
WARMING THE PASSENGER
COMPARTMENT
Proceed as follows:
❒knob pointer Ain the red section;
❒knob pointer Con required speed;
❒turn knob Fto:
≤to warm the feet and at the same time
demist the windscreen
μto warm the feet and keep the face cool
(“bilevel” function)
wto warm the feet of the front and rear
passengers.
❒air recirculation off (button led Toff).
F0C0372mfig. 45
Page 50 of 274

49
SAFETY
DEVICES
CORRECT USE
OF THE CAR
WARNING
LIGHTS AND
MESSAGES
IN AN
EMERGENCY
CAR
MAINTENANCE
TECHNICAL
SPECIFICATIONS
INDEX
DASHBOARD
AND CONTROLS
FRONT WINDOW
FAST DEMISTING/DEFROSTING
Proceed as follows:
❒press button ❄;
❒rotate completely (pointer on -)
knob Ato the right;
❒turn knob Cto -;
❒turn knob Fto -;
❒air recirculation off (button led Toff).
After demisting/defrosting use common
controls to maintain the optimum condi-
tions of visibility and comfort.
Window demisting
In the event of considerable outside mois-
ture and/or rain and/or considerable dif-
ferences in temperature inside and out-
side the passenger compartment, perform
the following preventive demisting proce-
dure:
❒press button ❄;
❒air recirculation off (button led Toff);
❒turn knob Ato red section;
❒turn knob Cto 2ndspeed;
❒turn knob Fto -or to ≤if the win-
dows do not demist.
Climate control system is very useful to
speed up demisting since it dehumidifies
the air. Set controls to demisting function
and switch on the climate control system
by pressing button
❄.
HEATED REAR WINDOW
AND DOOR MIRROR
DEMISTING/DEFROSTING
Pressing button
(turns on this function
which is shown by the turning on of the
led on the button
(.
This function is timed and switches off au-
tomatically after 20 minutes. To cut out
this function press again button
(.
IMPORTANT Do not apply stickers on
the inside of the rear window over the
heating filaments to avoid damage that
might cause it to stop working properly.FAN SPEED ADJUSTMENT
To ventilate the passenger’s compartment
properly, proceed as follows:
❒Central and side vents: completely
open;
❒Knob pointer Aon blue section;
❒knob pointer Con required speed;
❒Knob pointer Fto ¥;
❒air recirculation off (button led Toff).
Page 51 of 274

50
SAFETY
DEVICES
CORRECT USE
OF THE CAR
WARNING
LIGHTS AND
MESSAGES
IN AN
EMERGENCY
CAR
MAINTENANCE
TECHNICAL
SPECIFICATIONS
INDEX
DASHBOARD
AND CONTROLS
AIR RECIRCULATION
Pressing button
Tturns on this func-
tion which is shown by the turning on of
the led on the button.
This function is particularly useful when
the outside air is heavily polluted (in a traf-
fic jam, tunnel, etc.) However, it is better
not to use it for long periods, especially
if there are several people in the car.
IMPORTANT The inside air recirculation
system makes it possible to reach the re-
quired “heating” or “cooling” conditions
faster. Do not use the air recirculation
function on rainy/cold days as it would
considerably increase the possibility of the
windows misting inside.CLIMATE CONTROL (cooling)
Proceed as follows:
❒Knob pointer Aon blue section;
❒knob pointer Con required speed;
❒Knob pointer Fto ¥;
❒Press buttons ❄and T(button leds
on).
Cooling adjustment
Proceed as follows:
❒Turn off button T(button led off);
❒Turn knob Ato the right to raise tem-
perature;
❒Turn knob Cto the left to reduce the
fan speed.LOOKING AFTER THE SYSTEM
During winter, the climate control system
must be turned on at least once a month
for about 10 minutes. Before summer,
have the system checked at a Fiat Deal-
ership.
Page 52 of 274
51
SAFETY
DEVICES
CORRECT USE
OF THE CAR
WARNING
LIGHTS AND
MESSAGES
IN AN
EMERGENCY
CAR
MAINTENANCE
TECHNICAL
SPECIFICATIONS
INDEX
DASHBOARD
AND CONTROLS
F0C0381mfig. 46
AUTOMATIC
TWO-ZONE CLIMATE
CONTROL SYSTEM
(where provided)
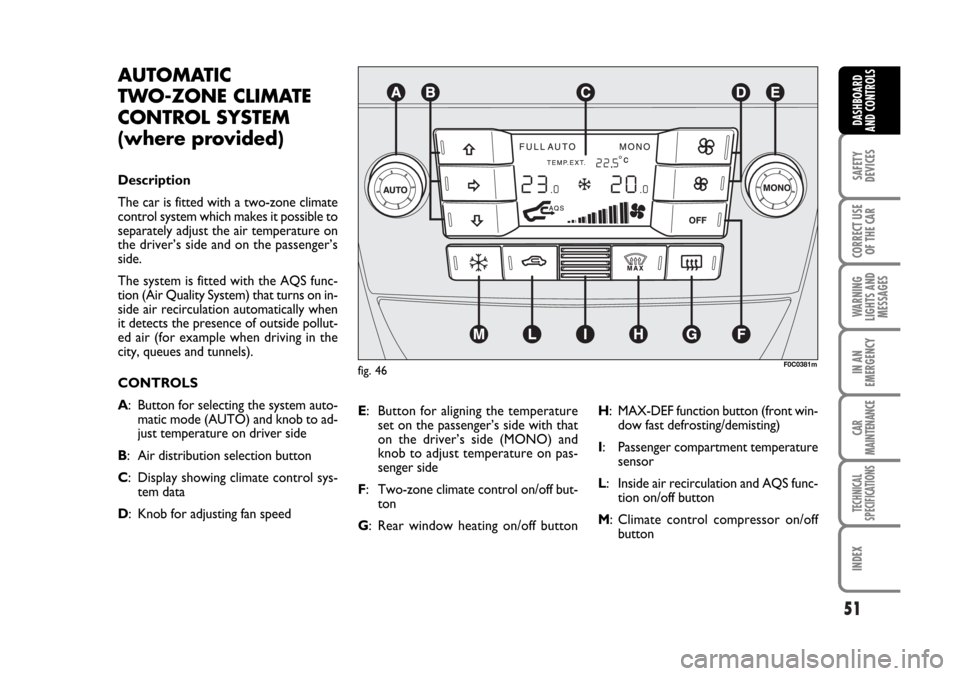
Description
The car is fitted with a two-zone climate
control system which makes it possible to
separately adjust the air temperature on
the driver’s side and on the passenger’s
side.
The system is fitted with the AQS func-
tion (Air Quality System) that turns on in-
side air recirculation automatically when
it detects the presence of outside pollut-
ed air (for example when driving in the
city, queues and tunnels).
CONTROLS
A: Button for selecting the system auto-
matic mode (AUTO) and knob to ad-
just temperature on driver side
B: Air distribution selection button
C: Display showing climate control sys-
tem data
D: Knob for adjusting fan speedE: Button for aligning the temperature
set on the passenger’s side with that
on the driver’s side (MONO) and
knob to adjust temperature on pas-
senger side
F: Two-zone climate control on/off but-
ton
G: Rear window heating on/off buttonH: MAX-DEF function button (front win-
dow fast defrosting/demisting)
I: Passenger compartment temperature
sensor
L: Inside air recirculation and AQS func-
tion on/off button
M: Climate control compressor on/off
button