ESP FIAT STRADA 2011 Owner handbook (in English)
[x] Cancel search | Manufacturer: FIAT, Model Year: 2011, Model line: STRADA, Model: FIAT STRADA 2011Pages: 195, PDF Size: 3.68 MB
Page 78 of 195
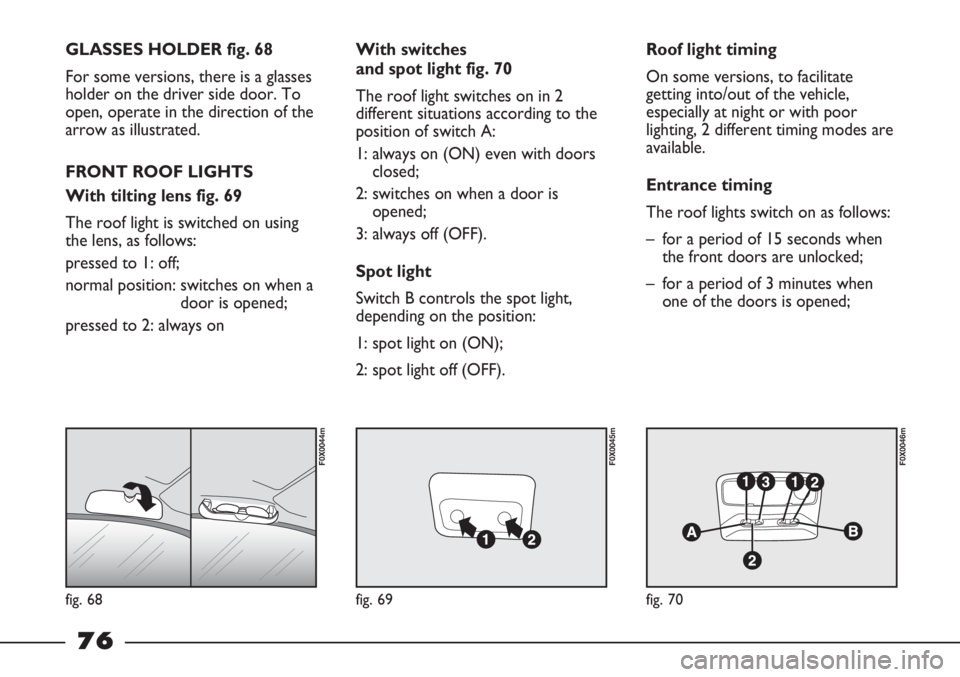
fig. 68
F0X0044m
fig. 69
F0X0045m
fig. 70
F0X0046m
GLASSES HOLDER fig. 68
For some versions, there is a glasses
holder on the driver side door. To
open, operate in the direction of the
arrow as illustrated.
FRONT ROOF LIGHTS
With tilting lens fig. 69
The roof light is switched on using
the lens, as follows:
pressed to 1: off;
normal position: switches on when a
door is opened;
pressed to 2: always onWith switches
and spot light fig. 70
The roof light switches on in 2
different situations according to the
position of switch A:
1: always on (ON) even with doors
closed;
2: switches on when a door is
opened;
3: always off (OFF).
Spot light
Switch B controls the spot light,
depending on the position:
1: spot light on (ON);
2: spot light off (OFF).Roof light timing
On some versions, to facilitate
getting into/out of the vehicle,
especially at night or with poor
lighting, 2 different timing modes are
available.
Entrance timing
The roof lights switch on as follows:
– for a period of 15 seconds when
the front doors are unlocked;
– for a period of 3 minutes when
one of the doors is opened;
76
Page 90 of 195
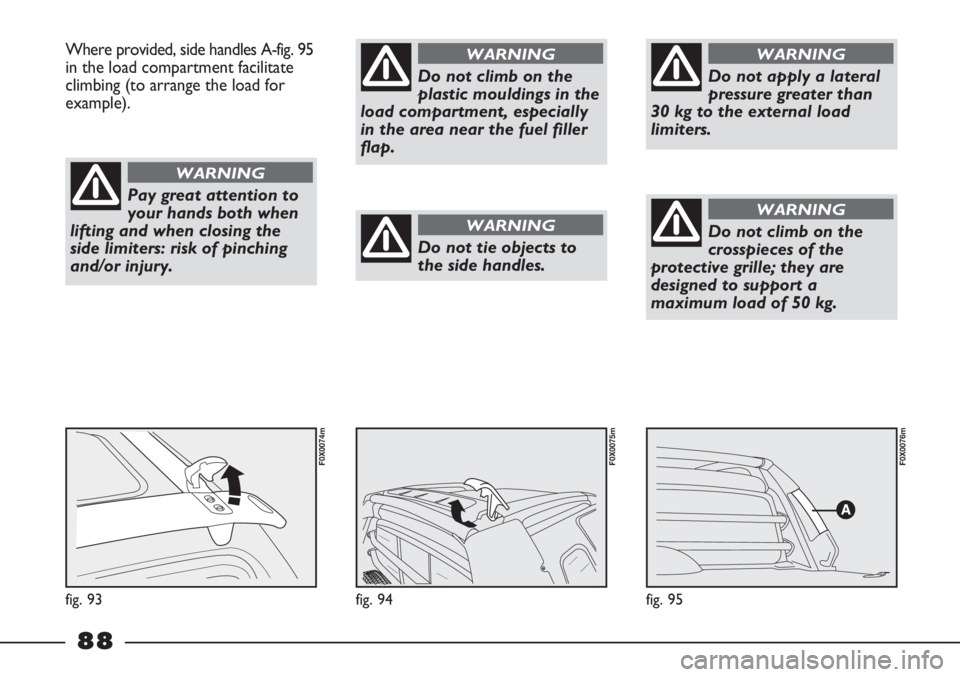
fig. 95
F0X0076m
fig. 94
F0X0075m
Where provided, side handles A-fig. 95
in the load compartment facilitate
climbing (to arrange the load for
example).
fig. 93
F0X0074m
Pay great attention to
your hands both when
lifting and when closing the
side limiters: risk of pinching
and/or injury.
WARNING
Do not climb on the
plastic mouldings in the
load compartment, especially
in the area near the fuel filler
flap.
WARNING
Do not tie objects to
the side handles.
WARNING
Do not apply a lateral
pressure greater than
30 kg to the external load
limiters.
WARNING
Do not climb on the
crosspieces of the
protective grille; they are
designed to support a
maximum load of 50 kg.
WARNING
88
Page 101 of 195
The E-Locker System
should not encourage
the driver to head towards and
travel through unknown places
and/or regions, confident of
tackling any obstacle.
The driver is always responsible
of controlling and driving the
vehicle in all circumstances.
WARNING
SEVERE DANGER:
If emergency conditions
require that a front wheel is
lifted: make sure that the
E-Locker system is deactivated
before any operation is carried
out.
WARNING
The system features manual and
automatic deactivation.
Manual deactivation
Press the ELD button again.
Automatic deactivation
This occurs when the speed of the
vehicle exceeds 20 km/h.
When the vehicle approaches this
speed (about 15 km/h):
– the system emits a sequence of
3 beeps
– the ELD warning light on the
instrument panel flashes more
quickly.When it is deactivated (manual or
automatic):
– the system emits a short beep
– The ELD warning light switches
off in the instrument panel
– the display shows a dedicated
message (ELD OFF for 5 seconds).
In the event of failure
– the ELD warning light on the
instrument panel switches on
constantly and the display shows a
dedicated message.
IMPORTANT If a user attempts to
activate the E-Locker System with
vehicle in motion and/or without the
brake pedal pressed, the command is
rejected and the system is not
activated; the ELD warning light on
the instrument panel switches on for
a few seconds at the same time.
99
Page 109 of 195
107
HOW TO WARM THE
ENGINE WHICH HAS JUST
STARTED
– Drive off slowly, letting the engine
turn at medium revs. Do not
accelerate abruptly.
– Do not demand maximum
performance for the first few
kilometres. Wait until the engine
coolant temperature gauge starts
moving.EMERGENCY STARTING
Never bump start the
engine by pushing,
towing or driving
downhill. This could cause fuel
to flow into the catalytic
converter and damage it beyond
repair.
Remember that the
brake servo and power
steering are not operational
until the engine has been
started, so you need to apply
much more force than usual to
the brake pedal and steering
wheel.
WARNING
TO STOP THE ENGINE
Turn the ignition key to STOP while
the engine is idling.
A quick burst on the
accelerator before
turning off the engine
serves absolutely no practical
purpose; it wastes fuel and is
especially damaging to
turbocharged engines.
IMPORTANT After a taxing drive,
you should allow the engine to
“catch its breath” before turning it
off by letting it idle to allow the
temperature in the engine
compartment to fall.
Page 113 of 195
111
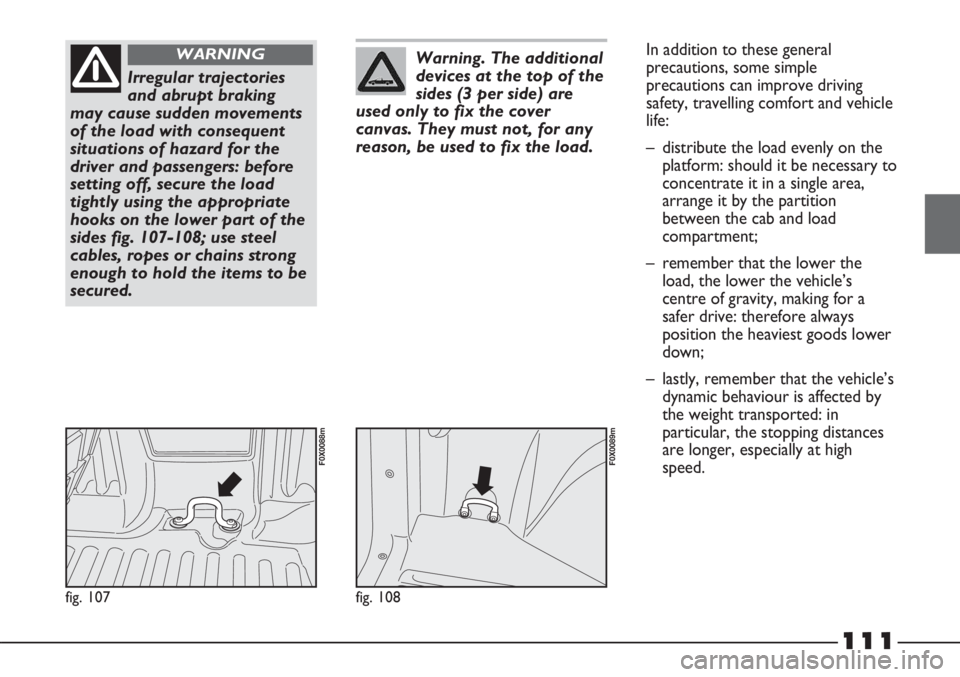
fig. 107
F0X0088m
Irregular trajectories
and abrupt braking
may cause sudden movements
of the load with consequent
situations of hazard for the
driver and passengers: before
setting off, secure the load
tightly using the appropriate
hooks on the lower part of the
sides fig. 107-108; use steel
cables, ropes or chains strong
enough to hold the items to be
secured.
WARNING
fig. 108
F0X0089m
Warning. The additional
devices at the top of the
sides (3 per side) are
used only to fix the cover
canvas. They must not, for any
reason, be used to fix the load.In addition to these general
precautions, some simple
precautions can improve driving
safety, travelling comfort and vehicle
life:
– distribute the load evenly on the
platform: should it be necessary to
concentrate it in a single area,
arrange it by the partition
between the cab and load
compartment;
– remember that the lower the
load, the lower the vehicle’s
centre of gravity, making for a
safer drive: therefore always
position the heaviest goods lower
down;
– lastly, remember that the vehicle’s
dynamic behaviour is affected by
the weight transported: in
particular, the stopping distances
are longer, especially at high
speed.
Page 114 of 195
112
FUEL SAVING
Here are some useful tips to save
fuel and minimise harmful emissions
of CO
2and other pollutants (nitric
oxides, unburnt hydrocarbons,
particulate matter etc.).
GENERAL CONSIDERATIONS
The general factors that affect fuel
consumption are listed below.
Vehicle maintenance
Have checks and adjustments carried
out on the vehicle in accordance
with the “Scheduled Servicing Plan”.Tyres
Check the pressure of the tyres
routinely at an interval of no more
than 4 weeks: if the pressure is too
low, consumption levels increase as
resistance to rolling is higher.
Unnecessary loads
Do not travel with excess load.
The weight of the vehicle (especially
when driving in town), and its trim
greatly affect consumption and
stability.
Roof rack/ski rack
Remove the roof rack or the ski
rack from the roof after use.
These accessories reduce the
vehicle’s aerodynamic penetration
and have a negative effect on
consumption. When transporting
particularly large objects, use a
trailer if possible.Electrical devices
Use electrical devices only for the
amount of time necessary. The
additional headlights, windscreen
wipers and heater fan consume a
considerable amount of energy,
thereby increasing fuel consumption
(by up to 25% in the urban cycle).
Climate control
Climate control leads to higher fuel
consumption (on average by up to
20%): if the temperature outside
permits, try and use the ventilation
only.
Devices for aerodynamic
control
The use of non-certified devices for
aerodynamic control may adversely
affect air drag and consumption
levels.
DRIVING STYLE
The main driving styles that affect
fuel consumption are listed below.
Page 125 of 195
123
Modifications or repairs
to the electrical system
that are not carried out
correctly or do not take the
system’s technical
specifications into account can
cause malfunctions leading to
the risk of fire.
WARNING
Halogen bulbs contain
pressurised gas. Glass
shards may be projected if a
bulb breaks.
WARNING
Halogen bulbs must be
handled by holding the
metal part only. If the
transparent bulb is touched with
the fingers, its lighting intensity
is reduced and life of the bulb
may be compromised. In the
event of accidental contact,
wipe the bulb with a cloth
moistened with alcohol and let
the bulb dry.
Where possible, it is
advisable to have bulbs
changed at a Fiat
Dealership. The correct
operation and direction of the
exterior lights are absolutely
essential for the driving in safety
and compliance with law.
– Burnt bulbs must be replaced by
others of the same type and
power.
– Always check the direction of the
beam after changing a headlight
bulb, for reasons of safety.
TYPES OF BULBS
Various types of bulbs are fitted on
your vehicle fig. 119:
A. All-glass bulbs
These are press-fitted.
Pull to remove them.
B. Bayonet bulbs
To remove this type of bulb from
the holder, press the bulb and turn it
anticlockwise.
C. Cylindrical bulbs
Release from the contacts to
remove.
D-E. Halogen bulbs
Detach the locking spring from its
housing to remove the bulb.IF YOU NEED TO
REPLACE A BULB
GENERAL INSTRUCTIONS
– When a light is not working,
check that the corresponding fuse
is intact before replacing the bulb.
– For the location of fuses, refer to
the paragraph “If you blow a fuse”
in this section.
– Before changing a burnt bulb,
check the contacts for oxidation.
Page 133 of 195
131
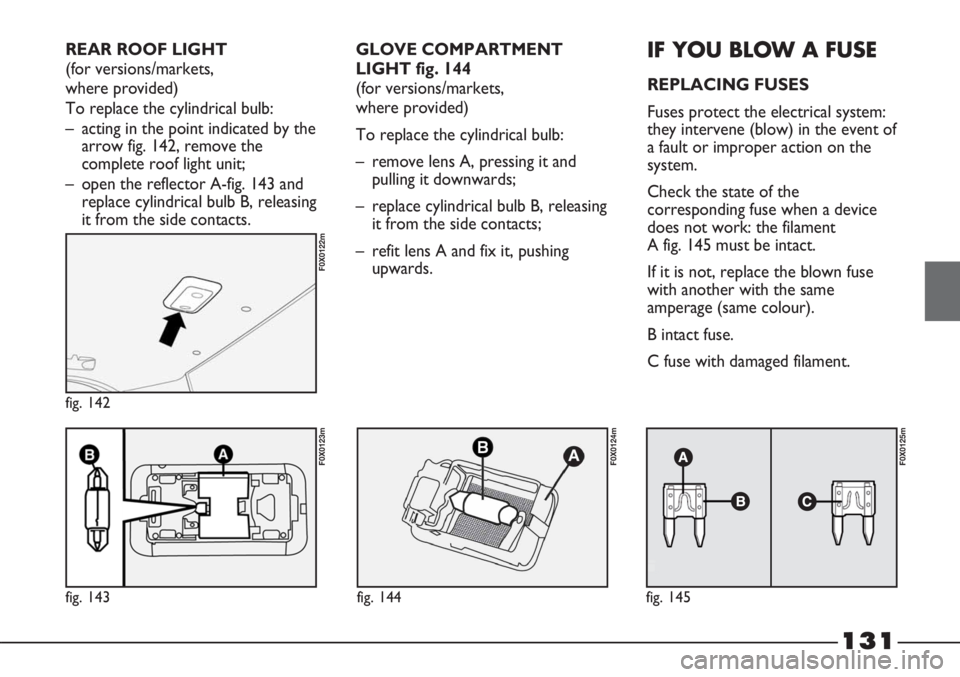
fig. 143
F0X0123m
fig. 142
F0X0122m
fig. 144
F0X0124m
fig. 145
F0X0125m
GLOVE COMPARTMENT
LIGHT fig. 144
(for versions/markets,
where provided)
To replace the cylindrical bulb:
– remove lens A, pressing it and
pulling it downwards;
– replace cylindrical bulb B, releasing
it from the side contacts;
– refit lens A and fix it, pushing
upwards.IF YOU BLOW A FUSE
REPLACING FUSES
Fuses protect the electrical system:
they intervene (blow) in the event of
a fault or improper action on the
system.
Check the state of the
corresponding fuse when a device
does not work: the filament
A fig. 145 must be intact.
If it is not, replace the blown fuse
with another with the same
amperage (same colour).
B intact fuse.
C fuse with damaged filament. REAR ROOF LIGHT
(for versions/markets,
where provided)
To replace the cylindrical bulb:
– acting in the point indicated by the
arrow fig. 142, remove the
complete roof light unit;
– open the reflector A-fig. 143 and
replace cylindrical bulb B, releasing
it from the side contacts.
Page 135 of 195
133
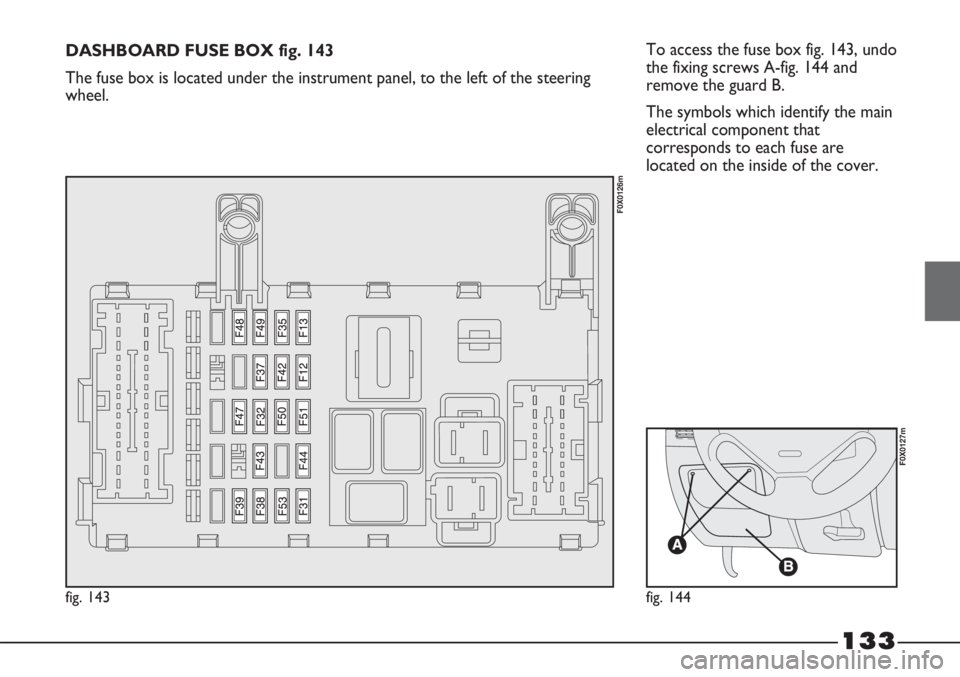
To access the fuse box fig. 143, undo
the fixing screws A-fig. 144 and
remove the guard B.
The symbols which identify the main
electrical component that
corresponds to each fuse are
located on the inside of the cover.
fig. 143
F0X0126m
fig. 144
F0X0127m
DASHBOARD FUSE BOX fig. 143
The fuse box is located under the instrument panel, to the left of the steering
wheel.
Page 151 of 195
149
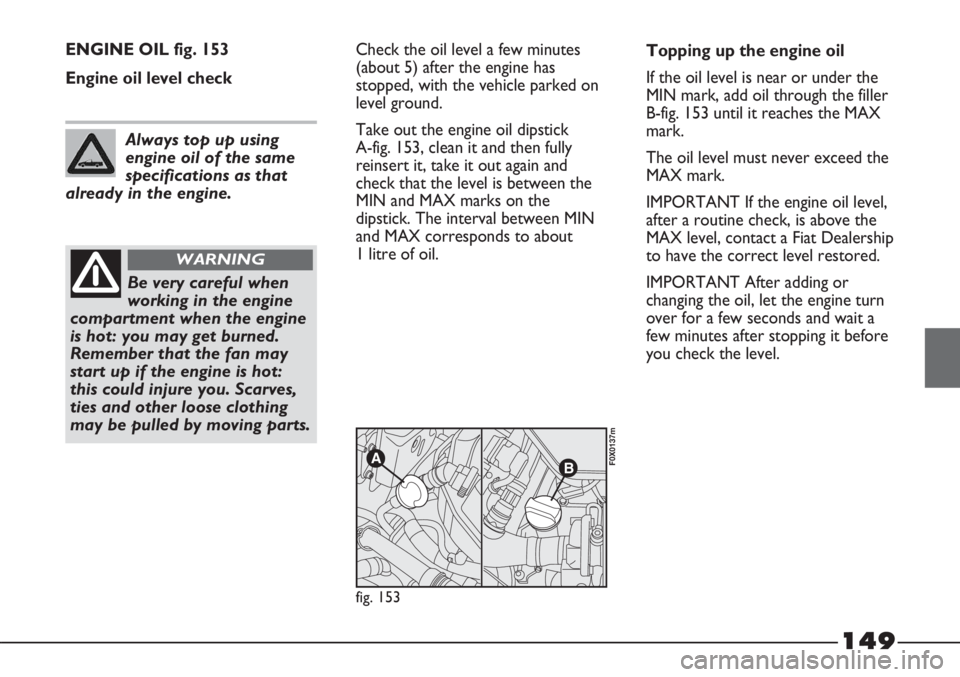
ENGINE OIL fig. 153
Engine oil level checkCheck the oil level a few minutes
(about 5) after the engine has
stopped, with the vehicle parked on
level ground.
Take out the engine oil dipstick
A-fig. 153, clean it and then fully
reinsert it, take it out again and
check that the level is between the
MIN and MAX marks on the
dipstick. The interval between MIN
and MAX corresponds to about
1 litre of oil.
AB
fig. 153
F0X0137m
Always top up using
engine oil of the same
specifications as that
already in the engine.
Be very careful when
working in the engine
compartment when the engine
is hot: you may get burned.
Remember that the fan may
start up if the engine is hot:
this could injure you. Scarves,
ties and other loose clothing
may be pulled by moving parts.
WARNING
Topping up the engine oil
If the oil level is near or under the
MIN mark, add oil through the filler
B-fig. 153 until it reaches the MAX
mark.
The oil level must never exceed the
MAX mark.
IMPORTANT If the engine oil level,
after a routine check, is above the
MAX level, contact a Fiat Dealership
to have the correct level restored.
IMPORTANT After adding or
changing the oil, let the engine turn
over for a few seconds and wait a
few minutes after stopping it before
you check the level.