coolant reservoir FIAT TEMPRA 1988 Service And Repair Manual
[x] Cancel search | Manufacturer: FIAT, Model Year: 1988, Model line: TEMPRA, Model: FIAT TEMPRA 1988Pages: 171, PDF Size: 18.05 MB
Page 7 of 171
Fluid levels (if included) are monitored by LEDs f, o and
p, indicating the levels of the fluid reservoirs.
A red LED illuminates at the position on the check panel
corresponding to a side door or a hatchback/tailgate
that is not properly closed.
SIDE AND TAIL LIGHTS
When the side and tail lights are turned on, the check
panel monitors the light bulbs, fuses and circuits.
• LED g monitors the front side lights.
• LED i monitors the tail lights.
If one of the two fuses protecting the following bulbs
blows, LEDs g, i, and m illuminate.
NUMBER PLATE LIGHTS
• LED m indicates when one or both of the number
plate light bulbs have burnt out.
REAR FOG LIGHTS
• When the fog-guard lights are turned on, LED h
monitors the light bulbs.
• When the fuse blows or a circuit malfunction occurs,
LED h illuminates, but not the panel indicator.
STOP LIGHTS
If one or both stop lights burn out, the fuse blows or a
circuit malfunction occurs, LED I or n illuminates when
braking.
• LED n monitors the left stop light.
• LED I monitors the right stop light.
If both bulbs burn out at the same time or brake pedal
switch malfunction occurs, both LEDs I and n
illuminate.
ENGINE OIL LEVEL
• LED f illuminates when the engine oil level is low (key
at MAR,engine not running).
The oil level monitoring system does not operate when
the engine is running. If the oil level warning LED
illuminates when driving, a circuit sensor malfunction
has occurred.
When starting the car on a hill or within 10 minutes of
switching off the engine the warning light may
illuminate (event will be stored in system memory). Start
the engine again on level ground to ensure the oil level
is sufficient.
COOLANT
A low coolant level is indicated by LED o (key at MAR).
The LED also illuminates when a sensor or circuit
malfunction occurs.
WINDSCREEN AND REAR SCREEN WASH LEVELS
• LED p illuminates (key at MAR) when the level in the
windscreen or rear screen wash reservoirs are low.
• The LED also indicates when a circuit or sensor
malfunction occurs.
• 5. HE ATI IMG AMD VENTILATION
CONTROLS
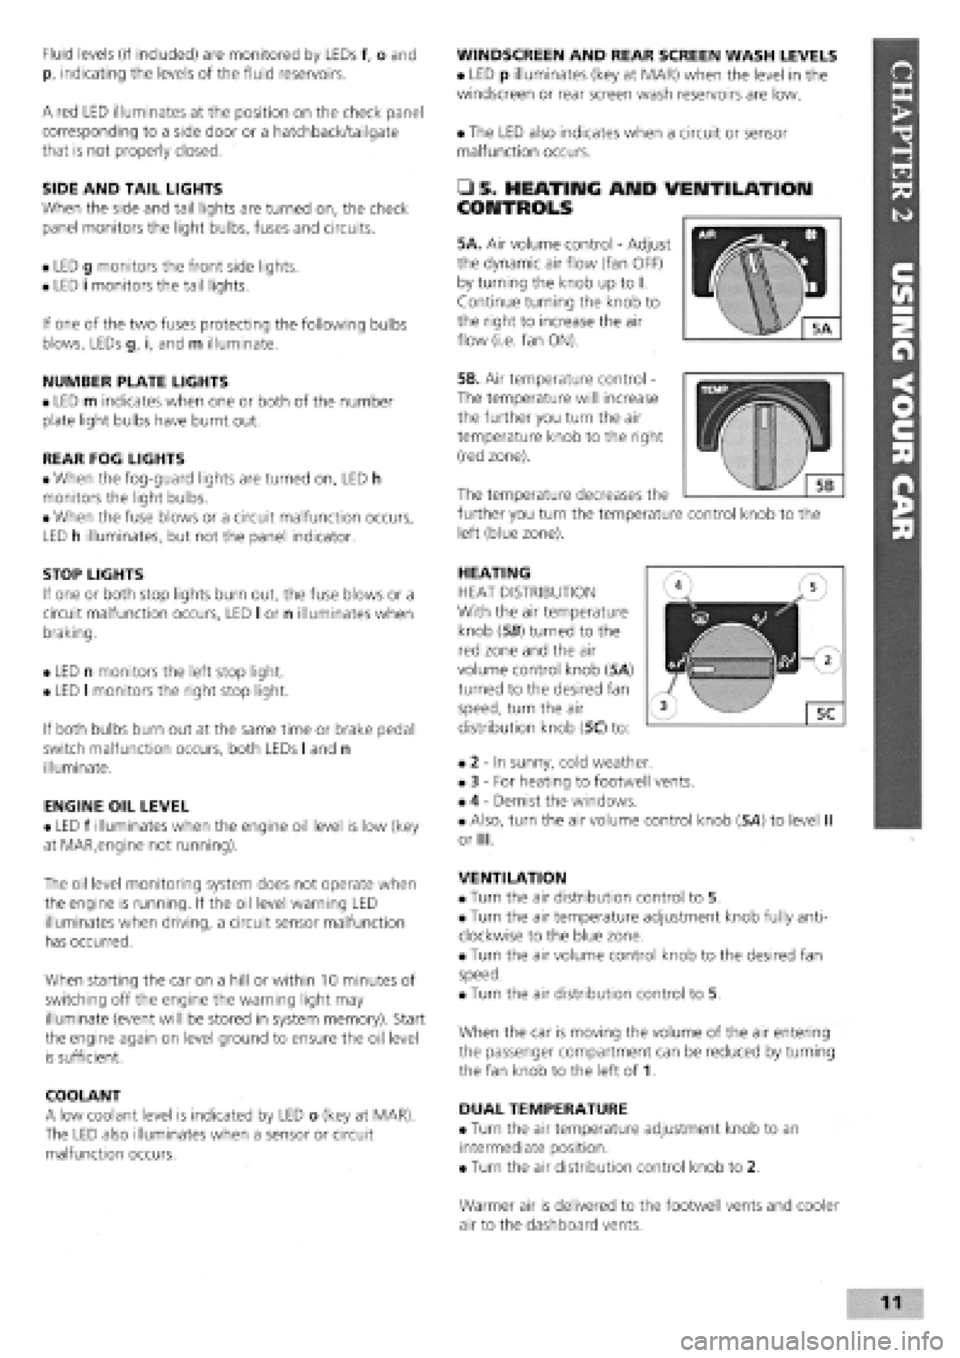
5A. Air volume control
-
Adjust
the dynamic air flow (fan OFF)
by turning the knob up to I.
Continue turning the knob to
the right to increase the air
flow (i.e. fan ON).
5B. Air temperature control -
The temperature will increase
the further you turn the air
temperature knob to the right
(red zone).
HEATING
HEAT DISTRIBUTION
With the air temperature
knob (56) turned to the
red zone and the air
volume control knob (5A)
turned to the desired fan
speed, turn the air
distribution knob (5C) to:
• 2
-
In sunny, cold weather.
• 3
-
For heating to footwell vents.
• 4
-
Demist the windows.
• Also, turn the air volume control knob (5A) to level II
or III.
VENTILATION
• Turn the air distribution control to 5.
• Turn the air temperature adjustment knob fully anti-
clockwise to the blue zone.
• Turn the air volume control knob to the desired fan
speed.
• Turn the air distribution control to 5.
When the car is moving the volume of the air entering
the passenger compartment can be reduced by turning
the fan knob to the left of 1.
DUAL TEMPERATURE
• Turn the air temperature adjustment knob to an
intermediate position.
• Turn the air distribution control knob to 2.
The temperature decreases the
further you turn the temperature control knob to the
left (blue zone).
Warmer air is delivered to the footwell vents and cooler
air to the dashboard vents.
Page 30 of 171
PART G: BRAKING SYSTEM
Job 49. Check front brakes
Job 50. Check rear brakes
Job 51. Check/adjust handbrake
Job 52. Check brake pipes
Job 53. Change brake hydraulic fluid
SERVICE INTERVALS
C
C
C
C
E
Job 56. Check seat and seat belt mountings C
Job 57. Check headlight alignment C
Job 58. Check underbody C
Job 59. Check spare tyre B
Job 60. Change pollen filter C
Job 61. Replace airbag gas generator 10 years
PART I: ROAD TEST
PART H: BODYWORK & INTERIOR
Job 54. Lubricate hinges and locks
Job 55. Check windscreen
Job 62. Road test and specialist check. AFTER EVERY
SERVICE
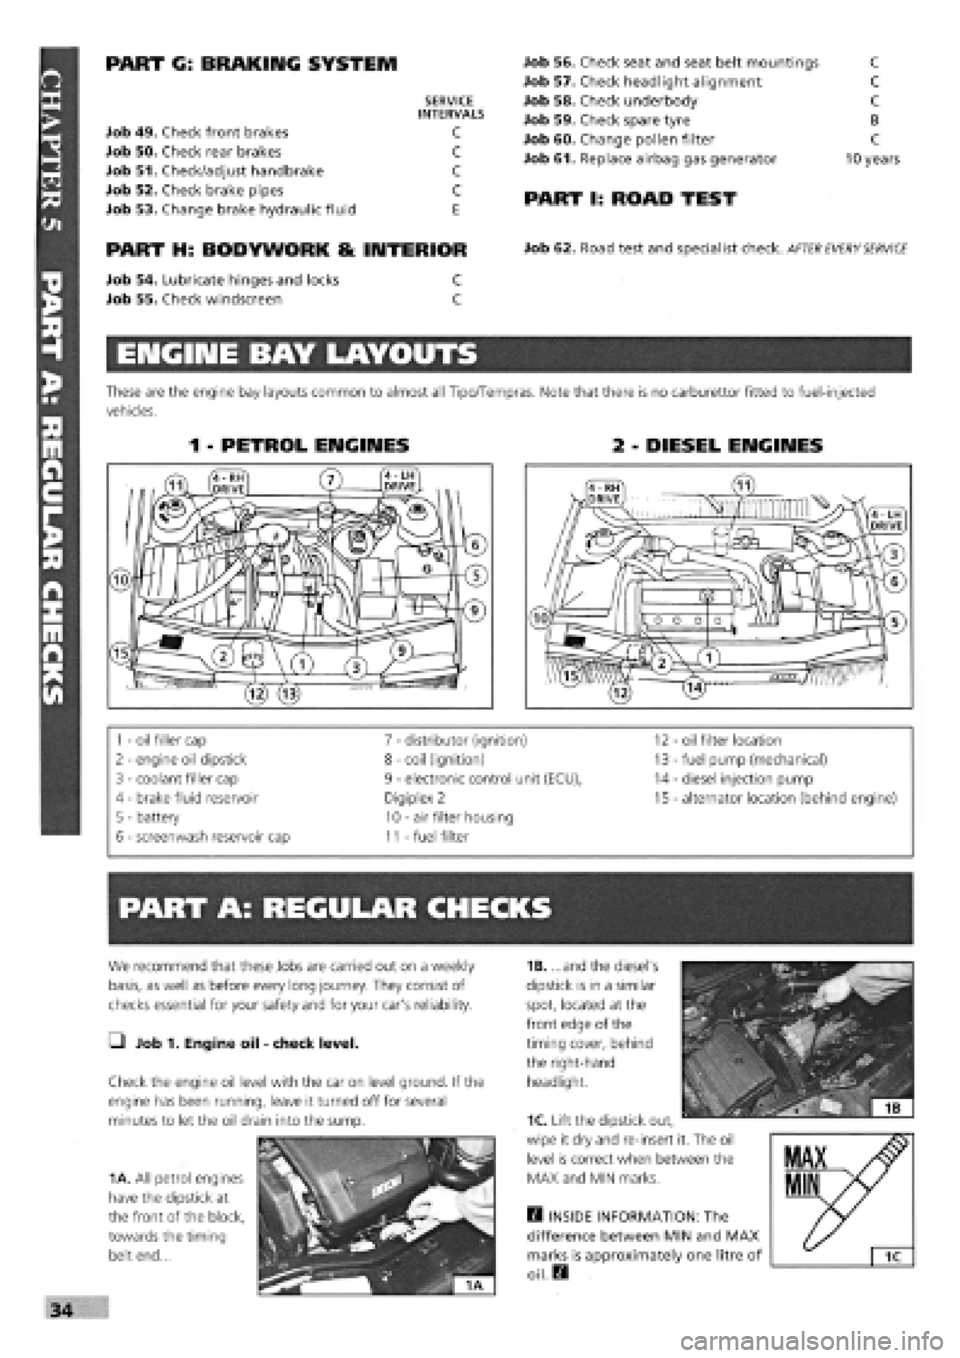
ENGINE BAY LAYOUTS
These are the engine bay layouts common to almost all Tipo/Tempras. Note that there is no carburettor fitted to fuel-injected
vehicles.
1 - PETROL ENGINES 2 - DIESEL ENGINES
1
-
oil filler cap 7
-
distributor (ignition) 12 - oil filter location
2
-
engine oil dipstick 8
-
coil (ignition) 13
-
fuel pump (mechanical)
3
-
coolant filler cap 9
-
electronic control unit (ECU), 14
-
diesel injection pump
4 - brake fluid reservoir Digiplex 2 15
-
alternator location (behind engine)
5 - battery 10
-
air filter housing
6
-
screenwash reservoir cap 11
-
fuel filter
PART A: REGULAR CHECKS
1B. ...and the diesel's
dipstick is in a similar
spot, located at the
front edge of the
timing cover, behind
the right-hand
headlight.
Q INSIDE INFORMATION: The
difference between MIN and MAX
marks is approximately one litre of
oil. Q
We recommend that these Jobs are carried out on a weekly
basis, as well as before every long journey. They consist of
checks essential for your safety and for your car's reliability.
• Job 1. Engine oil
-
check level.
Check the engine oil level with the car on level ground. If the
engine has been running, leave it turned off for several
minutes to let the oil drain into the sump.
1A. All petrol engines
have the dipstick at
the front of the block,
towards the timing
belt end...
1C. Lift the dipstick out,
wipe it dry and re-insert it. The oil
level is correct when between the
MAX and MIN marks.
Page 31 of 171
TOPPING-UP
1D. On petrol
engines the oil
filler cap is pull-
out rectangular
plug at the end
of the rocker
On diesel engines, the round cap is near the same end of the
cam cover. This cap is removed by turning a quarter-turn to
the left and lifting.
DIESEL ENGINES
Top-up, if necessary using a 50:50 mixture of distilled water
and Paraflu anti-freeze.
cover adjacent to
the distributor.
Note that on some models, the cap is circular.
1E. Pour in the
fresh oil carefully,
preferably using a
funnel. A clean
plastic bottle with
the bottom cut
off is ideal!
IMPORTANT NOTE: Regularly check the ground over
which the car has been parked for traces of oil or other
fluid leaks. If a leak is found, don't drive the car without
first finding out where the leak is from, and ideally,
repairing it.
G Job 2. Cooling system
-
check level.
SAFETY FIRST!
• ALWAYS check the coolant level with the engine
COLD
• If the engine is hot there is a real danger of
scalding
from boiling coolant gushing from the tank
when the cap is removed.
Never allow the coolant level to fall below the MIN (or UVELLO
A FREDDO) mark on the expansion tank. It is vitally important
that all engines have the correct proportion of anti-freeze in
the coolant all year round to prevent corrosion. A 50% mix of
distilled water with FL Paraflu coolant gives the best
protection.
• Job 3. Brake/dutch fluid
-
check level/s.
IMPORTANT NOTE: On later models, a hydraulic clutch is
fitted. The same fluid reservoir serves both brakes and
clutch.
SAFETY FIRST!
• If brake fluid should come into contact with skin or
eyes, rinse immediately with plenty of water.
• It is acceptable for the brake fluid level to fall
slightly during normal use, but if it falls significantly
below the MIN mark on the reservoir there is probably
a leak or internal seal failure. Stop using the car until
the problem has been put right.
• If you let dirt get into the hydraulic system it can
cause brake failure. Wipe the filler cap clean before
removing it.
• You should only ever use new brake fluid from a
sealed container
-
FIAT recommend FL Tutela Top 4
brake fluid. Old fluid absorbs moisture and this could
cause the brakes to fail when carrying out an
emergency stop or during another heavy use of the
brakes
-
just when you need them most and are least
able to do anything about it, in fact!
On all models the brake fluid reservoir is positioned above the
master cylinder either in the rear right-hand or rear left-hand
corner of the engine bay, according to model. The reservoir is
semi-transparent so the level can be checked without
disturbing the cap.
PETROL ENGINES
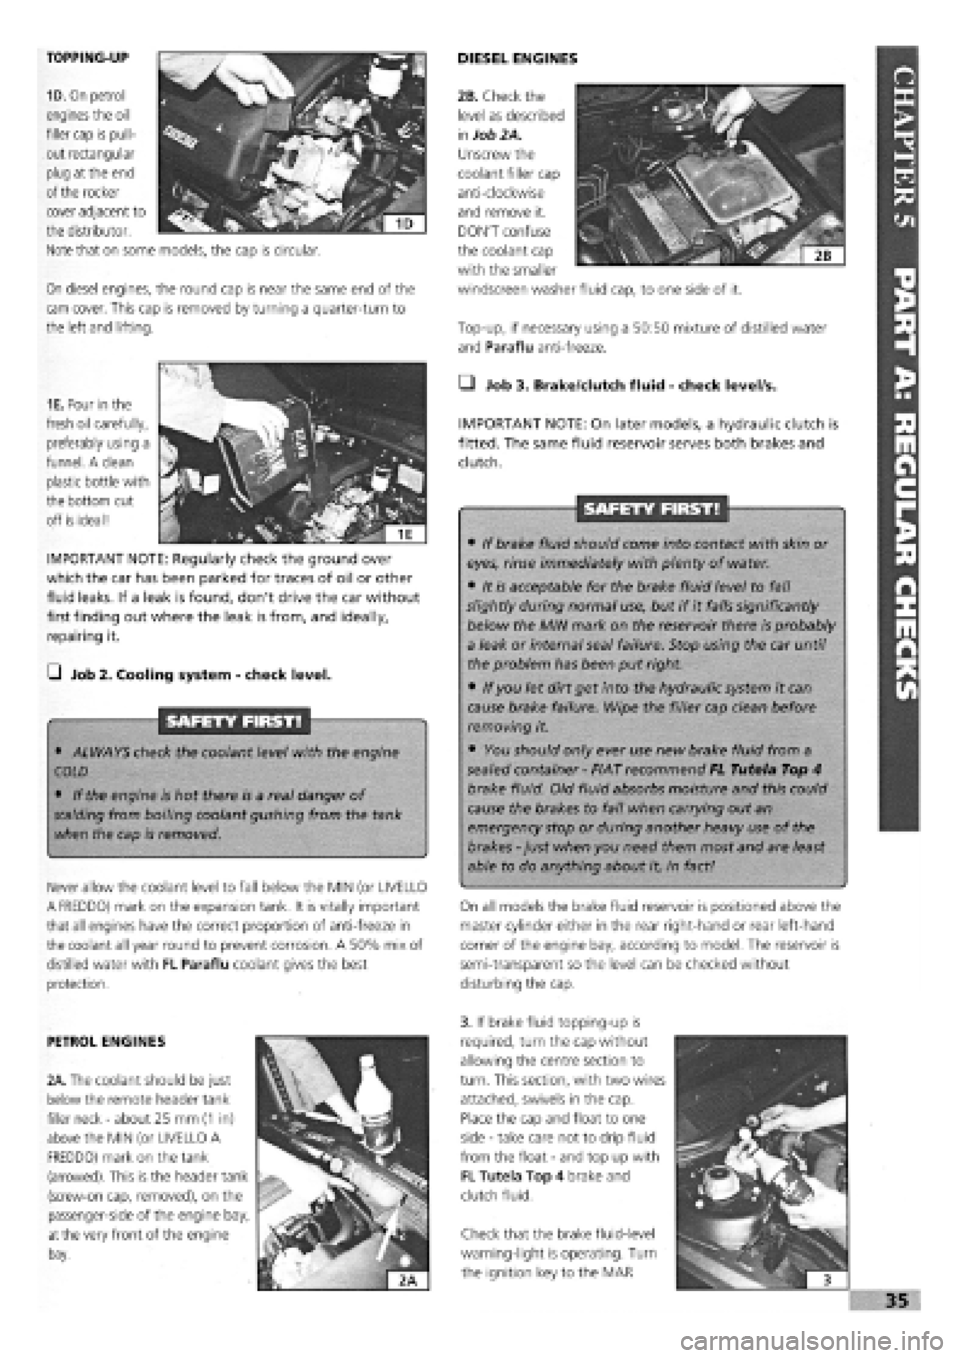
2A. The coolant should be just
below the remote header tank
filler neck
-
about 25 mm
(1
in)
above the MIN (or UVELLO A
FREDDO) mark on the tank
(arrowed). This is the header tank
(screw-on cap, removed), on the
passenger-side of the engine bay,
at
the very front of the engine
bay.
3. If brake fluid topping-up is
required, turn the cap without
allowing the centre section to
turn. This section, with two wires
attached, swivels in the cap.
Place the cap and float to one
side
-
take care not to drip fluid
from the float
-
and top up with
FL Tutela Top 4 brake and
clutch fluid.
Check that the brake fluid-level
warning-light is operating. Turn
the ignition key to the MAR
I
i 3
»35
2B. Check the
level as described
in
Job 2A.
Unscrew the
coolant filler cap
anti-clockwise
and remove it.
DON'T confuse
the coolant cap
with the smaller
windscreen washer fluid cap, to one side of it.
Page 32 of 171
(ignition-ON) position and press down the button between the
two terminals on the reservoir cap
-
when fitted. The warning
light on the dash should light up. When no button is fitted,
unscrew and raise the cap (ignition key ON) to check the
warning light. Check the bulb, check the fuse, or have your
FIAT dealer repair the warning system, if faulty.
• Job 4. Battery
-
check electrolyte level.
FACT FILE: DISCONNECTING THE
BATTERY
• Many vehicles depend on a constant
power supply from the battery; with
these you find yourself in trouble if you
simply disconnect the battery. You
might find the car alarm goes off, or that the engine
management system forgets all it ever 'learned', making
the car feel odd to drive until it has re-programmed
itself. You might also find that the radio refuses to
operate until its correct security code is keyed into it.
• On cars with engine management systems and/or
coded radios, you must ensure the car has a constant
electrical supply, even with the battery removed. You
will need a separate 12 volt battery; put a self-tapping
screw into the positive lead near the battery terminal
before disconnecting it, and put a positive connection
to your other battery via this screw.
• Be EXTREMELY CAREFUL to wrap insulation tape
around the connection so that no short is caused. The
negative terminal on the other battery must be
connected to the car's bodywork.
SAFETY FIRST!
• The gas given off by a battery is highly explosive.
Never smoke, use a naked flame or allow a spark in
the battery compartment.
• Never disconnect the battery (it can cause sparking)
with the battery caps removed.
• All vehicle batteries contain sulphuric acid. If the
acid comes into contact with the skin or eyes, wash
immediately with copious amounts of cold water and
seek medjcal advice.
• Do not check the battery levels within half an hour
of the battery being charged with a separate battery
charger because the addition of fresh water could
cause electrolyte to flood out.
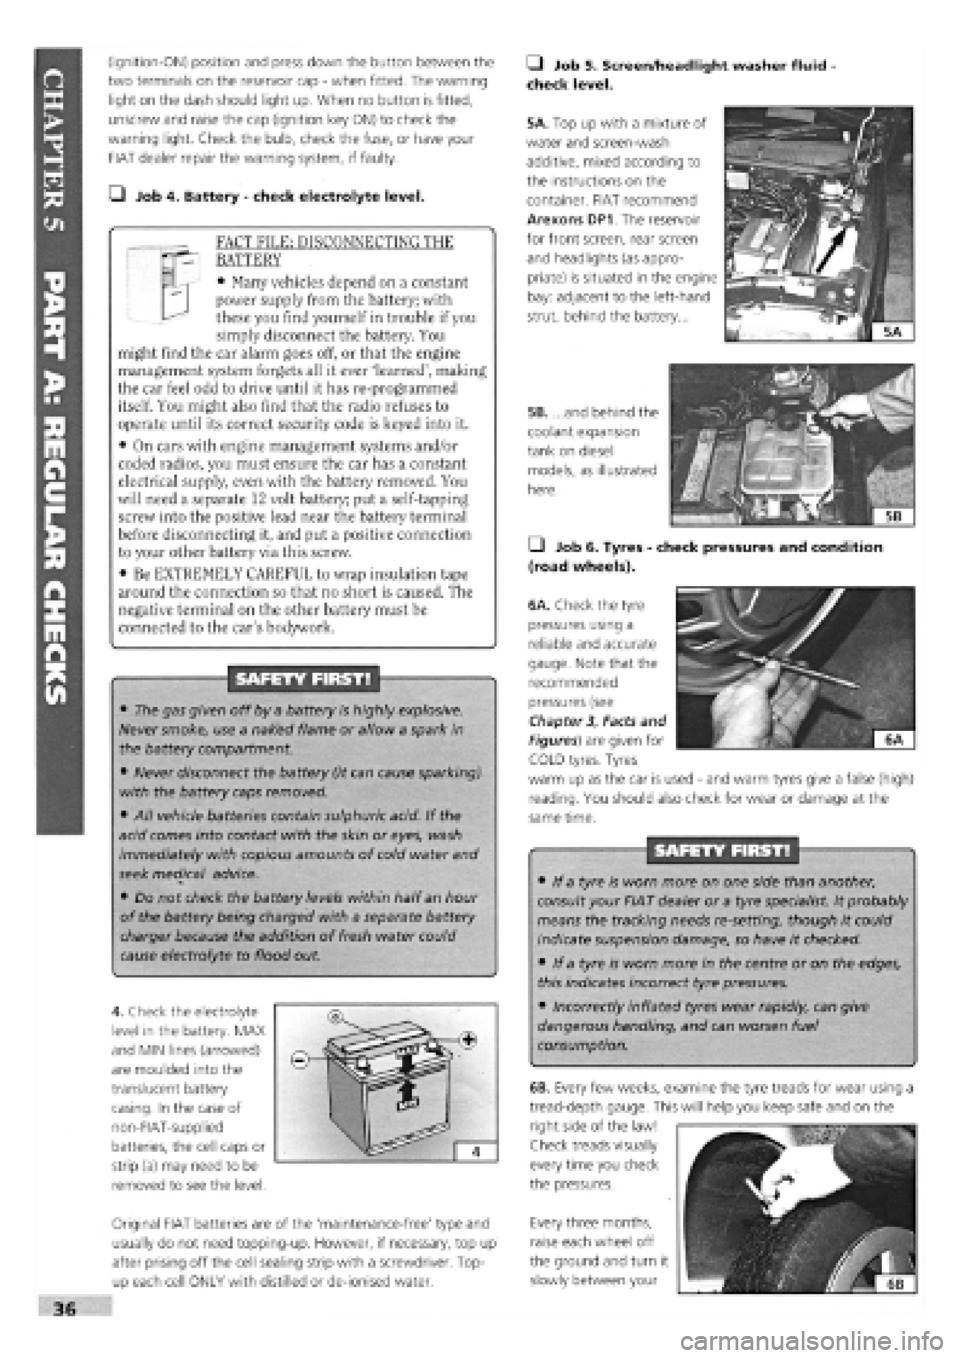
4. Check the electrolyte
level in the battery. MAX
and MIN lines (arrowed)
are moulded into the
translucent battery
casing. In the case of
non-FIAT-supplied
batteries, the cell caps or
strip (a) may need to be
removed to see the level.
Original FIAT batteries are of the 'maintenance-free' type and
usually do not need topping-up. However, if necessary, top up
after prising off the cell sealing strip with a screwdriver. Top-
up each cell ONLY with distilled or de-ionised water.
• Job 5. Screen/headlight washer fluid
check level.
5A. Top up with a mixture of
water and screen-wash
additive, mixed according to
the instructions on the
container. FIAT recommend
Arexons DP1. The reservoir
for front screen, rear screen
and headlights (as appro-
priate) is situated in the engine
bay: adjacent to the left-hand
strut, behind the battery...
5B. ...and behind the
coolant expansion
tank on diesel
models, as illustrated
here.
• Job 6. Tyres
-
check pressures and condition
(road wheels).
/
6A. Check the tyre
pressures using a
reliable and accurate
gauge. Note that the
recommended
pressures (see
Chapter
3,
Facts and
Figures) are given for ^^
iH^KKSEI ^ "'
COLD tyres. Tyres
warm up as the car is used
-
and warm tyres give a false (high)
reading. You should also check for wear or damage at the
same time.
SAFETY FIRST!
• If a tyre is worn more on one side than another,
consult your FIAT dealer or a tyre specialist. It probably
means the tracking needs re-setting, though it could
indicate suspension damage, so have it checked.
• If a tyre is worn more in the centre or on the edges,
this indicates incorrect tyre pressures.
• Incorrectly inflated tyres wear rapidly, can give
dangerous handling, and can worsen fuel
consumption.
Every three months,
raise each wheel off
the ground and turn it
slowly between your
36
6B. Every few weeks, examine the tyre treads for wear using a
tread-depth gauge. This will help you keep safe and on the
right side of the law!
Check treads visually
every time you check
the pressures.
Page 126 of 171
Q Step A9: Place the steering wheel in the dead ahead
position and engage the rack pinion splines with the column
coupling.
Q Step A10: Continue refitting in the reverse order of
removal.
• Step A11: Take your car to your nearest FIAT dealership
or tyre specialist to have the front wheel alignment set before
using the car further. This is NOT a job you can do at home
but is DOES need doing as soon as possible to avoid severe
tyre wear and dangerous braking and steering!
PART B: POWER STEERING RACK
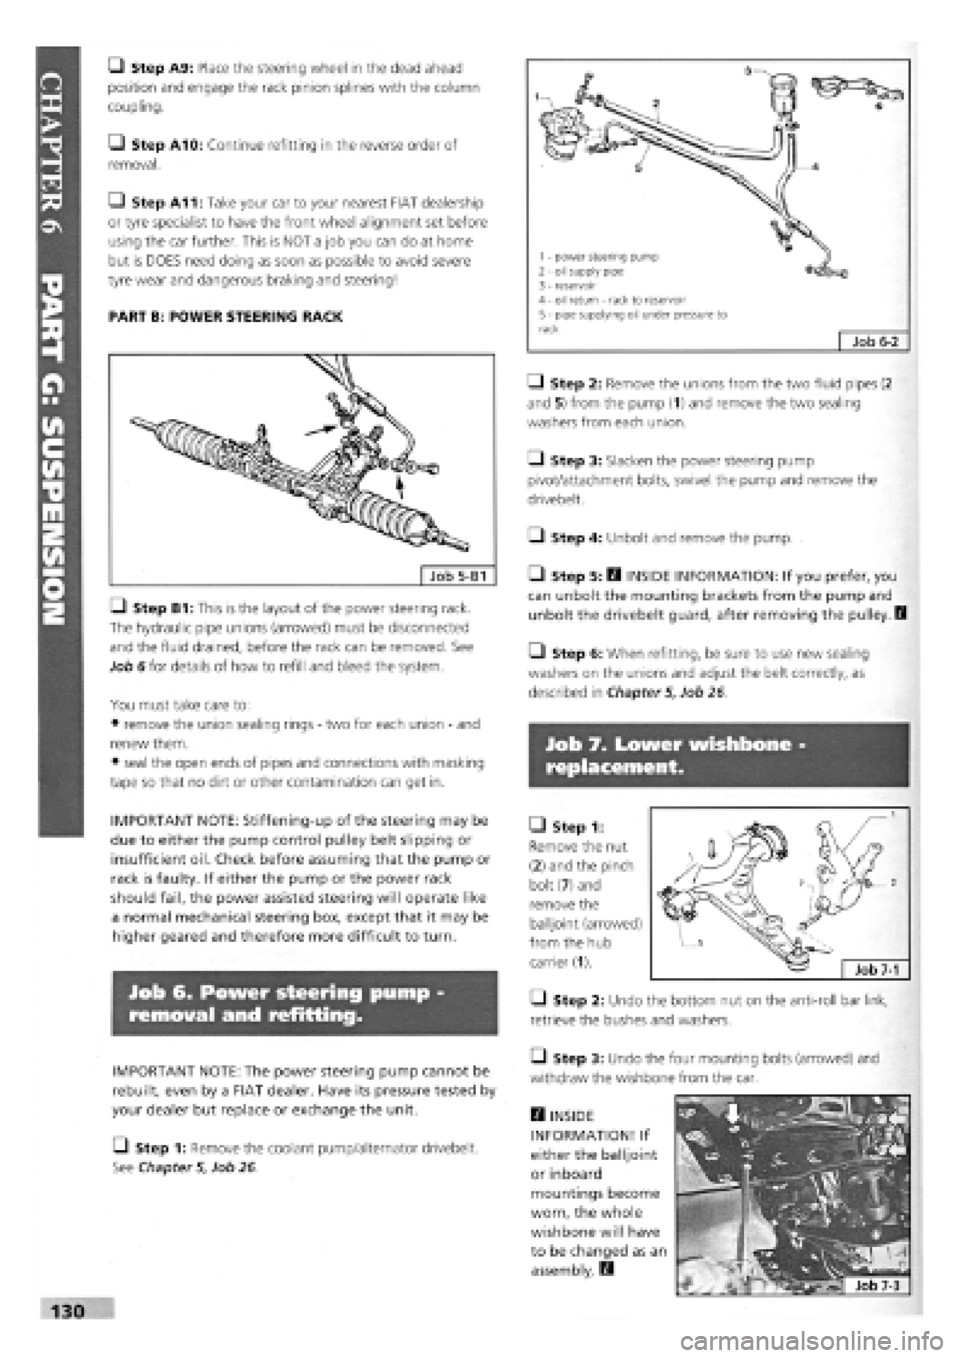
LI Step B1: This is the layout of the power steering rack.
The hydraulic pipe unions (arrowed) must be disconnected
and the fluid drained, before the rack can be removed. See
Job 6 for details of how to refill and bleed the system.
You must take care to:
• remove the union sealing rings
-
two for each union
-
and
renew them.
• seal the open ends of pipes and connections with masking
tape so that no dirt or other contamination can get in.
IMPORTANT NOTE: Stiffening-up of the steering may be
due to either the pump control pulley belt slipping or
insufficient oil. Check before assuming that the pump or
rack is faulty. If either the pump or the power rack
should fail, the power assisted steering will operate like
a normal mechanical steering box, except that it may be
higher geared and therefore more difficult to turn.
Job 6. Power steering pump
removal and refitting.
IMPORTANT NOTE: The power steering pump cannot be
rebuilt, even by a FIAT dealer. Have its pressure tested by
your dealer but replace or exchange the unit.
[_) Step 1: Remove the coolant pump/alternator drivebelt.
See Chapter
5,
Job 26.
• Step 2: Remove the unions from the two fluid pipes (2
and 5) from the pump (1) and remove the two sealing
washers from each union.
Q Step 3: Slacken the power steering pump
pivot/attachment bolts, swivel the pump and remove the
drivebelt.
• Step 4: Unbolt and remove the pump.
• Step 5: B INSIDE INFORMATION: If you prefer, you
can unbolt the mounting brackets from the pump and
unbolt the drivebelt guard, after removing the pulley. I
• Step 6: When refitting, be sure to use new sealing
washers on the unions and adjust the belt correctly, as
described in Chapter
5,
Job 26
Job 7. Lower wishbone
replacement.
• Step 1:
Remove the nut
(2) and the pinch
bolt (7) and
remove the
balljoint (arrowed)
from the hub
carrier (1).
• Step 2: Undo the bottom nut on the anti-roll bar link,
retrieve the bushes and washers.
• Step 3: Undo the four mounting bolts (arrowed) and
withdraw the wishbone from the car.
H INSIDE
INFORMATION! If
either the balljoint
or inboard
mountings become
worn, the whole
wishbone will have
to be changed as an
assembly. E3
130
1 - power steering pump 2 - oil supply pipe 3 - reservoir 4 - oil return - rack to reservoir 5 - pipe supplying oil under pressure to rack Job
6-2
Page 150 of 171
gjpjgjjl 'READING' YOUR SPARK PLUGS
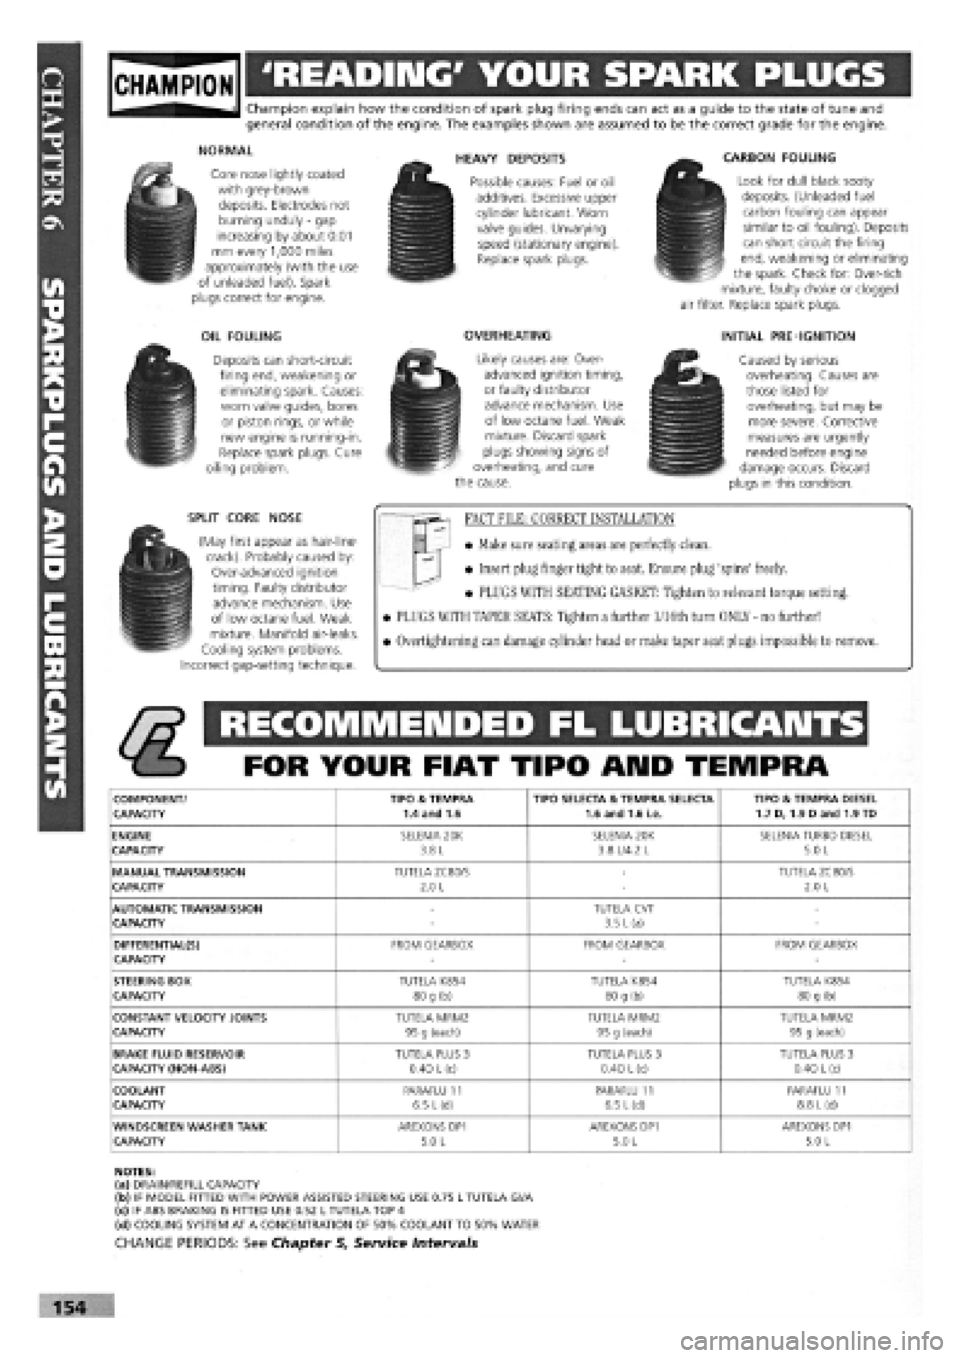
Champion explain how the condition of spark plug firing ends can act as a guide to the state of tune and general condition of the engine. The examples shown are assumed to be the correct grade for the engine.
NORMAL
Core nose lightly coated with grey-brown deposits. Electrodes not burning unduly
-
gap increasing by about 0.01 mm every 1,000 miles approximately (with the use of unleaded fuel). Spark plugs correct for engine.
OIL FOULING
Deposits can short-circuit firing end, weakening or eliminating spark. Causes: worn valve guides, bores or piston rings, or while new engine is running-in. Replace spark plugs. Cure oiling problem.
SPLIT CORE NOSE
(May first appear as hair-line-crack). Probably caused by: Over-advanced ignition timing. Faulty distributor advance mechanism. Use of low octane fuel. Weak mixture. Manifold air-leaks. Cooling system problems. Incorrect gap-setting technique.
HEAVY DEPOSITS
Possible causes: Fuel or oil additives. Excessive upper cylinder lubricant. Worn valve guides. Unvarying speed (stationary engine). Replace spark plugs.
OVERHEATING
Likely causes are: Over-advanced ignition timing, or faulty distributor advance mechanism. Use of low octane fuel. Weak mixture. Discard spark plugs showing signs of overheating, and cure the cause.
CARBON FOULING
Look for dull black sooty deposits. (Unleaded fuel carbon fouling can appear similar to oil fouling). Deposits can short circuit the firing end, weakening or eliminating the spark. Check for: Over-rich mixture, faulty choke or clogged air filter. Replace spark plugs.
INITIAL PRE-IGNITION
Caused by serious overheating. Causes are those listed for overheating, but may be more severe. Corrective measures are urgently needed before engine damage occurs. Discard plugs in this condition.
FACT FILE: CORRECT INSTALLATION
• Make sure seating areas are perfectly clean.
• Insert plug finger tight to seat. Ensure plug 'spins' freely.
• PLUGS WITH SEATING GASKET: Tighten to relevant torque setting.
• PLUGS WITH TAPER SEATS: Tighten a further l/16th turn ONLY - no further!
• Overtightening can damage cylinder head or make taper seat plugs impossible to remove.
RECOMMENDED FL LUBRICANTS
FOR YOUR FIAT TIPO ARID TEMPRA
COMPONENT/ TIPO & TEMPRA TIPO SELECTA & TEMPRA SELECTA TIPO & TEMPRA DIESEL CAPACITY 1.4 and 1.6 1.6 and 1.6 i.e. 1.7 D, 1.9 Dand 1.9 TD
ENGINE SELENIA 20K SELENIA 20K SELENIA TURBO DIESEL CAPACITY 3.8 L 3.8 L/4.2 L 5.0 L
MANUAL TRANSMISSION TUTELA ZC80/S -TUTELA ZC80/S CAPACITY 2.0 L -2.0 L
AUTOMATIC TRANSMISSION -TUTELA CVT -CAPACITY -3.5 L (a) -
DIFFERENTIAL(S) FROM GEARBOX FROM GEARBOX FROM GEARBOX CAPACITY ---
STEERING BOX TUTELA K854 TUTELA K854 TUTELA K854 CAPACITY 80 g (b) 80 g (b) 80 g (b)
CONSTANT VELOCITY JOINTS TUTELA MRM2 TUTELA MRM2 TUTELA MRM2 CAPACITY 95 g (each) 95 g (each) 95 g (each)
BRAKE FLUID RESERVOIR TUTELA PLUS 3 TUTELA PLUS 3 TUTELA PLUS 3 CAPACITY (NON-ABS) 0.40
L
(c) 0.40 L (c) 0.40
L
(c)
COOLANT PARAFLU 11 PARAFLU 11 PARAFLU 11 CAPACITY 6.5 L(d) 6.5 L(d) 8.8
L
(d)
WINDSCREEN WASHER TANK AREXONS DP1 AREXONS DP1 AREXONS DP1 CAPACITY 5.0 L 5.0 L 5.0 L
NOTES: (a) DRAIN/REFILL CAPACITY (b) IF MODEL FITTED WITH POWER ASSISTED STEERING USE 0.75 L TUTELA Gl/A (c) IF ABS BRAKING IS FITTED USE 0.52 L TUTELA TOP 4 (d) COOLING SYSTEM AT A CONCENTRATION OF 50% COOLANT TO 50% WATER
CHANGE PERIODS: See Chapter 5, Service Intervals
154
Page 171 of 171
A Accelerator linkages and cables 118,119 Aerial 112 Airbag 14, 63, 128 Air cleaner/filter 51 Air Conditioning 12,41 Alternator, drive belt . . 49, 50, 110 Antifreeze 43, 44 Anti-roll bars 131 Auto-Biography 1 Automatic transmission fluid 45 gear selector cable 102
B Ball-joints steering and suspension 57 Battery disconnecting 36 electrolyte 36 safety 7 Bellows, steering gear (see 'Gaiters') Bonnet 15, 143 Brakes 59 to 62, 134 to 142 bleeding 141 caliper 59 to 61, 135, 137 cylinder (master) 138 discs, front 59, 135 discs, rear 61, 137 drums 60, 136 fluid, check level 35,36 handbrake 61, 142 hoses/pipes 62, 141 pads 59, 135, 137 pressure regulating/proportioning . . . valve (ABS) 140 pressure regulating/proportioning valve (Non-ABS) 139 RPM sensors (ABS systems) .... 140 safety 7 servo 138 shoes 135 wear sensors (non-ABS) 60 Bulb renewal (see 'Lights') Bushes 57 Bumper removal and refitting. 146
c Cables accelerator 118,119 automatic transmission ... 101, 102 choke 119 clutch 46, 101 handbrake 61 Caliper, brakes (see 'Brakes') Camshaft belt 43, 66 Capacities 19,154 Carburettor adjustment 53 removal 117 Catalytic converter 54, 55 safety 6 Central locking 114 Choke 119 Clutch adjustment 46, 100 hydraulic 46, 105 replacement 100 cable 46, 101 Coil, ignition 47, 107, 108 Coil spring 57 Constant Velocity (C.V.) joints (see 'Driveshaft') Contents 4 Controls and switches ... 10 to 14 Cooling system .. 35, 43, 106 to107 change coolant 43 radiator pressure cap 35 Crankcase ventilation system 42 Cylinder head Diesel 87 to 93
Petrol 67 to 73
D Data 17 to 27 Diesel bleeding the system 126,127 fuel filter 52 glow plugs 115 injection pump 56,124 injectors 126 Disc, brakes (see 'Brakes') Distributor 108, 109 cap 47 Marelli Breakerless 48 Marelli Digiplex 2 48, 49 Doors hinges 62 locKs and handles 147 to 150 removal and refitting 147 trim panels 146 Drivebelts alternator 49, 50, 110 camshaft 43 Driveshaft C.V. joints 103 gaiters 45, 103 removal and refitting 103 Drum (see 'Brakes')
E Electrical system 110 to 115 Electronic control module 54 safety 7 Emergency starting 16 Emissions 31, 51 to 56 control 53, 54 legal limits 31 Engine bay layouts 34 Engine dismantling Diesel 95 Petrol 73 Engine mountings Diesel 95 Petrol 83 Engine oil (see 'Oil') check level 34 Engine refitting Diesel 94 Petrol 82 Exhaust manifold 56 Exhaust 56 system 56, 122 Expansion tank 35
F Facts & Figures 17 to 27 Fan 50, 106 Fast idle carburettor 53, 54 fuel injection 54 diesel 55 Filter air 51 diesel 52 petrol 52 oil (see 'Oil filter') pollen 63 Fire Extinguisher . 6 Fluoroelastomers, safety 8 Fuel cut-off switch 13 Fuel gauge 114 Fuel injection 52, 54, 55, 117 Fuel lines/pipes 51 Fuel pump electric 120 mechanical 120 Fuel system 51 to 56 evaporation control system . 54,122 Fuel tank 121 Fumes, safety 6 Fuses 40
Gearbox (transmission) .... 44 to 46 oil (automatic) . . 45 oil (manual) 44 Generator drive belt (see 'Alternator, drive belt')
H Handbrake 61, 142 Headlights (see 'Lights') adjustment 62 bulb replacement 37 Headrest 153 Heater 11 Hoses/pipes (see 'Pipes and hoses') HT leads 47 Hub front 104 rear 134
I Identification numbers 27 Idle speed adjustment (see 'Carburettor') Ignition system 46 to 51, 107 to 109 coil 47,48 safety 7 Ignition timing 19, 48 to 50 Instruments 110 panel lights 10 Intercooler 123, 124
J Jacking safety 5 wheelchange 15, 16 Jump leads (Jump starting) 16
L Lambda sensor ... 54, 55, 121, 122 Lights fog lights 13, 38 hazard warning 13 headlights 13,37 indicators 13, 37 interior 15, 39, 40 MoT 28 number plate 39 rear lights 38 reversing lights 39 sidelights 13, 37 Locks and latches 9, 10, 62 Lubricants 154
m Manifold fixings 56 Mirrors 14, 150 Mixture adjustment (see 'Carburettor') Model years 17, 18 MoT, getting through 28 to 31
m Number plates (lights) . . 28, 39, 145
o Oil change disposal 7, 8 engine 41, 42 transmission 44, 45 safety 7 Oil filler cap 35 Oil filter 41 Oil level engine 34, 35 gearbox 44, 45 topping up 35
P-Pads, brake (see 'Brakes') Pipes and hoses brakes 62, 138, 141 hot air 121 radiator (cooling system) 43 Plastics, safety 7 Production changes 17, 18
ft Radiator .* 106 Raising the car 5 Repair data 20 Road test, brakes and steering ... 63 Rotor arm 47, 49
s Safety First! 5 to 8 Seats 14, 151 to 153 mountings 62 Seat belts mountings 62 pretensioners 151, 152 Servicing Your Car 32 to 63 Shock absorbers 57,131 Shoes, brake (see 'Brakes') Sidelights (see 'Lights') Spark plugs 47, 154 Specifications (see 'Facts & Figures') Speedometer cable 110 Starter motor 110 Steering 57, 58, 127 to 131 lower wishbone 127, 130 power steering 58, 130 rack gaiters 58, 133 Steering wheel 128 Sun roof 151 Suspension ... 57 to 59, 127 to 134 front 57, 127, 131 rear 58, 59, 128, 133 strut 57, 131
T Tailgate wiper (see 'Windscreen wipers') Tailgate and strut 144 Thermostat 107 Throttle cable and pedal (see 'Accelerator, linkage and cables') Timing belt 43 Diesel 85 to 87 Petrol 65, 66 Torque wrench settings ... 23 to 27 Track control arm (inner bushes). . 57 Track rod ends 57, 58, 128 Transmission. . 80 to 83, 95, 98 to 106 removal 80 to 82 separation and reconnection (Diesel). . 95 separation and reconnection (Petrol). . 83 Transmission fluid 44, 45 Turbocharger replacement 122 to 124 Tyre checking 30, 36 pressures 18,36
u Universal joints 28, 58 Using your car 9 to 16
¥ Vacuum unit, distributor 48 Valve clearances 42, 43, 79, 93 Valve grinding 72 Vehicle Identification Numbers (VIN) 27
w Washer fluid reservoir 36 Water pump 107 Wheel alignment 28 Wheel bearings 57, 58 Wheel bolts 59 Wheel changing 15,16 Wheel cylinder 137 Wheel sizes 18 Windscreen, damage 29,162 Window regulator 147 to 149 Windscreen washers 112 Windscreen wipers 13,111 Wiring diagrams 155 to 174
Gaiters 30, 57
expert22 fl/ia http://rutracker.org