FIAT TIPO 5DOORS STATION WAGON 2017 1.G Owners Manual
Manufacturer: FIAT, Model Year: 2017, Model line: TIPO 5DOORS STATION WAGON, Model: FIAT TIPO 5DOORS STATION WAGON 2017 1.GPages: 264, PDF Size: 4.53 MB
Page 131 of 264
REFUELLING
PROCEDURE
Diesel and petrol versions
"Capless Fuel" is a device at the
opening for the fuel tank which opens
and recloses automatically when the
fuel supply gun is introduced/removed.
The "Capless Fuel" device is provided
with an inhibitor which prevents
refuelling with incorrect fuel.
Opening the flap
To refuel proceed as follows:
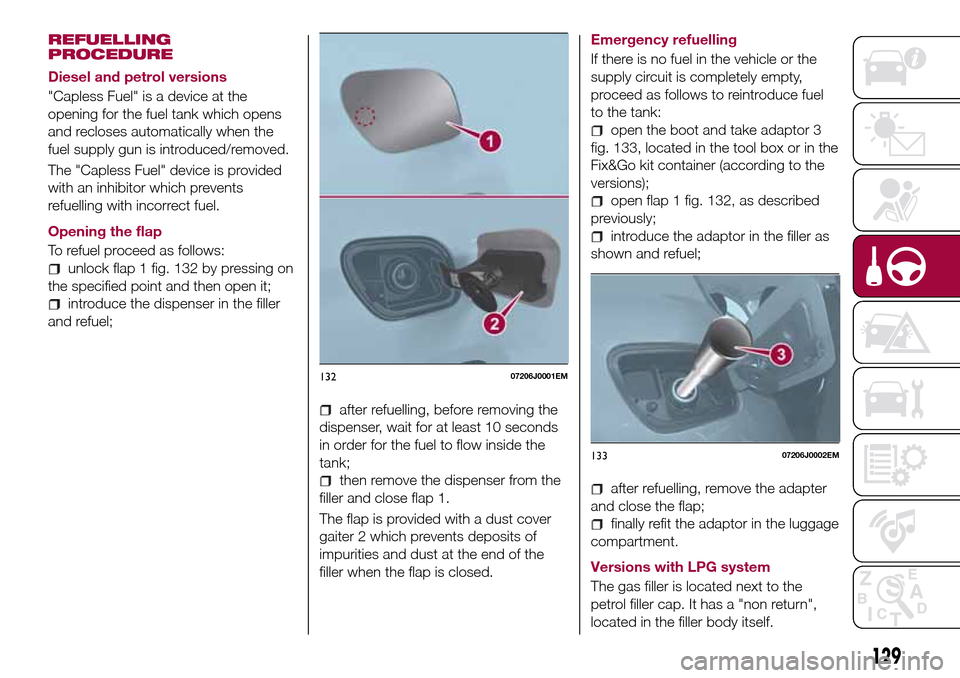
unlock flap 1 fig. 132 by pressing on
the specified point and then open it;
introduce the dispenser in the filler
and refuel;
after refuelling, before removing the
dispenser, wait for at least 10 seconds
in order for the fuel to flow inside the
tank;
then remove the dispenser from the
filler and close flap 1.
The flap is provided with a dust cover
gaiter 2 which prevents deposits of
impurities and dust at the end of the
filler when the flap is closed.Emergency refuelling
If there is no fuel in the vehicle or the
supply circuit is completely empty,
proceed as follows to reintroduce fuel
to the tank:
open the boot and take adaptor 3
fig. 133, located in the tool box or in the
Fix&Go kit container (according to the
versions);
open flap 1 fig. 132, as described
previously;
introduce the adaptor in the filler as
shown and refuel;
after refuelling, remove the adapter
and close the flap;
finally refit the adaptor in the luggage
compartment.
Versions with LPG system
The gas filler is located next to the
petrol filler cap. It has a "non return",
located in the filler body itself.
13207206J0001EM
13307206J0002EM
129
Page 132 of 264
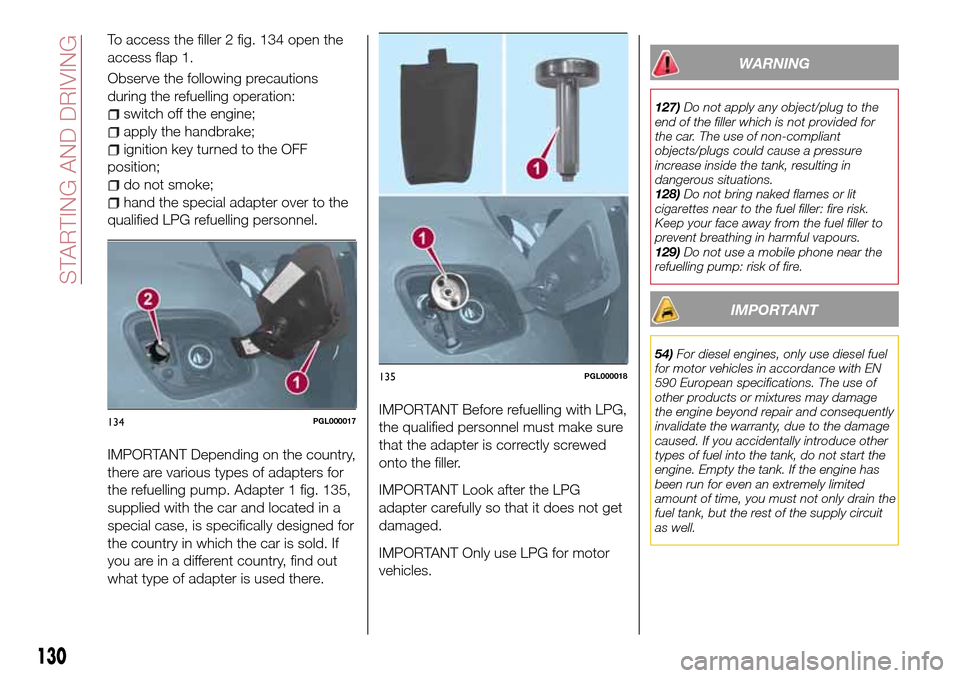
To access the filler 2 fig. 134 open the
access flap 1.
Observe the following precautions
during the refuelling operation:
switch off the engine;
apply the handbrake;
ignition key turned to the OFF
position;
do not smoke;
hand the special adapter over to the
qualified LPG refuelling personnel.
IMPORTANT Depending on the country,
there are various types of adapters for
the refuelling pump. Adapter 1 fig. 135,
supplied with the car and located in a
special case, is specifically designed for
the country in which the car is sold. If
you are in a different country, find out
what type of adapter is used there.IMPORTANT Before refuelling with LPG,
the qualified personnel must make sure
that the adapter is correctly screwed
onto the filler.
IMPORTANT Look after the LPG
adapter carefully so that it does not get
damaged.
IMPORTANT Only use LPG for motor
vehicles.
WARNING
127)Do not apply any object/plug to the
end of the filler which is not provided for
the car. The use of non-compliant
objects/plugs could cause a pressure
increase inside the tank, resulting in
dangerous situations.
128)Do not bring naked flames or lit
cigarettes near to the fuel filler: fire risk.
Keep your face away from the fuel filler to
prevent breathing in harmful vapours.
129)Do not use a mobile phone near the
refuelling pump: risk of fire.
IMPORTANT
54)For diesel engines, only use diesel fuel
for motor vehicles in accordance with EN
590 European specifications. The use of
other products or mixtures may damage
the engine beyond repair and consequently
invalidate the warranty, due to the damage
caused. If you accidentally introduce other
types of fuel into the tank, do not start the
engine. Empty the tank. If the engine has
been run for even an extremely limited
amount of time, you must not only drain the
fuel tank, but the rest of the supply circuit
as well.
134PGL000017
135PGL000018
130
STARTING AND DRIVING
Page 133 of 264
IN AN EMERGENCY
A punctured tyre or a burnt-out bulb?
At times, a problem may interfere with
our journey.
The pages on emergencies can help
you to deal with critical situations
independently and with calm.
In an emergency we recommend that
you call the freephone number found in
the Warranty Booklet.
It is also possible to call the national or
international universal freephone
number to search for the nearest Fiat
Dealership.HAZARD WARNING LIGHTS.....132
BULB REPLACEMENT........132
REPLACING FUSES..........142
CHANGING A WHEEL.........148
FIX&GO AUTOMATIC KIT.......152
JUMP STARTING............155
FUEL CUT-OFF SYSTEM.......157
TOWING THE VEHICLE........159
131
Page 134 of 264
HAZARD WARNING
LIGHTS
CONTROL
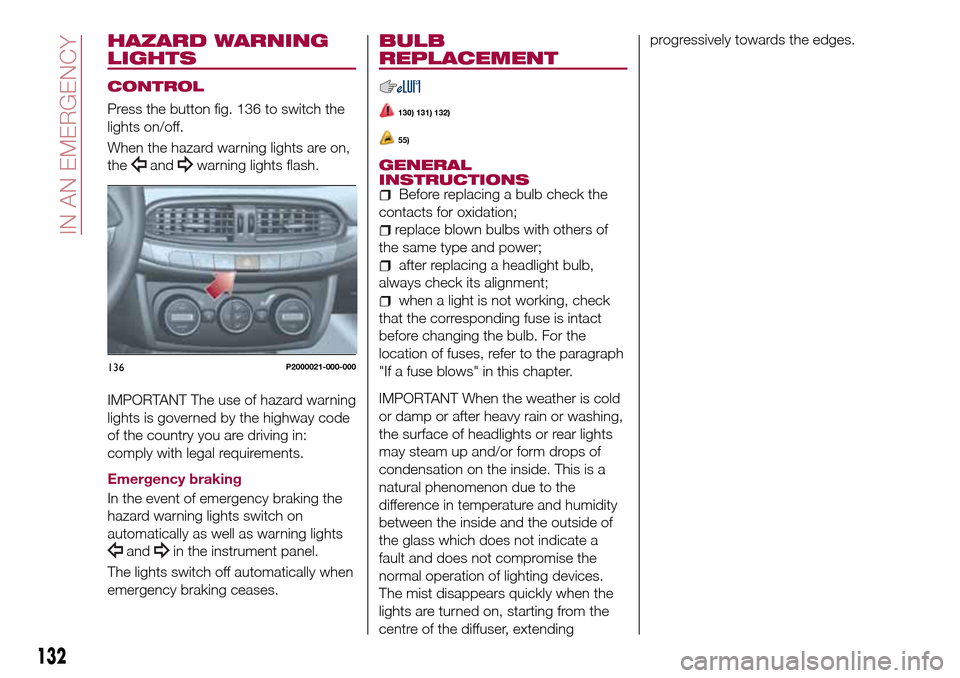
Press the button fig. 136 to switch the
lights on/off.
When the hazard warning lights are on,
the
andwarning lights flash.
IMPORTANT The use of hazard warning
lights is governed by the highway code
of the country you are driving in:
comply with legal requirements.
Emergency braking
In the event of emergency braking the
hazard warning lights switch on
automatically as well as warning lights
andin the instrument panel.
The lights switch off automatically when
emergency braking ceases.
BULB
REPLACEMENT
130) 131) 132)
55)
GENERAL
INSTRUCTIONS
Before replacing a bulb check the
contacts for oxidation;
replace blown bulbs with others of
the same type and power;
after replacing a headlight bulb,
always check its alignment;
when a light is not working, check
that the corresponding fuse is intact
before changing the bulb. For the
location of fuses, refer to the paragraph
"If a fuse blows" in this chapter.
IMPORTANT When the weather is cold
or damp or after heavy rain or washing,
the surface of headlights or rear lights
may steam up and/or form drops of
condensation on the inside. This is a
natural phenomenon due to the
difference in temperature and humidity
between the inside and the outside of
the glass which does not indicate a
fault and does not compromise the
normal operation of lighting devices.
The mist disappears quickly when the
lights are turned on, starting from the
centre of the diffuser, extendingprogressively towards the edges.
136P2000021-000-000
132
IN AN EMERGENCY
Page 135 of 264
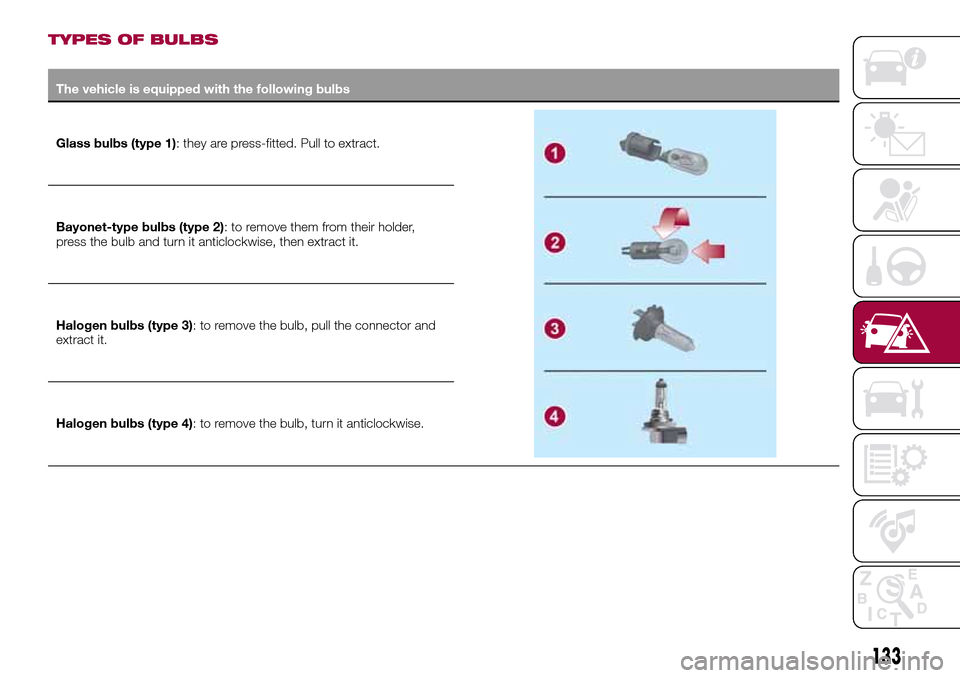
TYPES OF BULBS
The vehicle is equipped with the following bulbs
Glass bulbs (type 1): they are press-fitted. Pull to extract.
Bayonet-type bulbs (type 2): to remove them from their holder,
press the bulb and turn it anticlockwise, then extract it.
Halogen bulbs (type 3): to remove the bulb, pull the connector and
extract it.
Halogen bulbs (type 4): to remove the bulb, turn it anticlockwise.
133
Page 136 of 264
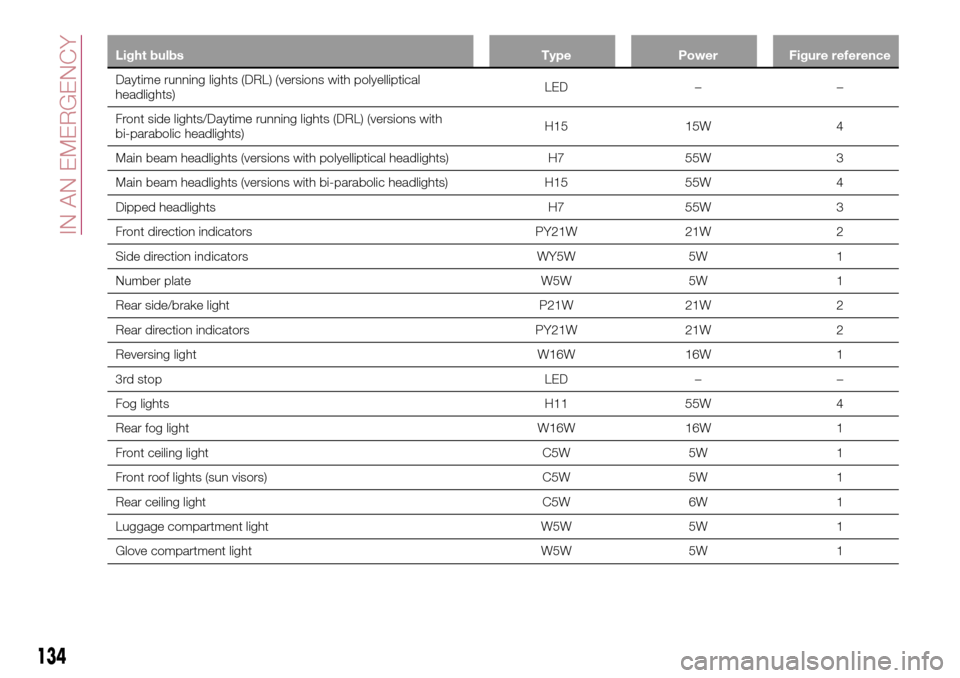
Light bulbs Type Power Figure reference
Daytime running lights (DRL) (versions with polyelliptical
headlights)LED – –
Front side lights/Daytime running lights (DRL) (versions with
bi-parabolic headlights)H15 15W 4
Main beam headlights (versions with polyelliptical headlights) H7 55W 3
Main beam headlights (versions with bi-parabolic headlights) H15 55W 4
Dipped headlights H7 55W 3
Front direction indicators PY21W 21W 2
Side direction indicators WY5W 5W 1
Number plate W5W 5W 1
Rear side/brake light P21W 21W 2
Rear direction indicators PY21W 21W 2
Reversing light W16W 16W 1
3rd stop LED – –
Fog lights H11 55W 4
Rear fog light W16W 16W 1
Front ceiling light C5W 5W 1
Front roof lights (sun visors) C5W 5W 1
Rear ceiling light C5W 6W 1
Luggage compartment light W5W 5W 1
Glove compartment light W5W 5W 1
134
IN AN EMERGENCY
Page 137 of 264
REPLACING AN
EXTERNAL BULB
Versions with polyelliptical
headlights
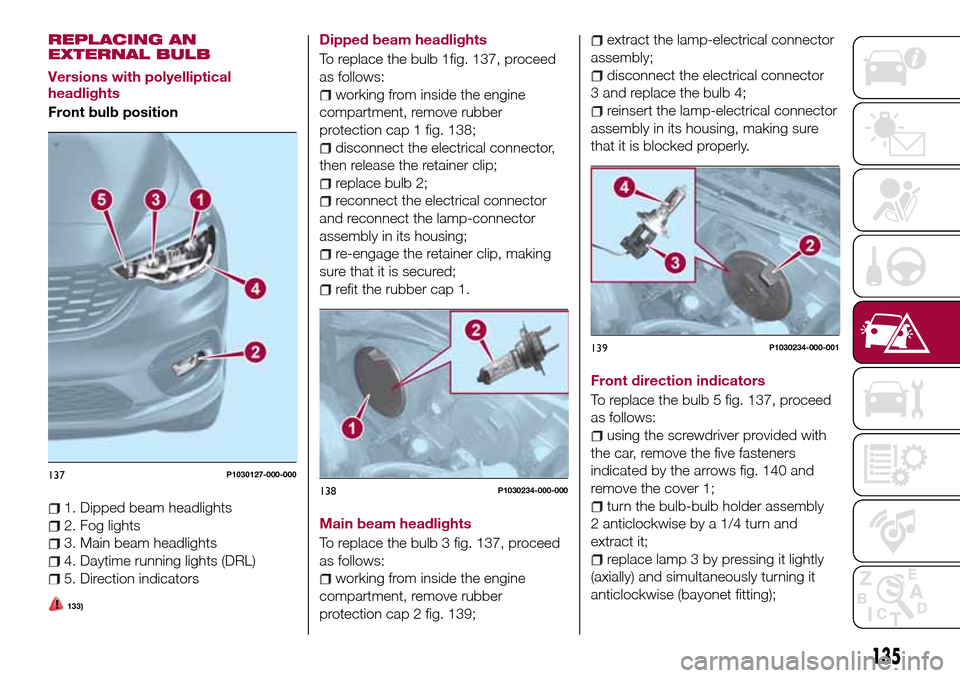
Front bulb position
1. Dipped beam headlights
2. Fog lights
3. Main beam headlights
4. Daytime running lights (DRL)
5. Direction indicators
133)
Dipped beam headlights
To replace the bulb 1fig. 137, proceed
as follows:
working from inside the engine
compartment, remove rubber
protection cap 1 fig. 138;
disconnect the electrical connector,
then release the retainer clip;
replace bulb 2;
reconnect the electrical connector
and reconnect the lamp-connector
assembly in its housing;
re-engage the retainer clip, making
sure that it is secured;
refit the rubber cap 1.
Main beam headlights
To replace the bulb 3 fig. 137, proceed
as follows:
working from inside the engine
compartment, remove rubber
protection cap 2 fig. 139;
extract the lamp-electrical connector
assembly;
disconnect the electrical connector
3 and replace the bulb 4;
reinsert the lamp-electrical connector
assembly in its housing, making sure
that it is blocked properly.
Front direction indicators
To replace the bulb 5 fig. 137, proceed
as follows:
using the screwdriver provided with
the car, remove the five fasteners
indicated by the arrows fig. 140 and
remove the cover 1;
turn the bulb-bulb holder assembly
2 anticlockwise by a 1/4 turn and
extract it;
replace lamp 3 by pressing it lightly
(axially) and simultaneously turning it
anticlockwise (bayonet fitting);
137P1030127-000-000
138P1030234-000-000
139P1030234-000-001
135
Page 138 of 264
reinsert the bulb-bulb holder
assembly in its housing, then turn the
assembly 2 clockwise, making sure that
it is blocked.
Front fog lamps
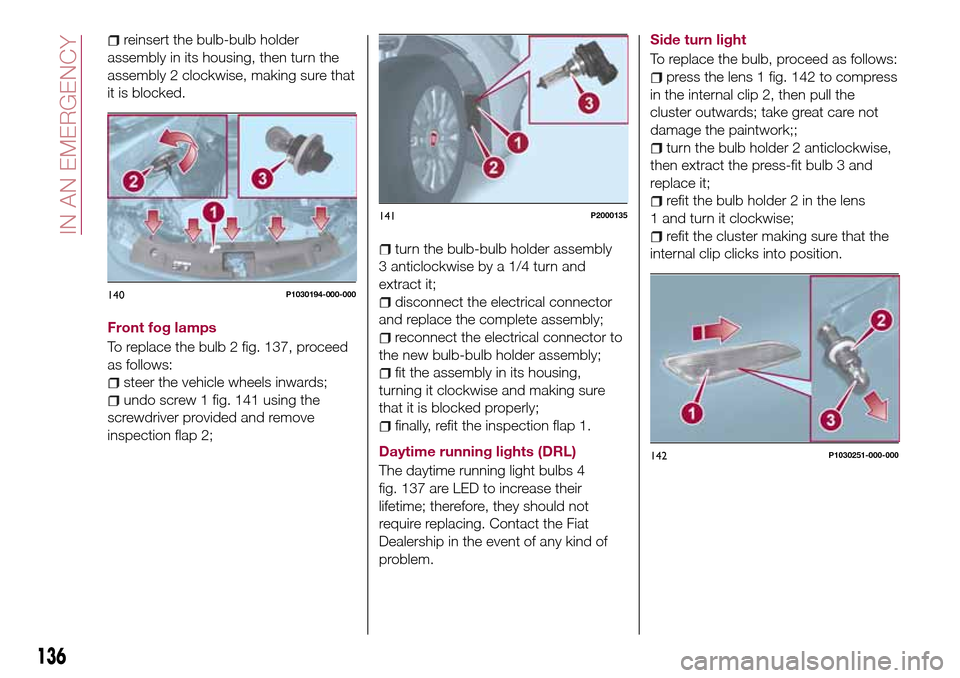
To replace the bulb 2 fig. 137, proceed
as follows:
steer the vehicle wheels inwards;
undo screw 1 fig. 141 using the
screwdriver provided and remove
inspection flap 2;
turn the bulb-bulb holder assembly
3 anticlockwise by a 1/4 turn and
extract it;
disconnect the electrical connector
and replace the complete assembly;
reconnect the electrical connector to
the new bulb-bulb holder assembly;
fit the assembly in its housing,
turning it clockwise and making sure
that it is blocked properly;
finally, refit the inspection flap 1.
Daytime running lights (DRL)
The daytime running light bulbs 4
fig. 137 are LED to increase their
lifetime; therefore, they should not
require replacing. Contact the Fiat
Dealership in the event of any kind of
problem.Side turn light
To replace the bulb, proceed as follows:
press the lens 1 fig. 142 to compress
in the internal clip 2, then pull the
cluster outwards; take great care not
damage the paintwork;;
turn the bulb holder 2 anticlockwise,
then extract the press-fit bulb 3 and
replace it;
refit the bulb holder 2 in the lens
1 and turn it clockwise;
refit the cluster making sure that the
internal clip clicks into position.
140P1030194-000-000
141P2000135
142P1030251-000-000
136
IN AN EMERGENCY
Page 139 of 264
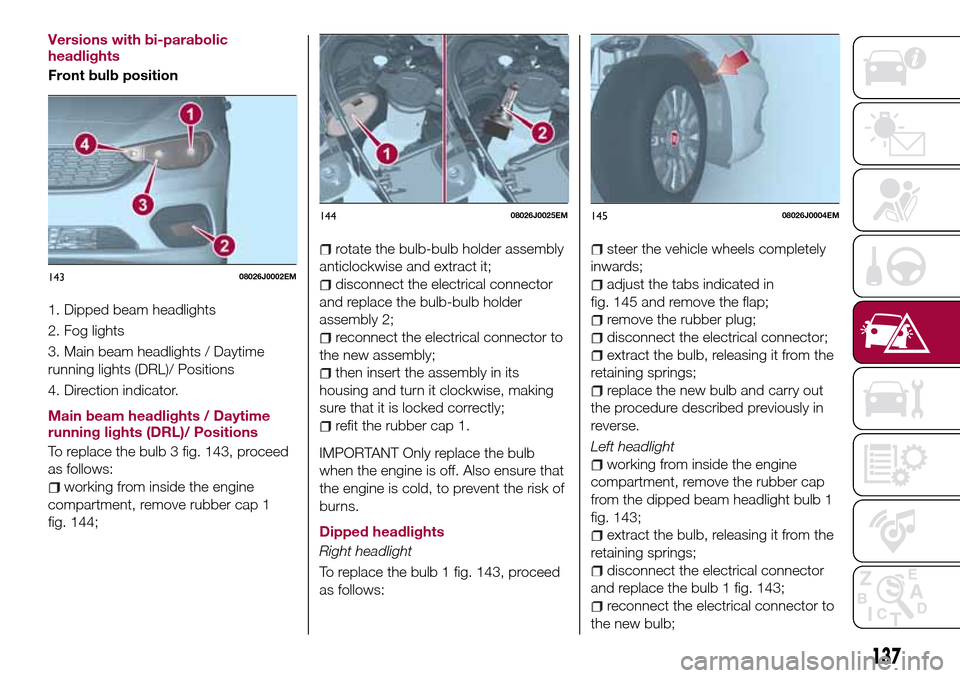
Versions with bi-parabolic
headlights
Front bulb position
1. Dipped beam headlights
2. Fog lights
3. Main beam headlights / Daytime
running lights (DRL)/ Positions
4. Direction indicator.
Main beam headlights / Daytime
running lights (DRL)/ Positions
To replace the bulb 3 fig. 143, proceed
as follows:
working from inside the engine
compartment, remove rubber cap 1
fig. 144;
rotate the bulb-bulb holder assembly
anticlockwise and extract it;
disconnect the electrical connector
and replace the bulb-bulb holder
assembly 2;
reconnect the electrical connector to
the new assembly;
then insert the assembly in its
housing and turn it clockwise, making
sure that it is locked correctly;
refit the rubber cap 1.
IMPORTANT Only replace the bulb
when the engine is off. Also ensure that
the engine is cold, to prevent the risk of
burns.
Dipped headlights
Right headlight
To replace the bulb 1 fig. 143, proceed
as follows:
steer the vehicle wheels completely
inwards;
adjust the tabs indicated in
fig. 145 and remove the flap;
remove the rubber plug;
disconnect the electrical connector;
extract the bulb, releasing it from the
retaining springs;
replace the new bulb and carry out
the procedure described previously in
reverse.
Left headlight
working from inside the engine
compartment, remove the rubber cap
from the dipped beam headlight bulb 1
fig. 143;
extract the bulb, releasing it from the
retaining springs;
disconnect the electrical connector
and replace the bulb 1 fig. 143;
reconnect the electrical connector to
the new bulb;
14308026J0002EM
14408026J0025EM14508026J0004EM
137
Page 140 of 264
reposition the assembly in the seat;
refit the rubber cap.
IMPORTANT Only replace the bulb
when the engine is off. Also ensure that
the engine is cold, to prevent the risk of
burns.
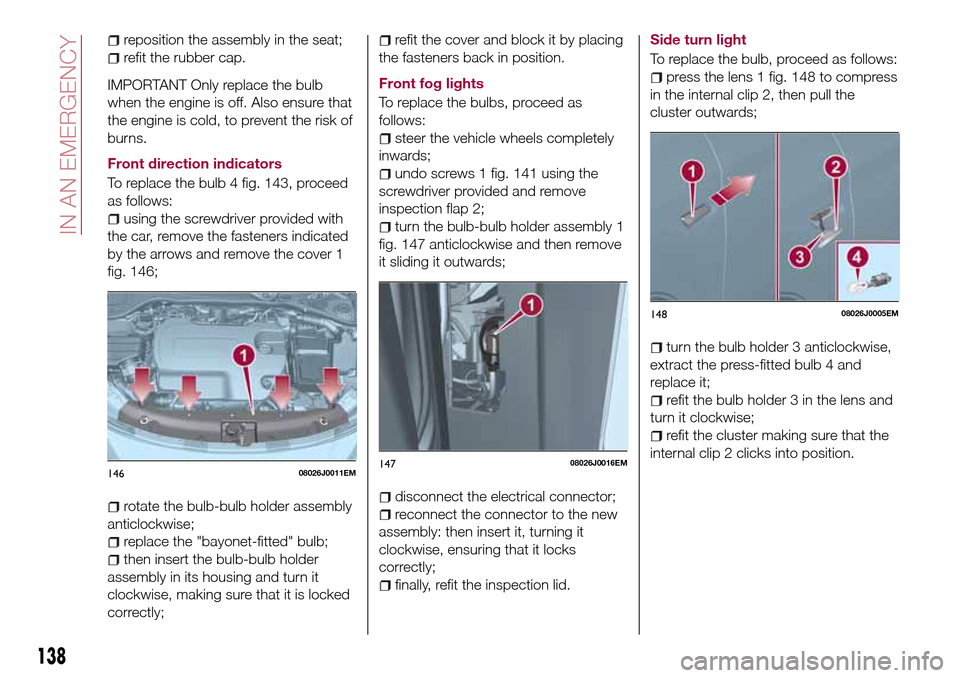
Front direction indicators
To replace the bulb 4 fig. 143, proceed
as follows:
using the screwdriver provided with
the car, remove the fasteners indicated
by the arrows and remove the cover 1
fig. 146;
rotate the bulb-bulb holder assembly
anticlockwise;
replace the "bayonet-fitted" bulb;
then insert the bulb-bulb holder
assembly in its housing and turn it
clockwise, making sure that it is locked
correctly;
refit the cover and block it by placing
the fasteners back in position.
Front fog lights
To replace the bulbs, proceed as
follows:
steer the vehicle wheels completely
inwards;
undo screws 1 fig. 141 using the
screwdriver provided and remove
inspection flap 2;
turn the bulb-bulb holder assembly 1
fig. 147 anticlockwise and then remove
it sliding it outwards;
disconnect the electrical connector;
reconnect the connector to the new
assembly: then insert it, turning it
clockwise, ensuring that it locks
correctly;
finally, refit the inspection lid.Side turn light
To replace the bulb, proceed as follows:
press the lens 1 fig. 148 to compress
in the internal clip 2, then pull the
cluster outwards;
turn the bulb holder 3 anticlockwise,
extract the press-fitted bulb 4 and
replace it;
refit the bulb holder 3 in the lens and
turn it clockwise;
refit the cluster making sure that the
internal clip 2 clicks into position.
14608026J0011EM14708026J0016EM
14808026J0005EM
138
IN AN EMERGENCY