Light FORD BRONCO 2022 Manual PDF
[x] Cancel search | Manufacturer: FORD, Model Year: 2022, Model line: BRONCO, Model: FORD BRONCO 2022Pages: 562, PDF Size: 73 MB
Page 337 of 562
ADJUSTING THE HEADLAMPS
Vertical Aim Adjustment
The headlamps on your vehicle areproperly aimed at the assembly plant. Ifyour vehicle has been in an accident,contact an authorized dealer to check andrealign your headlamps.
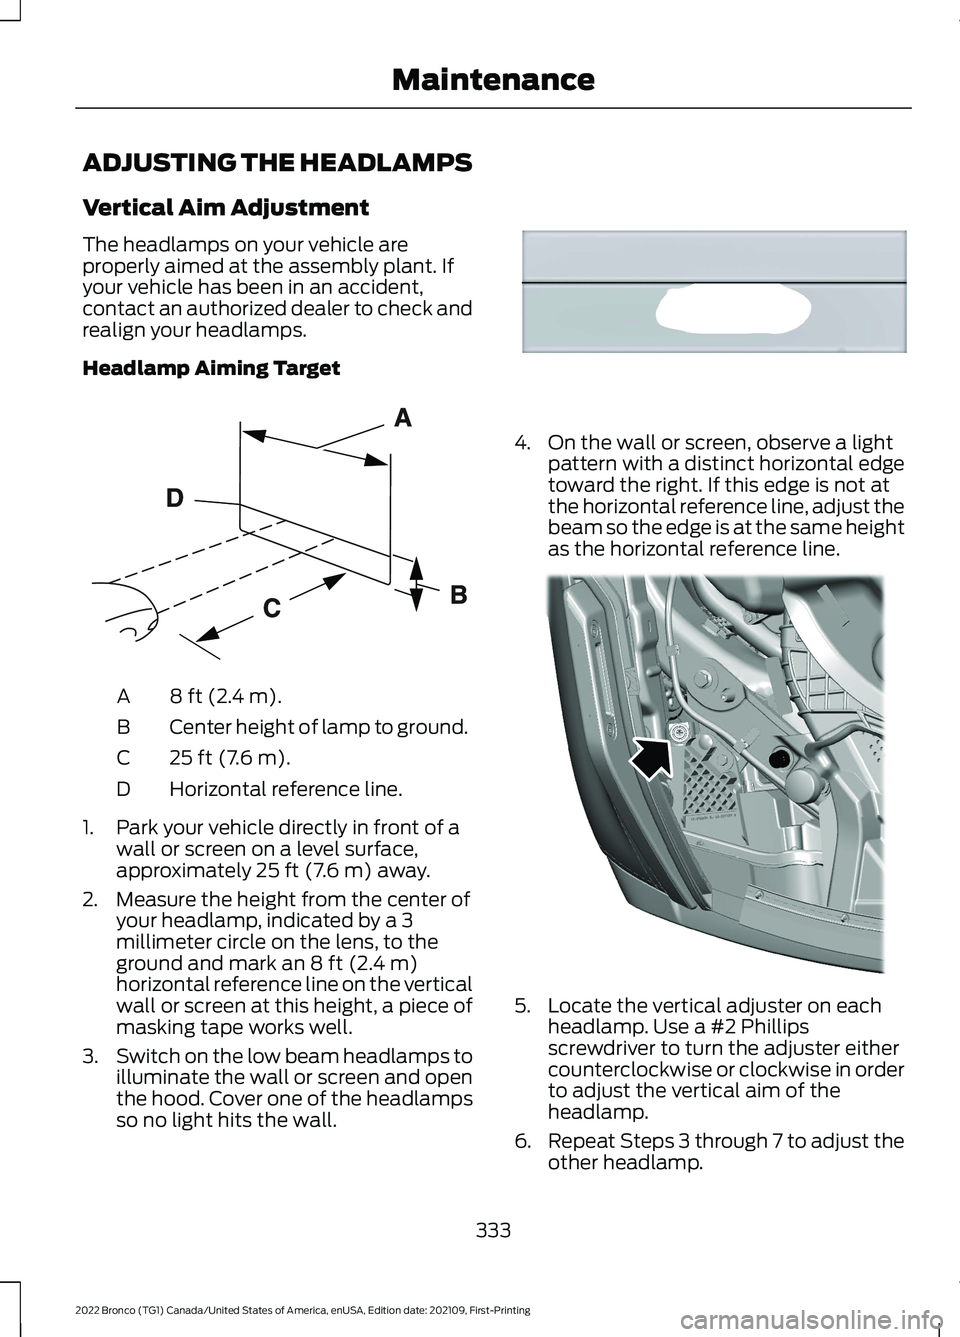
Headlamp Aiming Target
8 ft (2.4 m).A
Center height of lamp to ground.B
25 ft (7.6 m).C
Horizontal reference line.D
1.Park your vehicle directly in front of awall or screen on a level surface,approximately 25 ft (7.6 m) away.
2.Measure the height from the center ofyour headlamp, indicated by a 3millimeter circle on the lens, to theground and mark an 8 ft (2.4 m)horizontal reference line on the verticalwall or screen at this height, a piece ofmasking tape works well.
3.Switch on the low beam headlamps toilluminate the wall or screen and openthe hood. Cover one of the headlampsso no light hits the wall.
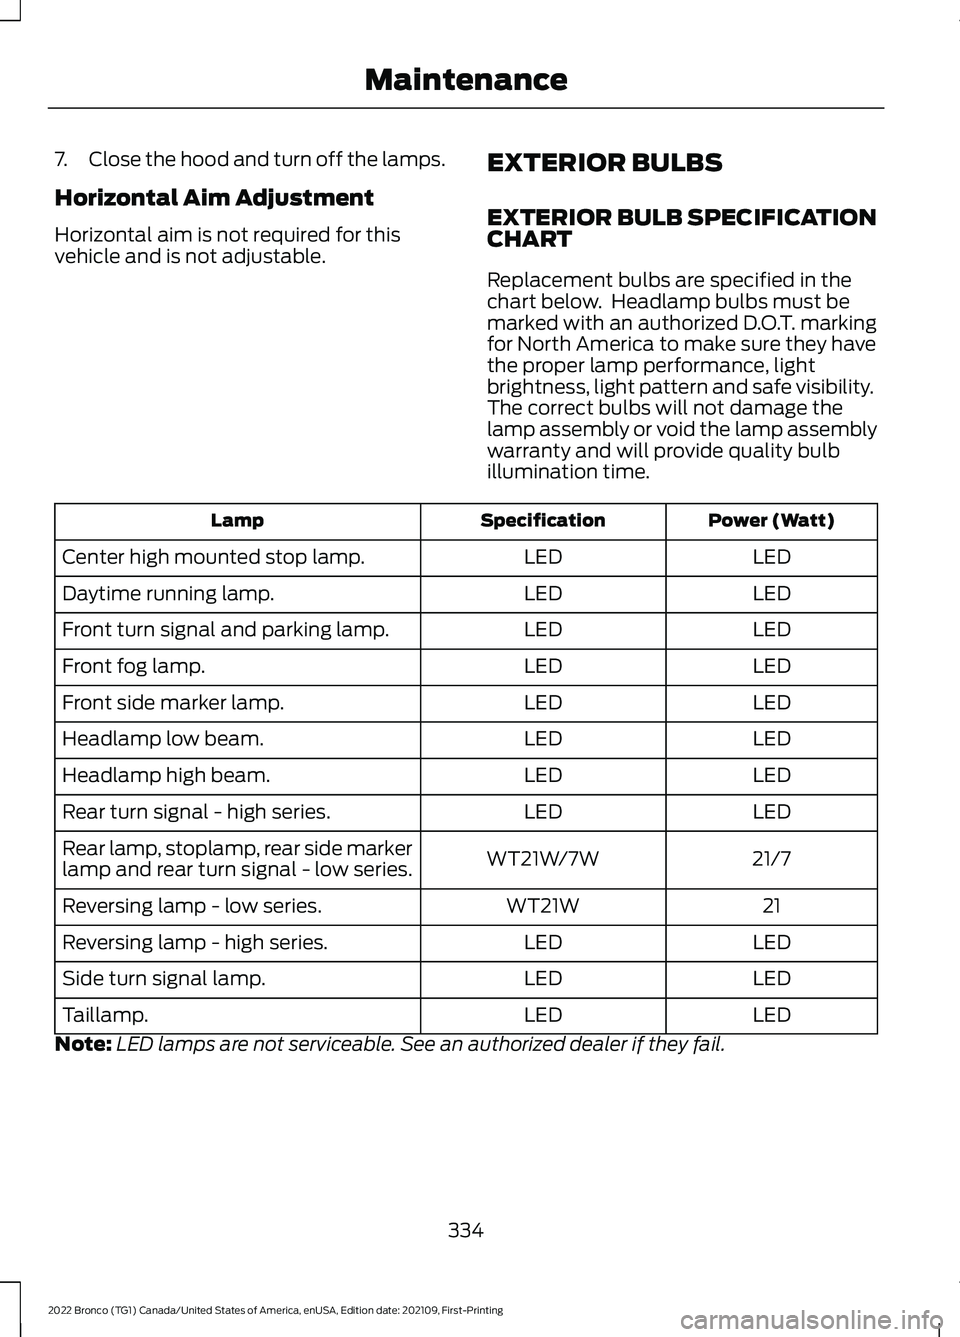
4.On the wall or screen, observe a lightpattern with a distinct horizontal edgetoward the right. If this edge is not atthe horizontal reference line, adjust thebeam so the edge is at the same heightas the horizontal reference line.
5.Locate the vertical adjuster on eachheadlamp. Use a #2 Phillipsscrewdriver to turn the adjuster eithercounterclockwise or clockwise in orderto adjust the vertical aim of theheadlamp.
6.Repeat Steps 3 through 7 to adjust theother headlamp.
333
2022 Bronco (TG1) Canada/United States of America, enUSA, Edition date: 202109, First-PrintingMaintenanceE142592 E167358 E339582
Page 338 of 562
7.Close the hood and turn off the lamps.
Horizontal Aim Adjustment
Horizontal aim is not required for thisvehicle and is not adjustable.
EXTERIOR BULBS
EXTERIOR BULB SPECIFICATIONCHART
Replacement bulbs are specified in thechart below. Headlamp bulbs must bemarked with an authorized D.O.T. markingfor North America to make sure they havethe proper lamp performance, lightbrightness, light pattern and safe visibility.The correct bulbs will not damage thelamp assembly or void the lamp assemblywarranty and will provide quality bulbillumination time.
Power (Watt)SpecificationLamp
LEDLEDCenter high mounted stop lamp.
LEDLEDDaytime running lamp.
LEDLEDFront turn signal and parking lamp.
LEDLEDFront fog lamp.
LEDLEDFront side marker lamp.
LEDLEDHeadlamp low beam.
LEDLEDHeadlamp high beam.
LEDLEDRear turn signal - high series.
21/7WT21W/7WRear lamp, stoplamp, rear side markerlamp and rear turn signal - low series.
21WT21WReversing lamp - low series.
LEDLEDReversing lamp - high series.
LEDLEDSide turn signal lamp.
LEDLEDTaillamp.
Note:LED lamps are not serviceable. See an authorized dealer if they fail.
334
2022 Bronco (TG1) Canada/United States of America, enUSA, Edition date: 202109, First-PrintingMaintenance
Page 344 of 562
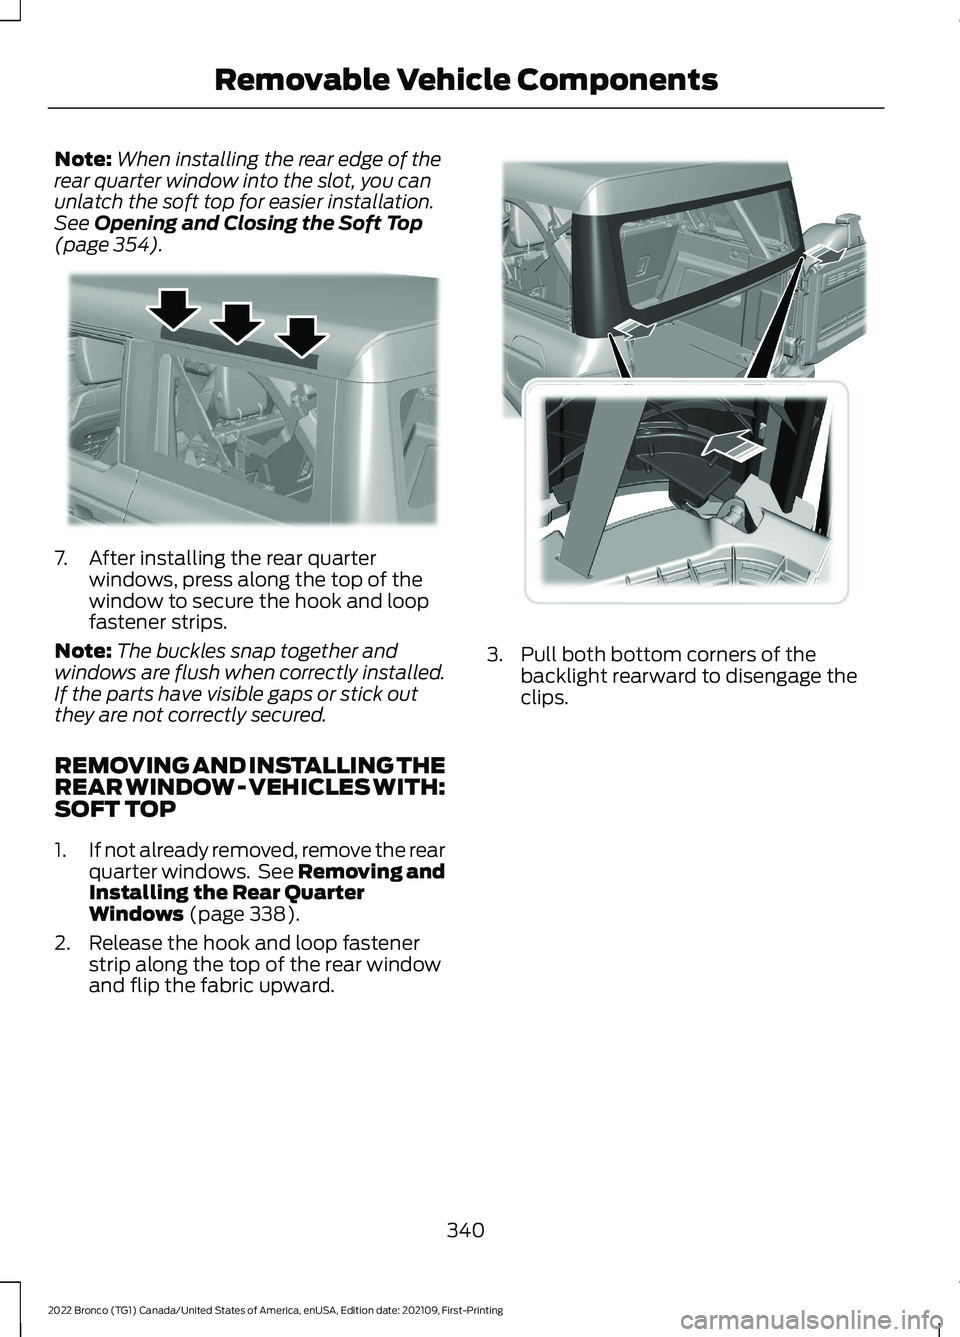
Note:When installing the rear edge of therear quarter window into the slot, you canunlatch the soft top for easier installation.See Opening and Closing the Soft Top(page 354).
7.After installing the rear quarterwindows, press along the top of thewindow to secure the hook and loopfastener strips.
Note:The buckles snap together andwindows are flush when correctly installed.If the parts have visible gaps or stick outthey are not correctly secured.
REMOVING AND INSTALLING THEREAR WINDOW - VEHICLES WITH:SOFT TOP
1.If not already removed, remove the rearquarter windows. See Removing andInstalling the Rear QuarterWindows (page 338).
2.Release the hook and loop fastenerstrip along the top of the rear windowand flip the fabric upward.
3.Pull both bottom corners of thebacklight rearward to disengage theclips.
340
2022 Bronco (TG1) Canada/United States of America, enUSA, Edition date: 202109, First-PrintingRemovable Vehicle ComponentsE347139 E347143
Page 345 of 562
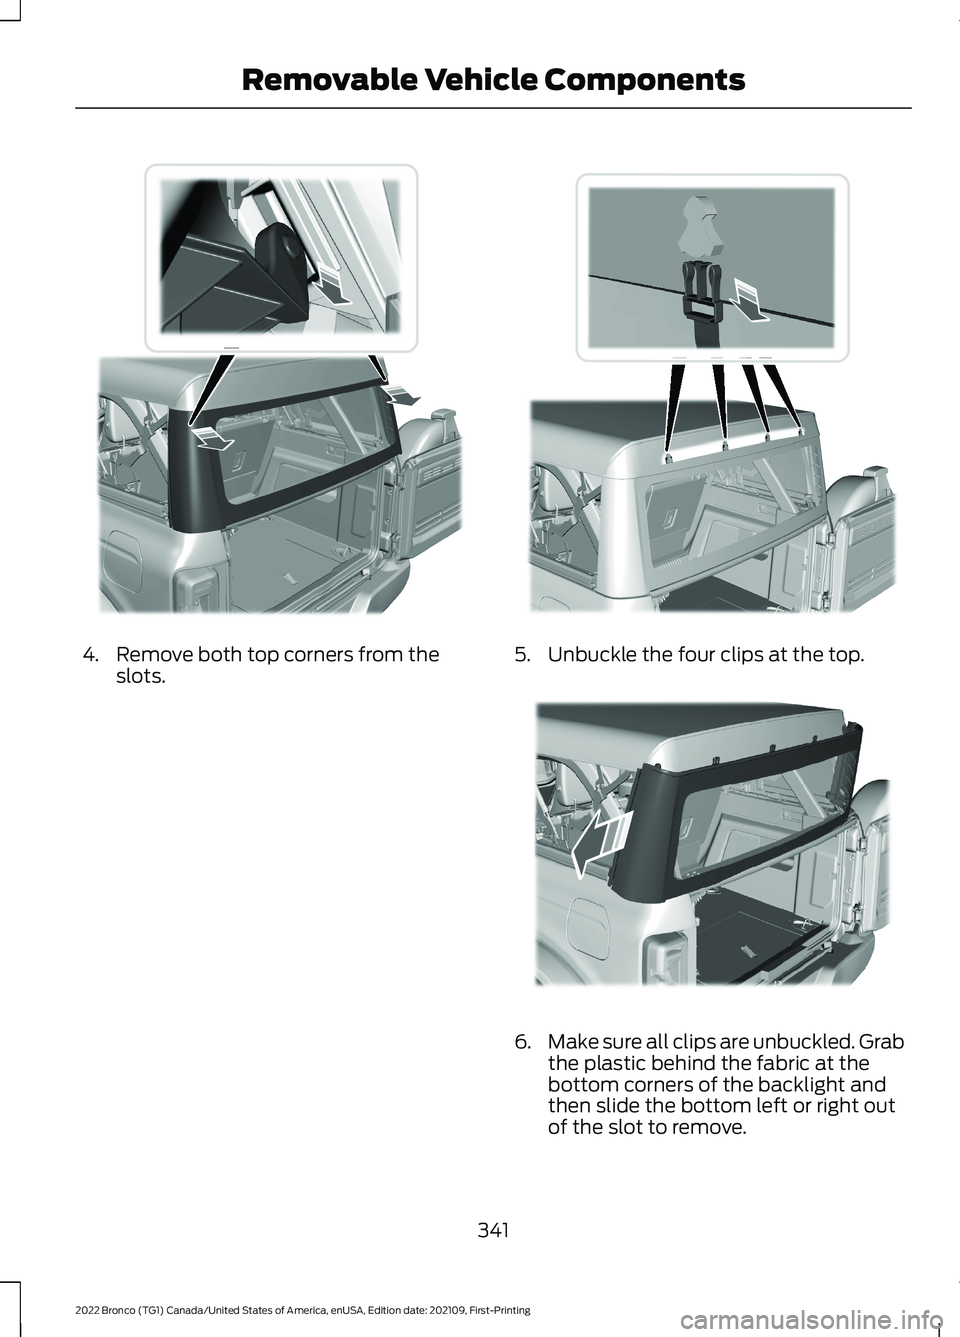
4.Remove both top corners from theslots.5.Unbuckle the four clips at the top.
6.Make sure all clips are unbuckled. Grabthe plastic behind the fabric at thebottom corners of the backlight andthen slide the bottom left or right outof the slot to remove.
341
2022 Bronco (TG1) Canada/United States of America, enUSA, Edition date: 202109, First-PrintingRemovable Vehicle ComponentsE347144 E347145 E347146
Page 352 of 562
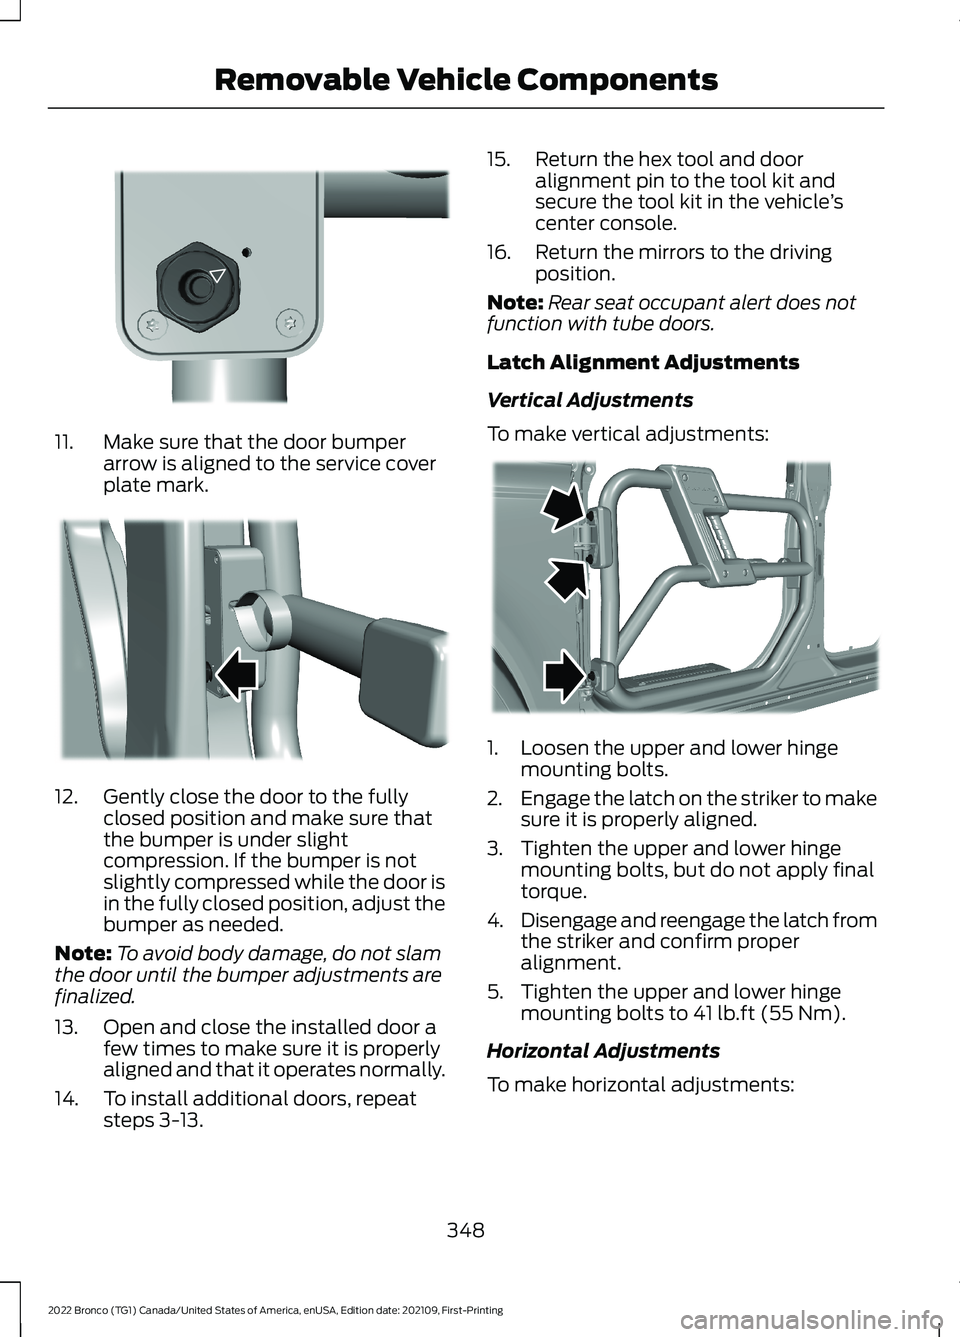
11.Make sure that the door bumperarrow is aligned to the service coverplate mark.
12.Gently close the door to the fullyclosed position and make sure thatthe bumper is under slightcompression. If the bumper is notslightly compressed while the door isin the fully closed position, adjust thebumper as needed.
Note:To avoid body damage, do not slamthe door until the bumper adjustments arefinalized.
13.Open and close the installed door afew times to make sure it is properlyaligned and that it operates normally.
14.To install additional doors, repeatsteps 3-13.
15.Return the hex tool and dooralignment pin to the tool kit andsecure the tool kit in the vehicle’scenter console.
16.Return the mirrors to the drivingposition.
Note:Rear seat occupant alert does notfunction with tube doors.
Latch Alignment Adjustments
Vertical Adjustments
To make vertical adjustments:
1.Loosen the upper and lower hingemounting bolts.
2.Engage the latch on the striker to makesure it is properly aligned.
3.Tighten the upper and lower hingemounting bolts, but do not apply finaltorque.
4.Disengage and reengage the latch fromthe striker and confirm properalignment.
5.Tighten the upper and lower hingemounting bolts to 41 lb.ft (55 Nm).
Horizontal Adjustments
To make horizontal adjustments:
348
2022 Bronco (TG1) Canada/United States of America, enUSA, Edition date: 202109, First-PrintingRemovable Vehicle ComponentsE344794 E344855 E344781
Page 356 of 562
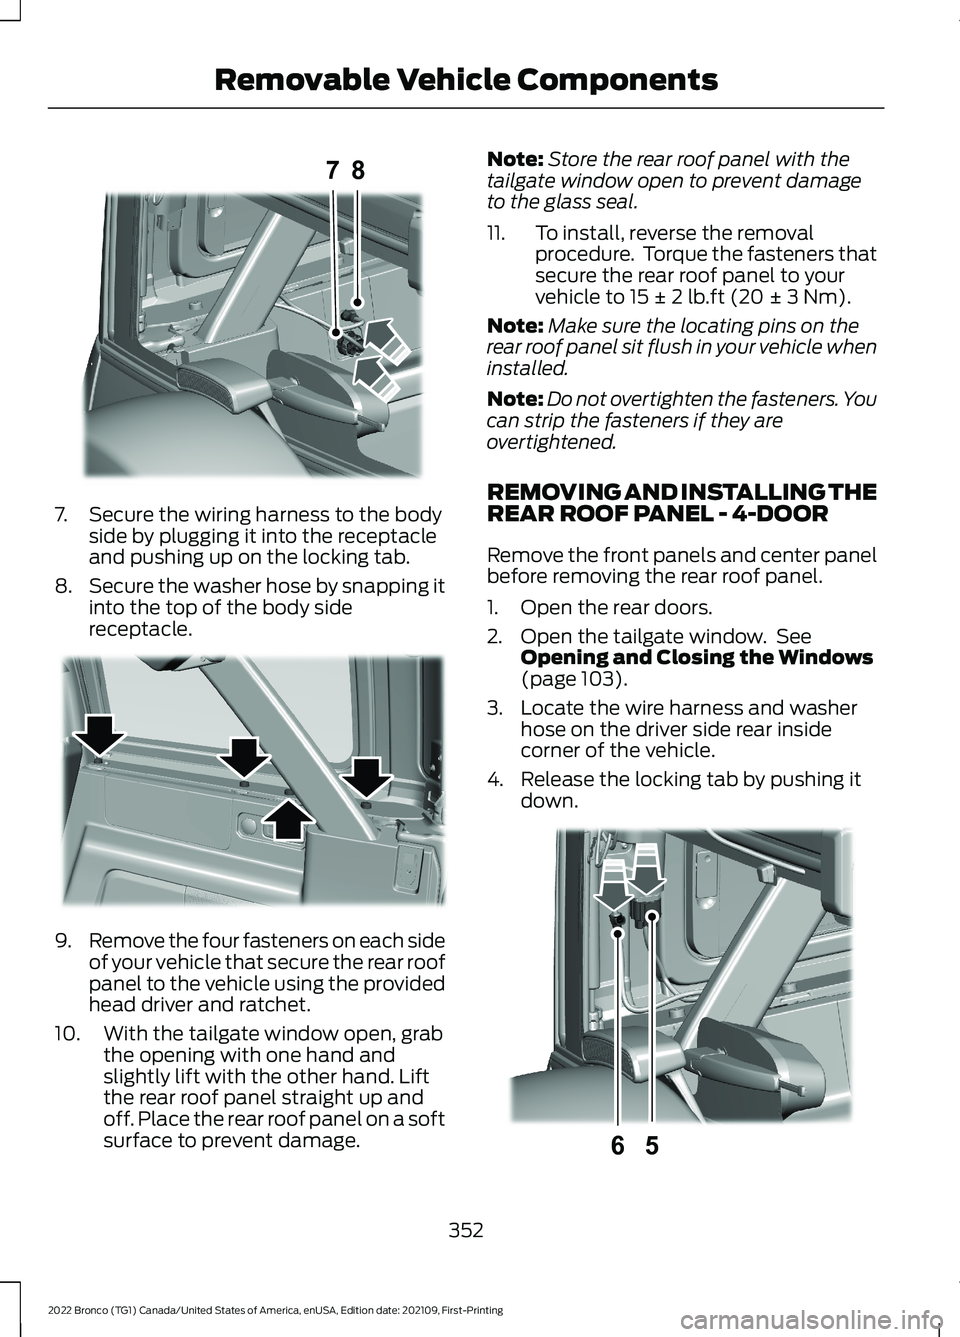
7.Secure the wiring harness to the bodyside by plugging it into the receptacleand pushing up on the locking tab.
8.Secure the washer hose by snapping itinto the top of the body sidereceptacle.
9.Remove the four fasteners on each sideof your vehicle that secure the rear roofpanel to the vehicle using the providedhead driver and ratchet.
10.With the tailgate window open, grabthe opening with one hand andslightly lift with the other hand. Liftthe rear roof panel straight up andoff. Place the rear roof panel on a softsurface to prevent damage.
Note:Store the rear roof panel with thetailgate window open to prevent damageto the glass seal.
11.To install, reverse the removalprocedure. Torque the fasteners thatsecure the rear roof panel to yourvehicle to 15 ± 2 lb.ft (20 ± 3 Nm).
Note:Make sure the locating pins on therear roof panel sit flush in your vehicle wheninstalled.
Note:Do not overtighten the fasteners. Youcan strip the fasteners if they areovertightened.
REMOVING AND INSTALLING THEREAR ROOF PANEL - 4-DOOR
Remove the front panels and center panelbefore removing the rear roof panel.
1.Open the rear doors.
2.Open the tailgate window. SeeOpening and Closing the Windows(page 103).
3.Locate the wire harness and washerhose on the driver side rear insidecorner of the vehicle.
4.Release the locking tab by pushing itdown.
352
2022 Bronco (TG1) Canada/United States of America, enUSA, Edition date: 202109, First-PrintingRemovable Vehicle Components87E335340 E333997 65E335339
Page 357 of 562
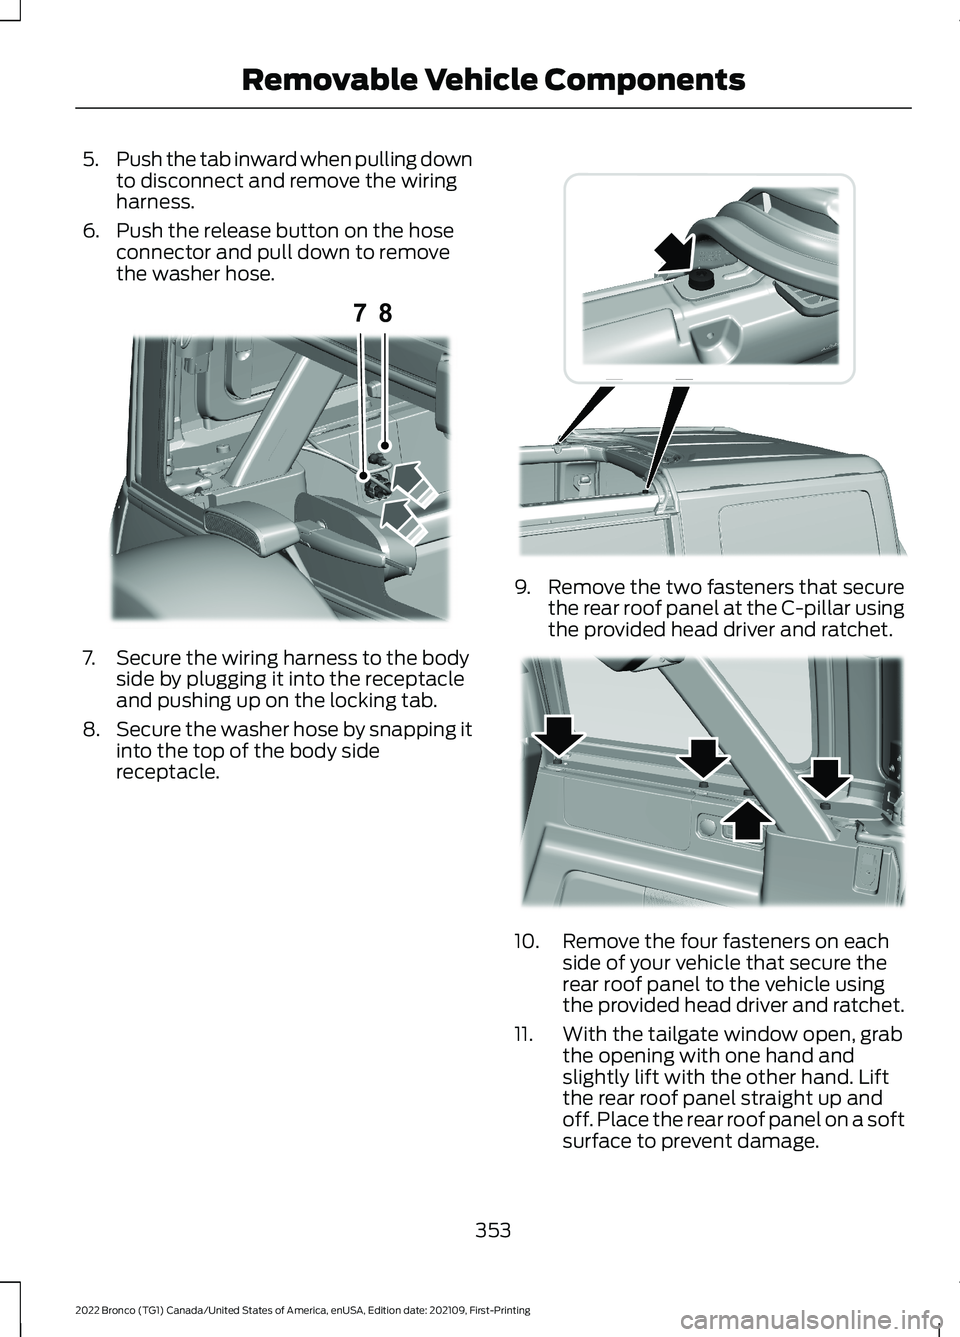
5.Push the tab inward when pulling downto disconnect and remove the wiringharness.
6.Push the release button on the hoseconnector and pull down to removethe washer hose.
7.Secure the wiring harness to the bodyside by plugging it into the receptacleand pushing up on the locking tab.
8.Secure the washer hose by snapping itinto the top of the body sidereceptacle.
9.Remove the two fasteners that securethe rear roof panel at the C-pillar usingthe provided head driver and ratchet.
10.Remove the four fasteners on eachside of your vehicle that secure therear roof panel to the vehicle usingthe provided head driver and ratchet.
11.With the tailgate window open, grabthe opening with one hand andslightly lift with the other hand. Liftthe rear roof panel straight up andoff. Place the rear roof panel on a softsurface to prevent damage.
353
2022 Bronco (TG1) Canada/United States of America, enUSA, Edition date: 202109, First-PrintingRemovable Vehicle Components87E335340 E345383 E333997
Page 377 of 562
3.Wash out debris using a standardgarden style hose.
Note:Use caution to not spray seats,console, door interior, electrical connections,instrument cluster display and underside ofthe instrument panel on both driver andpassenger sides.
4.Wipe out remaining water or debrisfrom the floor.
5.Install active drain plugs and turnclockwise to close.
6.Reinstall floor mats.
CLEANING SEATBELTS
WARNING: Do not use cleaningsolvents, bleach or dye on the vehicle'sseatbelts, as these actions may weakenthe belt webbing.
1.Wipe the surface with a soft, dampcloth and a mild soap and watersolution. Dry the area with a clean, softcloth.
REPAIRING MINOR PAINT
DAMAGE
Authorized dealers have touch-up paint tomatch your vehicle’s color. Your vehiclecolor code is printed on a sticker on thefront, left-hand side door jamb. Take yourcolor code to your authorized dealer tomake sure you get the correct color.
Before repairing minor paint damage, usea cleaner to remove particles such as birddroppings, tree sap, insect deposits, tarspots, road salt and industrial fallout.
Read the instructions before using cleaningproducts.
WAXING YOUR VEHICLE
Wax the high-gloss painted surface of yourprewashed vehicle once or twice a year.
We recommend that you only use anapproved quality wax that does notcontain abrasives. Follow themanufacturer's instructions to apply andremove the wax. For additional informationand assistance, we recommend that youcontact an authorized dealer.
When washing and waxing, park yourvehicle in a shaded area out of directsunlight.
Note:Avoid waxing unpainted or low-glossblack colored parts, they discolor over time.
373
2022 Bronco (TG1) Canada/United States of America, enUSA, Edition date: 202109, First-PrintingVehicle Care
Page 378 of 562
PREPARING YOUR VEHICLE
FOR STORAGE
If you plan on storing your vehicle for 30days or more, the following maintenancerecommendations ensures your vehiclestays in good operating condition.
Under various conditions, long-termstorage may lead to degraded engineperformance or failure unless you usespecific precautions to preserve yourvehicle.
General
•Store all vehicles in a dry, ventilatedplace.
•If vehicles are stored outside, theyrequire regular maintenance to protectagainst rust and weather damage.
•Make sure all linkages, cables, leversand pins under your vehicle are coveredwith grease to prevent rust.
•Move vehicles at least 25 ft (7.5 m)every 15 days to lubricate working partsand prevent corrosion.
•Fill the fuel tank with high-quality fueluntil the first automatic shutoff of thefuel pump nozzle.
Engine
•Change the engine oil and filter prior tostorage because used engine oilcontains contaminants which maycause engine damage.
•Start the engine every 15 days for aminimum of 15 minutes. Run at fastidle with the climate controls set todefrost until the engine reaches normaloperating temperature.
•With your foot on the brake, shiftthrough all the gears while the engineis running.
Body
•Wash your vehicle thoroughly toremove dirt, grease, oil, tar or mud fromexterior surfaces, rear-wheel housingsand the underside of front fenders.
•Periodically wash your vehicle if it isstored in exposed locations.
•Touch-up exposed or primed metal toprevent rust.
•Cover chrome and stainless steel partswith a thick coat of auto wax to preventdiscoloration. Re-wax as necessarywhen you wash your vehicle.
•Lubricate all hood, door and luggagecompartment hinges and latches witha light grade oil.
•Cover interior trim to prevent fading.
•Keep all rubber parts free from oil andsolvents.
12 Volt Battery
•Check and recharge as necessary. Keepconnections clean.
Note:It is necessary to reset memoryfeatures if you disconnect the batterycables.
Brakes
Make sure the brakes and parking brakerelease fully.
Note:If you intend on parking your vehiclefor an extended period after cleaning thewheels with a wheel cleaner, drive yourvehicle for a few minutes before doing so toreduce the risk of increased corrosion of thebrake discs, brake pads and linings.
Tires
•Maintain recommended air pressure.
374
2022 Bronco (TG1) Canada/United States of America, enUSA, Edition date: 202109, First-PrintingStoring Your Vehicle
Page 380 of 562
LOCATING THE TIRE LABEL
You will find a Tire Labelcontaining tire inflation pressureby tire size and other importantinformation located on the B-Pillaror the edge of the driver's door.See Locating the SafetyCompliance CertificationLabels (page 272).
DEPARTMENT OF
TRANSPORTATION UNIFORM
TIRE QUALITY GRADES
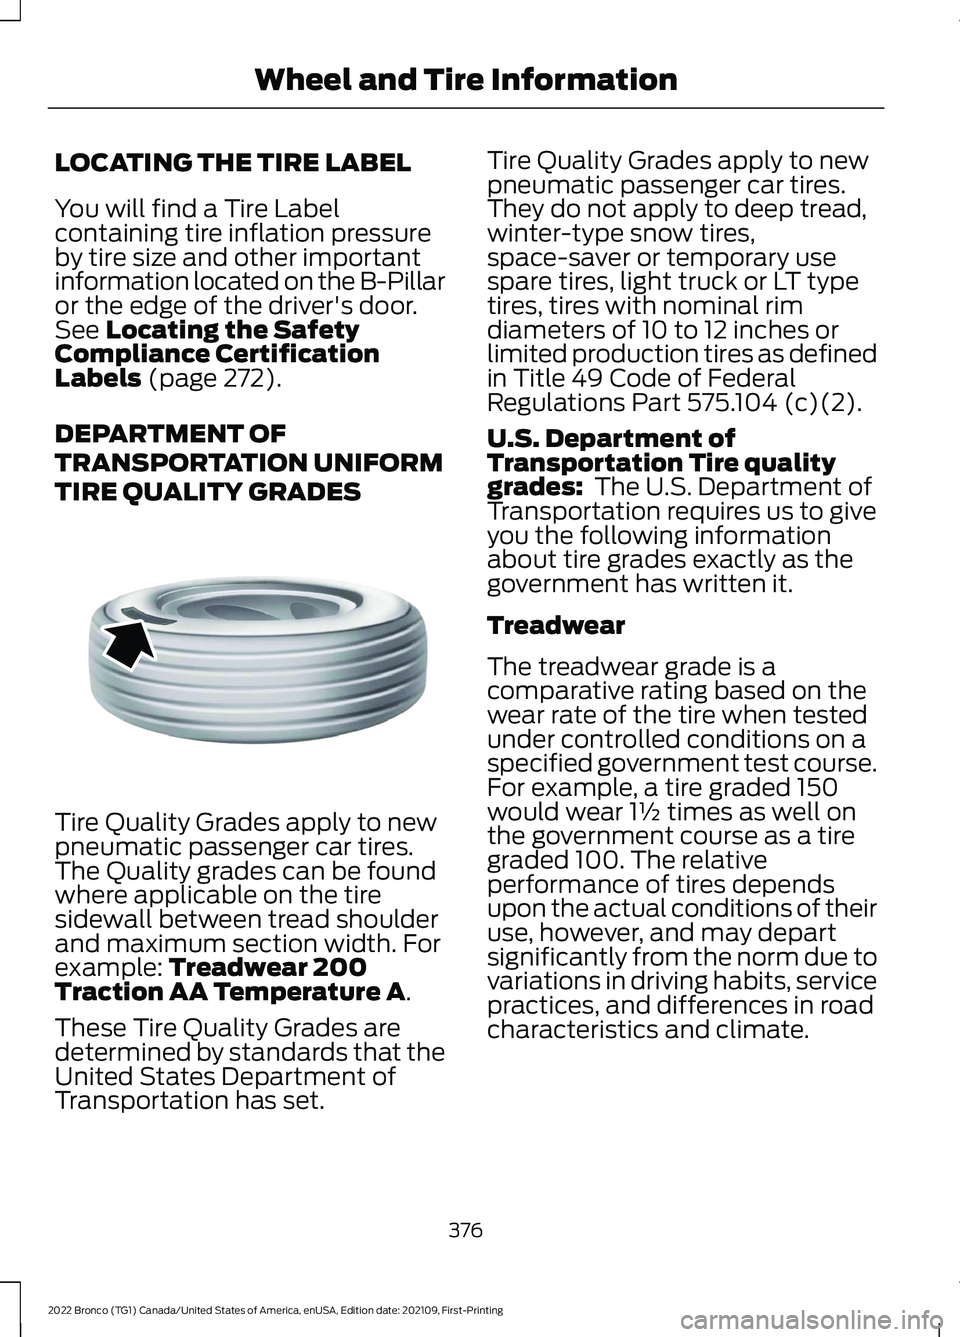
Tire Quality Grades apply to newpneumatic passenger car tires.The Quality grades can be foundwhere applicable on the tiresidewall between tread shoulderand maximum section width. Forexample: Treadwear 200Traction AA Temperature A.
These Tire Quality Grades aredetermined by standards that theUnited States Department ofTransportation has set.
Tire Quality Grades apply to newpneumatic passenger car tires.They do not apply to deep tread,winter-type snow tires,space-saver or temporary usespare tires, light truck or LT typetires, tires with nominal rimdiameters of 10 to 12 inches orlimited production tires as definedin Title 49 Code of FederalRegulations Part 575.104 (c)(2).
U.S. Department ofTransportation Tire qualitygrades: The U.S. Department ofTransportation requires us to giveyou the following informationabout tire grades exactly as thegovernment has written it.
Treadwear
The treadwear grade is acomparative rating based on thewear rate of the tire when testedunder controlled conditions on aspecified government test course.For example, a tire graded 150would wear 1½ times as well onthe government course as a tiregraded 100. The relativeperformance of tires dependsupon the actual conditions of theiruse, however, and may departsignificantly from the norm due tovariations in driving habits, servicepractices, and differences in roadcharacteristics and climate.
376
2022 Bronco (TG1) Canada/United States of America, enUSA, Edition date: 202109, First-PrintingWheel and Tire InformationE142542