ABS FORD BRONCO 2023 Owners Manual
[x] Cancel search | Manufacturer: FORD, Model Year: 2023, Model line: BRONCO, Model: FORD BRONCO 2023Pages: 642, PDF Size: 14.71 MB
Page 145 of 642
•Bend your legs slightly so that you canpress the pedals fully.
•Position the shoulder strap of theseatbelt over the center of yourshoulder and position the lap straptightly across your hips.
Make sure that your driving position iscomfortable and that you can maintain fullcontrol of your vehicle.
MANUAL SEATS
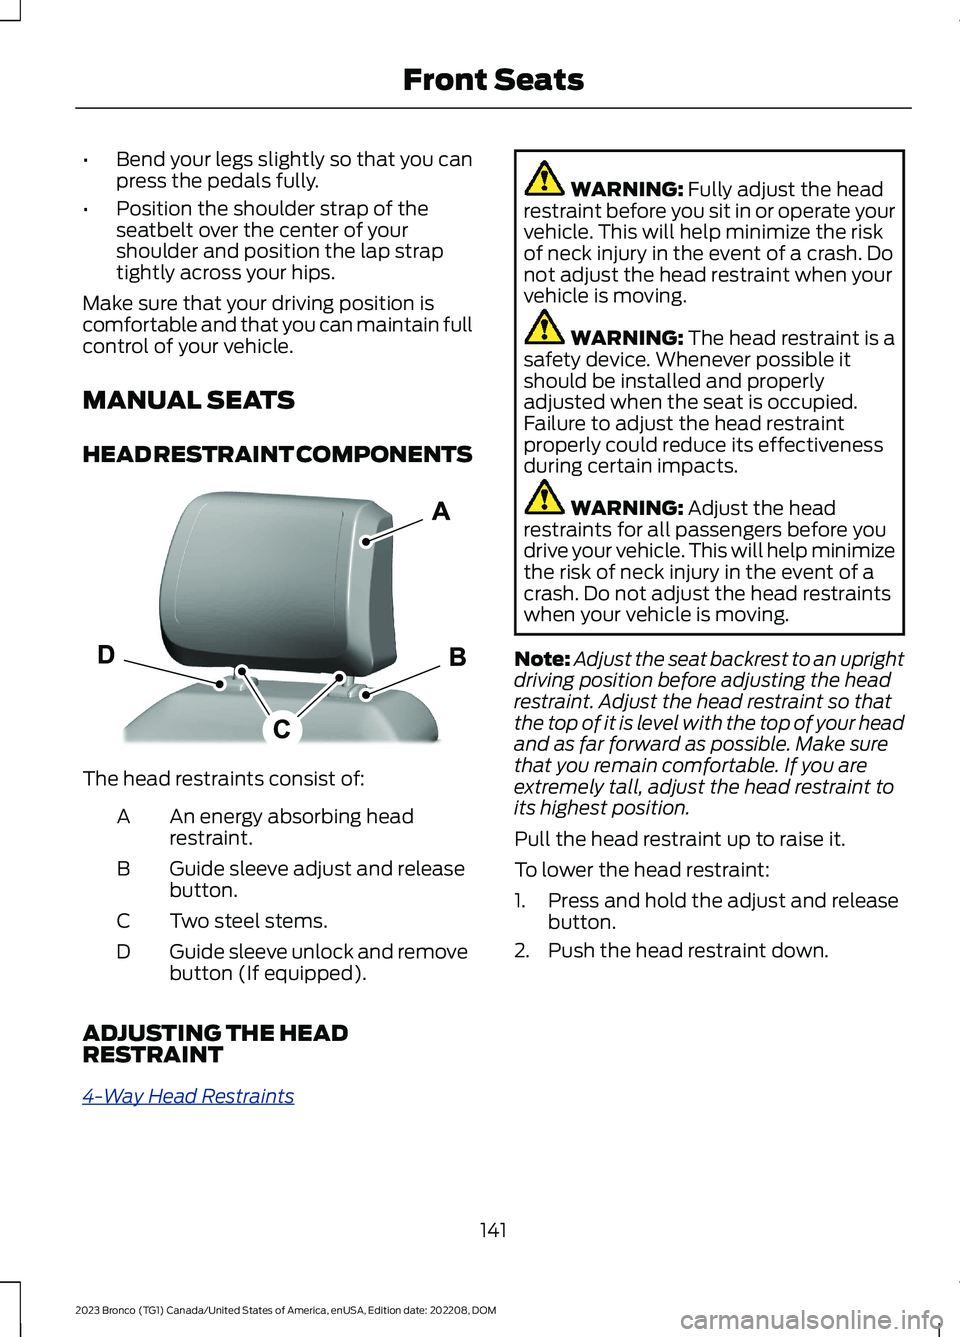
HEAD RESTRAINT COMPONENTS
The head restraints consist of:
An energy absorbing headrestraint.A
Guide sleeve adjust and releasebutton.B
Two steel stems.C
Guide sleeve unlock and removebutton (If equipped).D
ADJUSTING THE HEADRESTRAINT
4-Way Head Restraints
WARNING: Fully adjust the headrestraint before you sit in or operate yourvehicle. This will help minimize the riskof neck injury in the event of a crash. Donot adjust the head restraint when yourvehicle is moving.
WARNING: The head restraint is asafety device. Whenever possible itshould be installed and properlyadjusted when the seat is occupied.Failure to adjust the head restraintproperly could reduce its effectivenessduring certain impacts.
WARNING: Adjust the headrestraints for all passengers before youdrive your vehicle. This will help minimizethe risk of neck injury in the event of acrash. Do not adjust the head restraintswhen your vehicle is moving.
Note:Adjust the seat backrest to an uprightdriving position before adjusting the headrestraint. Adjust the head restraint so thatthe top of it is level with the top of your headand as far forward as possible. Make surethat you remain comfortable. If you areextremely tall, adjust the head restraint toits highest position.
Pull the head restraint up to raise it.
To lower the head restraint:
1.Press and hold the adjust and releasebutton.
2.Push the head restraint down.
141
2023 Bronco (TG1) Canada/United States of America, enUSA, Edition date: 202208, DOMFront SeatsE308298
Page 147 of 642
ADJUSTING THE SEAT BACKREST
Manual Seat Adjustment
WARNING: Always drive and ridewith your seatback upright and the lapbelt snug and low across the hips.
WARNING: Do not place cargo orany objects behind the seat backrestbefore returning it to the original position.Pull on the seat backrest to make surethat it has fully latched after returningthe seat backrest to its original position.An unlatched seat may becomedangerous if you stop suddenly or havea crash.
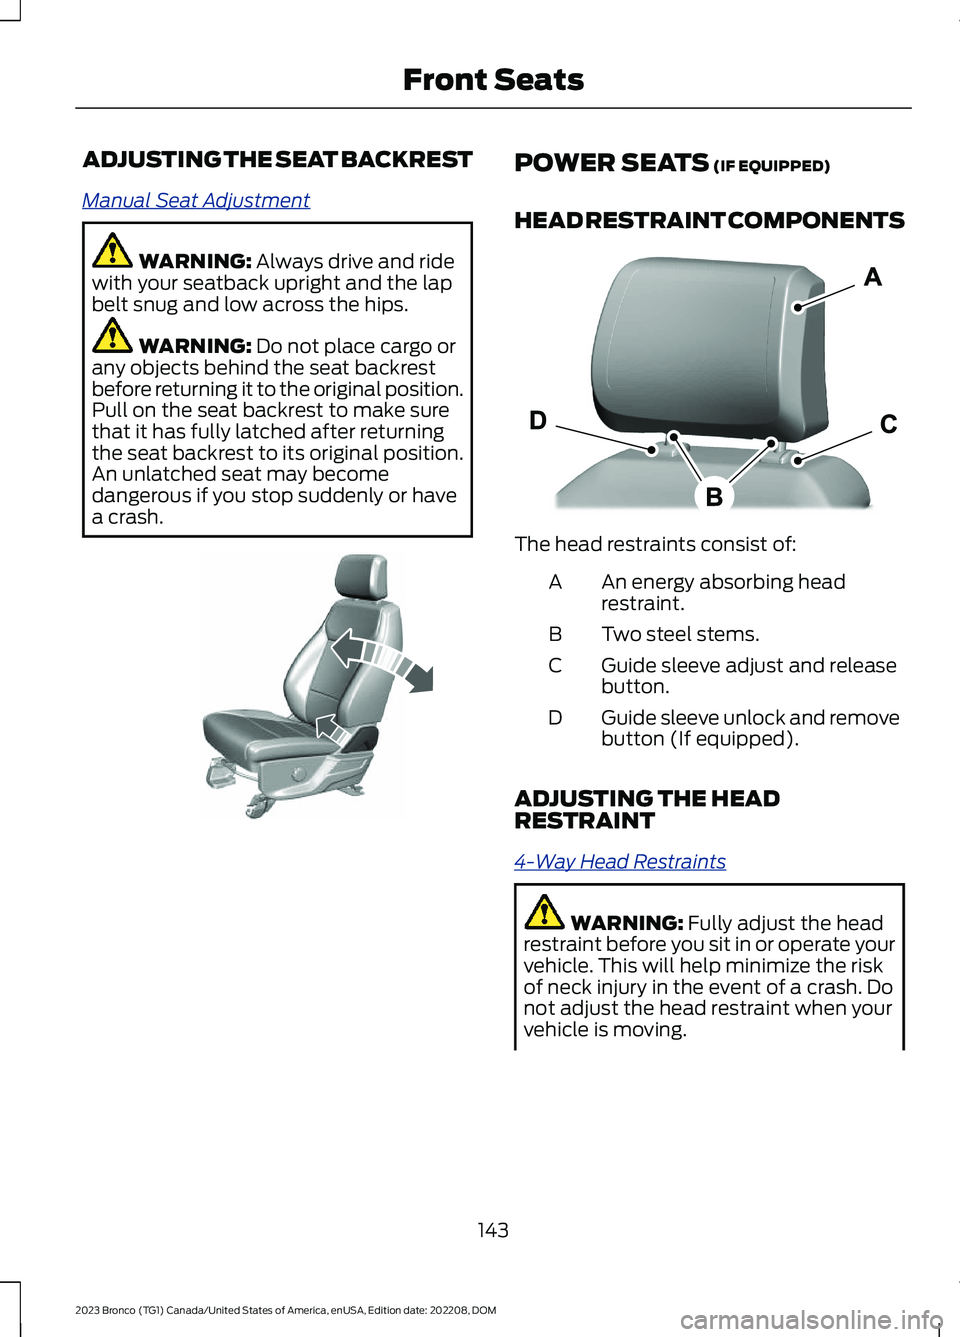
POWER SEATS (IF EQUIPPED)
HEAD RESTRAINT COMPONENTS
The head restraints consist of:
An energy absorbing headrestraint.A
Two steel stems.B
Guide sleeve adjust and releasebutton.C
Guide sleeve unlock and removebutton (If equipped).D
ADJUSTING THE HEADRESTRAINT
4-Way Head Restraints
WARNING: Fully adjust the headrestraint before you sit in or operate yourvehicle. This will help minimize the riskof neck injury in the event of a crash. Donot adjust the head restraint when yourvehicle is moving.
143
2023 Bronco (TG1) Canada/United States of America, enUSA, Edition date: 202208, DOMFront SeatsE327922 E327921
Page 151 of 642
MANUAL SEATS
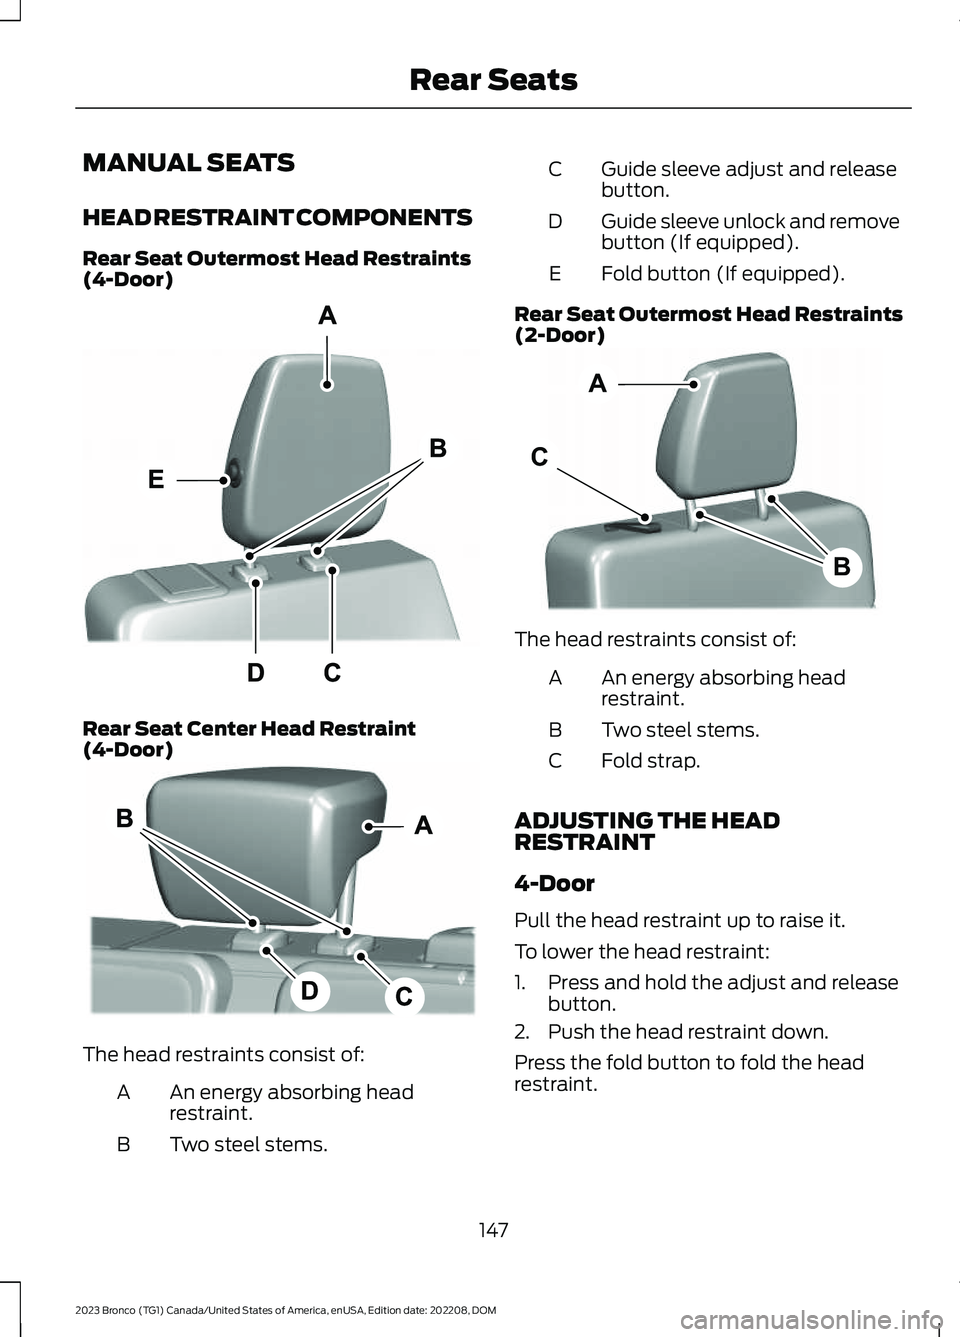
HEAD RESTRAINT COMPONENTS
Rear Seat Outermost Head Restraints(4-Door)
Rear Seat Center Head Restraint(4-Door)
The head restraints consist of:
An energy absorbing headrestraint.A
Two steel stems.B
Guide sleeve adjust and releasebutton.C
Guide sleeve unlock and removebutton (If equipped).D
Fold button (If equipped).E
Rear Seat Outermost Head Restraints(2-Door)
The head restraints consist of:
An energy absorbing headrestraint.A
Two steel stems.B
Fold strap.C
ADJUSTING THE HEADRESTRAINT
4-Door
Pull the head restraint up to raise it.
To lower the head restraint:
1.Press and hold the adjust and releasebutton.
2.Push the head restraint down.
Press the fold button to fold the headrestraint.
147
2023 Bronco (TG1) Canada/United States of America, enUSA, Edition date: 202208, DOMRear SeatsE330418 E342165 ABCE333887
Page 183 of 642
FUEL AND REFUELING
PRECAUTIONS
WARNING: Do not overfill the fueltank. The pressure in an overfilled tankmay cause leakage and lead to fuel sprayand fire.
WARNING: The fuel system maybe under pressure. If you hear a hissingsound near the fuel filler inlet, do notrefuel until the sound stops. Otherwise,fuel may spray out, which could causeserious personal injury.
WARNING: Fuels can cause seriousinjury or death if misused or mishandled.
WARNING: Fuel may containbenzene, which is a cancer-causingagent.
WARNING: When refueling alwaysshut the engine off and never allowsparks or open flames near the fuel tankfiller valve. Never smoke or use a cellphone while refueling. Fuel vapor isextremely hazardous under certainconditions. Avoid inhaling excess fumes.
WARNING: Read and follow all theinstructions on the pump island.
Follow these guidelines when refueling:
•Extinguish all smoking materials andany open flames before refueling yourvehicle.
•Switch the engine off before refueling.
•Automotive fuels can be harmful orfatal if swallowed. Fuel is highly toxicand if swallowed can cause death orpermanent injury. If fuel is swallowedimmediately call a physician, even if nosymptoms are immediately apparent.The toxic effects of fuel may not beapparent for hours.
•Avoid inhaling fuel vapors. Inhaling fuelvapor can lead to eye and respiratorytract irritation. In severe cases,excessive or prolonged breathing offuel vapor can cause serious illness andpermanent injury.
•Avoid getting fuel in your eyes. If yousplash fuel in your eyes, immediatelyremove contact lenses, if worn, flushwith water for 15 minutes and seekmedical attention. Failure to seekproper medical attention could lead topermanent injury.
•Fuels can be harmful if absorbedthrough the skin. If you splash fuel onyour skin, clothing or both, promptlyremove contaminated clothing andthoroughly wash your skin with soapand water. Repeated or prolonged skincontact causes skin irritation.
•Be particularly careful if you are takingAntabuse or other forms of Disulfiramfor the treatment of alcoholism.Breathing fuel vapors could cause anadverse reaction, serious personalinjury or sickness. Immediately call aphysician if you experience any adversereactions.
179
2023 Bronco (TG1) Canada/United States of America, enUSA, Edition date: 202208, DOMFuel and Refueling
Page 198 of 642
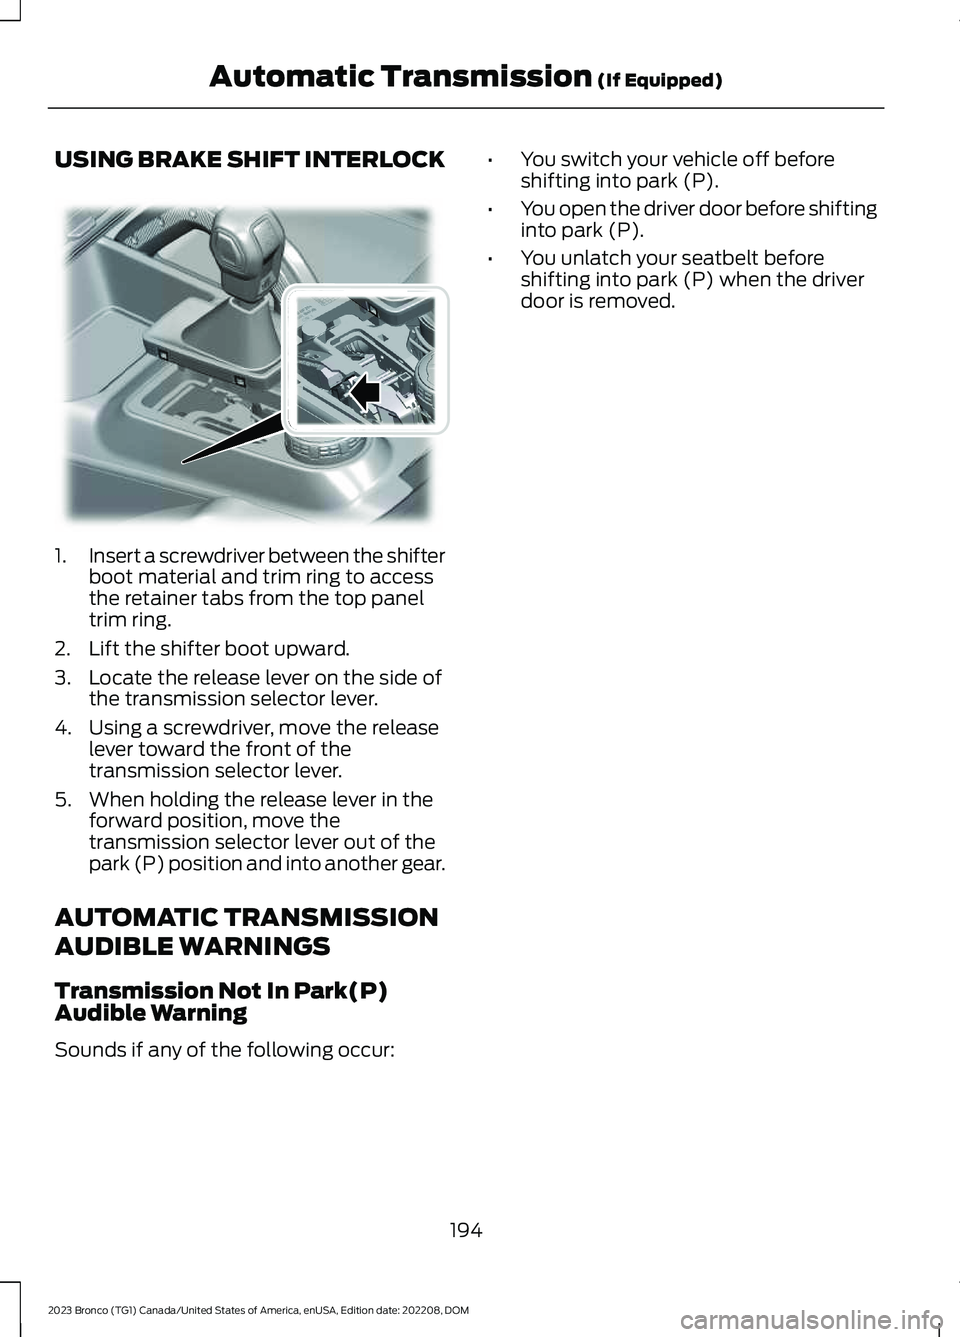
USING BRAKE SHIFT INTERLOCK
1.Insert a screwdriver between the shifterboot material and trim ring to accessthe retainer tabs from the top paneltrim ring.
2.Lift the shifter boot upward.
3.Locate the release lever on the side ofthe transmission selector lever.
4.Using a screwdriver, move the releaselever toward the front of thetransmission selector lever.
5.When holding the release lever in theforward position, move thetransmission selector lever out of thepark (P) position and into another gear.
AUTOMATIC TRANSMISSION
AUDIBLE WARNINGS
Transmission Not In Park(P)Audible Warning
Sounds if any of the following occur:
•You switch your vehicle off beforeshifting into park (P).
•You open the driver door before shiftinginto park (P).
•You unlatch your seatbelt beforeshifting into park (P) when the driverdoor is removed.
194
2023 Bronco (TG1) Canada/United States of America, enUSA, Edition date: 202208, DOMAutomatic Transmission (If Equipped)E346836
Page 214 of 642
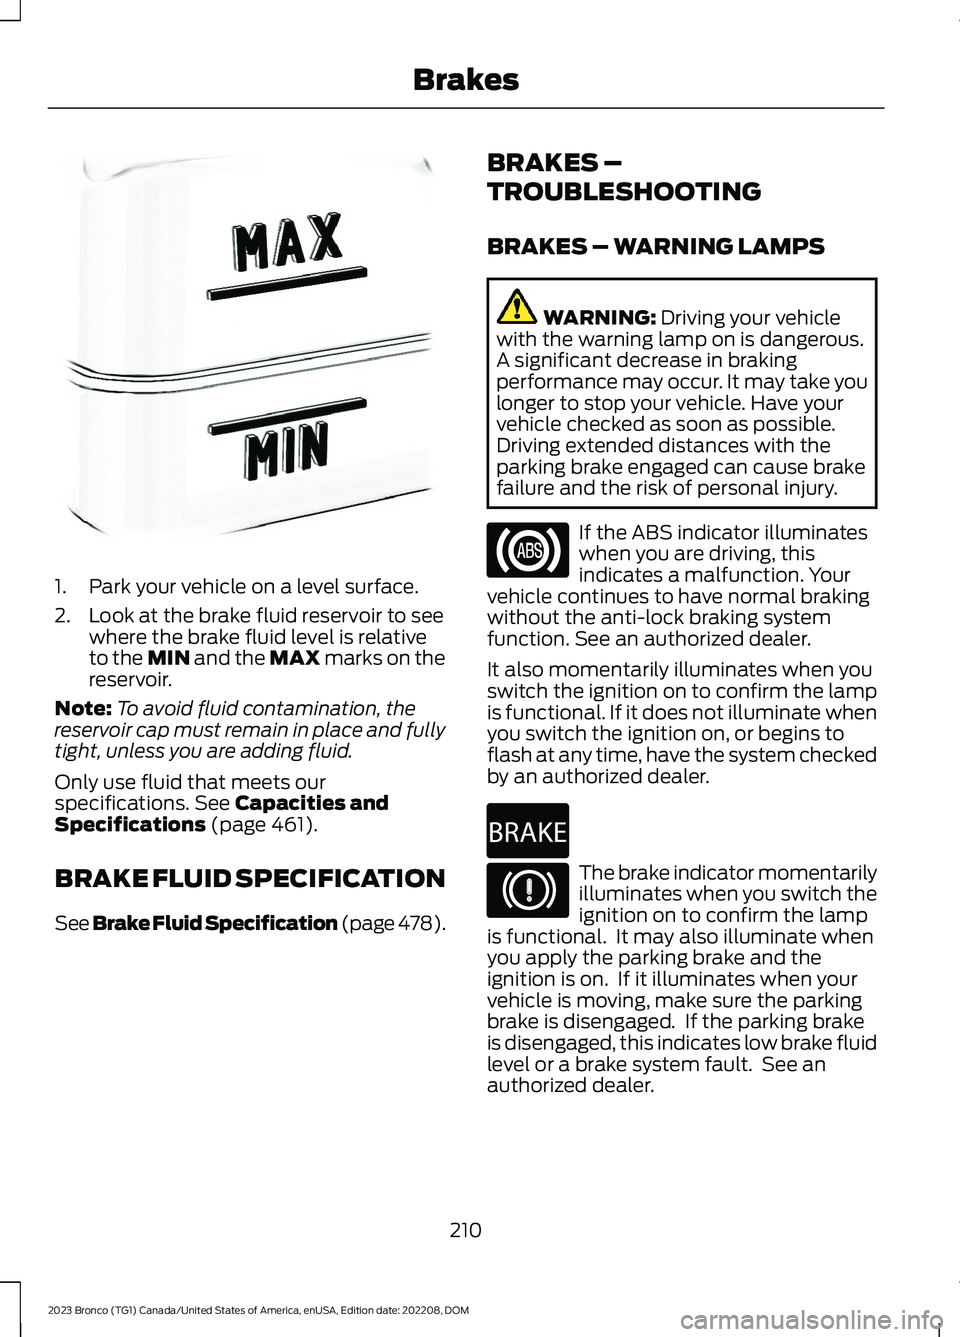
1.Park your vehicle on a level surface.
2.Look at the brake fluid reservoir to seewhere the brake fluid level is relativeto the MIN and the MAX marks on thereservoir.
Note:To avoid fluid contamination, thereservoir cap must remain in place and fullytight, unless you are adding fluid.
Only use fluid that meets ourspecifications. See Capacities andSpecifications (page 461).
BRAKE FLUID SPECIFICATION
See Brake Fluid Specification (page 478).
BRAKES –
TROUBLESHOOTING
BRAKES – WARNING LAMPS
WARNING: Driving your vehiclewith the warning lamp on is dangerous.A significant decrease in brakingperformance may occur. It may take youlonger to stop your vehicle. Have yourvehicle checked as soon as possible.Driving extended distances with theparking brake engaged can cause brakefailure and the risk of personal injury.
If the ABS indicator illuminateswhen you are driving, thisindicates a malfunction. Yourvehicle continues to have normal brakingwithout the anti-lock braking systemfunction. See an authorized dealer.
It also momentarily illuminates when youswitch the ignition on to confirm the lampis functional. If it does not illuminate whenyou switch the ignition on, or begins toflash at any time, have the system checkedby an authorized dealer.
The brake indicator momentarilyilluminates when you switch theignition on to confirm the lampis functional. It may also illuminate whenyou apply the parking brake and theignition is on. If it illuminates when yourvehicle is moving, make sure the parkingbrake is disengaged. If the parking brakeis disengaged, this indicates low brake fluidlevel or a brake system fault. See anauthorized dealer.
210
2023 Bronco (TG1) Canada/United States of America, enUSA, Edition date: 202208, DOMBrakesE170684 E67020 E270480 E67024
Page 244 of 642
PARKING AID PRECAUTIONS
WARNING: To help avoid personalinjury, always use caution when inreverse (R) and when using the sensingsystem.
WARNING: The system may notdetect objects with surfaces that absorbreflection. Always drive with due careand attention. Failure to take care mayresult in a crash.
WARNING: Traffic control systems,fluorescent lamps, inclement weather,air brakes, external motors and fans mayaffect the correct operation of thesensing system. This may cause reducedperformance or false alerts.
WARNING: The system may notdetect small or moving objects,particularly those close to the ground.
WARNING: The parking aid systemcan only assist you to detect objectswhen your vehicle is moving at parkingspeeds. To help avoid personal injury youmust take care when using the parkingaid system.
WARNING: The system may notfunction if the sensor is blocked.
WARNING: In cold and severeweather conditions the system may notfunction. Rain, snow and spray can alllimit sensor performance.
WARNING: If damage occurs in theimmediate area surrounding the sensor,have your vehicle checked as soon aspossible.
Note:If your vehicle sustains damageleaving the sensors misaligned, this willcause inaccurate measurements or falsealerts.
When you connect a trailer to your vehicle,the rear parking aid detects the trailer andprovides an alert. Disable the parking aidwhen you connect a trailer to prevent thealert.
Note:Connected trailers might be detectedby the vehicle and parking aid turns offautomatically in those instances.
Note:Certain add-on devices installedaround the bumper or fascia may createfalse alerts, for example, large trailerhitches, bike or surfboard racks, license platebrackets, bumper covers or any other devicethat could block the normal detection zoneof the parking aid system. Aftermarket sparetires or spare tire covers mounted to the reartailgate could cause false alerts from thepark aid system. Remove the add-on deviceto prevent false alerts.
Note: Keep the sensors free from snow, iceand large accumulations of dirt. If thesensors are covered, the system's accuracycan be affected.
Do not clean the sensors with sharpobjects.
Note: When using a programmed MyKey,you cannot switch the parking aids off. SeeMyKey™ (page 84).
SWITCHING PARKING AID ON
AND OFF
Press the parking aid button toswitch the system on and off.
Switching Parking Aid On and OffLong-Term
The system can be set to stay disabled inbetween ignition cycles.
240
2023 Bronco (TG1) Canada/United States of America, enUSA, Edition date: 202208, DOMParking AidsE139213
Page 281 of 642
LANE KEEPING SYSTEM – FREQUENTLY ASKED QUESTIONS
Why is the feature not available (lane markings are gray) when I can see the lane markingson the road?
Your vehicle speed is less than 40 mph (65 km/h).
The sun is shining directly into the camera lens.
A quick intentional lane change has occurred.
Your vehicle stays too close to the lane markings for an extended interval of time.
Driving at high speeds in curves.
The last alert warning or aid intervention occurred a short time ago.
Ambiguous lane markings, for example, in construction zones.
Rapid transition from light to dark, or from dark to light.
Sudden offset in lane markings.
ABS or AdvanceTrac™ is active.
There is a camera blockage due to dirt, grime, fog, frost or water on the windshield.
You are driving too close to the vehicle in front of you.
Transitioning between no lane markings to lane markings, or vice versa.
There is standing water on the road.
Faint lane markings, for example, partial yellow lane markings on concrete roads.
Lane width is too narrow or too wide.
You have not calibrated the camera after a windshield replacement.
Driving on tight or on uneven roads.
277
2023 Bronco (TG1) Canada/United States of America, enUSA, Edition date: 202208, DOMLane Keeping System (If Equipped)
Page 319 of 642
WARNING: Never link two winchropes together with a clevis pin. Theseheavy metal objects could becomeprojectiles if the winch rope breaks.
WARNING: When using the winch,take care not to get your fingers or handscaught in the mechanism. Failure tofollow this instruction could result inpersonal injury.
WARNING: Avoid wearing loosefitting clothing or jewelry when winching.
WARNING: Make sure to wear eyeprotection when winching.
WARNING: Do not exceed thewinch or winch rope capacity. Failure tofollow this instruction could result inpersonal injury.
WARNING: Wear gloves whenhandling the winch rope. Failure to followthis instruction could result in personalinjury.
WARNING: Do not use the winchto secure loads.
WARNING: Do not use the winchto tow a trailer. This can damage,overload and break the winch rope.
WARNING: Make sure the anchorpoint can properly support the load andsecure the winching equipment. Failureto follow this instruction could result inpersonal injury.
WARNING: Only use theequipment supplied with the winch whenwinching.
WARNING: Do not engage ordisengage the winch clutch when thewinch is in use.
WARNING: The winch andassociated components become hotwhen in use. Let them cool down beforeremoving them.
WARNING: Do not attempt toservice, repair or modify the winchingsystem. Failure to follow this instructioncould result in personal injury or death.
WARNING: Make sure to properlystore the winch rope to the shackle pointor fairlead when not in use. Failure toproperly store the winch rope couldcause it to become a projectile.
WINCHING REQUIREMENTS
To winch your vehicle, make sure of thefollowing:
•The intended anchor point is secure.The anchor point must be strongenough to hold the weight of yourvehicle when winching.
•The intended anchor point allows youto pull your vehicle straight ahead.
•The intended anchor point is as faraway as possible, within the 100 ft(30 m) rope length. This allows thegreatest pulling power for the winch.
•The winch rope is in good condition andfree of visible cuts, tear or damage.
•Use a damper device such as a tarp,heavy blanket or piece of carpet, andplace it over the winch rope to helpabsorb the energy in the event thewinch rope breaks.
•Bystanders are to the sides of thevehicle, at a distance of at least twicethe length of the winch rope.
315
2023 Bronco (TG1) Canada/United States of America, enUSA, Edition date: 202208, DOMWinching - Everglades
Page 320 of 642

WINCHING LIMITATIONS
The following could impact winchoperation:
•Temperatures below 32°F (0°C).
•Low battery charge.
•Winching without the engine runningor for sustained pulls of a minute ormore.
•Try winching using shorter pullswith breaks, both to check setupand to allow the vehicle's batteryto recharge.
•Exceeding the winch or winch roperating.
You may see messages on your instrumentcluster if the system voltage drops belowa set threshold, specifically if batteryhealth is poor, winching occurs in freezingtemperatures, and/or a continuouswinching cycle. These messages go awayonce vehicle system voltage returns tonormal.
WINCHING YOUR VEHICLE
For more information, refer to The BasicGuide to Winching Techniques.
1.Put on gloves.
2.Switch the clutch to the freespoolposition.
3.Pull the winch rope to the anchor point.
4.Secure the winch rope to the anchorpoint using a tree trunk protector orchoker chain.
5.Secure the clevis to the tree trunkprotector or choker chain and the hookstrap by threading the two ends of thetree trunk protector or choker chain andthe hook strap loop through the clevis.Do not overtighten the clevis.
6.Switch the clutch to the lockedposition.
7.Remove the cap from the control boxand connect the remote control to thecontrol box.
8.Put the winch rope under tension byslowly winding it with the remotecontrol.
9.Check the anchor and make sure allthe connections are secure and free ofdebris.
10.Make sure the winch rope is neatlywound around the spooling drum.
11.Place an energy absorber, such as atree limb, heavy jacket, chain orbackpack, over the winch rope,halfway between the winch andanchor point.
12.Make sure that everyone in theimmediate area is clear of thewinching vehicle.
13.With your vehicle switched on, beginwinching slowly and steadily with theremote control.
14.Continue winching your vehicle untilit is on stable ground.
15.Place your vehicle in park (P).
Note:If your vehicle is manual transmission,place it in first gear.
16.Disconnect the winch rope from theanchor.
17.Wind the winch rope back onto thewinch drum by walking it back withthe remote control. Keep tension onthe rope when rewinding it onto thedrum to evenly distribute the winchrope on the drum.
18.Secure the winch hook to the shacklepoint or the fairlead.
19.Disconnect the remote control fromthe control box. Store the remote ina clean, dry place. Place the cap backon the control box.
316
2023 Bronco (TG1) Canada/United States of America, enUSA, Edition date: 202208, DOMWinching - Everglades