steering FORD C MAX 2011 2.G Owner's Guide
[x] Cancel search | Manufacturer: FORD, Model Year: 2011, Model line: C MAX, Model: FORD C MAX 2011 2.GPages: 296, PDF Size: 7.87 MB
Page 162 of 296
Downloaded from www.Manualslib.com manuals search engine PRINCIPLE OF OPERATION
WARNING
When you are going downhill, your
speed may increase above the set
speed. The system will not apply the
brakes but a warning will be given. The system allows you to set a speed, to
which the vehicle then becomes limited.
The set speed will become the effective
maximum speed of the vehicle, but with
the option to temporarily exceed this limit
if required.
USING THE SPEED LIMITER
Note:
The set speed limit can be
intentionally exceeded for a short period if
required, for example when overtaking.
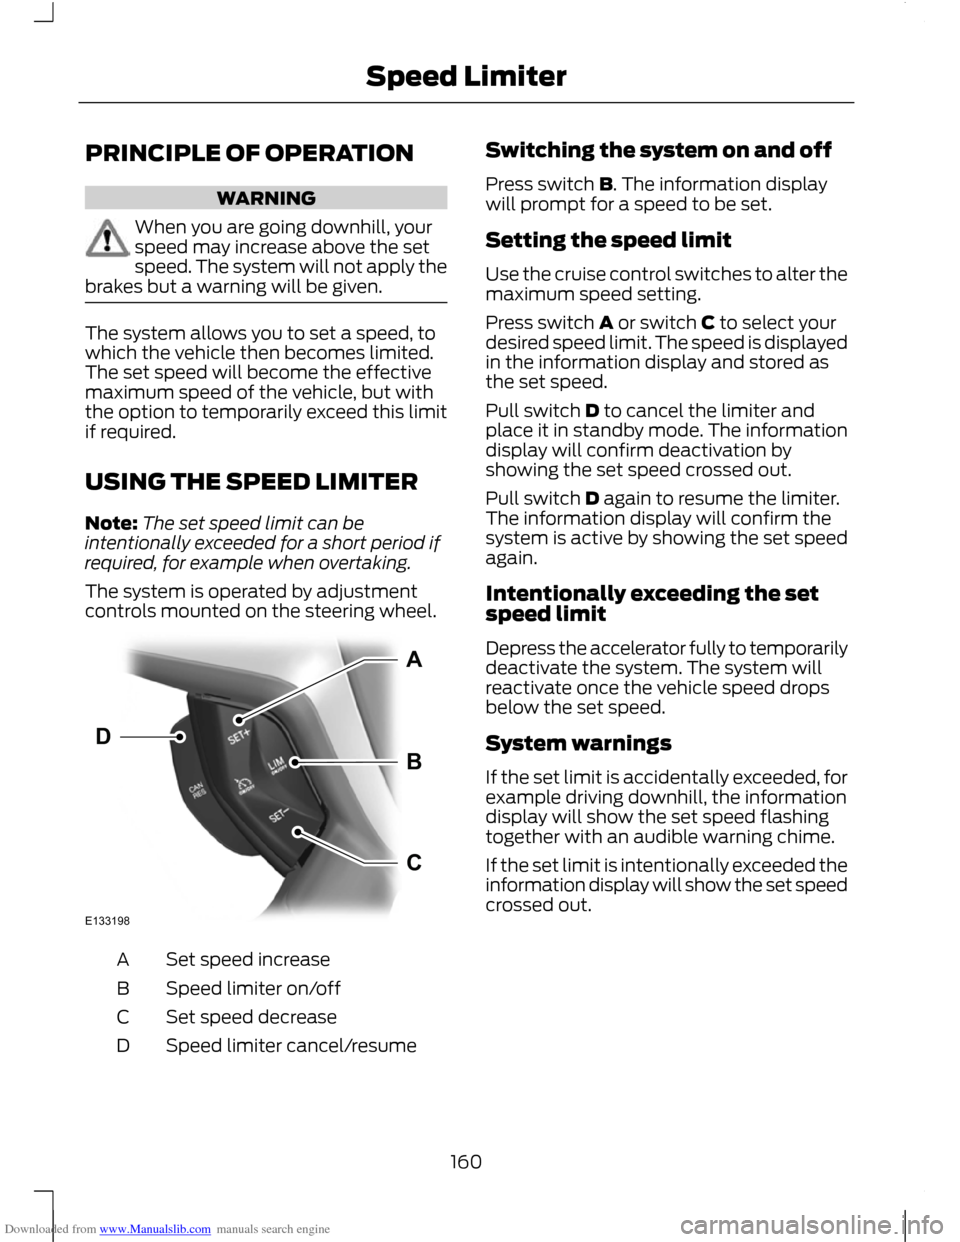
The system is operated by adjustment
controls mounted on the steering wheel. Set speed increase
A
Speed limiter on/off
B
Set speed decrease
C
Speed limiter cancel/resume
D Switching the system on and off
Press switch B. The information display
will prompt for a speed to be set.
Setting the speed limit
Use the cruise control switches to alter the
maximum speed setting.
Press switch A or switch C to select your
desired speed limit. The speed is displayed
in the information display and stored as
the set speed.
Pull switch D to cancel the limiter and
place it in standby mode. The information
display will confirm deactivation by
showing the set speed crossed out.
Pull switch D again to resume the limiter.
The information display will confirm the
system is active by showing the set speed
again.
Intentionally exceeding the set
speed limit
Depress the accelerator fully to temporarily
deactivate the system. The system will
reactivate once the vehicle speed drops
below the set speed.
System warnings
If the set limit is accidentally exceeded, for
example driving downhill, the information
display will show the set speed flashing
together with an audible warning chime.
If the set limit is intentionally exceeded the
information display will show the set speed
crossed out.
160
Speed LimiterE133198ABCD
Page 174 of 296
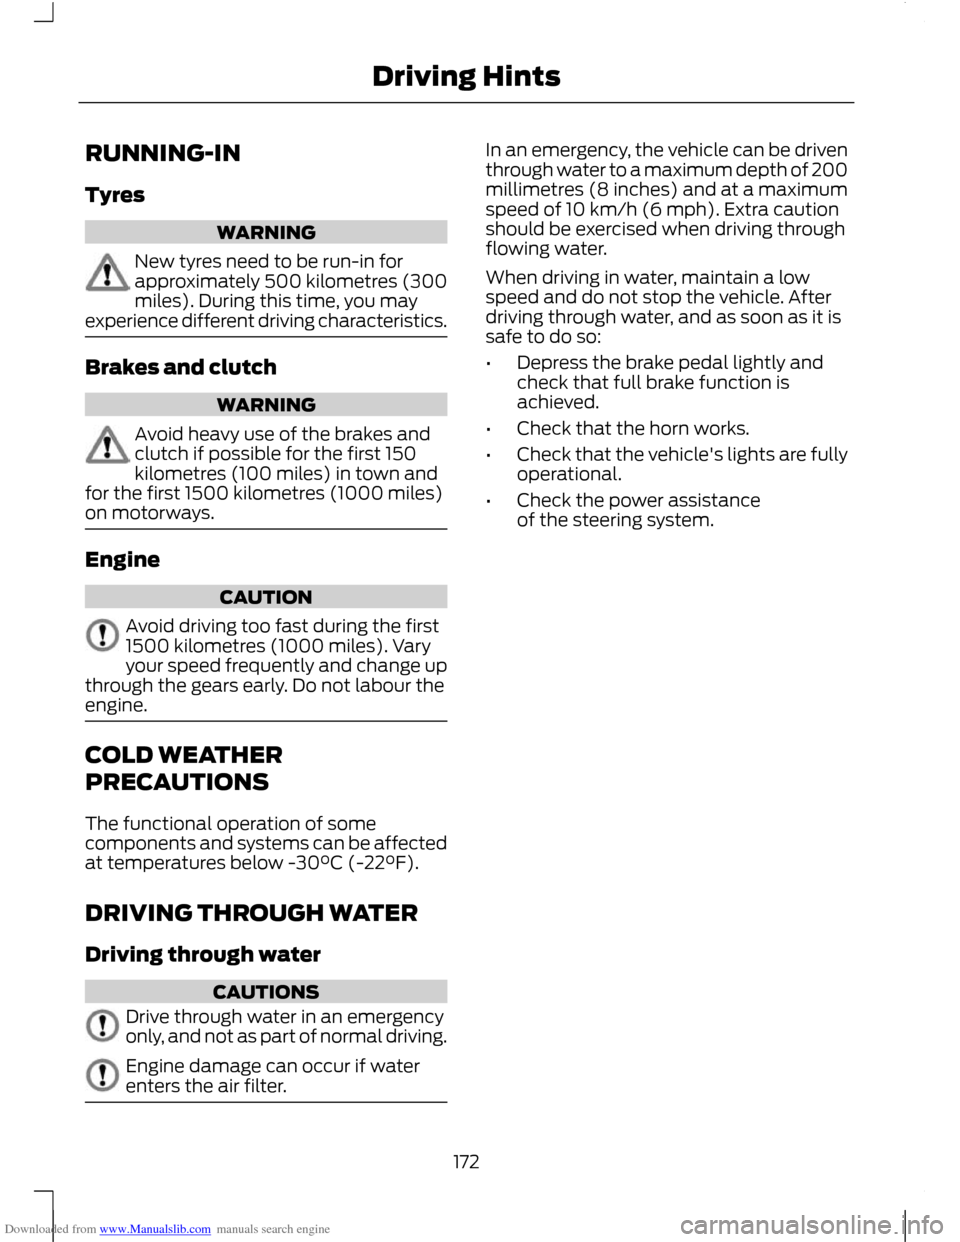
Downloaded from www.Manualslib.com manuals search engine RUNNING-IN
Tyres
WARNING
New tyres need to be run-in for
approximately 500 kilometres (300
miles). During this time, you may
experience different driving characteristics. Brakes and clutch
WARNING
Avoid heavy use of the brakes and
clutch if possible for the first 150
kilometres (100 miles) in town and
for the first 1500 kilometres (1000 miles)
on motorways. Engine
CAUTION
Avoid driving too fast during the first
1500 kilometres (1000 miles). Vary
your speed frequently and change up
through the gears early. Do not labour the
engine. COLD WEATHER
PRECAUTIONS
The functional operation of some
components and systems can be affected
at temperatures below -30°C (-22°F).
DRIVING THROUGH WATER
Driving through water
CAUTIONS
Drive through water in an emergency
only, and not as part of normal driving.
Engine damage can occur if water
enters the air filter. In an emergency, the vehicle can be driven
through water to a maximum depth of 200
millimetres (8 inches) and at a maximum
speed of 10 km/h (6 mph). Extra caution
should be exercised when driving through
flowing water.
When driving in water, maintain a low
speed and do not stop the vehicle. After
driving through water, and as soon as it is
safe to do so:
•
Depress the brake pedal lightly and
check that full brake function is
achieved.
• Check that the horn works.
• Check that the vehicle's lights are fully
operational.
• Check the power assistance
of the steering system.
172
Driving Hints
Page 178 of 296
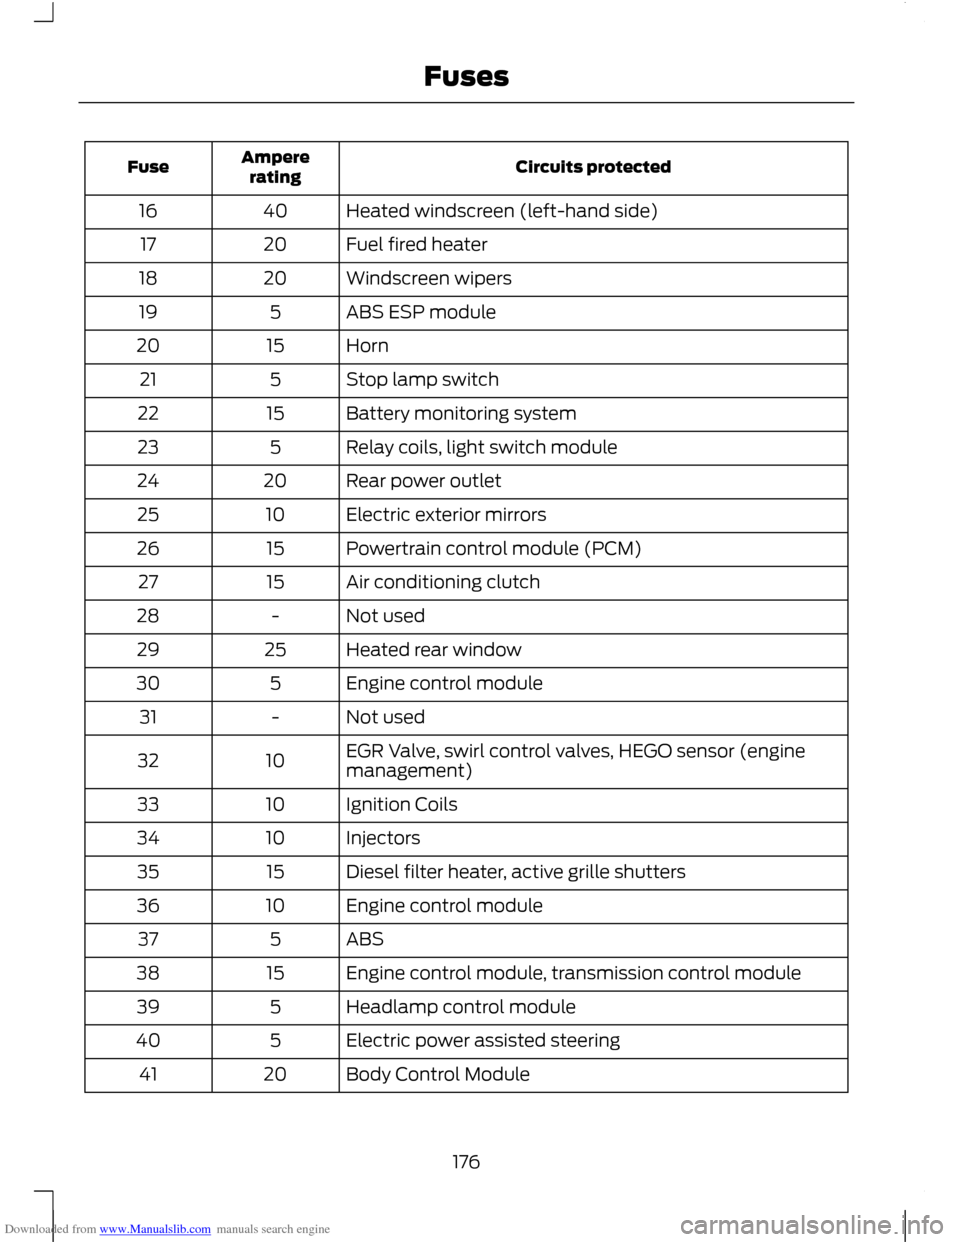
Downloaded from www.Manualslib.com manuals search engine Circuits protected
Ampere
rating
Fuse
Heated windscreen (left-hand side)
40
16
Fuel fired heater
20
17
Windscreen wipers
20
18
ABS ESP module
5
19
Horn
15
20
Stop lamp switch
5
21
Battery monitoring system
15
22
Relay coils, light switch module
5
23
Rear power outlet
20
24
Electric exterior mirrors
10
25
Powertrain control module (PCM)
15
26
Air conditioning clutch
15
27
Not used
-
28
Heated rear window
25
29
Engine control module
5
30
Not used
-
31
EGR Valve, swirl control valves, HEGO sensor (engine
management)
10
32
Ignition Coils
10
33
Injectors
10
34
Diesel filter heater, active grille shutters
15
35
Engine control module
10
36
ABS
5
37
Engine control module, transmission control module
15
38
Headlamp control module
5
39
Electric power assisted steering
5
40
Body Control Module
20
41
176
Fuses
Page 181 of 296
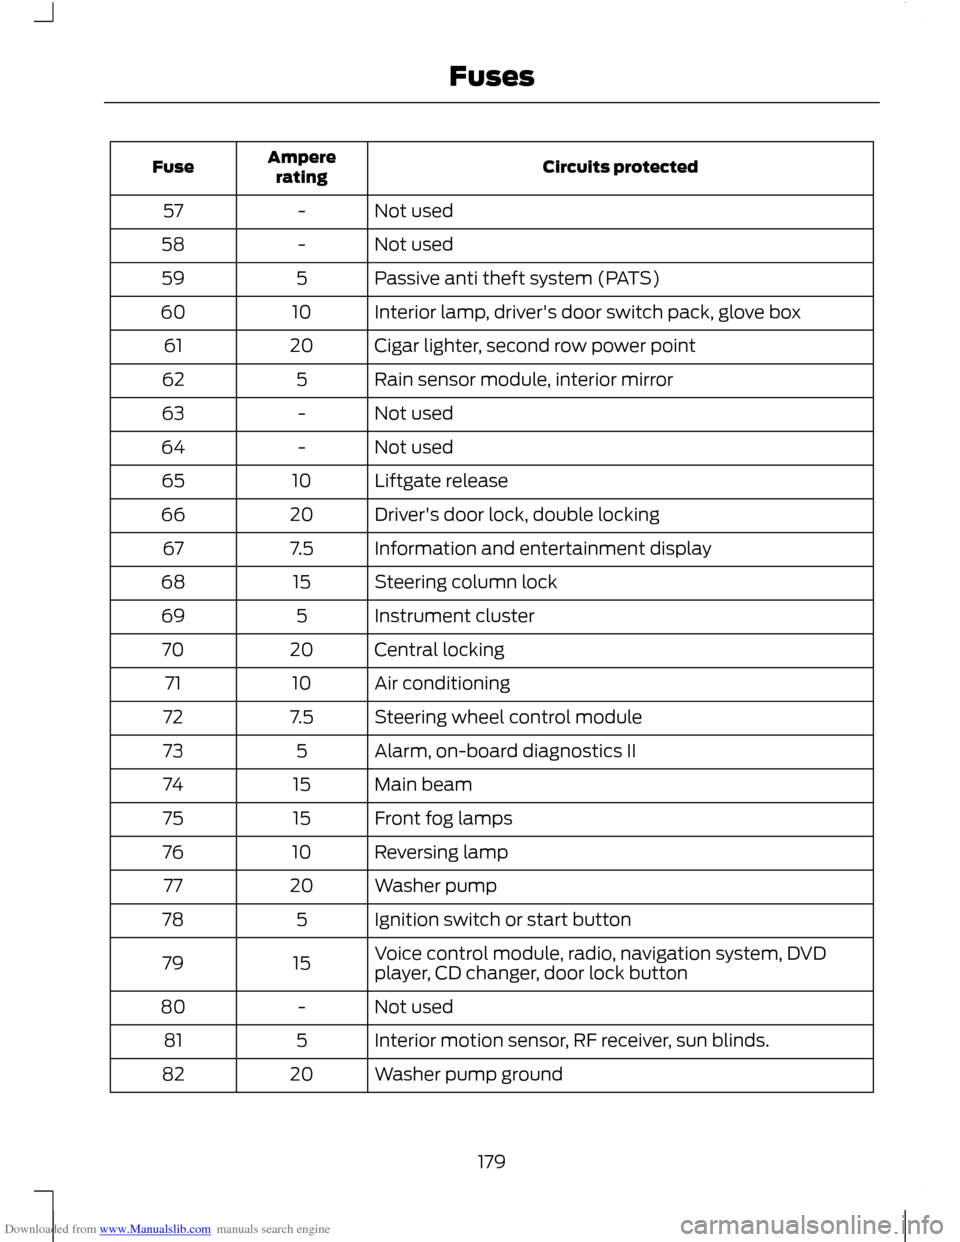
Downloaded from www.Manualslib.com manuals search engine Circuits protected
Ampere
rating
Fuse
Not used
-
57
Not used
-
58
Passive anti theft system (PATS)
5
59
Interior lamp, driver's door switch pack, glove box
10
60
Cigar lighter, second row power point
20
61
Rain sensor module, interior mirror
5
62
Not used
-
63
Not used
-
64
Liftgate release
10
65
Driver's door lock, double locking
20
66
Information and entertainment display
7.5
67
Steering column lock
15
68
Instrument cluster
5
69
Central locking
20
70
Air conditioning
10
71
Steering wheel control module
7.5
72
Alarm, on-board diagnostics II
5
73
Main beam
15
74
Front fog lamps
15
75
Reversing lamp
10
76
Washer pump
20
77
Ignition switch or start button
5
78
Voice control module, radio, navigation system, DVD
player, CD changer, door lock button
15
79
Not used
-
80
Interior motion sensor, RF receiver, sun blinds.
5
81
Washer pump ground
20
82
179
Fuses
Page 185 of 296
Downloaded from www.Manualslib.com manuals search engine TOWING POINTS
Towing eye location
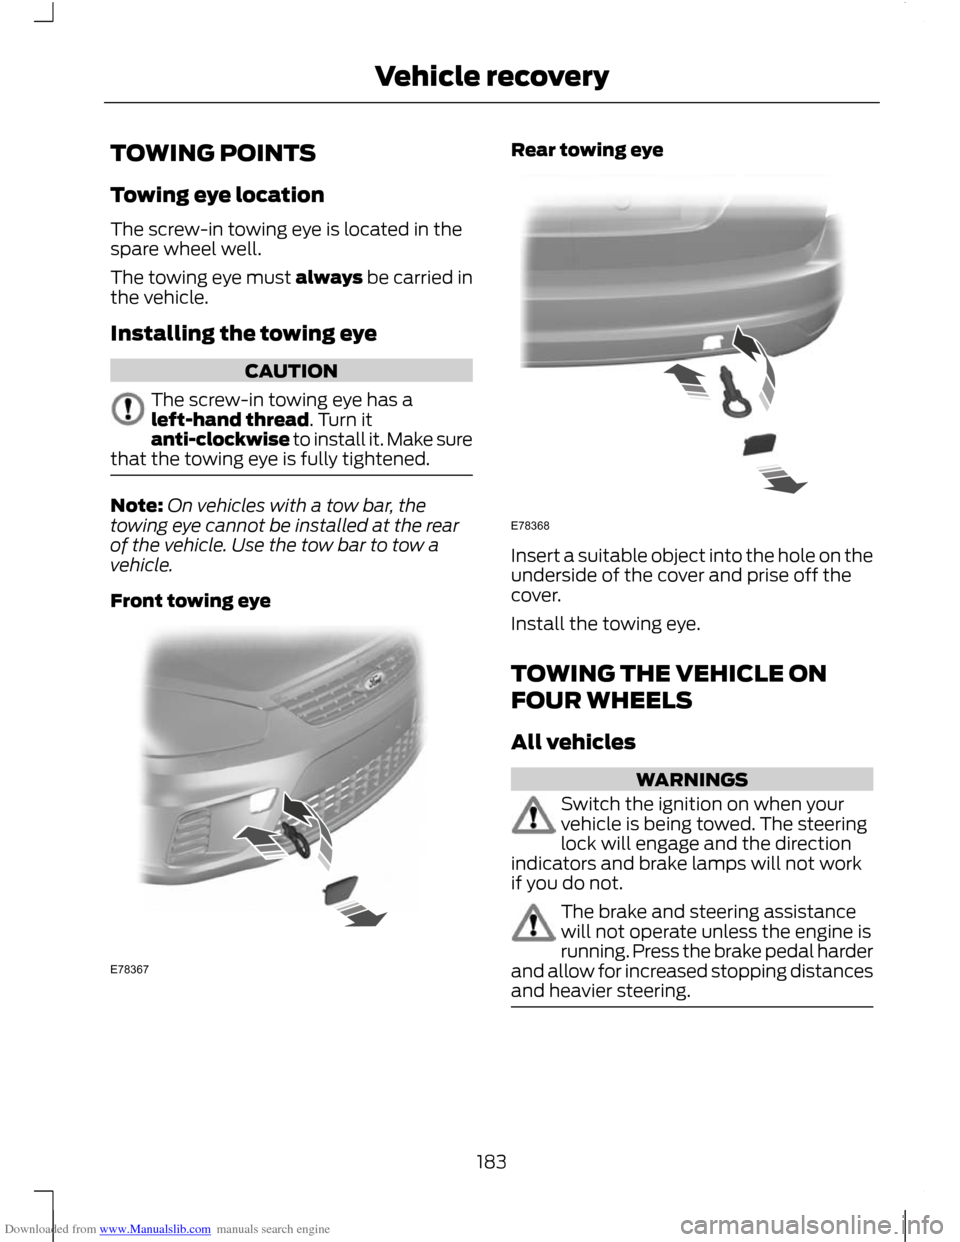
The screw-in towing eye is located in the
spare wheel well.
The towing eye must always be carried in
the vehicle.
Installing the towing eye
CAUTION
The screw-in towing eye has a
left-hand thread. Turn it
anti-clockwise to install it. Make sure
that the towing eye is fully tightened. Note:
On vehicles with a tow bar, the
towing eye cannot be installed at the rear
of the vehicle. Use the tow bar to tow a
vehicle.
Front towing eye Rear towing eye
Insert a suitable object into the hole on the
underside of the cover and prise off the
cover.
Install the towing eye.
TOWING THE VEHICLE ON
FOUR WHEELS
All vehicles
WARNINGS
Switch the ignition on when your
vehicle is being towed. The steering
lock will engage and the direction
indicators and brake lamps will not work
if you do not. The brake and steering assistance
will not operate unless the engine is
running. Press the brake pedal harder
and allow for increased stopping distances
and heavier steering. 183
Vehicle recoveryE78367 E78368
Page 202 of 296
Downloaded from www.Manualslib.com manuals search engine Note:
Vehicles with a tyre repair kit are not
equipped with a vehicle jack or a wheel
brace.
It is recommended to use a workshop type
hydraulic jack for changing between
summer and winter tyres.
Note: Use a jack with a minimum lifting
capacity of 1.5 tonnes and a lifting plate with
a minimum diameter of 80 millimetres (3.1
inches). Vehicles without tyre repair kit
Your vehicle jack, wheel brace, screw-in
towing eye and wheel trim remover are
located in the spare wheel well.
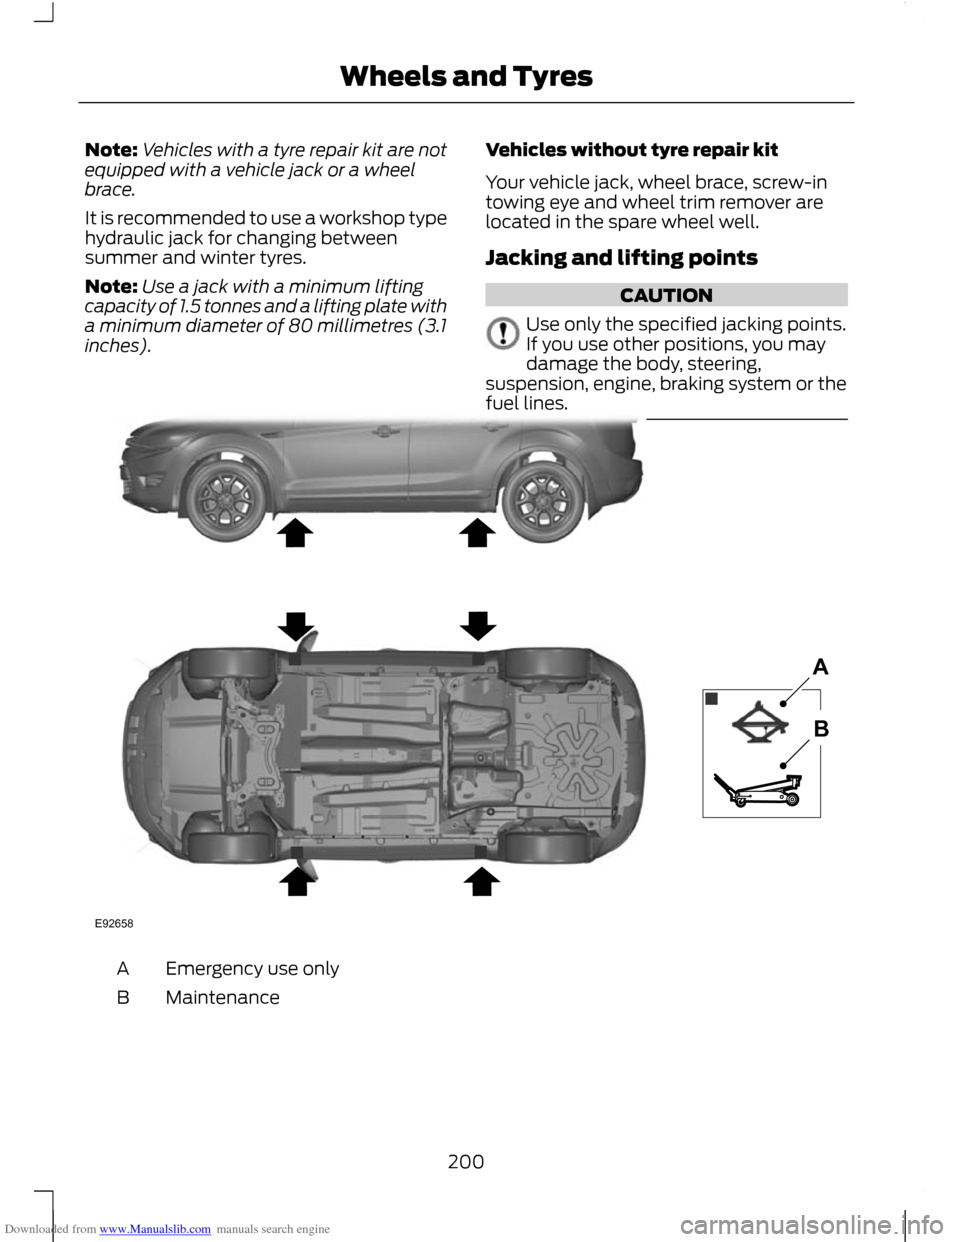
Jacking and lifting points CAUTION
Use only the specified jacking points.
If you use other positions, you may
damage the body, steering,
suspension, engine, braking system or the
fuel lines. Emergency use only
A
Maintenance
B
200
Wheels and TyresE92658AB
Page 206 of 296
Downloaded from www.Manualslib.com manuals search engine WARNING
Have the wheel nuts checked for
tightness and the tyre pressure
checked as soon as possible.
TYRE REPAIR KIT
Your vehicle may not have a spare tyre. In
this case it will have an emergency tyre
repair kit that can be used to repair one
flat tyre.
The tyre repair kit is located in the spare
wheel well.
General information
WARNINGS
Depending on the type and extent of
tyre damage, some tyres can only be
partially sealed or not sealed at all.
Loss of tyre pressure can affect vehicle
handling, leading to loss of vehicle control. Do not use the tyre repair kit if the
tyre has already been damaged as a
result of being driven under inflated.
Do not use the tyre repair kit on run
flat tyres.
Do not try to seal damage other than
that located within the visible tread
of the tyre.
Do not try to seal damage to the
tyre
’s sidewall. The tyre repair kit seals most tyre
punctures [with a diameter of up to six
millimetres (1/4 inch)] to temporarily
restore mobility.
Observe the following rules when using the
kit: •
Drive with caution and avoid
making sudden steering or driving
manoeuvres, especially if the vehicle
is heavily loaded or you are towing a
trailer.
• The kit will provide you with an
emergency temporary repair, enabling
you to continue your journey to the next
vehicle or tyre dealer, or to drive a
maximum distance of 200 kilometres
(125 miles).
• Do not exceed a maximum speed of
80 km/h (50 mph) .
• Keep the kit out of the reach of
children.
• Only use the kit when the ambient
temperature is between – 30°C (-22°F)
and +70°C (+158°F).
Using the tyre repair kit WARNINGS
Compressed air can act as an
explosive or propellant.
Never leave the tyre repair kit
unattended while in use.
CAUTION
Do not keep the compressor operating
for more than 10 minutes.
Note:
Use the tyre repair kit only for the
vehicle with which it was supplied.
• Park your vehicle at the roadside so
that you do not obstruct the flow of
traffic and so that you are able to use
the kit without being in danger.
• Apply the parking brake, even if you
have parked on a level road, to make
sure that the vehicle will not move.
• Do not attempt to remove foreign
objects like nails or screws penetrating
the tyre.
204
Wheels and Tyres
Page 208 of 296
Downloaded from www.Manualslib.com manuals search engine Power plug with cable
G
Compressor switch
H
Label
I
Bottle lid
J
Sealant bottle
K
1. Open the lid of the tyre repair kit.
2. Peel off the label I showing the maximum permissible speed of
80 km/h (50 mph) from the casing and
attach it to the instrument panel in the
driver ’s field of view. Make sure the
label does not obscure anything
important.
3. Take the hose C and the power plug with cable G out of the kit.
4. Unscrew the orange cap D and the bottle lid J.
5. Screw the sealant bottle K clockwise into the bottle holder E fully tight.
6. Remove the valve cap from the damaged tyre.
7. Detach the protective cap A from the hose C and screw the hose C firmly
onto the valve of the damaged tyre.
8. Make sure that the compressor switch
H is in position 0.
9. Insert the power plug G into the cigar lighter socket or auxiliary power socket.
See Cigar Lighter (page 122). See
Auxiliary Power Points (page 123).
10. Start the engine.
11. Move the compressor switch H to position 1.
12. Inflate the tyre for no longer than seven minutes to an inflation pressure
of minimum 1.8 bar (26 psi) and a
maximum of 3.5 bar (51 psi). Move
the compressor switch H to position
0 and check the current tyre pressure
with pressure gauge F. 13. Remove the power plug G from the
cigar lighter socket or auxiliary power
socket.
14. Quickly unscrew the hose C from the
tyre valve and replace the protective
cap A. Fasten the valve cap again.
15. Leave the sealant bottle K in the bottle holder E.
16. Make sure the kit, the bottle lid and the orange cap are stored safely, but
still easily accessible in the vehicle.
The kit will be required again when
you check the tyre pressure.
17. Immediately drive approximately three kilometres (two miles) so that
the sealant can seal the damaged
area.
Note: When pumping in the sealant through
the tyre valve, the pressure may rise up to
6 bar (87 psi) but will drop again after about
30 seconds. WARNING
If you experience heavy vibrations,
unsteady steering behaviour or
noises while driving, reduce your
speed and drive with caution to a place
where it is safe for you to stop the vehicle.
Recheck the tyre and its pressure. If the
tyre pressure is less than 1.3 bar (19 psi) or
if there are any cracks, bumps or similar
damage visible, do not continue driving
with this tyre. Checking the tyre pressure
1. Stop the vehicle after driving
approximately three kilometres
(two miles). Check, and where
necessary, adjust the pressure of the
damaged tyre.
2. Attach the kit and read the tyre pressure from the pressure gauge F.
206
Wheels and Tyres
Page 241 of 296
Downloaded from www.Manualslib.com manuals search engine Note:
You can exit the phone menu by
pressing any source button CD, RADIO or
AUX.
Note: When referred to, the use of the
up/down arrow buttons, seek up and seek
down buttons, and the OK button can be
used on either the steering wheel or the
audio unit.
This chapter describes the phone functions
of the audio unit.
An active phone must be present.
Even if connected to the audio unit, your
phone can still be used in the usual way.
Making a call
Dialling a number using voice control
Phone numbers can be dialled using voice
control. See Telephone commands
(page 249).
Dialling a number using the address
book
1. Press the PHONE button.
2. Press the up/down arrow buttons until
PHONEBOOK is shown.
3. Press the OK button.
Note: You can also use the telephone
keypad to select the first letter of the entry
you are looking for. Press the relevant
number that corresponds to the letter
repeatedly until the required letter is
displayed.
4. Press the up/down arrow buttons to select the desired phone number.
Note: Press and hold the up/down arrow
buttons to search forwards or backwards
within the phonebook.
5. Press the OK button to dial the selected phone number. Dialling a number using the telephone
keypad
1. Press the PHONE button.
2. Dial the number using the telephone
keypad on the audio unit.
3. Press the OK button.
Note: If you enter an incorrect digit whilst
entering a phone number, press function
button 3 to erase the last digit. A long press
will erase the complete string of digits.
Ending a call
Calls can be ended by:
• pressing the seek up button
• pressing the OK button
• pressing function button 4.
Redialling a number
1. Press the PHONE button.
2. Press the up/down arrow buttons until
CALL LISTS is displayed.
3. Press the OK button.
Note: If the active phone does not provide
a call out list, the last outgoing call
number/entry can be redialled.
4. Press the up/down buttons to select the desired call list.
5. Press the OK button.
6. Press the up/down buttons to select the desired phone number.
7. Press the OK button.
Redialling the last dialled number
1. Press the PHONE button.
2. Press the up/down arrow buttons until
REDIAL is displayed.
3. Press the OK button.
239
Telephone
Page 242 of 296
Downloaded from www.Manualslib.com manuals search engine Receiving an incoming call
Accepting an incoming call
Incoming calls can be accepted by pressing
the seek down button, or by pressing the
OK button.
Rejecting an incoming call
Incoming calls can be rejected by:
•
pressing the seek up button, or
• pressing the arrow down button to
highlight REJECT and then pressing
the OK button.
Receiving a second incoming call
Note: The second incoming call function
must be activated in your phone.
If there is an incoming call whilst there is
an ongoing call, a beep will be heard and
you will have the option to end the active
call and to accept the incoming call.
Accepting a second incoming call
Note: The first incoming call will be
disconnected and replaced by the second
incoming call.
Second incoming calls can be accepted
by pressing the seek down button on the
steering wheel or on the audio unit, or by
pressing the OK button on the audio unit.
Rejecting a second incoming call
Second incoming calls can be rejected by:
• pressing the seek up button, or
• pressing the arrow down button to
highlight REJECT and then pressing
the OK button.
Second incoming calls can be rejected by
pressing function button 4. Muting the microphone
Note:
During a call, it is possible to mute
the microphone. Whilst muted, confirmation
will appear in the display.
Press function button 1. Press the button
once again to turn this function off.
Changing the active phone
Note: Phones must be bonded to the
system before they can be made active.
Note: After bonding a phone to the system,
this becomes the active phone.
1. Press the PHONE button.
2. Press the up/down buttons until SELECT PHONE is shown.
3. Press the OK button.
4. Scroll through the different stored phones by using the up/down buttons
to display the bonded phones.
5. Press the OK button to select the phone which is to be the active phone.
Debonding a bonded phone
A bonded phone can be deleted from the
system at any time, unless a phone call is
in progress.
1. Press the PHONE button.
2. Press the up/down buttons until SELECT PHONE is shown.
3. Press the OK button.
4. Press the up/down buttons to highlight
the required phone.
5. Press function button 1.
240
Telephone