FORD CAPRI 1974 Workshop Manual
Manufacturer: FORD, Model Year: 1974, Model line: CAPRI, Model: FORD CAPRI 1974Pages: 205, PDF Size: 43.75 MB
Page 111 of 205
~10 Chap ter 6 Manual gearbo)( an d automatic transm iss io n
operlltlon. looseness between the inner ;mel oulC. ';)ces. imd 10f genera' wear. NOfIll.llly they should be .enewed on a gearbox lh<11 IS being .ebuil l. 8 II Clther 0' the synchrOnise. unllS ;nc WOUl II w Ill be ncccssmy 10 buy" complete assembly as the Pill ts ,lIC not sold individually. Also check the sliding keys 10' we;'!. 9 Examine tho ends 0' IhO scl(!C I(ll' lor ks where they rub "g.1In51 the channels in the peJiphery of the synchrOntSfl f units_If I)()Ss,ble cOIllp.."e the sclecw. lorks with new Units to hell) dC1Crminc the weill lh,,1 h,IS occtJUcd Renew thelll " worn. 10 If the bCilring bUSh ,n Ihe CXI(mSlon is b;uliy worn II,s OOS110 [
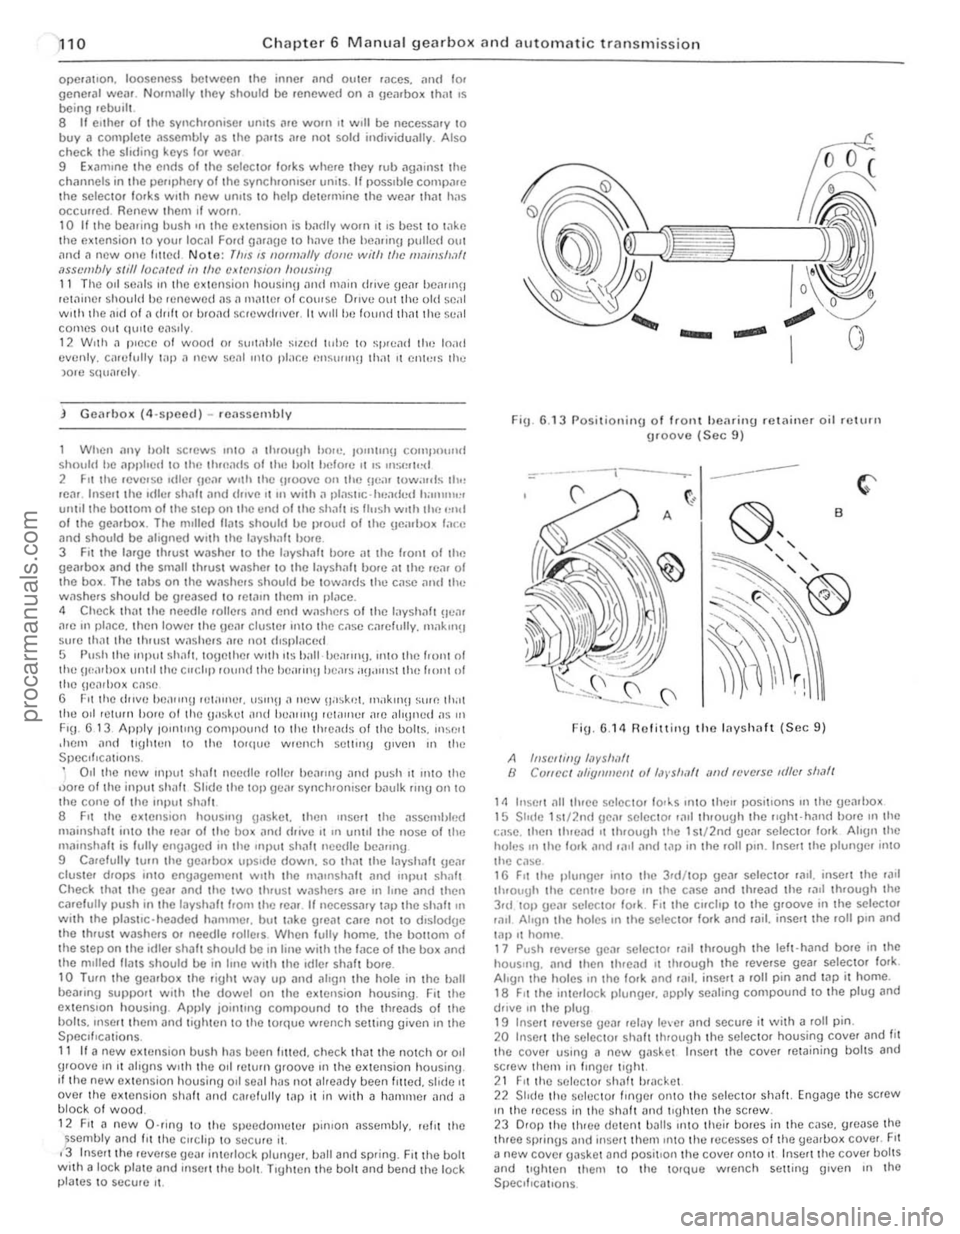
When any hOlt screws "110 a throuUh hor". JOllll11\!J COlllpnulI/t Should hc nj)lllted to I he lhwads 011l11! holl helorc It ," InS/"h~1 2 Fit Ihe /cve.so Idle. He"r WIlli Ihc It,oolle on the !le;1I tuw;IId,. Ih,' lenr.lnsel! Ihe .dle, s h ah nnll dlllle 11111 with .1 pla~t.c·IIIl:IIIt].1 h;""""" unllllhc OOltOnl ollhe Slel) on the end ollhe shalt.s IIIIsh WIth lhl! ,,11.1 0 1 the gCJloox. Thc mIlled "
FlU. 6 13 Apply 101ll1lng compoullll to the threilds 0 1 Ihe bolts. lIl~e
0,1
the new IIlput sh,ll! ncedle rollel heilrlllg ilnd push I t 11)10 tllC oJorc 01 the input sha ft Slide the lOP gC(lr synchroniser baulk IInu on to the cone olthe IIlJ)u I sha h 8 FIt the extension houSll19 gnske!. lhen InSerl the ,1s~",hlcd mainsha/t into Ihe rca. 01 the box anll (frille II III untIl the nose 01 Ihe Illalnsh~h is fully engaucd in I he II1PUI shilh necdle l>c,l11nU 9 Carefully lu.n the ge;ubox upSIde down. so thilt the layshalt \}e,lr elusler dIOI)S mto engJgelllenl with the malnshillt Jnd IIlpIII shalt Check thilt the gear and the two lluust wilshe.s il.e III line and then c,l.elully push in the layshalt from thc leal. If necessary till) Ihe S h ,ll! In with the p lasuc·headed IHI/llmer. bllt take grC;lI CJre not to dlslodUe Ihe thruSI washels or needle .olle.s . When fully home. the h Ollom of Ihe slep on the .dlel shalt shOuld be In hnc with Ihe face 01 the box and Ihe mIlled flats should be in IIno wllh the Idler shalt oo.e. 10 Turn the geilrbo~ the lighl w;ly UI) Jnd align the hole in the 1>.111 bemll1g SUpj)Orl WIth the dowcl on Ihc cxtcnsion housing. Fit the eXlenSlon housing. Apply jOlllllnu coml)ound to the ttlle<1ds of Ihe bolts. InSClt them and tightcn 10 thO torQuc wrench seHlng gillen In the SpeCll l
C3tions . 11 1/ a new cxtension bush has been fllle(1. check Ih~t the notch 01 011 groolle III II ilhgns wllh lhe o ll,elurn grOOlle In thoJ extension housing. If thc now exlension housinU 011 senl hilS not illready been filled. slide It Ollel the extension Shill t and enrelully tap it in wilh n h~nllller and n
b lock 01 wood.
1 2 FIt J ncw O ·ring to the spcedomeler pll110n assembly. relit the ~Sembly and f it the C llcli l) to socure i1. ,3 Inser t the r(,lIerse gear interlock plungel. ball and spring. Fllihe boll with aloek plate and lIl$crl tI,c l.Iol t. TIghten the boll and bend Ihe lock plilles to seCure ,to
Fig. 6.1 3 Posilionin g of Iront hearin\} .e lainer oil return \}Ioove (Sec 9)
=-*.------t---.---- ---
FiU . 6.14 R olitting the Inyshaft (Sec 9 )
A hlSC//ing /,1vs/!I!f/ B ClJflec / lIi1:qlll!!efl/ of /,J)'$/I,III illld 'fJve.se IdlfJf sl!,lfl
1/1 Insert ~II Ihrce selecto, 10l~s Into Ihcn I)ositlons 111 lhe gearl)o~ 15 Shllc 1~1/2n(1 \le,1r selector ,,111 through Ihe r,ghl-hilll(1 bo.e mille
I:ilse. Ihell tluead ,t through the 1 S I/2nd gCM selector lo.k Align Ihe holes 111 tile lo.k and r~11 ,111(/ t<1l) in the 101l1)ln. Insert the plunUe/ into thc c,lse 16 FIt Ihe pltlllgc/ '1110 Iho 3rd /lOI) ge,ll selecto. lad. inscrt lhe 'illl
t h .ough Ihe ccnHe hore III the C,lse ;lnd Ihread the raIl Ihrough Ihe 3rd 101) gea. sel()(: tor lo.k. Fit the clfchp to Ihe groolle ;n the se lecta' lilll Ahon Ihe holcS III the selectol 100k and ,;lil. insert the loll pIn and lal) .t home. 17 PUSh lellerSC gc,'1 seleelo, r;llt Ih/ough Ihe lelt·hand bore in the hou$"'g. and then thread 11 through the rellerse gear seleclol fork. Align Ihe holes III Iho IOrk and 101.1. inserl a roll pin and tap it home. 18 FIt Ihe interlock plungC/< apply sealing compound to the plug and dfille In Ihe plug 19 Inse!! ICllerSe ueJI ,clay lever and secu/c it wilh a roll pin. 20 Inse't thO sCleCtOr shalt ItHough the selcctol housing COllel and fit the co~er using a new gaskel Insert the COlier rewining bolts and screw them in Iingel lIghl. 21 FII the sel/lCIO' sh:lh b'lIcket 22 Shdo lhe S(lIOClOr flnge. onto the selec tol shalt. Eng~gc the strew III the ,ece~~ in th O shaft ~nd tIghten the sc rew. 23 0101) lhe Ihloo dctent ba lls 1I1tO thcir bores in t he casc. g1Case the thleo sprinus alld Ilise rt thcm Into the recesses 01 tile yeJ.1>ox COllel. FII
a new COlier gasket and positIon Ihe COllcr onto II Insert the COllel holtS and tlghtcn Ihem to tho 10Ique wrench suiting (Jillen III lhO SpeClf,callons
procarmanuals.com
Page 112 of 205
Chapter 6 Manual gearbox and automatic transmiss ion 111
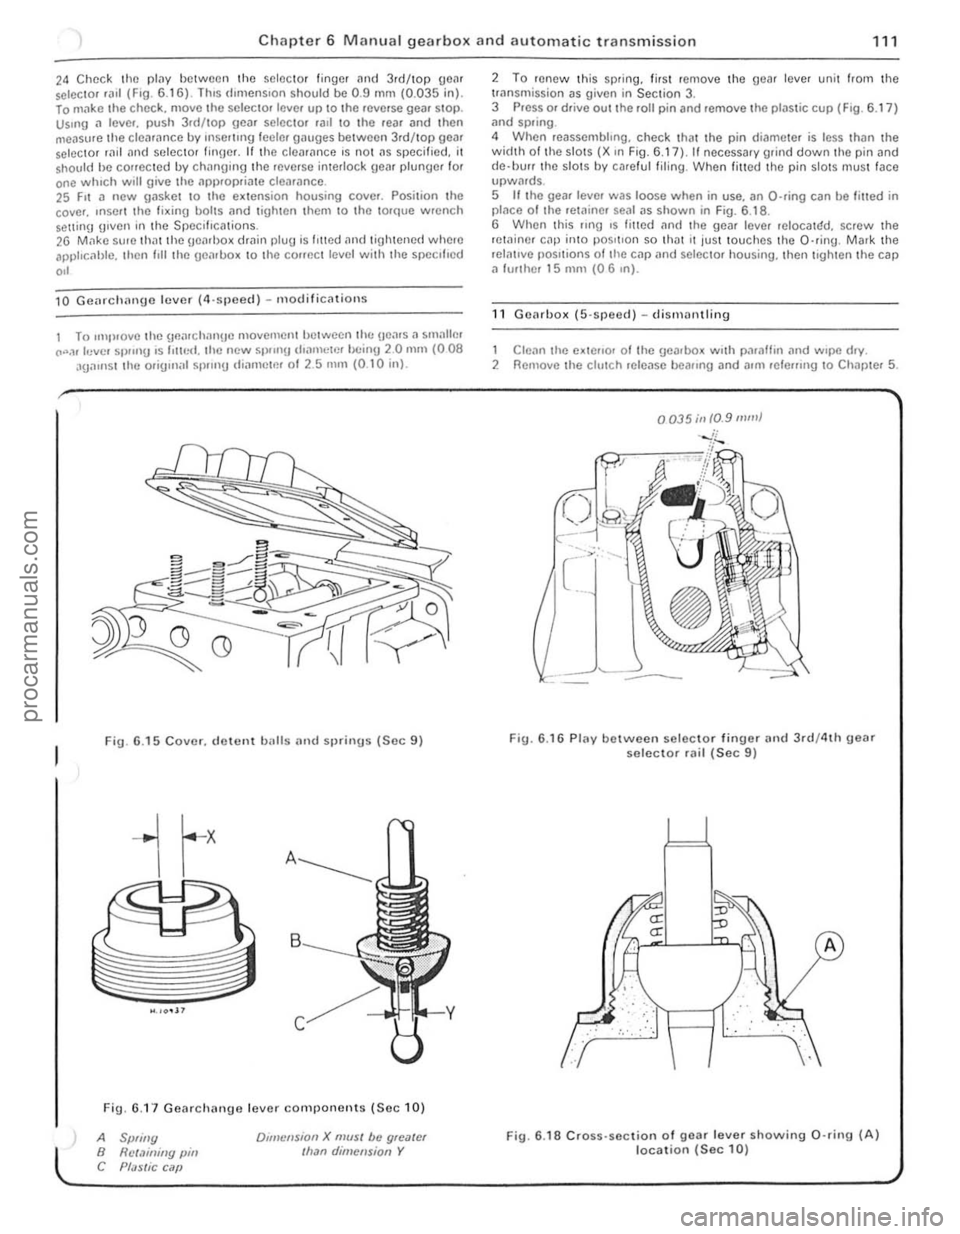
24 Chec k the plilY between the selector finger and 3.d/top geM selC{;lOr .a,1 (F,O. 6 .1 6) . lh,s d,mens,on shou ld be 0.9 mm (0.035 in). lo m"ke t he chec k. move the selec to. leve. up to the .everse gea. SlOp. Us.ng a lever. push 3.d/top gear selector .all \0 the rear and then
measure th e clea .ance by rnsel1lng leeler gauges betwee n 3rd/top gear selector rild "nd seleClOr finger. If th e cleM,mce 's no t ns specified. it shou ld he conecled by chnnging lhe .everse interlock geM plunger for one whIch will give the ,'PI).opria te clearance. 25 F,t a new gasket 10 the e~lension housing cover. Posilion the
cove •. ,nSOI I the fi~ing bolts nnd lighten Ihem 10 Ihe torque wrench Solt1inlJ g,ven in the Specifications. 26 M,1kc su, e th atthe geMl>o~ dmin plug is I,tted and tigh tened where apphc, 1hlc. then I,ll the uenlbo~ 10 the COffect level with the specl l'ed
,,'
10 Gcnrchnnge lever (4,sjleccl ) - m odificnlions
1 To ,mp,ovelhe \]flnr ch nngc movemcntlJctwecn lh(: Hea.s. , smallm CO".,r levcl Sl)!"'g ,s 1'lIr,<:I. the new 51)/,nU d,amclr'!' bc inU 20 mill (008 aga,nst the orig,n;r l sp.,n!) IIiarllctm 01 2.5 nUll (0 .1 0 inl.
Fig. 6 .15 Cover. d ewnt balls and sprinus (Sec 9)
Fig. 6.1 7 Gearchange lever components (Se c 10)
A Spliny B Rct.1illiny pin C Pf;JSlic C ilP
Dlillcnsion X mUSI be gloater Ilran dimension Y
2 To renew Ihis sp.ing. lir sl remove the gear lever unit from the trnnsmission as given in Section 3. 3 Press or drive out the roll pin and remove the plastic cup (F ig . 6.17 ) ;rnd spring .
4 When reassembhng. check that the pin di('!meter is less thiln the width 01 th e slots (X ,n Fig. 6.17), II necessary grind down the pin and
d e·llUrr the slots by ca.e ful filing . When filled the pin slotS mus t face upwMds. 5 If the gear leve. was loose when in use. an O-ring can be filled in placo o f Ihe retainer sOill as shown in Fig. 6.1 8 .
6 When this flng ,s fmed an(I the gear leve. reIOCalr:!d. screw the retainer cap inlO pos,tlon so th ilt It jus t touches th e O·ring . Mark the relntlve pOSitions of tile cap
1 Clean the e~tello. 01 Ihe gearbox w.th paraffin .,nd w.pe d.y. 2 Remove the clutch release beallng and allli lele",ng 10 Chapter 5.
0035;11 10.9 mill}
Fig. 6.16 Plav between selec to r finuer and 3rd/4th geM selector rail (Sec 9)
.. : . :,'. :", .
fLJ
··· ..
A
Fig. 6 .18 Cross· section of gear lever showing 0 ·rin9 (A) location (Sec 10)
i
i
procarmanuals.com
Page 113 of 205
Chapter 6 Manual gearbox and automatic transmission
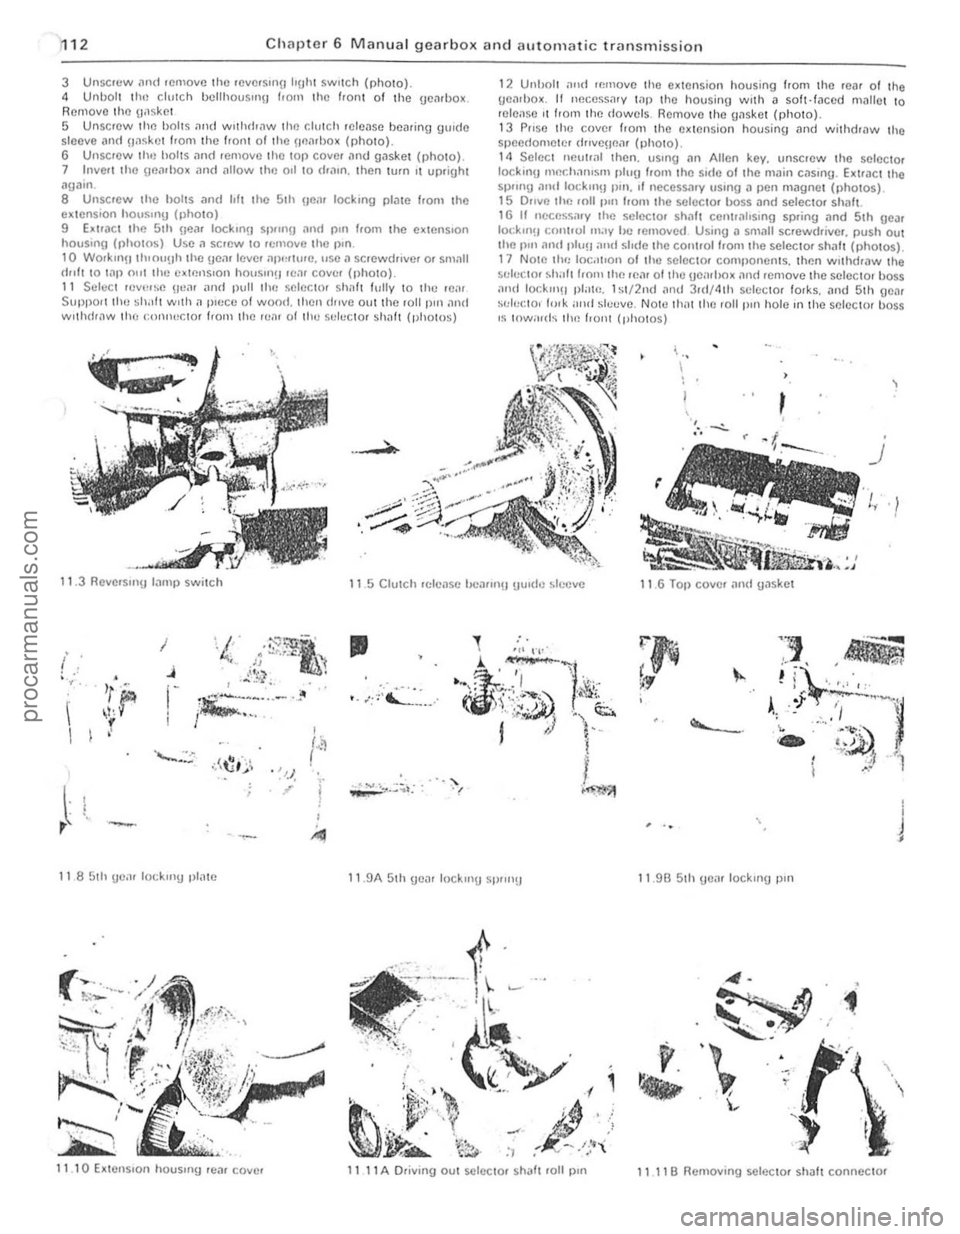
3 Unscr(lw .1ml remove Ihe reversrnu IrUtli SWilch (rhOIO). 4 UnbO lt the clulch bellhousrrl\J f,om the /,onl of the ge~rbox. Removo Iho gaske t 5 Unscrew tllo bolts .111<1 w,thdr
7 Inve,1 the UflilrllO x
I I Select revct~e !Ica,
12 Unholl and removc Iho extension housing Irom the ,ea, of Ihe
!)en,box . t1 nece5snrv lilP tho housing wrth a soft·/aced mallet to releilse ,I t,om 1he dowels. Removo tho gnske ! {photo}.
13 P"se Ihe cove, from th e ex 1ension housing Dnd withcfrnw the speedome1e, d"vc\Jenr (photo). 14 Selec i neut,
)
r
I
~~ . '
~~~,.,::
11.3 Revc,sm!t lilmp switch 1 1.5 Clutch rdense 1.K.'111"'!1 gu,dc sl(:cve 11.6 Tal) cover and tPske
I
( j • , .
'r" i'
I ,,J'" , i
I I
Ji;:;:~"'-'--·ft ; . -. '" . I
•
.-~:~'':''-'',:.-.,
I .-. " J
11 85th \)e;II lockrrlU plilte 1 1.9A 5th eil' lock"' SP""!t 11.9B 51h !)C
11 1 1 B Ilemovong scle<:tor shaft connector
c
procarmanuals.com
Page 114 of 205
,.
J
d .' ,
I' I . /
I ~./T
,f}Li~~
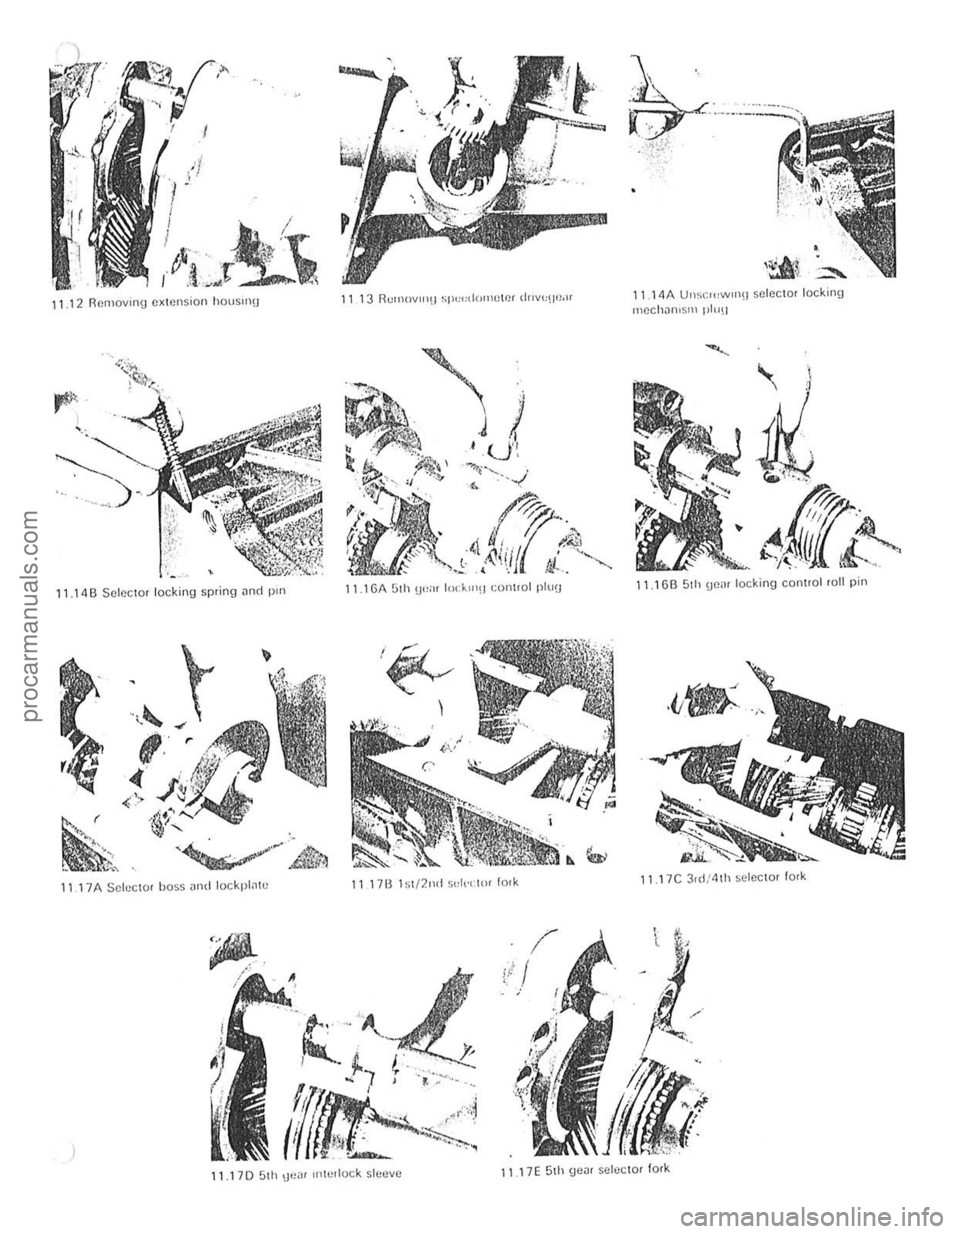
11.12 Rcrllovll1Y extension hO\lsln!j
11.14 B Selector locking sp ring nno pill
t
r~
11 17 A Selector hoss ,lI\d lockplo11o:
)
11 17B 1~1/211d Sul,'t:in! lo,k
,;fA;, ;.a\.
•
l'.14A UIlS'~'''WI''\j selector locking mCCh
11. 170 51h UeM ,nu"'oc k sleeve 11.17E 51h genr selecto r tork
I
i
I
Ii I
I , ., ,
,
, , ;
i I
-. ________________________ .................. 4
procarmanuals.com
Page 115 of 205
Chapter 6 Manual g ea rbox and automatic transmission
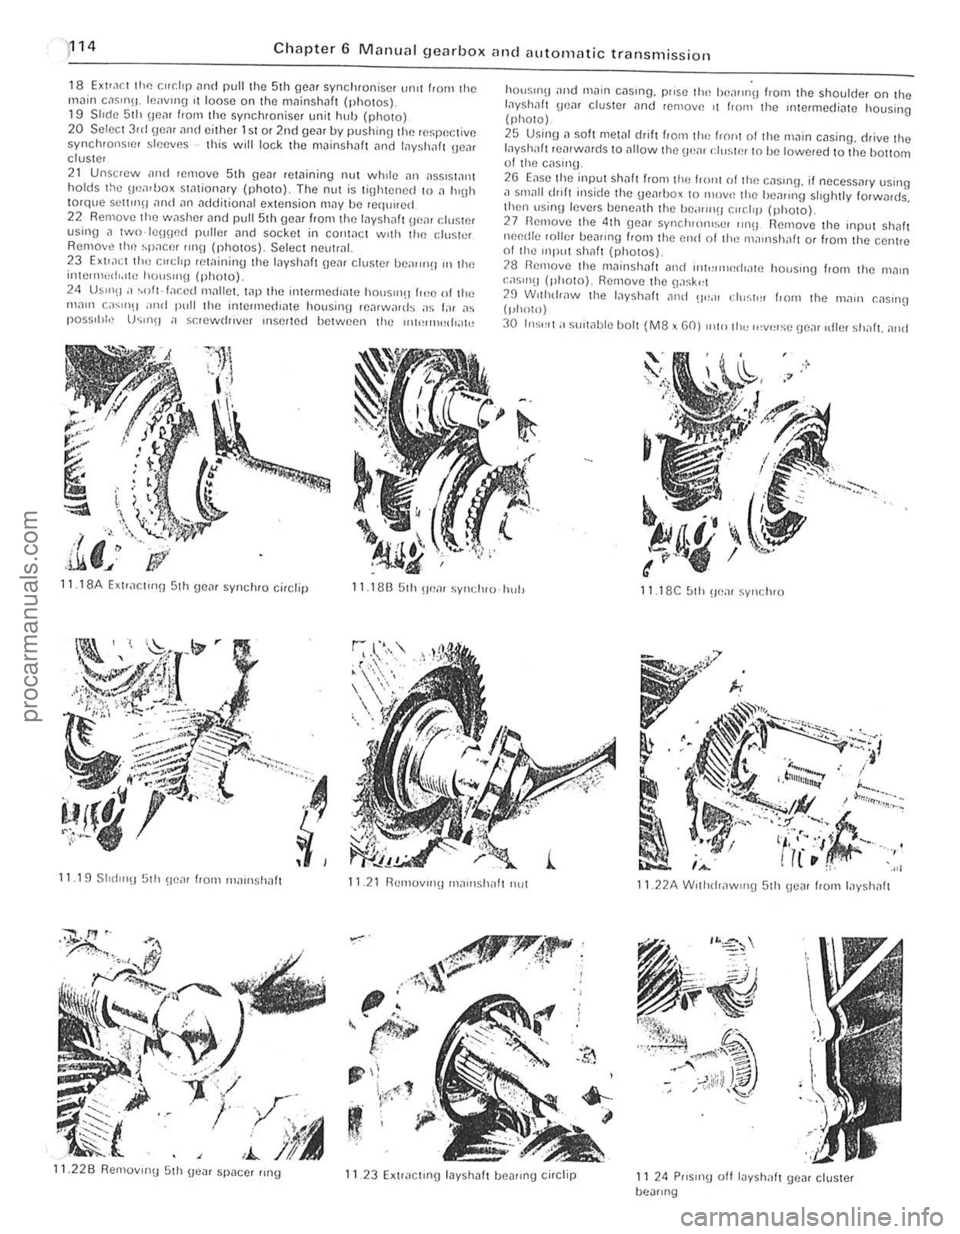
18 EXlra ct the r."dp and pull the 5th gcar synchronise r ur1lt f'orn the
rnn in c,lsm\1. Icavlllg I t loose on thtl mninshaft (photos). 19 S II(le 51h IlcM from the synchroniser unit huh {photo) 20 S elect 3rd gem and either 1st or 2nd gear by pushin\) the re~peclivc synchronsrcr sleeves this will lock the mainshllft
24 US"'(I;' ~oft·f;,r.ed Ill;-rllm. wp the intermedrate hOtJS"'~1 (,,!e of tl,,; ",<1111 c
.I,' ,i.li. J
hO(lSII1\1
layshilft rearwards to <11101'11 the \ .wm d,,~tn' t o he lowered 10 the hottoot 01 tlHl cas,,'U .
2G Ease tlte input Shaft f'om the frOllt 01 tlHl c;-rSlng, if oecess
29 Wllhdr,lW th e I,lyshalt ,11lel 0"_" eh";t,,, I,om Ihe 111<1111 C;-rSlIlg (phOlO)
30 In:;'''I; ' sUlwble bOl t (M8 x GO) Illto Ih" ,,,v',,:;c !Je,1( ,die, shnft. alld
11 18A Exlrar.t,nn 5th geM synchro ci,clip 11.18B 5th u em syl,(IHU hul) 11 18C 51h ~Je;-rr synclH O
11.19 SlId l"!J 5th !/tlar from "'
Page 116 of 205
'(OIOWI
)
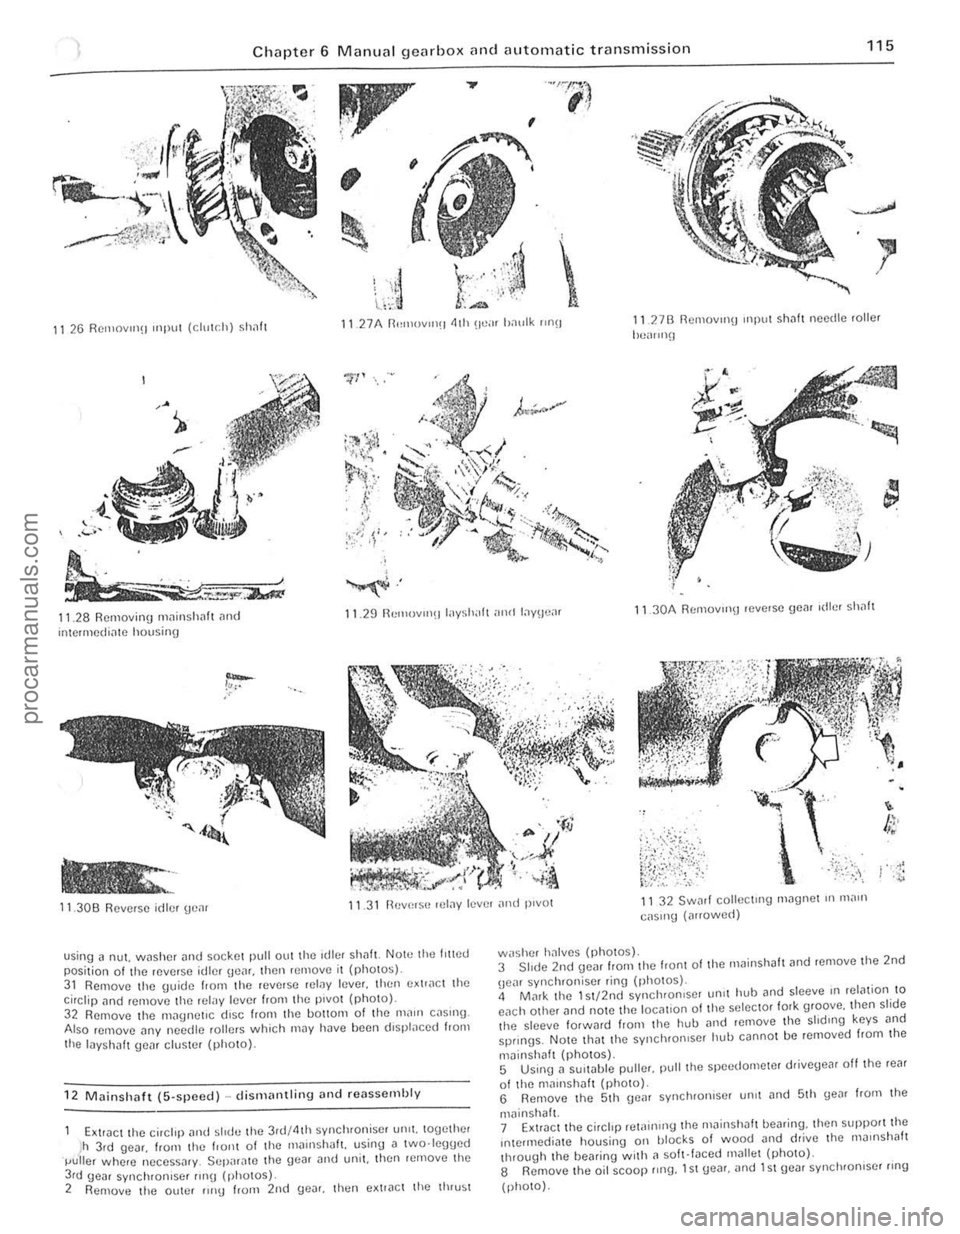
BUll ,[lSIUOJ\pU~s 1(l[lB 1St puc 'w[lB IS I 'Bull dOOJS I!o ayl
leal [lql Jlo ,caB,,,,-!}p ,a l;)IUop[I;)ds alp IIn(1 ')[Ilind alqelms C flu!sn S -(so)oyd) I jcqSUIU IU
aq) WO'1 pallow(lJ oq 1 0UUCJ qnlJ JaSluoJ\PIl~S aql leql (lION -sGulJds pue s~a">! GuIP'IS ;)q)
pUl ;}11I [lIlDlUa, puc Ileqsu!c\l1 ,)III 10 IUD') [lql IUO)I wall pUl [lPIIS £ (SOIOlld) s[llIlcq mqsl'M IsnHIl
;}ql
)JU')~
A
1Qlll;;lSSCaJ pue f)U!11UI!I\lS!P -(pa<.lds-g) lIC'ISU!(!li\I Zl
'(0101)(1) }<.llsnp 'Ull!) lIC\jS~UI aq)
\UOII paJ~I(lslp U;)
ali I I:)\!I)~[I U01i1 ');)1\;)1 ~{qa, (lS'[llIaJ [1111 Iuo'l ap!nG (llil ;)"otuau 1£
(sOIOlld) I! ;)"0111;)' \1[1111 'moll !;)IP! as);)II;)' [1111 )0 lJ0!l!SOd POW! [1111 ;:lION -I jells )[lIPI [lll\lno IIn(i J;)">!JOS pue J;)ljSCM '\IlU e 5u!sn
(P(lMOJJC) BUISI!:!
IHCW UI l(luGew 6ulI:)[l1I0:) pCMS l£ II 101\1(1 pue I(IlIal ~\!I(l, as':)"fl!;! I C·II '(!;;JO j[lIP! [lSJ(lIl[lU 80£'11
~' \~.:;:i.c· .
.. ~:,J .,: "~-I
'~~~~:I~;'Y(}'4
,:·:'t~'M:~:':·';
'7 .,' ,
l leljS ,[lIP' le[lO [15'[111[1' fi\lIlIow[lU VO£'II
Illllm
/..
Jl!ofiALq Pili! 1)"'1S~l)1 1)llIfI()IlI
'~ . ...... ,., "~". -'.
~'<',~:::.":-: iJ ...... JJoo ... '
~ ,
" {, ','; , " ~~:" ,.
r
l~
'.;p.~, \ . "/" fl:: ~
. '-. .:.t.
flull ~Invq W
1, 1
Coi"". ,
I
..
e""\> iii,
~
~
, J)l ."t,.~
<." ./ . " •
.... .< -.
fiu!snoq ;)IC!pa\lualul pue ljCqSIIIC\\l flU!IIOlua!;l gZ' I t
~ - ' > -."", -.' -
-q'
~
"
ljeljS ('I:)1l1p) Indlll HIIIIIOIll[ll:l 9l II
gLL UO!SS!WSUI?Jl O!lBUIOlrle pUr! ){o(pea6 ll!nuBV\I 9 JaldelJ:J (
procarmanuals.com
Page 117 of 205
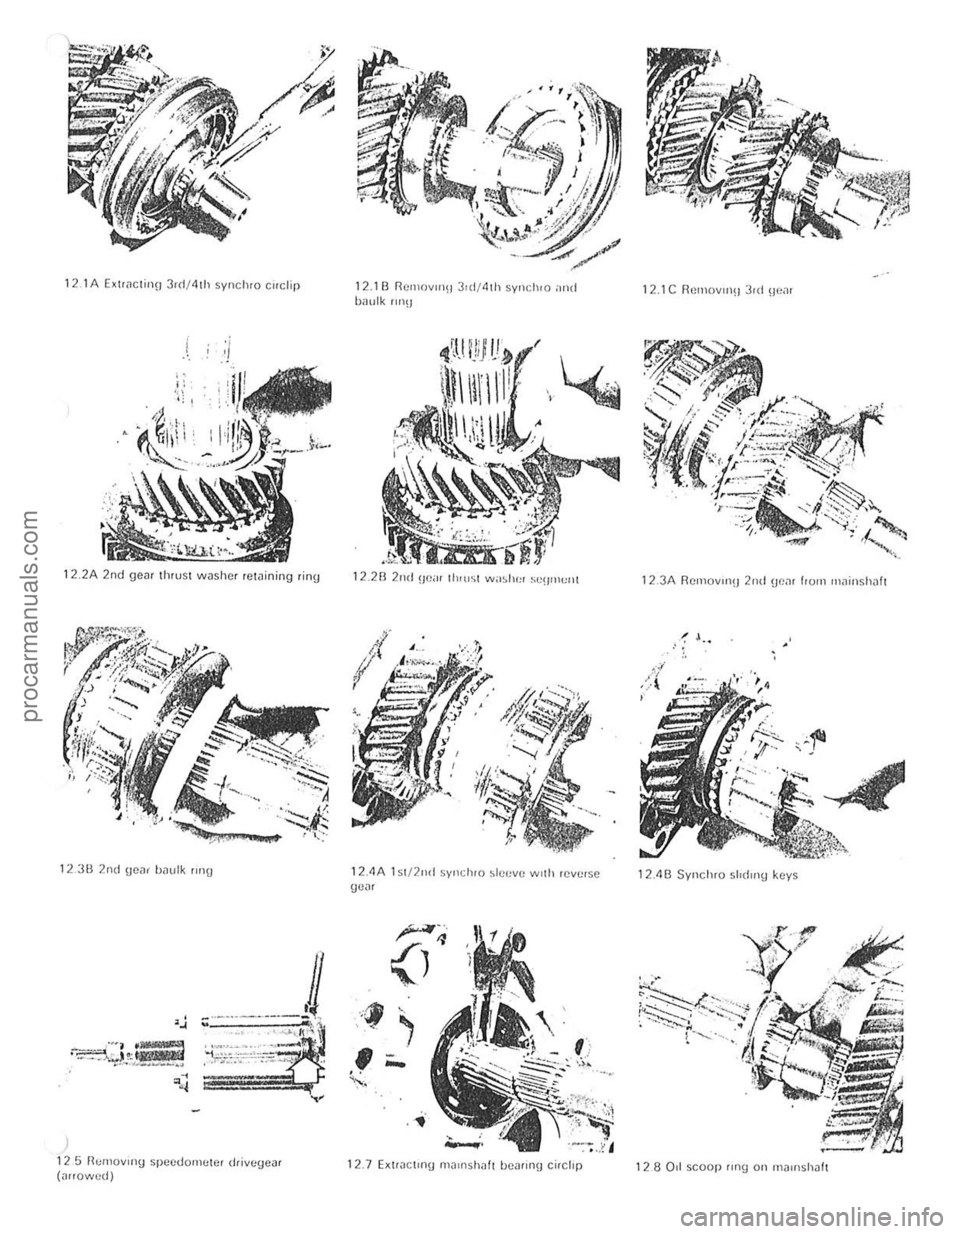
121A EXtlnClinn 3rd/4lh synchro cuclip
, .
" '11
1" I . ~ .
~.
:j
12.2A 2nd ge~1 thrust wllshCI rewining ring
12311 2nd gOD! h~ulk rmg
)
125 R"r"ov"'g speedometer d,ivegclI' (nrrowed)
12.111 Rel11ov"'11 3,d/4Ih synchro ilnd bnulk "n\l
, ~j.
,~
12.28 2nd \)(1,,, Ih'rrsl w,,~her ~"IJrrH,rrl
12.4A 1 sl /2nd synduo ~Ie"v(! wrth reverso ge~r
1 2.7 EXlractrng m~rnshilh hca"ng ci,clrp
12.1C RemOVln~13,d Bt,nl
12.3A RcmovlIlU 2nd uonr frOIll lI1~insh1lfl
, .
12411 Syncluo shdlll\) keys
128011 scoop rll19 on 1l1~,,'shJft
灲潣慲浡湵慬献捯m
Page 118 of 205
)
k----------------------------------------------------------------117
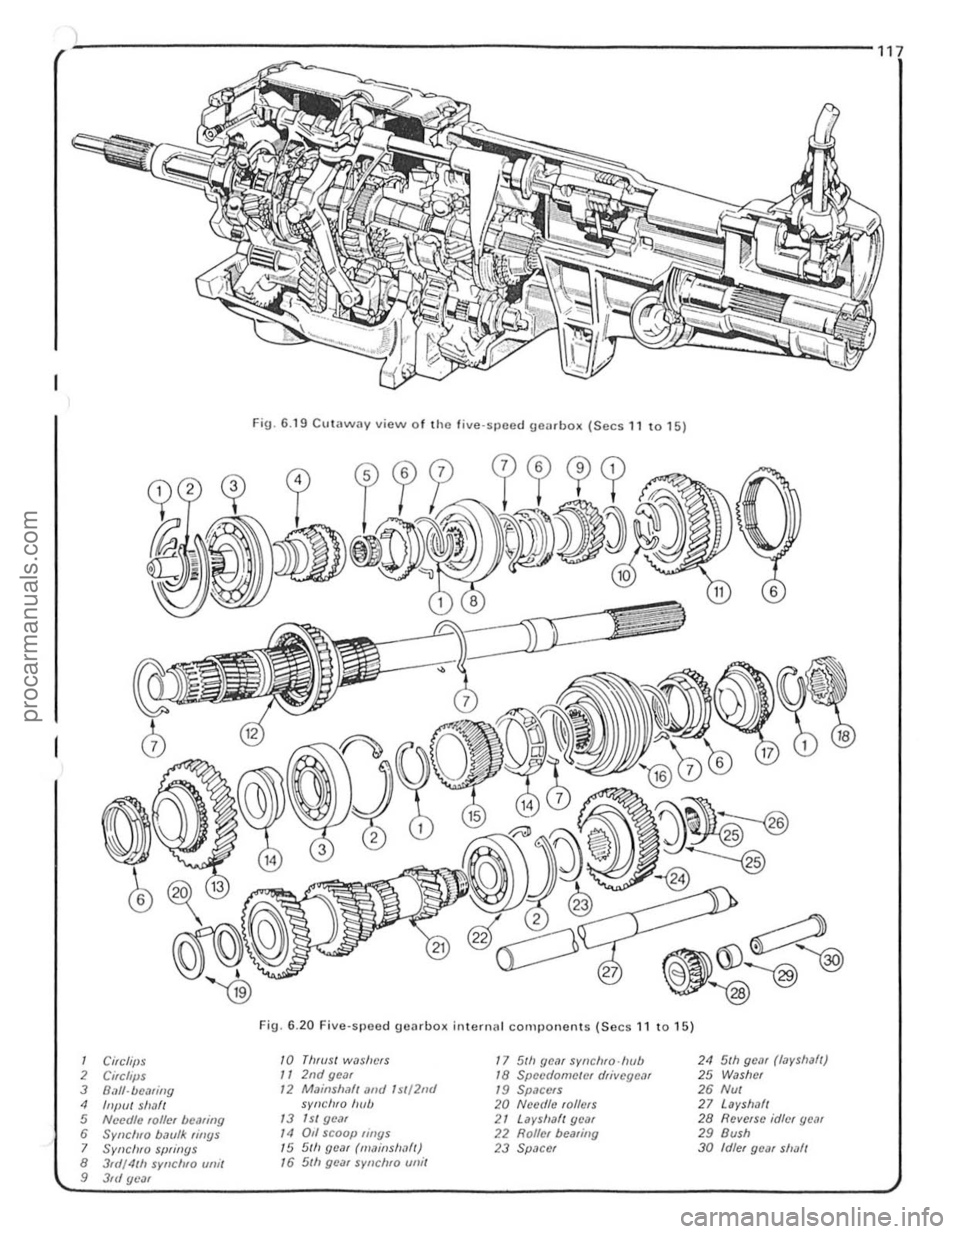
Fig. 6. 19 Cutaway view of th e five speed 90MboK (Sees 11 to 15)
Fig. 6 .20 Five-speed gearbol( internal components (Sees 11 to 15)
1 eifelillS 10 Thf(l s/ w,?slwrs 17 5111 yeilr synC/llo·/wb 24 51h ge.l( (Iayshafl)
2 Circh,IS 11 2nd geiJr 18 SpccdomctCI drivcgCM 25 Wash er
3 O.7f1·bctlring 12 Moinsh,?l lom/lsI/2m/ 19 Space,s 2. NUl 4 Input s haft sym;lIro flUb 20 Needle ,0I/C ($ 27 layshal/
5 Nl:cdJe rolfcl bearing 13 1 Sf gc'" 21 Laysllaft ge ar 28 Revelse idle r gc,v
• SrI/CillO baulk rinys 14 Od scoop fIIlgS 22 Rollcf be'lling 29 Bush 7 Synciuo springs 15 5111 gC,lf (mllins/wll) 23 Splicer 30 Idler gCil' s""'t 8 3f(/IIl/h Sy/lchro unit I. 5th gear synC/I/o unit
9 3,,1 geilr
, .'
procarmanuals.com
Page 119 of 205
18 Chapter 6 Manual gearbox
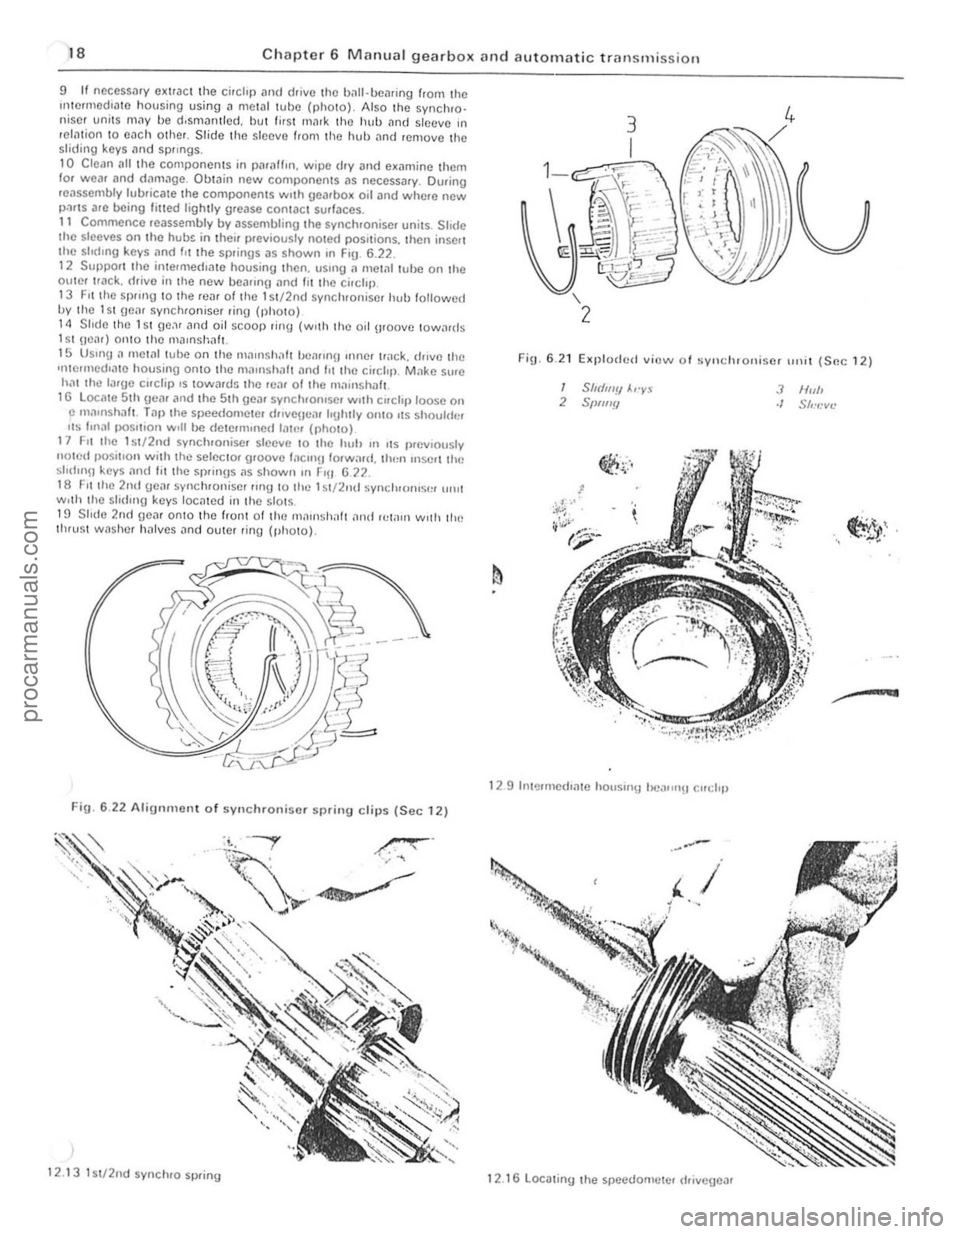
reassembly lubriC31C the components WIth geJrbox oir and where new p.).I$ alc ooing lilled ligh tly grease contact sullaces. 11 Commence reassembly by assemb ling the synchroni se. units. Sh(IC the sleeves on lhe h ubs in the ir previously noted positions, t hen insert
the slodmg keys .-mel f" Ihe springs as Shown on Frg 6 .22 .
12 SUllPOrl th e inte.rneelrate housing then. USrrlg a mewltube on the oute, I rack. drive in the new l.loarrngllnd lit I he cirelrp 13 F it Ihe sprrng 1 0 th e rea, 01 tho 1 sI,2nd s yn chroniser hull followed by the 1 Sl gear synchronise, 'ing (phOIO) 1 4 Sl ide Ihe 1 S l go., r and oil SCOOp rin g (wilh the oil uroove 10 w ,lIds 151 \lear) \"lniO tho mllmshafl. 15 Us,ng a metal lube on th o maonsh.11t he"rnl{) 'nner Ir ,lck. drive th e 'rlle,med,.-Ite housing Onto the ma'llshllh nnd 1'1 Ihe circl'll. Make sure hm Ihe larg e c"clip.s IOwards the rc." ollhe m,'"ls haf .. 1 G l ocate 51h gear ilrld the 51h goa, synchronrse . wilh Crrchjlloose on p m,llllshilft . Taplhe speedometel drrvenco1l Iogh.,y omo ,ts shoulder "~S lon"l j.lOsOIOon w,1I be de lerm,ned filter (,11\0\0) 17 F, . the 1 stJ2nd synchronisc r s'eeve 1 0 Ihe huh on 1\5 prell'ously n Olod posit,on wit h the selce ,ol groove 'ilCmU 10 rw,lrd. Ih,,,, mscrl the sl'd'nU keys ,1n(l lilt"O sp,ings as shown "' r-,U 672. 18 FIl the 2nd ueil' sync hronisc! ling to the 1 sl/2ml synch't"lIS'" "'HI wolh the shtllnu keys located in the slol~. HJ Slid e 2nd ge<"ll onl0 Ihe front 01 th e (ll ",n Sh;lh <"Iml rC1
""'=~~ ';e:o/l -~ &;J -~;V
Fig. 6 .22 Alignment of syn chroniser spring clips (Sec 12)
12 .1 3 lSI/2nd synchro sp ring
FiU · 6.2 1 E~plodcd lIi(!w oJ sylldllOlli s(!r ,,,,,I (Soc 12)
/ Sh(llIJiJ A,·y.~ 2 SPIIJIY
,
I!l1. '. ~~':;.'
1 2 9 Illt!lHnelhme hOllsm!j he ... ",,!) Cllt:i,p
1 2.1
6locatiny the speedometer Ifrillegellr
3 N,,1> ./ S","cv~'
dfO:. , . ""lJ' . ., ..
~~-.••
procarmanuals.com
Page 120 of 205
) Chapter 6 Manual gearbox and automatic transmission 119
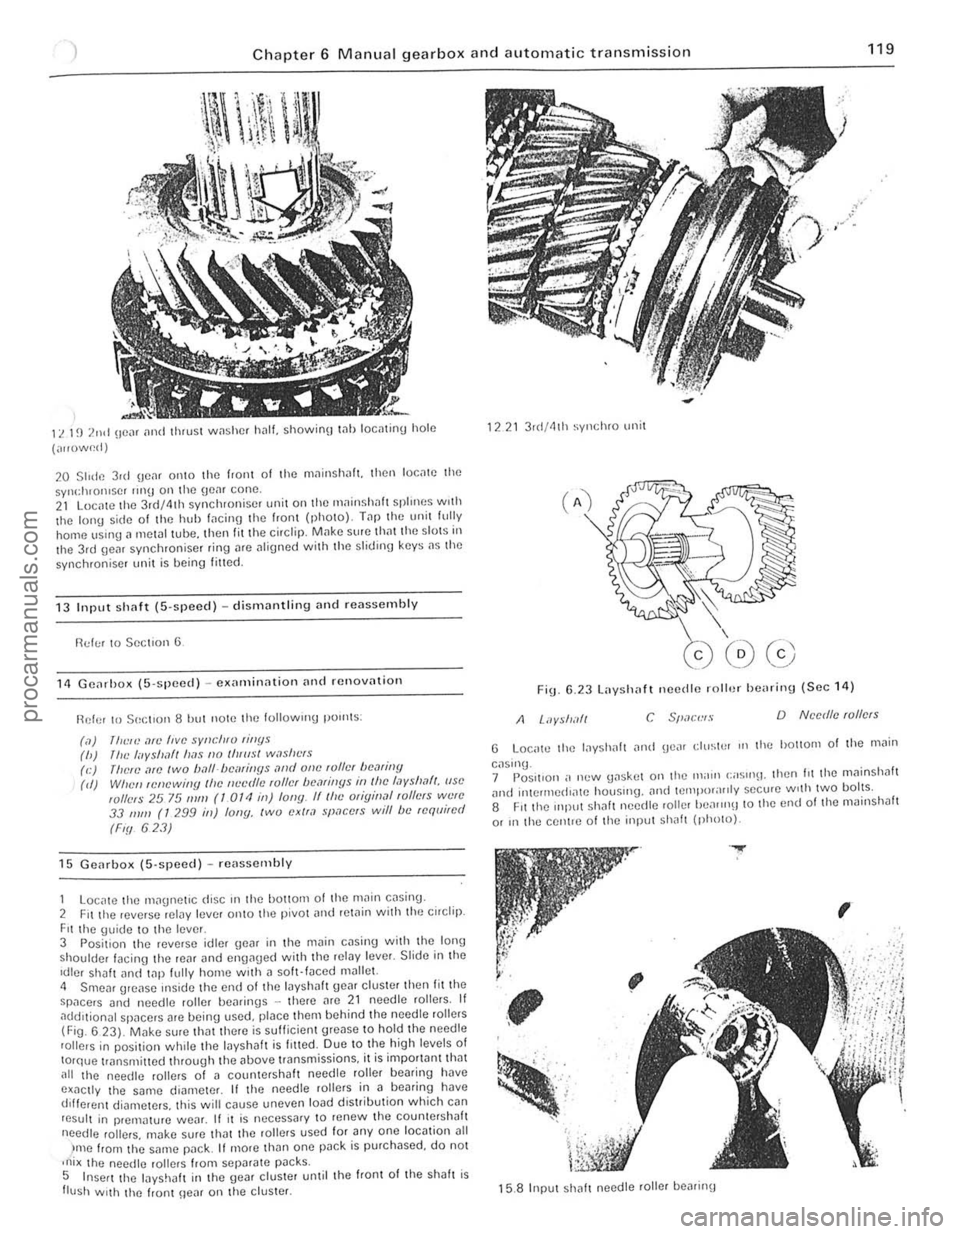
11. 1~) 2nd (Ie", [Inti thrust w,1shcf h.1l1. showioO t .. llloctltinu hole
(",,()w~d)
20 Slide 3ul \jC,lf 01110 the f,aiH 01 the mninsh
13 Input sh(lf( (S·speed) -dismantling Dnd reassembly
!'ld!;! to Section 6
11 GCil,ho)l ([i·spced) -C)lamin,lIion [In(1 rcnov[ltioll
Ref or 10501:[ '0 118 hut now the lollowlng pOllltS :
(,1)
111<:,,) ,1fI! five sYllcll,v rillYs (h) /IlL' I"yshlft lI[1s 110 IIIlIIsl w,lsllt"s (e) (lielL',1ro IWO ball-/)cmiIJYs ,lrId olle ,01lcI hCMiny (d) Wile" ,cnewi"y Ihc IIL'cr/lL' ,01lcI /)(1,1/ill[lS ill I!lc I,Jyslml/, (ISO wllels 25 75 111111 (1 OTt! ill) fony. IIlhc Oligin,ll ,ollers W{!lC 33 111/11 (T 299 ill) lony, two exll,l space's will be requi,ed
(Fiy 623)
15 Gcarbox (5'SI}Cc(l) -rC
Fit the \juidc to the leve r 3 Posit ion the reverse idler \Je~r in the m~in cDsill\j with the Ion,) shoulder facing the reill and en{lllued with thc ,eiDy Icver. Slide ill thc Idler shalt lInci t
)me from t he SMne l"JilCk It more than one pDck is purchased, do not ,ni x lho needlc rol lers from sepilrate p~cks. 5 Insert the layshJlI in the gear cluster unlil the front of Ihe shah is flush With the frunt \Ie~r on lhe cluster.
1221 3 r(I/41h syl1chro unit
Fig 6.23 Layshaft necdle roll.)/ he
G Loc,.tc the lilyshah iln!! gCilr ell/stP' III tho hOllom of the .11il;n
caslnu_ 7 Pos.1I0n ,. n(.'w \Jaskot on the Ill;nll (;;05"'11. Ihen hi the mllinshah ilnt! inlCrll1ed"l\C houslIlg. and IClllpor;I"ly secu.e w,th twO bolts. 8 Fit the mll"t Shilh needte roller heilrrn\J to the end 01 lhe mainshJlt
or In the centle 01 lho input Shilh (photo).
.....
,
~
; , .. '-; . '. ~, .
,
15.8 Input sh
i 1 ,1
I
procarmanuals.com