headlamp FORD E SERIES 2015 4.G Owners Manual
[x] Cancel search | Manufacturer: FORD, Model Year: 2015, Model line: E SERIES, Model: FORD E SERIES 2015 4.GPages: 360, PDF Size: 3.28 MB
Page 5 of 360
Roadside Emergencies 145
Getting roadside assistance..............................145
Hazard flasher control..................................147
Fuel pump shut-off....................................147
Jump-starting the vehicle...............................148
Customer Assistance 151
Reporting safety defects (U.S. only).......................158
Reporting safety defects (Canada only).....................158
Fuses 159
Changing a fuse......................................159
Fuse specification chart................................160
Maintenance 168
General information...................................168
Opening and closing the hood............................169
Under hood overview..................................170
Engine oil dipstick....................................171
Engine oil check......................................171
Engine coolant check..................................172
Automatic transmission fluid check........................177
Brake fluid check.....................................185
Power steering fluid check..............................185
Fuel filter...........................................185
Washer fluid check....................................186
Changing the vehicle battery.............................186
Checking the wiper blades..............................189
Changing the wiper blades..............................190
Air filter(s).........................................190
Adjusting the headlamps................................191
Changing a bulb......................................195
Removing a headlamp..................................195
4Table of Contents
2015 Econoline(eco)
Owners Guide gf, 1st Printing, June 2014
USA(fus)
Page 37 of 360
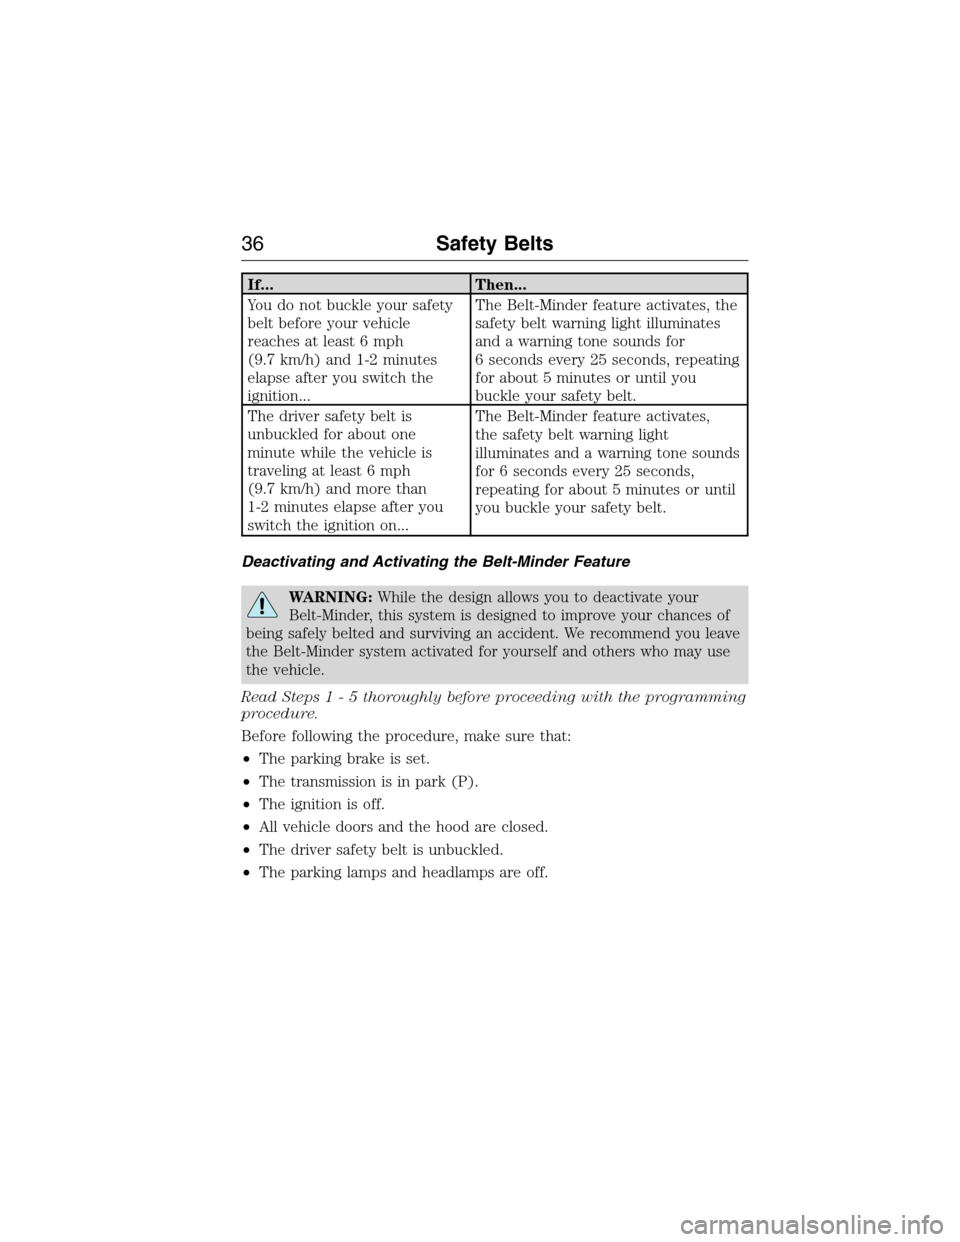
If... Then...
You do not buckle your safety
belt before your vehicle
reaches at least 6 mph
(9.7 km/h) and 1-2 minutes
elapse after you switch the
ignition...The Belt-Minder feature activates, the
safety belt warning light illuminates
and a warning tone sounds for
6 seconds every 25 seconds, repeating
for about 5 minutes or until you
buckle your safety belt.
The driver safety belt is
unbuckled for about one
minute while the vehicle is
traveling at least 6 mph
(9.7 km/h) and more than
1-2 minutes elapse after you
switch the ignition on...The Belt-Minder feature activates,
the safety belt warning light
illuminates and a warning tone sounds
for 6 seconds every 25 seconds,
repeating for about 5 minutes or until
you buckle your safety belt.
Deactivating and Activating the Belt-Minder Feature
WARNING:While the design allows you to deactivate your
Belt-Minder, this system is designed to improve your chances of
being safely belted and surviving an accident. We recommend you leave
the Belt-Minder system activated for yourself and others who may use
the vehicle.
Read Steps1-5thoroughly before proceeding with the programming
procedure.
Before following the procedure, make sure that:
•The parking brake is set.
•The transmission is in park (P).
•The ignition is off.
•All vehicle doors and the hood are closed.
•The driver safety belt is unbuckled.
•The parking lamps and headlamps are off.
36Safety Belts
2015 Econoline(eco)
Owners Guide gf, 1st Printing, June 2014
USA(fus)
Page 61 of 360
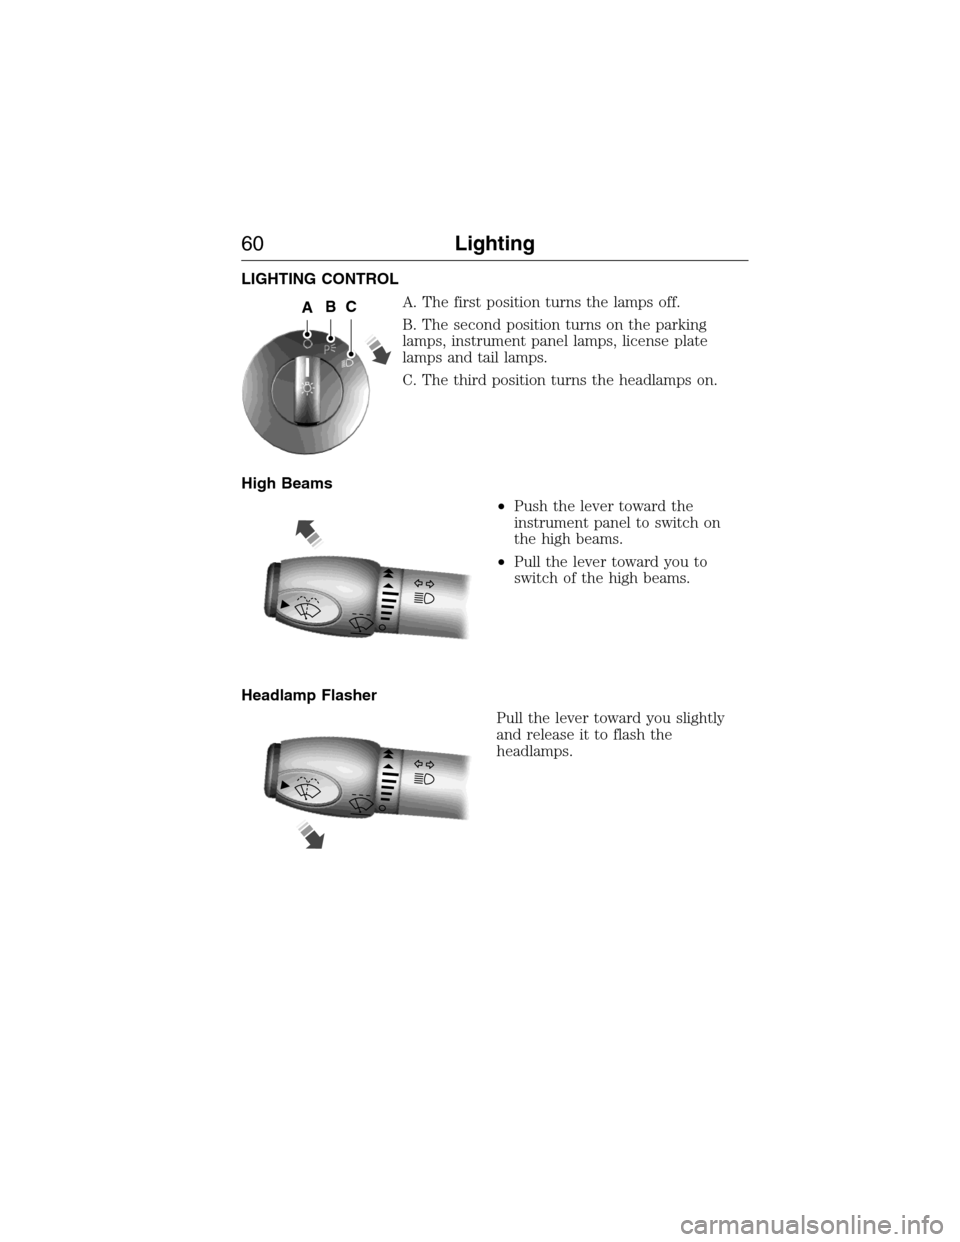
LIGHTING CONTROL
A. The first position turns the lamps off.
B. The second position turns on the parking
lamps, instrument panel lamps, license plate
lamps and tail lamps.
C. The third position turns the headlamps on.
High Beams
•Push the lever toward the
instrument panel to switch on
the high beams.
•Pull the lever toward you to
switch of the high beams.
Headlamp Flasher
Pull the lever toward you slightly
and release it to flash the
headlamps.
ABC
60Lighting
2015 Econoline(eco)
Owners Guide gf, 1st Printing, June 2014
USA(fus)
Page 62 of 360
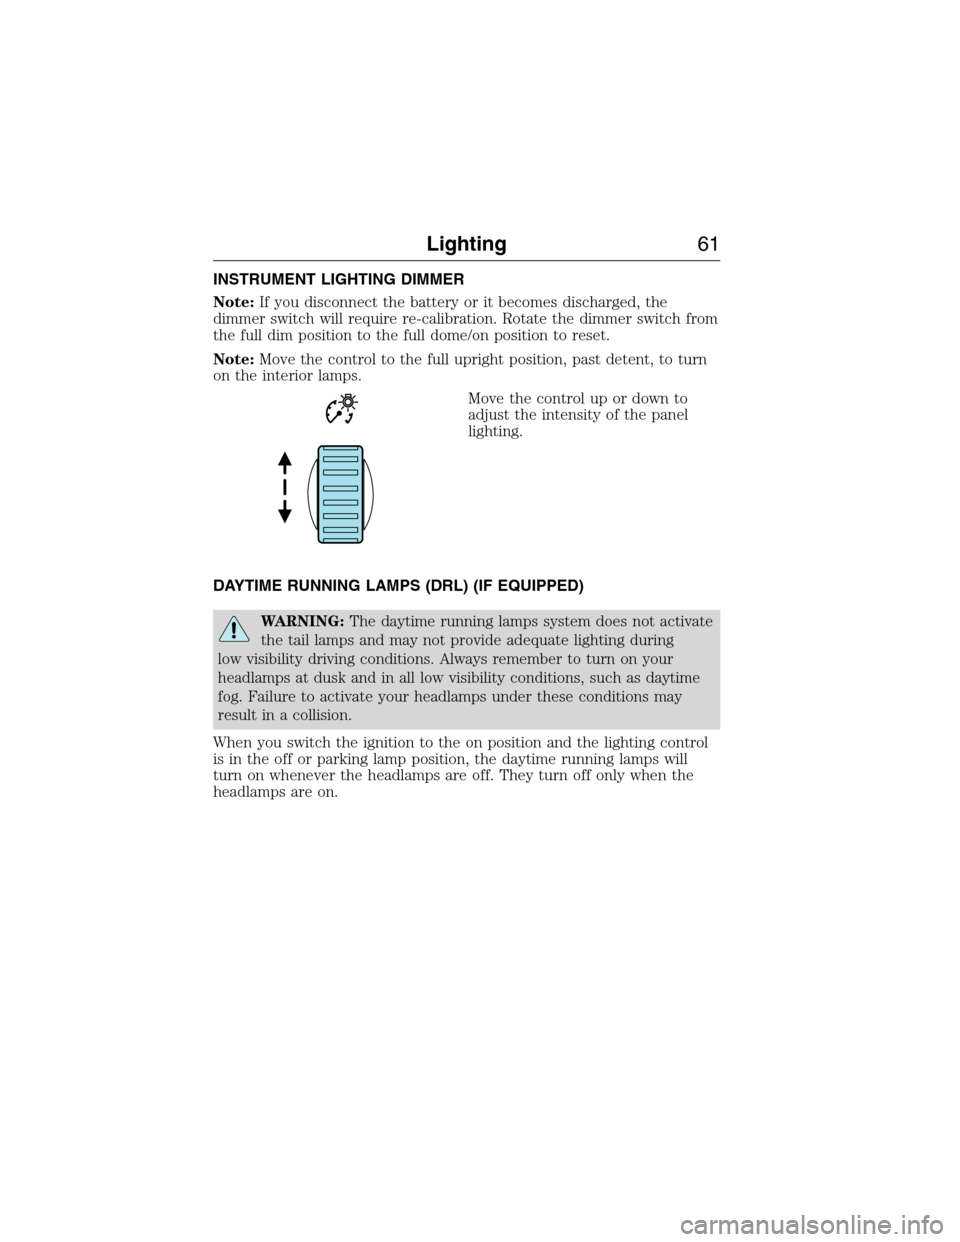
INSTRUMENT LIGHTING DIMMER
Note:If you disconnect the battery or it becomes discharged, the
dimmer switch will require re-calibration. Rotate the dimmer switch from
the full dim position to the full dome/on position to reset.
Note:Move the control to the full upright position, past detent, to turn
on the interior lamps.
Move the control up or down to
adjust the intensity of the panel
lighting.
DAYTIME RUNNING LAMPS (DRL) (IF EQUIPPED)
WARNING:The daytime running lamps system does not activate
the tail lamps and may not provide adequate lighting during
low visibility driving conditions. Always remember to turn on your
headlamps at dusk and in all low visibility conditions, such as daytime
fog. Failure to activate your headlamps under these conditions may
result in a collision.
When you switch the ignition to the on position and the lighting control
is in the off or parking lamp position, the daytime running lamps will
turn on whenever the headlamps are off. They turn off only when the
headlamps are on.
Lighting61
2015 Econoline(eco)
Owners Guide gf, 1st Printing, June 2014
USA(fus)
Page 73 of 360
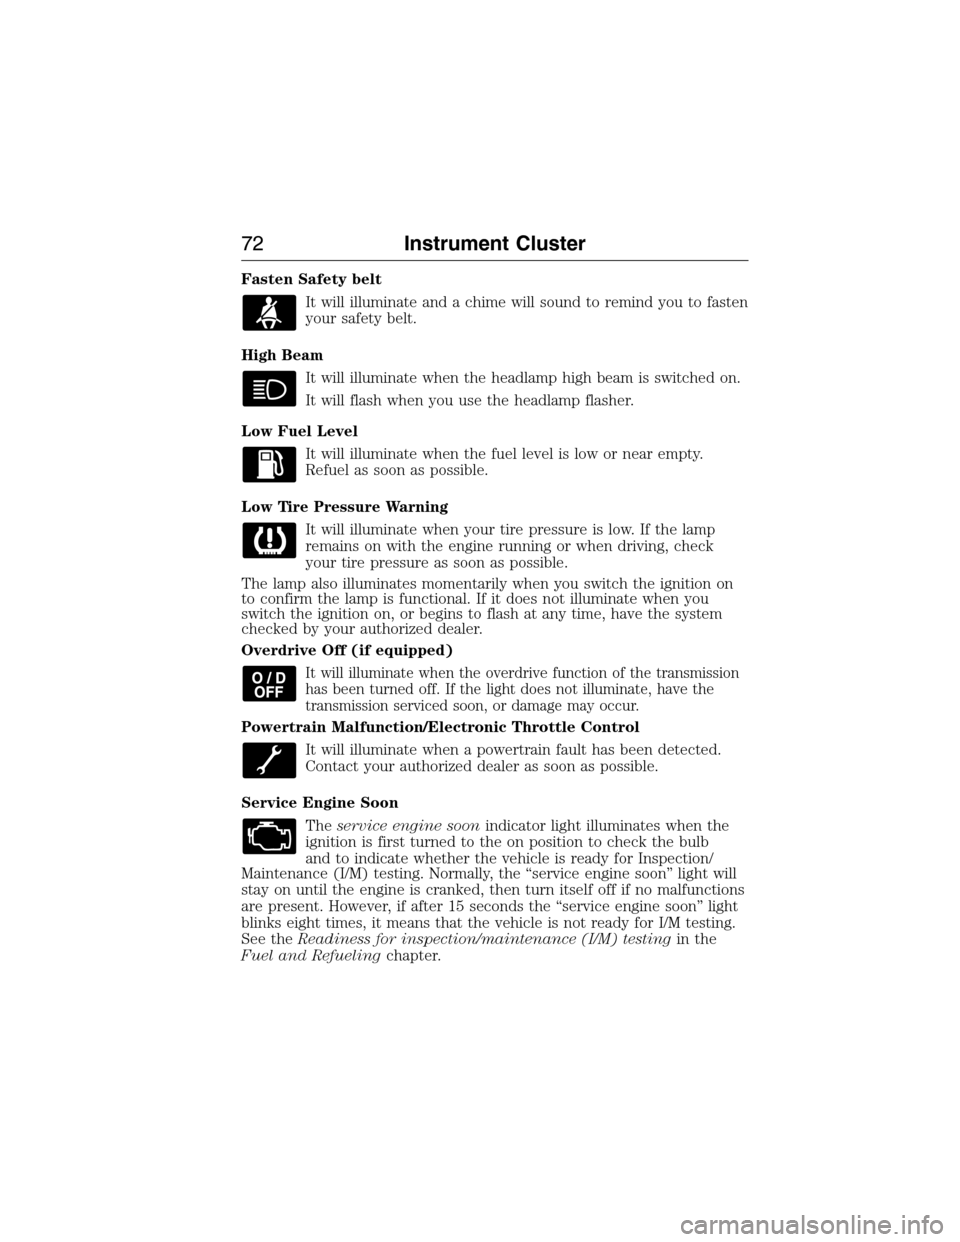
Fasten Safety belt
It will illuminate and a chime will sound to remind you to fasten
your safety belt.
High Beam
It will illuminate when the headlamp high beam is switched on.
It will flash when you use the headlamp flasher.
Low Fuel Level
It will illuminate when the fuel level is low or near empty.
Refuel as soon as possible.
Low Tire Pressure Warning
It will illuminate when your tire pressure is low. If the lamp
remains on with the engine running or when driving, check
your tire pressure as soon as possible.
The lamp also illuminates momentarily when you switch the ignition on
to confirm the lamp is functional. If it does not illuminate when you
switch the ignition on, or begins to flash at any time, have the system
checked by your authorized dealer.
Overdrive Off (if equipped)
It will illuminate when the overdrive function of the transmission
has been turned off. If the light does not illuminate, have the
transmission serviced soon, or damage may occur.
Powertrain Malfunction/Electronic Throttle Control
It will illuminate when a powertrain fault has been detected.
Contact your authorized dealer as soon as possible.
Service Engine Soon
Theservice engine soonindicator light illuminates when the
ignition is first turned to the on position to check the bulb
and to indicate whether the vehicle is ready for Inspection/
Maintenance (I/M) testing. Normally, the “service engine soon” light will
stay on until the engine is cranked, then turn itself off if no malfunctions
are present. However, if after 15 seconds the “service engine soon” light
blinks eight times, it means that the vehicle is not ready for I/M testing.
See theReadiness for inspection/maintenance (I/M) testingin the
Fuel and Refuelingchapter.
72Instrument Cluster
2015 Econoline(eco)
Owners Guide gf, 1st Printing, June 2014
USA(fus)
Page 74 of 360
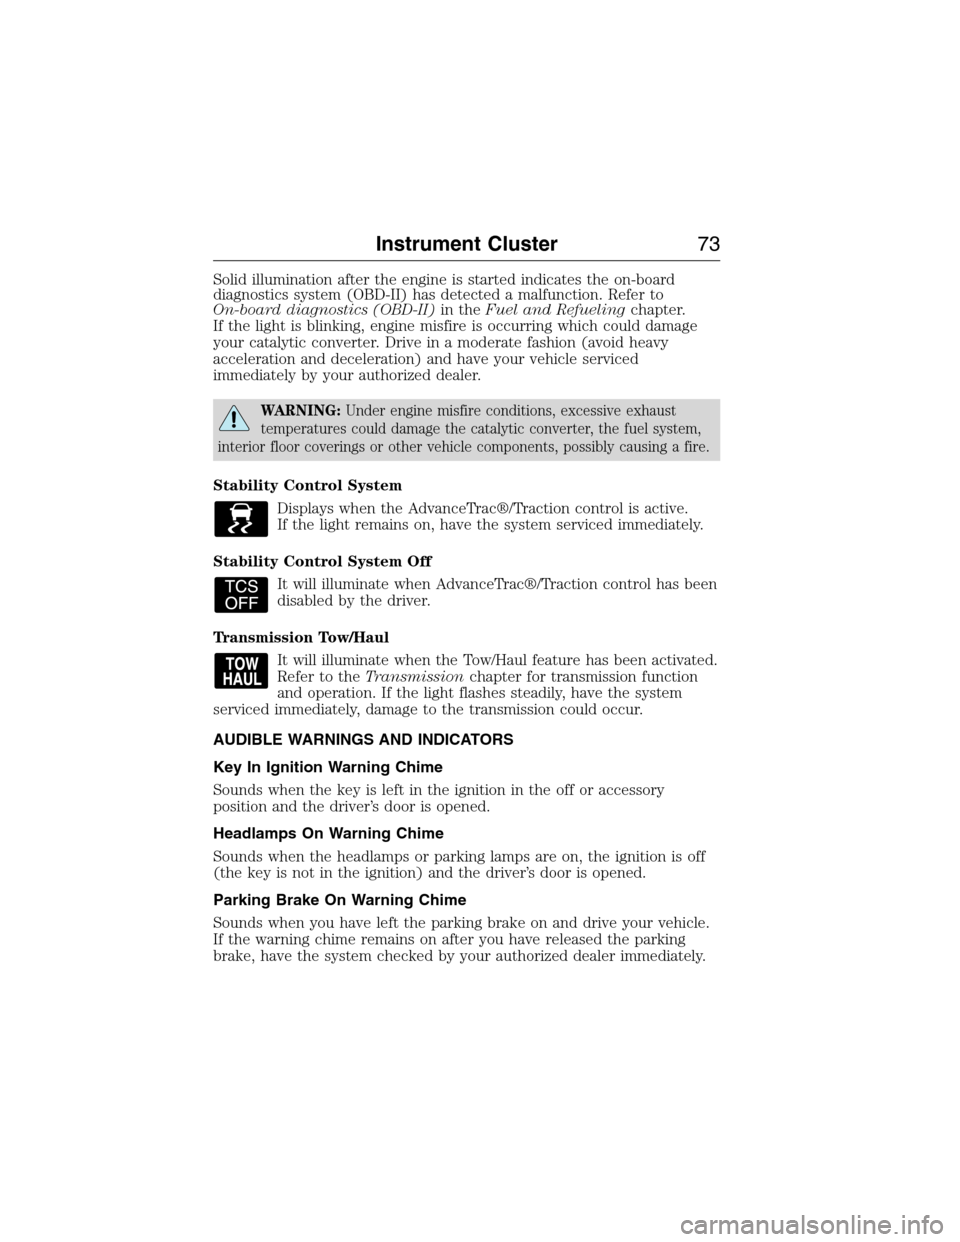
Solid illumination after the engine is started indicates the on-board
diagnostics system (OBD-II) has detected a malfunction. Refer to
On-board diagnostics (OBD-II)in theFuel and Refuelingchapter.
If the light is blinking, engine misfire is occurring which could damage
your catalytic converter. Drive in a moderate fashion (avoid heavy
acceleration and deceleration) and have your vehicle serviced
immediately by your authorized dealer.
WARNING:Under engine misfire conditions, excessive exhaust
temperatures could damage the catalytic converter, the fuel system,
interior floor coverings or other vehicle components, possibly causing a fire.
Stability Control System
Displays when the AdvanceTrac®/Traction control is active.
If the light remains on, have the system serviced immediately.
Stability Control System Off
It will illuminate when AdvanceTrac®/Traction control has been
disabled by the driver.
Transmission Tow/Haul
It will illuminate when the Tow/Haul feature has been activated.
Refer to theTransmissionchapter for transmission function
and operation. If the light flashes steadily, have the system
serviced immediately, damage to the transmission could occur.
AUDIBLE WARNINGS AND INDICATORS
Key In Ignition Warning Chime
Sounds when the key is left in the ignition in the off or accessory
position and the driver’s door is opened.
Headlamps On Warning Chime
Sounds when the headlamps or parking lamps are on, the ignition is off
(the key is not in the ignition) and the driver’s door is opened.
Parking Brake On Warning Chime
Sounds when you have left the parking brake on and drive your vehicle.
If the warning chime remains on after you have released the parking
brake, have the system checked by your authorized dealer immediately.
Instrument Cluster73
2015 Econoline(eco)
Owners Guide gf, 1st Printing, June 2014
USA(fus)
Page 95 of 360
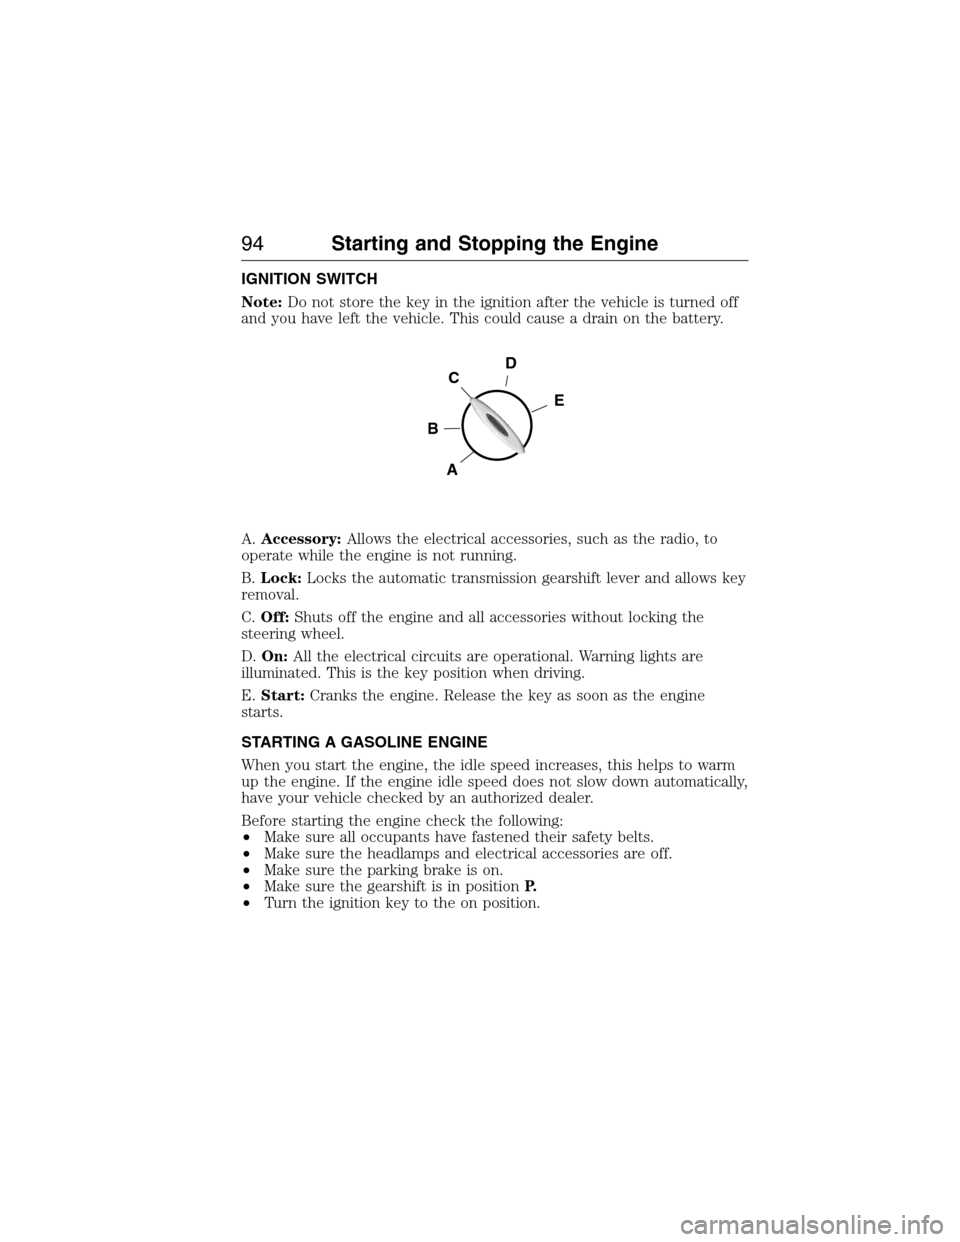
IGNITION SWITCH
Note:Do not store the key in the ignition after the vehicle is turned off
and you have left the vehicle. This could cause a drain on the battery.
A.Accessory:Allows the electrical accessories, such as the radio, to
operate while the engine is not running.
B.Lock:Locks the automatic transmission gearshift lever and allows key
removal.
C.Off:Shuts off the engine and all accessories without locking the
steering wheel.
D.On:All the electrical circuits are operational. Warning lights are
illuminated. This is the key position when driving.
E.Start:Cranks the engine. Release the key as soon as the engine
starts.
STARTING A GASOLINE ENGINE
When you start the engine, the idle speed increases, this helps to warm
up the engine. If the engine idle speed does not slow down automatically,
have your vehicle checked by an authorized dealer.
Before starting the engine check the following:
•Make sure all occupants have fastened their safety belts.
•Make sure the headlamps and electrical accessories are off.
•Make sure the parking brake is on.
•Make sure the gearshift is in positionP.
•Turn the ignition key to the on position.
D
E
C
B
A
94Starting and Stopping the Engine
2015 Econoline(eco)
Owners Guide gf, 1st Printing, June 2014
USA(fus)
Page 192 of 360
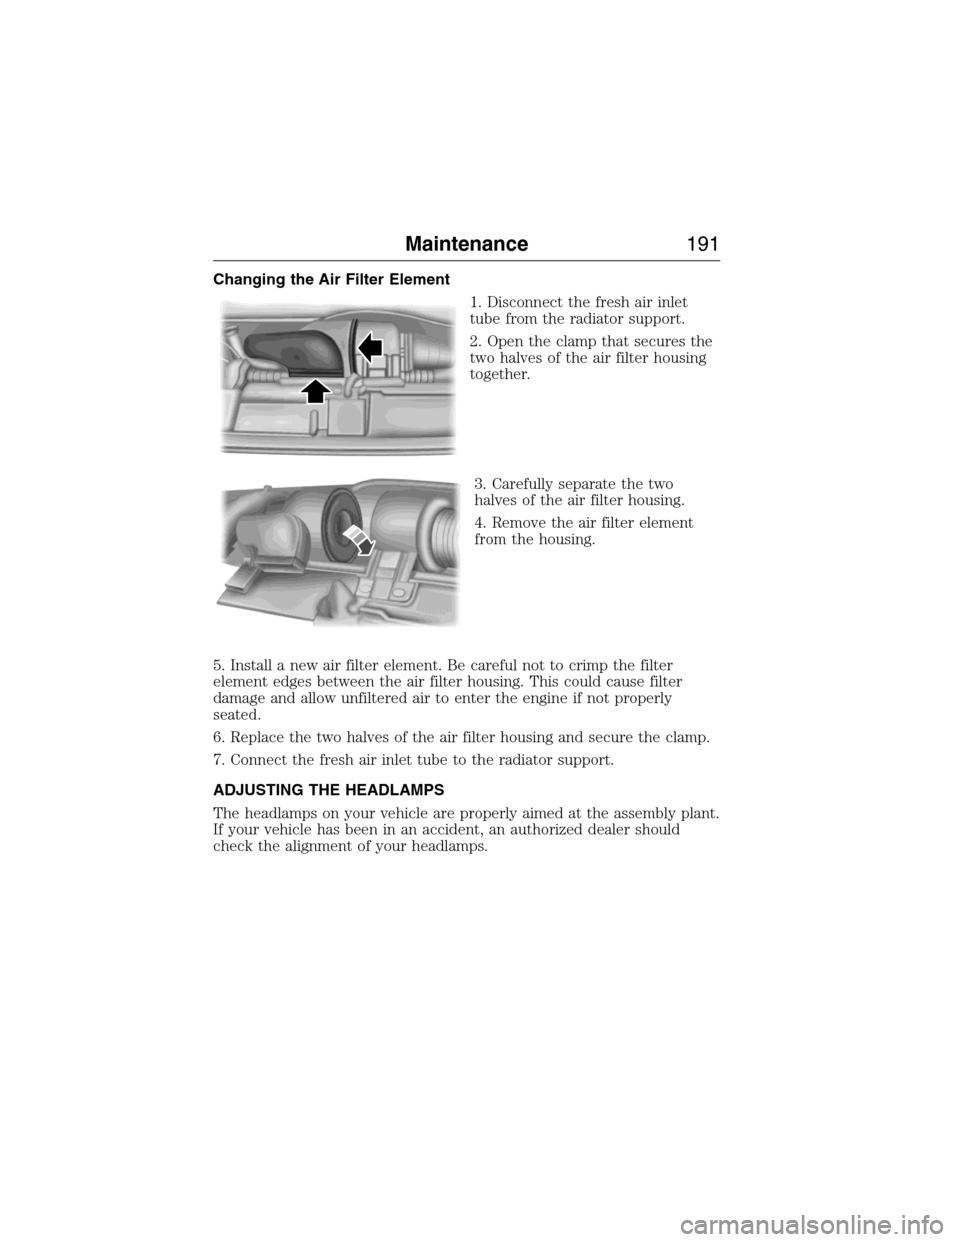
Changing the Air Filter Element
1. Disconnect the fresh air inlet
tube from the radiator support.
2. Open the clamp that secures the
two halves of the air filter housing
together.
3. Carefully separate the two
halves of the air filter housing.
4. Remove the air filter element
from the housing.
5. Install a new air filter element. Be careful not to crimp the filter
element edges between the air filter housing. This could cause filter
damage and allow unfiltered air to enter the engine if not properly
seated.
6. Replace the two halves of the air filter housing and secure the clamp.
7. Connect the fresh air inlet tube to the radiator support.
ADJUSTING THE HEADLAMPS
The headlamps on your vehicle are properly aimed at the assembly plant.
If your vehicle has been in an accident, an authorized dealer should
check the alignment of your headlamps.
Maintenance191
2015 Econoline(eco)
Owners Guide gf, 1st Printing, June 2014
USA(fus)
Page 193 of 360
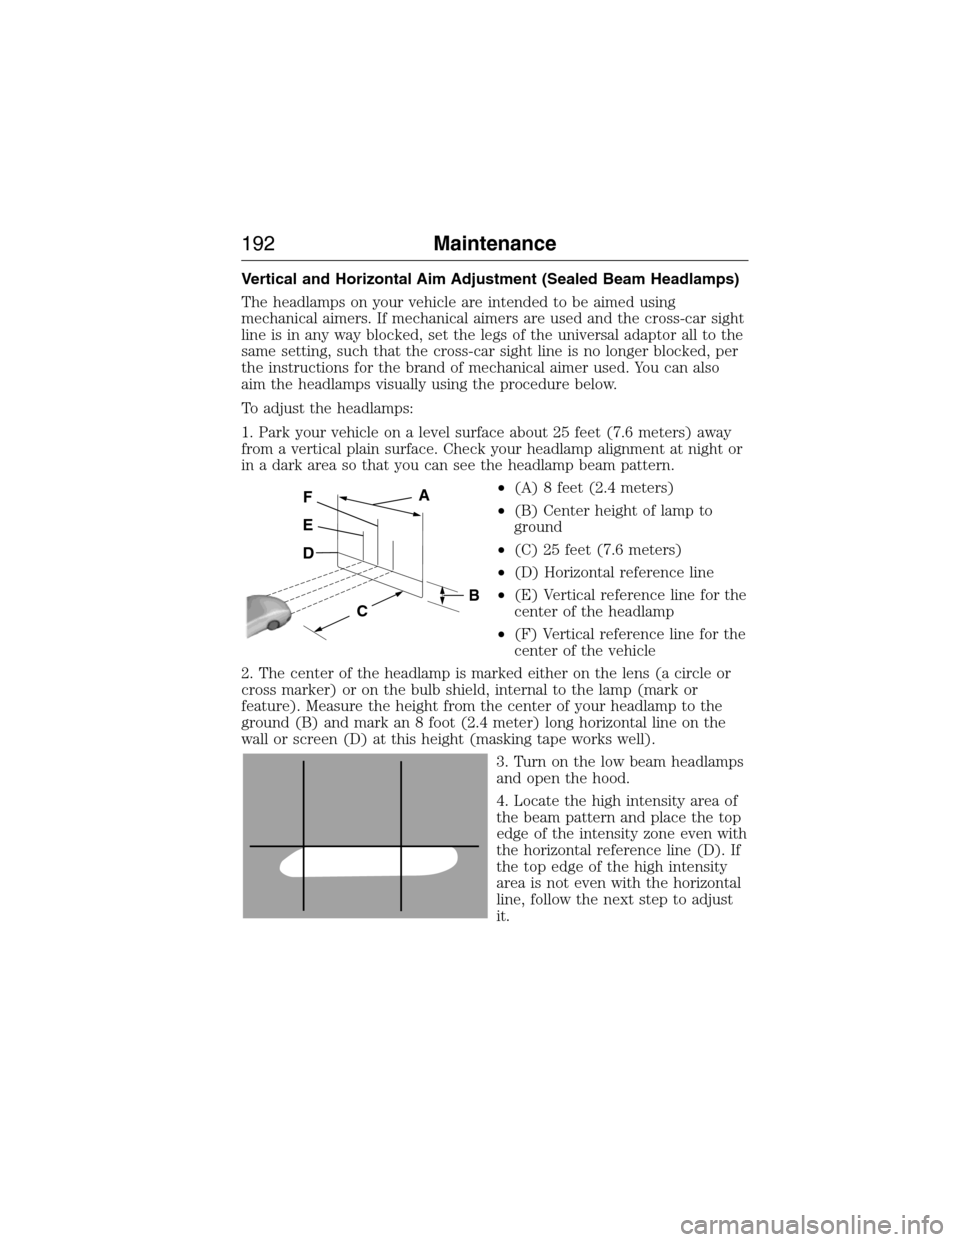
Vertical and Horizontal Aim Adjustment (Sealed Beam Headlamps)
The headlamps on your vehicle are intended to be aimed using
mechanical aimers. If mechanical aimers are used and the cross-car sight
line is in any way blocked, set the legs of the universal adaptor all to the
same setting, such that the cross-car sight line is no longer blocked, per
the instructions for the brand of mechanical aimer used. You can also
aim the headlamps visually using the procedure below.
To adjust the headlamps:
1. Park your vehicle on a level surface about 25 feet (7.6 meters) away
from a vertical plain surface. Check your headlamp alignment at night or
in a dark area so that you can see the headlamp beam pattern.
•(A) 8 feet (2.4 meters)
•(B) Center height of lamp to
ground
•(C) 25 feet (7.6 meters)
•(D) Horizontal reference line
•(E) Vertical reference line for the
center of the headlamp
•(F) Vertical reference line for the
center of the vehicle
2. The center of the headlamp is marked either on the lens (a circle or
cross marker) or on the bulb shield, internal to the lamp (mark or
feature). Measure the height from the center of your headlamp to the
ground (B) and mark an 8 foot (2.4 meter) long horizontal line on the
wall or screen (D) at this height (masking tape works well).
3. Turn on the low beam headlamps
and open the hood.
4. Locate the high intensity area of
the beam pattern and place the top
edge of the intensity zone even with
the horizontal reference line (D). If
the top edge of the high intensity
area is not even with the horizontal
line, follow the next step to adjust
it.
B
D
E
FA
C
192Maintenance
2015 Econoline(eco)
Owners Guide gf, 1st Printing, June 2014
USA(fus)
Page 194 of 360
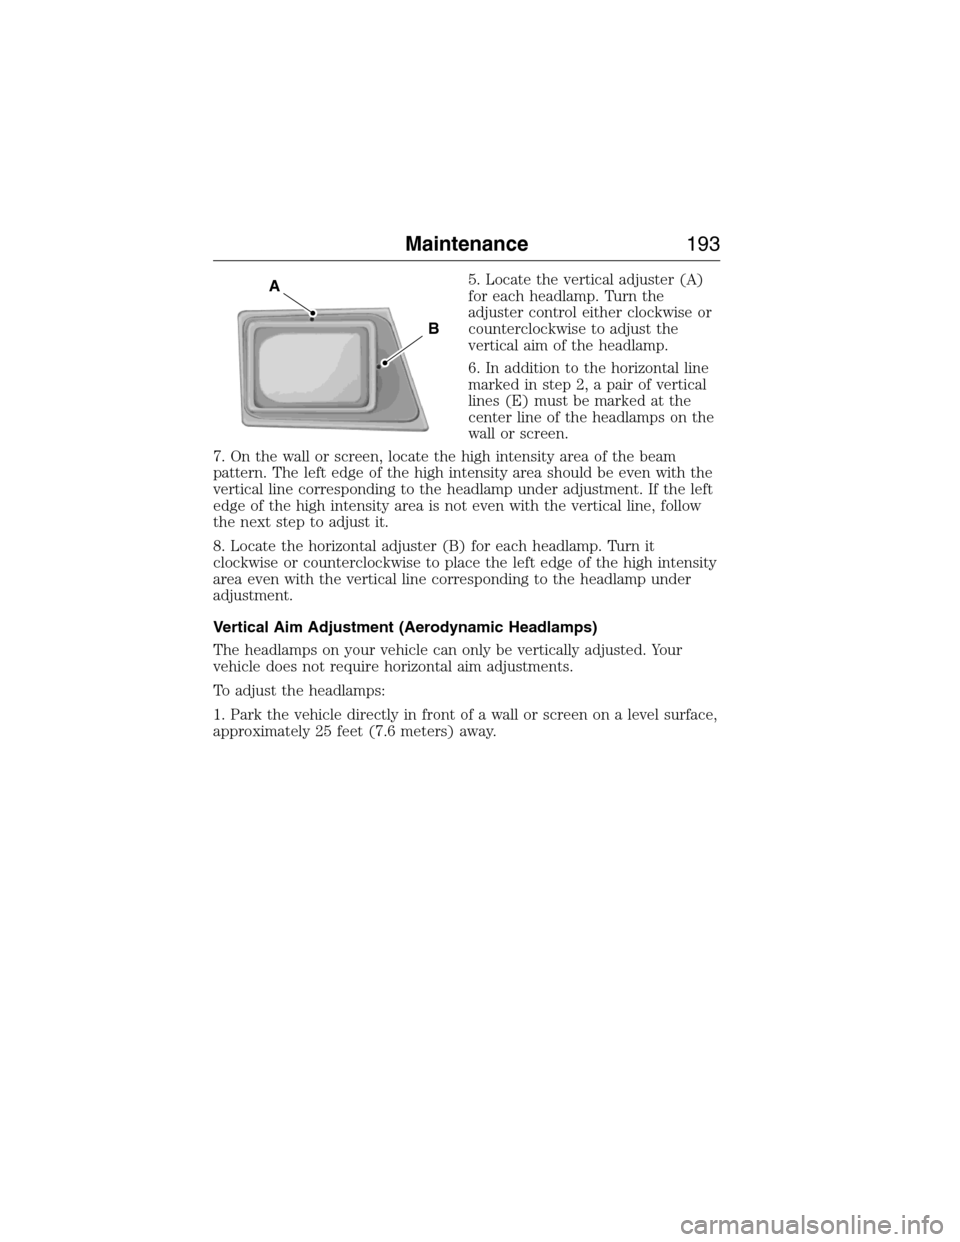
5. Locate the vertical adjuster (A)
for each headlamp. Turn the
adjuster control either clockwise or
counterclockwise to adjust the
vertical aim of the headlamp.
6. In addition to the horizontal line
marked in step 2, a pair of vertical
lines (E) must be marked at the
center line of the headlamps on the
wall or screen.
7. On the wall or screen, locate the high intensity area of the beam
pattern. The left edge of the high intensity area should be even with the
vertical line corresponding to the headlamp under adjustment. If the left
edge of the high intensity area is not even with the vertical line, follow
the next step to adjust it.
8. Locate the horizontal adjuster (B) for each headlamp. Turn it
clockwise or counterclockwise to place the left edge of the high intensity
area even with the vertical line corresponding to the headlamp under
adjustment.
Vertical Aim Adjustment (Aerodynamic Headlamps)
The headlamps on your vehicle can only be vertically adjusted. Your
vehicle does not require horizontal aim adjustments.
To adjust the headlamps:
1. Park the vehicle directly in front of a wall or screen on a level surface,
approximately 25 feet (7.6 meters) away.A
B
Maintenance193
2015 Econoline(eco)
Owners Guide gf, 1st Printing, June 2014
USA(fus)