warning light FORD E SERIES 2024 Service Manual
[x] Cancel search | Manufacturer: FORD, Model Year: 2024, Model line: E SERIES, Model: FORD E SERIES 2024Pages: 303, PDF Size: 6.95 MB
Page 170 of 303
WARNING: To reduce the risk ofpersonal injury, make sure the engine iscool before unscrewing the coolantpressure relief cap. The cooling systemis under pressure. Steam and hot liquidcan come out forcefully when you loosenthe cap slightly.
When the engine is cold, check theconcentration and level of the coolant atthe intervals listed in the scheduledmaintenance information. See ScheduledMaintenance (page 249).
Note:Make sure that the coolant level isbetween the MIN and MAX marks on thecoolant reservoir.
Note:Coolant expands when it is hot. Thelevel may extend beyond the MAX mark.
Maintain coolant concentration within48% to 50%, which equates to a freezepoint between -29°F (-34°C) and -35°F(-37°C). Use a refractometer to checkcoolant concentration. Do not usehydrometers or coolant test strips formeasuring coolant concentration.
Adding Coolant
WARNING: Do not add coolantwhen the vehicle is on or the coolingsystem is hot. Failure to follow thisinstruction could result in personal injury.
WARNING: Do not put coolant inthe windshield washer reservoir. Ifsprayed on the windshield, coolant couldmake it difficult to see through thewindshield.
WARNING: Do not remove thecoolant reservoir cap when the engine ison or the cooling system is hot. Wait 10minutes for the cooling system to cooldown. Cover the coolant reservoir capwith a thick cloth to prevent thepossibility of scalding and slowly removethe cap. Failure to follow this instructioncould result in personal injury.
WARNING: Do not add coolantfurther than the MAX mark.
Note: Automotive fluids are notinterchangeable. Do not use coolant orwindshield washer fluid outside of itsspecified function and vehicle location.
Note:Do not use stop leak pellets, coolingsystem sealants, or non-specified additivesas they can cause damage to the enginecooling or heating systems. Resultingcomponent damage may not be covered bythe vehicle warranty.
Always use prediluted coolant approvedto the correct specification to avoidplugging the small passageways in theengine cooling system. See Capacitiesand Specifications (page 226). Do notmix different colors or types of coolant inyour vehicle. Mixing of engine coolants orusing an incorrect coolant may harm theengine or cooling system components andmay not be covered by the vehiclewarranty.
Note:If prediluted coolant is not available,use the approved concentrated coolantdiluting it to 50/50 with distilled water. SeeCapacities and Specifications (page 226).Using water that has not been deionizedmay contribute to deposit formation,corrosion and plugging of the small coolingsystem passageways.
166
2024 E-Series (TE4) Canada/United States of America, enUSA, Edition date: 202210, First-PrintingMaintenance
Page 177 of 303
Only use fluid that meets ourspecifications. See Capacities andSpecifications (page 226).
Brake Fluid Service Interval
Brake fluid absorbs water over time whichdegrades the effectiveness of the brakefluid. Change the brake fluid at thespecified intervals to prevent degradedbraking performance.
For detailed interval information, seeScheduled Maintenance in your Owner'sManual or your local maintenance guide.
POWER STEERING FLUID
CHECK
WARNING: A fluid level betweenthe MAX and MIN lines is within thenormal operating range and there is noneed to add fluid. A fluid level not in thenormal operating range couldcompromise the performance of thesystem.
WARNING: For E-350 and E-450vehicles with the Hydro-Boost BrakeSystem, do not press the brake pedalafter the engine has been turned off.Pressing the brake pedal after the enginehas been turned off will give a falsepower steering fluid level reading.
Only use fluid that meets Fordspecifications. See Hydraulic PowerSteering Fluid Capacity andSpecification (page 236).
To top up the power steering fluid level dothe following.
1.Start the engine and let it run until itreaches normal operating temperature.
2.Make sure the fluid is within the MINand MAX range.
3.If the fluid level is low, add fluid to bewithin the MIN and MAX range. Do notoverfill.
4.While the engine idles, turn the steeringwheel left and right several times.
5.Recheck the fluid level in the reservoir.
Note:Do not operate the vehicle with a lowpower steering pump fluid level.
CHANGING THE 12V BATTERY
WARNING: This vehicle may havemore than one battery. Removing thebattery cables from only one batterydoes not disconnect your vehicleelectrical system. Make sure youdisconnect the battery cables from allbatteries when disconnecting power.Failure to do so may cause seriouspersonal injury or property damage.
WARNING: Batteries normallyproduce explosive gases which cancause personal injury. Therefore, do notallow flames, sparks or lightedsubstances to come near the battery.When working near the battery, alwaysshield your face and protect your eyes.Always provide correct ventilation.
WARNING: When lifting aplastic-cased battery, excessive pressureon the end walls could cause acid to flowthrough the vent caps, resulting inpersonal injury and damage to thevehicle or battery. Lift the battery with abattery carrier or with your hands onopposite corners.
173
2024 E-Series (TE4) Canada/United States of America, enUSA, Edition date: 202210, First-PrintingMaintenance
Page 181 of 303
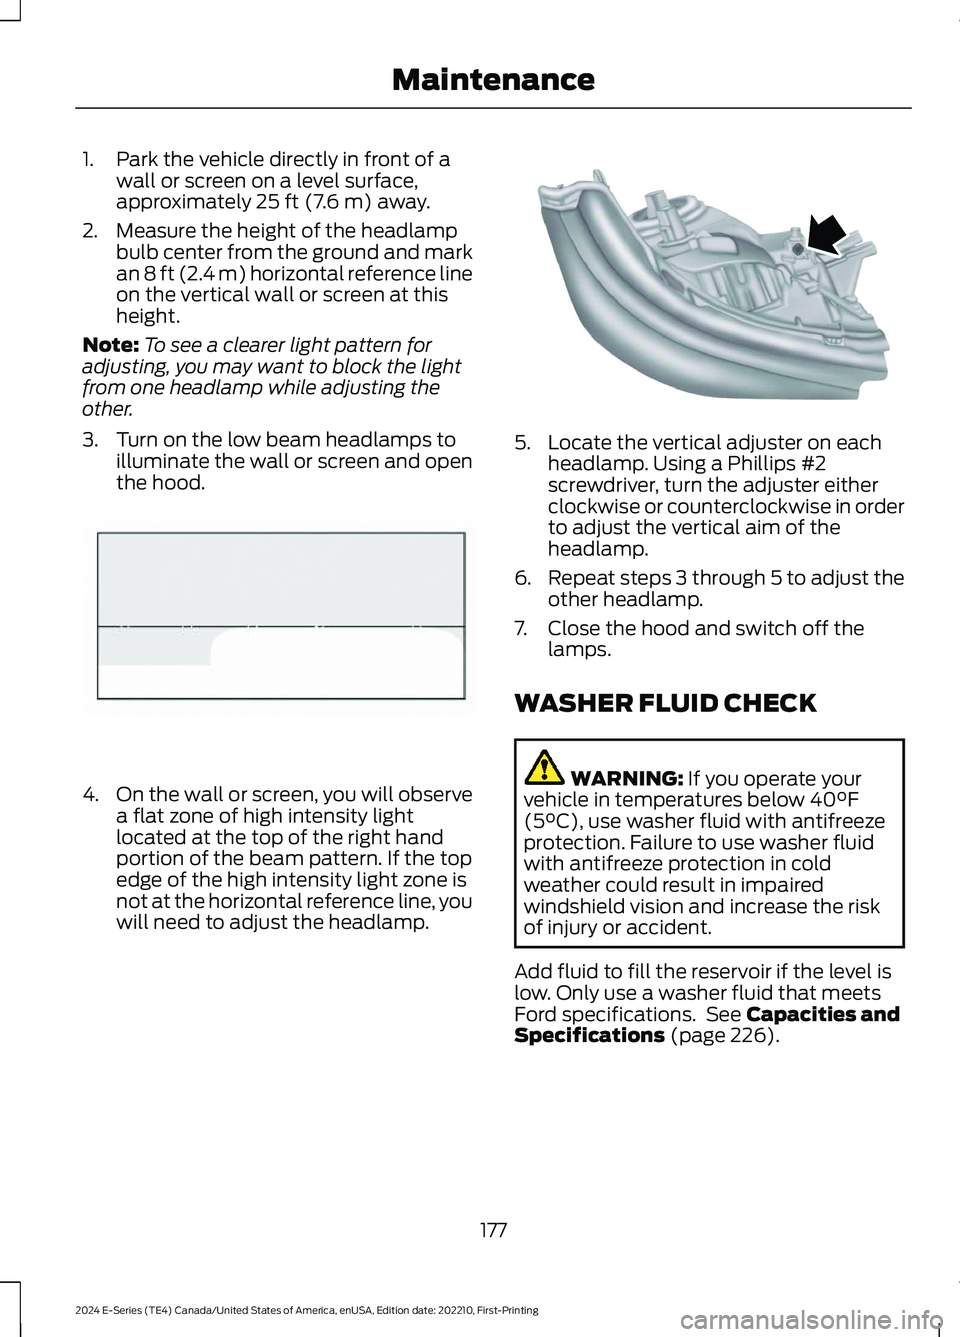
1.Park the vehicle directly in front of awall or screen on a level surface,approximately 25 ft (7.6 m) away.
2.Measure the height of the headlampbulb center from the ground and markan 8 ft (2.4 m) horizontal reference lineon the vertical wall or screen at thisheight.
Note:To see a clearer light pattern foradjusting, you may want to block the lightfrom one headlamp while adjusting theother.
3.Turn on the low beam headlamps toilluminate the wall or screen and openthe hood.
4.On the wall or screen, you will observea flat zone of high intensity lightlocated at the top of the right handportion of the beam pattern. If the topedge of the high intensity light zone isnot at the horizontal reference line, youwill need to adjust the headlamp.
5.Locate the vertical adjuster on eachheadlamp. Using a Phillips #2screwdriver, turn the adjuster eitherclockwise or counterclockwise in orderto adjust the vertical aim of theheadlamp.
6.Repeat steps 3 through 5 to adjust theother headlamp.
7.Close the hood and switch off thelamps.
WASHER FLUID CHECK
WARNING: If you operate yourvehicle in temperatures below 40°F(5°C), use washer fluid with antifreezeprotection. Failure to use washer fluidwith antifreeze protection in coldweather could result in impairedwindshield vision and increase the riskof injury or accident.
Add fluid to fill the reservoir if the level islow. Only use a washer fluid that meetsFord specifications. See Capacities andSpecifications (page 226).
177
2024 E-Series (TE4) Canada/United States of America, enUSA, Edition date: 202210, First-PrintingMaintenanceE142465 E163806
Page 189 of 303
•Never wash or rinse the engine while itis hot or running; water in the runningengine may cause internal damage.
•Never wash or rinse any ignition coil,spark plug wire or spark plug well, orthe area in and around these locations.
•Cover the battery, power distributionbox, and air filter assembly to preventwater damage when cleaning theengine.
CLEANING THE WINDOWS AND
WIPER BLADES
Car wash chemicals and environmentalfallout can result in windshield and wiperblade contamination. Dirty windshield andwipers will result in poor windshield wiperoperation. Keep the windshield and wiperblades clean to maintain windshield wiperperformance.
To clean the windshield and wiper blades:
•Clean the windshield with anon-abrasive glass cleaner. Whencleaning the interior of the windshield,avoid getting any glass cleaner on theinstrument panel or door panels. Wipeany glass cleaner off these surfacesimmediately.
•For windshields contaminated withtree sap, chemicals, wax or bugs, cleanthe entire windshield using steel wool(no greater than 0000 grade) in acircular motion and rinse with water.
•Clean the wiper blades with isopropylrubbing alcohol or windshield washerconcentrate.
Note: Do not use razor blades or othersharp objects to clean or remove decalsfrom the inside of the heated rear window.The vehicle warranty does not coverdamage caused to the heated rear windowgrid lines.
CLEANING THE INTERIOR
WARNING: Do not use cleaningsolvents, bleach or dye on the vehicle'sseatbelts, as these actions may weakenthe belt webbing.
WARNING: On vehicles equippedwith seat-mounted airbags, do not usechemical solvents or strong detergents.Such products could contaminate theside airbag system and affectperformance of the side airbag in a crash.
For fabric, carpets, cloth seats and seatsequipped with side airbags:
•Remove dust and loose dirt with avacuum cleaner.
•Remove light stains and soil withMotorcraft Professional StrengthCarpet & Upholstery Cleaner.
•If grease or tar is present on thematerial, spot-clean the area first withMotorcraft Spot and Stain Remover. InCanada, use Motorcraft Multi-PurposeCleaner.
•If a ring forms on the fabric after spotcleaning, clean the entire areaimmediately (but do not oversaturate)or the ring will set.
•Do not use household cleaningproducts or glass cleaners, which canstain and discolor the fabric and affectthe flame retardant abilities of the seatmaterials.
Mirrors
Do not clean the housing or glass of anymirror with harsh abrasives, fuel or otherpetroleum or ammonia-based cleaningproducts.
185
2024 E-Series (TE4) Canada/United States of America, enUSA, Edition date: 202210, First-PrintingVehicle Care
Page 201 of 303

The tire suppliers may haveadditional markings, notes orwarnings such as standard loador radial tubeless.
Additional InformationContained on the Tire Sidewallfor LT Type Tires
Note:Tire Quality Grades do notapply to this type of tire.
LT type tires have some additionalinformation beyond those of Ptype tires. These differences aredescribed below.
A.LT: Indicates a tire, designatedby the Tire and Rim Association,that is intended for service on lighttrucks.
B.Load Range and LoadInflation Limits: Indicates thetire's load-carrying capabilitiesand its inflation limits.
C.Maximum Load Dual lb (kg)at psi (kPa) cold: Indicates themaximum load and tire pressurewhen the tire is used as a dual;defined as four tires on the rearaxle (a total of six or more tires onthe vehicle).
D.Maximum Load Single lb(kg) at psi (kPa) cold: Indicatesthe maximum load and tirepressure when the tire is used asa single; defined as two tires(total) on the rear axle.
Information on T Type Tires
T145/80D16 is an example of atire size.
Note:The temporary tire size foryour vehicle may be different fromthis example. Tire Quality Grades
do not apply to this type of tire.
197
2024 E-Series (TE4) Canada/United States of America, enUSA, Edition date: 202210, First-PrintingWheels and TiresABCBDE142544
Page 203 of 303
You are strongly urged to buy areliable tire pressure gauge, asautomatic service station gaugesmay be inaccurate. Fordrecommends the use of a digitalor dial-type tire pressure gaugerather than a stick-type tirepressure gauge.
Use the recommended coldinflation pressure for optimum tireperformance and wear.Under-inflation or over-inflationmay cause uneven treadwearpatterns
WARNING: Under-inflationis the most common cause oftire failures and may result insevere tire cracking, treadseparation or blowout, withunexpected loss of vehiclecontrol and increased risk ofinjury. Under-inflation increasessidewall flexing and rollingresistance, resulting in heatbuildup and internal damage tothe tire. It also may result inunnecessary tire stress, irregularwear, loss of vehicle control andaccidents. A tire can lose up tohalf of its air pressure and notappear to be flat!
Always inflate your tires to theFord recommended inflationpressure even if it is less than themaximum inflation pressureinformation found on the tire. TheFord recommended tire inflation
pressure is found on the SafetyCompliance Certification Label or
Tire Label (affixed to either thedoor hinge pillar, door-latch post,or the door edge that meets thedoor-latch post, next to thedriver's seating position), or TireLabel located on the B-pillar orthe edge of the driver's door.Failure to follow the tire pressurerecommendations can causeuneven treadwear patterns andadversely affect the way yourvehicle handles
Note:Do not reduce tire pressureto change the ride characteristicsof the vehicle. If you do notmaintain the inflation pressure atthe levels specified by Ford, yourvehicle may experience a conditionknown as shimmy. Shimmy is asevere vibration and oscillation inthe steering wheel after the vehicletravels over a bump or dip in theroad that does not dampen out byitself. Shimmy may result fromsignificant under-inflation of thetires, improper tires (load range,size, or type), or vehiclemodifications such as lift-kits. Inthe event that your vehicleexperiences shimmy, you shouldslowly reduce speed by either liftingoff the accelerator pedal or lightlyapplying the brakes. The shimmyceases as the vehicle speeddecreases.
Maximum Inflation Pressure isthe tire manufacturer's maximumpermissible pressure and thepressure at which the maximum
load can be carried by the tire. Thispressure is normally higher than
199
2024 E-Series (TE4) Canada/United States of America, enUSA, Edition date: 202210, First-PrintingWheels and Tires
Page 218 of 303
When the malfunction indicator isilluminated, the system may not be ableto detect or signal low tire pressure asintended. TPMS malfunctions may occurfor a variety of reasons, including theinstallation of replacement or alternatetires or wheels on the vehicle that preventthe TPMS from functioning properly.Always check the TPMS malfunctiontelltale after replacing one or more tires orwheels on your vehicle to ensure that thereplacement or alternate tires and wheelsallow the TPMS to continue to functionproperly.
Note: Only use tire sealants in roadsideemergencies as they may cause damage tothe tire pressure monitoring system sensor.
Note: If the tire pressure monitoring systemsensor becomes damaged, it may notfunction.
Changing Tires With a TirePressure Monitoring System
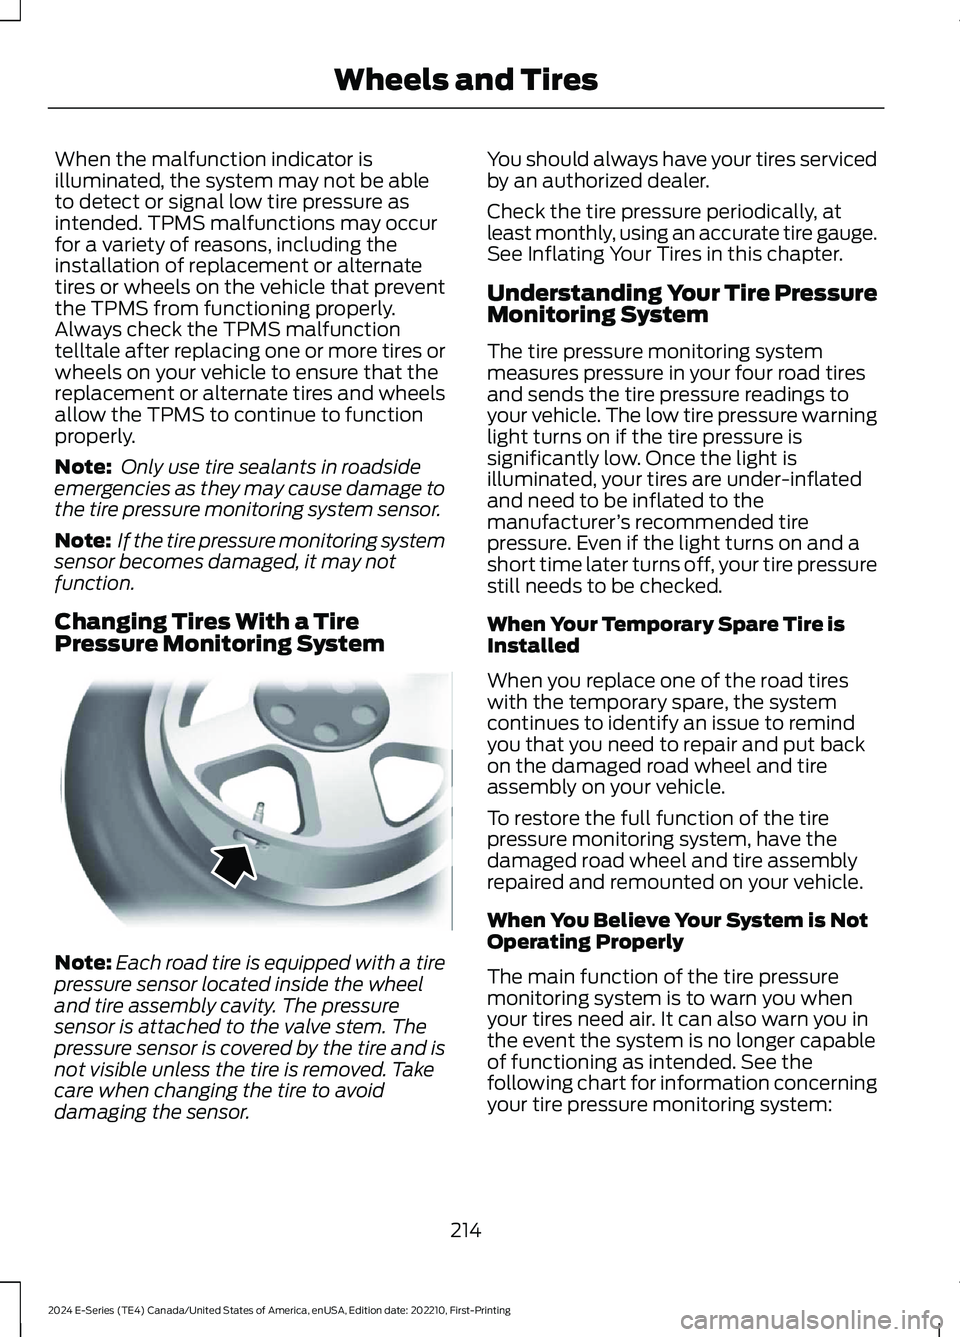
Note:Each road tire is equipped with a tirepressure sensor located inside the wheeland tire assembly cavity. The pressuresensor is attached to the valve stem. Thepressure sensor is covered by the tire and isnot visible unless the tire is removed. Takecare when changing the tire to avoiddamaging the sensor.
You should always have your tires servicedby an authorized dealer.
Check the tire pressure periodically, atleast monthly, using an accurate tire gauge.See Inflating Your Tires in this chapter.
Understanding Your Tire PressureMonitoring System
The tire pressure monitoring systemmeasures pressure in your four road tiresand sends the tire pressure readings toyour vehicle. The low tire pressure warninglight turns on if the tire pressure issignificantly low. Once the light isilluminated, your tires are under-inflatedand need to be inflated to themanufacturer’s recommended tirepressure. Even if the light turns on and ashort time later turns off, your tire pressurestill needs to be checked.
When Your Temporary Spare Tire isInstalled
When you replace one of the road tireswith the temporary spare, the systemcontinues to identify an issue to remindyou that you need to repair and put backon the damaged road wheel and tireassembly on your vehicle.
To restore the full function of the tirepressure monitoring system, have thedamaged road wheel and tire assemblyrepaired and remounted on your vehicle.
When You Believe Your System is NotOperating Properly
The main function of the tire pressuremonitoring system is to warn you whenyour tires need air. It can also warn you inthe event the system is no longer capableof functioning as intended. See thefollowing chart for information concerningyour tire pressure monitoring system:
214
2024 E-Series (TE4) Canada/United States of America, enUSA, Edition date: 202210, First-PrintingWheels and TiresE142549
Page 219 of 303
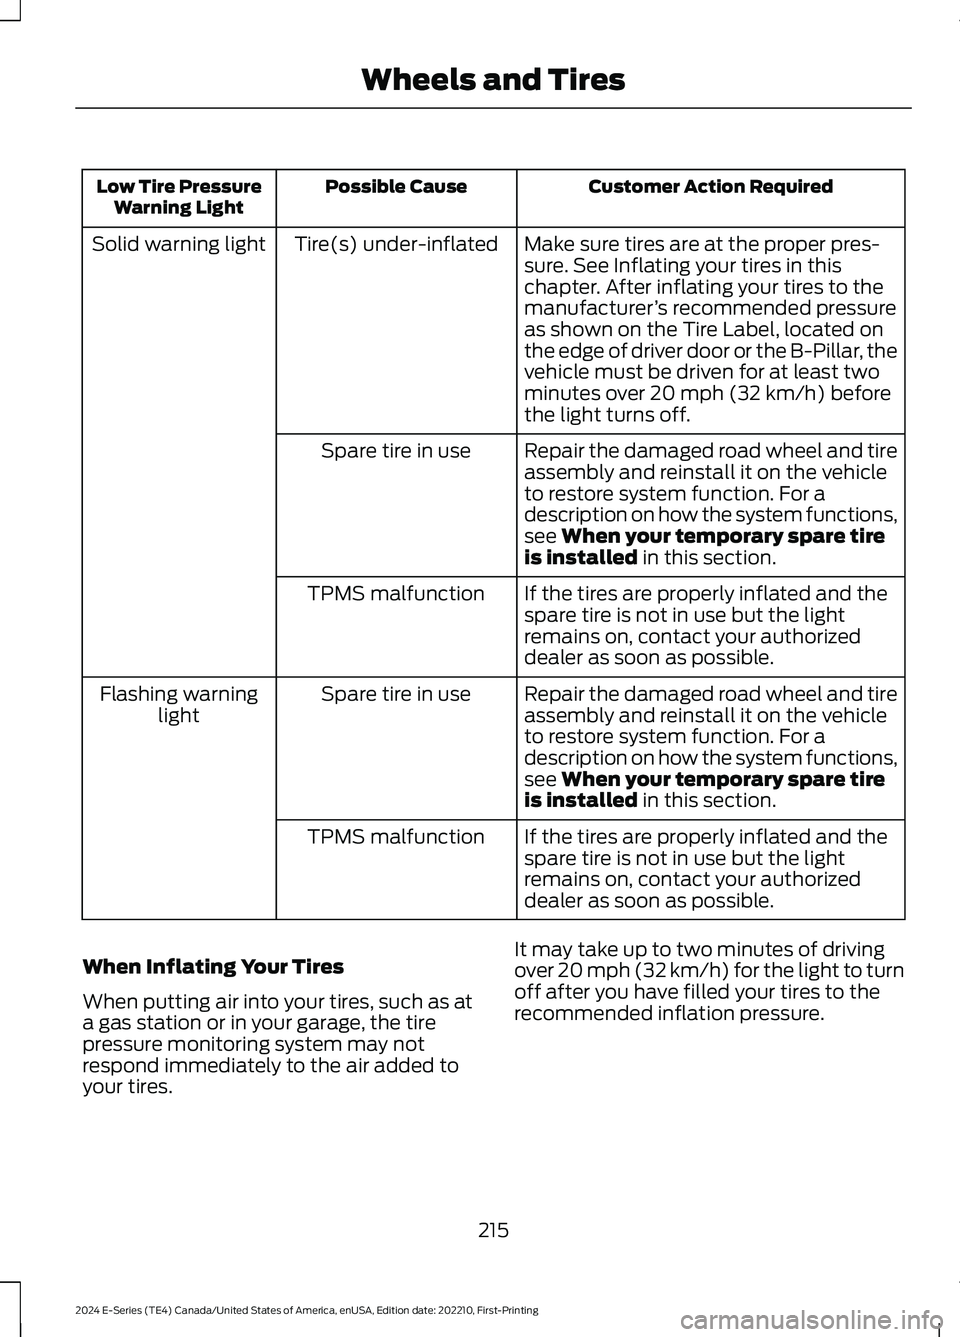
Customer Action RequiredPossible CauseLow Tire PressureWarning Light
Make sure tires are at the proper pres-sure. See Inflating your tires in thischapter. After inflating your tires to themanufacturer’s recommended pressureas shown on the Tire Label, located onthe edge of driver door or the B-Pillar, thevehicle must be driven for at least twominutes over 20 mph (32 km/h) beforethe light turns off.
Tire(s) under-inflatedSolid warning light
Repair the damaged road wheel and tireassembly and reinstall it on the vehicleto restore system function. For adescription on how the system functions,see When your temporary spare tireis installed in this section.
Spare tire in use
If the tires are properly inflated and thespare tire is not in use but the lightremains on, contact your authorizeddealer as soon as possible.
TPMS malfunction
Repair the damaged road wheel and tireassembly and reinstall it on the vehicleto restore system function. For adescription on how the system functions,see When your temporary spare tireis installed in this section.
Spare tire in useFlashing warninglight
If the tires are properly inflated and thespare tire is not in use but the lightremains on, contact your authorizeddealer as soon as possible.
TPMS malfunction
When Inflating Your Tires
When putting air into your tires, such as ata gas station or in your garage, the tirepressure monitoring system may notrespond immediately to the air added toyour tires.
It may take up to two minutes of drivingover 20 mph (32 km/h) for the light to turnoff after you have filled your tires to therecommended inflation pressure.
215
2024 E-Series (TE4) Canada/United States of America, enUSA, Edition date: 202210, First-PrintingWheels and Tires
Page 220 of 303
How Temperature Affects Your TirePressure
The tire pressure monitoring systemmonitors tire pressure in each pneumatictire. When driving in a normal manner, atypical passenger tire inflation pressuremay increase about 2–4 psi (14–28 kPa)from a cold start situation. If the vehicle isstationary overnight with the outsidetemperature significantly lower than thedaytime temperature, the tire pressure maydecrease about 3 psi (21 kPa) for a drop of30°F (17°C) in ambient temperature. Thislower pressure value may be detected bythe tire pressure monitoring system asbeing significantly lower than therecommended inflation pressure andactivate the system warning light for lowtire pressure. If the low tire pressurewarning light is on, visually check each tireto verify that no tire is flat. If one or moretires are flat, repair as necessary. Checkthe air pressure in the road tires. If any tireis under-inflated, carefully drive the vehicleto the nearest location where air can beadded to the tires. Inflate all the tires tothe recommended inflation pressure.
Tire Pressure Monitoring System ResetProcedure
WARNING: To determine therequired pressure(s) for your vehicle, seethe Safety Compliance CertificationLabel (on the door hinge pillar,door-latch post or the door edge thatmeets the door-latch post, next to thedriver seat) or the Tire Label on theB-Pillar or the edge of the driver door.
Note:You need to perform the tire pressuremonitoring system reset procedure aftereach tire rotation.
To provide the vehicle's load carryingcapability, some vehicles require differentrecommended tire pressures in the fronttires as compared to the rear tires. The tirepressure monitoring system on thesevehicles illuminate the low tire pressurewarning light at two different pressures:one for the front tires and one for the reartires.
Since tires need to be rotated to provideconsistent performance and maximum tirelife, the tire pressure monitoring systemneeds to know when the tires are rotatedto determine which set of tires are on thefront and which are on the rear. With thisinformation, the system can detect andproperly warn of low tire pressures.
System reset tips:
•To reduce the chances of interferencefrom another vehicle, perform thesystem reset procedure at least 3 ft(1 m) away from another vehicleundergoing the system reset procedureat the same time.
•Do not wait more than two minutesbetween resetting each tire sensor orthe system can time-out and you haveto repeat the entire procedure on allfour wheels.
•A double horn sounds indicating theneed to repeat the procedure.
Performing the System Reset Procedure- Single Rear Wheel
Read the entire procedure beforeattempting.
1.Drive the vehicle above 20 mph(32 km/h) for at least two minutes,then park in a safe location where youcan easily get to all four tires and haveaccess to an air pump.
2.Place the ignition in the off position andkeep the key in the ignition.
216
2024 E-Series (TE4) Canada/United States of America, enUSA, Edition date: 202210, First-PrintingWheels and Tires
Page 223 of 303
Note:The tire pressure monitoring systemindicator light illuminates when the sparetire is in use. To restore the full function ofthe monitoring system, all road wheelsequipped with tire pressure monitoringsensors must be mounted on the vehicle.
Note:Do not use wheels or wheel nutsdifferent than the original equipment, as thismay damage the wheel or mounting system.
If you get a flat tire when driving, do notapply the brake heavily. Instead, graduallydecrease your speed. Hold the steeringwheel firmly and slowly move to a safeplace on the side of the road.
Have a flat serviced by an authorizeddealer to prevent damage to the tirepressure monitoring system sensors. SeeTire Pressure Monitoring System (page213). Replace the spare tire with a road tireas soon as possible. During repairing orreplacing of the flat tire, have theauthorized dealer inspect the tire pressuremonitoring system sensor for damage.
Dissimilar Spare Wheel and TireAssembly Information
WARNING: Failure to follow theseguidelines could result in an increasedrisk of loss of vehicle control, injury ordeath.
If you have a dissimilar spare wheel andtire, then it is intended for temporary useonly. This means that if you need to use it,you should replace it as soon as possiblewith a road wheel and tire assembly thatis the same size and type as the road tiresand wheels that were originally providedby Ford. If the dissimilar spare tire or wheelis damaged, it should be replaced ratherthan repaired.
A dissimilar spare wheel and tire assemblyis defined as a spare wheel and tireassembly that is different in brand, size orappearance from the road tires and wheelsand can be one of three types:
1.T-type mini-spare: This spare tirebegins with the letter T for tire size andmay have Temporary Use Only molded inthe sidewall.
2.Full-size dissimilar spare with labelon wheel: This spare tire has a label onthe wheel that states: THIS WHEEL ANDTIRE ASSEMBLY FOR TEMPORARY USEONLY.
When driving with one of the dissimilarspare tires listed above:
•Do not exceed 50 mph (80 km/h).
•Do not load the vehicle beyondmaximum vehicle load rating listed onthe Safety Compliance Label.
•Do not tow a trailer.
•Do not use snow chains on the end ofthe vehicle with the dissimilar sparetire.
•Do not use more than one dissimilarspare tire at a time.
•Do not use commercial car washingequipment.
•Do not try to repair the dissimilar sparetire.
Using a dissimilar spare wheel and tireassembly can compromise theeffectiveness of the following:
•Handling, stability and brakingperformance.
•Comfort and noise.
•Ground clearance and parking at curbs.
•Winter weather driving capability.
•Wet weather driving capability.
•All-wheel driving capability.
219
2024 E-Series (TE4) Canada/United States of America, enUSA, Edition date: 202210, First-PrintingWheels and Tires