sensor FORD ESCAPE 2015 3.G User Guide
[x] Cancel search | Manufacturer: FORD, Model Year: 2015, Model line: ESCAPE, Model: FORD ESCAPE 2015 3.GPages: 449, PDF Size: 5.36 MB
Page 62 of 449
Note:
Be careful when opening or closing
the liftgate in a garage or other enclosed
area to avoid damaging the liftgate. Press twice within three seconds
to:
• unlatch a manual liftgate
• open, close or stop the movement of
a power liftgate. See Power Liftgate
(page 63).
Mechanical Key
Turn the top of the key toward the front of
your vehicle once to lock all doors.
Turn the top of the key toward the rear of
your vehicle once to unlock the driver door
only.
Locking the Doors Individually
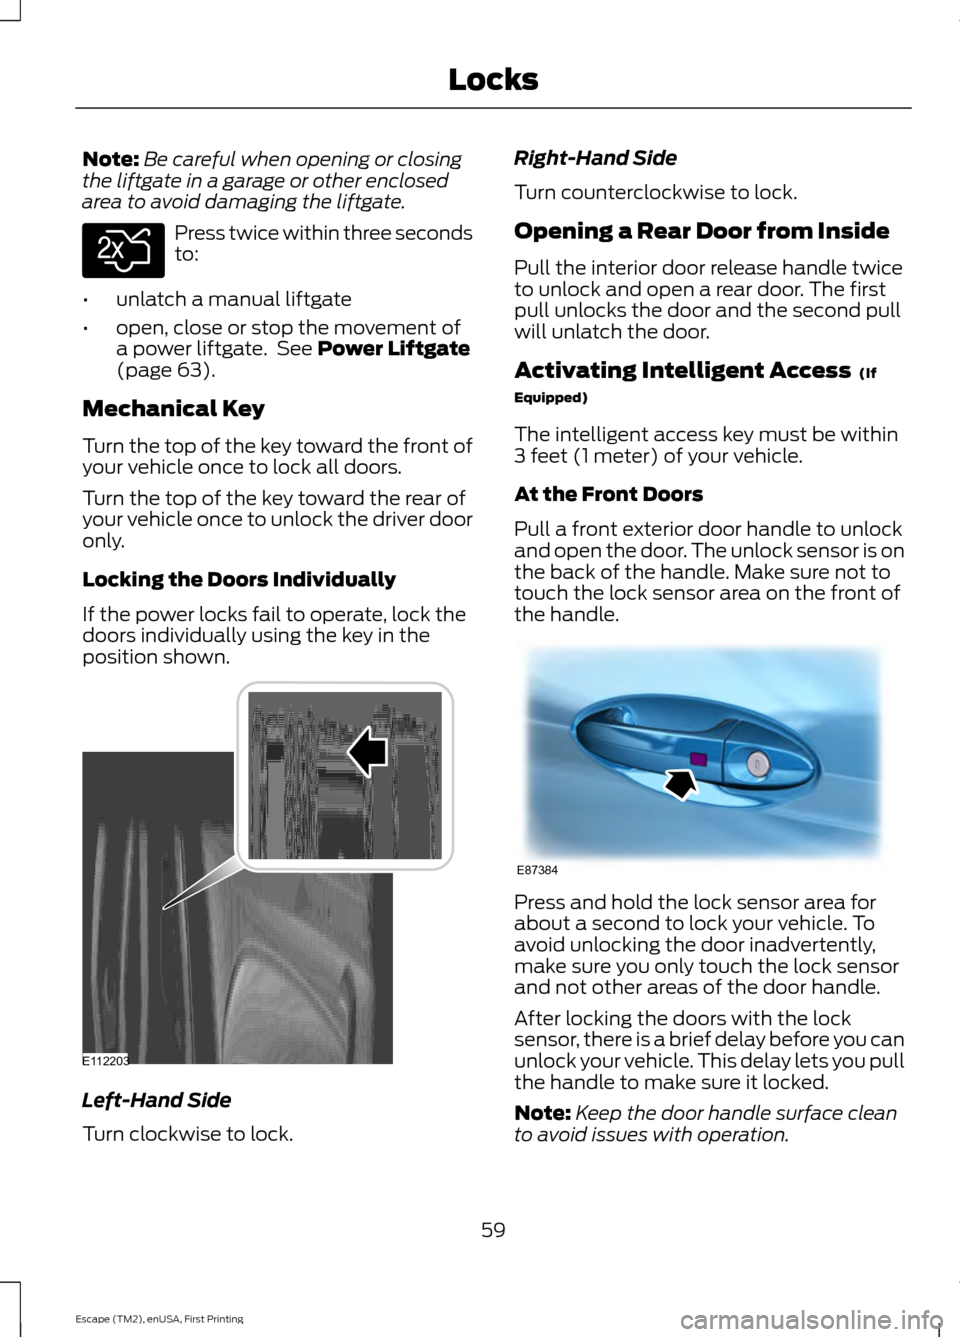
If the power locks fail to operate, lock the
doors individually using the key in the
position shown. Left-Hand Side
Turn clockwise to lock. Right-Hand Side
Turn counterclockwise to lock.
Opening a Rear Door from Inside
Pull the interior door release handle twice
to unlock and open a rear door. The first
pull unlocks the door and the second pull
will unlatch the door.
Activating Intelligent Access (If
Equipped)
The intelligent access key must be within
3 feet (1 meter) of your vehicle.
At the Front Doors
Pull a front exterior door handle to unlock
and open the door. The unlock sensor is on
the back of the handle. Make sure not to
touch the lock sensor area on the front of
the handle. Press and hold the lock sensor area for
about a second to lock your vehicle. To
avoid unlocking the door inadvertently,
make sure you only touch the lock sensor
and not other areas of the door handle.
After locking the doors with the lock
sensor, there is a brief delay before you can
unlock your vehicle. This delay lets you pull
the handle to make sure it locked.
Note:
Keep the door handle surface clean
to avoid issues with operation.
59
Escape (TM2), enUSA, First Printing LocksE138630 E112203 E87384
Page 67 of 449
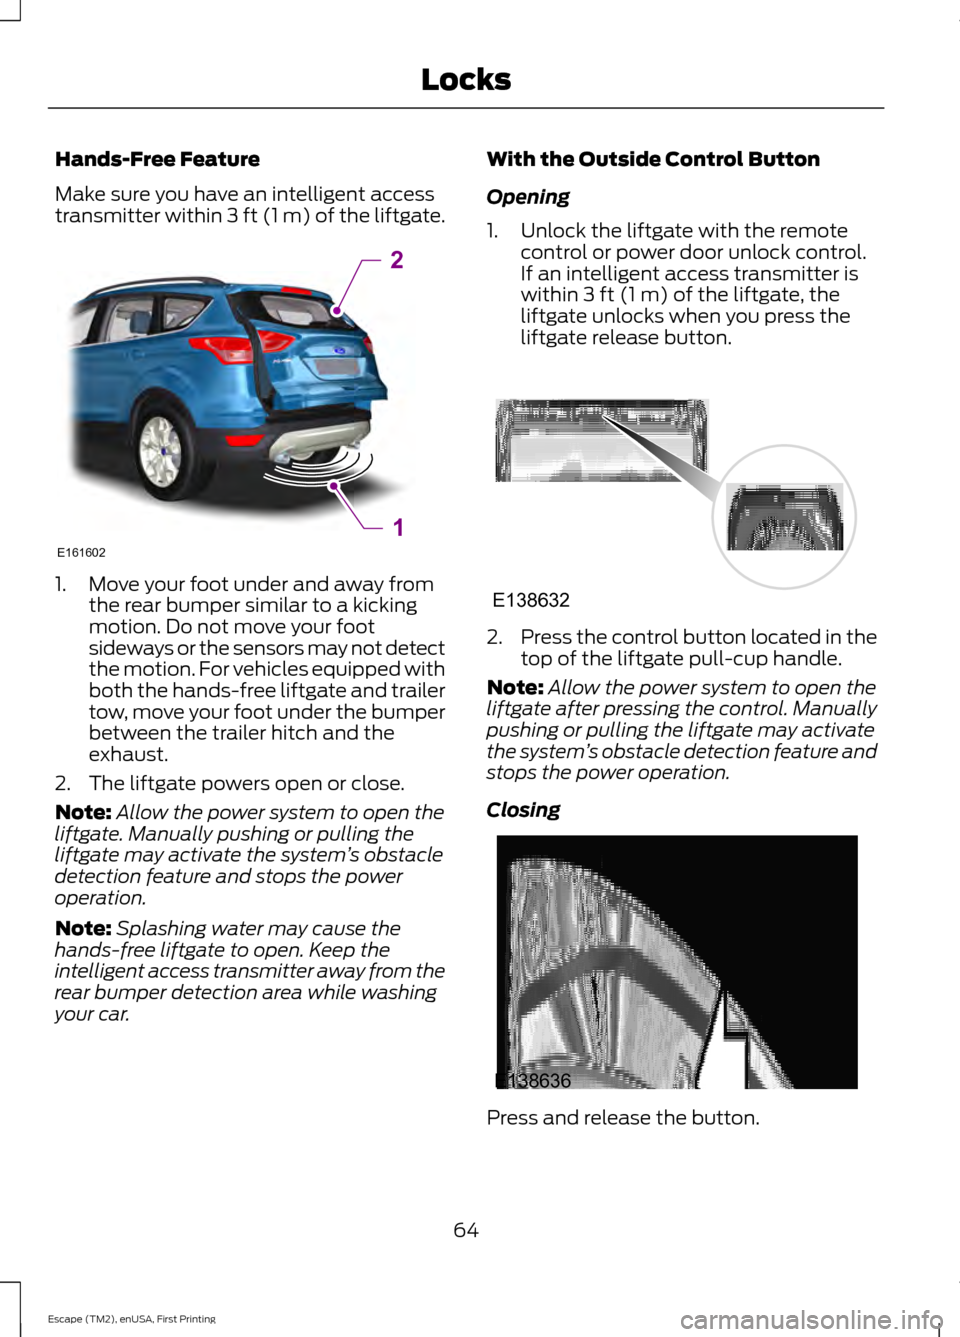
Hands-Free Feature
Make sure you have an intelligent access
transmitter within 3 ft (1 m) of the liftgate.
1. Move your foot under and away from
the rear bumper similar to a kicking
motion. Do not move your foot
sideways or the sensors may not detect
the motion. For vehicles equipped with
both the hands-free liftgate and trailer
tow, move your foot under the bumper
between the trailer hitch and the
exhaust.
2. The liftgate powers open or close.
Note: Allow the power system to open the
liftgate. Manually pushing or pulling the
liftgate may activate the system ’s obstacle
detection feature and stops the power
operation.
Note: Splashing water may cause the
hands-free liftgate to open. Keep the
intelligent access transmitter away from the
rear bumper detection area while washing
your car. With the Outside Control Button
Opening
1. Unlock the liftgate with the remote
control or power door unlock control.
If an intelligent access transmitter is
within 3 ft (1 m) of the liftgate, the
liftgate unlocks when you press the
liftgate release button. 2.
Press the control button located in the
top of the liftgate pull-cup handle.
Note: Allow the power system to open the
liftgate after pressing the control. Manually
pushing or pulling the liftgate may activate
the system ’s obstacle detection feature and
stops the power operation.
Closing Press and release the button.
64
Escape (TM2), enUSA, First Printing LocksE161602
2
1 E138632 E138636
Page 74 of 449
WINDSHIELD WIPERS
Note:
Fully defrost the windshield before
switching on the windshield wipers.
Note: Make sure the windshield wipers are
switched off before entering a car wash.
Note: Clean the windshield and wiper
blades if they begin to leave streaks or
smears. If that does not resolve the issue,
install new wiper blades.
Note: Do not operate the wipers on a dry
windshield. This may scratch the glass,
damage the wiper blades or cause the wiper
motor to burn out. Always use the
windshield washers before wiping a dry
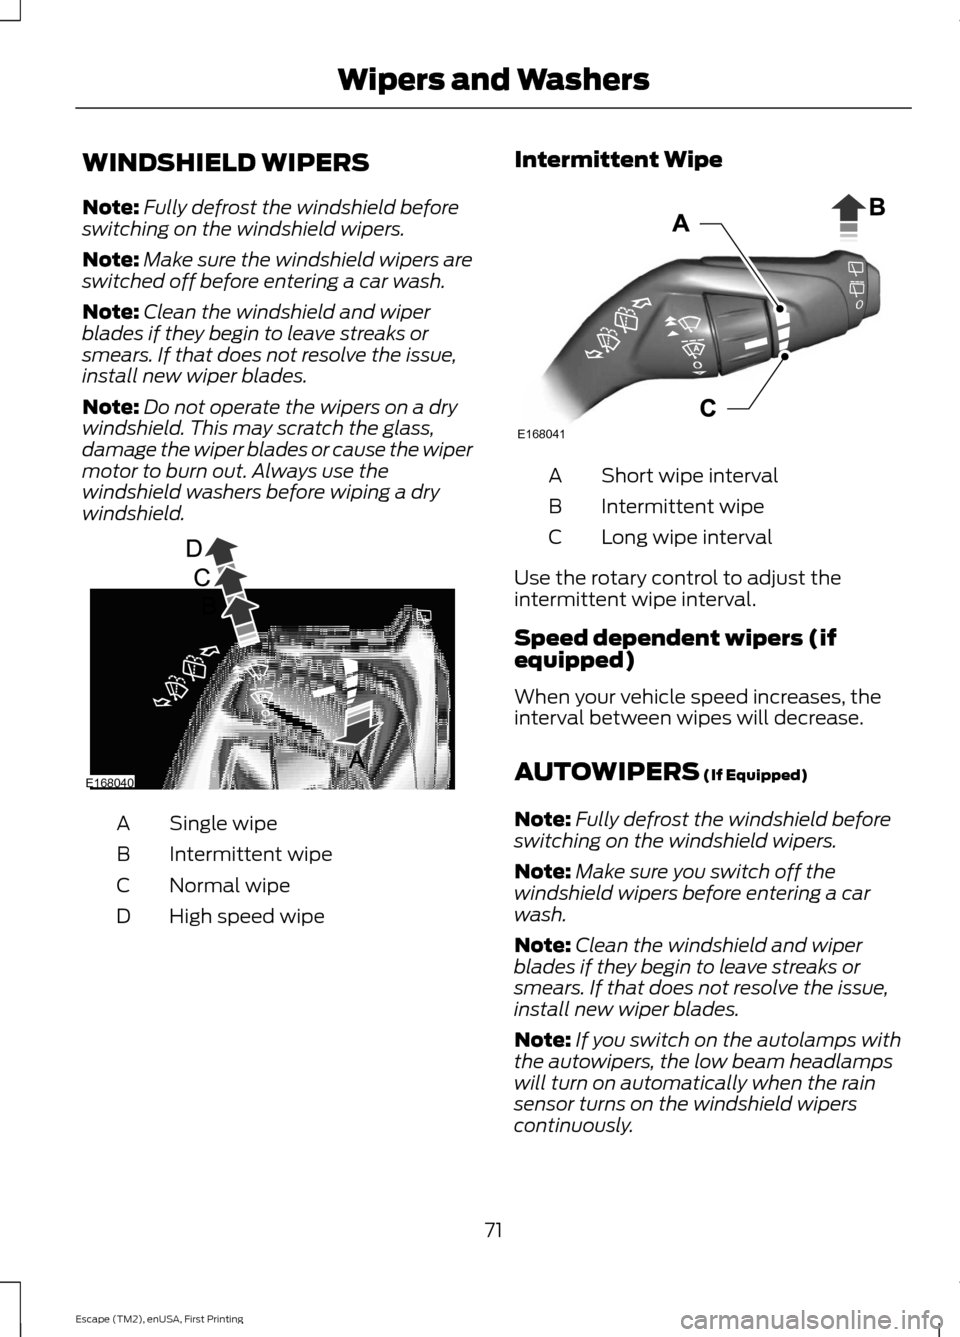
windshield. Single wipe
A
Intermittent wipe
B
Normal wipe
C
High speed wipe
D Intermittent Wipe Short wipe interval
A
Intermittent wipe
B
Long wipe interval
C
Use the rotary control to adjust the
intermittent wipe interval.
Speed dependent wipers (if
equipped)
When your vehicle speed increases, the
interval between wipes will decrease.
AUTOWIPERS (If Equipped)
Note: Fully defrost the windshield before
switching on the windshield wipers.
Note: Make sure you switch off the
windshield wipers before entering a car
wash.
Note: Clean the windshield and wiper
blades if they begin to leave streaks or
smears. If that does not resolve the issue,
install new wiper blades.
Note: If you switch on the autolamps with
the autowipers, the low beam headlamps
will turn on automatically when the rain
sensor turns on the windshield wipers
continuously.
71
Escape (TM2), enUSA, First Printing Wipers and WashersE168040 E168041
Page 75 of 449
Note:
During wet or winter driving
conditions with ice, snow or a salty road
mist, inconsistent or unexpected wiping or
smearing may occur.
In these conditions, you can do the
following:
• Lower the sensitivity of the autowipers
to reduce the amount of smearing.
• Switch to normal or high-speed wipe.
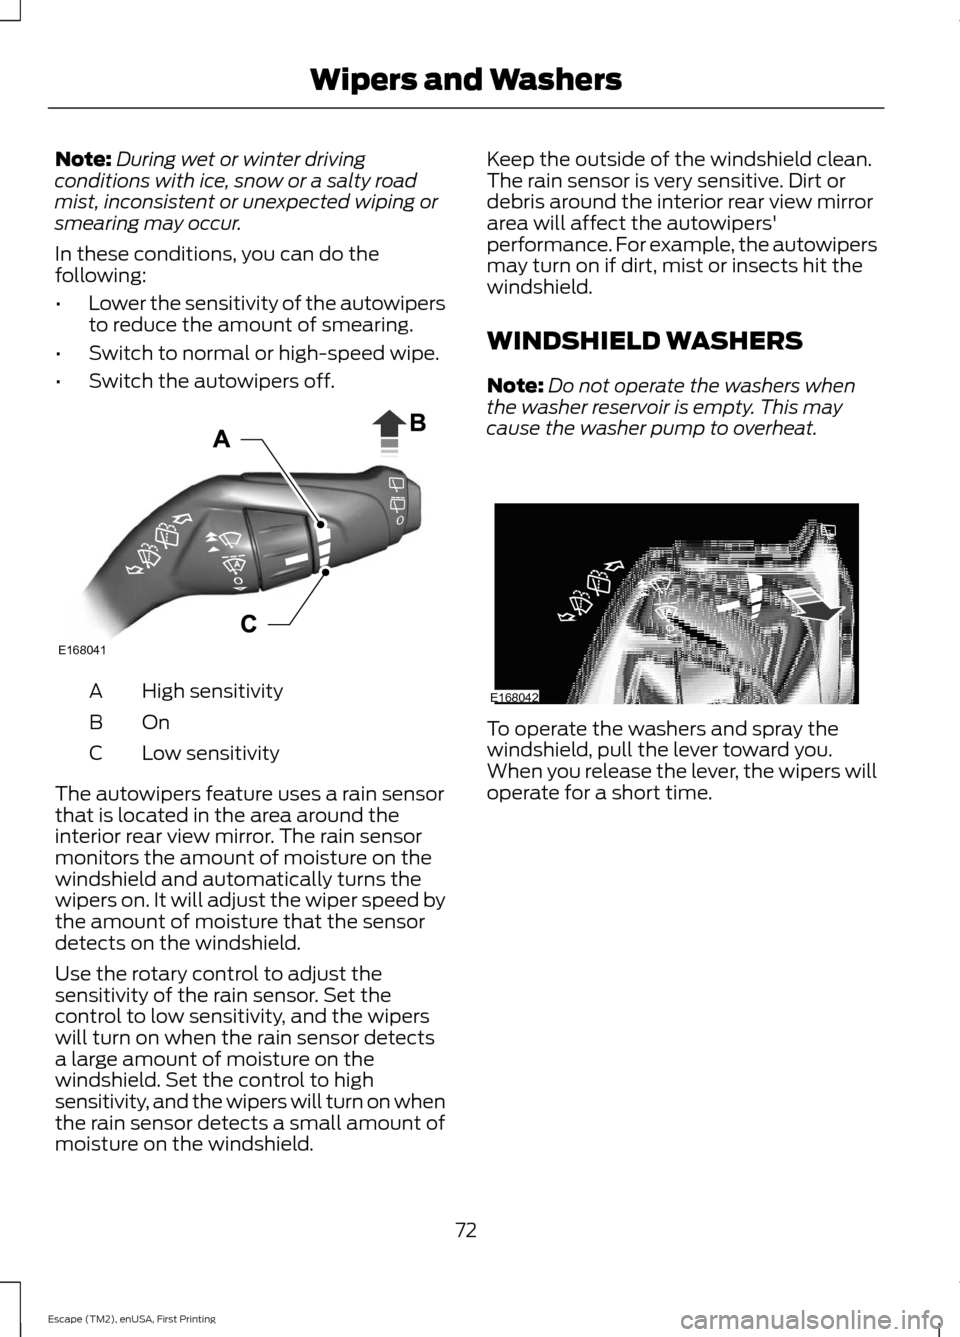
• Switch the autowipers off. High sensitivity
A
OnB
Low sensitivity
C
The autowipers feature uses a rain sensor
that is located in the area around the
interior rear view mirror. The rain sensor
monitors the amount of moisture on the
windshield and automatically turns the
wipers on. It will adjust the wiper speed by
the amount of moisture that the sensor
detects on the windshield.
Use the rotary control to adjust the
sensitivity of the rain sensor. Set the
control to low sensitivity, and the wipers
will turn on when the rain sensor detects
a large amount of moisture on the
windshield. Set the control to high
sensitivity, and the wipers will turn on when
the rain sensor detects a small amount of
moisture on the windshield. Keep the outside of the windshield clean.
The rain sensor is very sensitive. Dirt or
debris around the interior rear view mirror
area will affect the autowipers'
performance. For example, the autowipers
may turn on if dirt, mist or insects hit the
windshield.
WINDSHIELD WASHERS
Note:
Do not operate the washers when
the washer reservoir is empty. This may
cause the washer pump to overheat. To operate the washers and spray the
windshield, pull the lever toward you.
When you release the lever, the wipers will
operate for a short time.
72
Escape (TM2), enUSA, First Printing Wipers and WashersE168041 E168042
Page 85 of 449
The image of the approaching vehicle is
small and near the inboard edge of the
main mirror when it is at a distance. The
image becomes larger and begins to move
outboard across the main mirror as the
vehicle approaches (A). The image will
transition from the main mirror and begin
to appear in the blind spot mirror as the
vehicle approaches (B). The vehicle will
transition to your peripheral field of view
as it leaves the blind spot mirror (C).
Blind Spot Monitor (If Equipped)
See
Blind Spot Information System
(page 162).
INTERIOR MIRROR WARNING
Do not adjust the mirror when your
vehicle is moving.
Note:
Do not clean the housing or glass of
any mirror with harsh abrasives, fuel or other
petroleum or ammonia-based cleaning
products.
You can adjust the interior mirror to your
preference. Some mirrors also have a
second pivot point. This lets you move the
mirror head up or down and from side to
side.
Pull the tab below the mirror toward you
to reduce glare at night.
Auto-Dimming Mirror
(If Equipped)
Note: Do not block the sensors on the front
and back of the mirror. Mirror performance
may be affected. A rear center passenger or
raised rear center head restraint may also
block light from reaching the sensor. The mirror will dim automatically to reduce
glare when bright lights are detected from
behind your vehicle. It will automatically
return to normal reflection when you select
reverse gear to make sure you have a clear
view when backing up.
SUN VISORS
Rotate the sun visor toward the side
window and extend it rearward for extra
shade.
Illuminated Vanity Mirror
(If Equipped)
Lift the cover to switch the lamp on.
82
Escape (TM2), enUSA, First Printing Windows and MirrorsE138666 E162197
Page 98 of 449
Battery and Charging System
Action
Message
Indicator
Message
Stop your vehicle as soon as it is safe to do soand switch off the ignition. Contact your authorized dealer.
Red
Electrical system over-
voltage Stop safely
Displays to warn of a low battery condition.
Turn off all unneeded electrical accessories. Contact your authorized dealer.
Amber
Battery low See manual
Blind Spot Information and Cross Traffic Alert System Action
Message
Indicator
Message
Displayed when the blind spot information
system and cross traffic alert system sensors are blocked. See Blind Spot Information
System (page 162).
Amber
BLIS Low visibility See
manual
Displayed when a fault with the system has
occurred. Contact your authorized dealer as soon as possible.
Amber
BLIS: X sensor fault
Service required
Displayed when the system is not available dueto trailer use. See
Blind Spot Information
System (page 162).
Amber
BLIS not available Trailer
attached
Displayed when the system detects a vehicle.See
Blind Spot Information System (page
162).
Amber
Cross Traffic Vehicle
coming from X
Displayed when the blind spot information
system and cross traffic alert system sensors are blocked. See
Blind Spot Information
System (page 162).
Amber
Cross Traffic Sensor
blocked See manual
Displays when the system requires service dueto a malfunction. Contact your authorized dealer.
Amber
Cross Traffic fault
Service required
Displayed when the system is not available dueto trailer use. See
Blind Spot Information
System (page 162).
-
Cross Traffic disabled
Trailer attached
95
Escape (TM2), enUSA, First Printing Information Displays
Page 105 of 449
Tire Pressure Monitoring System
Action
Message
Indicator
Message
Displays when one or more tires on your vehiclehave low tire pressure. See Tire Pressure
Monitoring System (page 255).
Amber
Low Tire Pressure
Displays when the tire pressure monitoring
system is malfunctioning. If the warning stays on or continues to come on, contact your
authorized dealer.
See Tire Pressure Monit-
oring System (page 255).
Amber
Tire Pressure Monitor
Fault
Displayed when a tire pressure sensor is
malfunctioning, or your spare tire is in use. For
more information on how the system operates
under these conditions, see See Tire Pressure
Monitoring System (page 255). If the warning
stays on or continues to come on, contact your authorized dealer as soon as possible.
Amber
Tire Pressure Sensor
Fault
Traction Control Action
Message
Indicator
Message
Displays when the traction control system hasbeen switched off. See
Using Traction
Control (page 149).
-
Traction control off
102
Escape (TM2), enUSA, First Printing Information Displays
Page 126 of 449
When the indicator light, located on the
power point, is:
•
On — the power point is working, the
ignition is on and a device is plugged
in.
• Off — the power point and ignition are
off, and you do not have a device
plugged in.
• Flashing — the power point is in fault
mode.
The power point temporarily turns off if
you exceed the 150-watt limit. When
overloaded, overheated or shorted, the
power point can also switch to a fault
mode. For overloading and shorting
conditions, unplug your device, then switch
the ignition off and back on. For
overheating conditions, let the system cool,
then switch the ignition off and back on.
Do not use the power point to power
electric devices such as:
• Cathode ray tube type televisions.
• Motor loads, such as vacuum cleaners,
electric saws and other electric power
tools, compressor-driven refrigerators,
etc.
• Measuring devices, which process
precise data, such as medical
equipment, measuring equipment, etc.
• Other appliances requiring an
extremely stable power supply:
microcomputer-controlled electric
blankets, touch sensor lamps, etc.
123
Escape (TM2), enUSA, First Printing Auxiliary Power Points
Page 151 of 449
PARKING BRAKE
WARNING
Always set the parking brake fully
and leave your vehicle with the
transmission selector lever in
position P. Note:
Do not press the release button while
pulling the lever up.
To apply the parking brake:
1. Press the foot brake pedal firmly.
2. Pull the parking brake lever up to its fullest extent.
Note: If you park your vehicle on a hill and
facing uphill, move the transmission selector
lever to position
P and turn the steering
wheel away from the curb.
Note: If you park your vehicle on a hill and
facing downhill, move the transmission
selector lever to
P and turn the steering
wheel toward the curb.
To release the parking brake:
1. Press the brake pedal firmly.
2. Pull the lever up slightly.
3. Press the release button and push the lever down.
HILL START ASSIST WARNINGS
The system does not replace the
parking brake. When you leave your
vehicle, always apply the parking
brake and put the transmission in park (P). You must remain in your vehicle once
you have activated the system.
During all times, you are responsible
for controlling your vehicle,
supervising the system and
intervening, if required. WARNINGS
If the engine is revved excessively, or
if a malfunction is detected, the
system will be deactivated.
The system makes it easier to pull away
when your vehicle is on a slope without the
need to use the parking brake.
When the system is active, your vehicle will
remain stationary on the slope for two to
three seconds after you release the brake
pedal. This allows you time to move your
foot from the brake to the accelerator
pedal. The brakes are released
automatically once the engine has
developed sufficient drive to prevent your
vehicle from rolling down the slope. This
is an advantage when pulling away on a
slope, (for example from a car park ramp,
traffic lights or when reversing uphill into
a parking space).
The system will activate automatically on
any slope that will cause significant vehicle
rollback.
Using Hill Start Assist
1. Press the brake pedal to bring your
vehicle to a complete standstill. Keep
the brake pedal pressed.
2. If the sensors detect that your vehicle is on a slope, the system will activate
automatically.
3. When you remove your foot from the brake pedal, your vehicle will remain
on the slope without rolling away for
about two or three seconds. This hold
time will automatically be extended if
you are in the process of driving off.
4. Drive off in the normal manner. The brakes will release automatically.
148
Escape (TM2), enUSA, First Printing Brakes
Page 153 of 449
PRINCIPLE OF OPERATION
WARNINGS
Vehicle modifications involving
braking system, aftermarket roof
racks, suspension, steering system,
tire construction and wheel and tire size
may change the handling characteristics
of your vehicle and may adversely affect
the performance of the AdvanceTrac
system. In addition, installing any stereo
loudspeakers may interfere with and
adversely affect the AdvanceTrac system.
Install any aftermarket stereo loudspeaker
as far as possible from the front center
console, the tunnel, and the front seats in
order to minimize the risk of interfering with
the AdvanceTrac sensors. Reducing the
effectiveness of the AdvanceTrac system
could lead to an increased risk of loss of
vehicle control, vehicle rollover, personal
injury and death. Remember that even advanced
technology cannot defy the laws of
physics. It’
s always possible to lose
control of a vehicle due to inappropriate
driver input for the conditions. Aggressive
driving on any road condition can cause
you to lose control of your vehicle
increasing the risk of personal injury or
property damage. Activation of the
AdvanceTrac system is an indication that
at least some of the tires have exceeded
their ability to grip the road; this could
reduce the operator ’s ability to control the
vehicle potentially resulting in a loss of
vehicle control, vehicle rollover, personal
injury and death. If your AdvanceTrac
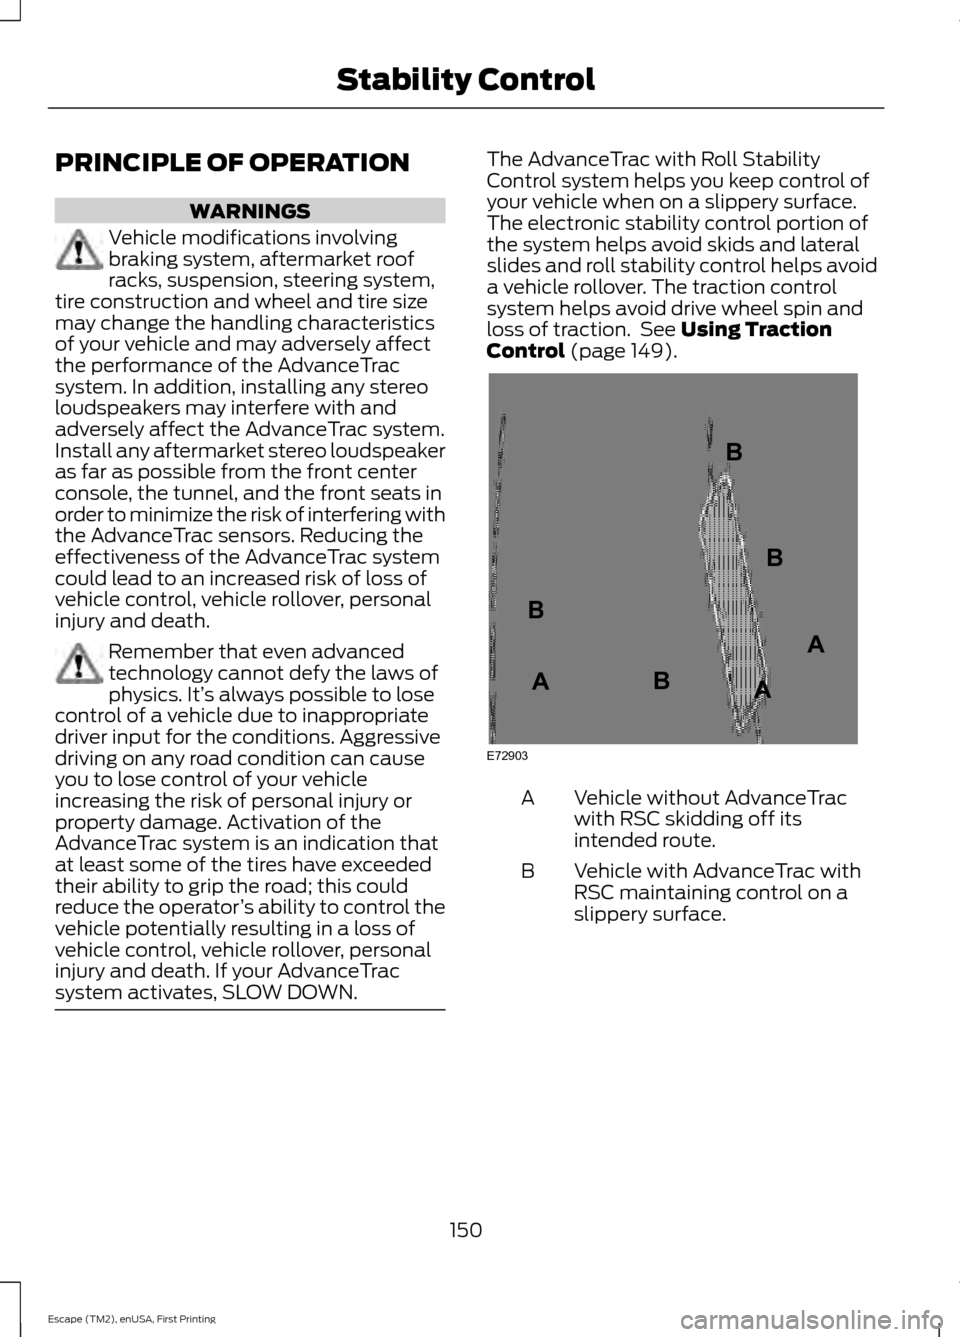
system activates, SLOW DOWN. The AdvanceTrac with Roll Stability
Control system helps you keep control of
your vehicle when on a slippery surface.
The electronic stability control portion of
the system helps avoid skids and lateral
slides and roll stability control helps avoid
a vehicle rollover. The traction control
system helps avoid drive wheel spin and
loss of traction. See Using Traction
Control (page 149). Vehicle without AdvanceTrac
with RSC skidding off its
intended route.
A
Vehicle with AdvanceTrac with
RSC maintaining control on a
slippery surface.
B
150
Escape (TM2), enUSA, First Printing Stability ControlE72903A
AA
B
BB
B