Electrical FORD ESCAPE 2022 User Guide
[x] Cancel search | Manufacturer: FORD, Model Year: 2022, Model line: ESCAPE, Model: FORD ESCAPE 2022Pages: 585, PDF Size: 6.15 MB
Page 204 of 585
• Do not use this product if the flexiblepower cord or electric vehicle cable has
broken insulation, or any other signs of
damage.
• Do not use this product if the enclosure or the electric vehicle connector is
broken, cracked, open, or shows any
other indication of damage.
Note: Ground this product. If it
malfunctions or breaks down, grounding
provides a path of least resistance for
electric current to reduce the risk of electric
shock. This product comes with a cord
having an equipment grounding conductor
and a grounding plug. Make sure you plug it
into an appropriate outlet that is properly
installed and grounded in accordance with
all local codes and ordinances.
Note: You need to plug the convenience
cord into a dedicated outlet.
Note: Firmly fit the AC wall plug into the
AC outlet. If the connection feels loose,
worn or the AC outlet is damaged, please
have a qualified electrician replace the AC
outlet. Using a convenience cord with a
worn outlet could cause burns, property
damage and increase the risk of electric
shock.
Note: Do not use the 120 volt convenience
cord with an extension cord, two-prong
adapter, surge protector, timer or other
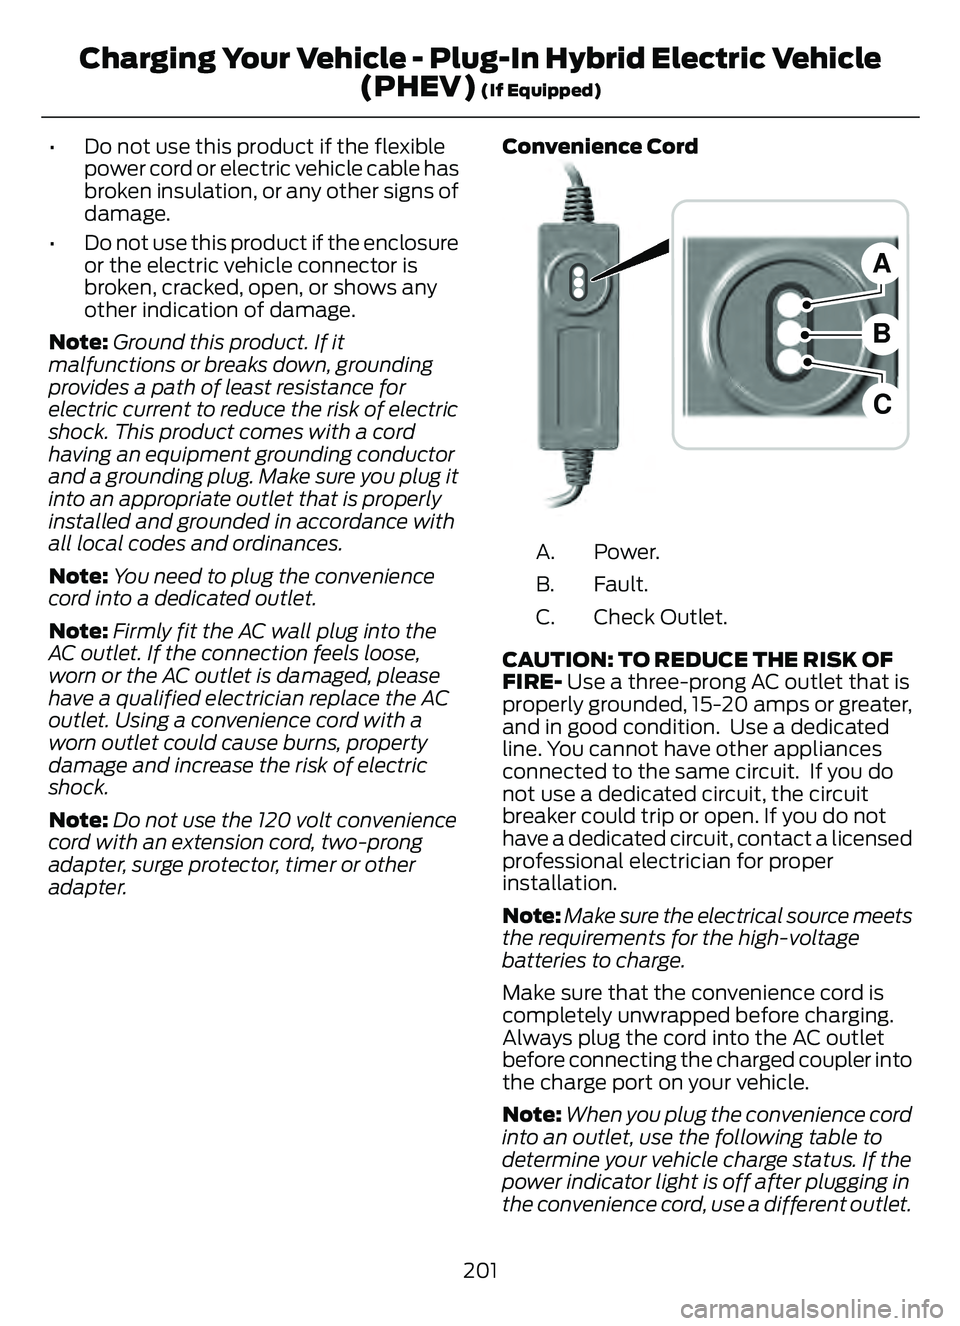
adapter. Convenience Cord
E299688E299688
B
A
C
Power.
A.
Fault.
B.
Check Outlet.
C.
CAUTION: TO REDUCE THE RISK OF
FIRE- Use a three-prong AC outlet that is
properly grounded, 15-20 amps or greater,
and in good condition. Use a dedicated
line. You cannot have other appliances
connected to the same circuit. If you do
not use a dedicated circuit, the circuit
breaker could trip or open. If you do not
have a dedicated circuit, contact a licensed
professional electrician for proper
installation.
Note: Make sure the electrical source meets
the requirements for the high-voltage
batteries to charge.
Make sure that the convenience cord is
completely unwrapped before charging.
Always plug the cord into the AC outlet
before connecting the charged coupler into
the charge port on your vehicle.
Note: When you plug the convenience cord
into an outlet, use the following table to
determine your vehicle charge status. If the
power indicator light is off after plugging in
the convenience cord, use a different outlet.
201
Charging Your Vehicle - Plug-In Hybrid Electric Vehicle (PHEV)
(If Equipped)
Page 208 of 585
Note:If the charge status indicator does
not light up or pulse after plugging in, please
verify that the charge port light setting is On.
If you do not wish to have the charge status
indicator light up at all while charging, then
you can switch it Off. See charge port light
under vehicle settings on your touchscreen.
See SYNC™ 3 (page 431).
AC CHARGING
CONNECTING THE CHARGER
E306676To charge the high-voltage battery:
1. Put the vehicle in park (P).
2. Press the center right edge of the
charge port door and then release to
open the door.
3. Plug the charging coupler into the charge port receptacle on your vehicle.
Make sure the button clicks confirming
that you have completely engaged the
coupler.
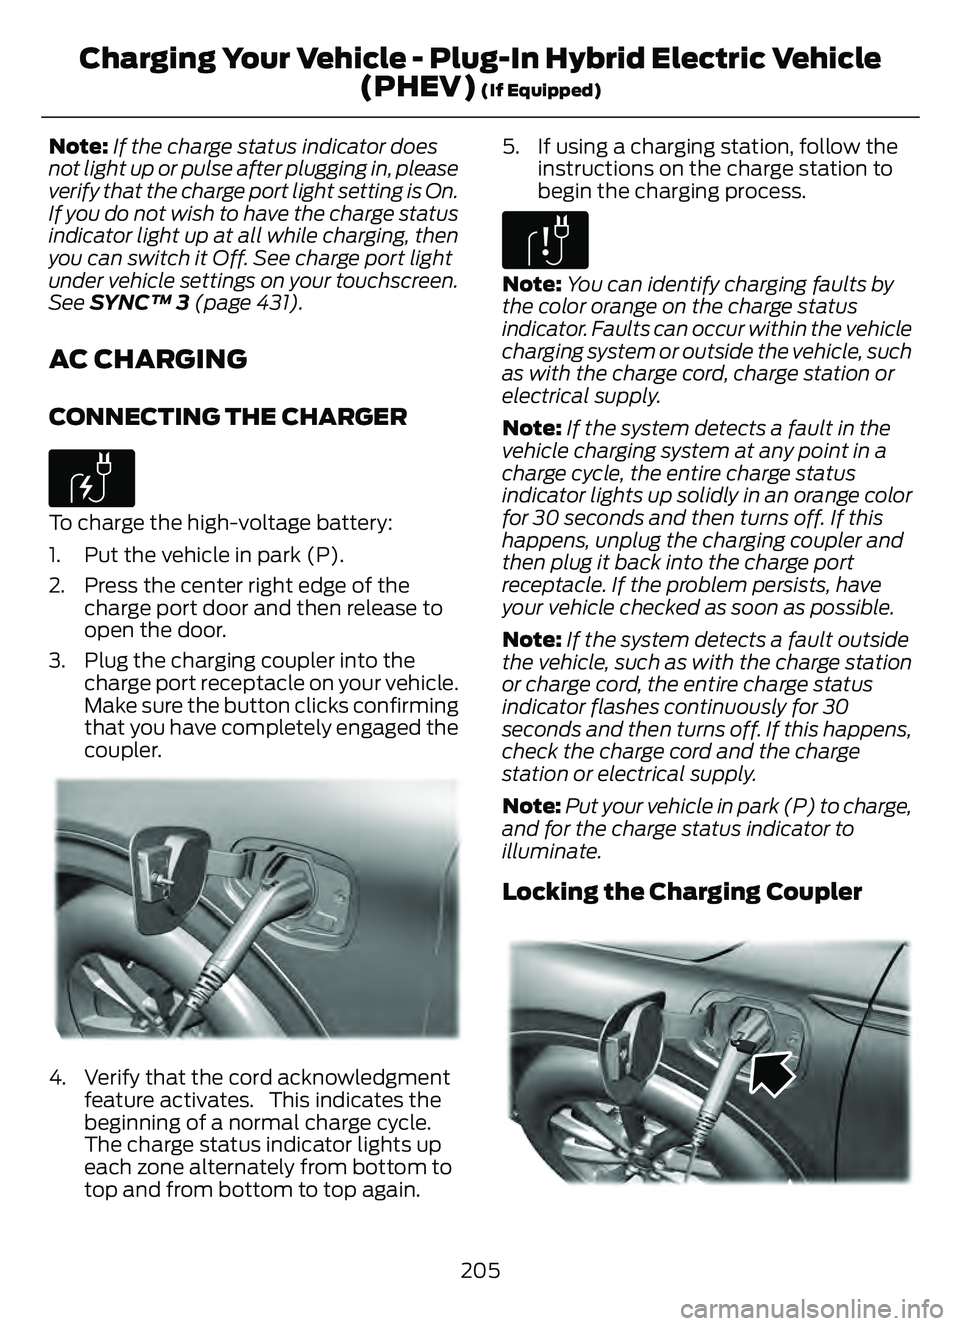
E295257E295257E29529522295229292929295295955295295292952992952295295995225725722577222557257257257225257252572572557
4. Verify that the cord acknowledgmentfeature activates. This indicates the
beginning of a normal charge cycle.
The charge status indicator lights up
each zone alternately from bottom to
top and from bottom to top again. 5. If using a charging station, follow the
instructions on the charge station to
begin the charging process.
E306677
Note: You can identify charging faults by
the color orange on the charge status
indicator. Faults can occur within the vehicle
charging system or outside the vehicle, such
as with the charge cord, charge station or
electrical supply.
Note: If the system detects a fault in the
vehicle charging system at any point in a
charge cycle, the entire charge status
indicator lights up solidly in an orange color
for 30 seconds and then turns off. If this
happens, unplug the charging coupler and
then plug it back into the charge port
receptacle. If the problem persists, have
your vehicle checked as soon as possible.
Note: If the system detects a fault outside
the vehicle, such as with the charge station
or charge cord, the entire charge status
indicator flashes continuously for 30
seconds and then turns off. If this happens,
check the charge cord and the charge
station or electrical supply.
Note: Put your vehicle in park (P) to charge,
and for the charge status indicator to
illuminate.
Locking the Charging Coupler
95 5E295451E295451
205
Charging Your Vehicle - Plug-In Hybrid Electric Vehicle (PHEV)
(If Equipped)
Page 210 of 585
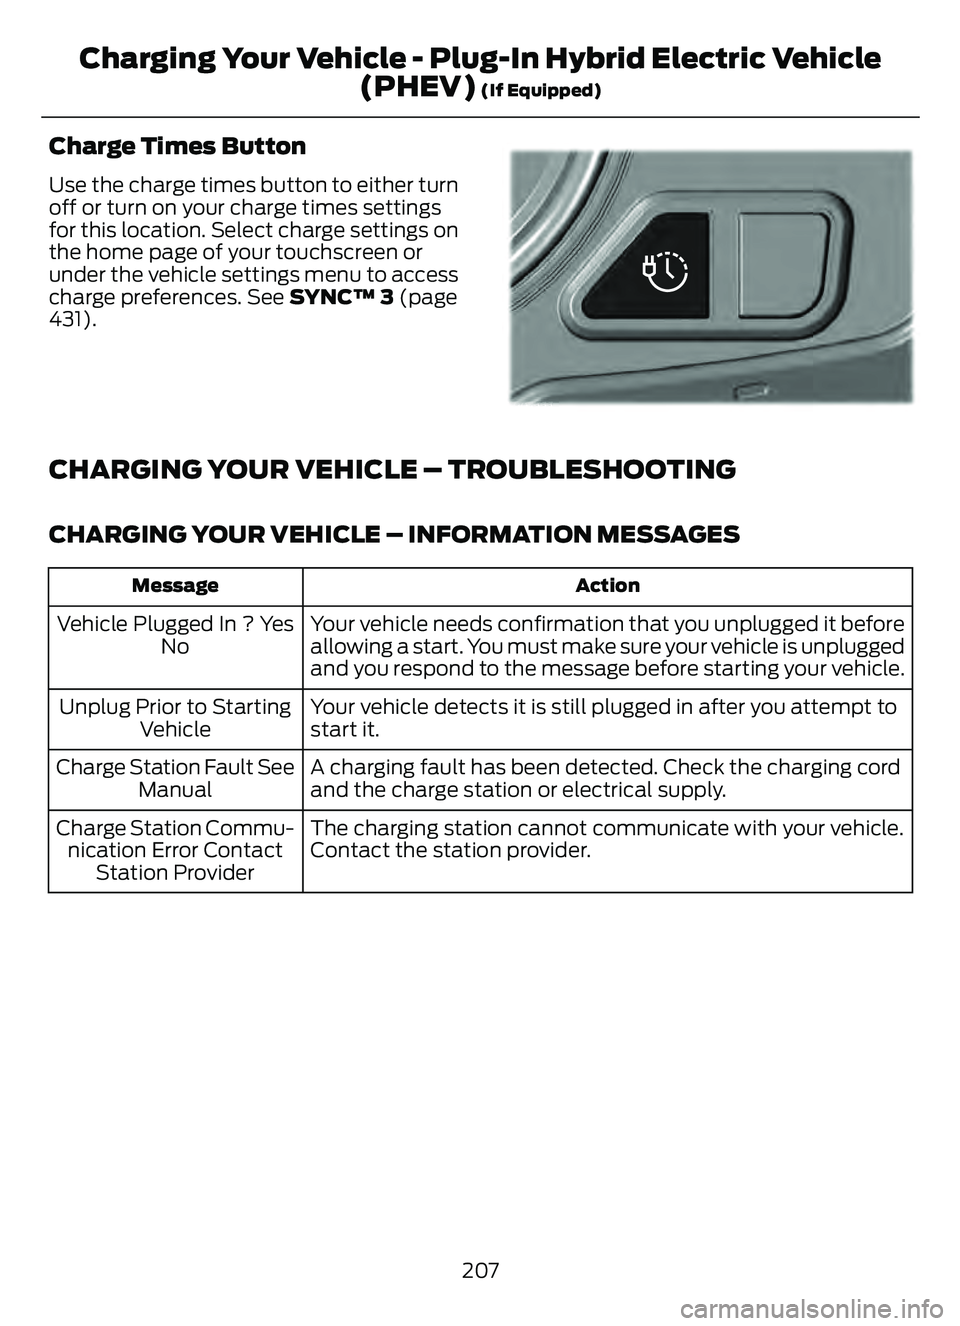
Charge Times Button
Use the charge times button to either turn
off or turn on your charge times settings
for this location. Select charge settings on
the home page of your touchscreen or
under the vehicle settings menu to access
charge preferences. See SYNC™ 3 (page
431).
E301E301E301E301E301E301E301001301E301E3013E111111111111111111111111111111
CHARGING YOUR VEHICLE – TROUBLESHOOTING
CHARGING YOUR VEHICLE – INFORMATION MESSAGES
Action
Message
Your vehicle needs confirmation that you unplugged it before
allowing a start. You must make sure your vehicle is unplugged
and you respond to the message before starting your vehicle.
Vehicle Plugged In ? Yes
No
Your vehicle detects it is still plugged in after you attempt to
start it.
Unplug Prior to Starting
Vehicle
A charging fault has been detected. Check the charging cord
and the charge station or electrical supply.
Charge Station Fault See
Manual
The charging station cannot communicate with your vehicle.
Contact the station provider.
Charge Station Commu-
nication Error Contact Station Provider
207
Charging Your Vehicle - Plug-In Hybrid Electric Vehicle(PHEV)
(If Equipped)
Page 215 of 585
HOW DOES AUTOMATIC RETURN
TO PARK (P) WORK
Your vehicle shifts into park (P) when your
vehicle is stationary and any of the
following occur:
• You switch the vehicle off.
• You open the driver door with yourseatbelt unlatched.
• You unlatch the driver seatbelt when the driver door is open.
Note: Do not use automatic return to park
(P) when your vehicle is moving, except in
an emergency. See Stopping the Engine
When Your Vehicle is Moving (page 175).
AUTOMATIC RETURN TO PARK
(P) LIMITATIONS
Automatic return to park may not work if
the door ajar switch is malfunctioning.
See an authorized dealer if any of the
following occur:
• Door ajar indicator does not illuminate with the driver door open.
• Door ajar indicator illuminates with the driver door closed.
• Transmission not in park message appears with the driver door closed,
after you shift out of park (P).
GRADE ASSIST - HYBRID
ELECTRIC VEHICLE (HEV)
WHAT IS GRADE ASSIST
Provides additional grade braking with a
combination of engine motoring and
high-voltage battery charging to help
maintain vehicle speed when descending
a grade.
SWITCHING GRADE ASSIST ON
AND OFF
1. Press Settings on the touchscreen.
2. Select Driver Assistance Settings .
3. Select Grade Assist.
The grade assist lamp appears in the
instrument cluster.
Your vehicle determines the amount of
engine motoring and high-voltage battery
charging. You could notice the engine
speed increasing and decreasing to help
maintain your vehicle speed when
descending a slope.
GRADE ASSIST INDICATORS
E345122E345122
MANUAL PARK RELEASE -
GASOLINE
WHAT IS MANUAL PARK RELEASE
Manual park release is used to move your
transmission from the park (P) position in
the event of an electrical malfunction or
emergency.
MANUAL PARK RELEASE
PRECAUTIONS
WARNING: When doing this
procedure, you need to take the
transmission out of park (P) which
means your vehicle can roll freely. To
avoid unwanted vehicle movement,
always fully apply the parking brake prior
to doing this procedure. Use wheel
chocks if appropriate.
212
Automatic Transmission
Page 216 of 585
WARNING: If the parking brake is
fully released, but the brake warning
lamp remains illuminated, the brakes
may not be working properly. Have your
vehicle checked as soon as possible.
WARNING: Do not drive your
vehicle until you verify that the
stoplamps are working.
USING MANUAL PARK RELEASE
Activating the Manual Park Release
Cable
1. Apply the parking brake. See What Is
the Electric Parking Brake (page 220).
Note: If the vehicle battery is dead, for
example, no electrical power is available,
you could use an external power source to
apply the parking brake.
E307867E307867
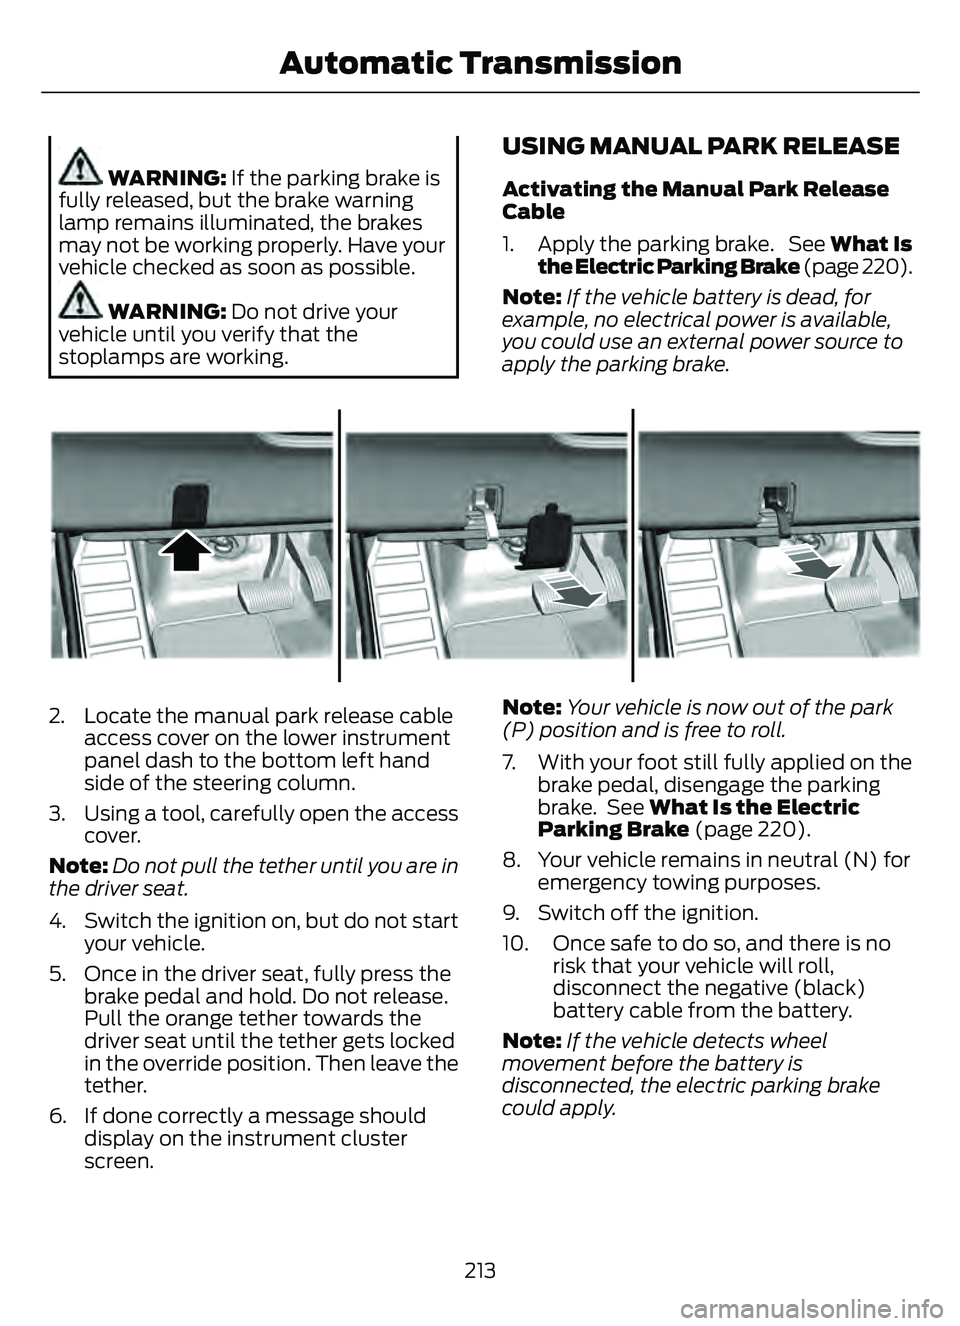
2. Locate the manual park release cable access cover on the lower instrument
panel dash to the bottom left hand
side of the steering column.
3. Using a tool, carefully open the access cover.
Note: Do not pull the tether until you are in
the driver seat.
4. Switch the ignition on, but do not start your vehicle.
5. Once in the driver seat, fully press the brake pedal and hold. Do not release.
Pull the orange tether towards the
driver seat until the tether gets locked
in the override position. Then leave the
tether.
6. If done correctly a message should display on the instrument cluster
screen. Note:
Your vehicle is now out of the park
(P) position and is free to roll.
7. With your foot still fully applied on the brake pedal, disengage the parking
brake. See What Is the Electric
Parking Brake (page 220).
8. Your vehicle remains in neutral (N) for emergency towing purposes.
9. Switch off the ignition.
10. Once safe to do so, and there is no risk that your vehicle will roll,
disconnect the negative (black)
battery cable from the battery.
Note: If the vehicle detects wheel
movement before the battery is
disconnected, the electric parking brake
could apply.
213
Automatic Transmission
Page 217 of 585
Returning Your Vehicle to Normal
Mode
1. Once it is safe to do so, reconnect thenegative (black) battery cable to the
battery.
2. Apply the parking brake. See What Is
the Electric Parking Brake (page 220).
Note: If the vehicle battery is dead, for
example, no electrical power is available,
you could use an external power source to
apply the parking brake.
3. Fully apply the brake pedal and hold. Do not release. Pull the orange tether
outward towards the driver seat to
release it from the override position.
4. The cable will release and retract back to its original rest position.
5. Stow the manual park release cable tether back inside the instrument panel
dash hole, install the access cover by
pressing it back in position.
6. With your foot fully applied on the brake pedal, start your vehicle. Confirm
that your vehicle is in the park (P)
position and that the instrument
cluster indicates park (P).
7. If the instrument cluster is not displaying the park (P) position or a
message displays on the instrument
cluster screen, make sure you apply the
parking brake before exiting your
vehicle. Contact an authorized dealer
for service.
AUTOMATIC TRANSMISSION
AUDIBLE WARNINGS
Transmission Not In Park (P)
Audible Warning
Sounds if you open the driver door before
shifting into park (P).
AUTOMATIC TRANSMISSION
– TROUBLESHOOTING
AUTOMATIC TRANSMISSION –
INFORMATION MESSAGES
Description
Message
The electric parking
brake is not fully applied.
Park Brake Not
Applied
A reminder to shiftinto park. In addi-
tion, this message is typically afterreconnecting or recharging the
battery until you
cycle the ignition to the on mode.
Transmission Not in
Park
Displays when
there is a system
fault and the park
brake needs to be depressed before
exiting the vehicle.
See your authorized dealer.
SHIFT SYS FAULT
Apply Park Brake
Before Exiting the Vehicle
The system has
detected a fault that requires
service. Have your
vehicle checked as soon as possible.
Transmission
Malfunction Service Now
214
Automatic Transmission
Page 299 of 585
CONNECTING A TRAILER
PRECAUTIONS
Do not tow a trailer until you drive your
vehicle at least 1,000 mi (1,600 km).
Consult your local motor vehicle laws for
towing a trailer.
See the instructions included with towing
accessories for the proper installation and
adjustment specifications.
Service your vehicle more frequently if you
tow a trailer. See Normal Scheduled
Maintenance (page 485).
If you use a rental trailer, follow the
instructions the rental agency gives you.
When attaching the trailer wiring connector
to your vehicle, only use a proper fitting
connector that works with the vehicle and
trailer functions.
Account for the trailer coupler weight as
part of your vehicle load when calculating
the total vehicle weight.
Do not exceed the load limits. See
Calculating the Load Limit (page 290).
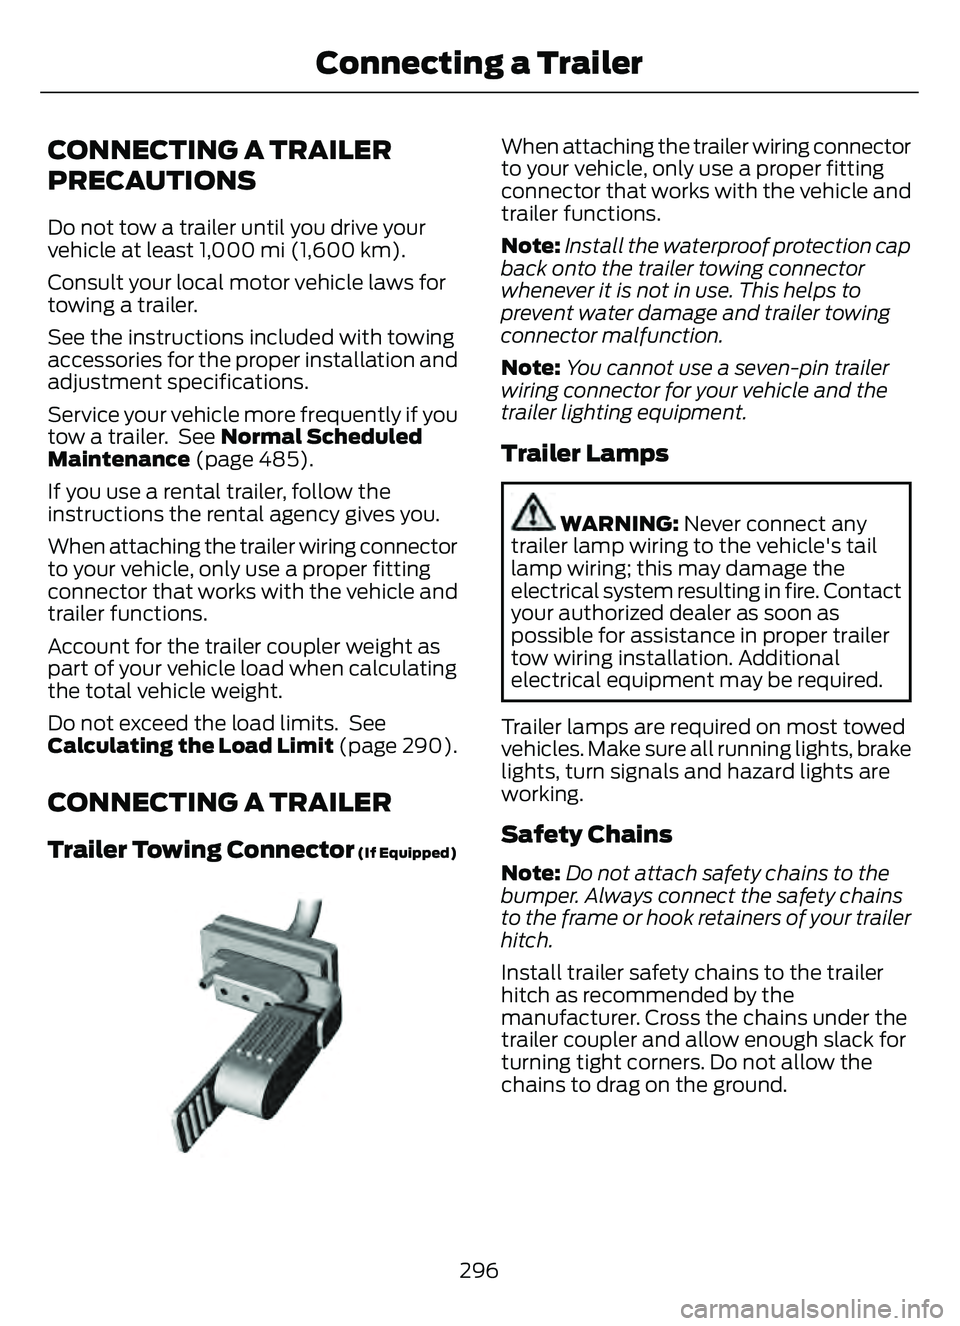
CONNECTING A TRAILER
Trailer Towing Connector (If Equipped)
E168683E168683
When attaching the trailer wiring connector
to your vehicle, only use a proper fitting
connector that works with the vehicle and
trailer functions.
Note:Install the waterproof protection cap
back onto the trailer towing connector
whenever it is not in use. This helps to
prevent water damage and trailer towing
connector malfunction.
Note: You cannot use a seven-pin trailer
wiring connector for your vehicle and the
trailer lighting equipment.
Trailer Lamps
WARNING: Never connect any
trailer lamp wiring to the vehicle's tail
lamp wiring; this may damage the
electrical system resulting in fire. Contact
your authorized dealer as soon as
possible for assistance in proper trailer
tow wiring installation. Additional
electrical equipment may be required.
Trailer lamps are required on most towed
vehicles. Make sure all running lights, brake
lights, turn signals and hazard lights are
working.
Safety Chains
Note:Do not attach safety chains to the
bumper. Always connect the safety chains
to the frame or hook retainers of your trailer
hitch.
Install trailer safety chains to the trailer
hitch as recommended by the
manufacturer. Cross the chains under the
trailer coupler and allow enough slack for
turning tight corners. Do not allow the
chains to drag on the ground.
296
Connecting a Trailer
Page 303 of 585
When towing a trailer:
• Obey country specific regulations fortowing a trailer.
• Do not drive faster than 70 mph (113 km/h) during the first 500 mi
(800 km).
• Do not make full-throttle starts.
• Check your hitch, electrical connections and trailer wheel lug nuts thoroughly
after you have traveled 50 mi (80 km).
• When stopped in congested or heavy traffic during hot weather, place the
transmission in park (P) to aid engine
and transmission cooling and to help
A/C performance.
• Turn off the speed control with heavy loads or in hilly terrain. The speed
control may turn off when you are
towing on long, steep slopes.
• Shift to a lower gear when driving down a long or steep hill. Do not continuously
apply the brakes, as they may overheat
and become less effective.
• If your transmission has Grade Assist or Tow/Haul, use this feature when
towing. This provides engine braking
and helps eliminate excessive
transmission shifting for optimum fuel
economy and transmission cooling.
• Your vehicle has AdvanceTrac with roll stability control. When towing a trailer,
additional loads could cause the
AdvanceTrac system to engage during
cornering maneuvers. Reduce cornering
speeds to make sure that you can
maintain control of the vehicle and
trailer if the AdvanceTrac system
engages. • Allow more distance for stopping with
a trailer attached. Anticipate stops and
gradually brake.
• Avoid parking on a slope. However, if you must park on a slope, turn the
steering wheel to point your vehicle
tires away from traffic flow, set the
parking brake, place the transmission
in park (P) and place wheel chocks in
front and back of the trailer wheels.
Note: Chocks are not included with your
vehicle.
LAUNCHING OR RETRIEVING
A BOAT OR PERSONAL
WATERCRAFT
When backing down a ramp during boat
launching or retrieval:
• Do not allow the static water level to rise above the bottom edge of the rear
bumper.
• Do not allow waves to break higher than 6 in (15 cm) above the bottom
edge of the rear bumper.
Exceeding 6 in (15 cm) could allow water
to enter vehicle components, causing
internal damage to the components and
affecting driveability, emissions and
reliability.
Note: Replace the rear axle lubricant
anytime the rear axle has been submerged
in water.
Note: Disconnect the trailer wiring
connector before backing the trailer into the
water.
Note: Reconnect the trailer wiring
connector after removing the trailer from
the water.
300
Towing a Trailer
Page 312 of 585
Vehicles Sold in Canada: Getting
Roadside Assistance
To fully assist you should you have a
vehicle concern, Ford Motor Company of
Canada, Limited offers a complimentary
roadside assistance program. This
program is eligible within Canada or the
continental United States.
The service is available 24 hours a day,
seven days a week.
This program is separate from the New
Vehicle Limited Warranty, but the coverage
is concurrent with the powertrain coverage
period of your vehicle. Canadian roadside
coverage and benefits may differ from the
U.S. coverage.
If you require more information, please call
us in Canada at 1-800-665-2006, or visit
our website at www
.ford.ca.
HIGH VOLTAGE BATTERY
VEHICLE PRECAUTIONS -
HYBRID ELECTRIC VEHICLE
(HEV)
In the event of damage or fire involving an
electric vehicle or hybrid-electric vehicle:
• Assume the high-voltage battery and
associated components are energized
and fully charged.
• Exposed electrical components, wires and high-voltage batteries present
potential high-voltage shock hazards.
• Venting high-voltage battery vapors are potentially toxic and flammable.
• Physical damage to the vehicle or high-voltage battery could result in
immediate or delayed release of toxic,
flammable gases and fire. Vehicle information and general safety
practices include reviewing the owner's
manual and becoming familiar with your
vehicle's safety information and
recommended safety practices.
Crashes
A crash or impact significant enough to
require an emergency response for
conventional vehicles would also require
the same response for an electric or
hybrid-electric vehicle.
If Possible:
1. Move your vehicle to a safe, nearby
location and remain on the scene.
2. Roll down the windows before you switch your vehicle off.
3. Place your vehicle in park (P), set the parking brake, switch off the vehicle,
activate the hazard flashers and move
your key(s) at least 16 ft (5 m) away
from the vehicle.
Always:
• Call emergency assistance if needed and advise that an electric or
hybrid-electric vehicle is involved.
• Avoid contact with leaking fluids and gases, and remain out of the way of
oncoming traffic until emergency
responders arrive.
• When emergency responders arrive, tell them that the vehicle involved is an
electric vehicle or hybrid-electric
vehicle.
Fires
As with any vehicle, call emergency
assistance immediately if you see sparks,
smoke or flames coming from the vehicle.
Remain a safe distance from the vehicle
and try to stay clear of the smoke.
309
Crash and Breakdown Information
Page 314 of 585
WARNING: If the engine is running
while the hood is open, stay clear of
moving engine components. Failure to
follow this warning could result in serious
personal injury or death.
Do not attempt to push-start an automatic
transmission vehicle. This could cause
transmission damage.
Do not disconnect the battery of the
disabled vehicle. This could damage your
vehicle's electrical system.
PREPARING THE VEHICLE
Use only a 12 volt supply to start your
vehicle.
Park the booster vehicle close to the hood
of the disabled vehicle, making sure the
two vehicles do not touch.
JUMP STARTING THE VEHICLE -
EXCLUDING: PLUG-IN HYBRID
ELECTRIC VEHICLE (PHEV)
Connecting the Jumper Cables
WARNING: Do not connect the
negative jumper cable to any other part
of your vehicle. Use the ground point.
Note: If you are using a jump pack or
booster box, follow the manufacturer's
instructions.
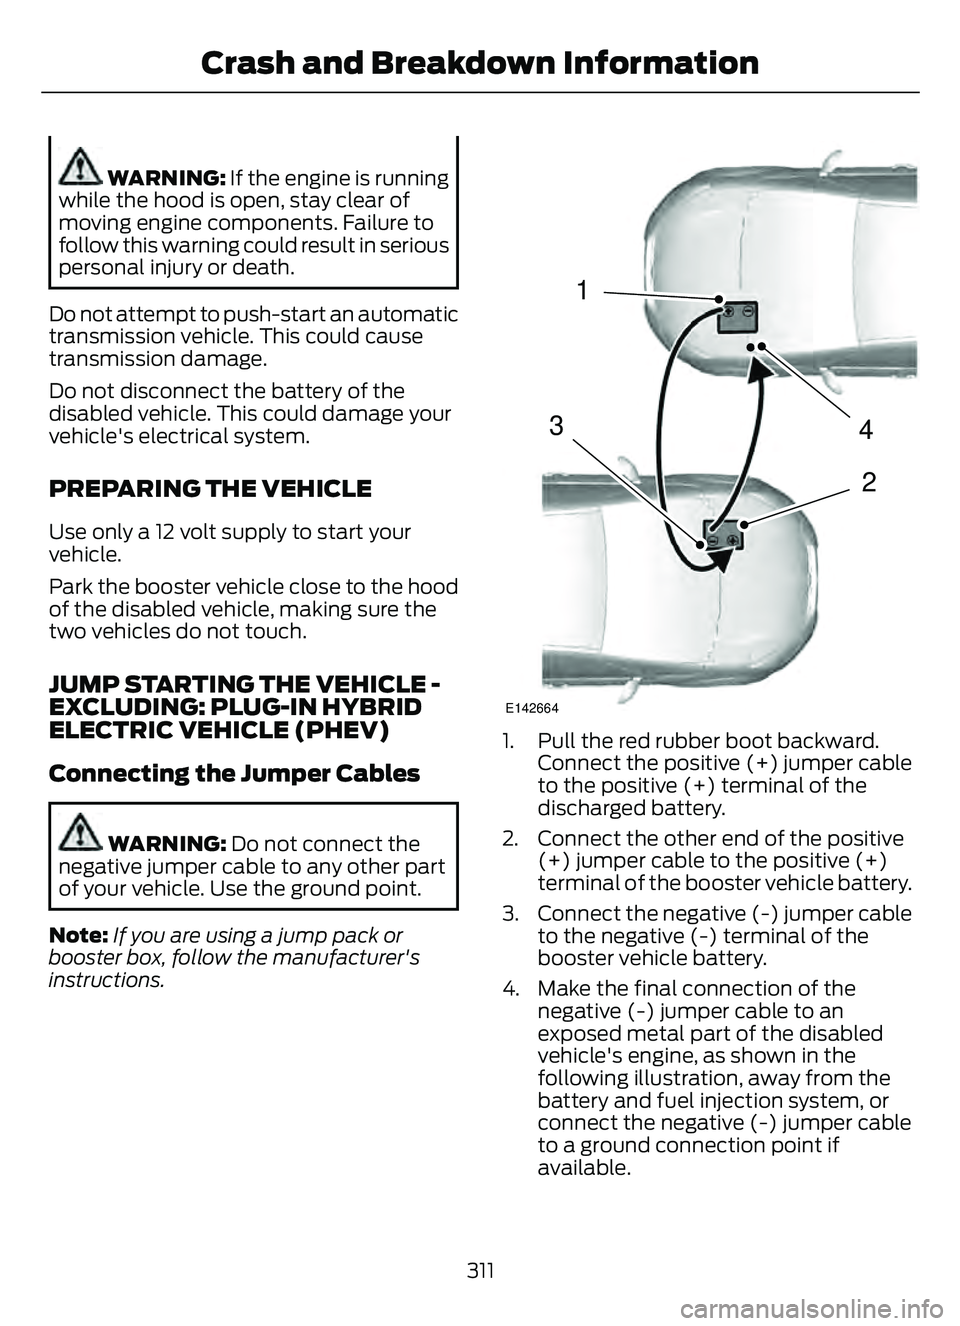
4
2
1
3
E142664
1. Pull the red rubber boot backward. Connect the positive (+) jumper cable
to the positive (+) terminal of the
discharged battery.
2. Connect the other end of the positive (+) jumper cable to the positive (+)
terminal of the booster vehicle battery.
3. Connect the negative (-) jumper cable to the negative (-) terminal of the
booster vehicle battery.
4. Make the final connection of the negative (-) jumper cable to an
exposed metal part of the disabled
vehicle's engine, as shown in the
following illustration, away from the
battery and fuel injection system, or
connect the negative (-) jumper cable
to a ground connection point if
available.
311
Crash and Breakdown Information