FORD EXPEDITION 1998 1.G Owners Manual
Manufacturer: FORD, Model Year: 1998, Model line: EXPEDITION, Model: FORD EXPEDITION 1998 1.GPages: 216, PDF Size: 1.51 MB
Page 131 of 216
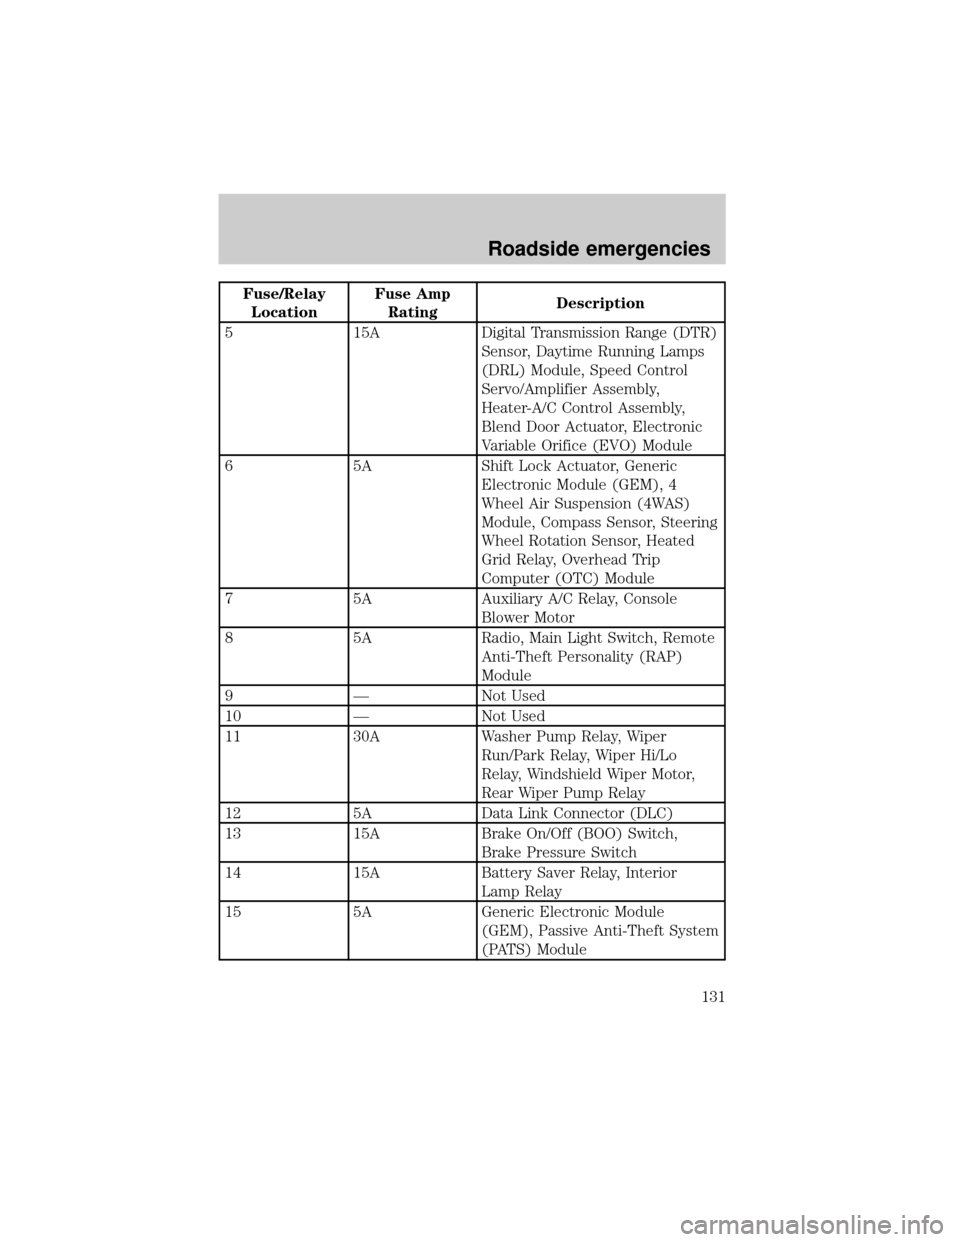
Fuse/Relay
LocationFuse Amp
RatingDescription
5 15A Digital Transmission Range (DTR)
Sensor, Daytime Running Lamps
(DRL) Module, Speed Control
Servo/Amplifier Assembly,
Heater-A/C Control Assembly,
Blend Door Actuator, Electronic
Variable Orifice (EVO) Module
6 5A Shift Lock Actuator, Generic
Electronic Module (GEM), 4
Wheel Air Suspension (4WAS)
Module, Compass Sensor, Steering
Wheel Rotation Sensor, Heated
Grid Relay, Overhead Trip
Computer (OTC) Module
7 5A Auxiliary A/C Relay, Console
Blower Motor
8 5A Radio, Main Light Switch, Remote
Anti-Theft Personality (RAP)
Module
9 Ð Not Used
10 Ð Not Used
11 30A Washer Pump Relay, Wiper
Run/Park Relay, Wiper Hi/Lo
Relay, Windshield Wiper Motor,
Rear Wiper Pump Relay
12 5A Data Link Connector (DLC)
13 15A Brake On/Off (BOO) Switch,
Brake Pressure Switch
14 15A Battery Saver Relay, Interior
Lamp Relay
15 5A Generic Electronic Module
(GEM), Passive Anti-Theft System
(PATS) Module
Roadside emergencies
131
Page 132 of 216
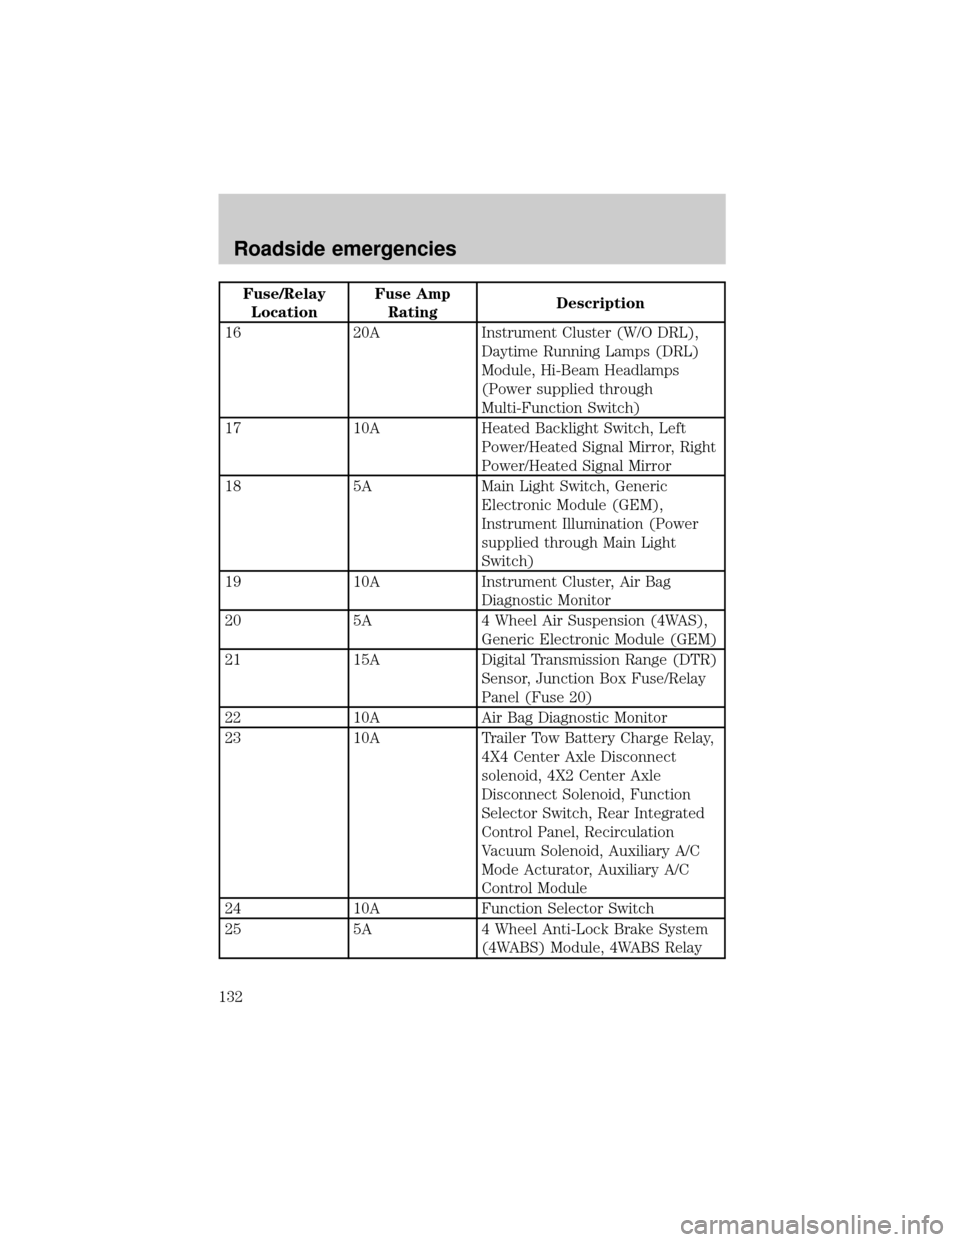
Fuse/Relay
LocationFuse Amp
RatingDescription
16 20A Instrument Cluster (W/O DRL),
Daytime Running Lamps (DRL)
Module, Hi-Beam Headlamps
(Power supplied through
Multi-Function Switch)
17 10A Heated Backlight Switch, Left
Power/Heated Signal Mirror, Right
Power/Heated Signal Mirror
18 5A Main Light Switch, Generic
Electronic Module (GEM),
Instrument Illumination (Power
supplied through Main Light
Switch)
19 10A Instrument Cluster, Air Bag
Diagnostic Monitor
20 5A 4 Wheel Air Suspension (4WAS),
Generic Electronic Module (GEM)
21 15A Digital Transmission Range (DTR)
Sensor, Junction Box Fuse/Relay
Panel (Fuse 20)
22 10A Air Bag Diagnostic Monitor
23 10A Trailer Tow Battery Charge Relay,
4X4 Center Axle Disconnect
solenoid, 4X2 Center Axle
Disconnect Solenoid, Function
Selector Switch, Rear Integrated
Control Panel, Recirculation
Vacuum Solenoid, Auxiliary A/C
Mode Acturator, Auxiliary A/C
Control Module
24 10A Function Selector Switch
25 5A 4 Wheel Anti-Lock Brake System
(4WABS) Module, 4WABS Relay
Roadside emergencies
132
Page 133 of 216
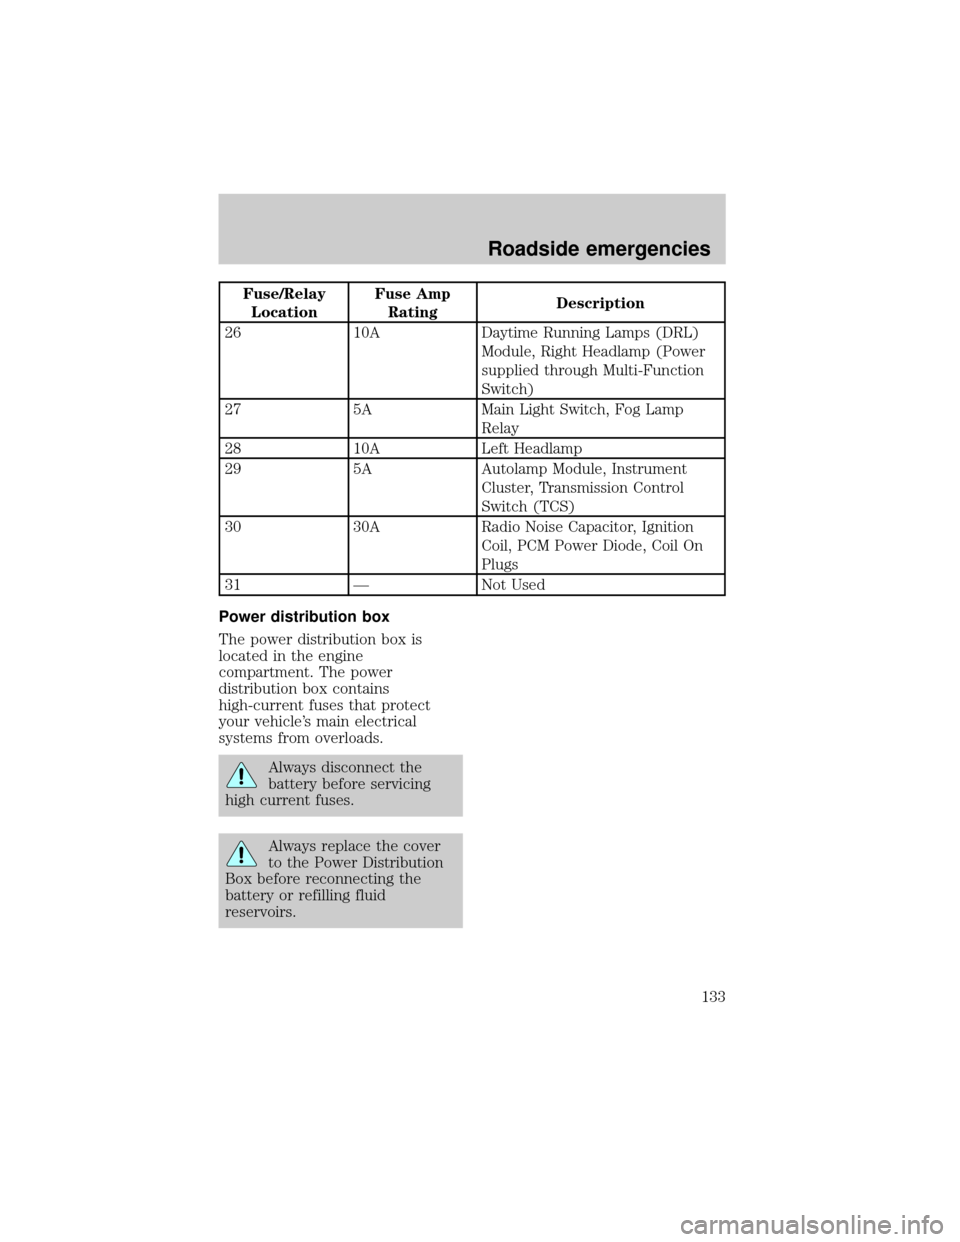
Fuse/Relay
LocationFuse Amp
RatingDescription
26 10A Daytime Running Lamps (DRL)
Module, Right Headlamp (Power
supplied through Multi-Function
Switch)
27 5A Main Light Switch, Fog Lamp
Relay
28 10A Left Headlamp
29 5A Autolamp Module, Instrument
Cluster, Transmission Control
Switch (TCS)
30 30A Radio Noise Capacitor, Ignition
Coil, PCM Power Diode, Coil On
Plugs
31 Ð Not Used
Power distribution box
The power distribution box is
located in the engine
compartment. The power
distribution box contains
high-current fuses that protect
your vehicle's main electrical
systems from overloads.
Always disconnect the
battery before servicing
high current fuses.
Always replace the cover
to the Power Distribution
Box before reconnecting the
battery or refilling fluid
reservoirs.
Roadside emergencies
133
Page 134 of 216
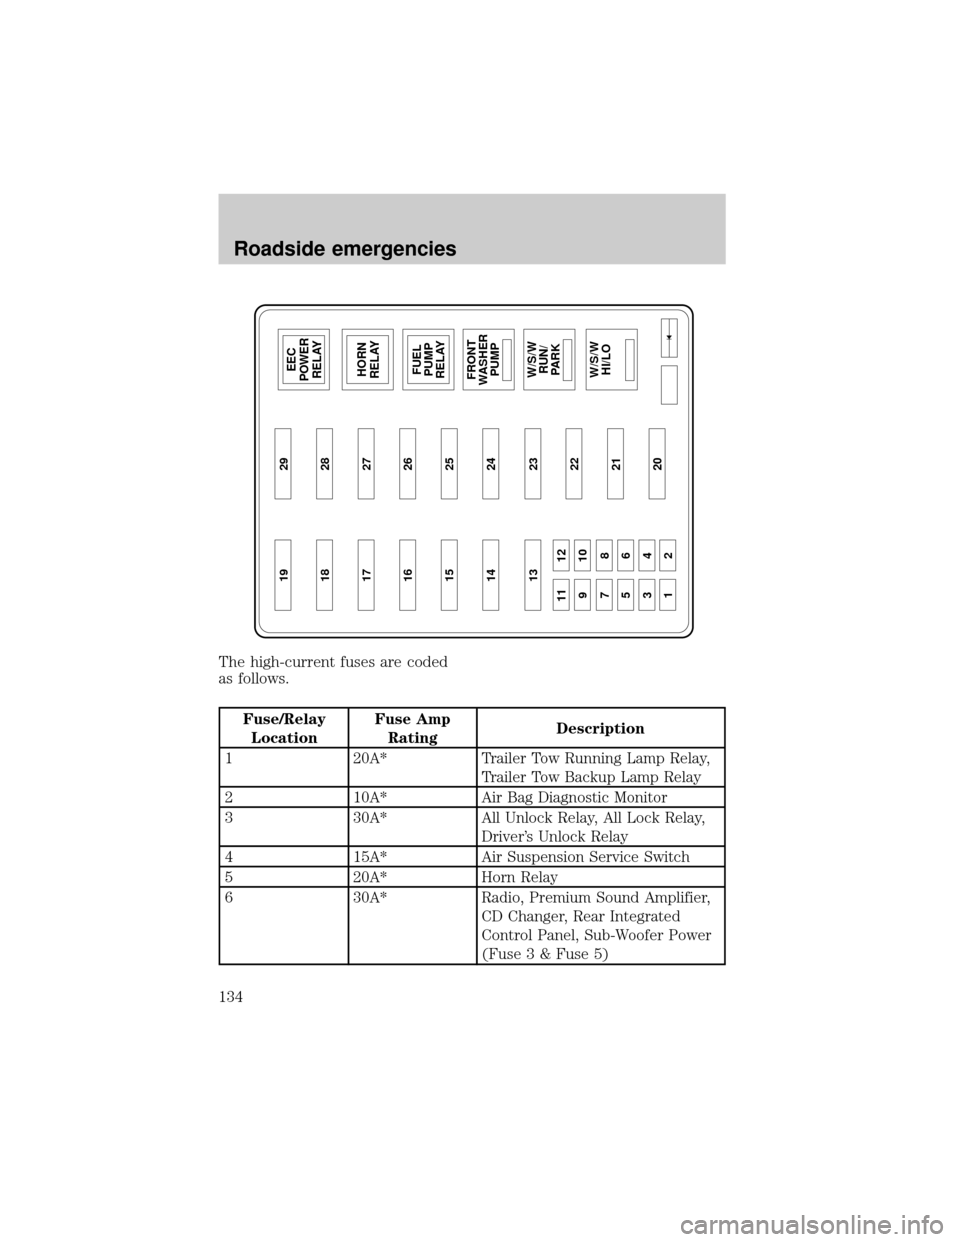
The high-current fuses are coded
as follows.
Fuse/Relay
LocationFuse Amp
RatingDescription
1 20A* Trailer Tow Running Lamp Relay,
Trailer Tow Backup Lamp Relay
2 10A* Air Bag Diagnostic Monitor
3 30A* All Unlock Relay, All Lock Relay,
Driver's Unlock Relay
4 15A* Air Suspension Service Switch
5 20A* Horn Relay
6 30A* Radio, Premium Sound Amplifier,
CD Changer, Rear Integrated
Control Panel, Sub-Woofer Power
(Fuse 3 & Fuse 5)
19 29
18 28EEC
POWER
RELAY
FUEL
PUMP
RELAY
FRONT
WASHER
PUMP HORN
RELAY 17 27
16 26
15 25
14 24
13
11 12
910
78
56
34
1223
22
21
20
W/S/W
RUN/
PARKW/S/W
HI/LO
Roadside emergencies
134
Page 135 of 216
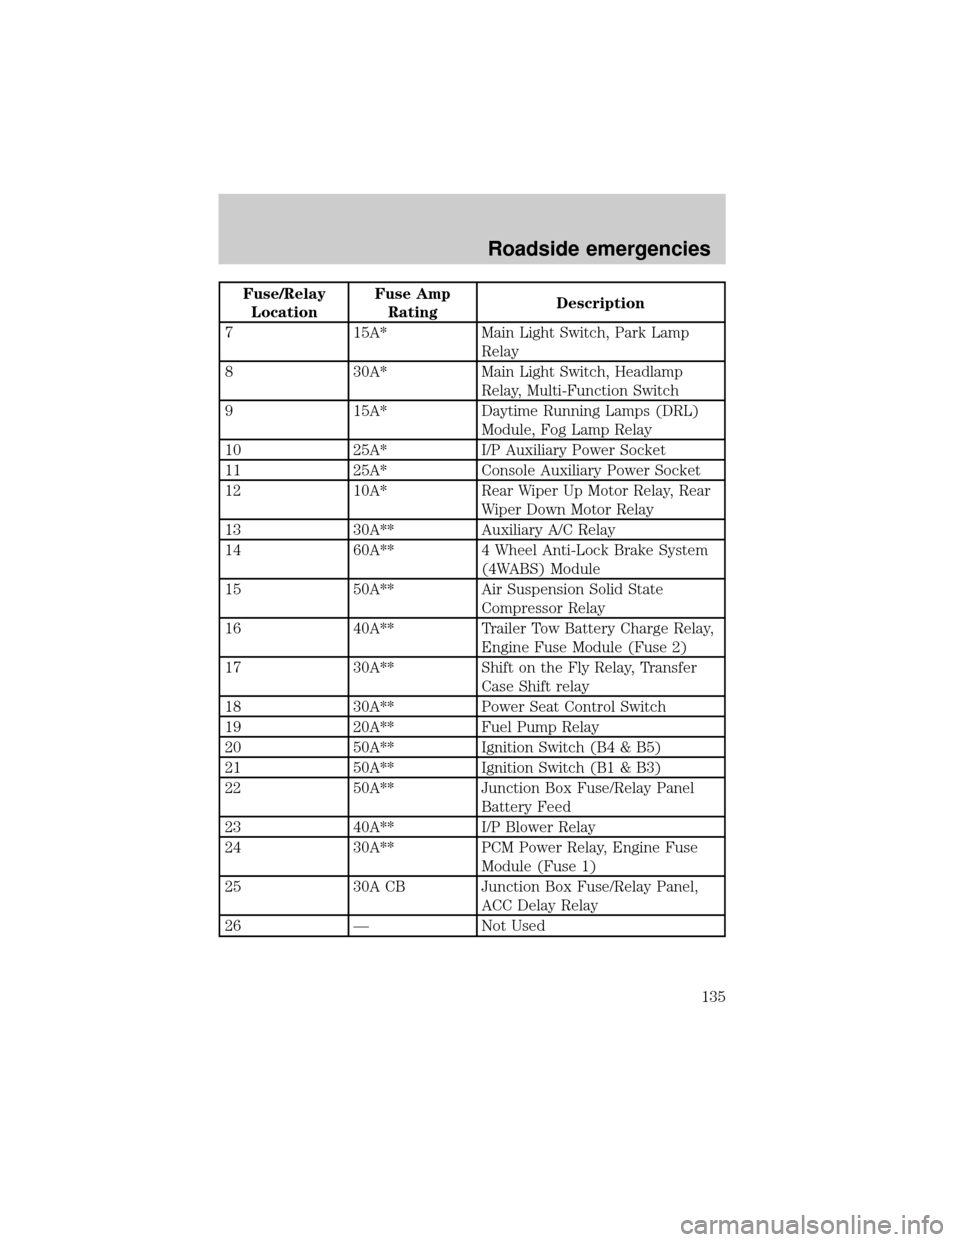
Fuse/Relay
LocationFuse Amp
RatingDescription
7 15A* Main Light Switch, Park Lamp
Relay
8 30A* Main Light Switch, Headlamp
Relay, Multi-Function Switch
9 15A* Daytime Running Lamps (DRL)
Module, Fog Lamp Relay
10 25A* I/P Auxiliary Power Socket
11 25A* Console Auxiliary Power Socket
12 10A* Rear Wiper Up Motor Relay, Rear
Wiper Down Motor Relay
13 30A** Auxiliary A/C Relay
14 60A** 4 Wheel Anti-Lock Brake System
(4WABS) Module
15 50A** Air Suspension Solid State
Compressor Relay
16 40A** Trailer Tow Battery Charge Relay,
Engine Fuse Module (Fuse 2)
17 30A** Shift on the Fly Relay, Transfer
Case Shift relay
18 30A** Power Seat Control Switch
19 20A** Fuel Pump Relay
20 50A** Ignition Switch (B4 & B5)
21 50A** Ignition Switch (B1 & B3)
22 50A** Junction Box Fuse/Relay Panel
Battery Feed
23 40A** I/P Blower Relay
24 30A** PCM Power Relay, Engine Fuse
Module (Fuse 1)
25 30A CB Junction Box Fuse/Relay Panel,
ACC Delay Relay
26 Ð Not Used
Roadside emergencies
135
Page 136 of 216
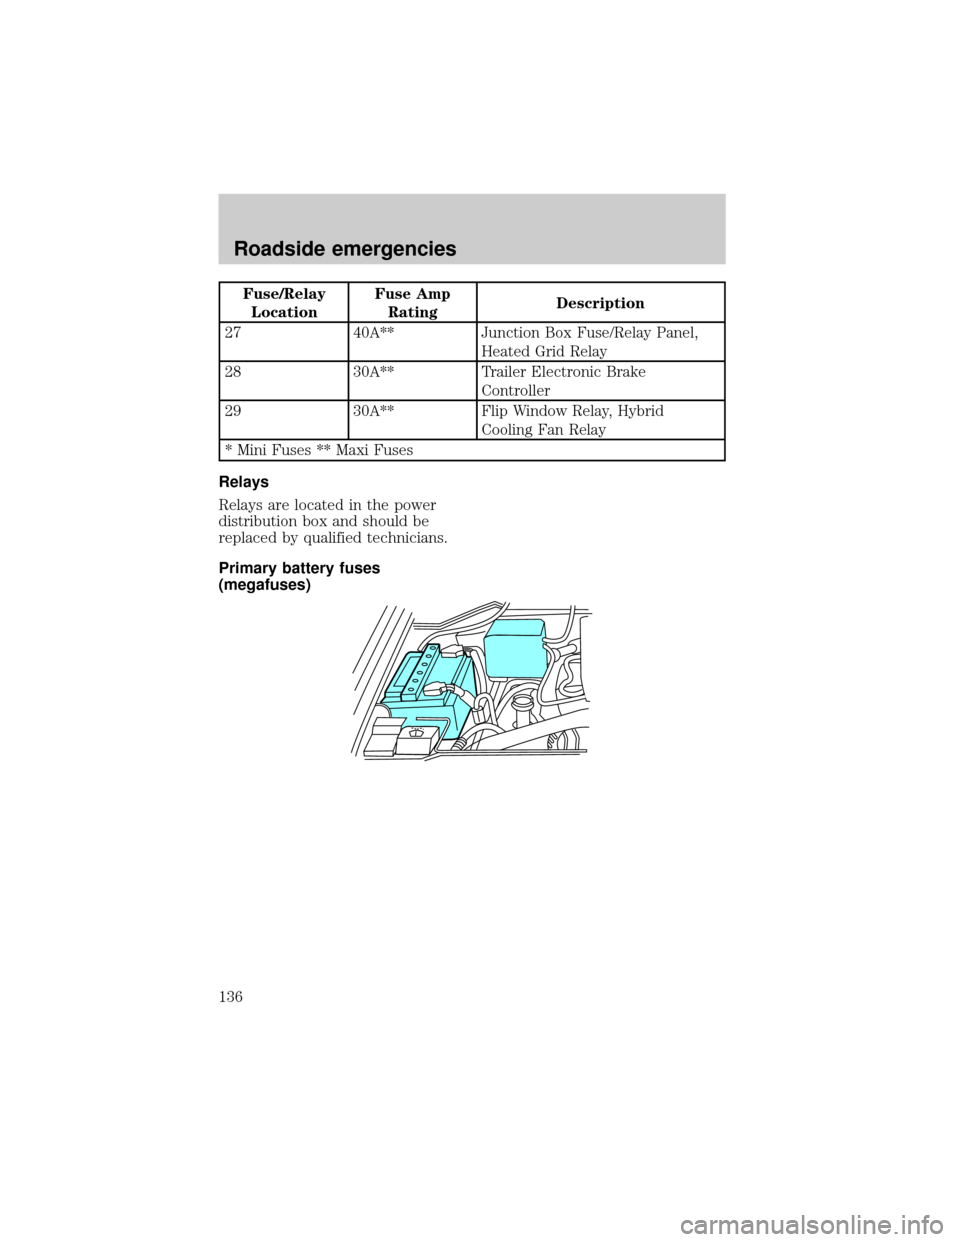
Fuse/Relay
LocationFuse Amp
RatingDescription
27 40A** Junction Box Fuse/Relay Panel,
Heated Grid Relay
28 30A** Trailer Electronic Brake
Controller
29 30A** Flip Window Relay, Hybrid
Cooling Fan Relay
* Mini Fuses ** Maxi Fuses
Relays
Relays are located in the power
distribution box and should be
replaced by qualified technicians.
Primary battery fuses
(megafuses)
Roadside emergencies
136
Page 137 of 216
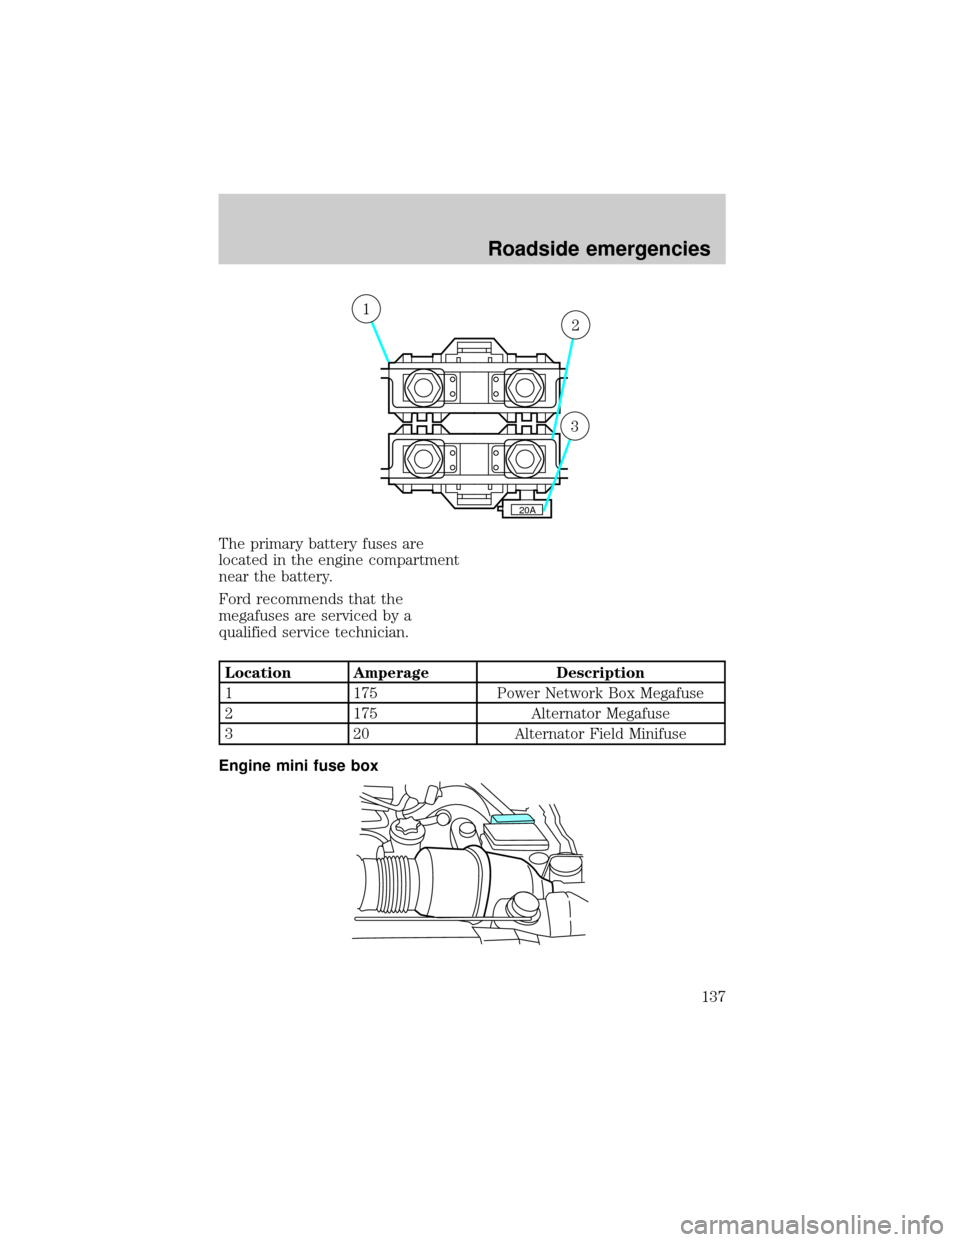
The primary battery fuses are
located in the engine compartment
near the battery.
Ford recommends that the
megafuses are serviced by a
qualified service technician.
Location Amperage Description
1 175 Power Network Box Megafuse
2 175 Alternator Megafuse
3 20 Alternator Field Minifuse
Engine mini fuse box
20A
1
2
3
Roadside emergencies
137
Page 138 of 216
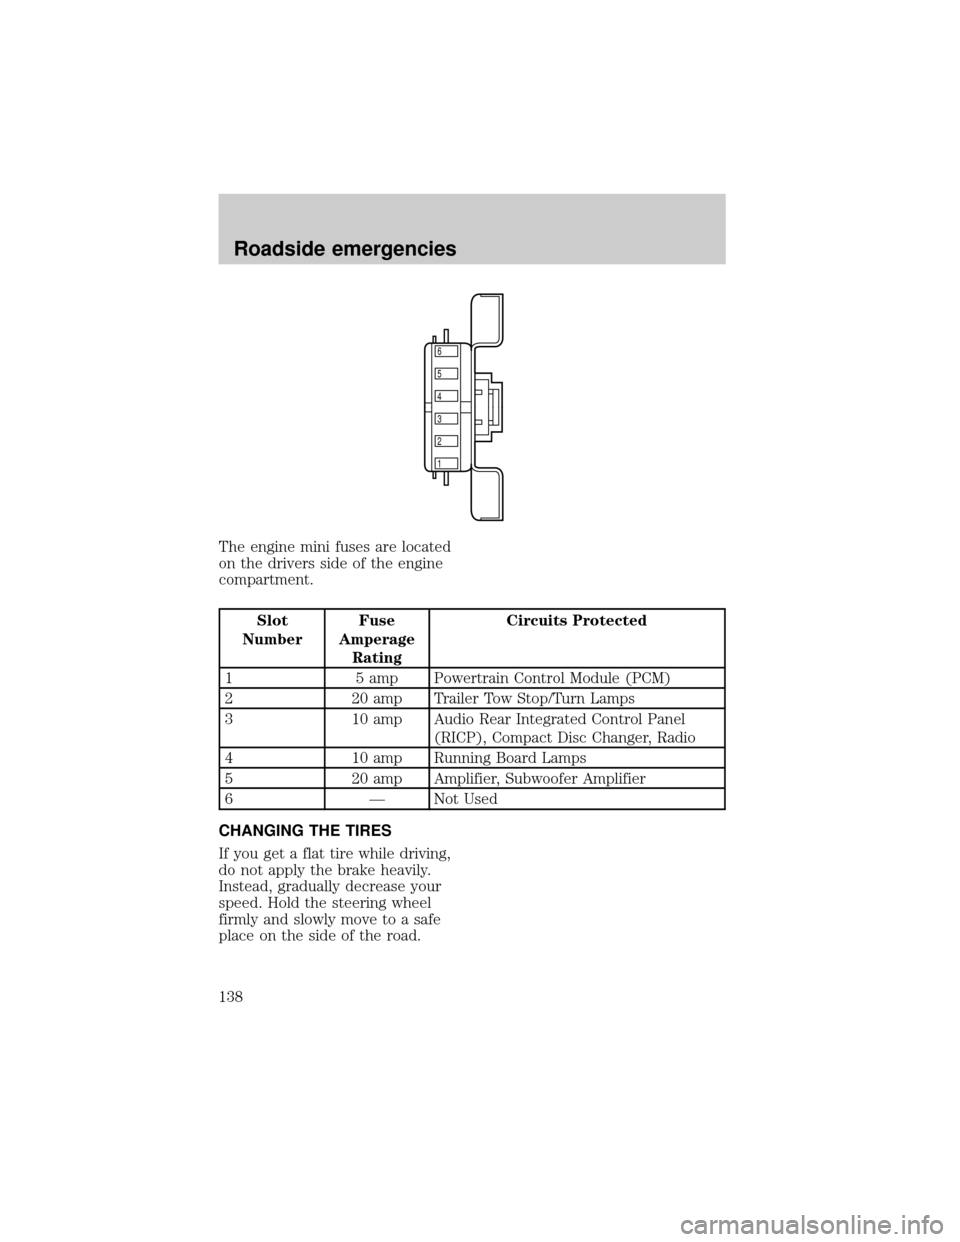
The engine mini fuses are located
on the drivers side of the engine
compartment.
Slot
NumberFuse
Amperage
RatingCircuits Protected
1 5 amp Powertrain Control Module (PCM)
2 20 amp Trailer Tow Stop/Turn Lamps
3 10 amp Audio Rear Integrated Control Panel
(RICP), Compact Disc Changer, Radio
4 10 amp Running Board Lamps
5 20 amp Amplifier, Subwoofer Amplifier
6 Ð Not Used
CHANGING THE TIRES
If you get a flat tire while driving,
do not apply the brake heavily.
Instead, gradually decrease your
speed. Hold the steering wheel
firmly and slowly move to a safe
place on the side of the road.
6
5
4
3
2
1
Roadside emergencies
138
Page 139 of 216
Spare tire information
Your vehicle is equipped with a
spare tire that may be used as a
spare or a regular tire. The spare
is identical to the other tires on
your vehicle, although the wheel
cover may not match.
Location of the spare tire and
tools
The spare tire and tools for your
vehicle are stowed in the following
locations:
Item Location
Spare tire Under the vehicle, just forward of
the rear bumper
Jack, wheel nut wrench,
instructions, work glovesBehind the access panel located
on the right rear quarter panel
interior trim
Jack handle On top of the radiator support at
the front of the engine
compartment
Removing the jack handle
1. Open the hood.
2. Un-snap the end of the handle
that is retained by the clip on the
top of the windshield washer
bottle.
3. Un-snap the shaft of the handle
from the two retaining clips
attached to the top of the radiator
shroud.
Roadside emergencies
139
Page 140 of 216
Removing the jack and tools
1. Locate the access panel on the
interior trim. Lift and rotate the
two panel retaining clips and
remove the panel.
2. Un-snap the wheel lug nut
wrench, instructions and work
gloves from their retaining bracket.
3. Remove the jack by turning the
thumbwheel counterclockwise to
relieve tension against the stowage
bracket.
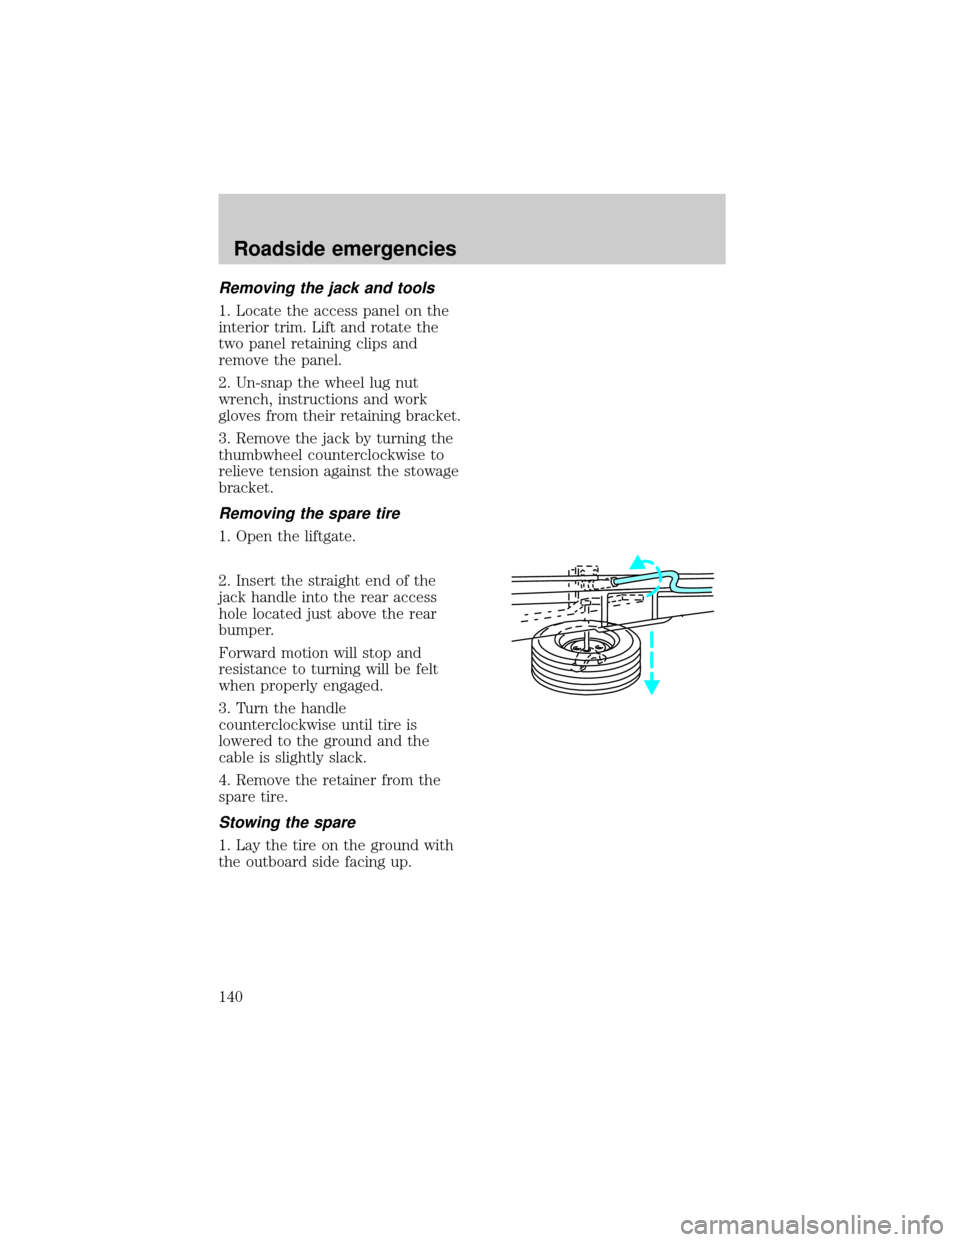
Removing the spare tire
1. Open the liftgate.
2. Insert the straight end of the
jack handle into the rear access
hole located just above the rear
bumper.
Forward motion will stop and
resistance to turning will be felt
when properly engaged.
3. Turn the handle
counterclockwise until tire is
lowered to the ground and the
cable is slightly slack.
4. Remove the retainer from the
spare tire.
Stowing the spare
1. Lay the tire on the ground with
the outboard side facing up.
Roadside emergencies
140