FORD EXPEDITION EL 2009 Owners Manual
Manufacturer: FORD, Model Year: 2009, Model line: EXPEDITION EL, Model: FORD EXPEDITION EL 2009Pages: 415, PDF Size: 5.4 MB
Page 361 of 415
LEATHER SEATS FOR THE KING RANCH EXPEDITION ONLY
(IF EQUIPPED)
Your vehicle is equipped with seating covered in premium, top-grain
leather which is extremely durable, but still requires special care and
maintenance in order to ensure longevity and comfort.
Regular cleaning and conditioning will maintain the appearance of the
leather. Failure to care for the leather can result in drying out and fading
of the material.
Note: In some instances, color or dye transfer can occur when wet
clothing comes in contact with leather upholstery. If this occurs, the
leather should be cleaned immediately to avoid permanent staining.
Cleaning
For dirt, use a vacuum cleaner then use a clean, damp cloth or soft
brush.
For routine cleaning, wipe the surface with a soft, damp cloth. For more
thorough cleaning, wipe the surface with a mild soap. If the leather
cannot be completely cleaned using a mild soap and water solution, the
leather may be cleaned using a commercially available cleaning product
“Tanners Preserve Leather Cleaner” and a 3M “Type T” scrubbing pad.
• Clean spills as quickly as possible.
• Test any cleaner or stain remover on an inconspicuous part of the
leather as cleaners may darken the leather. For more specific cleaning
information, contact the King Ranch Saddle Shop at 1–800–282–KING
(5464).
• Do not spill coffee, ketchup, mustard, orange juice or oil-based
products on the leather as they may permanently stain the leather.
• Do not use household cleaning products, alcohol solutions, solvents or
cleaners intended for rubber, vinyl or plastics.
Scratches
Natural Markings - Because the leather in the seat comes from genuine
steer hides, there will be evidence of naturally occurring markings, such
as small scars. These markings give character to the seating covers and
should be considered as proof of a genuine leather product.
In order to lessen the appearance of certain scratches and other wear
marks, apply conditioner on the affected area following the same
instructions as in the Conditioning section.
2009 Expedition (exd)
Owners Guide, 2nd Printing
USA (fus) Cleaning
361
Page 362 of 415
Conditioning
Bottles of King Ranch Leather Conditioner are available at the King
Ranch Saddle Shop. Visit the Web site at www.krsaddleshop.com ,or
telephone (in the United States) 1–800–282–KING (5464). If you are
unable to obtain King Ranch Leather Conditioner, use another premium
leather conditioner.
• Apply your first conditioning treatment within six months of taking
delivery of your vehicle. Condition twice yearly in order to replenish
lost oils and revitalize the aroma, suppleness and resilience of the
leather.
• Clean the surfaces using the steps outlined in the Cleaning section.
• Ensure the leather is dry then apply a nickel-sized amount of
conditioner to a clean, dry cloth
• Rub the conditioner into leather until it disappears. Allow the
conditioner to dry and repeat the process for the entire interior. If a
film appears, wipe off film with a dry, clean cloth.
UNDERBODY
Flush the complete underside of your vehicle frequently. Keep body and
door drain holes free from packed dirt.
FORD AND LINCOLN MERCURY CAR CARE PRODUCTS
Your Ford or Lincoln Mercury authorized dealer has many quality
products available to clean your vehicle and protect its finishes. These
quality products have been specifically engineered to fulfill your
automotive needs; they are custom designed to complement the style
and appearance of your vehicle. Each product is made from high quality
materials that meet or exceed rigid specifications. For best results, use
the following products or products of equivalent quality:
Motorcraft Bug and Tar Remover (ZC-42)
Motorcraft Car Wash (Canada only) (CXC-83)
Motorcraft Custom Bright Metal Cleaner (ZC-15)
Motorcraft Custom Clear Coat Polish (ZC-8-A)
Motorcraft Custom Vinyl Protectant (ZC-40-A)
Motorcraft Dash and Vinyl Cleaner (ZC-38-A)
Motorcraft Deluxe Leather and Vinyl Cleaner (U.S. only) (ZC-11-A)
Motorcraft Leather Care Kit (U.S. only) (ZC-11-D)
2009 Expedition (exd)
Owners Guide, 2nd Printing
USA (fus)Cleaning
362
Page 363 of 415
Motorcraft Detail Wash (ZC-3-A)
Motorcraft Dusting Cloth (ZC-24)
Motorcraft Engine Shampoo and Degreaser (U.S. only) (ZC-20)
Motorcraft Engine Shampoo (Canada only) (CXC-66-A)
Motorcraft Multi-Purpose Cleaner (Canada only) (CXC-101)
Motorcraft Premium Glass Cleaner (Canada only) (CXC-100)
Motorcraft Premium Liquid Wax (ZC-53-A)
Motorcraft Premium Windshield Washer Concentrate (U.S. only)
(ZC-32-A)
Motorcraft Professional Strength Carpet & Upholstery Cleaner (ZC-54)
Motorcraft Spot and Stain Remover (U.S. only) (ZC-14)
Motorcraft Tire Clean and Shine (ZC-28)
Motorcraft Triple Clean (U.S. only) (ZC-13)
Motorcraft Ultra-Clear Spray Glass Cleaner (ZC-23)
Motorcraft Vinyl Cleaner (Canada only) (CXC-93)
Motorcraft Wash and Wax (Canada only) (CXC-95)
Motorcraft Wheel and Tire Cleaner (ZC-37-A)
2009 Expedition (exd)
Owners Guide, 2nd Printing
USA (fus) Cleaning
363
Page 364 of 415
SERVICE RECOMMENDATIONS
To help you service your vehicle, we provide scheduled maintenance
information which makes tracking routine service easy.
If your vehicle requires professional service, your authorized dealer can
provide the necessary parts and service. Check your Warranty
Guide/Customer Information Guide to find out which parts and
services are covered.
Use only recommended fuels, lubricants, fluids and service parts
conforming to specifications. Motorcraft parts are designed and built to
provide the best performance in your vehicle.
PRECAUTIONS WHEN SERVICING YOUR VEHICLE
• Do not work on a hot engine.
• Make sure that nothing gets caught in moving parts.
• Do not work on a vehicle with the engine running in an enclosed
space, unless you are sure you have enough ventilation.
• Keep all open flames and other lit material away from the battery and
all fuel related parts.
WARNING: Turn off the power running boards, if equipped,
before working under the vehicle, jacking or placing any object
under the vehicle. Never place your hand between the extended
running board and the vehicle. A moving running board may cause
injury.
Working with the engine off
1. Set the parking brake and ensure the gearshift is securely latched in P
(Park).
2. Turn off the engine and remove the key.
3. Block the wheels to prevent the vehicle from moving unexpectedly.
2009 Expedition (exd)
Owners Guide, 2nd Printing
USA (fus)Maintenance and Specifications
364
Page 365 of 415
Working with the engine on
1. Set the parking brake and shift to P (Park).
2. Block the wheels.
WARNING: To reduce the risk of vehicle damage and/or
personal burn injuries, do not start your engine with the air
cleaner removed and do not remove it while the engine is running.
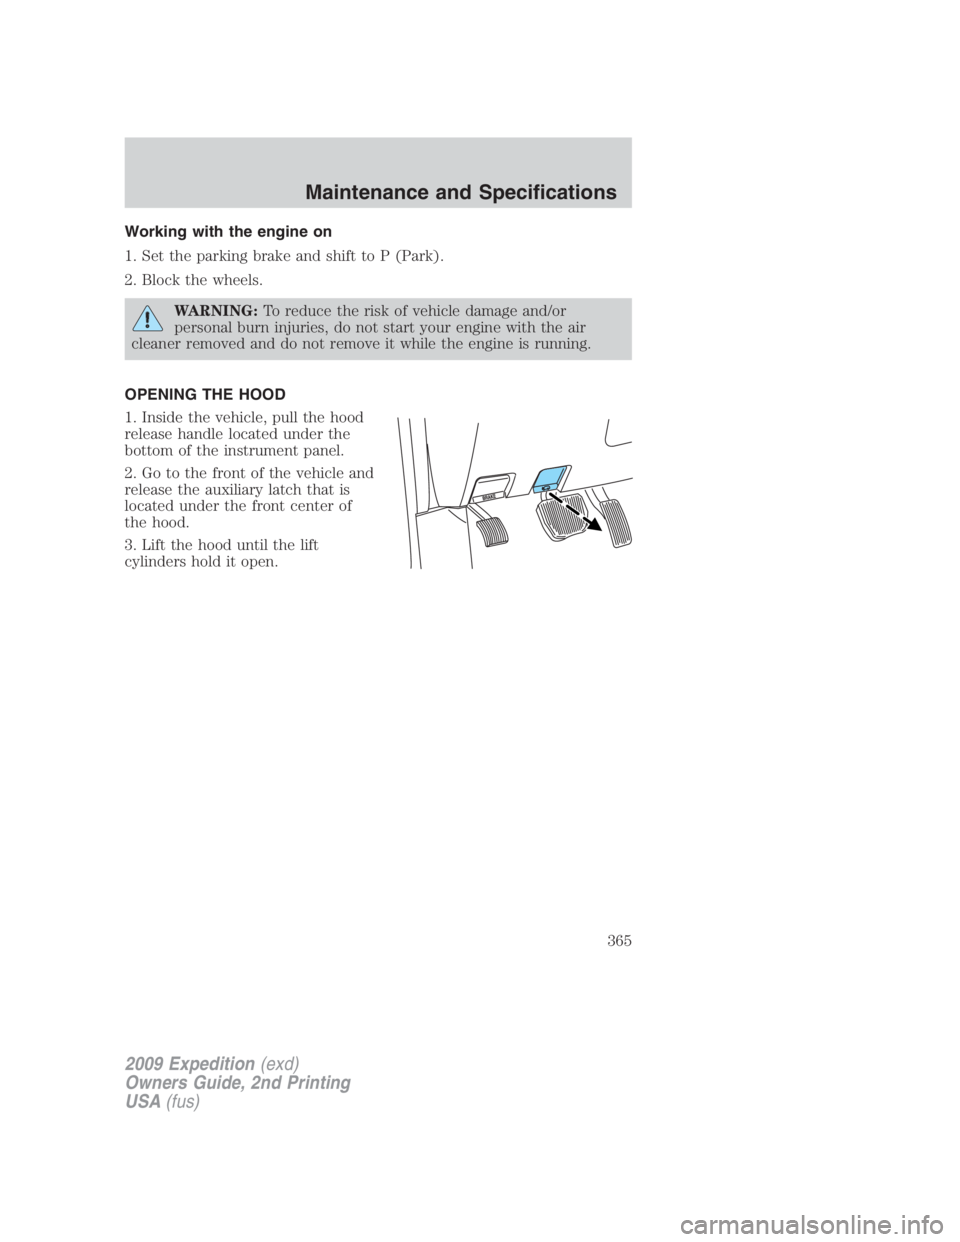
OPENING THE HOOD
1. Inside the vehicle, pull the hood
release handle located under the
bottom of the instrument panel.
2. Go to the front of the vehicle and
release the auxiliary latch that is
located under the front center of
the hood.
3. Lift the hood until the lift
cylinders hold it open.
2009 Expedition (exd)
Owners Guide, 2nd Printing
USA (fus) Maintenance and Specifications
365
Page 366 of 415
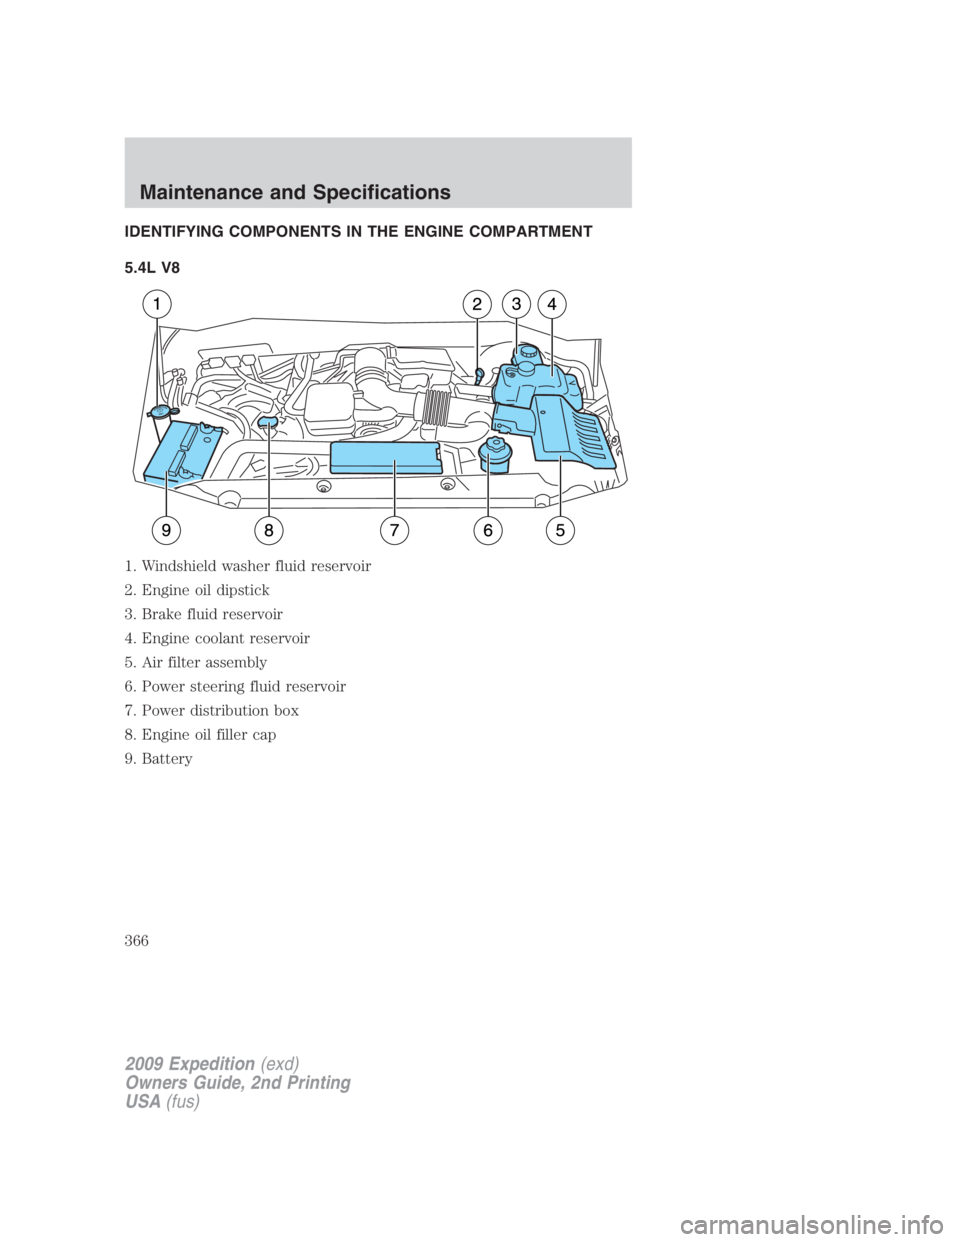
IDENTIFYING COMPONENTS IN THE ENGINE COMPARTMENT
5.4L V8
1. Windshield washer fluid reservoir
2. Engine oil dipstick
3. Brake fluid reservoir
4. Engine coolant reservoir
5. Air filter assembly
6. Power steering fluid reservoir
7. Power distribution box
8. Engine oil filler cap
9. Battery
2009 Expedition (exd)
Owners Guide, 2nd Printing
USA (fus)Maintenance and Specifications
366
Page 367 of 415
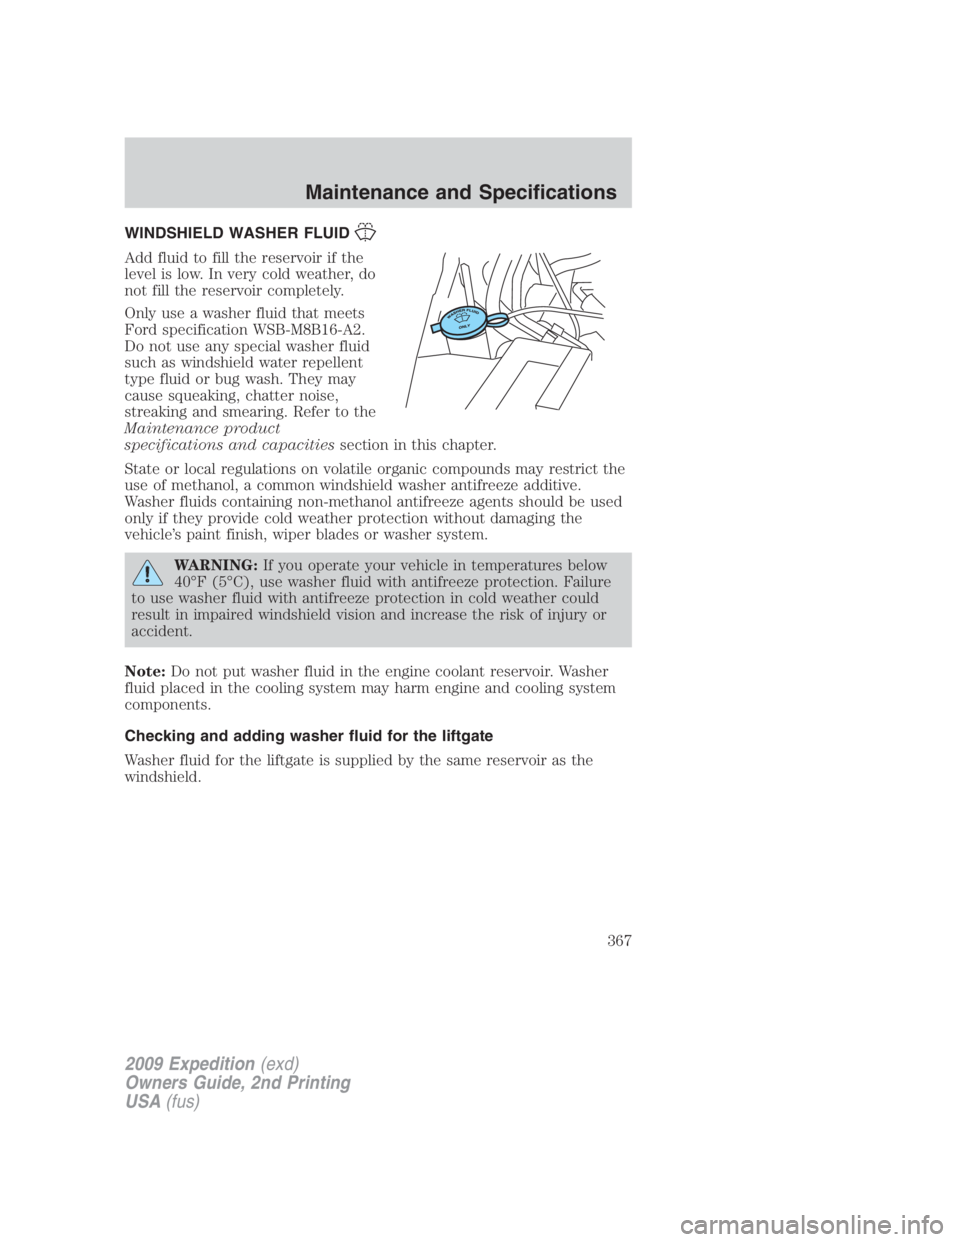
WINDSHIELD WASHER FLUID
Add fluid to fill the reservoir if the
level is low. In very cold weather, do
not fill the reservoir completely.
Only use a washer fluid that meets
Ford specification WSB-M8B16-A2.
Do not use any special washer fluid
such as windshield water repellent
type fluid or bug wash. They may
cause squeaking, chatter noise,
streaking and smearing. Refer to the
Maintenance product
specifications and capacities section in this chapter.
State or local regulations on volatile organic compounds may restrict the
use of methanol, a common windshield washer antifreeze additive.
Washer fluids containing non-methanol antifreeze agents should be used
only if they provide cold weather protection without damaging the
vehicle’s paint finish, wiper blades or washer system.
WARNING: If you operate your vehicle in temperatures below
40°F (5°C), use washer fluid with antifreeze protection. Failure
to use washer fluid with antifreeze protection in cold weather could
result in impaired windshield vision and increase the risk of injury or
accident.
Note: Do not put washer fluid in the engine coolant reservoir. Washer
fluid placed in the cooling system may harm engine and cooling system
components.
Checking and adding washer fluid for the liftgate
Washer fluid for the liftgate is supplied by the same reservoir as the
windshield.
2009 Expedition (exd)
Owners Guide, 2nd Printing
USA (fus) Maintenance and Specifications
367
Page 368 of 415
CHANGING THE WIPER BLADES
It is recommended that wiper blades are renewed before winter.
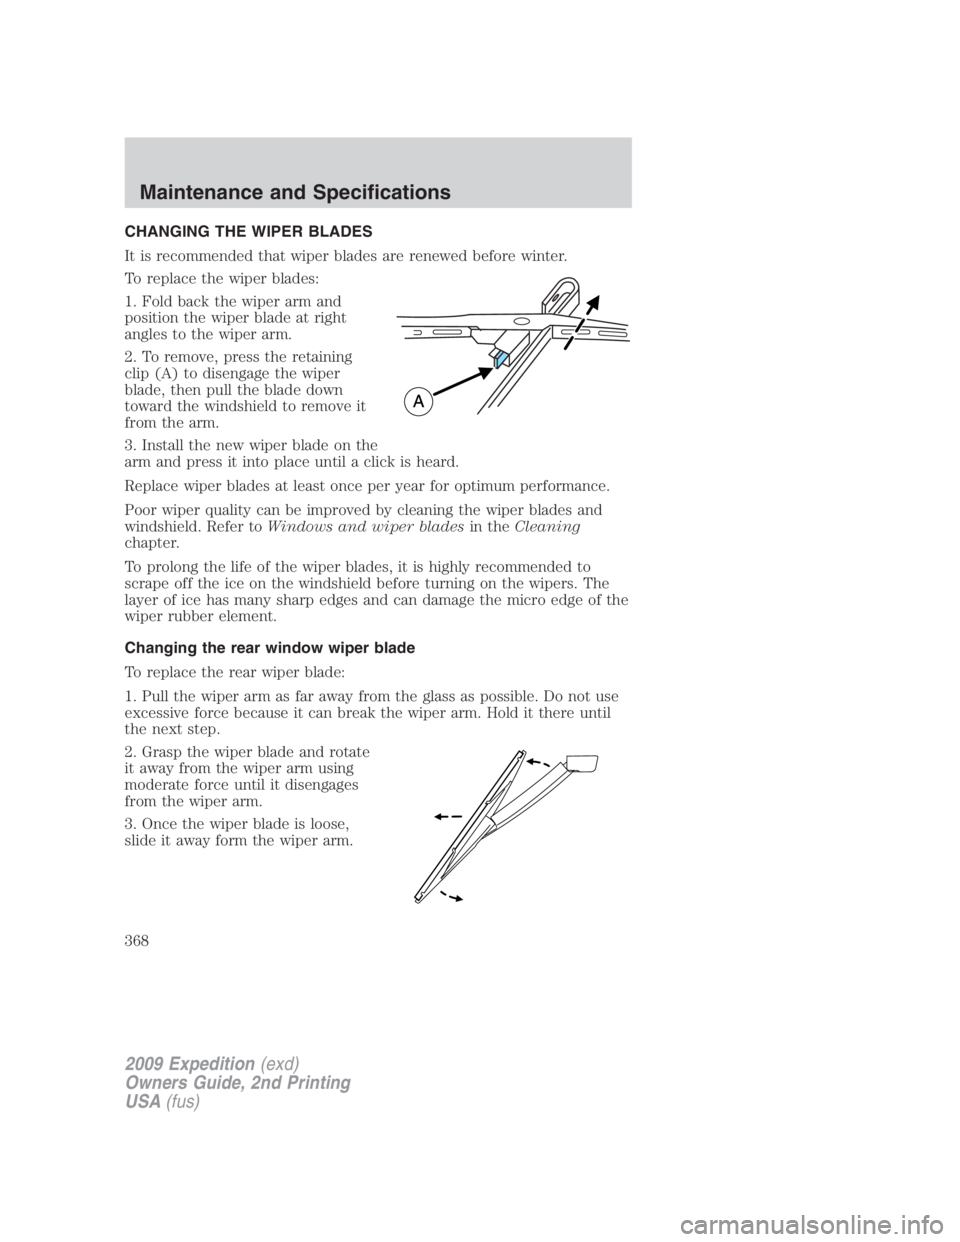
To replace the wiper blades:
1. Fold back the wiper arm and
position the wiper blade at right
angles to the wiper arm.
2. To remove, press the retaining
clip (A) to disengage the wiper
blade, then pull the blade down
toward the windshield to remove it
from the arm.
3. Install the new wiper blade on the
arm and press it into place until a click is heard.
Replace wiper blades at least once per year for optimum performance.
Poor wiper quality can be improved by cleaning the wiper blades and
windshield. Refer to Windows and wiper blades in the Cleaning
chapter.
To prolong the life of the wiper blades, it is highly recommended to
scrape off the ice on the windshield before turning on the wipers. The
layer of ice has many sharp edges and can damage the micro edge of the
wiper rubber element.
Changing the rear window wiper blade
To replace the rear wiper blade:
1. Pull the wiper arm as far away from the glass as possible. Do not use
excessive force because it can break the wiper arm. Hold it there until
the next step.
2. Grasp the wiper blade and rotate
it away from the wiper arm using
moderate force until it disengages
from the wiper arm.
3. Once the wiper blade is loose,
slide it away form the wiper arm.
2009 Expedition (exd)
Owners Guide, 2nd Printing
USA (fus)Maintenance and Specifications
368
Page 369 of 415
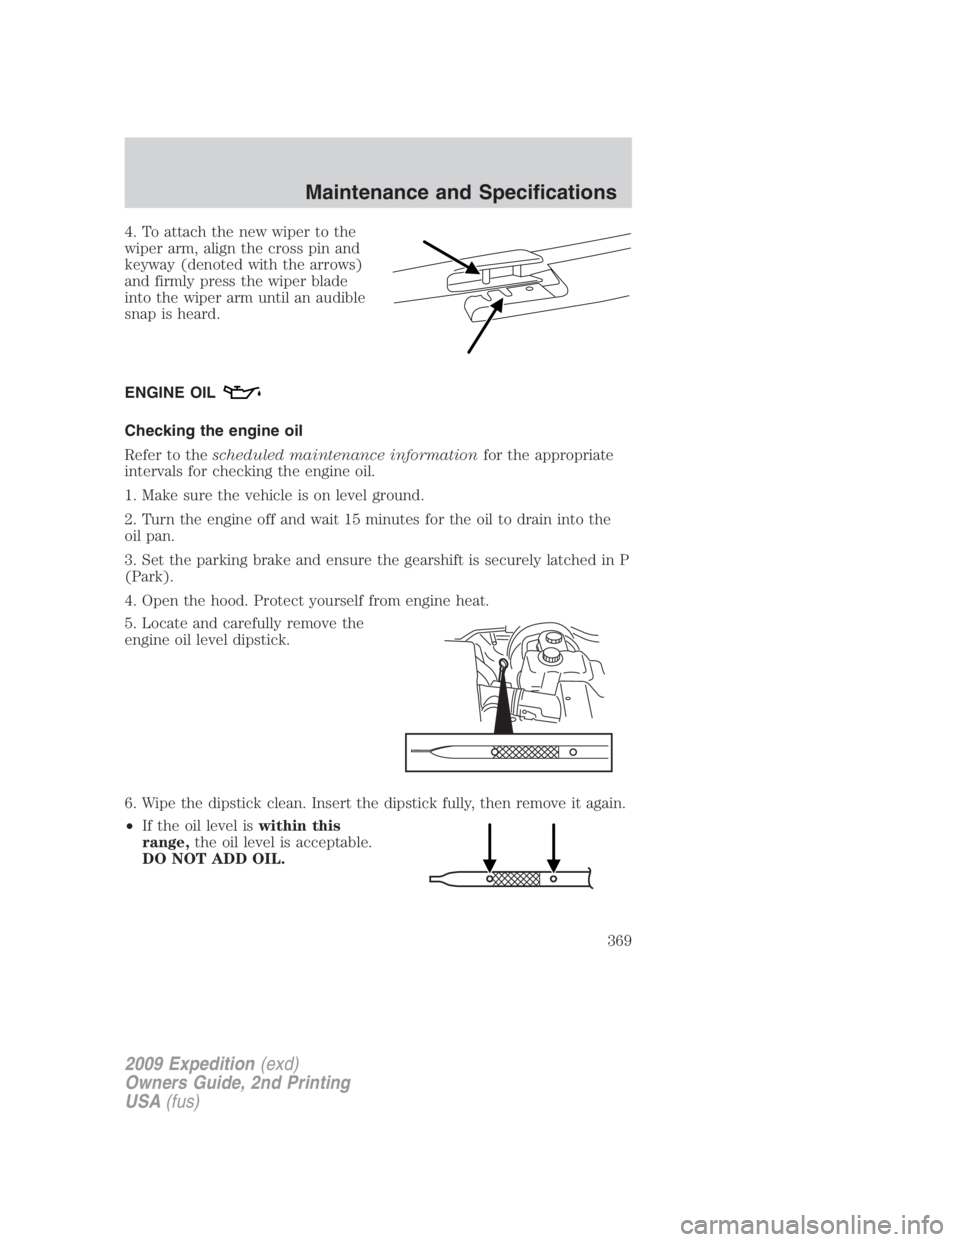
4. To attach the new wiper to the
wiper arm, align the cross pin and
keyway (denoted with the arrows)
and firmly press the wiper blade
into the wiper arm until an audible
snap is heard.
ENGINE OIL
Checking the engine oil
Refer to the scheduled maintenance information for the appropriate
intervals for checking the engine oil.
1. Make sure the vehicle is on level ground.
2. Turn the engine off and wait 15 minutes for the oil to drain into the
oil pan.
3. Set the parking brake and ensure the gearshift is securely latched in P
(Park).
4. Open the hood. Protect yourself from engine heat.
5. Locate and carefully remove the
engine oil level dipstick.
6. Wipe the dipstick clean. Insert the dipstick fully, then remove it again.
• If the oil level is within this
range, the oil level is acceptable.
DO NOT ADD OIL.
2009 Expedition (exd)
Owners Guide, 2nd Printing
USA (fus) Maintenance and Specifications
369
Page 370 of 415
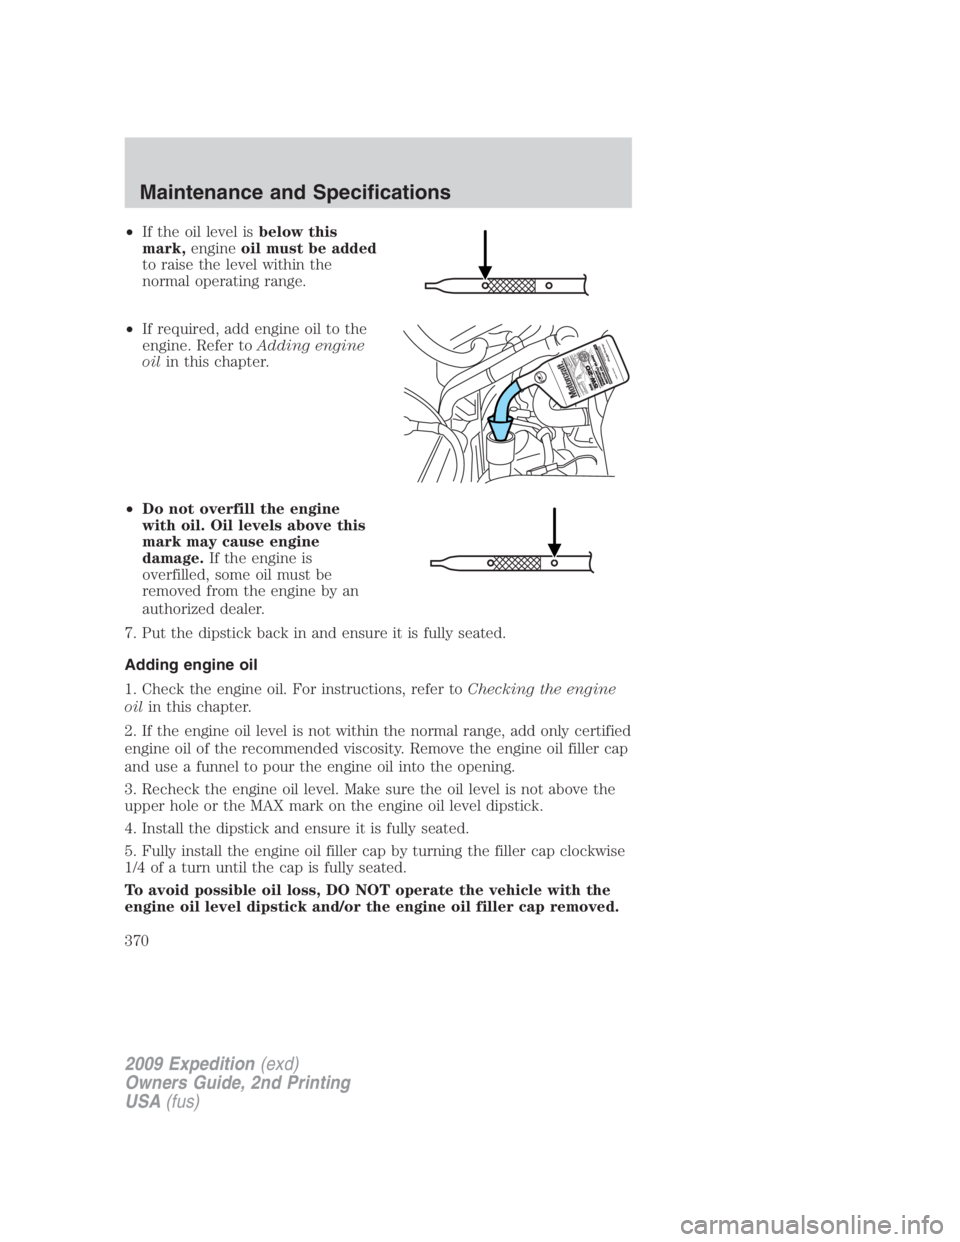
• If the oil level is below this
mark, engine oil must be added
to raise the level within the
normal operating range.
• If required, add engine oil to the
engine. Refer to Adding engine
oil in this chapter.
• Do not overfill the engine
with oil. Oil levels above this
mark may cause engine
damage. If the engine is
overfilled, some oil must be
removed from the engine by an
authorized dealer.
7. Put the dipstick back in and ensure it is fully seated.
Adding engine oil
1. Check the engine oil. For instructions, refer to Checking the engine
oil in this chapter.
2. If the engine oil level is not within the normal range, add only certified
engine oil of the recommended viscosity. Remove the engine oil filler cap
and use a funnel to pour the engine oil into the opening.
3. Recheck the engine oil level. Make sure the oil level is not above the
upper hole or the MAX mark on the engine oil level dipstick.
4. Install the dipstick and ensure it is fully seated.
5. Fully install the engine oil filler cap by turning the filler cap clockwise
1/4 of a turn until the cap is fully seated.
To avoid possible oil loss, DO NOT operate the vehicle with the
engine oil level dipstick and/or the engine oil filler cap removed.
2009 Expedition (exd)
Owners Guide, 2nd Printing
USA (fus)Maintenance and Specifications
370