automatic transmission FORD EXPEDITION EL 2016 Owner's Manual
[x] Cancel search | Manufacturer: FORD, Model Year: 2016, Model line: EXPEDITION EL, Model: FORD EXPEDITION EL 2016Pages: 421, PDF Size: 7.39 MB
Page 193 of 421
If the system detects a degradedperformance condition, a message warningof a blocked sensor will appear in theinformation display. Also the BLIS alertindicators will remain ON and BLIS will nolonger provide any vehicle warnings. Youcan clear the information display warningbut the alert indicators will remainilluminated.
A "blocked" condition can be cleared intwo ways:
•After the blockage in front of thesensors is removed or therainfall/snowfall rate decreases orstops, drive for a few minutes in trafficto allow the sensors to detect passingvehicles.
•By cycling the ignition from ON to OFFand then back ON.
Note:If your vehicle has a tow bar with afactory equipped trailer tow module and itis towing a trailer, the sensors willautomatically turn the Blind SpotInformation System off. If your vehicle hasa tow bar but no factory equipped trailertow module, it is recommended to turn theBlind Spot Information System offmanually. Operating the Blind SpotInformation System with a trailer attachedwill cause poor system performance.
System Errors
If the system senses a problem with theleft or right sensor, the telltale willilluminate and a message will appear inthe information display. See InformationMessages (page 103).
Switching the System Off and On
You can temporarily switch the Blind SpotInformation System off in the informationdisplay. See General Information (page92). When the Blind Spot InformationSystem switches off, you will not receivealerts and the information display showsa system off message. The telltale in thecluster also illuminates. When you switchthe Blind Spot Information System on oroff, the alert indicators flash twice.
Note:The Blind Spot Information Systemremembers the last selected on or offsetting.
You can also have the Blind SpotInformation System switched offpermanently at an authorized dealer. Onceswitched off permanently, the system canonly be switched back on at an authorizeddealer.
CROSS TRAFFIC ALERT
WARNING
To help avoid personal injury, NEVERuse the Cross Traffic Alert system asa replacement for using the interiorand exterior mirrors and looking over yourshoulder before backing out of a parkingspace. Cross Traffic Alert is not areplacement for careful driving.
Cross Traffic Alert is designed to warn youof vehicles approaching from the sideswhen the transmission is in reverse (R).
Using the System
Cross Traffic Alert turns on when you startthe engine and you shift into reverse (R).Once shifted out of reverse (R), CrossTraffic Alert turns off.
Note:Cross Traffic Alert only functionswhile your transmission is in reverse (R).
190
Expedition (TB7) Canada/United States of America, enUSA, First Printing
Driving Aids
Page 196 of 421
The following are other situations that maylimit the Cross Traffic Alert performance:
•Adjacently parked vehicles or objectsobstructing the sensors.
•Approaching vehicles passing atspeeds greater than 37 mph(60 km/h).
•Driving in reverse faster than 7 mph(12 km/h).
•Backing out of an angled parking spot.
False Alerts
Note:If your vehicle has a tow bar with afactory equipped trailer tow module and itis towing a trailer, the sensors willautomatically turn the Cross Traffic Alertoff. If your vehicle has a tow bar but nofactory equipped trailer tow module, it isrecommended to turn the Cross Traffic Alertoff manually. Operating Cross Traffic Alertwith a trailer attached will cause poor CrossTraffic Alert performance.
There may be certain instances when thereis a false alert by the Cross Traffic Alertsystem that illuminates the alert indicatorwith no vehicle in the coverage zone. Someamount of false alerts are normal; they aretemporary and self-correct.
System Errors
If Cross Traffic Alert senses a problem withthe left or right sensor a message willappear in the information display. SeeInformation Messages (page 103).
Switching the System Off and On
You can temporarily switch Cross TrafficAlert off in the information display. SeeGeneral Information (page 92). Whenyou switch Cross Traffic Alert off, you willnot receive alerts and the informationdisplay will display a system off message.
Note:The Cross Traffic Alert switches onwhenever the ignition is switched on andready to provide appropriate alerts whenthe transmission is in reverse (R). CrossTraffic Alert will not remember the lastselected on or off setting.
You can also have Cross Traffic Alertswitched off permanently at an authorizeddealer. Once switched off permanently,the system can only be switched back onat an authorized dealer.
STEERING
Electric Power Steering
WARNINGS
The electric power steering systemhas diagnostic checks thatcontinuously monitor the system. Ifa fault is detected, a message displays inthe information display. Stop your vehicleas soon as it is safe to do so. Switch theignition off. After at least 10 seconds,switch the ignition on and watch theinformation display for a steering systemwarning message. If a steering systemwarning message returns, have the systemchecked by an authorized dealer.
If the system detects an error, youmay not feel a difference in thesteering, however a serious conditionmay exist. Obtain immediate service froman authorized dealer, failure to do so mayresult in loss of steering control.
Your vehicle has an electric power steeringsystem. There is no fluid reservoir. Nomaintenance is required.
If your vehicle loses electrical power whileyou are driving, electric power steeringassistance is lost. The steering system stilloperates and you can steer your vehiclemanually. Manually steering your vehiclerequires more effort.
193
Expedition (TB7) Canada/United States of America, enUSA, First Printing
Driving Aids
Page 212 of 421
Integrated Hitch Rating
WARNING
Towing trailers beyond the maximumtongue weight exceeds the limit ofthe towing system and could resultin vehicle structural damage, loss of vehiclecontrol and personal injury.
The standard integrated hitch has tworatings depending on mode of operation:
•Weight-carrying mode requires a drawbar and hitch ball. The draw barsupports all the vertical tongue load ofthe trailer.
•Weight-distributing mode requires anaftermarket weight-distributingsystem, which includes draw bar, hitchball, spring bars and snap-up brackets.This system distributes the verticaltongue load of the trailer between thetruck and the trailer.
Maximum Tongue WeightMaximum Trailer WeightMode
600 lb (272 kg)6000 lb (2721 kg)Weight carrying
920 lb (417 kg)9200 lb (4173 kg)Weight distributing
Note:These are hitch ratings only. Actualvehicle ratings are dependent on engine,transmission and axle combinations.
Weight-distributing Hitch - Vehicleswithout Automatic LevelingSuspension
WARNING
Do not adjust a weight-distributinghitch to any position where the rearbumper of the vehicle is higher thanit was before attaching the trailer. Doingso will defeat the function of theweight-distributing hitch, which may causeunpredictable handling, and could resultin serious personal injury.
When hooking-up a trailer using aweight-distributing hitch, always use thefollowing procedure:
1. Park the loaded vehicle, without thetrailer, on a level surface.
2. Measure the height to the top of yourvehicle's front wheel opening on thefender. This is H1.
3.Attach the loaded trailer to your vehiclewithout the weight-distributing barsconnected.
4. Measure the height to the top of yourvehicle's front wheel opening on thefender a second time. This is H2.
5. Install and adjust the tension in theweight-distributing bars so that theheight of your vehicle's front wheelopening on the fender is approximatelyhalf the way down from H2, toward H1.
6.Check that the trailer is level or slightlynose down toward your vehicle. If not,adjust the ball height accordingly andrepeat Steps 2-6.
When the trailer is level or slightly nosedown toward the vehicle:
•Lock the bar tension adjuster in place.
•Check that the trailer tongue securelyattaches and locks onto the hitch.
•Install safety chains, lighting, and trailerbrake controls as required by law or thetrailer manufacturer.
209
Expedition (TB7) Canada/United States of America, enUSA, First Printing
Towing
Page 217 of 421
•Your vehicle's brake system and thetrailer brake system workindependently of each other. Changingthe gain setting on the controller doesnot affect the operation of yourvehicle's brakes whether you attach atrailer or not.
•When you switch the engine off, thecontroller output is disabled and thedisplay and module shut down. Thecontroller module and display turn onwhen you switch the ignition on.
•The trailer brake controller is only afactory-installed or dealer-installeditem. Ford is not responsible forwarranty or performance of thecontroller due to misuse or customerinstallation.
Trailer Lamps
WARNING
Never connect any trailer lamp wiringto the vehicle's tail lamp wiring; thismay damage the electrical systemresulting in fire. Contact your authorizeddealer as soon as possible for assistancein proper trailer tow wiring installation.Additional electrical equipment may berequired.
Trailer lamps are required on most towedvehicles. Make sure all running lights, brakelights, turn signals and hazard lights areworking.
Before Towing a Trailer
Practice turning, stopping and backing upto get the feel of your vehicle-trailercombination before starting on a trip.When turning, make wider turns so thetrailer wheels clear curbs and otherobstacles.
When Towing a Trailer
•Do not drive faster than 70 mph (113km/h) during the first 500 miles (800kilometers).
•Do not make full-throttle starts.
•Check your hitch, electrical connectionsand trailer wheel lug nuts thoroughlyafter you have traveled 50 miles (80kilometers).
•When stopped in congested or heavytraffic during hot weather, place thegearshift in position P to aid engine andtransmission cooling and to help A/Cperformance.
•Turn off the speed control with heavyloads or in hilly terrain. The speedcontrol may turn off automaticallywhen you are towing on long, steepgrades.
•Shift to a lower gear when driving downa long or steep hill. Do not apply thebrakes continuously, as they mayoverheat and become less effective.
•If your transmission is equipped with aGrade Assist or Tow/Haul feature, usethis feature when towing. This providesengine braking and helps eliminateexcessive transmission shifting foroptimum fuel economy andtransmission cooling.
•If your vehicle is equipped withAdvanceTrac with RSC, this systemmay turn on during typical corneringmaneuvers with a heavily loaded trailer.This is normal. Turning the corner at aslower speed while towing may reducethis tendency.
•If you are towing a trailer frequently inhot weather, hilly conditions, at thegross combined weight rating (or anycombination of these factors), considerrefilling your rear axle with syntheticgear lubricant (if the axle is not alreadyfilled with it). See Capacities andSpecifications (page 303).
214
Expedition (TB7) Canada/United States of America, enUSA, First Printing
Towing
Page 218 of 421
•Allow more distance for stopping witha trailer attached. Anticipate stops andbrake gradually.
•Avoid parking on a grade. However, ifyou must park on a grade:
1. Turn the steering wheel to point yourvehicle tires away from traffic flow.
2. Set your vehicle parking brake.
3. Place the automatic transmission inposition P.
4. Place wheel chocks in front and backof the trailer wheels. (Chocks notincluded with vehicle.)
Your vehicle may be equipped with atemporary or conventional spare tire. A"temporary" spare tire is different in size(diameter or width), tread-type(All-Season or All Terrain) or is from adifferent manufacturer than the road tireson your vehicle. Consult information on thetire label or Safety Compliance label forlimitations when using.
Launching or Retrieving a Boat orPersonal Watercraft (PWC)
Note:Disconnect the wiring to the trailerbefore backing the trailer into the water.
Note:Reconnect the wiring to the trailerafter removing the trailer from the water.
When backing down a ramp during boatlaunching or retrieval:
•Do not allow the static water level torise above the bottom edge of the rearbumper.
•Do not allow waves to break higherthan 6 inches (15 centimeters) abovethe bottom edge of the rear bumper.
Exceeding these limits may allow water toenter vehicle components:
•Causing internal damage to thecomponents.
•Affecting driveability, emissions, andreliability.
Replace the rear axle lubricant anytimethe rear axle has been submerged in water.Water may have contaminated the rearaxle lubricant, which is not normallychecked or changed unless a leak issuspected or other axle repair is required.
TOWING POINTS (If Equipped)
WARNINGS
Using recovery hooks is dangerousand should only be done by a personfamiliar with proper vehicle recoverysafety practices. Improper use of recoveryhooks may cause hook failure or separationfrom the vehicle and could result in seriousinjury or death.
Always slowly remove the slack fromthe recovery strap prior to pulling.Failure to do so can introducesignificantly higher loads which can causethe recovery hooks to break off, or therecovery strap to fail which can causeserious injury or death.
Never link two straps together witha clevis pin. These heavy metalobjects could become projectiles ifthe strap breaks and can cause seriousinjury or death.
Your vehicle comes equipped withframe-mounted front recovery hooks.These hooks should never have a loadapplied to them greater than the grossvehicle weight rating of your vehicle.
215
Expedition (TB7) Canada/United States of America, enUSA, First Printing
Towing
Page 228 of 421
3.Remove your foot from the brake pedaland press the START/STOP buttonto switch off the ignition.
4. You can either attempt to start theengine by pressing the brake pedal andthe START/STOP button, or switchon the ignition only by pressing theSTART/STOP button withoutpressing the brake pedal. Both waysre-enable the fuel system.
Note:When you try to restart your vehicleafter a fuel shutoff, the vehicle makes surethat various systems are safe to restart.Once your vehicle determines that thesystems are safe, then the vehicle will allowyou to restart.
Note:In the event that your vehicle doesnot restart after your third attempt, contactan authorized dealer.
JUMP STARTING THE VEHICLE
WARNINGS
Batteries normally produce explosivegases which can cause personalinjury. Therefore, do not allowflames, sparks or lighted substances tocome near the battery. When working nearthe battery, always shield your face andprotect your eyes. Always provide correctventilation.
Keep batteries out of reach ofchildren. Batteries contain sulfuricacid. Avoid contact with skin, eyes orclothing. Shield your eyes when workingnear the battery to protect against possiblesplashing of acid solution. In case of acidcontact with skin or eyes, flushimmediately with water for a minimum of15 minutes and get prompt medicalattention. If acid is swallowed, call aphysician immediately.
Use only adequately sized cableswith insulated clamps.
Preparing Your Vehicle
Do not attempt to push-start yourautomatic transmission vehicle.
Note:Attempting to push-start a vehiclewith an automatic transmission may causetransmission damage.
Note:Use only a 12-volt supply to start yourvehicle.
Note:Do not disconnect the battery of thedisabled vehicle as this could damage thevehicle electrical system.
Park the booster vehicle close to the hoodof the disabled vehicle, making sure thetwo vehicles do not touch.
Connecting the Jumper Cables
WARNINGS
Do not attach the cables to fuel lines,engine rocker covers, the intakemanifold or electrical componentsas grounding points. Stay clear of movingparts. To avoid reverse polarityconnections, make sure that you correctlyidentify the positive (+) and negative (-)terminals on both the disabled and boostervehicles before connecting the cables.
Do not attach the end of the positivecable to the studs or L-shaped eyeletlocated above the positive (+)terminal of your vehicle’s battery. Highcurrent may flow through and causedamage to the fuses.
Do not connect the end of thesecond cable to the negative (-)terminal of the battery to be jumped.A spark may cause an explosion of thegases that surround the battery.
Note:In the illustration, the bottom vehiclerepresents the booster vehicle.
225
Expedition (TB7) Canada/United States of America, enUSA, First Printing
Roadside Emergencies
Page 253 of 421
At this time, you may notice your enginecoolant temperature gauge needle movetoward the H and the POWER REDUCEDTO LOWER TEMP message may appearin the information display.
You may notice a reduction in vehiclespeed caused by reduced engine power.In order to manage the engine fluidtemperatures, your vehicle may enter thismode if certain high-temperature andhigh-load conditions take place. Theamount of speed reduction depends onmany factors such as vehicle loading,towing, grade and ambient temperature.If this occurs, there is no need to pull offthe road. You can continue to drive yourvehicle while this message is active.
The air conditioning may also cycle on andoff during severe operating conditions toprotect overheating of the engine. Whenthe engine coolant temperature decreasesto a normal operating temperature, the airconditioning will turn on once again.
If the engine coolant temperature gaugemoves fully into the red (hot) area, or if thecoolant temperature warning or serviceengine soon messages appear in yourinformation display:
1. Pull off the road as soon as safelypossible and shift the transmission intoP.
2. Leave the engine running until thecoolant temperature gauge needlemoves away from the red (hot) area.After several minutes, if thetemperature does not drop, follow theremaining steps.
3.Switch the engine off and wait for it tocool before checking the coolant level.
4. If the coolant level is normal, restartyour engine and continue.
5. If the coolant is low, add coolant, andrestart the engine. See Adding EngineCoolant or How Fail-Safe CoolingWorks in this chapter for moreinformation.
AUTOMATIC TRANSMISSION
FLUID CHECK
If required, have an authorized dealer checkand change the transmission fluid at thecorrect service interval. See ScheduledMaintenance (page 372).
The automatic transmission does not havea transmission fluid dipstick.
Refer to your scheduled maintenanceinformation for scheduled intervals for fluidchecks and changes. Your transmissiondoes not consume fluid. However, if thetransmission slips, shifts slowly or if younotice a sign of leaking fluid, contact anauthorized dealer.
Do not use supplemental transmissionfluid additives, treatments or cleaningagents. The use of these materials mayaffect transmission operation and resultin damage to internal transmissioncomponents.
250
Expedition (TB7) Canada/United States of America, enUSA, First Printing
Maintenance
Page 309 of 421
VEHICLE CERTIFICATION
LABEL
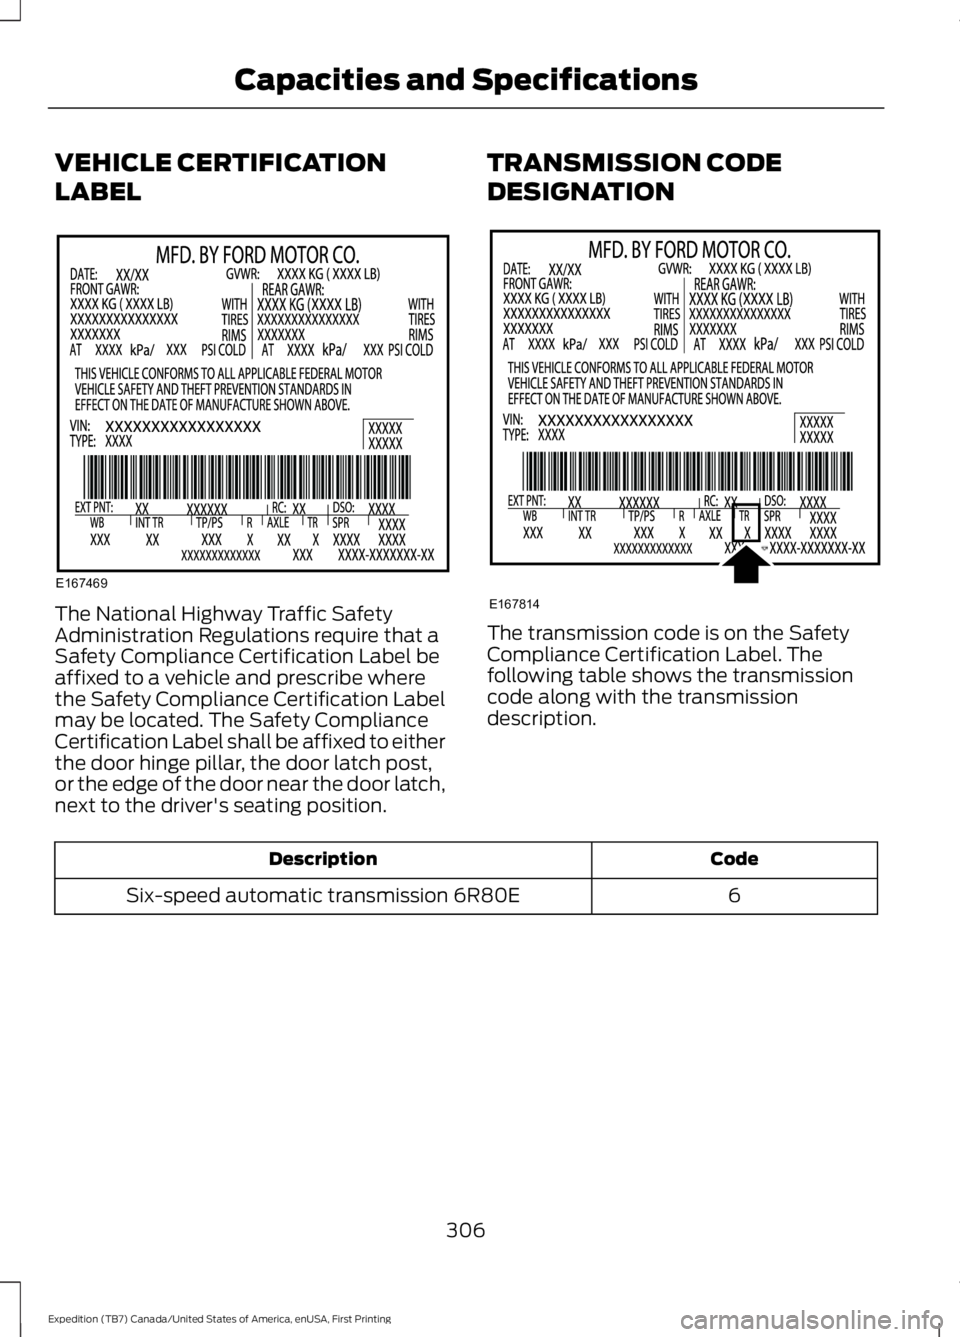
The National Highway Traffic SafetyAdministration Regulations require that aSafety Compliance Certification Label beaffixed to a vehicle and prescribe wherethe Safety Compliance Certification Labelmay be located. The Safety ComplianceCertification Label shall be affixed to eitherthe door hinge pillar, the door latch post,or the edge of the door near the door latch,next to the driver's seating position.
TRANSMISSION CODE
DESIGNATION
The transmission code is on the SafetyCompliance Certification Label. Thefollowing table shows the transmissioncode along with the transmissiondescription.
CodeDescription
6Six-speed automatic transmission 6R80E
306
Expedition (TB7) Canada/United States of America, enUSA, First Printing
Capacities and SpecificationsE167469 E167814
Page 310 of 421
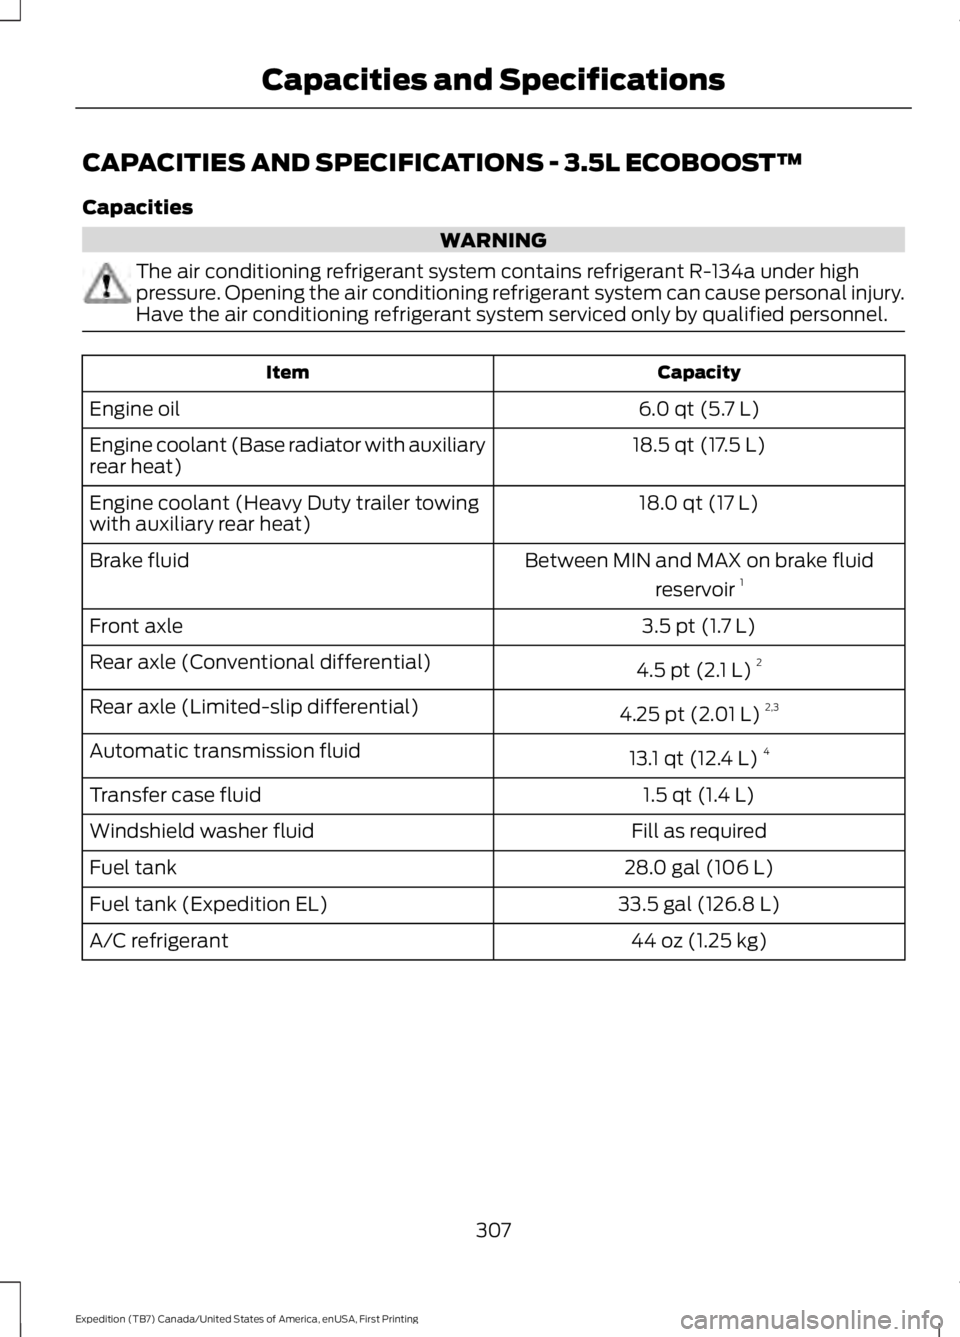
CAPACITIES AND SPECIFICATIONS - 3.5L ECOBOOST™
Capacities
WARNING
The air conditioning refrigerant system contains refrigerant R-134a under highpressure. Opening the air conditioning refrigerant system can cause personal injury.Have the air conditioning refrigerant system serviced only by qualified personnel.
CapacityItem
6.0 qt (5.7 L)Engine oil
18.5 qt (17.5 L)Engine coolant (Base radiator with auxiliaryrear heat)
18.0 qt (17 L)Engine coolant (Heavy Duty trailer towingwith auxiliary rear heat)
Between MIN and MAX on brake fluid
reservoir 1Brake fluid
3.5 pt (1.7 L)Front axle
4.5 pt (2.1 L) 2Rear axle (Conventional differential)
4.25 pt (2.01 L) 2,3Rear axle (Limited-slip differential)
13.1 qt (12.4 L)4Automatic transmission fluid
1.5 qt (1.4 L)Transfer case fluid
Fill as requiredWindshield washer fluid
28.0 gal (106 L)Fuel tank
33.5 gal (126.8 L)Fuel tank (Expedition EL)
44 oz (1.25 kg)A/C refrigerant
307
Expedition (TB7) Canada/United States of America, enUSA, First Printing
Capacities and Specifications
Page 312 of 421
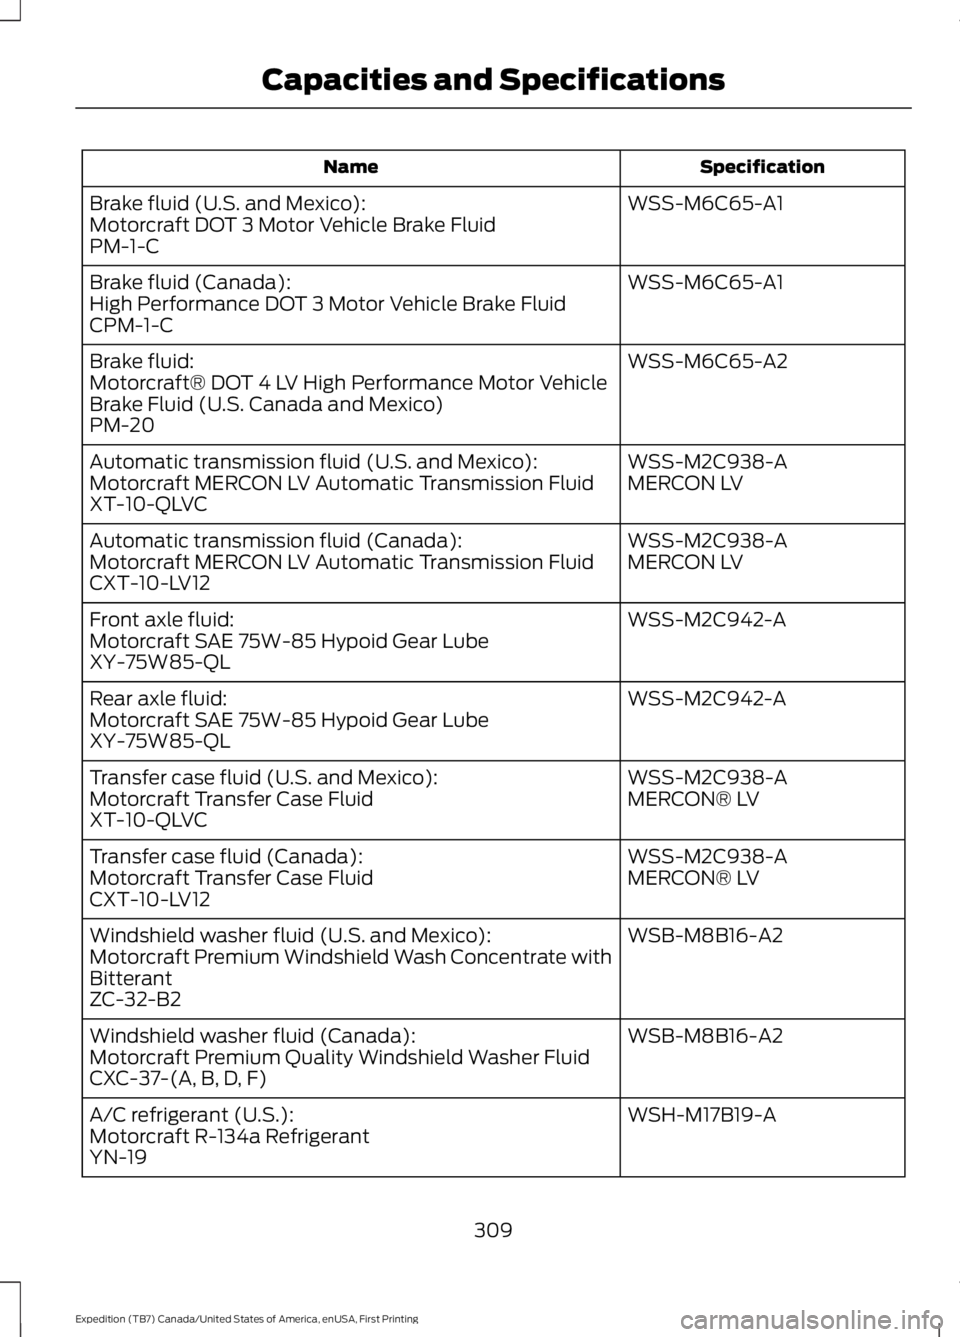
SpecificationName
WSS-M6C65-A1Brake fluid (U.S. and Mexico):Motorcraft DOT 3 Motor Vehicle Brake FluidPM-1-C
WSS-M6C65-A1Brake fluid (Canada):High Performance DOT 3 Motor Vehicle Brake FluidCPM-1-C
WSS-M6C65-A2Brake fluid:Motorcraft® DOT 4 LV High Performance Motor VehicleBrake Fluid (U.S. Canada and Mexico)PM-20
WSS-M2C938-AAutomatic transmission fluid (U.S. and Mexico):MERCON LVMotorcraft MERCON LV Automatic Transmission FluidXT-10-QLVC
WSS-M2C938-AAutomatic transmission fluid (Canada):MERCON LVMotorcraft MERCON LV Automatic Transmission FluidCXT-10-LV12
WSS-M2C942-AFront axle fluid:Motorcraft SAE 75W-85 Hypoid Gear LubeXY-75W85-QL
WSS-M2C942-ARear axle fluid:Motorcraft SAE 75W-85 Hypoid Gear LubeXY-75W85-QL
WSS-M2C938-ATransfer case fluid (U.S. and Mexico):MERCON® LVMotorcraft Transfer Case FluidXT-10-QLVC
WSS-M2C938-ATransfer case fluid (Canada):MERCON® LVMotorcraft Transfer Case FluidCXT-10-LV12
WSB-M8B16-A2Windshield washer fluid (U.S. and Mexico):Motorcraft Premium Windshield Wash Concentrate withBitterantZC-32-B2
WSB-M8B16-A2Windshield washer fluid (Canada):Motorcraft Premium Quality Windshield Washer FluidCXC-37-(A, B, D, F)
WSH-M17B19-AA/C refrigerant (U.S.):Motorcraft R-134a RefrigerantYN-19
309
Expedition (TB7) Canada/United States of America, enUSA, First Printing
Capacities and Specifications