FORD EXPLORER 2016 5.G Owners Manual
Manufacturer: FORD, Model Year: 2016, Model line: EXPLORER, Model: FORD EXPLORER 2016 5.GPages: 541, PDF Size: 6.51 MB
Page 151 of 541
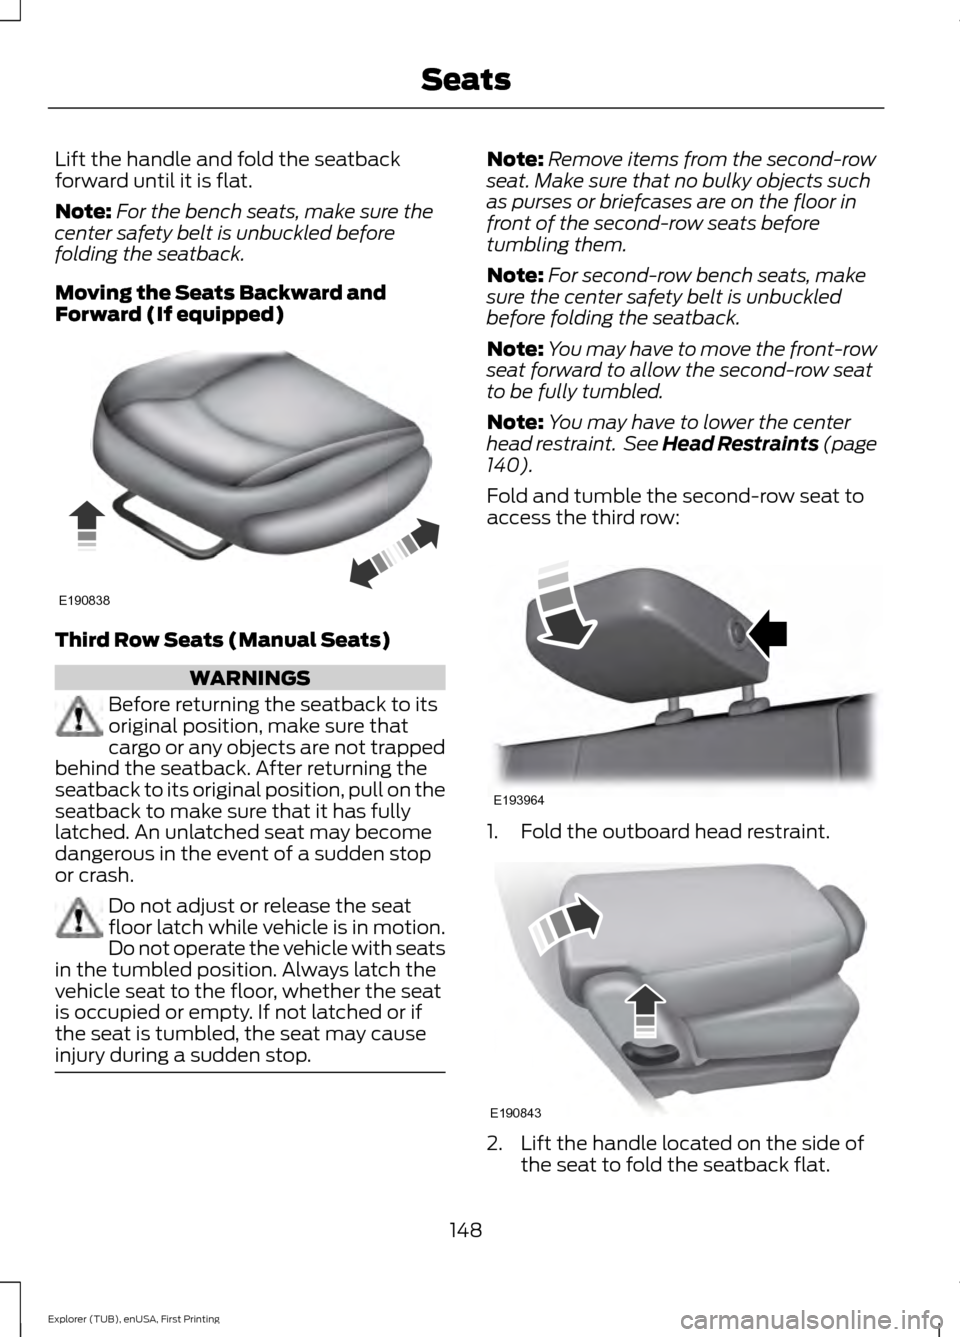
Lift the handle and fold the seatback
forward until it is flat.
Note:
For the bench seats, make sure the
center safety belt is unbuckled before
folding the seatback.
Moving the Seats Backward and
Forward (If equipped) Third Row Seats (Manual Seats)
WARNINGS
Before returning the seatback to its
original position, make sure that
cargo or any objects are not trapped
behind the seatback. After returning the
seatback to its original position, pull on the
seatback to make sure that it has fully
latched. An unlatched seat may become
dangerous in the event of a sudden stop
or crash. Do not adjust or release the seat
floor latch while vehicle is in motion.
Do not operate the vehicle with seats
in the tumbled position. Always latch the
vehicle seat to the floor, whether the seat
is occupied or empty. If not latched or if
the seat is tumbled, the seat may cause
injury during a sudden stop. Note:
Remove items from the second-row
seat. Make sure that no bulky objects such
as purses or briefcases are on the floor in
front of the second-row seats before
tumbling them.
Note: For second-row bench seats, make
sure the center safety belt is unbuckled
before folding the seatback.
Note: You may have to move the front-row
seat forward to allow the second-row seat
to be fully tumbled.
Note: You may have to lower the center
head restraint. See Head Restraints (page
140).
Fold and tumble the second-row seat to
access the third row: 1. Fold the outboard head restraint.
2. Lift the handle located on the side of
the seat to fold the seatback flat.
148
Explorer (TUB), enUSA, First Printing SeatsE190838 E193964 E190843
Page 152 of 541
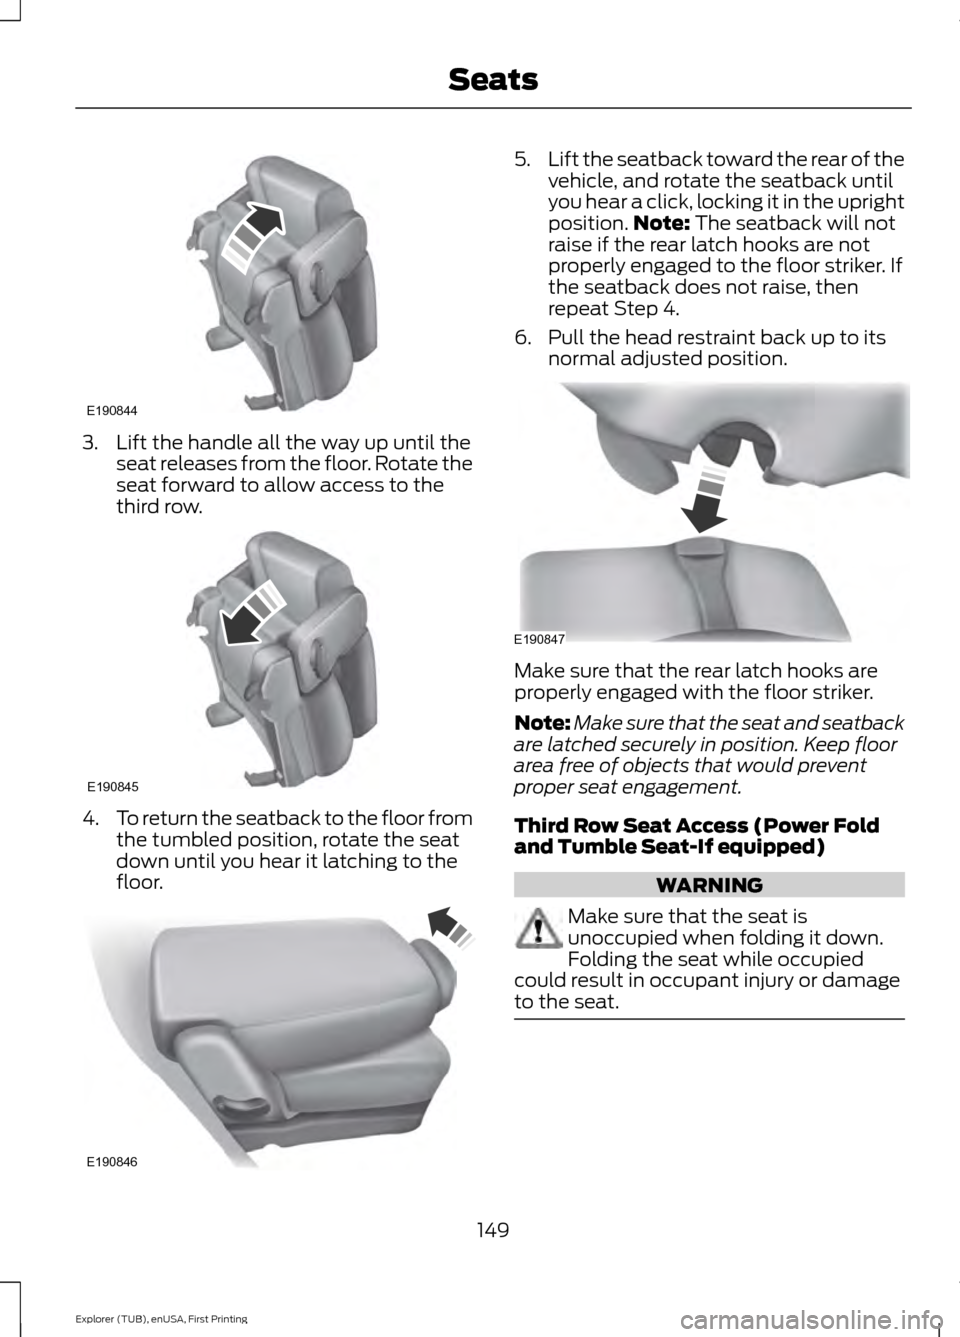
3. Lift the handle all the way up until the
seat releases from the floor. Rotate the
seat forward to allow access to the
third row. 4.
To return the seatback to the floor from
the tumbled position, rotate the seat
down until you hear it latching to the
floor. 5.
Lift the seatback toward the rear of the
vehicle, and rotate the seatback until
you hear a click, locking it in the upright
position. Note: The seatback will not
raise if the rear latch hooks are not
properly engaged to the floor striker. If
the seatback does not raise, then
repeat Step 4.
6. Pull the head restraint back up to its normal adjusted position. Make sure that the rear latch hooks are
properly engaged with the floor striker.
Note:
Make sure that the seat and seatback
are latched securely in position. Keep floor
area free of objects that would prevent
proper seat engagement.
Third Row Seat Access (Power Fold
and Tumble Seat-If equipped) WARNING
Make sure that the seat is
unoccupied when folding it down.
Folding the seat while occupied
could result in occupant injury or damage
to the seat. 149
Explorer (TUB), enUSA, First Printing SeatsE190844 E190845 E190846 E190847
Page 153 of 541
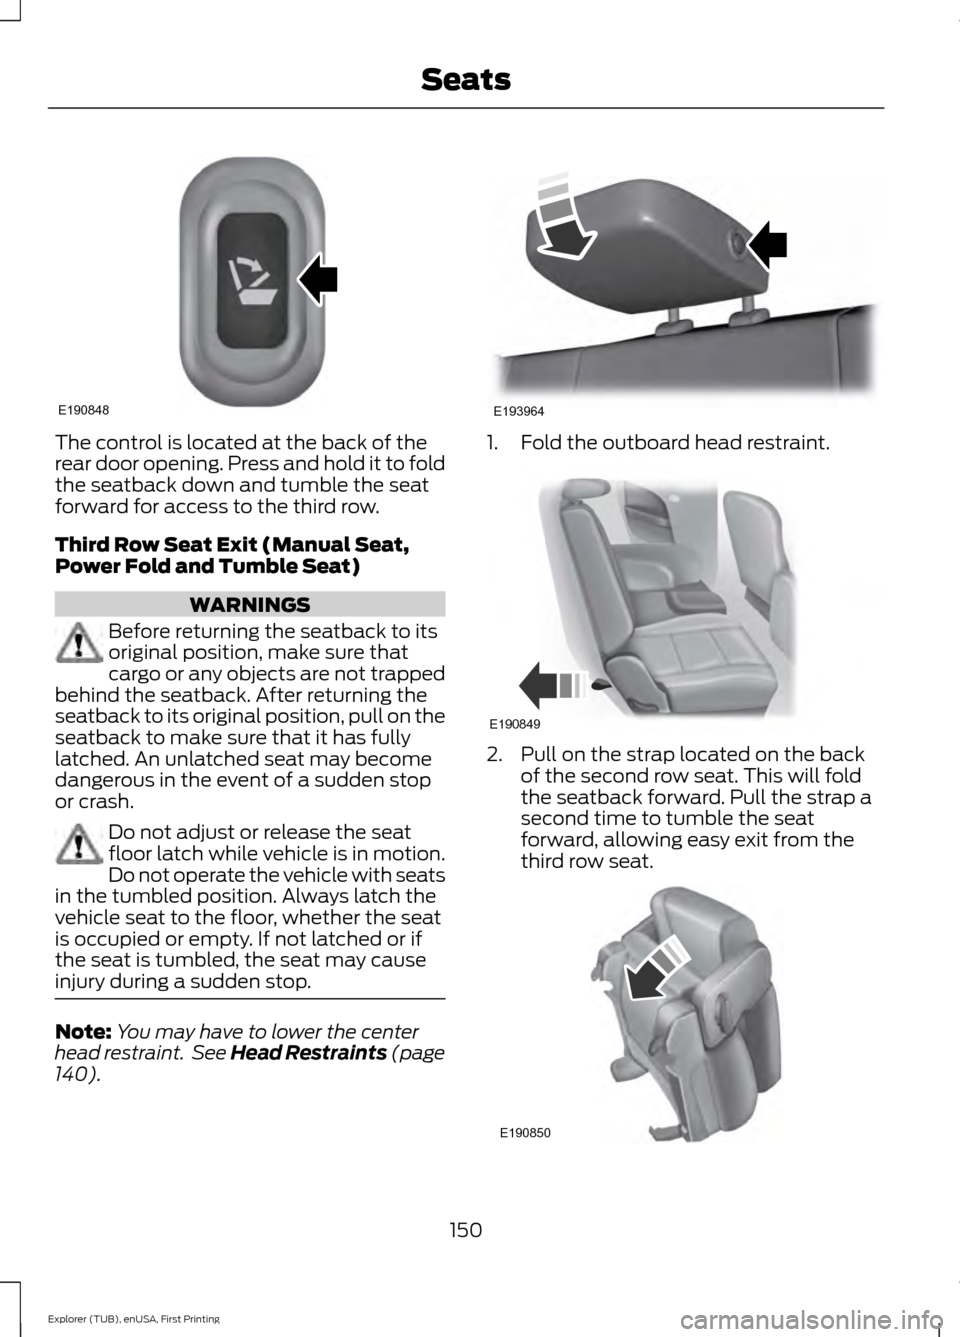
The control is located at the back of the
rear door opening. Press and hold it to fold
the seatback down and tumble the seat
forward for access to the third row.
Third Row Seat Exit (Manual Seat,
Power Fold and Tumble Seat)
WARNINGS
Before returning the seatback to its
original position, make sure that
cargo or any objects are not trapped
behind the seatback. After returning the
seatback to its original position, pull on the
seatback to make sure that it has fully
latched. An unlatched seat may become
dangerous in the event of a sudden stop
or crash. Do not adjust or release the seat
floor latch while vehicle is in motion.
Do not operate the vehicle with seats
in the tumbled position. Always latch the
vehicle seat to the floor, whether the seat
is occupied or empty. If not latched or if
the seat is tumbled, the seat may cause
injury during a sudden stop. Note:
You may have to lower the center
head restraint. See Head Restraints (page
140). 1. Fold the outboard head restraint.
2. Pull on the strap located on the back
of the second row seat. This will fold
the seatback forward. Pull the strap a
second time to tumble the seat
forward, allowing easy exit from the
third row seat. 150
Explorer (TUB), enUSA, First Printing SeatsE190848 E193964 E190849 E190850
Page 154 of 541
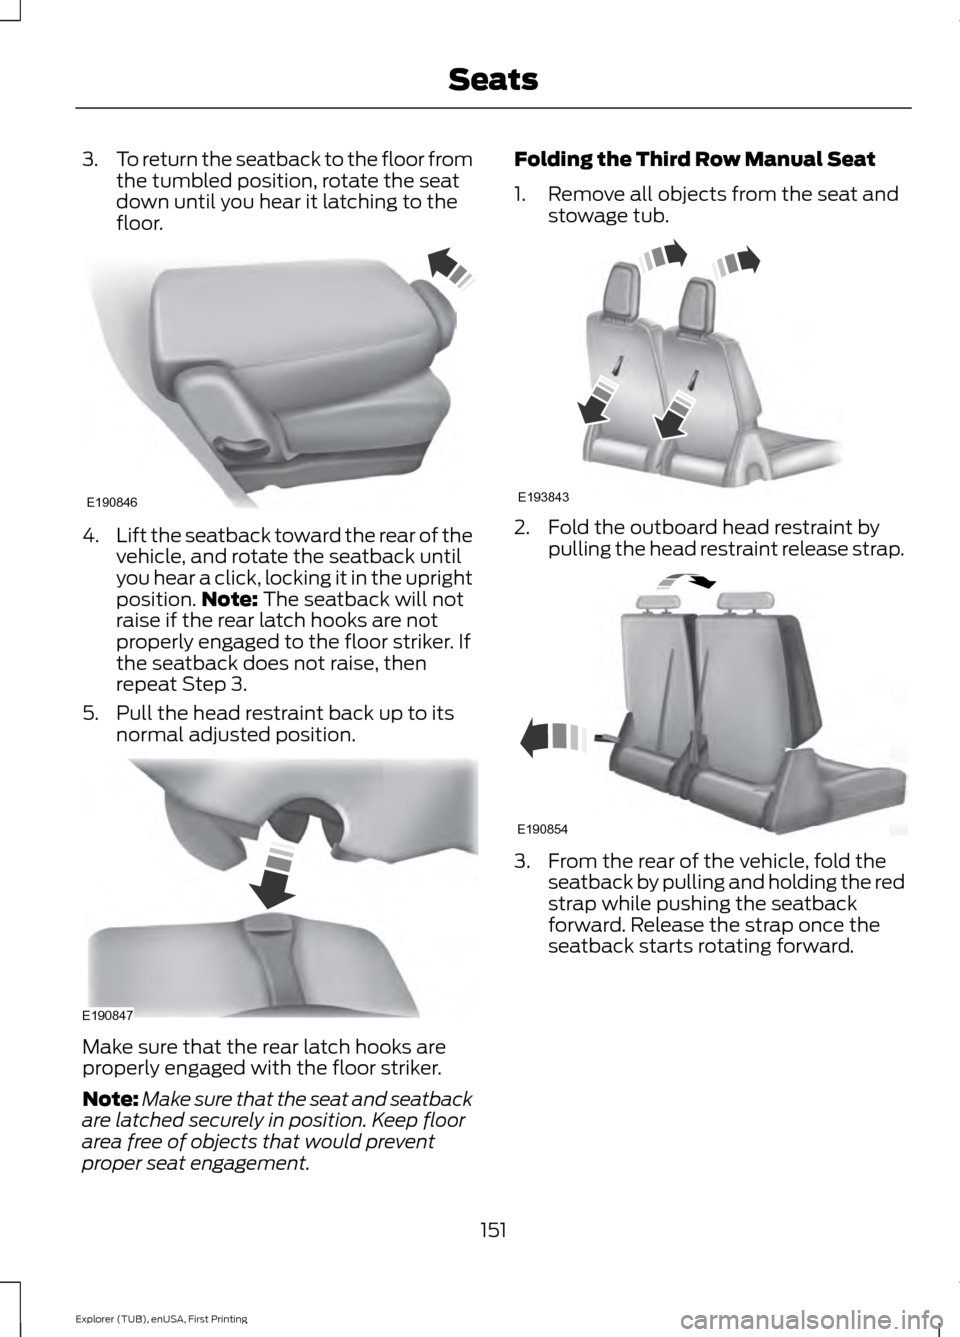
3.
To return the seatback to the floor from
the tumbled position, rotate the seat
down until you hear it latching to the
floor. 4.
Lift the seatback toward the rear of the
vehicle, and rotate the seatback until
you hear a click, locking it in the upright
position. Note: The seatback will not
raise if the rear latch hooks are not
properly engaged to the floor striker. If
the seatback does not raise, then
repeat Step 3.
5. Pull the head restraint back up to its normal adjusted position. Make sure that the rear latch hooks are
properly engaged with the floor striker.
Note:
Make sure that the seat and seatback
are latched securely in position. Keep floor
area free of objects that would prevent
proper seat engagement. Folding the Third Row Manual Seat
1. Remove all objects from the seat and
stowage tub. 2. Fold the outboard head restraint by
pulling the head restraint release strap. 3. From the rear of the vehicle, fold the
seatback by pulling and holding the red
strap while pushing the seatback
forward. Release the strap once the
seatback starts rotating forward.
151
Explorer (TUB), enUSA, First Printing SeatsE190846 E190847 E193843 E190854
Page 155 of 541
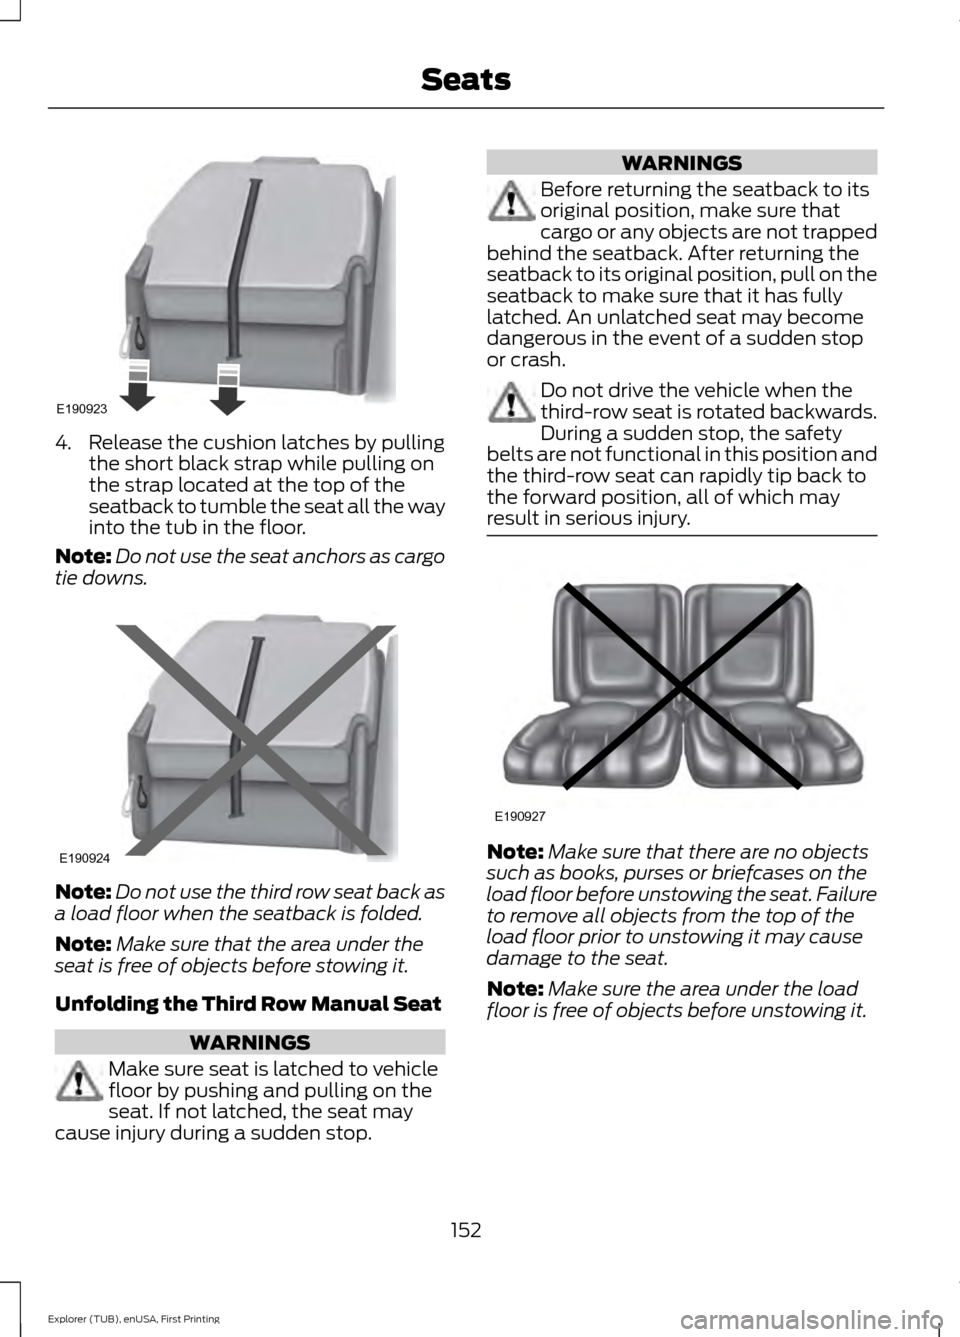
4. Release the cushion latches by pulling
the short black strap while pulling on
the strap located at the top of the
seatback to tumble the seat all the way
into the tub in the floor.
Note: Do not use the seat anchors as cargo
tie downs. Note:
Do not use the third row seat back as
a load floor when the seatback is folded.
Note: Make sure that the area under the
seat is free of objects before stowing it.
Unfolding the Third Row Manual Seat WARNINGS
Make sure seat is latched to vehicle
floor by pushing and pulling on the
seat. If not latched, the seat may
cause injury during a sudden stop. WARNINGS
Before returning the seatback to its
original position, make sure that
cargo or any objects are not trapped
behind the seatback. After returning the
seatback to its original position, pull on the
seatback to make sure that it has fully
latched. An unlatched seat may become
dangerous in the event of a sudden stop
or crash. Do not drive the vehicle when the
third-row seat is rotated backwards.
During a sudden stop, the safety
belts are not functional in this position and
the third-row seat can rapidly tip back to
the forward position, all of which may
result in serious injury. Note:
Make sure that there are no objects
such as books, purses or briefcases on the
load floor before unstowing the seat. Failure
to remove all objects from the top of the
load floor prior to unstowing it may cause
damage to the seat.
Note: Make sure the area under the load
floor is free of objects before unstowing it.
152
Explorer (TUB), enUSA, First Printing SeatsE190923 E190924 E190927
Page 156 of 541
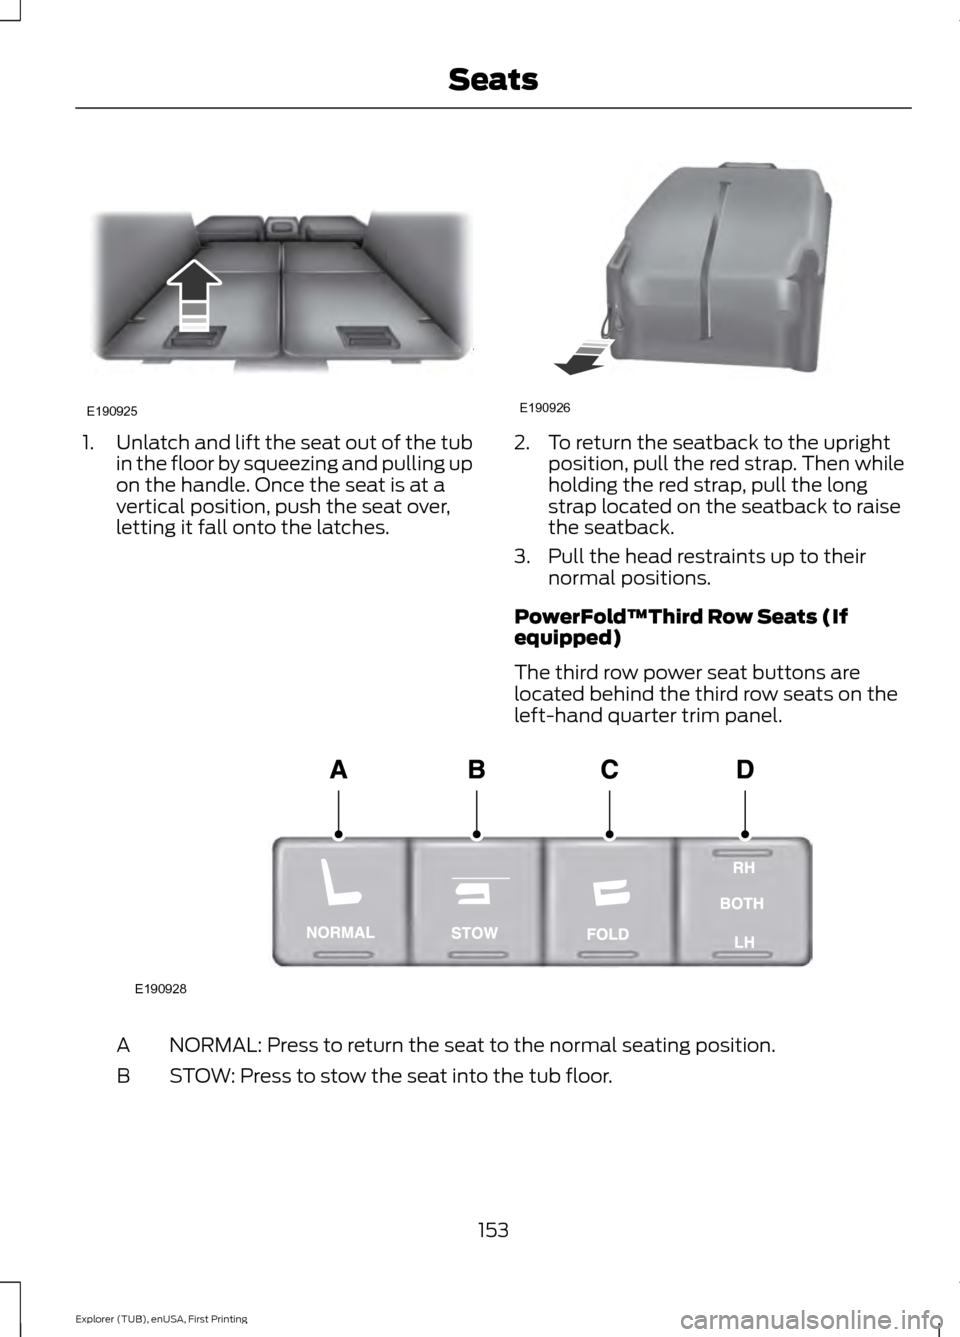
1.
Unlatch and lift the seat out of the tub
in the floor by squeezing and pulling up
on the handle. Once the seat is at a
vertical position, push the seat over,
letting it fall onto the latches. 2. To return the seatback to the upright
position, pull the red strap. Then while
holding the red strap, pull the long
strap located on the seatback to raise
the seatback.
3. Pull the head restraints up to their normal positions.
PowerFold™Third Row Seats (If
equipped)
The third row power seat buttons are
located behind the third row seats on the
left-hand quarter trim panel. NORMAL: Press to return the seat to the normal seating position.
A
STOW: Press to stow the seat into the tub floor.
B
153
Explorer (TUB), enUSA, First Printing SeatsE190925 E190926 E190928
Page 157 of 541
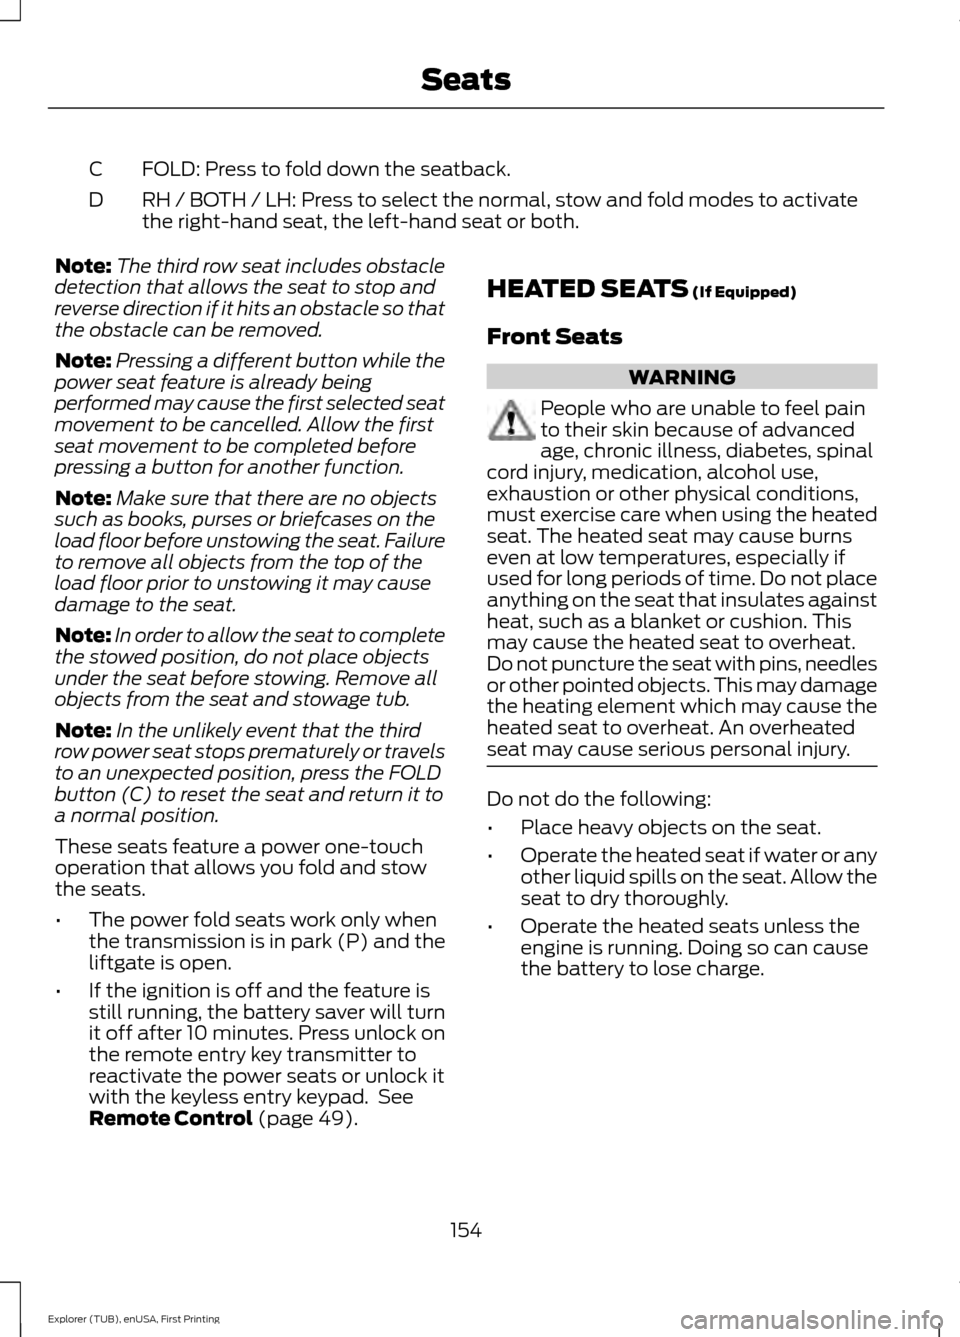
FOLD: Press to fold down the seatback.
C
RH / BOTH / LH: Press to select the normal, stow and fold modes to activate
the right-hand seat, the left-hand seat or both.
D
Note: The third row seat includes obstacle
detection that allows the seat to stop and
reverse direction if it hits an obstacle so that
the obstacle can be removed.
Note: Pressing a different button while the
power seat feature is already being
performed may cause the first selected seat
movement to be cancelled. Allow the first
seat movement to be completed before
pressing a button for another function.
Note: Make sure that there are no objects
such as books, purses or briefcases on the
load floor before unstowing the seat. Failure
to remove all objects from the top of the
load floor prior to unstowing it may cause
damage to the seat.
Note: In order to allow the seat to complete
the stowed position, do not place objects
under the seat before stowing. Remove all
objects from the seat and stowage tub.
Note: In the unlikely event that the third
row power seat stops prematurely or travels
to an unexpected position, press the FOLD
button (C) to reset the seat and return it to
a normal position.
These seats feature a power one-touch
operation that allows you fold and stow
the seats.
• The power fold seats work only when
the transmission is in park (P) and the
liftgate is open.
• If the ignition is off and the feature is
still running, the battery saver will turn
it off after 10 minutes. Press unlock on
the remote entry key transmitter to
reactivate the power seats or unlock it
with the keyless entry keypad. See
Remote Control (page 49). HEATED SEATS
(If Equipped)
Front Seats WARNING
People who are unable to feel pain
to their skin because of advanced
age, chronic illness, diabetes, spinal
cord injury, medication, alcohol use,
exhaustion or other physical conditions,
must exercise care when using the heated
seat. The heated seat may cause burns
even at low temperatures, especially if
used for long periods of time. Do not place
anything on the seat that insulates against
heat, such as a blanket or cushion. This
may cause the heated seat to overheat.
Do not puncture the seat with pins, needles
or other pointed objects. This may damage
the heating element which may cause the
heated seat to overheat. An overheated
seat may cause serious personal injury. Do not do the following:
•
Place heavy objects on the seat.
• Operate the heated seat if water or any
other liquid spills on the seat. Allow the
seat to dry thoroughly.
• Operate the heated seats unless the
engine is running. Doing so can cause
the battery to lose charge.
154
Explorer (TUB), enUSA, First Printing Seats
Page 158 of 541
Press the heated seat symbol to cycle
through the various heat settings and off.
More indicator lights indicate warmer
settings.
Rear Seats (If Equipped)
WARNING
Persons who are unable to feel pain
to the skin because of advanced age,
chronic illness, diabetes, spinal cord
injury, medication, alcohol use, exhaustion,
or other physical conditions, must exercise
care when using the seat heater. The seat
heater may cause burns even at low
temperatures, especially if used for long
periods of time. Do not place anything on
the seat that insulates against heat, such
as a blanket or cushion, because this may
cause the seat heater to overheat. Do not
puncture the seat with pins, needles, or
other pointed objects because this may
damage the heating element which may
cause the seat heater to overheat. An
overheated seat may cause serious
personal injury. Do not do the following:
•
Place heavy objects on the seat.
• Operate the seat heater if water or any
other liquid is spilled on the seat. Allow
the seat to dry thoroughly.
• Operate the heated seats unless the
engine is running. Doing so can cause
the battery to lose charge. The rear seat heat controls are located on
the rear of the center console.
Press the heated seat symbol to cycle
through the various heat settings and off.
More indicator lights indicate warmer
settings.
The heated seat module resets at every
ignition run cycle. While the ignition is on,
press the high or low heated seat switch
to enable heating mode. When activated,
they will turn off automatically when you
turn the engine off.
CLIMATE CONTROLLED SEATS
(If Equipped)
Heated Seats
155
Explorer (TUB), enUSA, First Printing SeatsE146322 E146322
Page 159 of 541
WARNING
Persons who are unable to feel pain
to the skin because of advanced age,
chronic illness, diabetes, spinal cord
injury, medication, alcohol use, exhaustion,
or other physical conditions, must exercise
care when using the seat heater. The seat
heater may cause burns even at low
temperatures, especially if used for long
periods of time. Do not place anything on
the seat that insulates against heat, such
as a blanket or cushion, because this may
cause the seat heater to overheat. Do not
puncture the seat with pins, needles, or
other pointed objects because this may
damage the heating element which may
cause the seat heater to overheat. An
overheated seat may cause serious
personal injury. Note:
Do not do the following:
• Place heavy objects on the seat.
• Operate the seat heater if water or any
other liquid spills on the seat. Allow the
seat to dry thoroughly.
• Operate the heated seats unless the
engine is running. Doing so can cause
the battery to lose charge. Touch the heated seat symbol to cycle
through the various heat settings and off.
More indicator lights indicate warmer
settings. Cooled Seats
The cooled seats only function when the
engine is running.
To operate the cooled seats:
Touch the cooled seat symbol to cycle
through the various cooling settings and
off. More indicator lights indicate cooler
settings.
If the engine falls below 350 RPM while
the cooled seats are on, the feature turns
itself off. You need to reactivate it.
Climate controlled seat air filter
replacement
Your vehicle is equipped with lifetime air
filters that are integrated with the seats.
Regular maintenance or replacement is
not needed.
156
Explorer (TUB), enUSA, First Printing SeatsE146322 E146309
Page 160 of 541
HomeLink Wireless Control
System
WARNINGS
Make sure that the garage door and
security device are free from
obstruction when you are
programming. Do not program the system
with the vehicle in the garage. Do not use the system with any
garage door opener that does not
have the safety stop and reverse
feature as required by U.S. Federal Safety
Standards (this includes any garage door
opener manufactured before April 1, 1982).
A garage door opener which cannot detect
an object, signaling the door to stop and
reverse, does not meet current federal
safety standards. Using a garage door
opener without these features increases
the risk of serious injury or death. Note:
Make sure you keep the original
remote control transmitter for use in other
vehicles as well as for future system
programming.
Note: We recommend that upon the sale
or lease termination of your vehicle, you
erase the programmed function buttons for
security reasons. See Erasing the Function
Button Codes.
Note: You can program a maximum of
three devices. To change or replace any of
the three devices after it has been initially
programmed, you must first erase the
current settings. See Erasing the Function
Button Codes
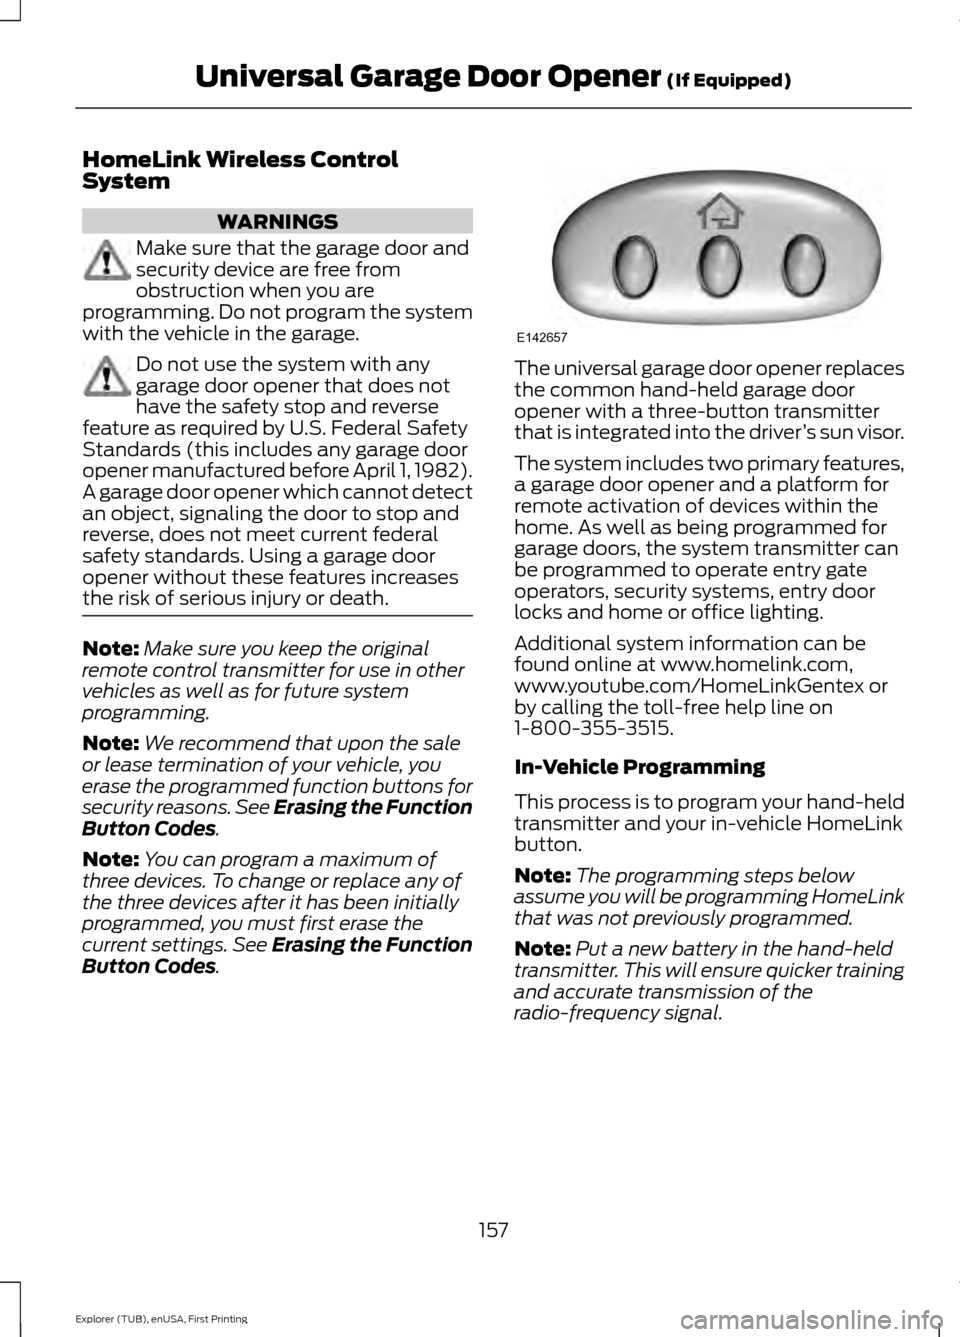
. The universal garage door opener replaces
the common hand-held garage door
opener with a three-button transmitter
that is integrated into the driver
’s sun visor.
The system includes two primary features,
a garage door opener and a platform for
remote activation of devices within the
home. As well as being programmed for
garage doors, the system transmitter can
be programmed to operate entry gate
operators, security systems, entry door
locks and home or office lighting.
Additional system information can be
found online at www.homelink.com,
www.youtube.com/HomeLinkGentex or
by calling the toll-free help line on
1-800-355-3515.
In-Vehicle Programming
This process is to program your hand-held
transmitter and your in-vehicle HomeLink
button.
Note: The programming steps below
assume you will be programming HomeLink
that was not previously programmed.
Note: Put a new battery in the hand-held
transmitter. This will ensure quicker training
and accurate transmission of the
radio-frequency signal.
157
Explorer (TUB), enUSA, First Printing Universal Garage Door Opener
(If Equipped)E142657