FORD EXPLORER SPORT 2002 1.G Owners Manual
Manufacturer: FORD, Model Year: 2002, Model line: EXPLORER SPORT, Model: FORD EXPLORER SPORT 2002 1.GPages: 184, PDF Size: 2.8 MB
Page 111 of 184
GETTING ROADSIDE ASSISTANCE
To fully assist you should you have a vehicle concern, Ford Motor
Company offers a complimentary roadside assistance program. This
program is separate from the New Vehicle Limited Warranty. The service
is available:
•24–hours, seven days a week
•for the New Vehicle Limited Warranty period of three years or 60 000
km (36 000 miles), whichever occurs first on Ford and Mercury
vehicles, and four years or 80 000 km (50 000 miles) on Lincoln
vehicles*.
Roadside assistance will cover:
•changing a flat tire
•jump-starts
•lock-out assistance
•limited fuel delivery*
•towing of your disabled vehicle to the nearest Ford Motor Company
dealership, or your selling dealer if within 25 kms (15.5 miles) of the
nearest Ford Motor Company dealership (one tow per disablement).
Even non-warranty related tows, like accidents or getting stuck in the
mud or snow, are covered (some exclusions apply, such as impound
towing or repossession).
* Canadian customers refer to your Owner Information Guide for exact
fuel amounts.
Using roadside assistance
Complete the roadside assistance identification card and place it in your
wallet for quick reference. In the United States, this card is found in the
Owner Guide portfolio in the glove compartment in Ford vehicles and is
mailed to you if you own a Mercury or Lincoln. In Canada, the card is
found in the Roadside Assistance book in the glove compartment.
U.S. Ford or Mercury vehicle customers who require roadside assistance,
call 1–800–241–3673; Lincoln vehicle customers call 1–800–521–4140.
Canadian customers who require roadside assistance, call
1–800–665–2006.
Roadside Emergencies
111
Page 112 of 184
If you need to arrange roadside assistance for yourself, Ford Motor
Company will reimburse a reasonable amount. To obtain reimbursement
information, U.S. Ford or Mercury vehicles customers call
1-800-241-3673; Lincoln vehicle customers call 1–800–521–4140.
Canadian customers who need to obtain reimbursement information, call
1–800–665–2006.
Roadside coverage beyond basic warranty
In the United States, you may purchase additional roadside assistance
coverage beyond this period through the Ford Auto Club by contacting
your Ford or Lincoln Mercury dealer.
Similarly in Canada, for uninterrupted Roadside Assistance coverage, you
may purchase extended coverage prior to your Basic Warranty’s Roadside
Assistance expiring. For more information and enrollment, contact
1–877–294–2582 or visit our website at www.ford.ca.
HAZARD FLASHER
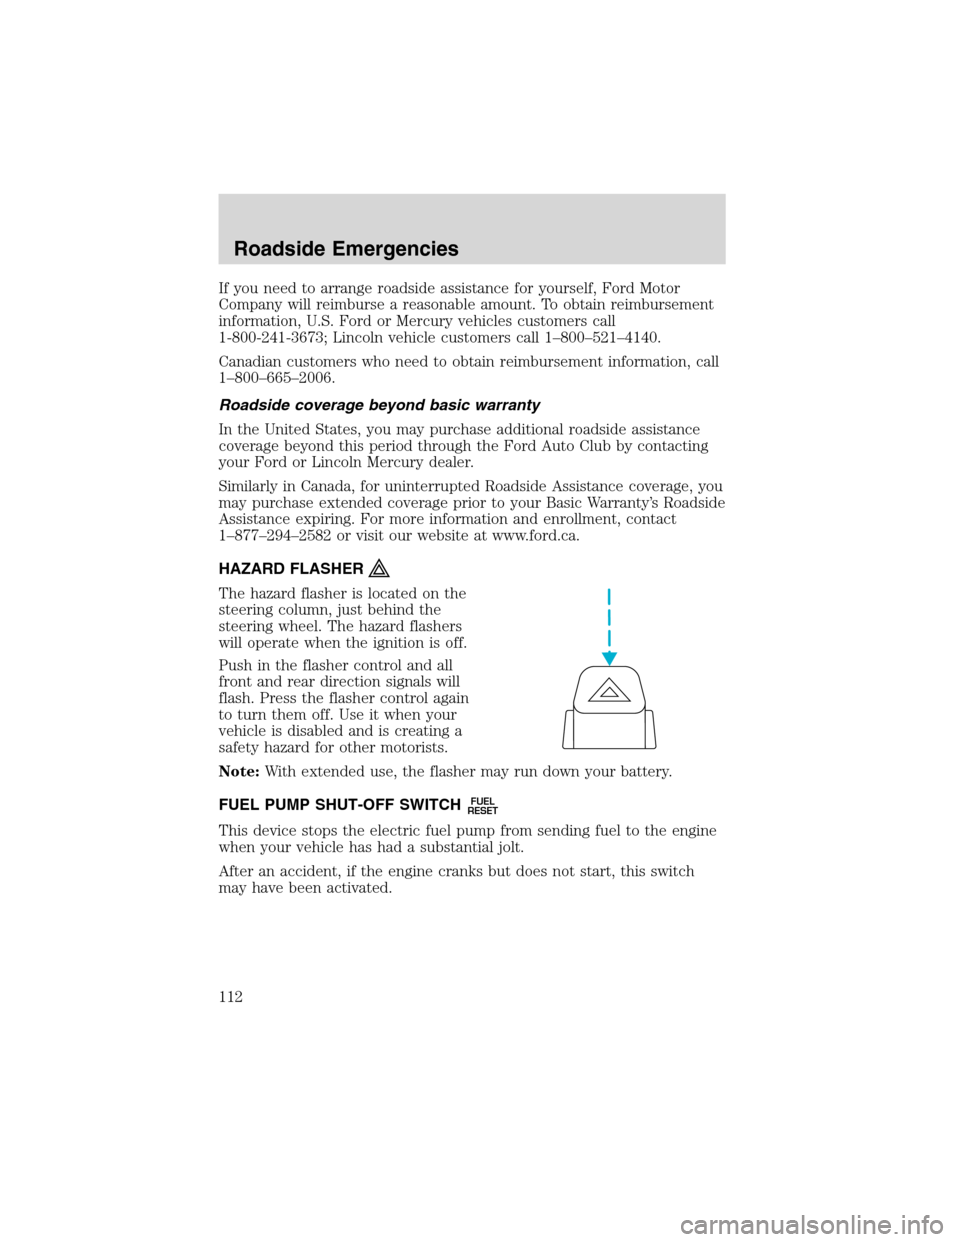
The hazard flasher is located on the
steering column, just behind the
steering wheel. The hazard flashers
will operate when the ignition is off.
Push in the flasher control and all
front and rear direction signals will
flash. Press the flasher control again
to turn them off. Use it when your
vehicle is disabled and is creating a
safety hazard for other motorists.
Note:With extended use, the flasher may run down your battery.
FUEL PUMP SHUT-OFF SWITCH
FUEL
RESET
This device stops the electric fuel pump from sending fuel to the engine
when your vehicle has had a substantial jolt.
After an accident, if the engine cranks but does not start, this switch
may have been activated.
Roadside Emergencies
112
Page 113 of 184
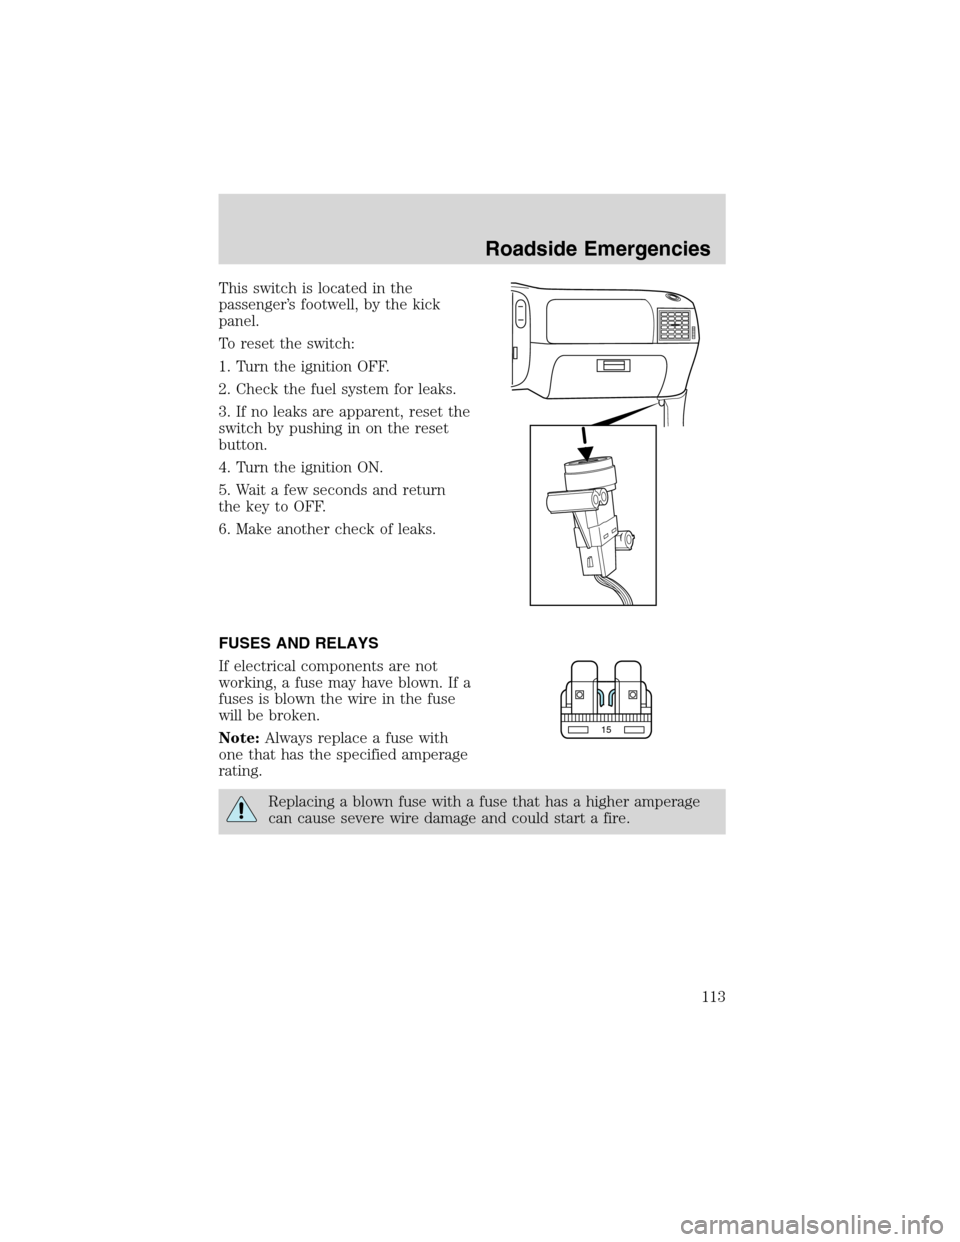
This switch is located in the
passenger’s footwell, by the kick
panel.
To reset the switch:
1. Turn the ignition OFF.
2. Check the fuel system for leaks.
3. If no leaks are apparent, reset the
switch by pushing in on the reset
button.
4. Turn the ignition ON.
5. Wait a few seconds and return
the key to OFF.
6. Make another check of leaks.
FUSES AND RELAYS
If electrical components are not
working, a fuse may have blown. If a
fuses is blown the wire in the fuse
will be broken.
Note:Always replace a fuse with
one that has the specified amperage
rating.
Replacing a blown fuse with a fuse that has a higher amperage
can cause severe wire damage and could start a fire.
15
Roadside Emergencies
113
Page 114 of 184
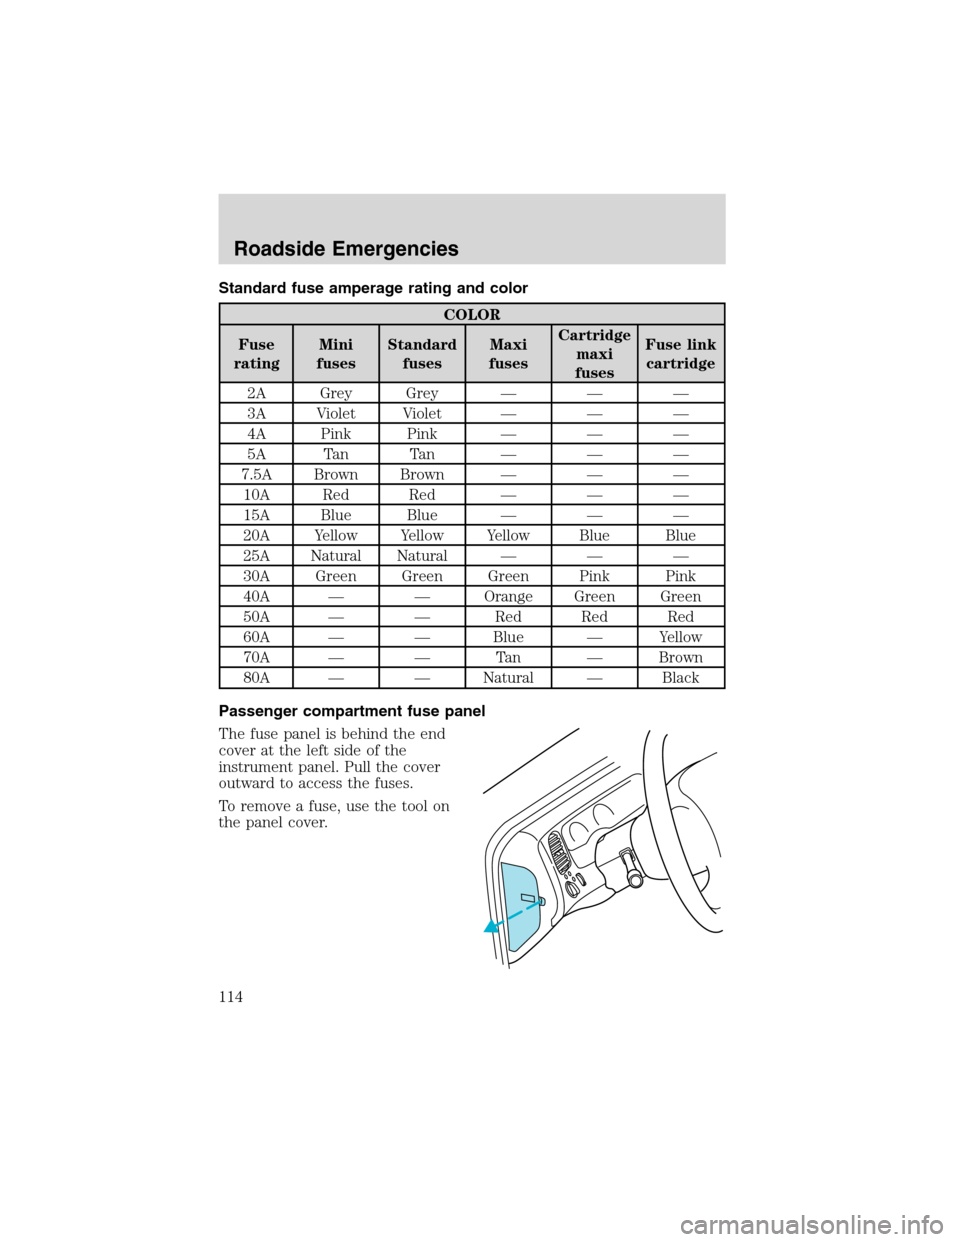
Standard fuse amperage rating and color
COLOR
Fuse
ratingMini
fusesStandard
fusesMaxi
fusesCartridge
maxi
fusesFuse link
cartridge
2A Grey Grey———
3A Violet Violet———
4A Pink Pink———
5A Tan Tan———
7.5A Brown Brown———
10A Red Red———
15A Blue Blue———
20A Yellow Yellow Yellow Blue Blue
25A Natural Natural———
30A Green Green Green Pink Pink
40A——Orange Green Green
50A——Red Red Red
60A——Blue—Yellow
70A——Ta n—Brown
80A——Natural—Black
Passenger compartment fuse panel
The fuse panel is behind the end
cover at the left side of the
instrument panel. Pull the cover
outward to access the fuses.
To remove a fuse, use the tool on
the panel cover.
Roadside Emergencies
114
Page 115 of 184
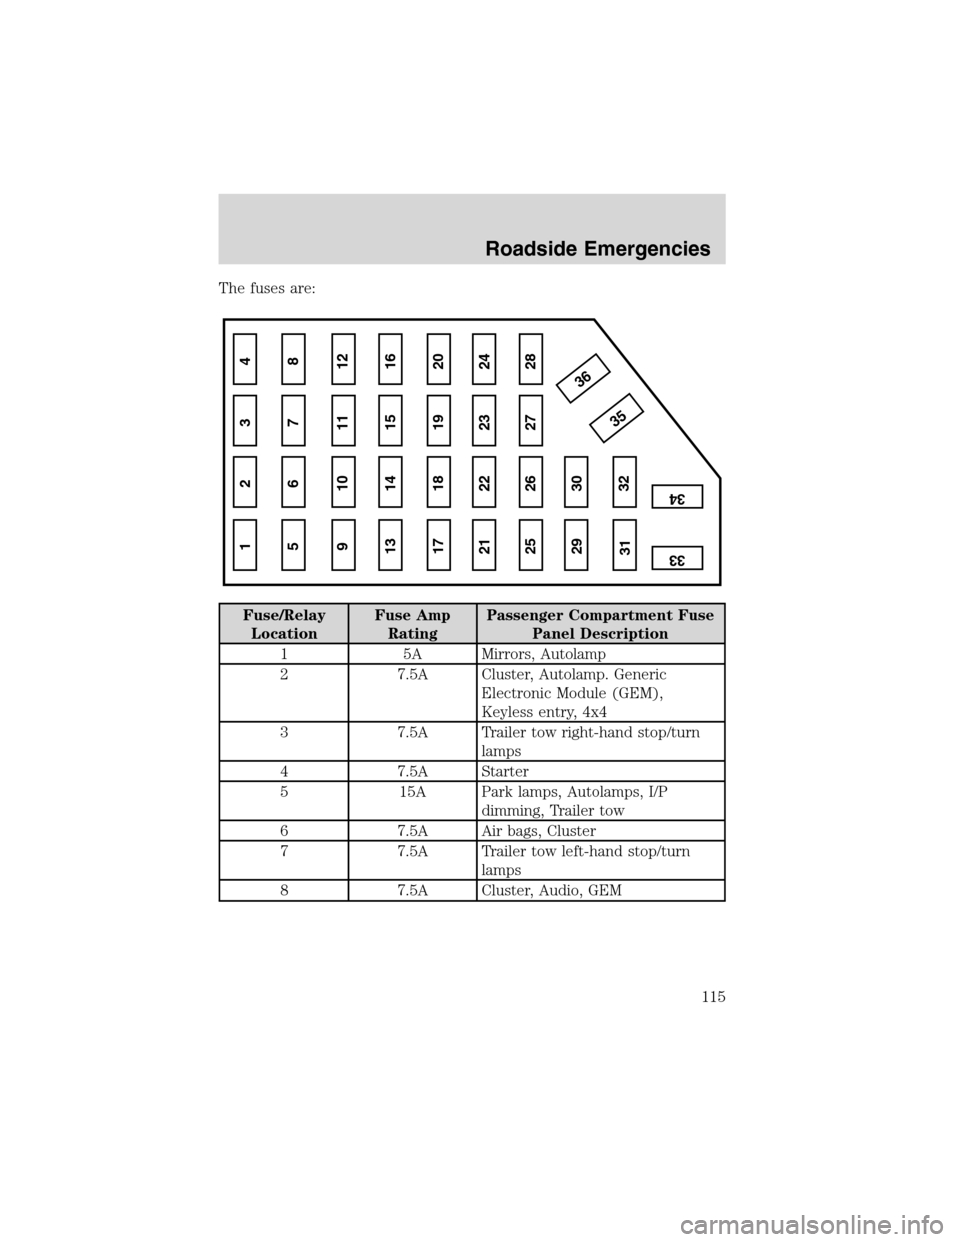
The fuses are:
Fuse/Relay
LocationFuse Amp
RatingPassenger Compartment Fuse
Panel Description
1 5A Mirrors, Autolamp
2 7.5A Cluster, Autolamp. Generic
Electronic Module (GEM),
Keyless entry, 4x4
3 7.5A Trailer tow right-hand stop/turn
lamps
4 7.5A Starter
5 15A Park lamps, Autolamps, I/P
dimming, Trailer tow
6 7.5A Air bags, Cluster
7 7.5A Trailer tow left-hand stop/turn
lamps
8 7.5A Cluster, Audio, GEM
1 234
5 678
9101112
13 14 15 16
17 18 19 20
21 22 23 24
25 26
29 30
35 36
313233
34
27 28
Roadside Emergencies
115
Page 116 of 184
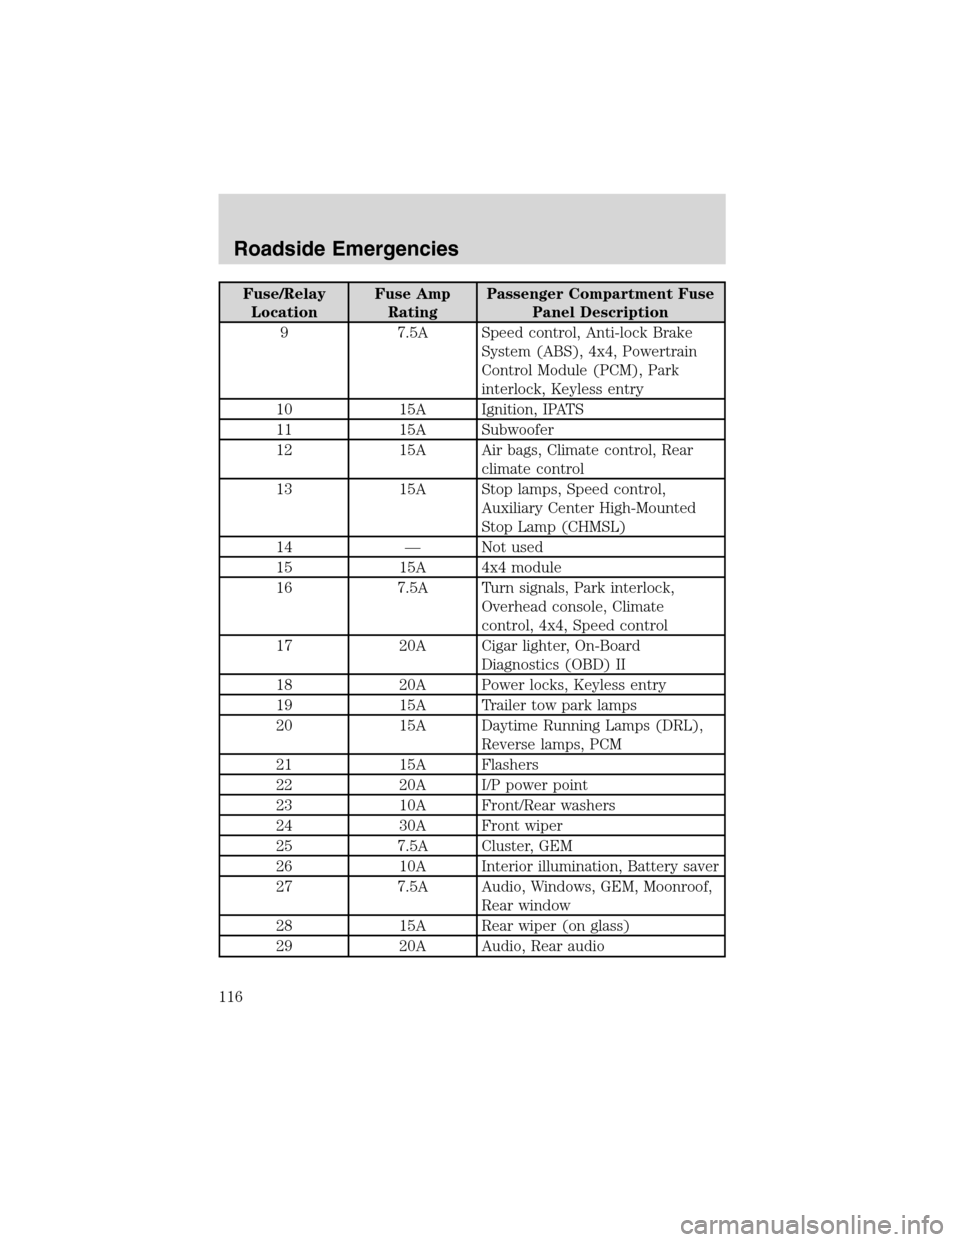
Fuse/Relay
LocationFuse Amp
RatingPassenger Compartment Fuse
Panel Description
9 7.5A Speed control, Anti-lock Brake
System (ABS), 4x4, Powertrain
Control Module (PCM), Park
interlock, Keyless entry
10 15A Ignition, IPATS
11 15A Subwoofer
12 15A Air bags, Climate control, Rear
climate control
13 15A Stop lamps, Speed control,
Auxiliary Center High-Mounted
Stop Lamp (CHMSL)
14—Not used
15 15A 4x4 module
16 7.5A Turn signals, Park interlock,
Overhead console, Climate
control, 4x4, Speed control
17 20A Cigar lighter, On-Board
Diagnostics (OBD) II
18 20A Power locks, Keyless entry
19 15A Trailer tow park lamps
20 15A Daytime Running Lamps (DRL),
Reverse lamps, PCM
21 15A Flashers
22 20A I/P power point
23 10A Front/Rear washers
24 30A Front wiper
25 7.5A Cluster, GEM
26 10A Interior illumination, Battery saver
27 7.5A Audio, Windows, GEM, Moonroof,
Rear window
28 15A Rear wiper (on glass)
29 20A Audio, Rear audio
Roadside Emergencies
116
Page 117 of 184
Fuse/Relay
LocationFuse Amp
RatingPassenger Compartment Fuse
Panel Description
30 25A Seats
31 5A Rear climate control
32 5A Heated rear window switch
33 15A Highbeam headlamps
34 5A Rear audio
35 5A ABS module
36—Not used
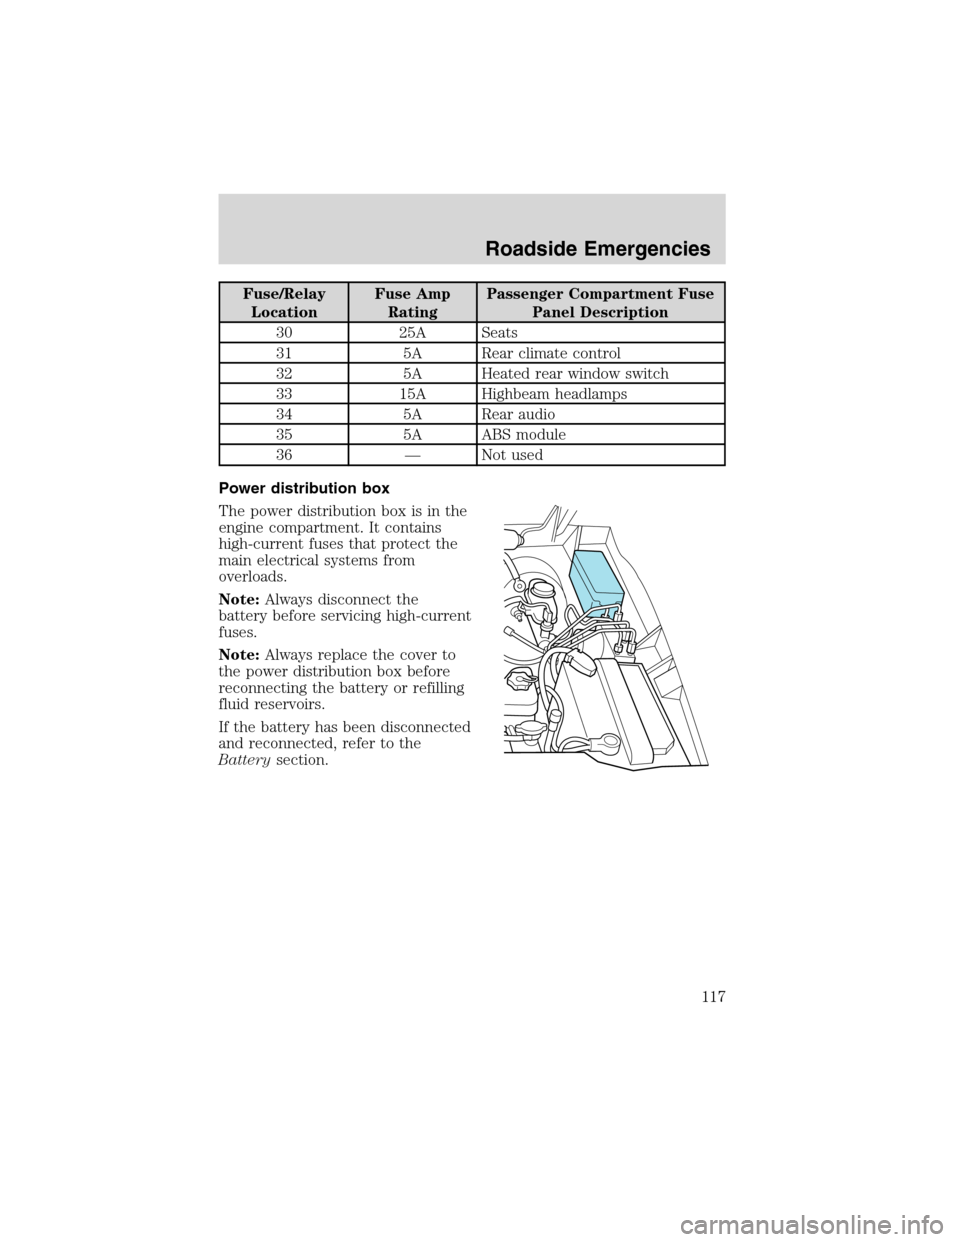
Power distribution box
The power distribution box is in the
engine compartment. It contains
high-current fuses that protect the
main electrical systems from
overloads.
Note:Always disconnect the
battery before servicing high-current
fuses.
Note:Always replace the cover to
the power distribution box before
reconnecting the battery or refilling
fluid reservoirs.
If the battery has been disconnected
and reconnected, refer to the
Batterysection.
Roadside Emergencies
117
Page 118 of 184
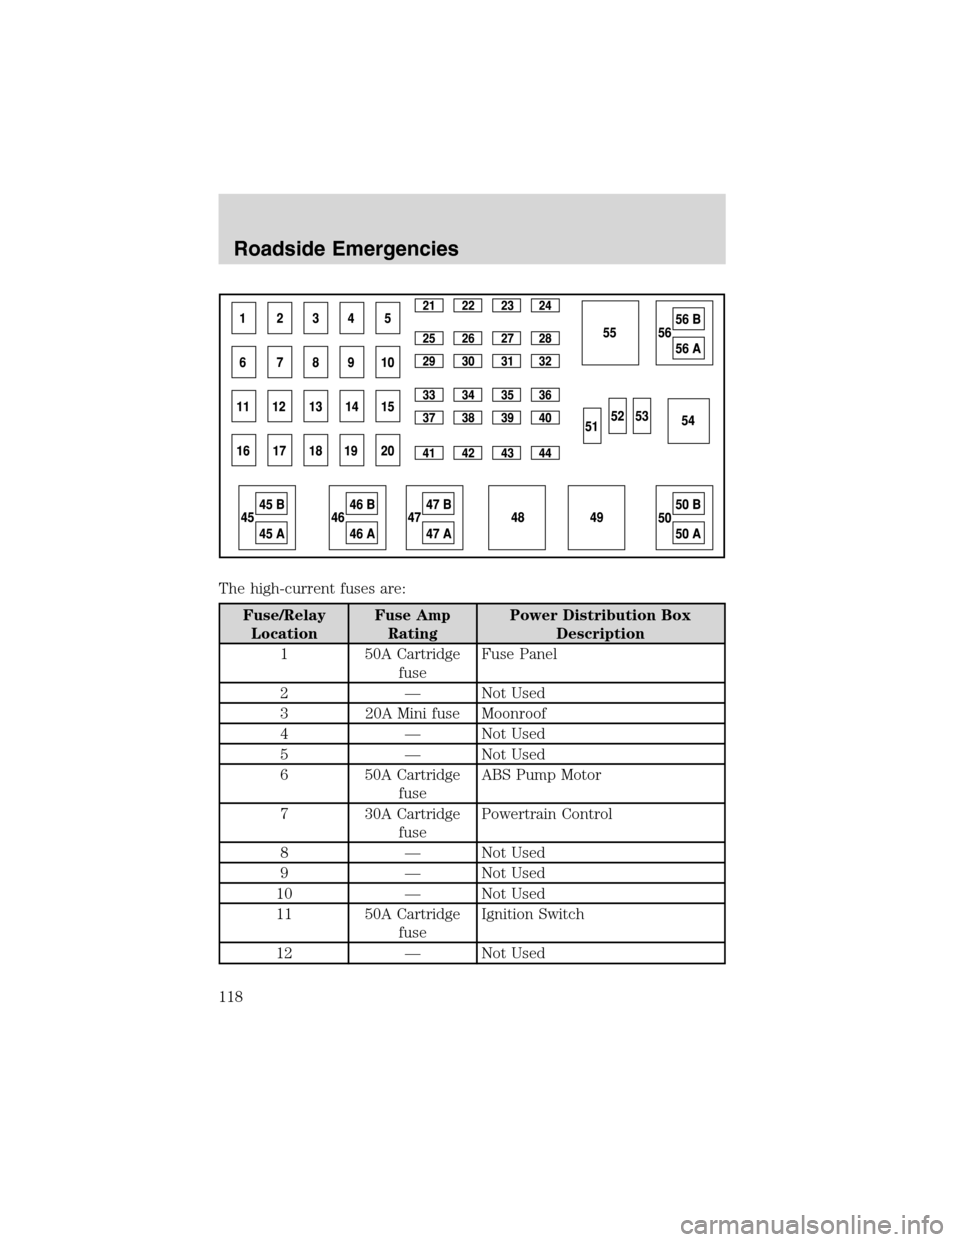
The high-current fuses are:
Fuse/Relay
LocationFuse Amp
RatingPower Distribution Box
Description
1 50A Cartridge
fuseFuse Panel
2—Not Used
3 20A Mini fuse Moonroof
4—Not Used
5—Not Used
6 50A Cartridge
fuseABS Pump Motor
7 30A Cartridge
fusePowertrain Control
8—Not Used
9—Not Used
10—Not Used
11 50A Cartridge
fuseIgnition Switch
12—Not Used
Roadside Emergencies
118
Page 119 of 184
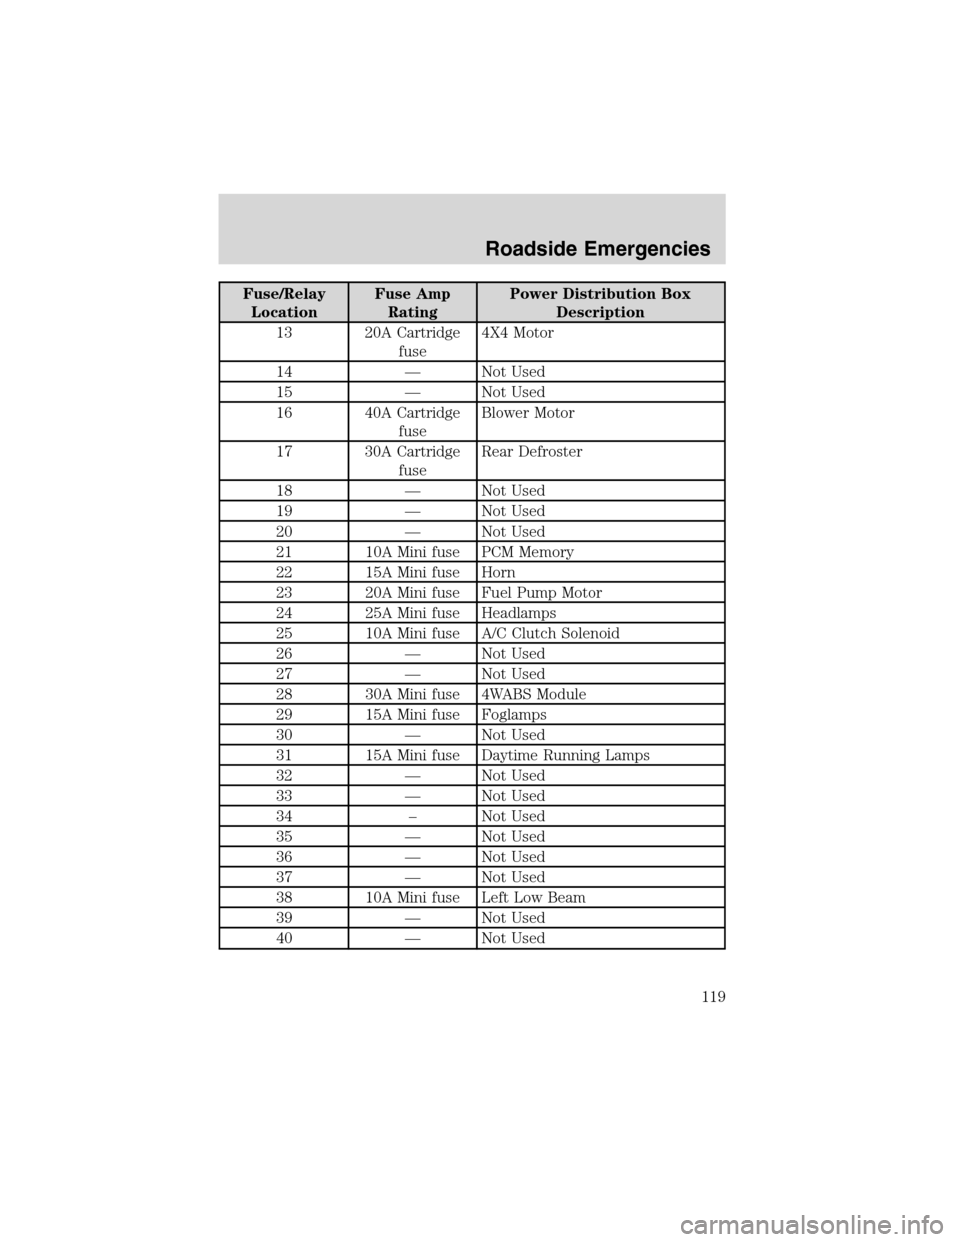
Fuse/Relay
LocationFuse Amp
RatingPower Distribution Box
Description
13 20A Cartridge
fuse4X4 Motor
14—Not Used
15—Not Used
16 40A Cartridge
fuseBlower Motor
17 30A Cartridge
fuseRear Defroster
18—Not Used
19—Not Used
20—Not Used
21 10A Mini fuse PCM Memory
22 15A Mini fuse Horn
23 20A Mini fuse Fuel Pump Motor
24 25A Mini fuse Headlamps
25 10A Mini fuse A/C Clutch Solenoid
26—Not Used
27—Not Used
28 30A Mini fuse 4WABS Module
29 15A Mini fuse Foglamps
30—Not Used
31 15A Mini fuse Daytime Running Lamps
32—Not Used
33—Not Used
34–Not Used
35—Not Used
36—Not Used
37—Not Used
38 10A Mini fuse Left Low Beam
39—Not Used
40—Not Used
Roadside Emergencies
119
Page 120 of 184
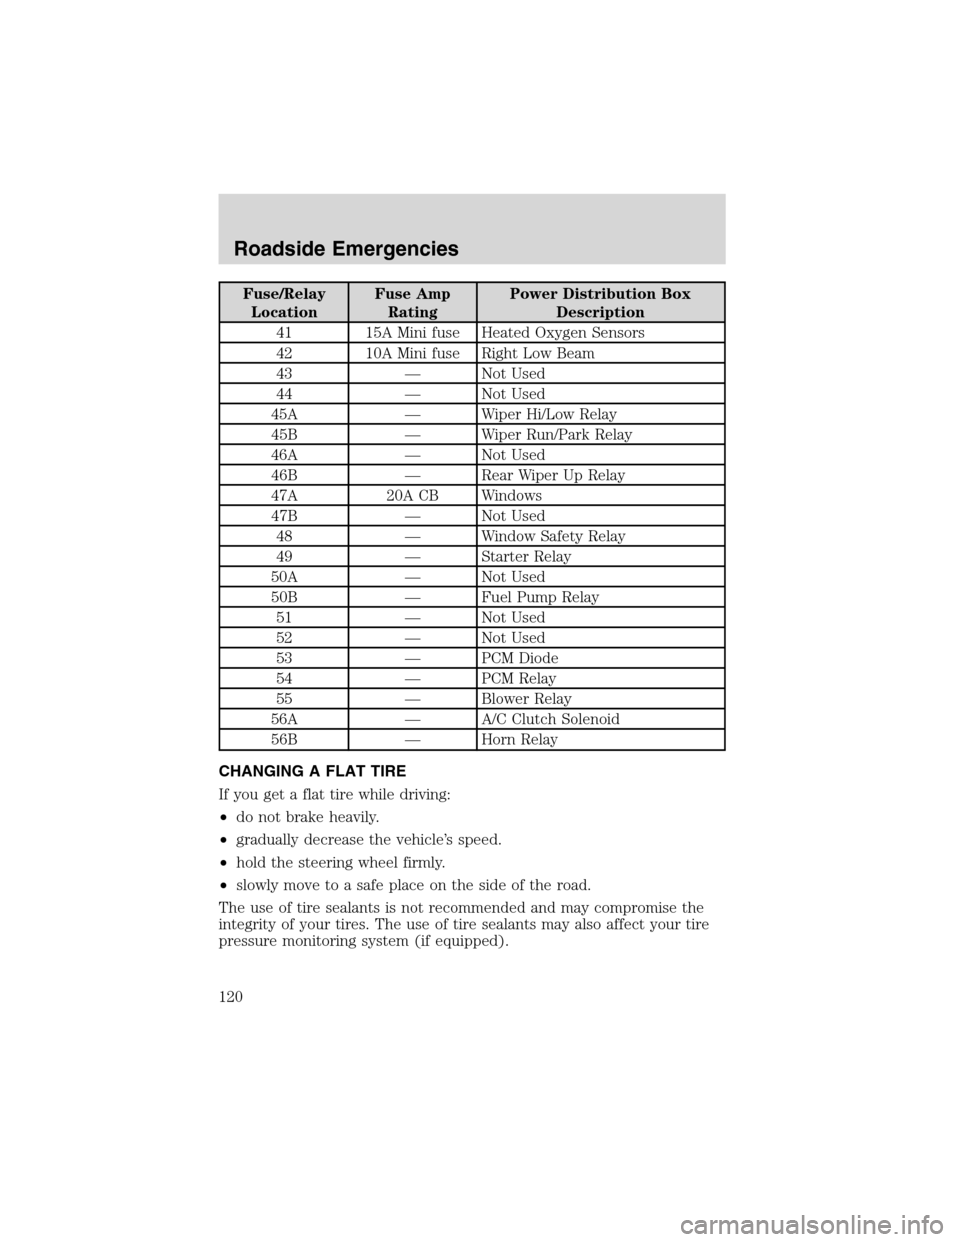
Fuse/Relay
LocationFuse Amp
RatingPower Distribution Box
Description
41 15A Mini fuse Heated Oxygen Sensors
42 10A Mini fuse Right Low Beam
43—Not Used
44—Not Used
45A—Wiper Hi/Low Relay
45B—Wiper Run/Park Relay
46A—Not Used
46B—Rear Wiper Up Relay
47A 20A CB Windows
47B—Not Used
48—Window Safety Relay
49—Starter Relay
50A—Not Used
50B—Fuel Pump Relay
51—Not Used
52—Not Used
53—PCM Diode
54—PCM Relay
55—Blower Relay
56A—A/C Clutch Solenoid
56B—Horn Relay
CHANGING A FLAT TIRE
If you get a flat tire while driving:
•do not brake heavily.
•gradually decrease the vehicle’s speed.
•hold the steering wheel firmly.
•slowly move to a safe place on the side of the road.
The use of tire sealants is not recommended and may compromise the
integrity of your tires. The use of tire sealants may also affect your tire
pressure monitoring system (if equipped).
Roadside Emergencies
120