Display screen FORD F-150 2022 User Guide
[x] Cancel search | Manufacturer: FORD, Model Year: 2022, Model line: F-150, Model: FORD F-150 2022Pages: 750, PDF Size: 12.96 MB
Page 206 of 750
WHAT IS THE REAR
OCCUPANT ALERT SYSTEM
The rear occupant alert system monitors
vehicle conditions and notifies you to check
for rear seat occupants when you switch
the ignition off.
HOW DOES THE REAR
OCCUPANT ALERT SYSTEM
WORK
The system monitors when rear doors have
been opened and closed to indicate the
potential presence of an occupant in the
rear seat.
A message displays in the information and
entertainment display screen and an
audible warning sounds when you switch
the ignition off after any of the following
conditions have been met:
•
A rear door is opened or closed while
the ignition is on.
• You switch the ignition on within 15
minutes of a rear door opening and
closing.
• You switch the ignition on within 15
minutes of the alert having displayed
or sounded.
REAR OCCUPANT ALERT
SYSTEM PRECAUTIONS WARNING: On hot days, the
temperature inside the vehicle can rise
very quickly. Exposure of people or
animals to these high temperatures for
even a short time can cause death or
serious heat related injuries, including
brain damage. Small children are
particularly at risk. WARNING:
Do not leave children
or pets unattended in your vehicle.
Failure to follow this instruction could
result in personal injury or death.
REAR OCCUPANT ALERT
SYSTEM LIMITATIONS
The system does not detect the presence
of objects or passengers in the rear seat.
It monitors when rear doors are opened
and closed.
Note: It is possible to receive an alert when
there is no rear seat occupant, but alert
conditions are met.
Note: It is possible to receive no alert when
there is an occupant in the rear seat, if alert
conditions are not met. For example, if a rear
seat occupant does not enter the vehicle
through a rear door.
Note: The audible warning does not sound
when the front door is opened before you
switch the ignition off.
SWITCHING REAR OCCUPANT
ALERT SYSTEM ON AND OFF
1. Press
Settings on the touchscreen.
2. Press
Vehicle.
3. Switch
Rear Occupant Alert on or off.
Note: The default setting is on.
Note: Performing a master reset causes the
system to switch on again.
Semiannual Reminder
(If Equipped)
When you switch the system off, a
message appears every six months as a
reminder that the system is off. You can
switch the system back on or leave it off.
202
2022 F-150 (TFD) Canada/United States of America, enUSA, Edition date: 202109, First-Printing Rear Occupant Alert System
(If Equipped)
Page 218 of 750
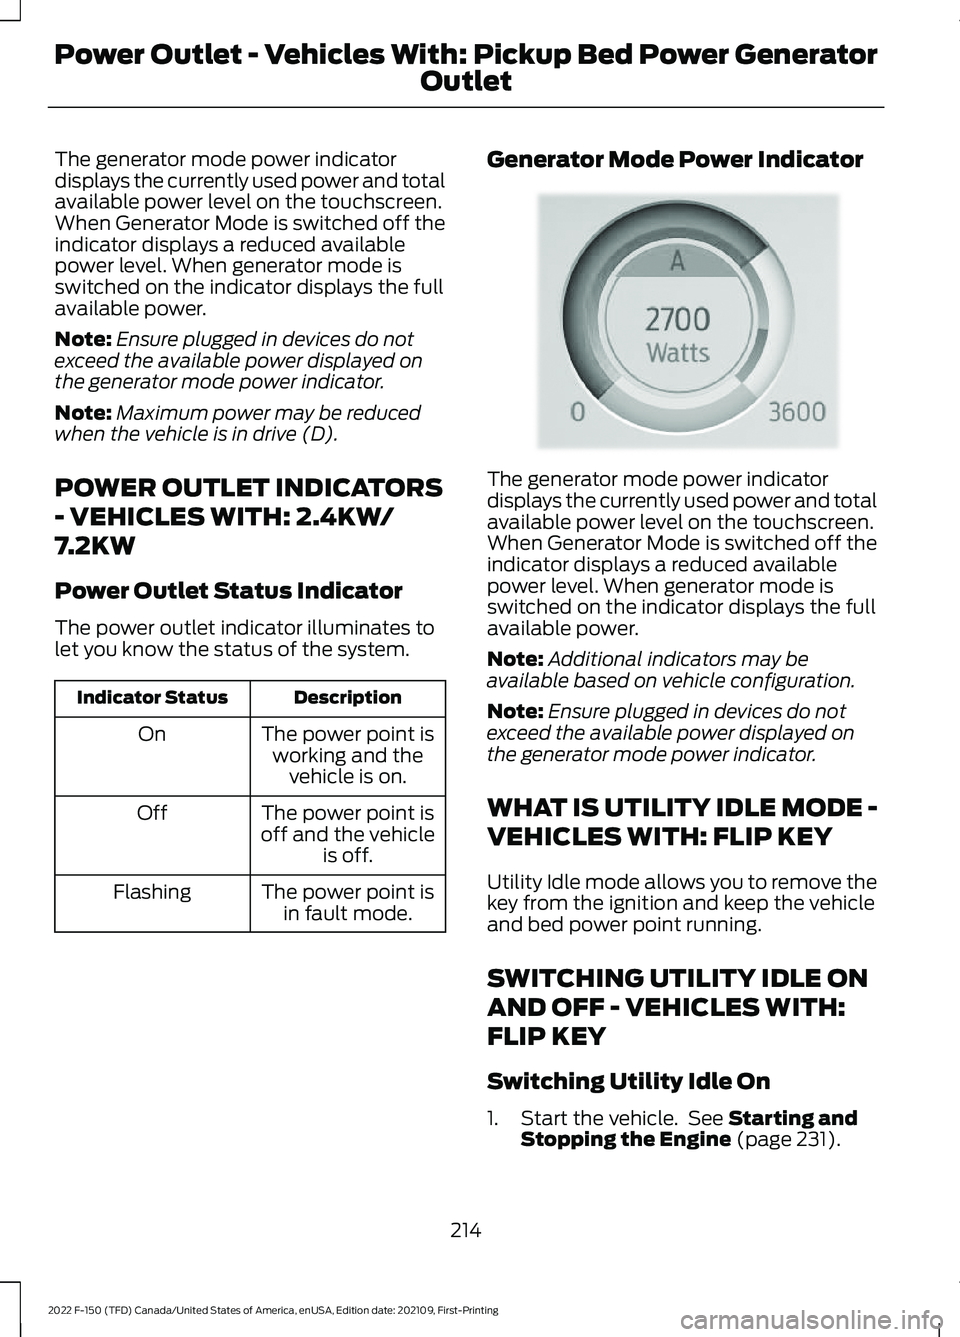
The generator mode power indicator
displays the currently used power and total
available power level on the touchscreen.
When Generator Mode is switched off the
indicator displays a reduced available
power level. When generator mode is
switched on the indicator displays the full
available power.
Note:
Ensure plugged in devices do not
exceed the available power displayed on
the generator mode power indicator.
Note: Maximum power may be reduced
when the vehicle is in drive (D).
POWER OUTLET INDICATORS
- VEHICLES WITH: 2.4KW/
7.2KW
Power Outlet Status Indicator
The power outlet indicator illuminates to
let you know the status of the system. Description
Indicator Status
The power point isworking and the vehicle is on.
On
The power point is
off and the vehicle is off.
Off
The power point isin fault mode.
Flashing Generator Mode Power Indicator The generator mode power indicator
displays the currently used power and total
available power level on the touchscreen.
When Generator Mode is switched off the
indicator displays a reduced available
power level. When generator mode is
switched on the indicator displays the full
available power.
Note:
Additional indicators may be
available based on vehicle configuration.
Note: Ensure plugged in devices do not
exceed the available power displayed on
the generator mode power indicator.
WHAT IS UTILITY IDLE MODE -
VEHICLES WITH: FLIP KEY
Utility Idle mode allows you to remove the
key from the ignition and keep the vehicle
and bed power point running.
SWITCHING UTILITY IDLE ON
AND OFF - VEHICLES WITH:
FLIP KEY
Switching Utility Idle On
1. Start the vehicle. See Starting and
Stopping the Engine (page 231).
214
2022 F-150 (TFD) Canada/United States of America, enUSA, Edition date: 202109, First-Printing Power Outlet - Vehicles With: Pickup Bed Power Generator
OutletE335469
Page 219 of 750
2. Press the Features button on the
touchscreen.
3. Press the Pro Power Onboard button.
4. Press the Generator Mode button to switch the power outlet to the rating
listed on the power outlet label.
5. Press the Utility Idle button.
6. Turn the key to position 0.
7. Remove the key from the ignition.
Switching Utility Idle Off using the
Key
1. Insert the key into the ignition.
2. Turn the key to position
III.
Switching Utility Idle off using the
Information and Entertainment
Display Screen
Use the controls on the touchscreen to
switch off the vehicle.
WHAT IS GENERATOR MODE
Generator Mode uses the vehicle engine
to increase power to the bed power outlets
up to the rating listed on the power outlet
label.
SWITCHING GENERATOR
MODE ON AND OFF
Using the Information and
Entertainment Display Screen
1. Switch the vehicle on.
See Starting
and Stopping the Engine (page 231).
2. Press the Features button on the touchscreen.
3. Press the Pro Power Onboard button.
4. Press the Generator Mode button to switch the power outlet to the full
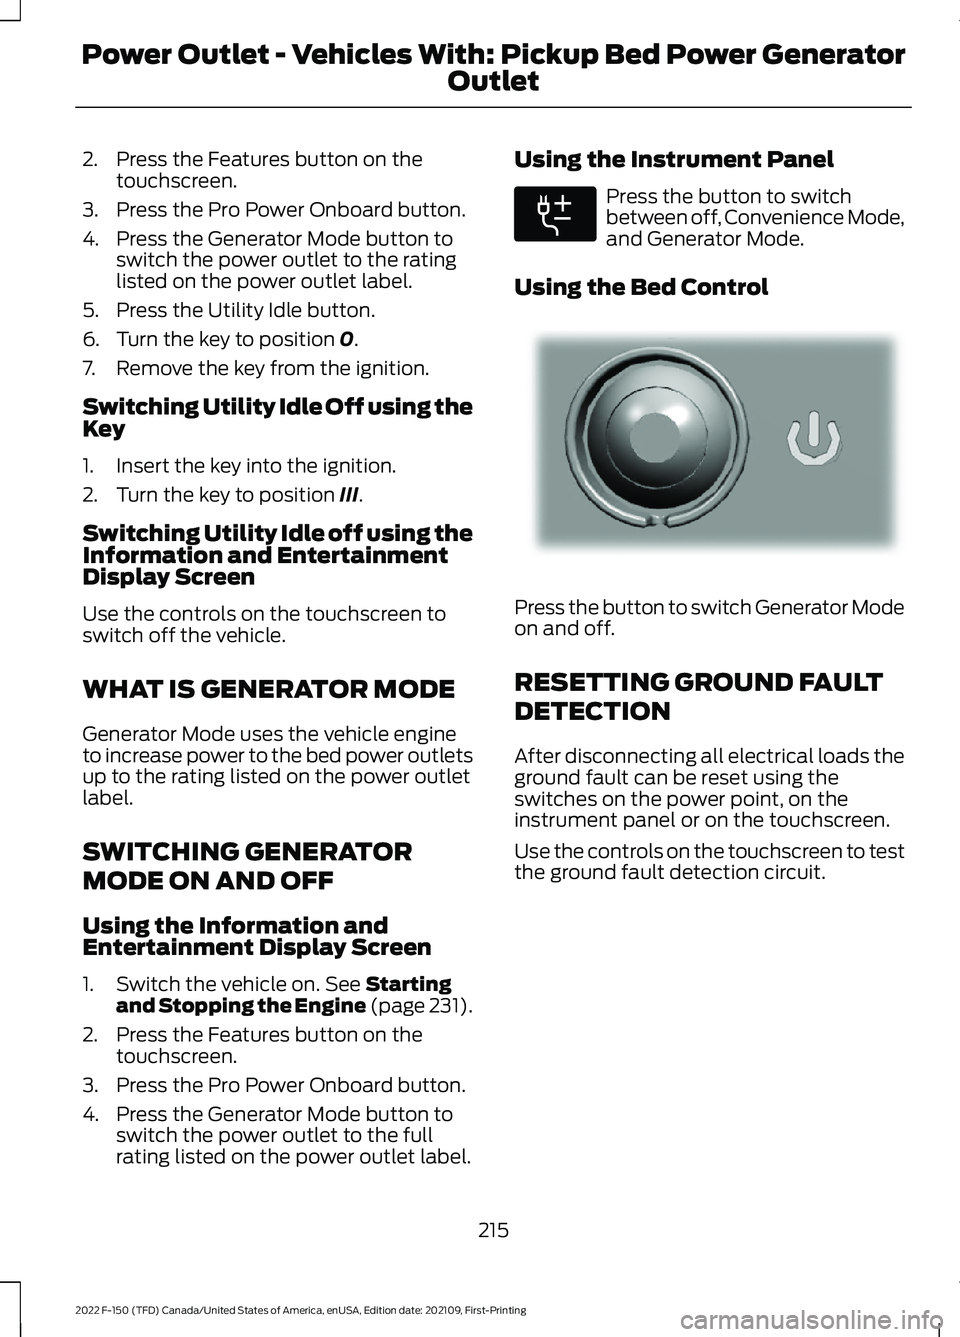
rating listed on the power outlet label. Using the Instrument Panel Press the button to switch
between off, Convenience Mode,
and Generator Mode.
Using the Bed Control Press the button to switch Generator Mode
on and off.
RESETTING GROUND FAULT
DETECTION
After disconnecting all electrical loads the
ground fault can be reset using the
switches on the power point, on the
instrument panel or on the touchscreen.
Use the controls on the touchscreen to test
the ground fault detection circuit.
215
2022 F-150 (TFD) Canada/United States of America, enUSA, Edition date: 202109, First-Printing Power Outlet - Vehicles With: Pickup Bed Power Generator
OutletE311311 E337175
Page 221 of 750
POWER OUTLET – TROUBLESHOOTING
POWER OUTLET – INFORMATION MESSAGES
Description
Message
Ensure plugged in devices do not exceed
the available power displayed. Devices may exceed the power rating shown the device label when plugged in. Unplug the device
and switch the ignition on and off to reset the system.
Item(s) plugged in exceed the system's
maximum capacity. Try unplugging one or
more items and reset. See Owner's Manual for detail.
After disconnecting all electrical loads, the
ground fault can be reset using the switches
on the power point, on the instrument panel
or on the touchscreen. Use the controls onthe touchscreen to test the ground fault detection circuit.
Ground Fault Detected. See Owner's
Manual for details.
The climate control system may turn on
and power may be limited during extreme hot or cold temperatures to optimize the performance of the system.
Generator System is outside its operating
temperature and capacity is reduced. See Owner's Manual for details.
Do not plug in any device that supplies
power to the vehicle through the power points. This could result in damage to vehicle systems.
Another power source is trying to supply
power to your vehicle's AC outlets. Discon- nect vehicle from that power source. See Owner's Manual for details.
The Pickup Bed Power Generator is in faultmode. Ensure all devices are unplugged
from the system. Use the controls on the touchscreen to reset the system. Switch
the vehicle on and off if the touchscreen
controls are unable to reset the system. See an authorized dealer if these steps do not fix the fault.
Pro Power OnBoard is currently unavailable.
See Owner's Manual for details.
After disconnecting all electrical loads, the
ground fault can be reset using the switches
on the power point, on the instrument panel
or on the touchscreen. Use the controls onthe touchscreen to test the ground fault detection circuit.
This button test outlets for proper opera-
tion of ground fault detection. In a
successful test, Pro Power OnBoard
detects the ground fault and turns off. See Owner's Manual for details.
217
2022 F-150 (TFD) Canada/United States of America, enUSA, Edition date: 202109, First-Printing Power Outlet - Vehicles With: Pickup Bed Power Generator
Outlet
Page 241 of 750
HOW DOES AUTOMATIC ENGINE
STOP WORK
Automatic engine stop turns the engine
off. The ignition also turns off in order to
save battery power. Before the engine
shuts down, a message appears in the
information display showing a timer
counting down. If you do not intervene
within 30 seconds, the engine shuts down.
Another message appears in the
information display to inform you that the
engine has shut down in order to save fuel.
Start your vehicle as you normally do.
SWITCHING AUTOMATIC ENGINE
STOP ON AND OFF
1. Press Settings on the touchscreen.
2. Press
Vehicle Settings.
3. Switch
30min Max Idle on or off.
Note: You cannot permanently switch off
the automatic shutdown. If you switch it off,
it turns on each time you switch the ignition
on.
OVERRIDING AUTOMATIC ENGINE
STOP
You can stop the engine shutdown, or reset
the timer, at any point before the
30-second countdown has expired by
doing any of the following:
• Pressing the brake pedal or accelerator
pedal.
• Pressing the
OK or RESET button
during the countdown.
Note: You cannot permanently switch off
the automatic engine shutdown feature.
When you switch it off temporarily, it turns
on at the next ignition cycle. ACCESSING THE PASSIVE KEY
BACKUP POSITION
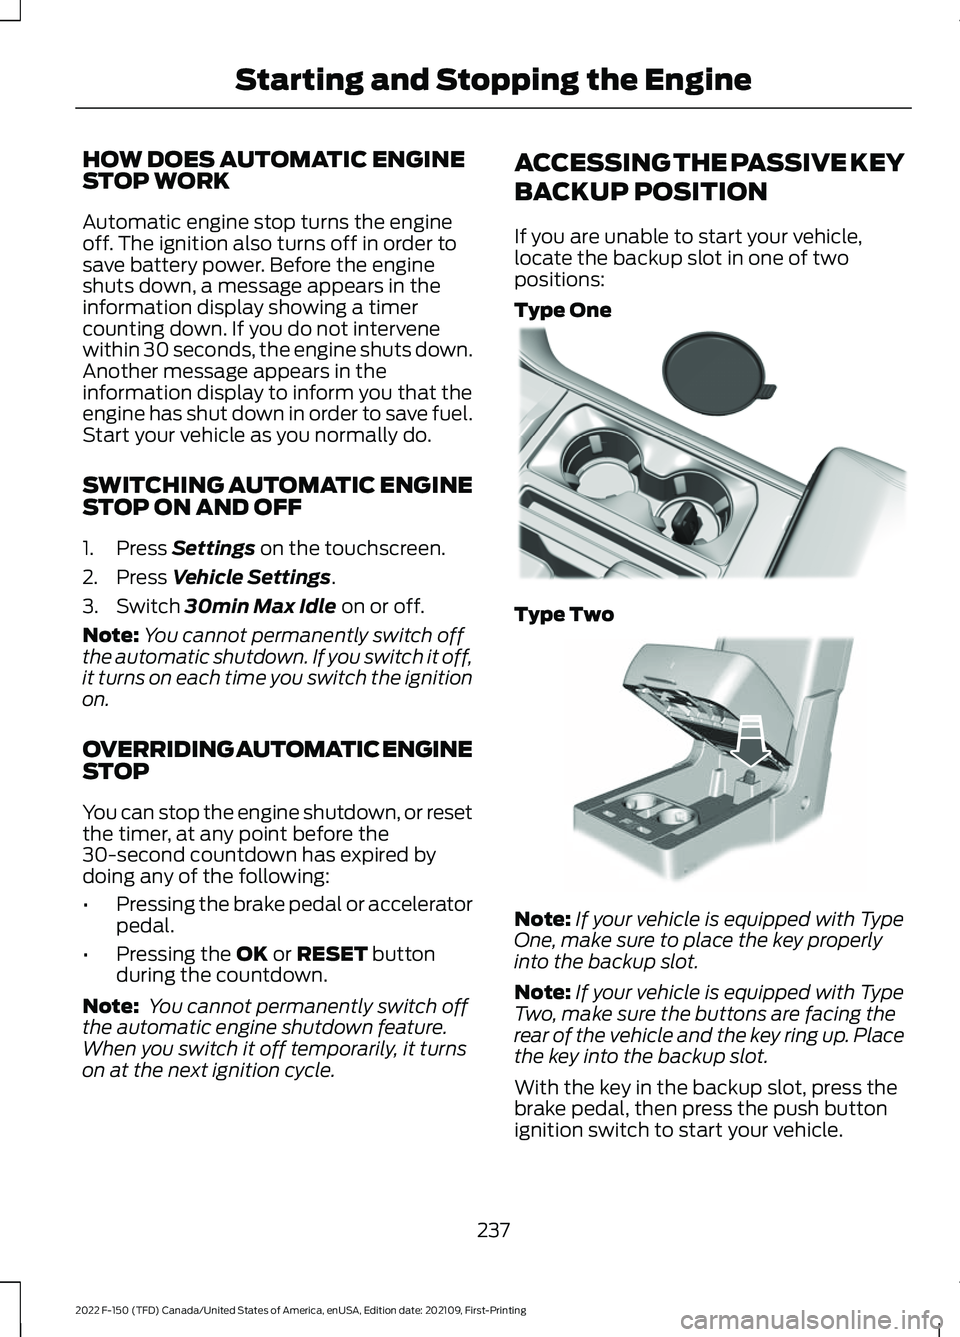
If you are unable to start your vehicle,
locate the backup slot in one of two
positions:
Type One
Type Two
Note:
If your vehicle is equipped with Type
One, make sure to place the key properly
into the backup slot.
Note: If your vehicle is equipped with Type
Two, make sure the buttons are facing the
rear of the vehicle and the key ring up. Place
the key into the backup slot.
With the key in the backup slot, press the
brake pedal, then press the push button
ignition switch to start your vehicle.
237
2022 F-150 (TFD) Canada/United States of America, enUSA, Edition date: 202109, First-Printing Starting and Stopping the EngineE312216 E269950
Page 301 of 750
HOW DOES AUTO HOLD WORK
Auto Hold applies the brakes to hold your
vehicle after you stop it and release the
brake pedal. This can help when waiting
on a hill or in traffic.
SWITCHING AUTO HOLD ON
AND OFF
WARNING: The system does not
replace the parking brake. When you
leave your vehicle, always apply the
parking brake. WARNING:
You must remain in
your vehicle when the system turns on.
At all times, you are responsible for
controlling your vehicle, supervising the
system and intervening, if required.
Failure to take care may result in the loss
of control of your vehicle, serious
personal injury or death.
You can switch the system on or off by
accessing the menu on the touchscreen.
1. Press
Settings on the touchscreen.
2. Press
Driver Assistance.
Note: You can only switch the system on
after you close the driver door and fasten
your seatbelt.
Note: The system remembers the last
setting when you start your vehicle.
Note: When using an automatic car wash,
make sure to switch auto hold off, or shift
to neutral (N) with the brake pedal applied
to ensure auto hold is not active. USING AUTO HOLD
1. Bring your vehicle to a complete stop.
The auto hold active indicator
illuminates in the information display.
2. Release the brake pedal. The system holds your vehicle at a standstill. The
auto hold active indicator remains
illuminated in the information display.
3. Pull away in the normal manner. The system releases the brakes and the
auto hold active indicator switches off.
Note: The system only activates if you
apply enough brake pressure on the brake
pedal to bring the vehicle to a standstill.
Note: Under certain conditions, the system
could apply the electric parking brake. The
brake system warning lamp illuminates. The
electric parking brake releases when you
press the accelerator pedal. See
Automatically Releasing the Electric
Parking Brake
(page 289).
Note: Auto hold cancels if you shift into
reverse (R), or neutral (N), and press the
brake pedal.
There could be actions that can cause the
auto hold system not to work when the
following occur:
• When you use active park assist.
• The driver door is open.
• You have not fastened your seatbelt.
• You shift into reverse (R), or neutral
(N) before the system is active.
AUTO HOLD INDICATORS Illuminates when the system is
active.
Illuminates when the system is
on but cannot hold your vehicle
at a standstill at this particular
time.
297
2022 F-150 (TFD) Canada/United States of America, enUSA, Edition date: 202109, First-Printing Auto HoldE323448 E323449
Page 311 of 750
WHAT IS TRAIL TURN ASSIST
Trail turn assist can reduce the turning
radius of your vehicle by applying the
brakes to the inside rear wheel in
low-speed, high steering-angle maneuvers.
TRAIL TURN ASSIST
PRECAUTIONS
Note:
Do not use trail turn assist on dry,
hard surfaced roads. Doing so can produce
excessive noise, increase tire wear and may
damage drive line, or braking components.
Trail turn assist is only intended for slippery,
or loose surfaces.
You may hear noise from the anti-lock
brake system while trail turn assist is
active. This is normal operation.
TRAIL TURN ASSIST
LIMITATIONS
Trail turn assist can only be used when the
vehicle ’s four-wheel drive system is in the
four-wheel drive high (4H), or four-wheel
drive low (4L) modes.
Trail Turn Assist cannot be used when the
vehicle ’s rear differential is locked. If the
rear differential has recently been locked
prior to Trail Turn Assist being turned on,
Trail Turn Assist may not activate until it
can confirm that the rear differential is
unlocked.
SWITCHING TRAIL TURN
ASSIST ON AND OFF
You can switch the trail turn assist on or
off from the features section of the vehicle
on screen display.
1. Press Features on the touchscreen.
2. Press
Trail Turn Assist. 3. Switch
Trail Turn Assist on or off.
Switch trail turn assist on when your
vehicle is in four-wheel drive high (4H) or
four-wheel drive low (4L).
The system activates when the:
• Vehicle speed is less than
12 mph
(19.3 km/h).
• Rear differential is fully unlocked.
• Steering wheel is almost fully turned
to the left or right.
Switch trail turn assist off by performing
any of the following:
• Switch trail turn assist off from the
features section of the vehicle on
screen display.
• Select two-wheel drive high, or
four-wheel drive auto.
• Switch on the rear locking differential.
TRAIL TURN ASSIST
INDICATORS When trail turn assist is on, one
of these two indicators will be
displayed, depending on the
direction of the vehicle
’s last
turn. When the feature is on but
not in use, the indicator light will
be gray. When the feature is active the
indicator light will be green.
307
2022 F-150 (TFD) Canada/United States of America, enUSA, Edition date: 202109, First-Printing Trail Turn Assist
(If Equipped)E338899 E338900
Page 323 of 750
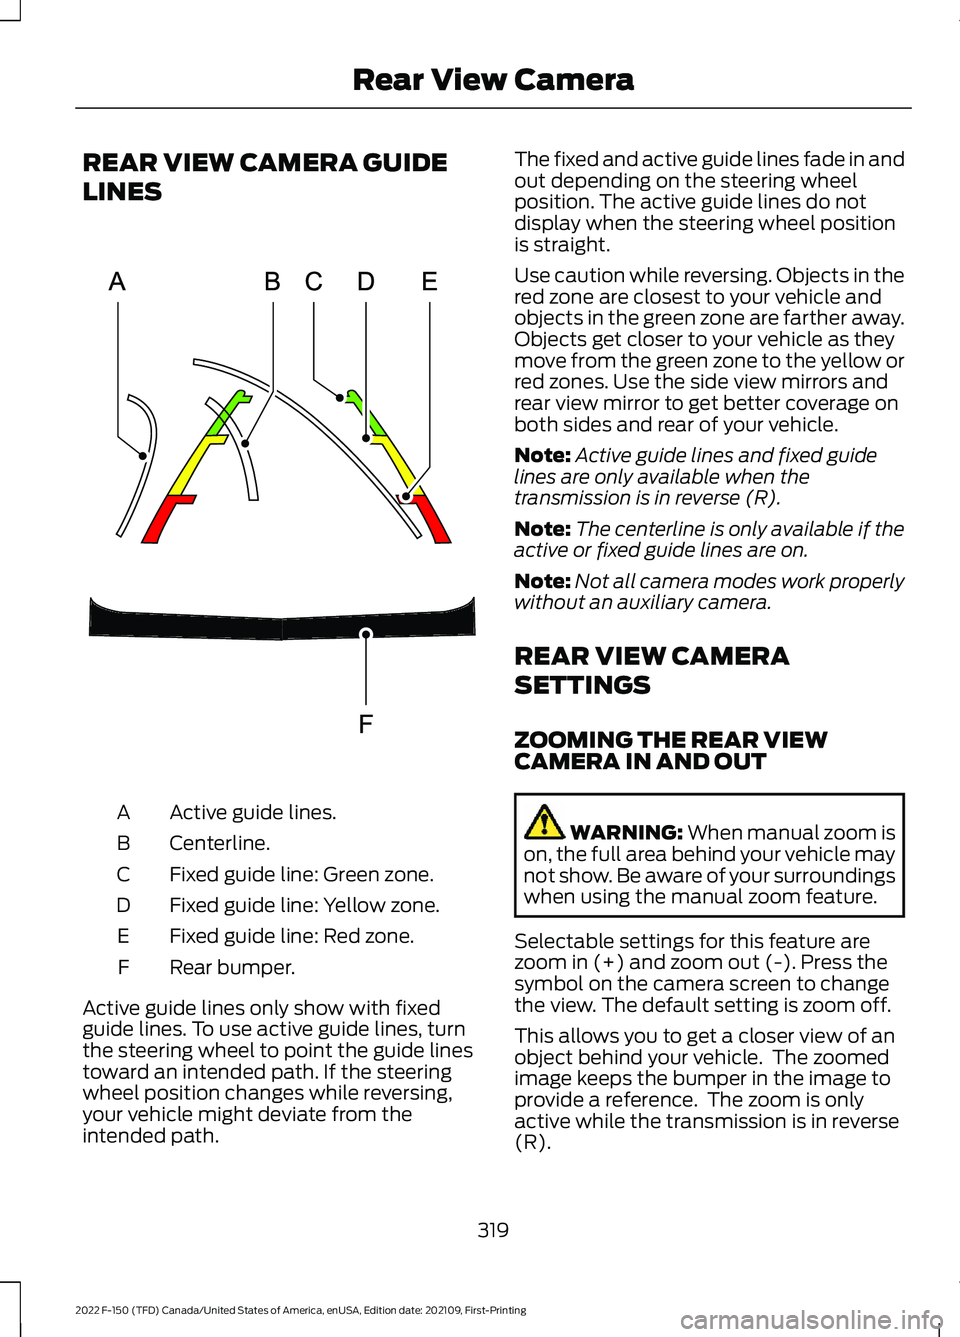
REAR VIEW CAMERA GUIDE
LINES
Active guide lines.
A
Centerline.
B
Fixed guide line: Green zone.
C
Fixed guide line: Yellow zone.
D
Fixed guide line: Red zone.
E
Rear bumper.
F
Active guide lines only show with fixed
guide lines. To use active guide lines, turn
the steering wheel to point the guide lines
toward an intended path. If the steering
wheel position changes while reversing,
your vehicle might deviate from the
intended path. The fixed and active guide lines fade in and
out depending on the steering wheel
position. The active guide lines do not
display when the steering wheel position
is straight.
Use caution while reversing. Objects in the
red zone are closest to your vehicle and
objects in the green zone are farther away.
Objects get closer to your vehicle as they
move from the green zone to the yellow or
red zones. Use the side view mirrors and
rear view mirror to get better coverage on
both sides and rear of your vehicle.
Note:
Active guide lines and fixed guide
lines are only available when the
transmission is in reverse (R).
Note: The centerline is only available if the
active or fixed guide lines are on.
Note: Not all camera modes work properly
without an auxiliary camera.
REAR VIEW CAMERA
SETTINGS
ZOOMING THE REAR VIEW
CAMERA IN AND OUT WARNING: When manual zoom is
on, the full area behind your vehicle may
not show. Be aware of your surroundings
when using the manual zoom feature.
Selectable settings for this feature are
zoom in (+) and zoom out (-). Press the
symbol on the camera screen to change
the view. The default setting is zoom off.
This allows you to get a closer view of an
object behind your vehicle. The zoomed
image keeps the bumper in the image to
provide a reference. The zoom is only
active while the transmission is in reverse
(R).
319
2022 F-150 (TFD) Canada/United States of America, enUSA, Edition date: 202109, First-Printing Rear View CameraE306774
Page 324 of 750
Note:
Zooming in also engages park hold
which applies the electric park brake when
you shift to park (P). When you press the
zoom button, the electronic park hold
button illuminates on the touchscreen. See
Connecting a Trailer (page 399).
Note: Manual zoom is only available when
the transmission is in reverse (R).
Note: Only the centerline shows when you
enable manual zoom.
SWITCHING REAR VIEW CAMERA
DELAY ON AND OFF
1. Press
Features on the touchscreen.
2. Press
Driver Assistance.
3. Press
Rear View Camera.
4. Switch
Rear View Camera Delay on or
off.
When shifting the transmission out of
reverse (R) and into any gear other than
park (P), the camera image remains in the
display until:
• Your vehicle speed reaches
approximately
5 mph (8 km/h).
• You shift your vehicle into park (P).
SWITCHING THE REAR VIEW
CAMERA VIEW Press to access the different
camera views.
Rear normal view provides an
image of what is directly behind
your vehicle.
Rear split view provides an
extended view of what is behind
your vehicle.
The hitch view provides an
image of the area around the
tow hitch. Note:
The rear normal view and hitch view
are also available when your vehicle is in
drive (D).
320
2022 F-150 (TFD) Canada/United States of America, enUSA, Edition date: 202109, First-Printing Rear View CameraE337002 E310967 E310974 E350276
Page 326 of 750
Side View Camera
The side view camera is on the outside
mirror. It provides a video image of the area
on the sides of your vehicle to aid you when
parking or when backing up a trailer.
Bed Camera
The bed camera is mounted within the
high-mount stop lamp. It displays the
contents of your truck bed. The camera
contains a dynamic guideline to help locate
the center of your vehicle. This view can
be accessed while in drive (D) or reverse
(R).
Auxiliary Camera
The auxiliary camera is a variant of the rear
view camera and is accessed by pressing
the AUX button on the display screen when
moving in reverse (R) or in drive (D). It
displays a rear view image from the back
of a trailer while in reverse.
LOCATING THE 360 DEGREE
CAMERAS - RAPTOR/TREMOR
Rear View Camera
The rear view camera is on the tailgate. It
provides a video image of the area behind
your vehicle.
Front View Camera
The front view camera is in the grille. It
provides a video image of the area in front
of your vehicle.
Note:
The front camera switches on when
you are in mud/ruts, deep snow/sand, rock
crawl, baja mode or in four-wheel drive low. Side View Camera
The side view camera is on the outside
mirror. It provides a video image of the area
on the sides of your vehicle to aid you when
parking or when backing up a trailer.
Bed Camera
The bed camera is in the high-mount stop
lamp. It displays the contents of your truck
bed. The camera contains a dynamic
guideline to help locate the center of your
vehicle. You can access this view while in
drive (D) or reverse (R).
Auxiliary Camera
The auxiliary camera is a variant of the rear
view camera and you can access the
auxiliary view by pressing the AUX button
on the display screen when moving in
reverse (R) or in drive (D). It displays a rear
view image from the back of a trailer while
in reverse.
360 DEGREE CAMERA GUIDE
LINES
Note:
Active guide lines are only available
when the transmission is in reverse (R).
322
2022 F-150 (TFD) Canada/United States of America, enUSA, Edition date: 202109, First-Printing 360 Degree Camera (If Equipped)