FORD F-650/750 2022 Owners Manual
Manufacturer: FORD, Model Year: 2022, Model line: F-650/750, Model: FORD F-650/750 2022Pages: 379, PDF Size: 5.29 MB
Page 91 of 379
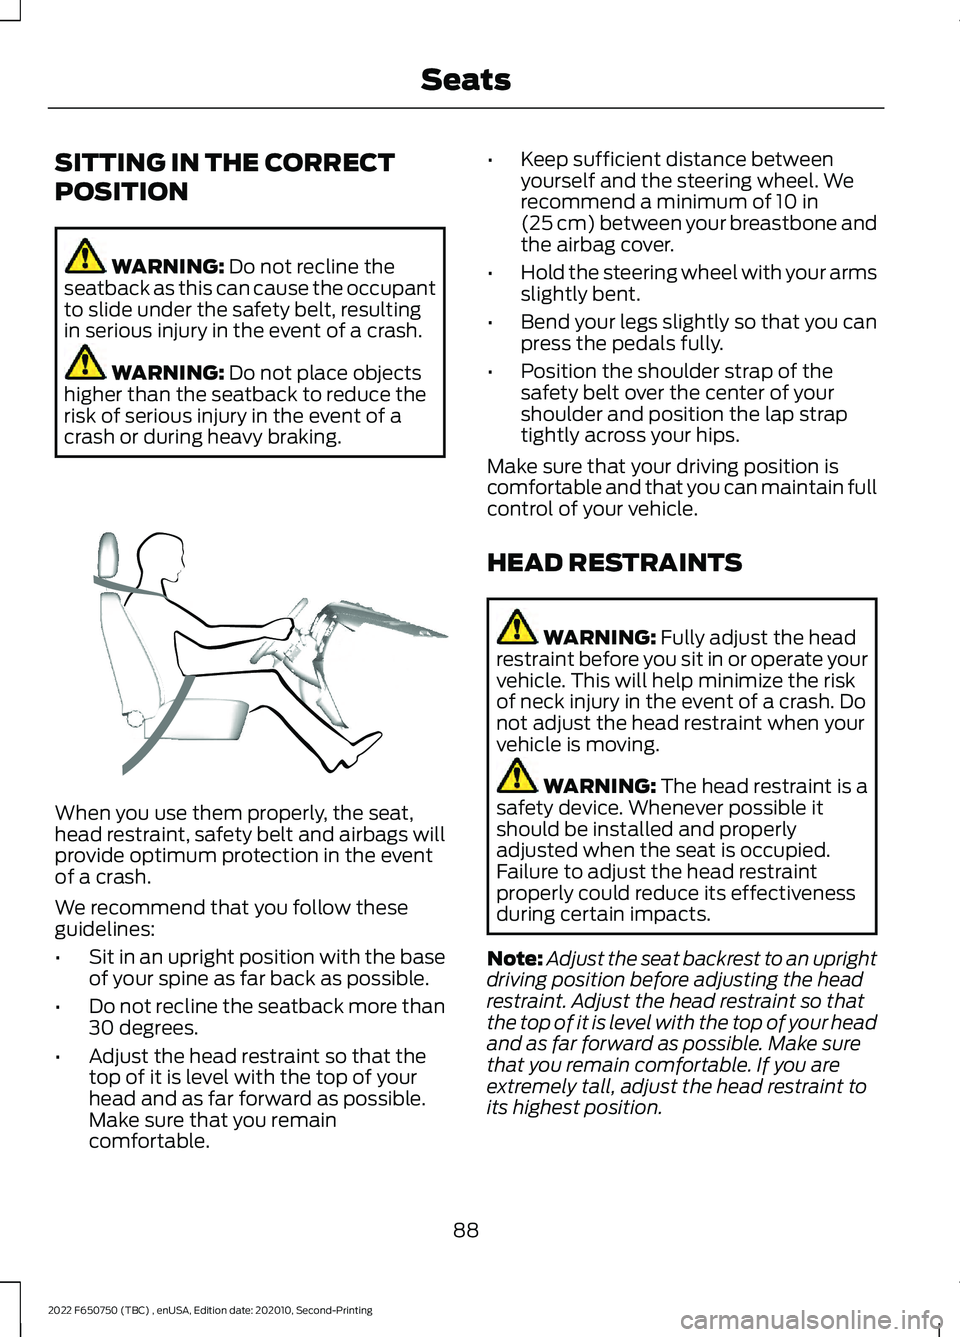
SITTING IN THE CORRECT
POSITION
WARNING: Do not recline the
seatback as this can cause the occupant
to slide under the safety belt, resulting
in serious injury in the event of a crash. WARNING:
Do not place objects
higher than the seatback to reduce the
risk of serious injury in the event of a
crash or during heavy braking. When you use them properly, the seat,
head restraint, safety belt and airbags will
provide optimum protection in the event
of a crash.
We recommend that you follow these
guidelines:
•
Sit in an upright position with the base
of your spine as far back as possible.
• Do not recline the seatback more than
30 degrees.
• Adjust the head restraint so that the
top of it is level with the top of your
head and as far forward as possible.
Make sure that you remain
comfortable. •
Keep sufficient distance between
yourself and the steering wheel. We
recommend a minimum of
10 in
(25 cm) between your breastbone and
the airbag cover.
• Hold the steering wheel with your arms
slightly bent.
• Bend your legs slightly so that you can
press the pedals fully.
• Position the shoulder strap of the
safety belt over the center of your
shoulder and position the lap strap
tightly across your hips.
Make sure that your driving position is
comfortable and that you can maintain full
control of your vehicle.
HEAD RESTRAINTS WARNING:
Fully adjust the head
restraint before you sit in or operate your
vehicle. This will help minimize the risk
of neck injury in the event of a crash. Do
not adjust the head restraint when your
vehicle is moving. WARNING:
The head restraint is a
safety device. Whenever possible it
should be installed and properly
adjusted when the seat is occupied.
Failure to adjust the head restraint
properly could reduce its effectiveness
during certain impacts.
Note: Adjust the seat backrest to an upright
driving position before adjusting the head
restraint. Adjust the head restraint so that
the top of it is level with the top of your head
and as far forward as possible. Make sure
that you remain comfortable. If you are
extremely tall, adjust the head restraint to
its highest position.
88
2022 F650750 (TBC) , enUSA, Edition date: 202010, Second-Printing SeatsE68595
Page 92 of 379
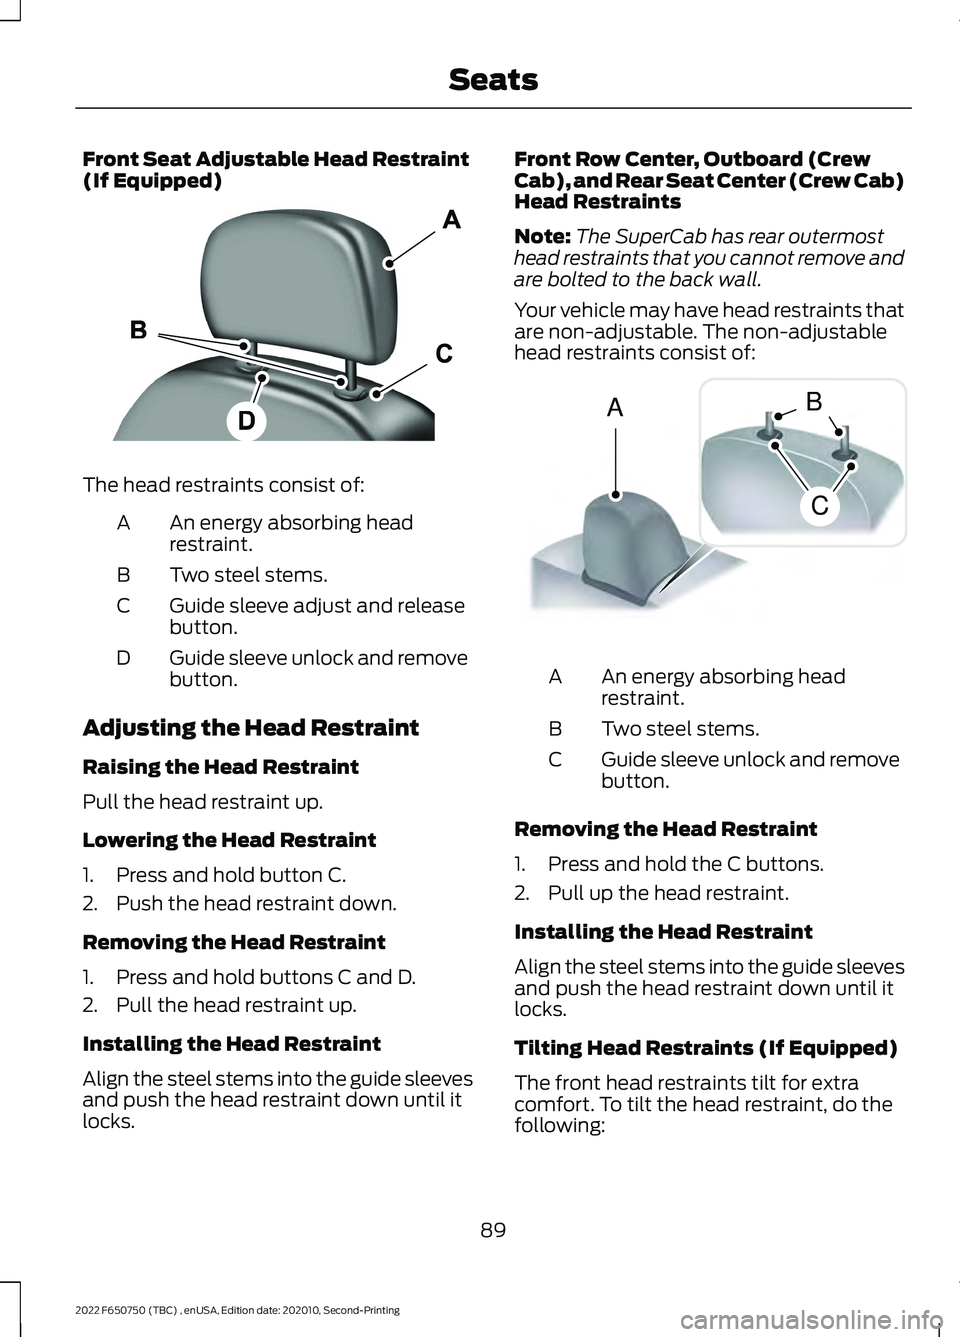
Front Seat Adjustable Head Restraint
(If Equipped)
The head restraints consist of:
An energy absorbing head
restraint.
A
Two steel stems.
B
Guide sleeve adjust and release
button.
C
Guide sleeve unlock and remove
button.
D
Adjusting the Head Restraint
Raising the Head Restraint
Pull the head restraint up.
Lowering the Head Restraint
1. Press and hold button C.
2. Push the head restraint down.
Removing the Head Restraint
1. Press and hold buttons C and D.
2. Pull the head restraint up.
Installing the Head Restraint
Align the steel stems into the guide sleeves
and push the head restraint down until it
locks. Front Row Center, Outboard (Crew
Cab), and Rear Seat Center (Crew Cab)
Head Restraints
Note:
The SuperCab has rear outermost
head restraints that you cannot remove and
are bolted to the back wall.
Your vehicle may have head restraints that
are non-adjustable. The non-adjustable
head restraints consist of: An energy absorbing head
restraint.
A
Two steel stems.
B
Guide sleeve unlock and remove
button.
C
Removing the Head Restraint
1. Press and hold the C buttons.
2. Pull up the head restraint.
Installing the Head Restraint
Align the steel stems into the guide sleeves
and push the head restraint down until it
locks.
Tilting Head Restraints (If Equipped)
The front head restraints tilt for extra
comfort. To tilt the head restraint, do the
following:
89
2022 F650750 (TBC) , enUSA, Edition date: 202010, Second-Printing SeatsE138642 A
C
B E162872
Page 93 of 379
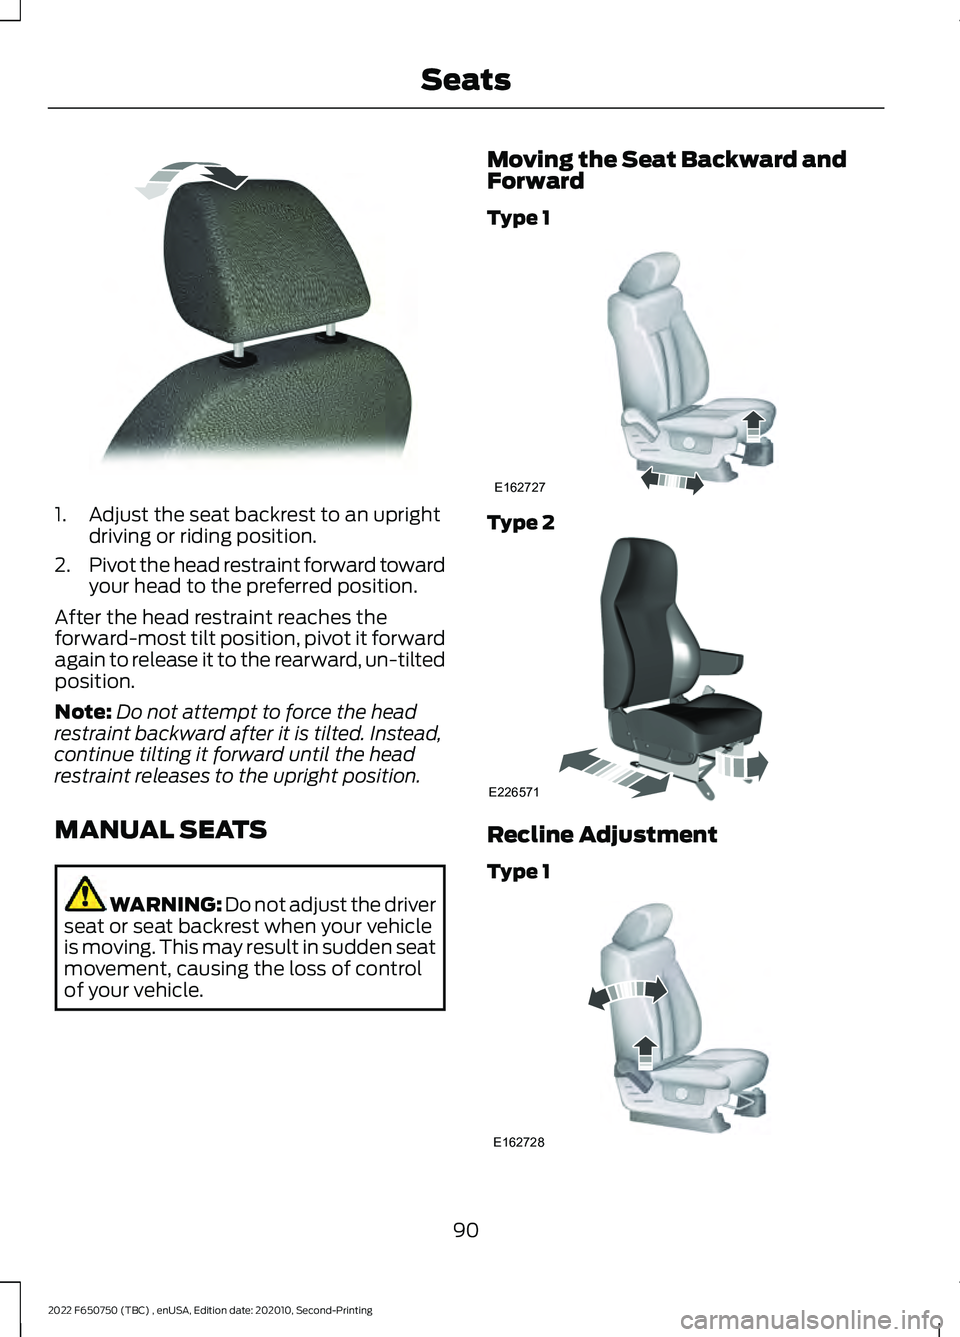
1. Adjust the seat backrest to an upright
driving or riding position.
2. Pivot the head restraint forward toward
your head to the preferred position.
After the head restraint reaches the
forward-most tilt position, pivot it forward
again to release it to the rearward, un-tilted
position.
Note: Do not attempt to force the head
restraint backward after it is tilted. Instead,
continue tilting it forward until the head
restraint releases to the upright position.
MANUAL SEATS WARNING: Do not adjust the driver
seat or seat backrest when your vehicle
is moving. This may result in sudden seat
movement, causing the loss of control
of your vehicle. Moving the Seat Backward and
Forward
Type 1
Type 2
Recline Adjustment
Type 1
90
2022 F650750 (TBC) , enUSA, Edition date: 202010, Second-Printing SeatsE144727 E162727 E226571 E162728
Page 94 of 379
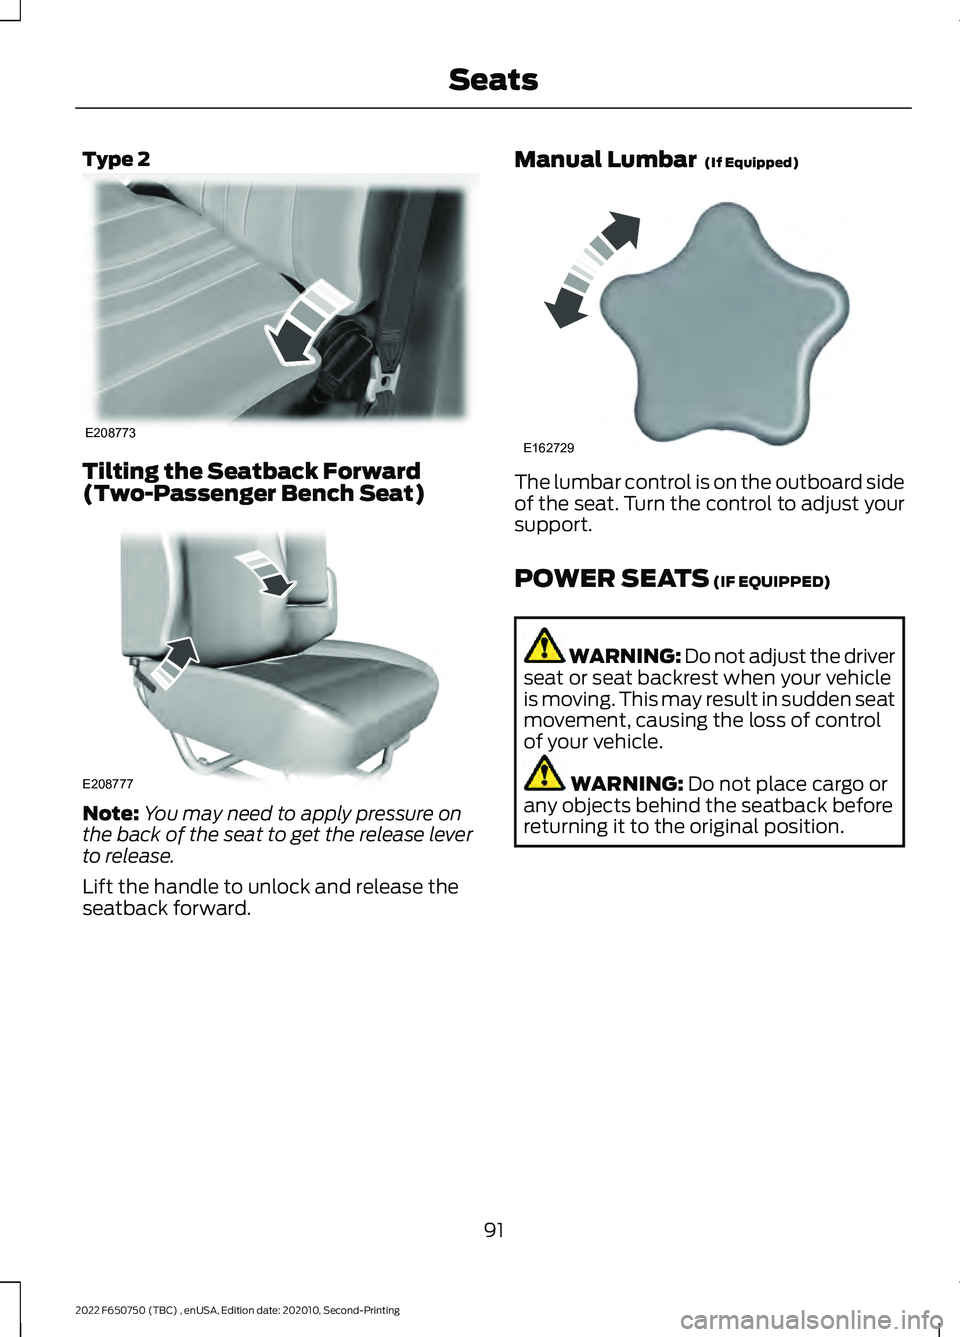
Type 2
Tilting the Seatback Forward
(Two-Passenger Bench Seat)
Note:
You may need to apply pressure on
the back of the seat to get the release lever
to release.
Lift the handle to unlock and release the
seatback forward. Manual Lumbar (If Equipped) The lumbar control is on the outboard side
of the seat. Turn the control to adjust your
support.
POWER SEATS
(IF EQUIPPED)
WARNING: Do not adjust the driver
seat or seat backrest when your vehicle
is moving. This may result in sudden seat
movement, causing the loss of control
of your vehicle. WARNING:
Do not place cargo or
any objects behind the seatback before
returning it to the original position.
91
2022 F650750 (TBC) , enUSA, Edition date: 202010, Second-Printing SeatsE208773 E208777 E162729
Page 95 of 379
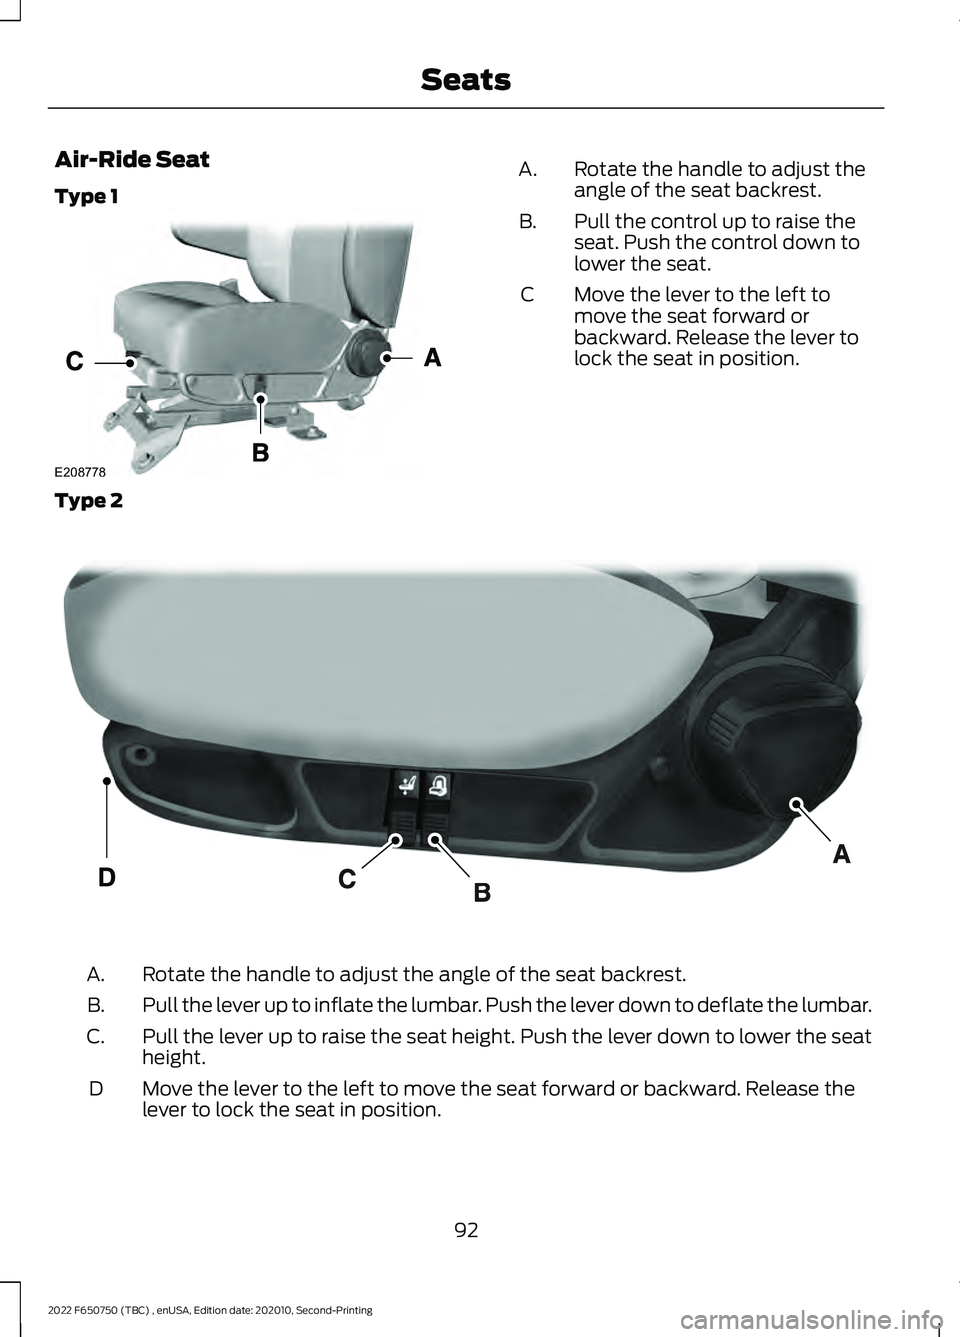
Air-Ride Seat
Type 1
Rotate the handle to adjust the
angle of the seat backrest.
A.
Pull the control up to raise the
seat. Push the control down to
lower the seat.
B.
Move the lever to the left to
move the seat forward or
backward. Release the lever to
lock the seat in position.
C
Type 2 Rotate the handle to adjust the angle of the seat backrest.
A.
Pull the lever up to inflate the lumbar. Push the lever down to deflate the lumbar.
B.
Pull the lever up to raise the seat height. Push the lever down to lower the seat
height.
C.
Move the lever to the left to move the seat forward or backward. Release the
lever to lock the seat in position.
D
92
2022 F650750 (TBC) , enUSA, Edition date: 202010, Second-Printing SeatsE208778 E298809
Page 96 of 379
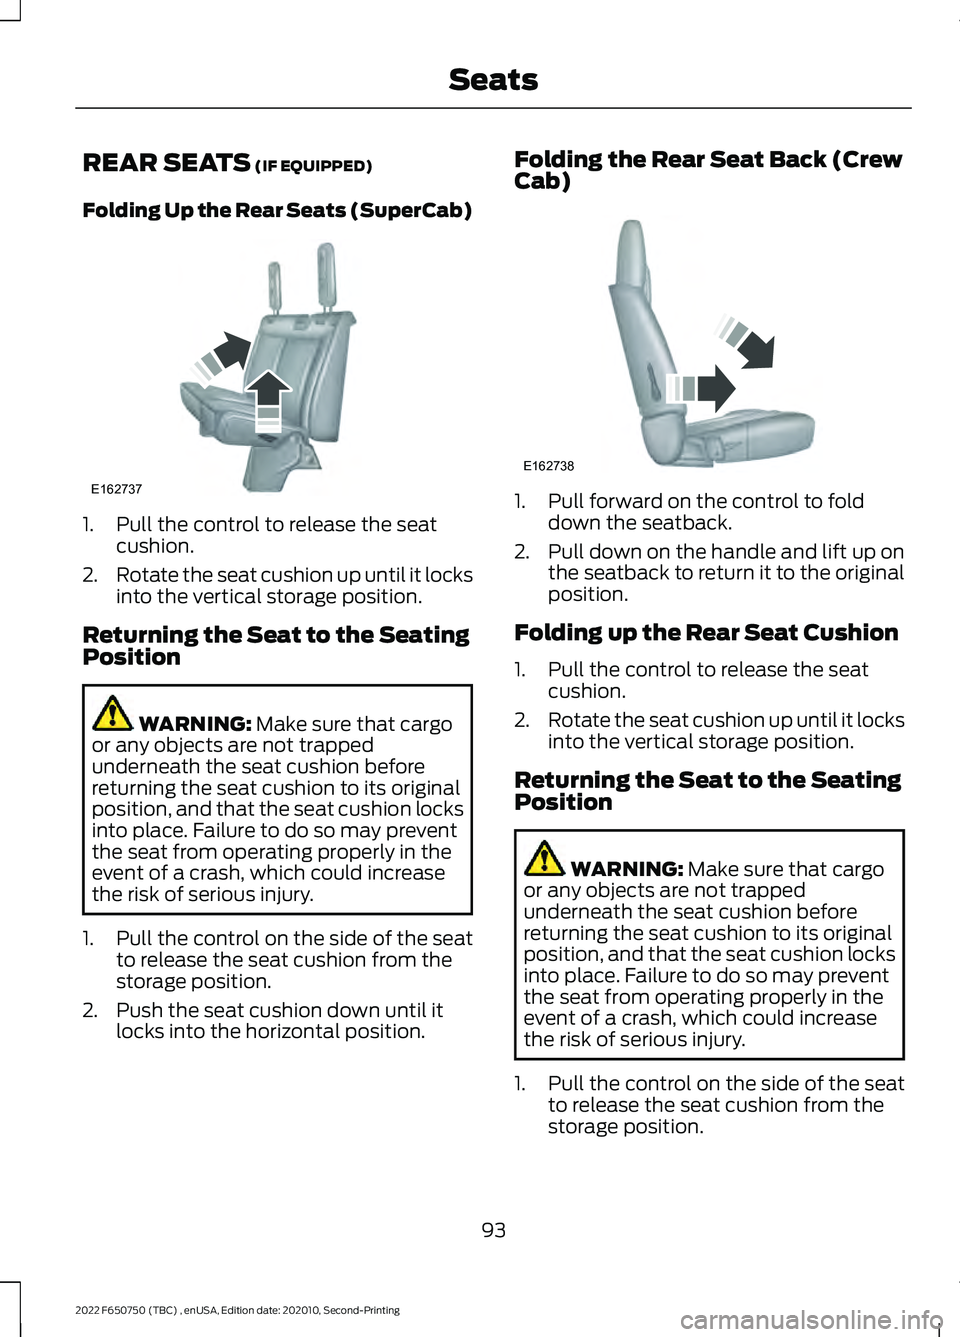
REAR SEATS (IF EQUIPPED)
Folding Up the Rear Seats (SuperCab) 1. Pull the control to release the seat
cushion.
2. Rotate the seat cushion up until it locks
into the vertical storage position.
Returning the Seat to the Seating
Position WARNING:
Make sure that cargo
or any objects are not trapped
underneath the seat cushion before
returning the seat cushion to its original
position, and that the seat cushion locks
into place. Failure to do so may prevent
the seat from operating properly in the
event of a crash, which could increase
the risk of serious injury.
1. Pull the control on the side of the seat to release the seat cushion from the
storage position.
2. Push the seat cushion down until it locks into the horizontal position. Folding the Rear Seat Back (Crew
Cab)
1. Pull forward on the control to fold
down the seatback.
2. Pull down on the handle and lift up on
the seatback to return it to the original
position.
Folding up the Rear Seat Cushion
1. Pull the control to release the seat cushion.
2. Rotate the seat cushion up until it locks
into the vertical storage position.
Returning the Seat to the Seating
Position WARNING:
Make sure that cargo
or any objects are not trapped
underneath the seat cushion before
returning the seat cushion to its original
position, and that the seat cushion locks
into place. Failure to do so may prevent
the seat from operating properly in the
event of a crash, which could increase
the risk of serious injury.
1. Pull the control on the side of the seat to release the seat cushion from the
storage position.
93
2022 F650750 (TBC) , enUSA, Edition date: 202010, Second-Printing SeatsE162737 E162738
Page 97 of 379
2. Push the seat cushion down until it
locks into the horizontal position.
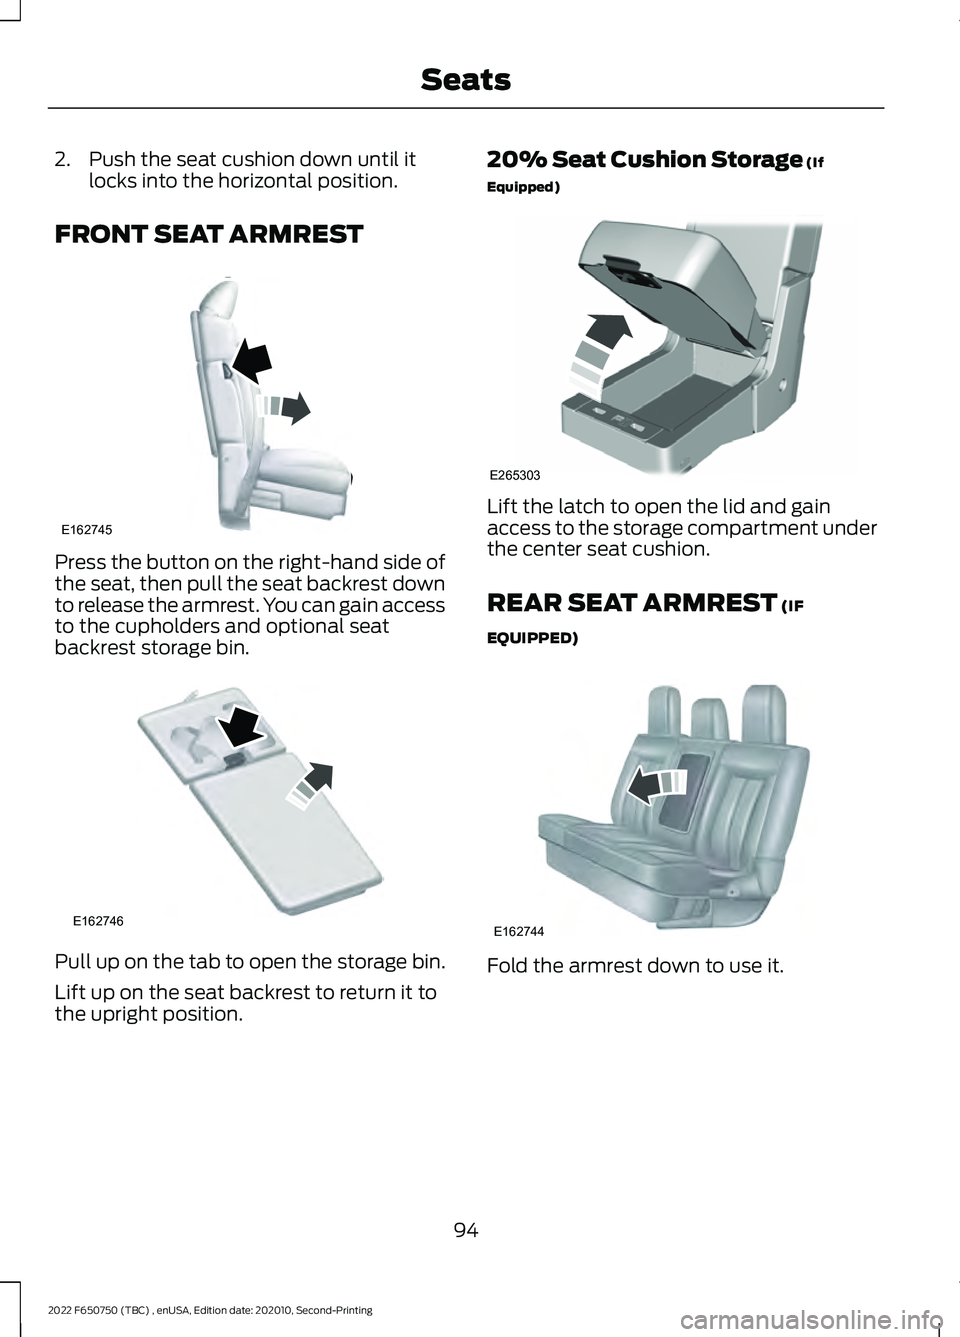
FRONT SEAT ARMREST Press the button on the right-hand side of
the seat, then pull the seat backrest down
to release the armrest. You can gain access
to the cupholders and optional seat
backrest storage bin.
Pull up on the tab to open the storage bin.
Lift up on the seat backrest to return it to
the upright position. 20% Seat Cushion Storage (If
Equipped) Lift the latch to open the lid and gain
access to the storage compartment under
the center seat cushion.
REAR SEAT ARMREST
(IF
EQUIPPED) Fold the armrest down to use it.
94
2022 F650750 (TBC) , enUSA, Edition date: 202010, Second-Printing SeatsE162745 E162746 E265303 E162744
Page 98 of 379
12 Volt DC Power Point
WARNING: Do not plug optional
electrical accessories into the cigar
lighter socket. Incorrect use of the cigar
lighter can cause damage not covered
by the vehicle warranty, and can result
in fire or serious injury.
Note: When you switch the ignition on, you
can use the socket to power 12 volt
appliances with a maximum current rating
of 15 amps.
If the power supply does not work after you
switch the ignition off, switch the ignition
on.
Note: Do not hang any accessory from the
accessory plug.
Note: Do not use the power point over the
vehicle capacity of 12 volt DC 180 watts or
a fuse may blow.
Note: Always keep the power point caps
closed when not in use.
Do not insert objects other than an
accessory plug into the power point. This
damages the power point and may blow
the fuse.
Run the vehicle for full capacity use of the
power point.
To prevent the battery from running out of
charge:
• Do not use the power point longer than
necessary when the vehicle is not
running.
• Do not leave devices plugged in
overnight or when you park your vehicle
for extended periods. Locations
Power points may be in the following
locations:
•
On the instrument panel (two
locations).
• Inside the front under-seat storage
compartment.
• Inside the rear under-seat storage
compartment.
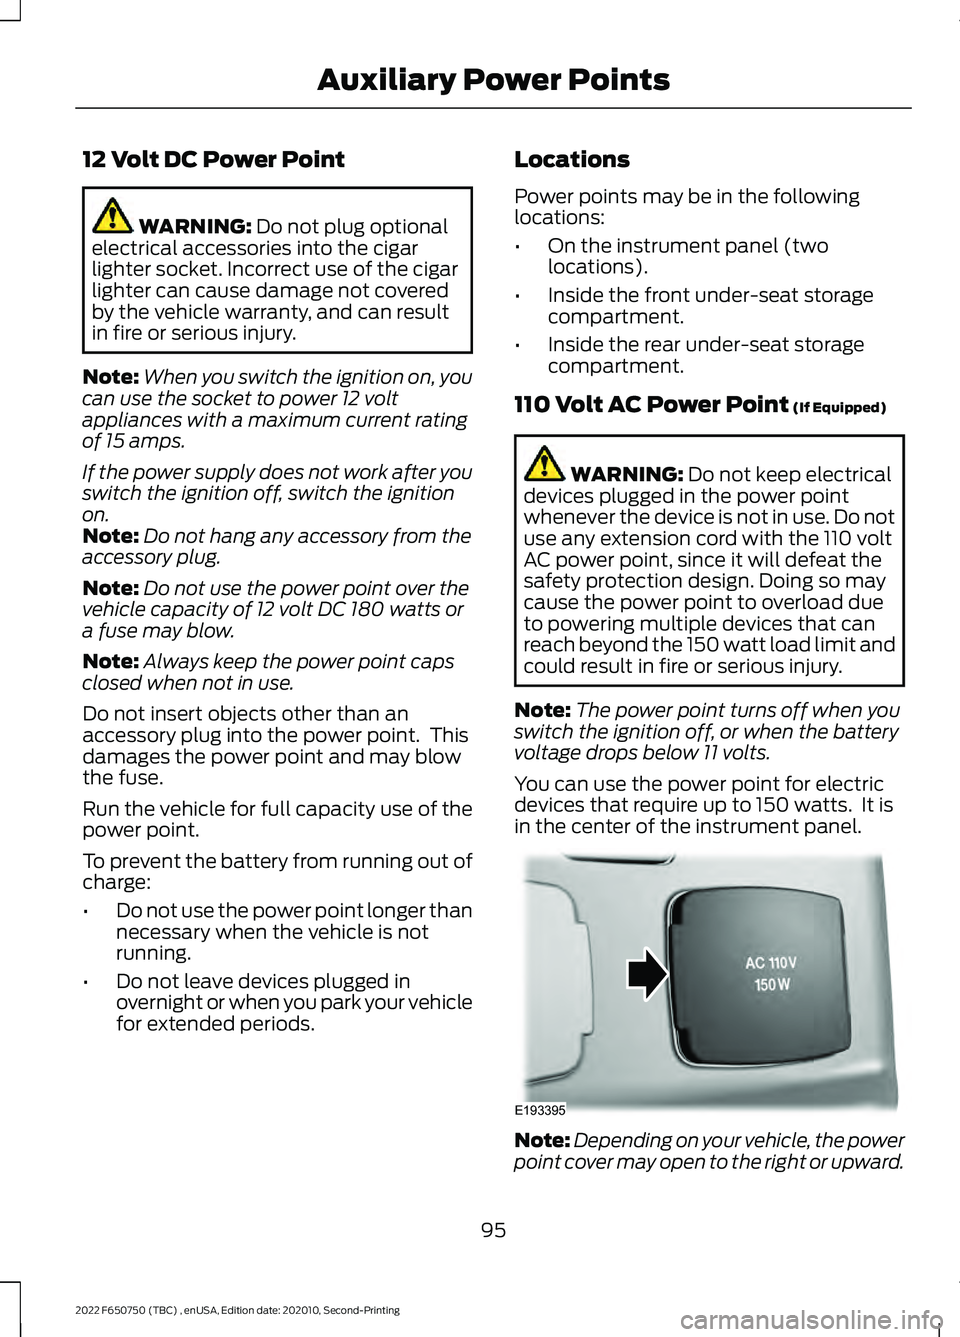
110 Volt AC Power Point
(If Equipped) WARNING:
Do not keep electrical
devices plugged in the power point
whenever the device is not in use. Do not
use any extension cord with the 110 volt
AC power point, since it will defeat the
safety protection design. Doing so may
cause the power point to overload due
to powering multiple devices that can
reach beyond the 150 watt load limit and
could result in fire or serious injury.
Note: The power point turns off when you
switch the ignition off, or when the battery
voltage drops below 11 volts.
You can use the power point for electric
devices that require up to 150 watts. It is
in the center of the instrument panel. Note:
Depending on your vehicle, the power
point cover may open to the right or upward.
95
2022 F650750 (TBC) , enUSA, Edition date: 202010, Second-Printing Auxiliary Power PointsE193395
Page 99 of 379
When the indicator light on the power point
is:
•
On: The power point is working, the
ignition is on and a device is plugged
in.
• Off: The power point is off, the ignition
is off or no device is plugged in.
• Flashing: The power point is in fault
mode.
The power outlet temporarily turns off
power when in fault mode if the device
exceeds the 150 watt limit. Unplug your
device and switch the ignition off. Switch
the ignition back on, but do not plug your
device back in. Let the system cool off and
switch the ignition off to reset the fault
mode. Switch the ignition back on and
make sure the indicator light remains on.
Do not use the power point for certain
electric devices, including:
• Cathode-ray, tube-type televisions.
• Motor loads, such as vacuum cleaners,
electric saws and other electric power
tools or compressor-driven
refrigerators.
• Measuring devices, which process
precise data, such as medical
equipment or measuring equipment.
• Other appliances requiring an
extremely stable power supply such as
microcomputer-controlled electric
blankets or touch-sensor lamps.
96
2022 F650750 (TBC) , enUSA, Edition date: 202010, Second-Printing Auxiliary Power Points
Page 100 of 379
LOCATING THE USB PORTS
Data Transfer USB Ports
The USB Ports could be in the following
locations:
•
On the lower instrument panel.
• Inside the media bin.
• Inside the center console.
Note: These USB ports can also charge
devices.
Note: Not all USB ports in your vehicle have
data transfer capabilities.
Note: We recommend using only USB-IF
certified cables and adapters. Non-certified
cables and adapters may not work.
Charge Only USB Ports The USB ports could be in the following
locations:
•
On the lower instrument panel.
• On the upper instrument panel.
• Inside the media bin.
• Inside the center console.
• On the rear of the center console.
• In the cargo area. PLAYING MEDIA USING THE
USB PORT WARNING: Driving while distracted
can result in loss of vehicle control, crash
and injury. We strongly recommend that
you use extreme caution when using any
device that may take your focus off the
road. Your primary responsibility is the
safe operation of your vehicle. We
recommend against the use of any
hand-held device while driving and
encourage the use of voice-operated
systems when possible. Make sure you
are aware of all applicable local laws
that may affect the use of electronic
devices while driving.
Connect your device to the USB port. Press the audio button on the
feature bar.
Select Sources. Select the USB option.
Press the button to play a track.
Press the button again to pause
the track.
Press the button to skip to the
next track.
Press and hold the button to fast
forward through the track. Press the button once to return
to the beginning of a track.
Repeatedly press the button to
return to previous tracks.
Press and hold the button to fast rewind.
97
2022 F650750 (TBC) , enUSA, Edition date: 202010, Second-Printing USB Ports E100027