reset FORD F450 SUPER DUTY 2016 Owner's Manual
[x] Cancel search | Manufacturer: FORD, Model Year: 2016, Model line: F450 SUPER DUTY, Model: FORD F450 SUPER DUTY 2016Pages: 507, PDF Size: 8.13 MB
Page 141 of 507
When the indicator light on the power pointis:
•On, the power point is working, theignition is on and a device is pluggedin.
•Off, the power point is off, the ignitionis off or no device is plugged in.
•Flashing, the power point is in faultmode.
The power outlet temporarily turns offpower when in fault mode if the deviceexceeds the 150 watt limit. Unplug yourdevice and switch the ignition off. Switchthe ignition back on, but do not plug yourdevice back in. Let the system cool off andswitch the ignition off to reset the faultmode. Switch the ignition back on andmake sure the indicator light remains on.
The power point is not designed for electricdevices such as:
•Cathode-ray, tube-type televisions.
•Motor loads, such as vacuum cleaners,electric saws and other electric powertools or compressor-drivenrefrigerators.
•Measuring devices, which processprecise data, such as medicalequipment or measuring equipment.
•Other appliances requiring anextremely stable power supply such asmicrocomputer-controlled electricblankets or touch-sensor lamps.
138
Super Duty (TFA) Canada/United States of America, enUSA, First Printing
Auxiliary Power Points
Page 150 of 507
Fuel Filler Cap
WARNINGS
The fuel system may be underpressure. If you hear a hissing soundnear the fuel filler door, do not refueluntil the sound stops. Otherwise, fuel mayspray out, which could cause seriouspersonal injury.
If you do not use the proper fuel fillercap, excessive pressure or vacuumin the fuel tank may damage the fuelsystem or cause the fuel cap to disengagein a collision, which may result in possiblepersonal injury.
Note:If you must replace the fuel filler cap,replace it with a fuel filler cap that isdesigned for your vehicle. The customerwarranty may be void for any damage to thefuel tank or fuel system if the correctgenuine Ford, Motorcraft or other certifiedfuel filler cap is not used.
Your fuel tank filler cap has an indexeddesign with a 1/4th turn on and off feature.When fueling your vehicle:
1. Put your vehicle in park (P).
2. Switch the engine off.
3. Carefully turn the filler capcounterclockwise until it spins off.
4. Pull to remove the cap from the fuelfiller pipe.
5.To install the cap, align the tabs on thecap with the notches on the filler pipe.
6. Turn the filler cap clockwise 1/4 of aturn clockwise until it clicks at leastonce.
If the Check Fuel Cap light or a Check FuelCap message appears in the instrumentcluster and stays on after you start theengine, you may not have installed the fuelfiller properly.
If the fuel cap light remains on, at the nextopportunity, safely pull off of the road,remove the fuel filler cap, align the capproperly and reinstall it. The check fuel caplight or Check fuel cap message may notreset immediately. It may take severaldriving cycles for the indicators to turn off.A driving cycle consists of an enginestart-up (after four or more hours with theengine off) followed by normal city andhighway driving.
FUEL CONSUMPTION
Empty reserve is the amount of fuelremaining in the tank after the fuel gaugeindicates empty. The amount of usablefuel in the empty reserve varies and shouldnot be relied upon to increase driving range.
•The usable capacity of the fuel tank isthe amount of fuel that can be addedinto the tank after the gauge indicatesempty
•The advertised capacity is the total fueltank size. See Capacities andSpecifications (page 303). It is thecombined usable capacity plus theempty reserve.
•Due to the empty reserve, you may notbe able to refuel the full amount of theadvertised capacity of the fuel tankeven when the fuel gauge reads empty.
Filling the Tank
For consistent results when filling the fueltank:
•Turn the ignition off before fueling; aninaccurate reading results if the engineis left running.
•Use the same fill rate(low-medium-high) each time the tankis filled.
•Allow no more than two automaticclick-offs when filling.
147
Super Duty (TFA) Canada/United States of America, enUSA, First Printing
Fuel and Refueling
Page 185 of 507
Fixed guidelines are always shown in thedisplay, but the active guidelines onlydisplay when the steering wheel is turned.To use active guidelines, turn the steeringwheel to point the guidelines toward anintended path. If the steering wheelposition is changed while reversing, thevehicle might deviate from the originalintended path.
The active guidelines fade in and outdepending on the steering wheel position.The active guidelines are not shown whenthe steering wheel position is straight.
Always use caution while reversing.Objects in the red zone are closest to yourvehicle and objects in the green zone arefarther away. Objects are getting closer toyour vehicle as they move from the greenzone to the yellow or red zones. Use theside view mirrors and rear view mirror toget better coverage on both sides and rearof your vehicle.
Enhanced Park Aids
Note:Enhanced park aids is only availablewhen the transmission is in reverse (R).
Note:The reverse sensing system is noteffective at speeds above 3 mph (5 km/h)and may not detect certain angular ormoving objects.
The system uses red, yellow and greenhighlights which appear on top of the videoimage when an object is detected by thereverse sensing system. The alert highlightsthe closest object detected. The reversesensing alert can be disabled and if visualpark aid alert is enabled, highlighted areasare still displayed.
Selectable settings for this feature are ONand OFF.
Manual Zoom
WARNING
When manual zoom is on, the fullarea behind your vehicle is notshown. Be aware of yoursurroundings when using the manual zoomfeature.
Note:Manual zoom is only available whenthe transmission is in reverse (R).
Note:When manual zoom is enabled, onlythe centerline is shown.
This feature allows you to get a closer viewof an object behind your vehicle (forexample, a trailer). The zoomed imagekeeps the bumper in the image to providea reference. The zoom is only active whilethe transmission is in reverse (R). Whenthe transmission is shifted out of reverse(R), the feature automatically turns offand must be reset when it is used again.
Selectable settings for this feature is OFF,Level 1, Level 2 and Level 3. The selectedlevel will appear between the buttons (forexample, Level 1) The default setting forthe manual zoom is OFF.
Rear Camera Delay
When shifting the transmission out ofreverse (R) and into any gear other thanpark (P), the camera image remains in thedisplay until your vehicle speed reaches5 mph (8 km/h). This occurs when the rearcamera delay feature is on or until a radiobutton is selected.
Selectable settings for this feature are ONand OFF. The default setting for the rearcamera delay is ON.
182
Super Duty (TFA) Canada/United States of America, enUSA, First Printing
Parking Aids
Page 226 of 507
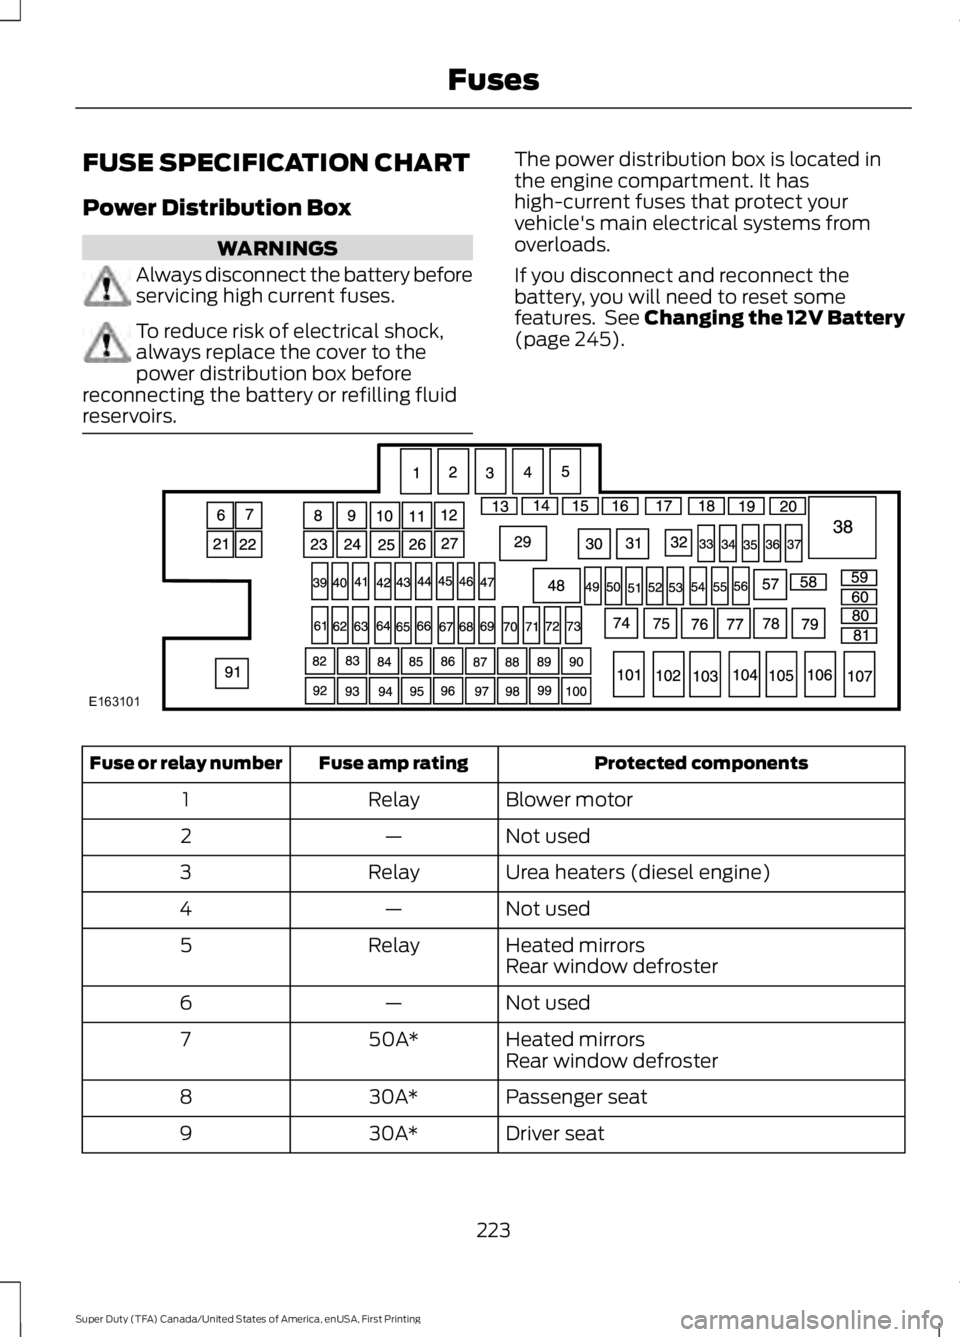
FUSE SPECIFICATION CHART
Power Distribution Box
WARNINGS
Always disconnect the battery beforeservicing high current fuses.
To reduce risk of electrical shock,always replace the cover to thepower distribution box beforereconnecting the battery or refilling fluidreservoirs.
The power distribution box is located inthe engine compartment. It hashigh-current fuses that protect yourvehicle's main electrical systems fromoverloads.
If you disconnect and reconnect thebattery, you will need to reset somefeatures. See Changing the 12V Battery(page 245).
Protected componentsFuse amp ratingFuse or relay number
Blower motorRelay1
Not used—2
Urea heaters (diesel engine)Relay3
Not used—4
Heated mirrorsRelay5Rear window defroster
Not used—6
Heated mirrors50A*7Rear window defroster
Passenger seat30A*8
Driver seat30A*9
223
Super Duty (TFA) Canada/United States of America, enUSA, First Printing
FusesE163101
Page 239 of 507
Only use oils certified for gasoline enginesby the American Petroleum Institute (API).An oil with this trademark symbolconforms to the current engine andemission system protection standards andfuel economy requirements of theInternational Lubricants SpecificationAdvisory Council (ILSAC), comprised ofU.S. and Japanese automobilemanufacturers.
1. Check the engine oil level.
2. If the engine oil level is not within thenormal range, add engine oil thatmeets Ford specifications. SeeCapacities and Specifications for moreinformation.
3. Remove the engine oil filler cap anduse a funnel to pour the engine oil intothe opening.
4.Recheck the engine oil level. Make surethe oil level is not above the normaloperating range on the engine oil leveldipstick.
5. Install the engine oil level dipstick andensure it is fully seated.
6. Fully install the engine oil filler cap byturning the filler cap clockwise untilthree clicks are heard or until the capis fully seated.
OIL CHANGE INDICATOR
RESET
Resetting the Oil Life MonitoringSystem
Only reset the oil life monitoring systemafter changing the engine oil and oil filter.
1.Switch the ignition on. Do not start theengine. For vehicles with push-buttonstart, press and hold the start buttonfor two seconds without pressing thebrake pedal. Do not start the engine.
2.Press the accelerator and brake pedalsat the same time.
3.Keep the accelerator and brake pedalsfully pressed.
4. After three seconds, a messageconfirming that the reset is in progresswill be displayed.
5. After 25 seconds, a messageconfirming that the reset is completewill be displayed.
6. Release the accelerator and brakepedals.
7.The message confirming that the resetis complete will no longer be displayed.
8.Switch the ignition off. For vehicles withpush-button start, press the startbutton to switch the ignition off.
ENGINE COOLANT CHECK
WARNINGS
Do not add engine coolant when theengine is hot. Steam and scaldingliquids released from a hot coolingsystem can burn you badly. Also, you canbe burned if you spill coolant on hot engineparts.
236
Super Duty (TFA) Canada/United States of America, enUSA, First Printing
MaintenanceE142732
Page 242 of 507
What You Should Know About Fail-Safe Cooling
If the engine coolant supply is depleted,this feature allows the vehicle to be driventemporarily before incremental componentdamage is incurred. The “fail-safe”distance depends on ambienttemperatures, vehicle load and terrain.
How Fail-Safe Cooling Works
If the engine begins to overheat, the enginecoolant temperature gauge will move tothe red (hot) area and:
The coolant temperaturewarning light will illuminate.
The service engine soonindicator will illuminate.
If the engine reaches a presetover-temperature condition, the enginewill automatically switch to alternatingcylinder operation. Each disabled cylinderacts as an air pump and cools the engine.
When this occurs the vehicle will stilloperate. However:
•The engine power will be limited.
•The air conditioning system will bedisabled.
Continued operation will increase theengine temperature and the engine willcompletely shut down, causing steeringand braking effort to increase.
Once the engine temperature cools, theengine can be re-started. Take your vehicleto an authorized dealer as soon as possibleto minimize engine damage.
When Fail-Safe Mode Is Activated
WARNINGS
Fail-safe mode is for use duringemergencies only. Operate thevehicle in fail-safe mode only as longas necessary to bring the vehicle to rest ina safe location and seek immediate repairs.When in fail-safe mode, the vehicle willhave limited power, will not be able tomaintain high-speed operation, and maycompletely shut down without warning,potentially losing engine power, powersteering assist, and power brake assist,which may increase the possibility of acrash resulting in serious injury.
Never remove the coolant reservoircap while the engine is running or hot.
You have limited engine power when in thefail-safe mode, so drive the vehicle withcaution. The vehicle will not be able tomaintain high-speed operation and theengine will run rough. Remember that theengine is capable of completely shuttingdown automatically to prevent enginedamage, therefore:
1. Pull off the road as soon as safelypossible and turn off the engine.
2. Arrange for the vehicle to be taken toan authorized dealer.
3. If this is not possible, wait a shortperiod for the engine to cool.
4. Check the coolant level and replenishif low.
5. Re-start the engine and take yourvehicle to an authorized dealer.
Note:Driving the vehicle without repairingthe engine problem increases the chance ofengine damage. Take your vehicle to anauthorized dealer as soon as possible.
239
Super Duty (TFA) Canada/United States of America, enUSA, First Printing
Maintenance
Page 249 of 507
6. Release the parking brake. With yourfoot on the brake pedal and with theA/C on, put the vehicle in D and allowthe engine to idle for at least oneminute.
•If you do not allow the engine torelearn its idle trim, the idle qualityof your vehicle may be adverselyaffected until the idle trim iseventually relearned.
7. Drive the vehicle to complete therelearning process
•The vehicle may need to be driven10 mi (16 km) or more to relearn theidle and fuel trim strategy alongwith the ethanol content for flexiblefuel vehicles.
•For flexible fuel vehicles, if you areoperating on E85, you mayexperience poor starts or aninability to start the engine anddriveability problems until the fueltrim and ethanol content have beenrelearned.
If the battery has been disconnected or anew battery has been installed, the clockand radio settings must be reset once thebattery is reconnected.
Always dispose of automotivebatteries in a responsible manner.Follow your local authorized standardsfor disposal. Call your local authorizedrecycling center to find out more aboutrecycling automotive batteries.
Battery Management System (IfEquipped)
The battery management system (BMS)monitors battery conditions and takesactions to extend battery life. If excessivebattery drain is detected, the system maytemporarily disable certain electricalfeatures to protect the battery. Thoseelectrical accessories affected include therear defrost, heated/cooled seats, climate
control fan, heated steering wheel, audioand navigation system. A message may beshown in the information displays to alertthe driver that battery protection actionsare active. These messages are only fornotification that an action is taking place,and not intended to indicate an electricalproblem or that the battery requiresreplacement.
Electrical accessory installation
To ensure proper operation of the BMS,any electrical devices that are added tothe vehicle should not have their groundconnection made directly at the negativebattery post. A connection at the negativebattery post can cause inaccuratemeasurements of the battery conditionand potential incorrect system operation.
Note:Electrical or electronic accessoriesadded to the vehicle by the dealer or theowner may adversely affect batteryperformance and durability, and may alsoaffect the performance of other electricalsystems in the vehicle.
When a battery replacement is required,the battery should only be replaced witha Ford recommended replacement batterywhich matches the electrical requirementsof the vehicle. After battery replacement,or in some cases after charging the batterywith the external charger, the BMS requireseight hours of vehicle sleep time (key offwith doors closed) to relearn the newbattery state of charge. Prior to relearningthe state of charge, the BMS may disableelectrical features (to protect the battery)earlier than normal.
246
Super Duty (TFA) Canada/United States of America, enUSA, First Printing
Maintenance
Page 265 of 507
•Touch-up exposed or primed metal toprevent rust.
•Cover chrome and stainless steel partswith a thick coat of auto wax to preventdiscoloration. Re-wax as necessarywhen you wash your vehicle.
•Lubricate all hood, door and luggagecompartment hinges and latches witha light grade oil.
•Cover interior trim to prevent fading.
•Keep all rubber parts free from oil andsolvents.
Engine
•Change the engine oil and filter prior tostorage because used engine oilcontains contaminates which maycause engine damage.
•Start the engine every 15 days for aminimum of 15 minutes. Run at fast idlewith the climate controls set to defrostuntil the engine reaches normaloperating temperature.
•With your foot on the brake, shiftthrough all the gears while the engineis running.
•We recommend that you change theengine oil before you use your vehicleagain.
Fuel system
•Fill the fuel tank with high-quality fueluntil the first automatic shutoff of thefuel pump nozzle.
Cooling system
•Protect against freezing temperatures.
•When removing your vehicle fromstorage, check coolant fluid level.Confirm that there are no coolingsystem leaks and that fluid is at therecommended level.
Battery
•Check and recharge as necessary. Keepconnections clean.
•If storing your vehicle for more than 30days without recharging the battery,we recommend that you disconnectthe battery cables to maintain batterycharge for quick starting.
Note:It is necessary to reset memoryfeatures if battery cables are disconnected.
Brakes
•Make sure the brakes and parking brakerelease fully.
Tires
•Maintain recommended air pressure.
Miscellaneous
•Make sure all linkages, cables, leversand pins under your vehicle are coveredwith grease to prevent rust.
•Move vehicles at least 25 ft (7.5 m)every 15 days to lubricate working partsand prevent corrosion.
Removing Vehicle From Storage
When your vehicle is ready to come out ofstorage, do the following:
•Wash your vehicle to remove any dirtor grease film build-up on windowsurfaces.
•Check windshield wipers for anydeterioration.
•Check under the hood for any foreignmaterial that may have collectedduring storage such as mice or squirrelnests.
•Check the exhaust for any foreignmaterial that may have collectedduring storage.
262
Super Duty (TFA) Canada/United States of America, enUSA, First Printing
Vehicle Care
Page 285 of 507
*Avoid fast starts, stops and turns.
*Avoid potholes and objects onthe road.
*Do not run over curbs or hit thetire against a curb when parking.
Highway Hazards
No matter how carefully you drivethere’s always the possibility thatyou may eventually have a flat tireon the highway. Drive slowly to theclosest safe area out of traffic.This may further damage the flattire, but your safety is moreimportant.
If you feel a sudden vibration orride disturbance while driving, oryou suspect your tire or vehiclehas been damaged, immediately
reduce your speed. Drive withcaution until you can safely pulloff the road. Stop and inspect thetires for damage. If a tire isunder-inflated or damaged,deflate it, remove wheel andreplace it with your spare tire andwheel. If you cannot detect acause, have the vehicle towed tothe nearest repair facility or tiredealer to have the vehicleinspected.
Tire and Wheel Alignment
A bad jolt from hitting a curb orpothole can cause the front endof your vehicle to becomemisaligned or cause damage toyour tires. If your vehicle seems topull to one side when you’redriving, the wheels may be out ofalignment. Have an authorizeddealer check the wheel alignmentperiodically.
Wheel misalignment in the frontor the rear can cause uneven andrapid treadwear of your tires andshould be corrected by anauthorized dealer. Front-wheeldrive vehicles and those with anindependent rear suspension mayrequire alignment of all fourwheels.
The tires should also be balancedperiodically. An unbalanced tireand wheel assembly may result inirregular tire wear.
Tire Rotation
WARNING
If the tire label showsdifferent tire pressures for thefront and rear tires and the vehicleis equipped with a tire pressuremonitoring system, then thesettings for the system sensorsneed to be updated. Alwaysperform the system resetprocedure after tire rotation. If thesystem is not reset, it may notprovide a low tire pressurewarning when necessary.
282
Super Duty (TFA) Canada/United States of America, enUSA, First Printing
Wheels and Tires
Page 291 of 507
When Inflating Your Tires
When putting air into your tires (such as ata gas station or in your garage), the tirepressure monitoring system may notrespond immediately to the air added toyour tires.
It may take up to two minutes of drivingover 20 mph (32 km/h) for the light to turnoff after you have filled your tires to therecommended inflation pressure.
How Temperature Affects Your TirePressure
The tire pressure monitoring systemmonitors tire pressure in each pneumatictire. While driving in a normal manner, atypical passenger tire inflation pressuremay increase about 2 to 4 psi (14 to 28kPa) from a cold start situation. If thevehicle is stationary overnight with theoutside temperature significantly lowerthan the daytime temperature, the tirepressure may decrease about 3 psi (21kPa) for a drop of 30°F (17°C) in ambienttemperature. This lower pressure valuemay be detected by the tire pressuremonitoring system as being significantlylower than the recommended inflationpressure and activate the system warninglight for low tire pressure.
If the low tire pressure warning light is on,visually check each tire to verify that no tireis flat. If one or more tires are flat, repair asnecessary. Check the air pressure in theroad tires. If any tire is under-inflated,carefully drive the vehicle to the nearestlocation where air can be added to thetires. Inflate all the tires to therecommended inflation pressure.
Tire Pressure Monitoring System ResetProcedure
WARNING
To determine the requiredpressure(s) for your vehicle, see theSafety Compliance CertificationLabel (affixed to either the door hingepillar, door-latch post, or the door edgethat meets the door-latch post, next to thedriver's seating position), or Tire Labellocated on the B-Pillar or the edge of thedriver's door.
Note:You need to perform the tire pressuremonitoring system reset procedure aftereach tire rotation on vehicles that requiredifferent recommended tire pressures in thefront tires as compared to the rear tires.
Overview
To provide the vehicle's load carryingcapability, some vehicles require differentrecommended tire pressures in the fronttires as compared to the rear tires. The tirepressure monitoring system equipped onthese vehicles is designed to illuminate thelow tire pressure warning light at twodifferent pressures; one for the front tiresand one for the rear tires.
Since tires need to be rotated to provideconsistent performance and maximum tirelife, the tire pressure monitoring systemneeds to know when the tires are rotatedto determine which set of tires are on thefront and which are on the rear. With thisinformation, the system can detect andproperly warn of low tire pressures.
System reset tips:
288
Super Duty (TFA) Canada/United States of America, enUSA, First Printing
Wheels and Tires