spare wheel FORD F450 SUPER DUTY 2017 User Guide
[x] Cancel search | Manufacturer: FORD, Model Year: 2017, Model line: F450 SUPER DUTY, Model: FORD F450 SUPER DUTY 2017Pages: 642, PDF Size: 12.35 MB
Page 397 of 642
USING SNOW CHAINS
WARNING
Snow tires must be the same size,load index, speed rating as thoseoriginally provided by Ford. Use ofany tire or wheel not recommended byFord can affect the safety andperformance of your vehicle, which couldresult in an increased risk of loss of vehiclecontrol, vehicle rollover, personal injury anddeath. Additionally, the use ofnon-recommended tires and wheels couldcause steering, suspension, axle, transfercase or power transfer unit failure.
Note:Do not use snow chains on vehicleswith 20 inch wheels and tires.
The tires on your vehicle have all-weathertreads to provide traction in rain and snow.However, in some climates, you may needto use snow tires and cables. If you needto use cables, it is recommended that steelwheels (of the same size andspecifications) be used, as cables may chipaluminum wheels.
Note:The suspension insulation andbumpers will help prevent vehicle damage.Do not remove these components from yourvehicle when using snow tires and chains.
Follow these guidelines when using snowtires and chains:
•If possible, avoid fully loading yourvehicle
•Use only SAE Class S chains.
•Install chains securely, verifying thatthe chains do not touch any wiring,brake lines or fuel lines.
•Drive cautiously. If you hear the chainsrub or bang against your vehicle, stopand retighten the chains. If this doesnot work, remove the chains to preventdamage to your vehicle.
•Remove the tire chains when they areno longer needed. Do not use tirechains on dry roads.
If you have any questions regarding snowchains or cables, please contact yourauthorized dealer.
TIRE PRESSURE MONITORING
SYSTEM
Vehicle Tire Pressure MonitoringSystem
WARNING
The tire pressure monitoring systemis not a substitute for manuallychecking tire pressures. You shouldperiodically check tire pressures using apressure gauge. Failure to correctlymaintain tire pressures could increase therisk of tire failure, loss of control, vehiclerollover and personal injury.
Each tire, including the spare (ifprovided), should be checkedmonthly when cold and inflatedto the inflation pressure recommended bythe vehicle manufacturer on the vehicleplacard or tire inflation pressure label. (Ifyour vehicle has tires of a different sizethan the size indicated on the vehicleplacard or tire inflation pressure label, youshould determine the proper tire inflationpressure for those tires.)
394
Super Duty (TFE) Canada/United States of America, enUSA, Edition date: 201710, Second Printing
Wheels and Tires
Page 399 of 642
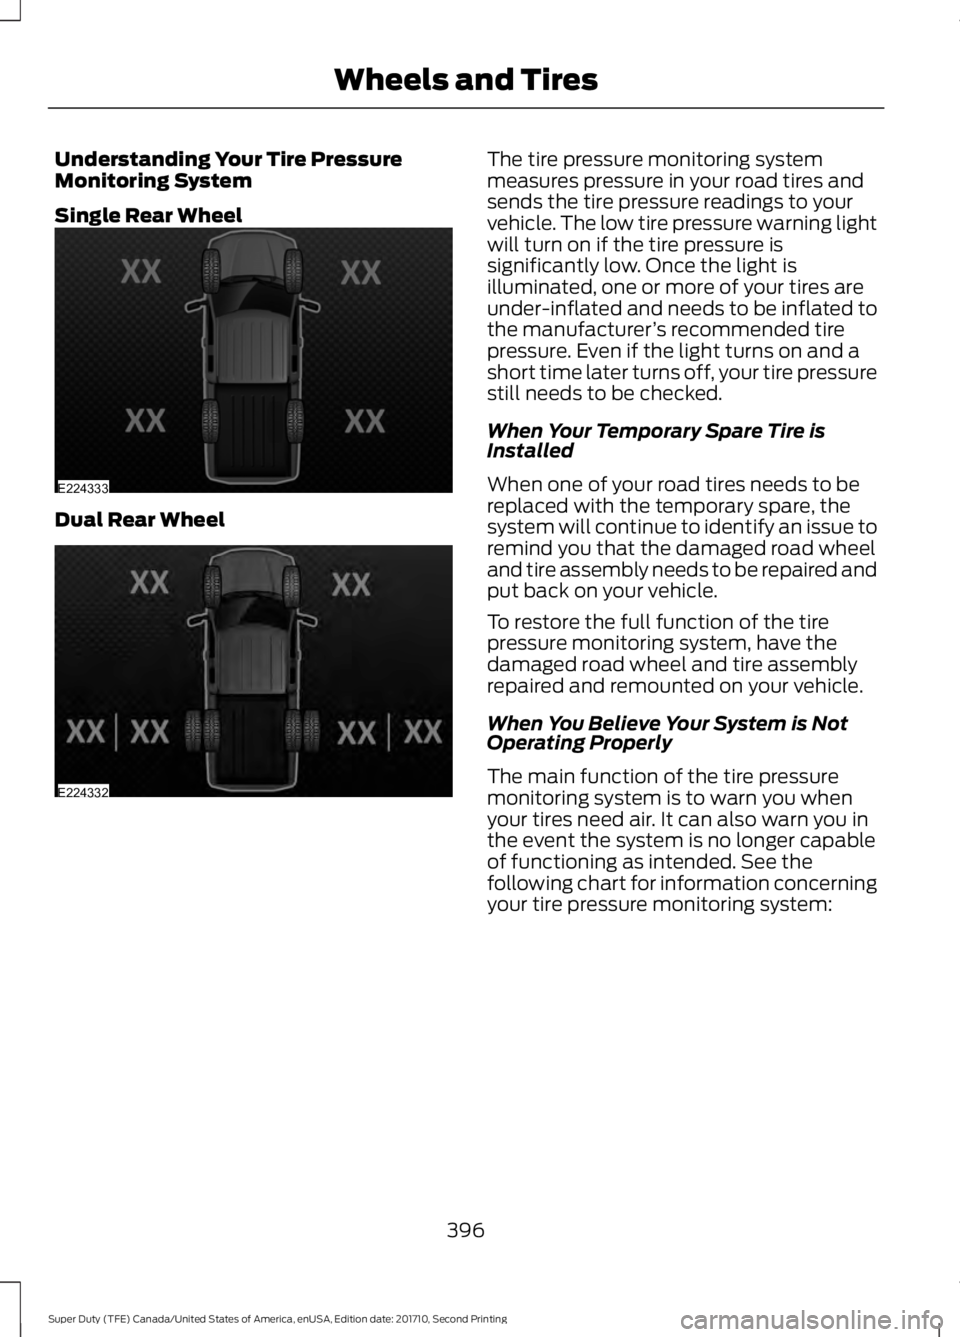
Understanding Your Tire PressureMonitoring System
Single Rear Wheel
Dual Rear Wheel
The tire pressure monitoring systemmeasures pressure in your road tires andsends the tire pressure readings to yourvehicle. The low tire pressure warning lightwill turn on if the tire pressure issignificantly low. Once the light isilluminated, one or more of your tires areunder-inflated and needs to be inflated tothe manufacturer’s recommended tirepressure. Even if the light turns on and ashort time later turns off, your tire pressurestill needs to be checked.
When Your Temporary Spare Tire isInstalled
When one of your road tires needs to bereplaced with the temporary spare, thesystem will continue to identify an issue toremind you that the damaged road wheeland tire assembly needs to be repaired andput back on your vehicle.
To restore the full function of the tirepressure monitoring system, have thedamaged road wheel and tire assemblyrepaired and remounted on your vehicle.
When You Believe Your System is NotOperating Properly
The main function of the tire pressuremonitoring system is to warn you whenyour tires need air. It can also warn you inthe event the system is no longer capableof functioning as intended. See thefollowing chart for information concerningyour tire pressure monitoring system:
396
Super Duty (TFE) Canada/United States of America, enUSA, Edition date: 201710, Second Printing
Wheels and TiresE224333 E224332
Page 400 of 642
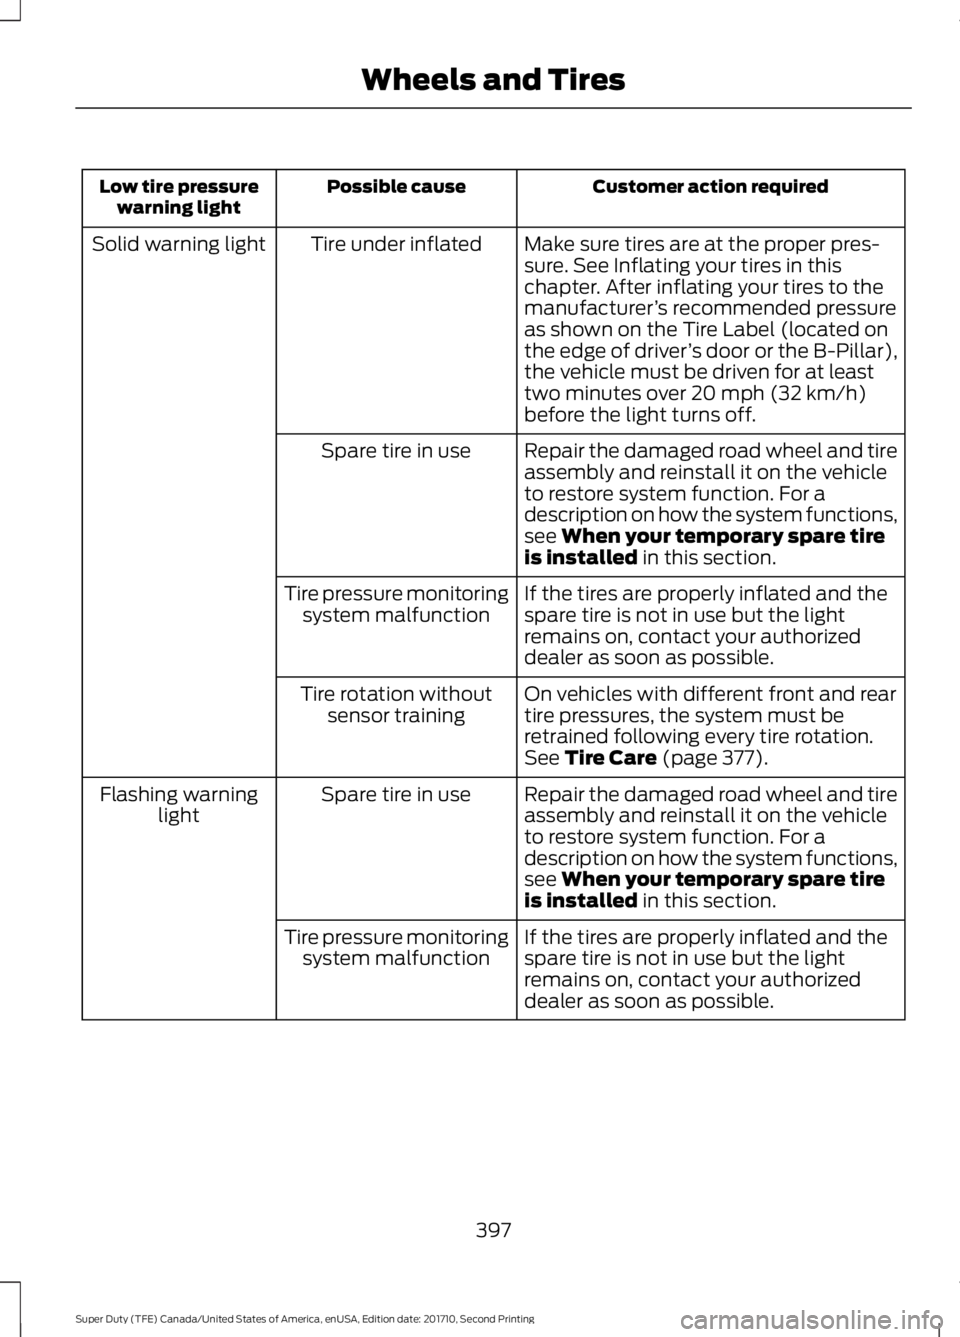
Customer action requiredPossible causeLow tire pressurewarning light
Make sure tires are at the proper pres-sure. See Inflating your tires in thischapter. After inflating your tires to themanufacturer’s recommended pressureas shown on the Tire Label (located onthe edge of driver’s door or the B-Pillar),the vehicle must be driven for at leasttwo minutes over 20 mph (32 km/h)before the light turns off.
Tire under inflatedSolid warning light
Repair the damaged road wheel and tireassembly and reinstall it on the vehicleto restore system function. For adescription on how the system functions,see When your temporary spare tireis installed in this section.
Spare tire in use
If the tires are properly inflated and thespare tire is not in use but the lightremains on, contact your authorizeddealer as soon as possible.
Tire pressure monitoringsystem malfunction
On vehicles with different front and reartire pressures, the system must beretrained following every tire rotation.See Tire Care (page 377).
Tire rotation withoutsensor training
Repair the damaged road wheel and tireassembly and reinstall it on the vehicleto restore system function. For adescription on how the system functions,see When your temporary spare tireis installed in this section.
Spare tire in useFlashing warninglight
If the tires are properly inflated and thespare tire is not in use but the lightremains on, contact your authorizeddealer as soon as possible.
Tire pressure monitoringsystem malfunction
397
Super Duty (TFE) Canada/United States of America, enUSA, Edition date: 201710, Second Printing
Wheels and Tires
Page 404 of 642
12.Turn the ignition off. If two short hornbeeps are heard, the reset procedurewas unsuccessful and you mustrepeat it. If after repeating theprocedure and two short beeps areheard when the ignition is turned tooff, seek assistance from yourauthorized dealer.
13.Set all four tires to the recommendedair pressure as indicated on theSafety Compliance CertificationLabel (affixed to either the door hingepillar, door-latch post, or the dooredge that meets the door-latch post,next to the driver's seating position)or Tire Label located on the B-Pillaror the edge of the driver's door.
Trailer Tire Pressure MonitoringSystem (If Equipped)
Note:Additional equipment may berequired for your vehicle to support trailertire pressure monitoring. See your authorizeddealer for more information.
Note:The trailer tire pressure monitoringsystem is not a substitute for proper tiremaintenance. It is your responsibility tomaintain correct tire pressures at all times.
Note:If a trailer tire is repaired, replaced orbroken down for service, the screw and valveon the trailer tire pressure sensor should bereplaced. See your authorized dealer fordetails.
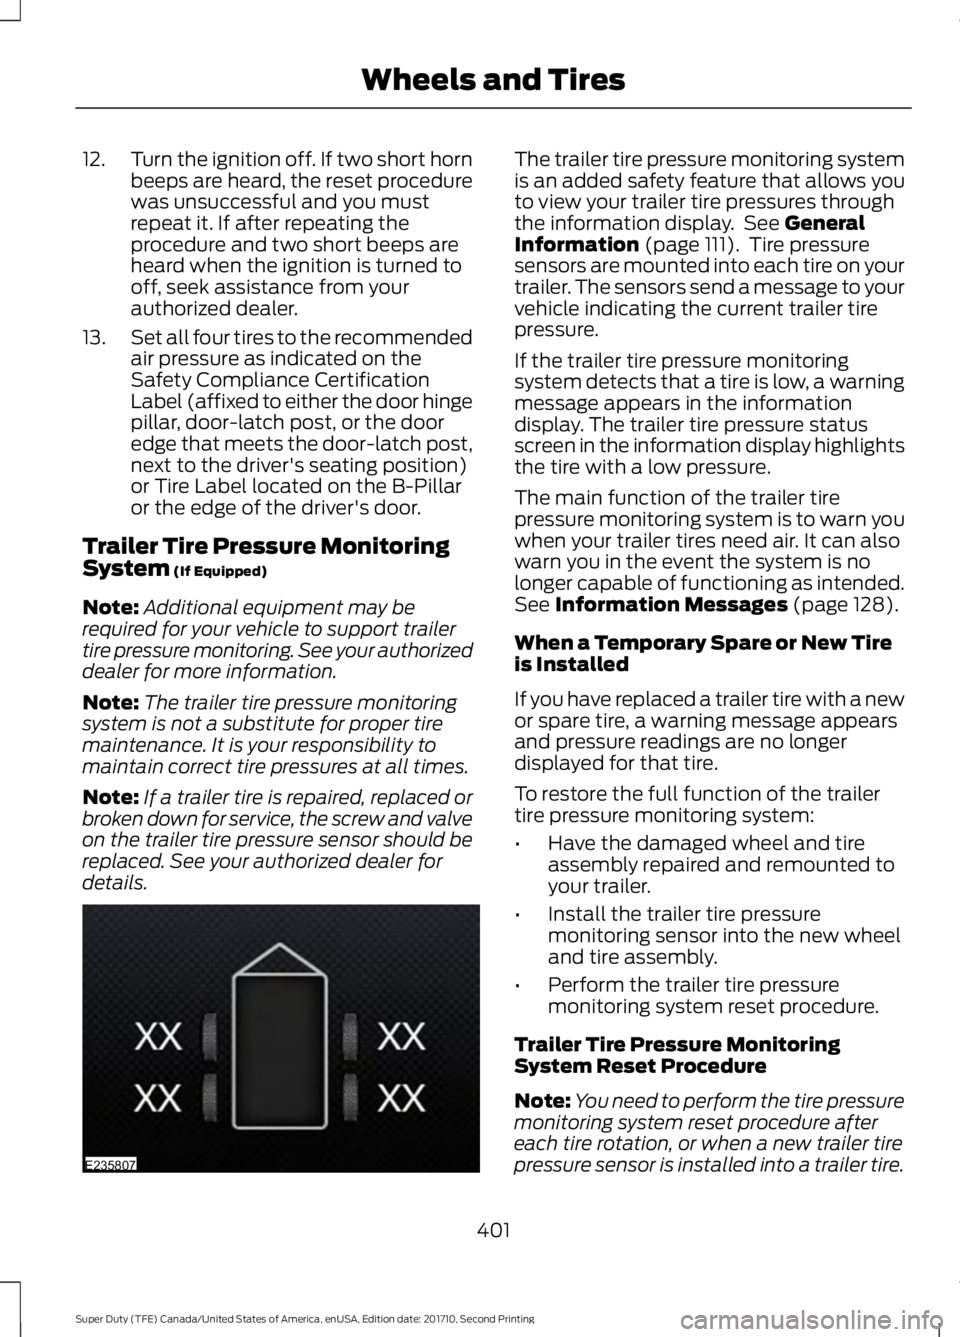
The trailer tire pressure monitoring systemis an added safety feature that allows youto view your trailer tire pressures throughthe information display. See GeneralInformation (page 111). Tire pressuresensors are mounted into each tire on yourtrailer. The sensors send a message to yourvehicle indicating the current trailer tirepressure.
If the trailer tire pressure monitoringsystem detects that a tire is low, a warningmessage appears in the informationdisplay. The trailer tire pressure statusscreen in the information display highlightsthe tire with a low pressure.
The main function of the trailer tirepressure monitoring system is to warn youwhen your trailer tires need air. It can alsowarn you in the event the system is nolonger capable of functioning as intended.See Information Messages (page 128).
When a Temporary Spare or New Tireis Installed
If you have replaced a trailer tire with a newor spare tire, a warning message appearsand pressure readings are no longerdisplayed for that tire.
To restore the full function of the trailertire pressure monitoring system:
•Have the damaged wheel and tireassembly repaired and remounted toyour trailer.
•Install the trailer tire pressuremonitoring sensor into the new wheeland tire assembly.
•Perform the trailer tire pressuremonitoring system reset procedure.
Trailer Tire Pressure MonitoringSystem Reset Procedure
Note:You need to perform the tire pressuremonitoring system reset procedure aftereach tire rotation, or when a new trailer tirepressure sensor is installed into a trailer tire.
401
Super Duty (TFE) Canada/United States of America, enUSA, Edition date: 201710, Second Printing
Wheels and TiresE235807
Page 405 of 642
The trailer tire pressure monitoring systemcan be reset through the menu in theinformation display. See GeneralInformation (page 111). Performing thetrailer setup process also resets the trailertire pressure monitoring system.
CHANGING A ROAD WHEEL
WARNINGS
The use of tire sealant may damageyour tire pressure monitoring systemand should only be used in roadsideemergencies. If you must use a sealant, theFord Tire Mobility Kit sealant should beused. The tire pressure monitoring systemsensor and valve stem on the wheel mustbe replaced by an authorized dealer afteruse of the sealant.
If the tire pressure monitor sensorbecomes damaged, it will no longerfunction. See Tire PressureMonitoring System (page 394).
Note:If your vehicle is equipped with thetire pressure monitoring system, theindicator light will illuminate when the sparetire is in use. To restore the full function ofthe monitoring system, all road wheelsequipped with tire pressure monitoringsensors must be mounted on the vehicle.
If you get a flat tire while driving, do notapply the brake heavily. Instead, graduallydecrease your speed. Hold the steeringwheel firmly and slowly move to a safeplace on the side of the road.
If your vehicle is equipped with the tirepressure monitoring system, have a flatserviced by an authorized dealer in orderto prevent damage to the system sensors.See Tire Pressure Monitoring System(page 394). Replace the spare tire with aroad tire as soon as possible. Duringrepairing or replacing of the flat tire, havethe authorized dealer inspect the systemsensor for damage.
Dissimilar Spare Wheel and TireAssembly Information
WARNING
Failure to follow these guidelinescould result in an increased risk ofloss of vehicle control, injury or death.
If you have a dissimilar spare wheel andtire, then it is intended for temporary useonly. This means that if you need to use it,you should replace it as soon as possiblewith a road wheel and tire assembly thatis the same size and type as the road tiresand wheels that were originally providedby Ford. If the dissimilar spare tire or wheelis damaged, it should be replaced ratherthan repaired.
A dissimilar spare wheel and tire assemblyis defined as a spare wheel and tireassembly that is different in brand, size orappearance from the road tires and wheelsand can be one of three types:
1.T-type mini-spare: This spare tirebegins with the letter T for tire size andmay have Temporary Use Only molded inthe sidewall.
2.Full-size dissimilar spare with labelon wheel: This spare tire has a label onthe wheel that states: THIS WHEEL ANDTIRE ASSEMBLY FOR TEMPORARY USEONLY
When driving with one of the dissimilarspare tires listed above, do not:
402
Super Duty (TFE) Canada/United States of America, enUSA, Edition date: 201710, Second Printing
Wheels and Tires
Page 406 of 642
•Exceed 50 mph (80 km/h)
•Load the vehicle beyond maximumvehicle load rating listed on the SafetyCompliance Label.
•Tow a trailer.
•Use snow chains on the end of thevehicle with the dissimilar spare tire.
•Use more than one dissimilar spare tireat a time.
•Use commercial car washingequipment.
•Try to repair the dissimilar spare tire.
Use of one of the dissimilar spare tireslisted above at any one wheel location canlead to impairment of the following:
•Handling, stability and brakingperformance.
•Comfort and noise.
•Ground clearance and parking at curbs.
•Winter weather driving capability.
•Wet weather driving capability.
•All-wheel driving capability.
3.Full-size dissimilar spare withoutlabel on wheel
When driving with the full-size dissimilarspare wheel and tire assembly, do not:
•Exceed 70 mph (113 km/h).
•Use more than one dissimilar sparewheel and tire assembly at a time.
•Use commercial car washingequipment.
•Use snow chains on the end of thevehicle with the dissimilar spare wheeland tire assembly.
The usage of a full-size dissimilar sparewheel and tire assembly can lead toimpairment of the following:
•Handling, stability and brakingperformance.
•Comfort and noise.
•Ground clearance and parking at curbs.
•Winter weather driving capability.
•Wet weather driving capability.
•All-wheel driving capability.
When driving with the full-size dissimilarspare wheel and tire assembly additionalcaution should be given to:
•Towing a trailer.
•Driving vehicles equipped with acamper body.
•Driving vehicles with a load on thecargo rack.
Drive cautiously when using a full-sizedissimilar spare wheel and tire assemblyand seek service as soon as possible.
Location of the Spare Tire andTools
If your vehicle is equipped with a spare tire,jack and associated tools, see thefollowing table for their locations:
403
Super Duty (TFE) Canada/United States of America, enUSA, Edition date: 201710, Second Printing
Wheels and Tires
Page 407 of 642
LocationTool
Under the vehicle, just forward of the rearbumper.Spare tire (pick-up trucks only)
Fastened to the floor pan behind the rear-most seat on the passenger side.Jack
Regular Cab: Fastened to floor behind thedriver seat.Jack handle, lug wrench, lug wrench exten-sion (only available on dual rear wheelvehicles) and wheel chock (only availableon single rear wheel vehicles equipped witha diesel engine)
Super Cab and Crew Cab: Fastened to thefloor under the rear seat on the drivers side.
Removing the Spare Tire (WithSpare Tire Carrier Only)
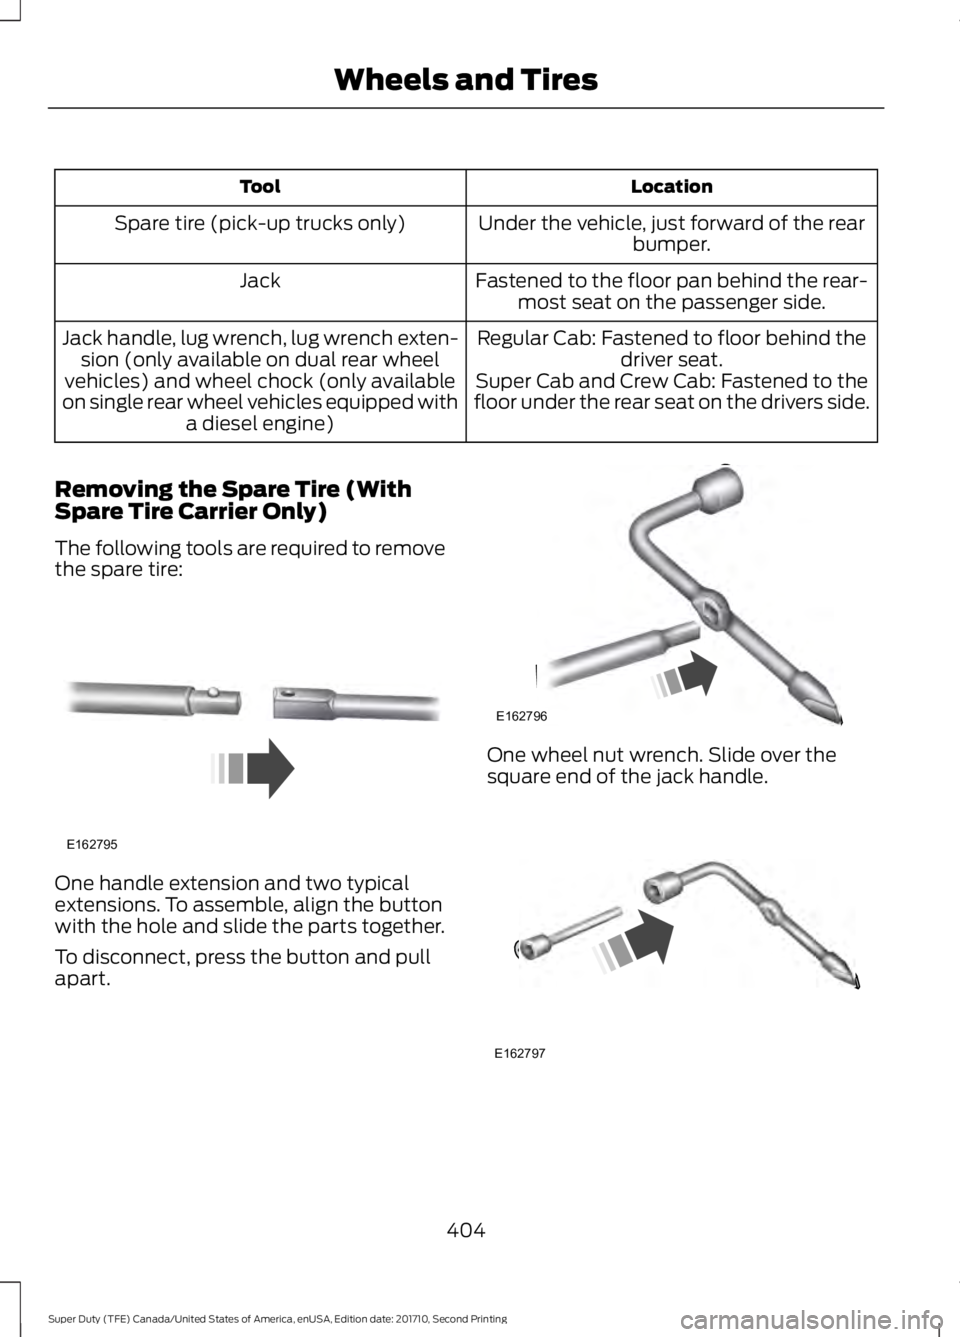
The following tools are required to removethe spare tire:
One handle extension and two typicalextensions. To assemble, align the buttonwith the hole and slide the parts together.
To disconnect, press the button and pullapart.
One wheel nut wrench. Slide over thesquare end of the jack handle.
404
Super Duty (TFE) Canada/United States of America, enUSA, Edition date: 201710, Second Printing
Wheels and TiresE162795 E162796 E162797
Page 408 of 642
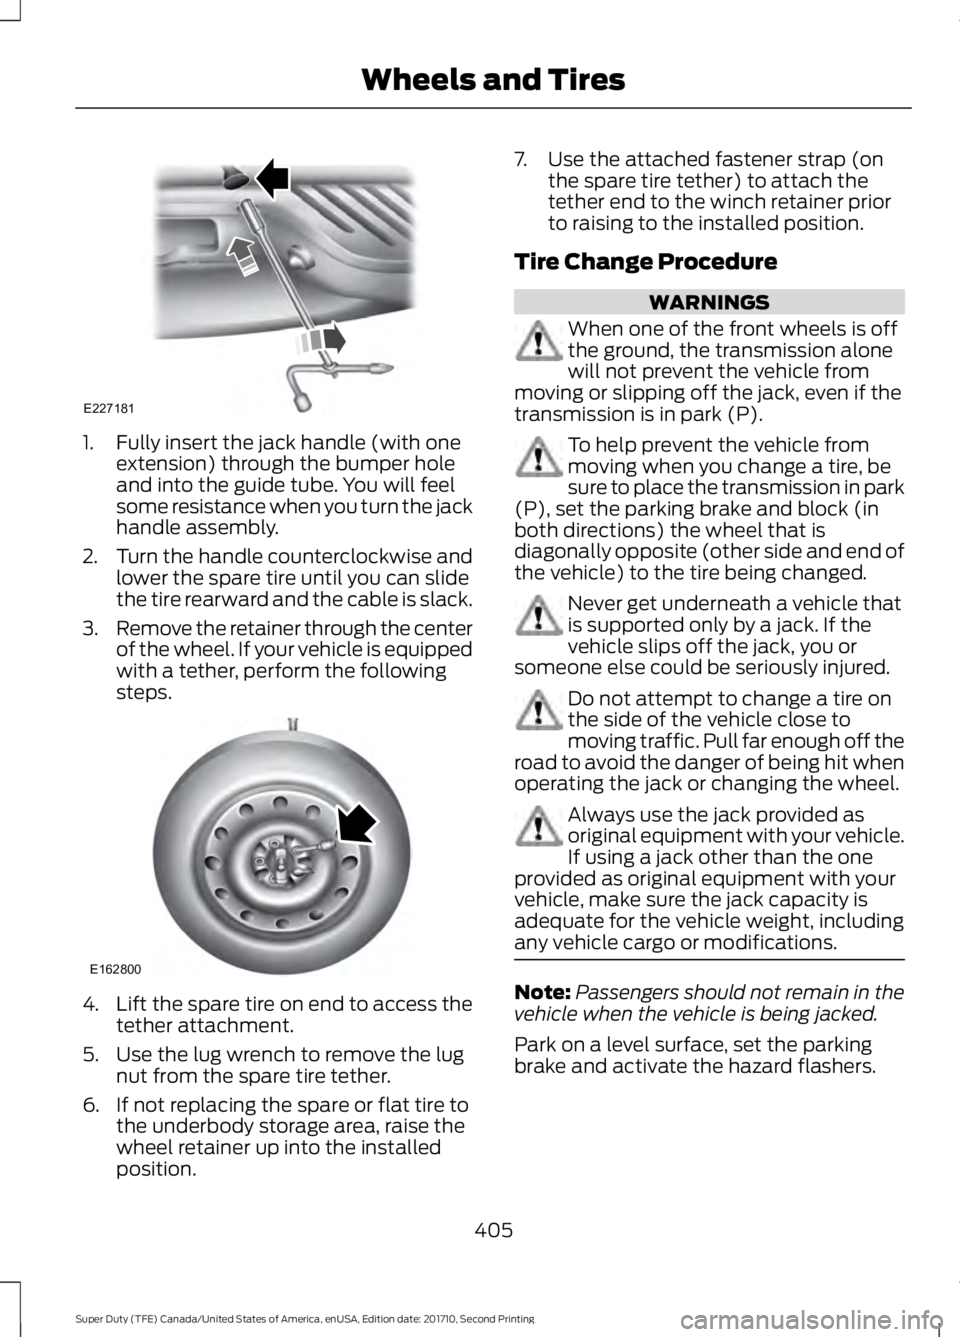
1. Fully insert the jack handle (with oneextension) through the bumper holeand into the guide tube. You will feelsome resistance when you turn the jackhandle assembly.
2.Turn the handle counterclockwise andlower the spare tire until you can slidethe tire rearward and the cable is slack.
3.Remove the retainer through the centerof the wheel. If your vehicle is equippedwith a tether, perform the followingsteps.
4.Lift the spare tire on end to access thetether attachment.
5. Use the lug wrench to remove the lugnut from the spare tire tether.
6. If not replacing the spare or flat tire tothe underbody storage area, raise thewheel retainer up into the installedposition.
7. Use the attached fastener strap (onthe spare tire tether) to attach thetether end to the winch retainer priorto raising to the installed position.
Tire Change Procedure
WARNINGS
When one of the front wheels is offthe ground, the transmission alonewill not prevent the vehicle frommoving or slipping off the jack, even if thetransmission is in park (P).
To help prevent the vehicle frommoving when you change a tire, besure to place the transmission in park(P), set the parking brake and block (inboth directions) the wheel that isdiagonally opposite (other side and end ofthe vehicle) to the tire being changed.
Never get underneath a vehicle thatis supported only by a jack. If thevehicle slips off the jack, you orsomeone else could be seriously injured.
Do not attempt to change a tire onthe side of the vehicle close tomoving traffic. Pull far enough off theroad to avoid the danger of being hit whenoperating the jack or changing the wheel.
Always use the jack provided asoriginal equipment with your vehicle.If using a jack other than the oneprovided as original equipment with yourvehicle, make sure the jack capacity isadequate for the vehicle weight, includingany vehicle cargo or modifications.
Note:Passengers should not remain in thevehicle when the vehicle is being jacked.
Park on a level surface, set the parkingbrake and activate the hazard flashers.
405
Super Duty (TFE) Canada/United States of America, enUSA, Edition date: 201710, Second Printing
Wheels and TiresE227181 E162800
Page 409 of 642
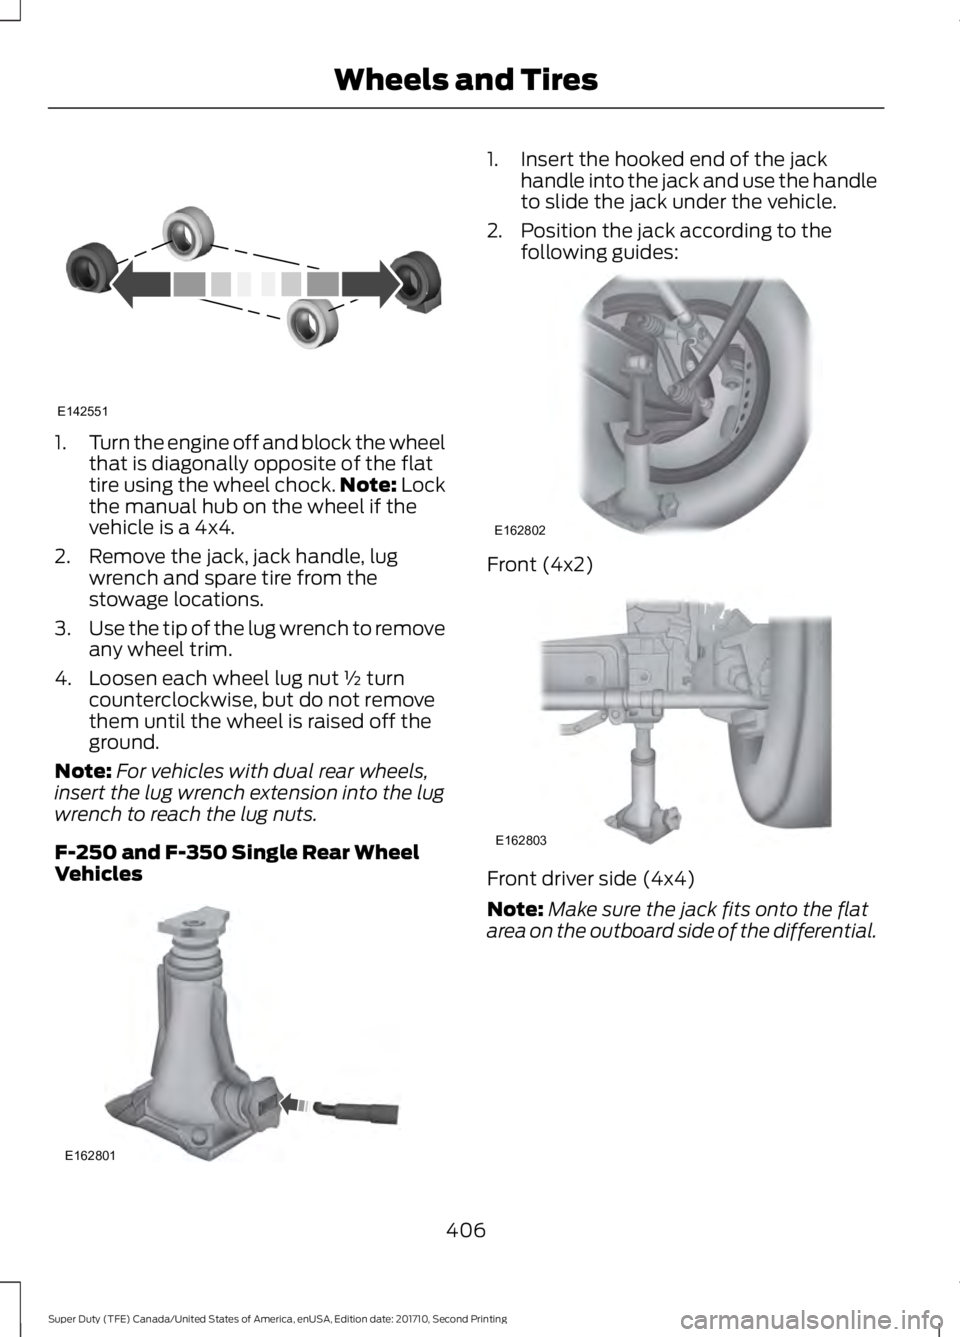
1.Turn the engine off and block the wheelthat is diagonally opposite of the flattire using the wheel chock.Note: Lockthe manual hub on the wheel if thevehicle is a 4x4.
2. Remove the jack, jack handle, lugwrench and spare tire from thestowage locations.
3.Use the tip of the lug wrench to removeany wheel trim.
4. Loosen each wheel lug nut ½ turncounterclockwise, but do not removethem until the wheel is raised off theground.
Note:For vehicles with dual rear wheels,insert the lug wrench extension into the lugwrench to reach the lug nuts.
F-250 and F-350 Single Rear WheelVehicles
1. Insert the hooked end of the jackhandle into the jack and use the handleto slide the jack under the vehicle.
2. Position the jack according to thefollowing guides:
Front (4x2)
Front driver side (4x4)
Note:Make sure the jack fits onto the flatarea on the outboard side of the differential.
406
Super Duty (TFE) Canada/United States of America, enUSA, Edition date: 201710, Second Printing
Wheels and TiresE142551 E162801 E162802 E162803
Page 410 of 642
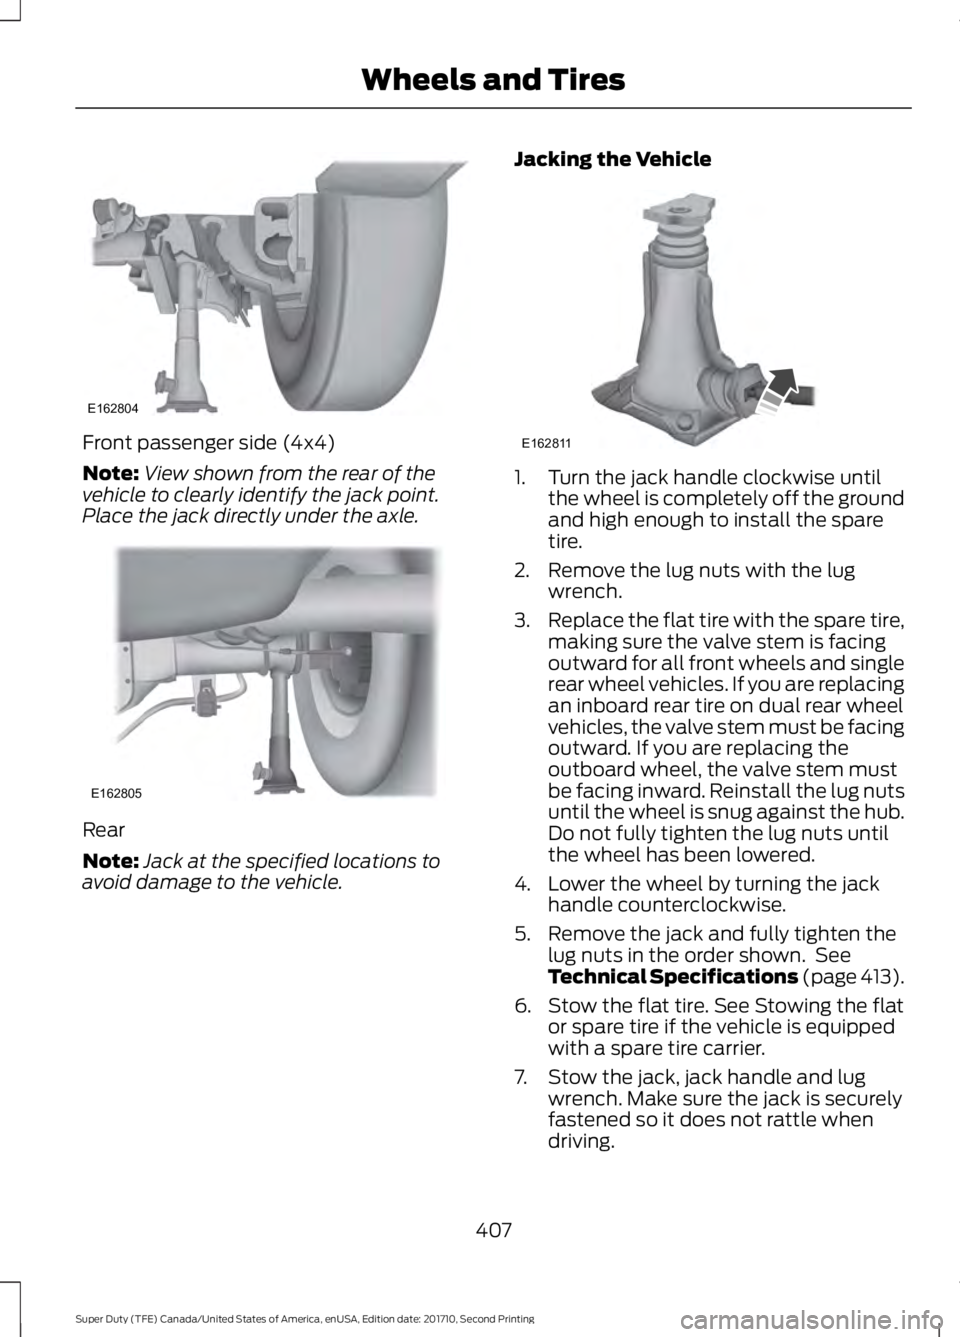
Front passenger side (4x4)
Note:View shown from the rear of thevehicle to clearly identify the jack point.Place the jack directly under the axle.
Rear
Note:Jack at the specified locations toavoid damage to the vehicle.
Jacking the Vehicle
1. Turn the jack handle clockwise untilthe wheel is completely off the groundand high enough to install the sparetire.
2. Remove the lug nuts with the lugwrench.
3.Replace the flat tire with the spare tire,making sure the valve stem is facingoutward for all front wheels and singlerear wheel vehicles. If you are replacingan inboard rear tire on dual rear wheelvehicles, the valve stem must be facingoutward. If you are replacing theoutboard wheel, the valve stem mustbe facing inward. Reinstall the lug nutsuntil the wheel is snug against the hub.Do not fully tighten the lug nuts untilthe wheel has been lowered.
4. Lower the wheel by turning the jackhandle counterclockwise.
5. Remove the jack and fully tighten thelug nuts in the order shown. SeeTechnical Specifications (page 413).
6. Stow the flat tire. See Stowing the flator spare tire if the vehicle is equippedwith a spare tire carrier.
7. Stow the jack, jack handle and lugwrench. Make sure the jack is securelyfastened so it does not rattle whendriving.
407
Super Duty (TFE) Canada/United States of America, enUSA, Edition date: 201710, Second Printing
Wheels and TiresE162804 E162805 E162811