check engine FORD F650 2005 11.G Owner's Guide
[x] Cancel search | Manufacturer: FORD, Model Year: 2005, Model line: F650, Model: FORD F650 2005 11.GPages: 272, PDF Size: 1.5 MB
Page 194 of 272
Fuel filter replacement - Caterpillar engine
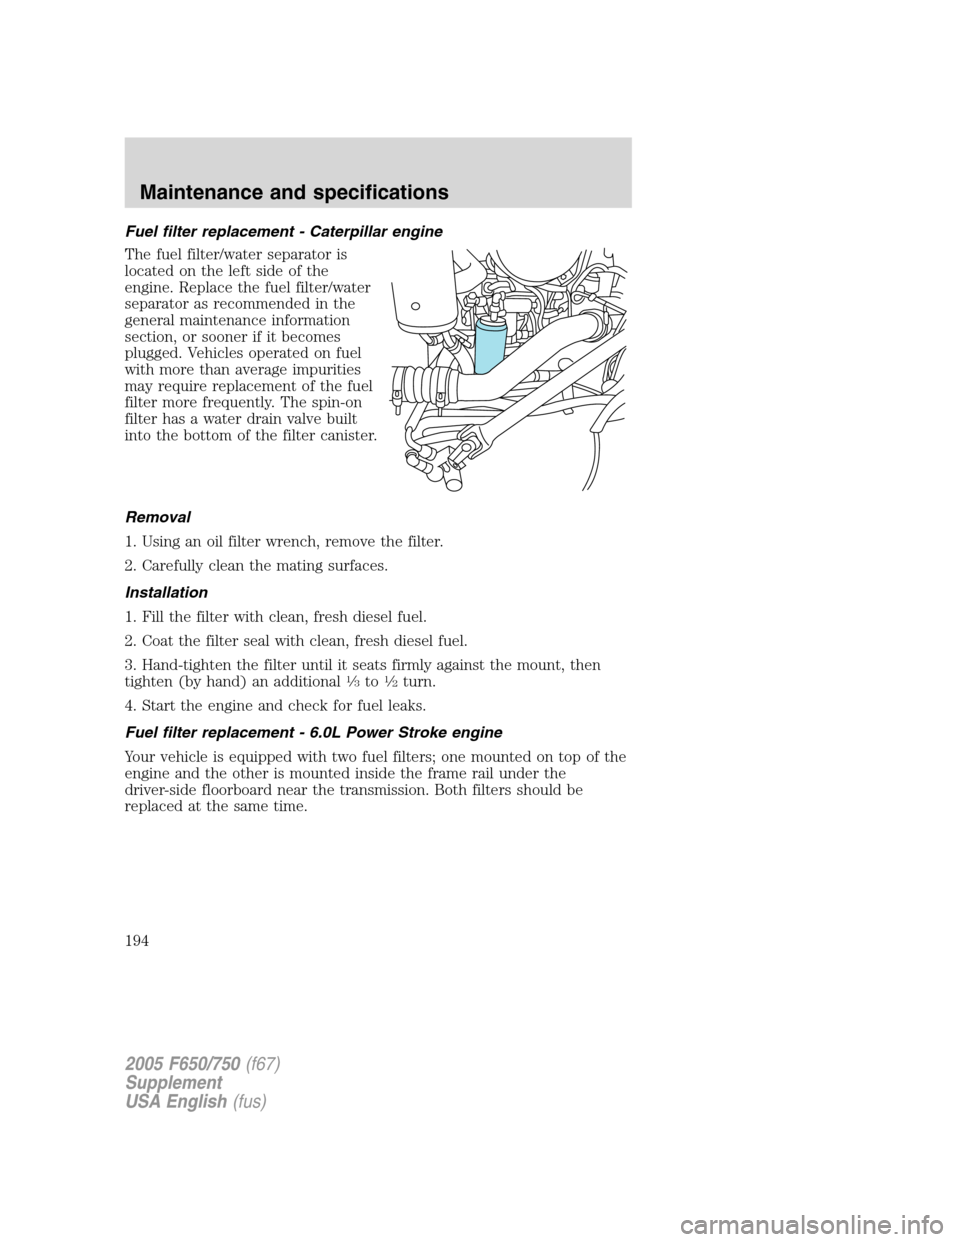
The fuel filter/water separator is
located on the left side of the
engine. Replace the fuel filter/water
separator as recommended in the
general maintenance information
section, or sooner if it becomes
plugged. Vehicles operated on fuel
with more than average impurities
may require replacement of the fuel
filter more frequently. The spin-on
filter has a water drain valve built
into the bottom of the filter canister.
Removal
1. Using an oil filter wrench, remove the filter.
2. Carefully clean the mating surfaces.
Installation
1. Fill the filter with clean, fresh diesel fuel.
2. Coat the filter seal with clean, fresh diesel fuel.
3. Hand-tighten the filter until it seats firmly against the mount, then
tighten (by hand) an additional
1⁄3to1⁄2turn.
4. Start the engine and check for fuel leaks.
Fuel filter replacement - 6.0L Power Stroke engine
Your vehicle is equipped with two fuel filters; one mounted on top of the
engine and the other is mounted inside the frame rail under the
driver-side floorboard near the transmission. Both filters should be
replaced at the same time.
2005 F650/750(f67)
Supplement
USA English(fus)
Maintenance and specifications
194
Page 199 of 272
![FORD F650 2005 11.G Owners Guide •Driving at reasonable speeds (traveling at 55 mph [88 km/h] uses 15%
less fuel than traveling at 65 mph [105 km/h]).
•Using the air conditioner or defroster may reduce fuel economy.
•Resting yo FORD F650 2005 11.G Owners Guide •Driving at reasonable speeds (traveling at 55 mph [88 km/h] uses 15%
less fuel than traveling at 65 mph [105 km/h]).
•Using the air conditioner or defroster may reduce fuel economy.
•Resting yo](/img/11/5071/w960_5071-198.png)
•Driving at reasonable speeds (traveling at 55 mph [88 km/h] uses 15%
less fuel than traveling at 65 mph [105 km/h]).
•Using the air conditioner or defroster may reduce fuel economy.
•Resting your foot on the brake pedal while driving may reduce fuel
economy.
Conditions
•Carrying unnecessary weight may reduce fuel economy.
•Fuel economy may decrease with lower temperatures during the first
8–10 miles (12–16 km) of driving.
•Flat terrain driving improves fuel economy over hilly roads.
•Transmissions give their best fuel economy when operated in the top
cruise gear and with steady pressure on the accelerator.
•Close windows for highway driving.
NOISE EMISSIONS–EXTERIOR
In order to comply with the federal exterior noise regulations, your
vehicle may be equipped with noise emission items. Depending on the
vehicle configuration, it may have all or some of the following items:
Air Intake System
•Air Cleaner:should be inspected and its location should not be
altered. Do not alter inlet and outlet piping.
Body
•Wheel Well:splash shields, cab shields and under-hood insulation
should be inspected for deterioration, dislocation, and orientation.
Cooling System
•Check the fan for damage to blades; replace, if damaged, with the
recommended parts. Inspect for fan to shroud interference, and any
damage to shroud such as cracks and holes.
•The fan ratio should not be changed and the fan spacer dimensions
and positions should not be altered.
•Inspect the fan clutch for proper operation, make sure that the fan is
disengaged when cooling of the engine is not required.
•Check for proper operation of radiator shutters, if equipped. The
shutters should be open during normal operating temperatures.
2005 F650/750(f67)
Supplement
USA English(fus)
Maintenance and specifications
199
Page 200 of 272
Engine and Driveline System
•Transmission Enclosure:inspect for cracks, holes, and tears. Clean
any deposits such as oil, dirt, and stones.
•Engine valve covers and block covers are made to damp out engine
mechanical noise and, if needed, should be replaced with
recommended parts. Check for mechanical isolations.
Exhaust System
•Inspect the exhaust system for leaks at various joint connections and
tighten the clamps.
•Do a visual inspection for cracks or holes in the muffler and tail pipe.
•Always use the recommended parts when items need to be replaced.
•The tail pipe elbow or offset tail pipe orientation must not be changed
from the standard position as originally received.
•To avoid abnormal changes in vehicle sound levels, it is necessary for
the owner to perform inspections and necessary maintenance at the
intervals shown in theGeneral Maintenance Informationsection.
CHASSIS-MOUNTED CHARGE AIR COOLER
Inspect charge air cooler daily
With the engine off, visually inspect the charge air cooler core assembly
for debris and clogging of external fins. Prior to engine operation,
remove any debris blocking the core.
•Turbocharger-to-charge air cooler
•Charge air cooler-to-intake manifold pipe
•Mounting bracket
•Chassis-mounted charge air cooler core
Inspect air intake piping
•Check for accumulation of salt deposits (where applicable). If present,
disassemble and clean the complete air intake piping system. If the
intake piping is pitted, use RTV silicone to seal joints against leakage.
•Check for loose hoses and clamps.
•Check for ruptured or collapsed hoses.
•Check air cleaner housing for cracks.
2005 F650/750(f67)
Supplement
USA English(fus)
Maintenance and specifications
200
Page 201 of 272
ELECTRICAL SYSTEM INSPECTIONS
Periodically inspect electrical connectors on the outside of the cab, on the
engine and frame for corrosion and tightness. Exposed terminals such as
the fuel sender, cranking motor, alternator and feed-through studs should
be cleaned and re-coated with a lubricant sealing grease such as Motorcraft
XG-3, or equivalent. This should include the ground cable connector for
batteries, engine and cab as well as the jump starting stud.
Accessory feed connections
Vehicle electrical systems are complex and often include electronic
components such as engine and transmission controls, instrument panels,
ABS, etc. While most systems operate on battery voltage (12 volts),
some systems can be as high as 90 volts or as low as five volts. Refer to
the Electrical Circuit Diagram Manuals, available from your vehicle’s
manufacturer, to assure that any additional body lights and accessories
are connected to circuits that are both appropriate and not overloaded.
No modification should be made to any vehicle control system without
first contacting your dealer.
SUSPENSION INSPECTION
Note:Do not adjust air suspension height to any setting other than the
specified setting. Altering the height setting will change the driveline
angle and may result in unwarrantable component damage, such as
transmission component damage.
Verify drive axle air suspension height and height control valve
performance at engine lube oil change intervals.
Periodically:
•Check condition of spring leaves for evidence of fatigue, bending or
breakage.
•Check condition of suspension mounting brackets and bushings.
•Check that torque rod mounting fasteners are tight.
•Check to be sure the suspension alignment is maintained at all time.
•Check U-bolts after the chassis has been operating under load for
1,000 miles (1,600 km) or six months, whichever comes first, the
U-Bolt nuts must be re-torqued. The U-Bolt nuts thereafter must be
re-torqued every 36,000 miles (58,000 km). The U-Bolt and nut
threads and seats should be cleaned and lubricated to assure a“like
new”condition when re-torquing.
Note:See theU-Bolt Nut Torquechart later in this section.
2005 F650/750(f67)
Supplement
USA English(fus)
Maintenance and specifications
201
Page 204 of 272
REAR AXLE LUBRICANT
Refer to your general maintenance information section for rear axle
lubricant level checks and lubricant change intervals.
Your rear axle may be filled with an optional synthetic lubricant which
allows the use of extended service intervals. A tag on the filler plug will
identify the use of the synthetic lubricant.
Use only a lubricant that meets manufacturer specifications (refer to
Lubricant specificationsin this chapter).
Use of a non-approved rear axle lubricant may cause internal axle
component damage.
Check your rear axle lubricant level using the following procedure:
1. Park the vehicle on level ground.
2. Set the parking brake and shift into N (Neutral) (automatic
transmission) or 1 (First) (manual transmission) and turn the engine off.
3. Clean any dirt from around the rear axle filler plug.
4. Remove the filler plug and inspect the lubricant level.
5. The lubricant level should be up to the bottom of the filler plug
opening.
6. If necessary, add enough lubricant through the filler plug opening so
that the lubricant level is at the bottom of the opening.
7. Clean and install the filler plug securely.
Drain and refill your rear axle lubricant using the following procedure:
1. Drain the rear axle while the lubricant is warm.
2. Park the vehicle on level ground.
3. Set the parking brake and shift into N (Neutral) (automatic
transmission) or 1 (First) (manual transmission) and turn the engine off.
4. Clean any dirt from around the rear axle filler and drain plugs.
5. Remove the filler and drain plugs and drain the lubricant into a
suitable container. Dispose all used automotive fluids in a responsible
manner following your local authorized standards.
6. Clean and install the drain plug securely.
7. Add enough lubricant through the filler plug opening so that the
lubricant level is up to the bottom of the opening.
8. Clean and install the filler plug securely.
2005 F650/750(f67)
Supplement
USA English(fus)
Maintenance and specifications
204
Page 221 of 272
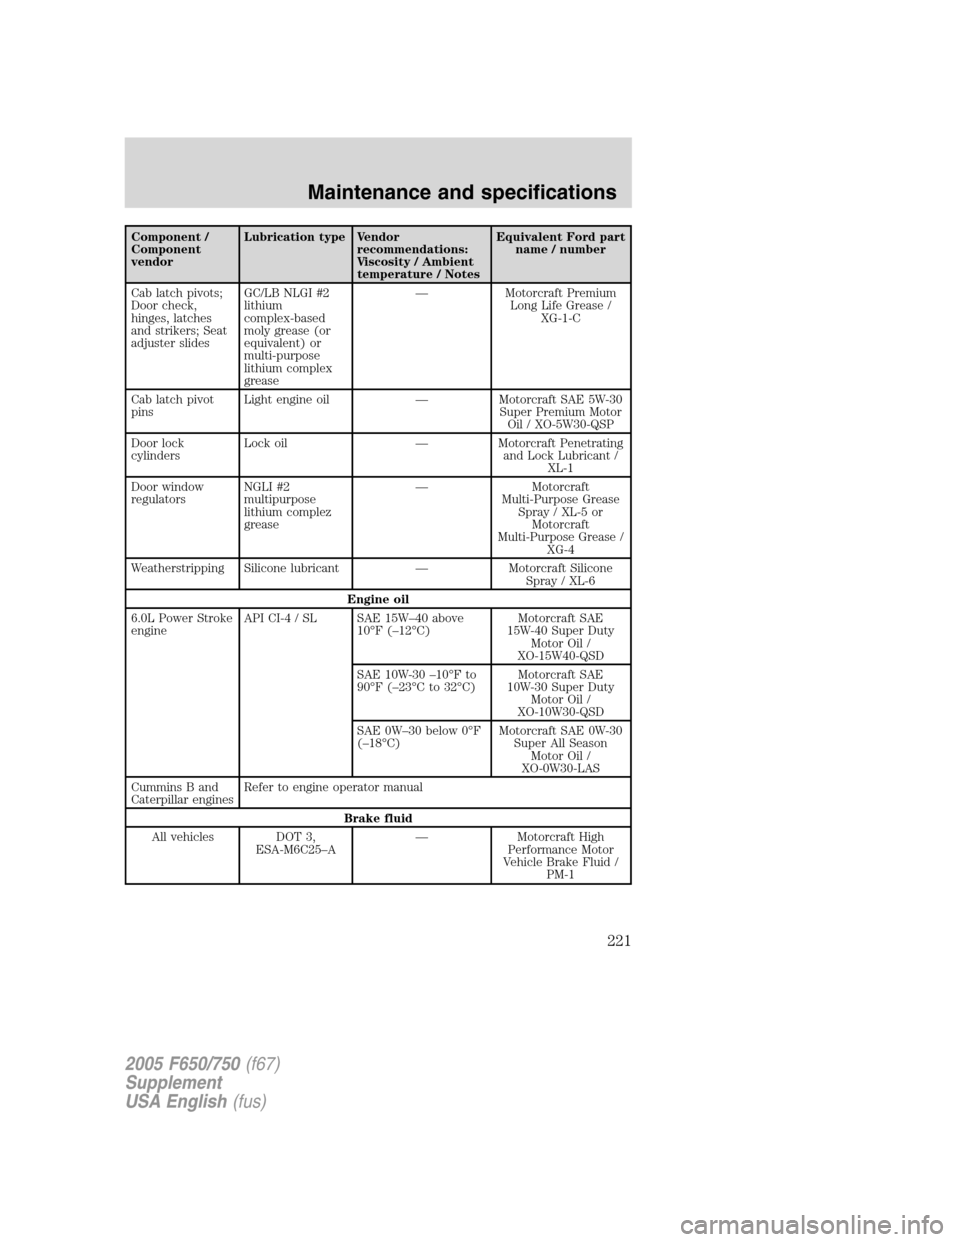
Component /
Component
vendorLubrication type Vendor
recommendations:
Viscosity / Ambient
temperature / NotesEquivalent Ford part
name / number
Cab latch pivots;
Door check,
hinges, latches
and strikers; Seat
adjuster slidesGC/LB NLGI #2
lithium
complex-based
moly grease (or
equivalent) or
multi-purpose
lithium complex
grease—Motorcraft Premium
Long Life Grease /
XG-1-C
Cab latch pivot
pinsLight engine oil—Motorcraft SAE 5W-30
Super Premium Motor
Oil / XO-5W30-QSP
Door lock
cylindersLock oil—Motorcraft Penetrating
and Lock Lubricant /
XL-1
Door window
regulatorsNGLI #2
multipurpose
lithium complez
grease—Motorcraft
Multi-Purpose Grease
Spray / XL-5 or
Motorcraft
Multi-Purpose Grease /
XG-4
Weatherstripping Silicone lubricant—Motorcraft Silicone
Spray / XL-6
Engine oil
6.0L Power Stroke
engineAPI CI-4 / SL SAE 15W–40 above
10°F(–12°C)Motorcraft SAE
15W-40 Super Duty
Motor Oil /
XO-15W40-QSD
SAE 10W-30–10°Fto
90°F(–23°Cto32°C)Motorcraft SAE
10W-30 Super Duty
Motor Oil /
XO-10W30-QSD
SAE 0W–30 below 0°F
(–18°C)Motorcraft SAE 0W-30
Super All Season
Motor Oil /
XO-0W30-LAS
Cummins B and
Caterpillar enginesRefer to engine operator manual
Brake fluid
All vehicles DOT 3,
ESA-M6C25–A—Motorcraft High
Performance Motor
Vehicle Brake Fluid /
PM-1
2005 F650/750(f67)
Supplement
USA English(fus)
Maintenance and specifications
221
Page 227 of 272
GENERAL MAINTENANCE INFORMATION
The Scheduled Maintenance Services listed in this section are required
because they are considered essential to the life and performance of
your vehicle.
Ford Motor Company recommends you perform the Owner Maintenance
Services listed in this section. These services are matters of day-to-day
care that are important to the proper operation of your vehicle. In
addition to the conditions described in the Owner Maintenance Checklist,
be alert for any unusual noise, vibration or other indication that your
vehicle may need service and attend to it promptly.
Use only recommended fuels, lubricants, fluids and service parts
conforming to Ford specifications. Motorcraft parts are designed and
built for best performance in your vehicle. Using these parts for
replacement is your assurance that Ford-Built quality stays in your
vehicle.
SCHEDULED MAINTENANCE
The maintenance or replacement of the emission control devices (or
systems) in your new Ford Motor Company vehicle (or engine) may be
performed at your expense. These services may be performed by any
automotive repair establishment or individual using automotive parts
equivalent to those with which your vehicle or engine was originally
equipped. If any parts other than Ford, Motorcraft, or Ford authorized,
remanufactured parts are used for maintenance replacements (or for the
service) of components effecting the emission control, the owner should
be assured that such parts are warranted by their manufacturer to be
equivalent to genuine Ford Motor Company Parts in performance and
durability. Please consult your warranty information booklet for complete
warranty information.
Authorized dealer maintenance
Your authorized dealer specializes in knowing all about Ford Motor
Company vehicles rather than knowing a little about all makes.
There are Ford or Ford of Canada dealer service shops ready to serve
you wherever you drive in the U.S. or Canada. They stock Ford and
Motorcraft parts, and Ford Chemicals and lubricants. You can be
confident that these meet the same exacting design and quality
standards as those used to build the vehicle originally. Dealer Service
Technicians have available training in the latest product developments
and service techniques.
2005 F650/750(f67)
Supplement
USA English(fus)
General maintenance information
General maintenance information
227
Page 230 of 272
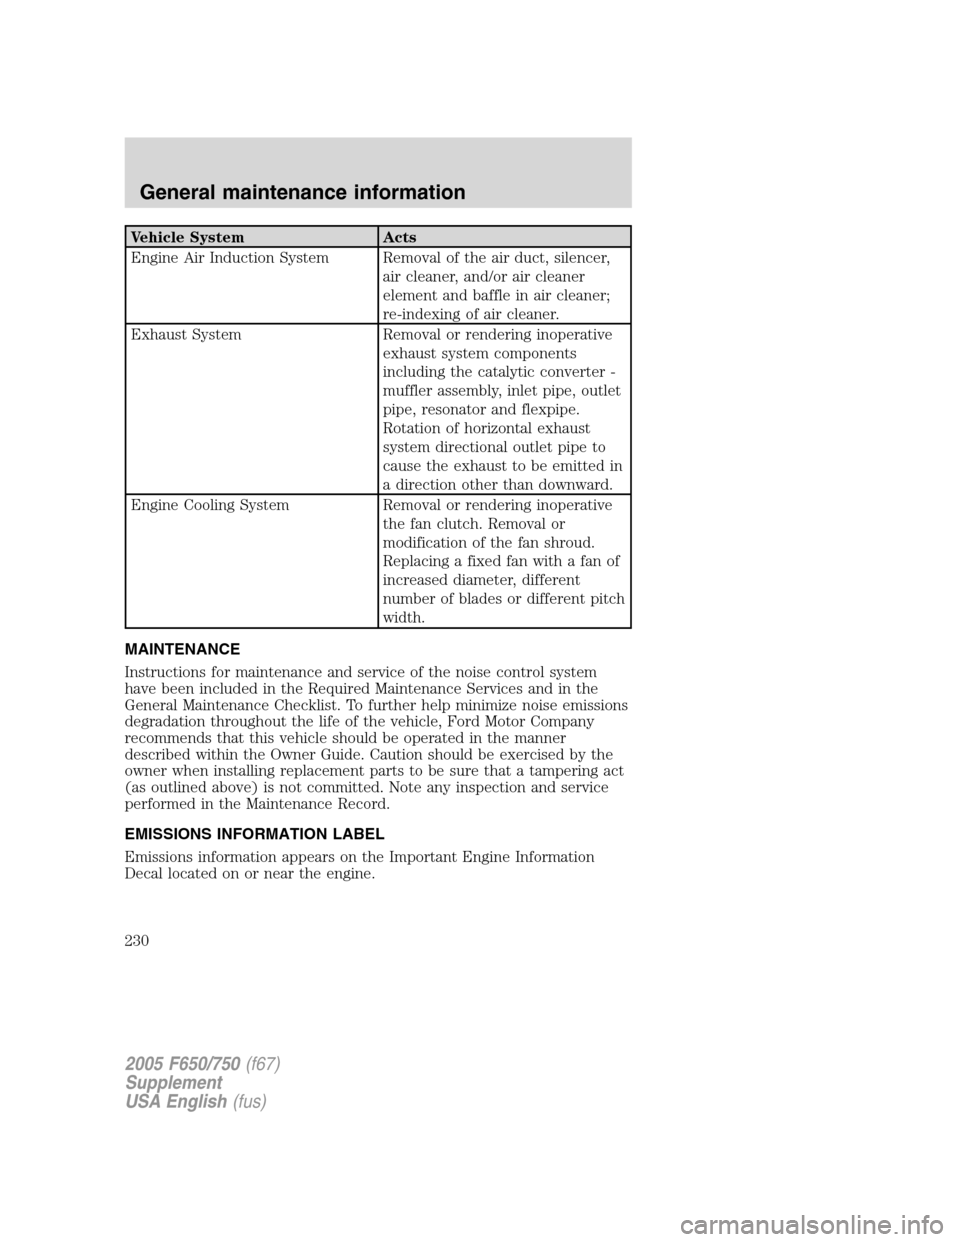
Vehicle System Acts
Engine Air Induction System Removal of the air duct, silencer,
air cleaner, and/or air cleaner
element and baffle in air cleaner;
re-indexing of air cleaner.
Exhaust System Removal or rendering inoperative
exhaust system components
including the catalytic converter -
muffler assembly, inlet pipe, outlet
pipe, resonator and flexpipe.
Rotation of horizontal exhaust
system directional outlet pipe to
cause the exhaust to be emitted in
a direction other than downward.
Engine Cooling System Removal or rendering inoperative
the fan clutch. Removal or
modification of the fan shroud.
Replacing a fixed fan with a fan of
increased diameter, different
number of blades or different pitch
width.
MAINTENANCE
Instructions for maintenance and service of the noise control system
have been included in the Required Maintenance Services and in the
General Maintenance Checklist. To further help minimize noise emissions
degradation throughout the life of the vehicle, Ford Motor Company
recommends that this vehicle should be operated in the manner
described within the Owner Guide. Caution should be exercised by the
owner when installing replacement parts to be sure that a tampering act
(as outlined above) is not committed. Note any inspection and service
performed in the Maintenance Record.
EMISSIONS INFORMATION LABEL
Emissions information appears on the Important Engine Information
Decal located on or near the engine.
2005 F650/750(f67)
Supplement
USA English(fus)
General maintenance information
230
Page 234 of 272
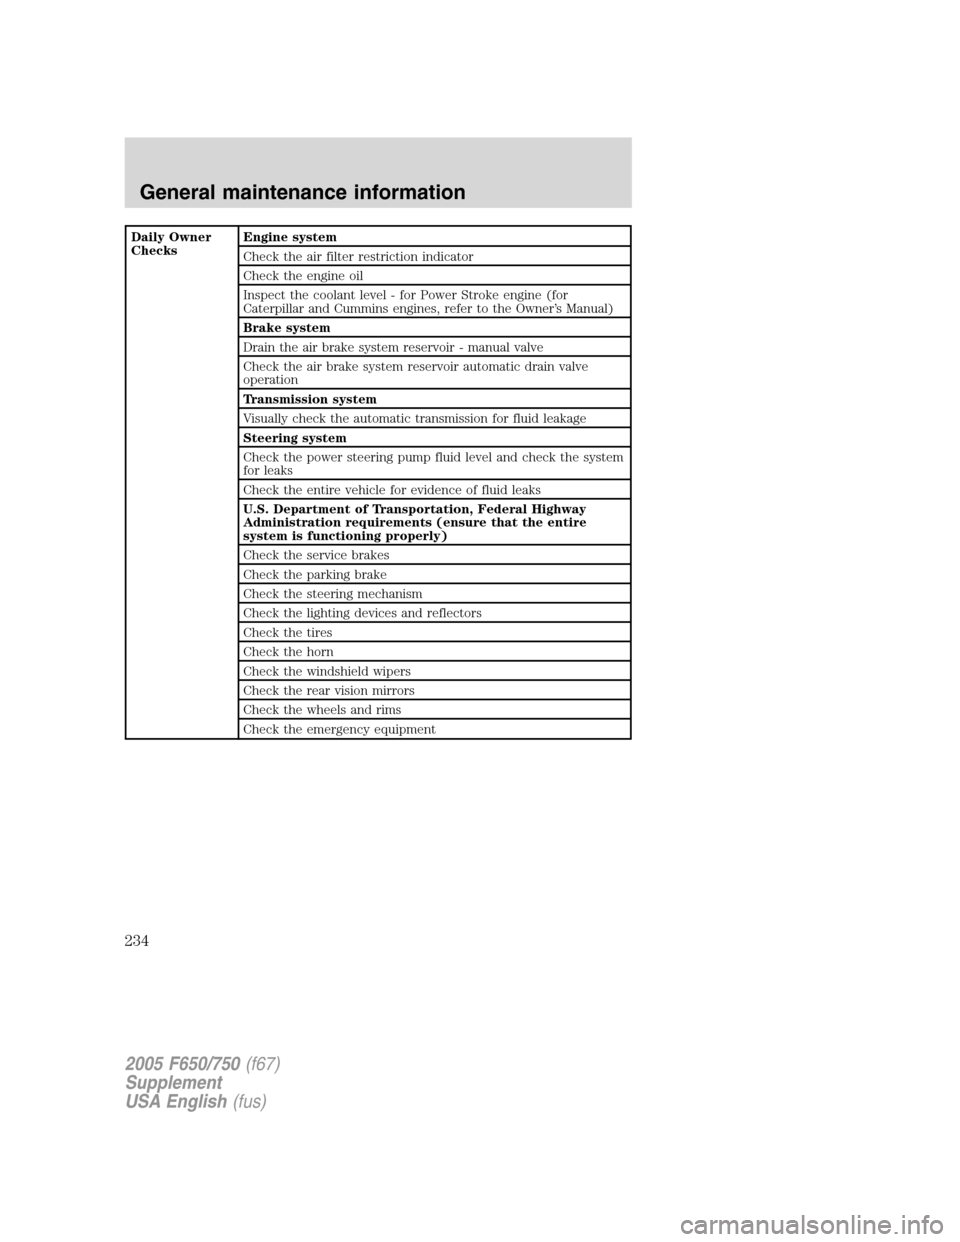
Daily Owner
ChecksEngine system
Check the air filter restriction indicator
Check the engine oil
Inspect the coolant level - for Power Stroke engine (for
Caterpillar and Cummins engines, refer to the Owner’s Manual)
Brake system
Drain the air brake system reservoir - manual valve
Check the air brake system reservoir automatic drain valve
operation
Transmission system
Visually check the automatic transmission for fluid leakage
Steering system
Check the power steering pump fluid level and check the system
for leaks
Check the entire vehicle for evidence of fluid leaks
U.S. Department of Transportation, Federal Highway
Administration requirements (ensure that the entire
system is functioning properly)
Check the service brakes
Check the parking brake
Check the steering mechanism
Check the lighting devices and reflectors
Check the tires
Check the horn
Check the windshield wipers
Check the rear vision mirrors
Check the wheels and rims
Check the emergency equipment
2005 F650/750(f67)
Supplement
USA English(fus)
General maintenance information
234
Page 235 of 272
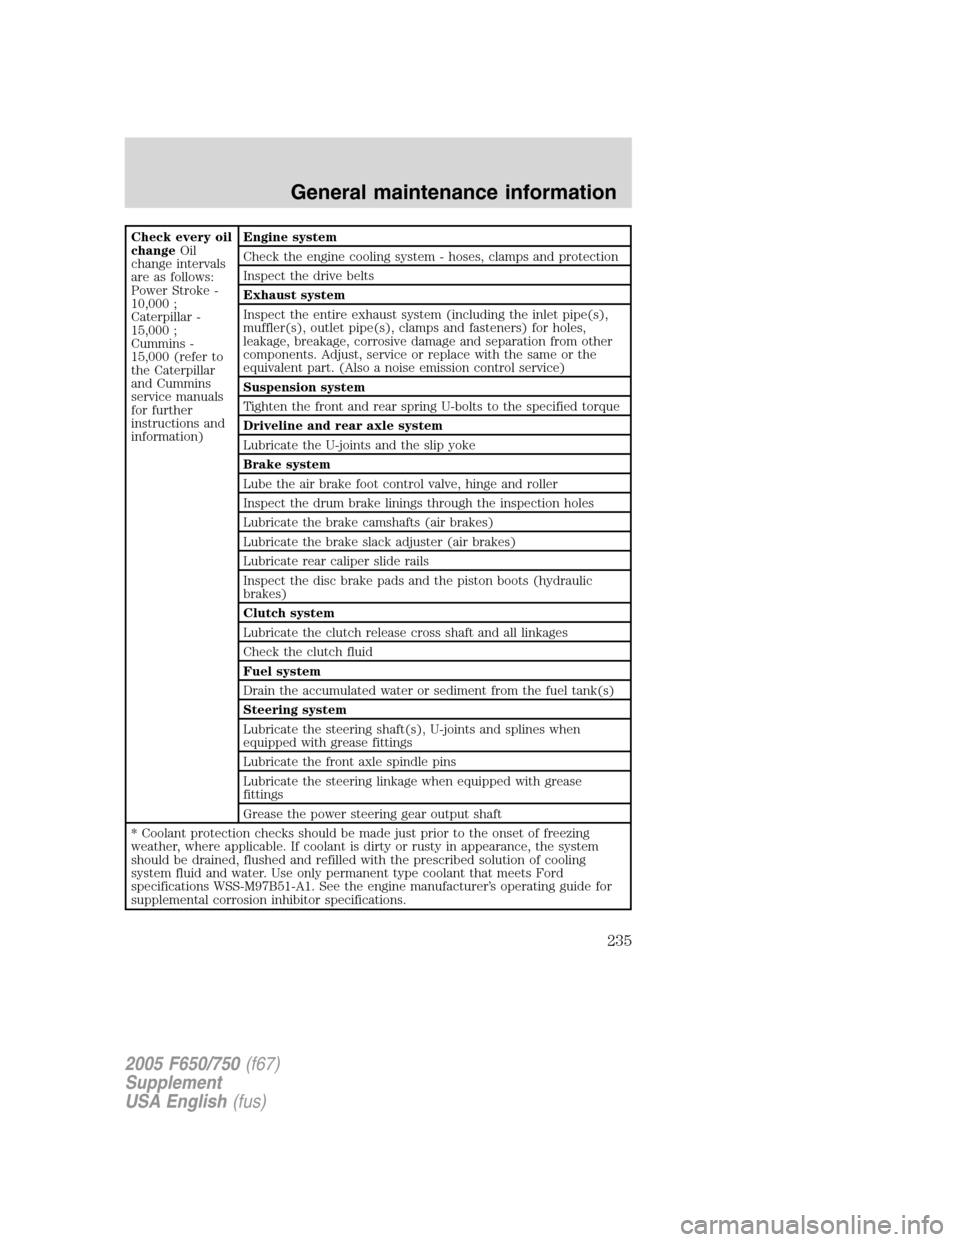
Check every oil
changeOil
change intervals
are as follows:
Power Stroke -
10,000 ;
Caterpillar -
15,000 ;
Cummins -
15,000 (refer to
the Caterpillar
and Cummins
service manuals
for further
instructions and
information)Engine system
Check the engine cooling system - hoses, clamps and protection
Inspect the drive belts
Exhaust system
Inspect the entire exhaust system (including the inlet pipe(s),
muffler(s), outlet pipe(s), clamps and fasteners) for holes,
leakage, breakage, corrosive damage and separation from other
components. Adjust, service or replace with the same or the
equivalent part. (Also a noise emission control service)
Suspension system
Tighten the front and rear spring U-bolts to the specified torque
Driveline and rear axle system
Lubricate the U-joints and the slip yoke
Brake system
Lube the air brake foot control valve, hinge and roller
Inspect the drum brake linings through the inspection holes
Lubricate the brake camshafts (air brakes)
Lubricate the brake slack adjuster (air brakes)
Lubricate rear caliper slide rails
Inspect the disc brake pads and the piston boots (hydraulic
brakes)
Clutch system
Lubricate the clutch release cross shaft and all linkages
Check the clutch fluid
Fuel system
Drain the accumulated water or sediment from the fuel tank(s)
Steering system
Lubricate the steering shaft(s), U-joints and splines when
equipped with grease fittings
Lubricate the front axle spindle pins
Lubricate the steering linkage when equipped with grease
fittings
Grease the power steering gear output shaft
* Coolant protection checks should be made just prior to the onset of freezing
weather, where applicable. If coolant is dirty or rusty in appearance, the system
should be drained, flushed and refilled with the prescribed solution of cooling
system fluid and water. Use only permanent type coolant that meets Ford
specifications WSS-M97B51-A1. See the engine manufacturer’s operating guide for
supplemental corrosion inhibitor specifications.
2005 F650/750(f67)
Supplement
USA English(fus)
General maintenance information
235