transmission fluid FORD F650/750 2019 User Guide
[x] Cancel search | Manufacturer: FORD, Model Year: 2019, Model line: F650/750, Model: FORD F650/750 2019Pages: 387, PDF Size: 4.78 MB
Page 183 of 387
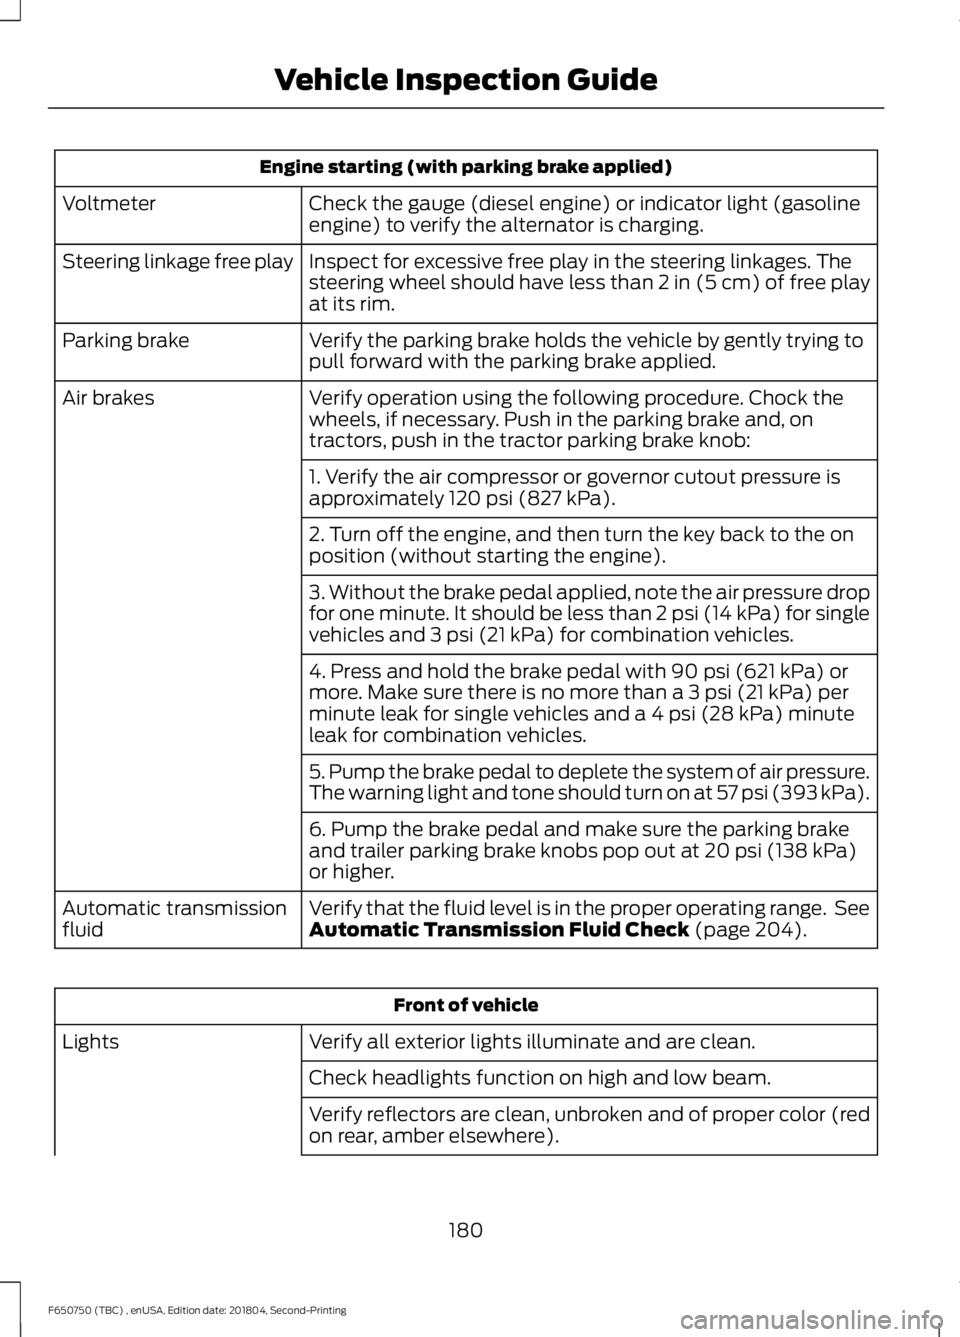
Engine starting (with parking brake applied)
Check the gauge (diesel engine) or indicator light (gasoline
engine) to verify the alternator is charging.
Voltmeter
Inspect for excessive free play in the steering linkages. The
steering wheel should have less than 2 in (5 cm) of free play
at its rim.
Steering linkage free play
Verify the parking brake holds the vehicle by gently trying to
pull forward with the parking brake applied.
Parking brake
Verify operation using the following procedure. Chock the
wheels, if necessary. Push in the parking brake and, on
tractors, push in the tractor parking brake knob:
Air brakes
1. Verify the air compressor or governor cutout pressure is
approximately 120 psi (827 kPa).
2. Turn off the engine, and then turn the key back to the on
position (without starting the engine).
3. Without the brake pedal applied, note the air pressure drop
for one minute. It should be less than 2 psi (14 kPa) for single
vehicles and
3 psi (21 kPa) for combination vehicles.
4. Press and hold the brake pedal with
90 psi (621 kPa) or
more. Make sure there is no more than a 3 psi (21 kPa) per
minute leak for single vehicles and a 4 psi (28 kPa) minute
leak for combination vehicles.
5. Pump the brake pedal to deplete the system of air pressure.
The warning light and tone should turn on at 57 psi (393 kPa).
6. Pump the brake pedal and make sure the parking brake
and trailer parking brake knobs pop out at
20 psi (138 kPa)
or higher.
Verify that the fluid level is in the proper operating range. See
Automatic Transmission Fluid Check
(page 204).
Automatic transmission
fluid Front of vehicle
Verify all exterior lights illuminate and are clean.
Lights
Check headlights function on high and low beam.
Verify reflectors are clean, unbroken and of proper color (red
on rear, amber elsewhere).
180
F650750 (TBC) , enUSA, Edition date: 201804, Second-Printing Vehicle Inspection Guide
Page 189 of 387
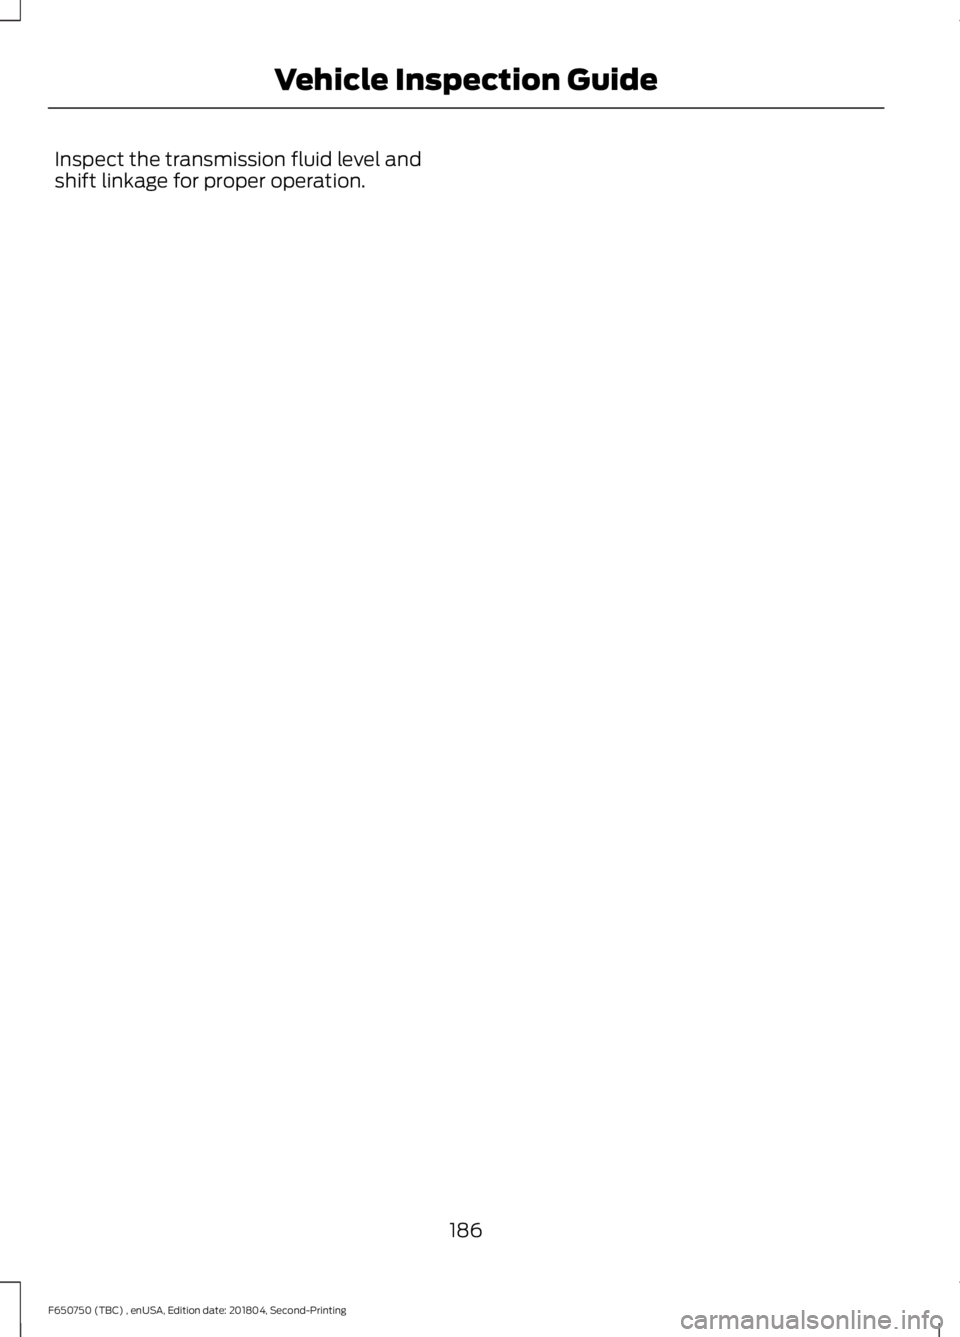
Inspect the transmission fluid level and
shift linkage for proper operation.
186
F650750 (TBC) , enUSA, Edition date: 201804, Second-Printing Vehicle Inspection Guide
Page 193 of 387
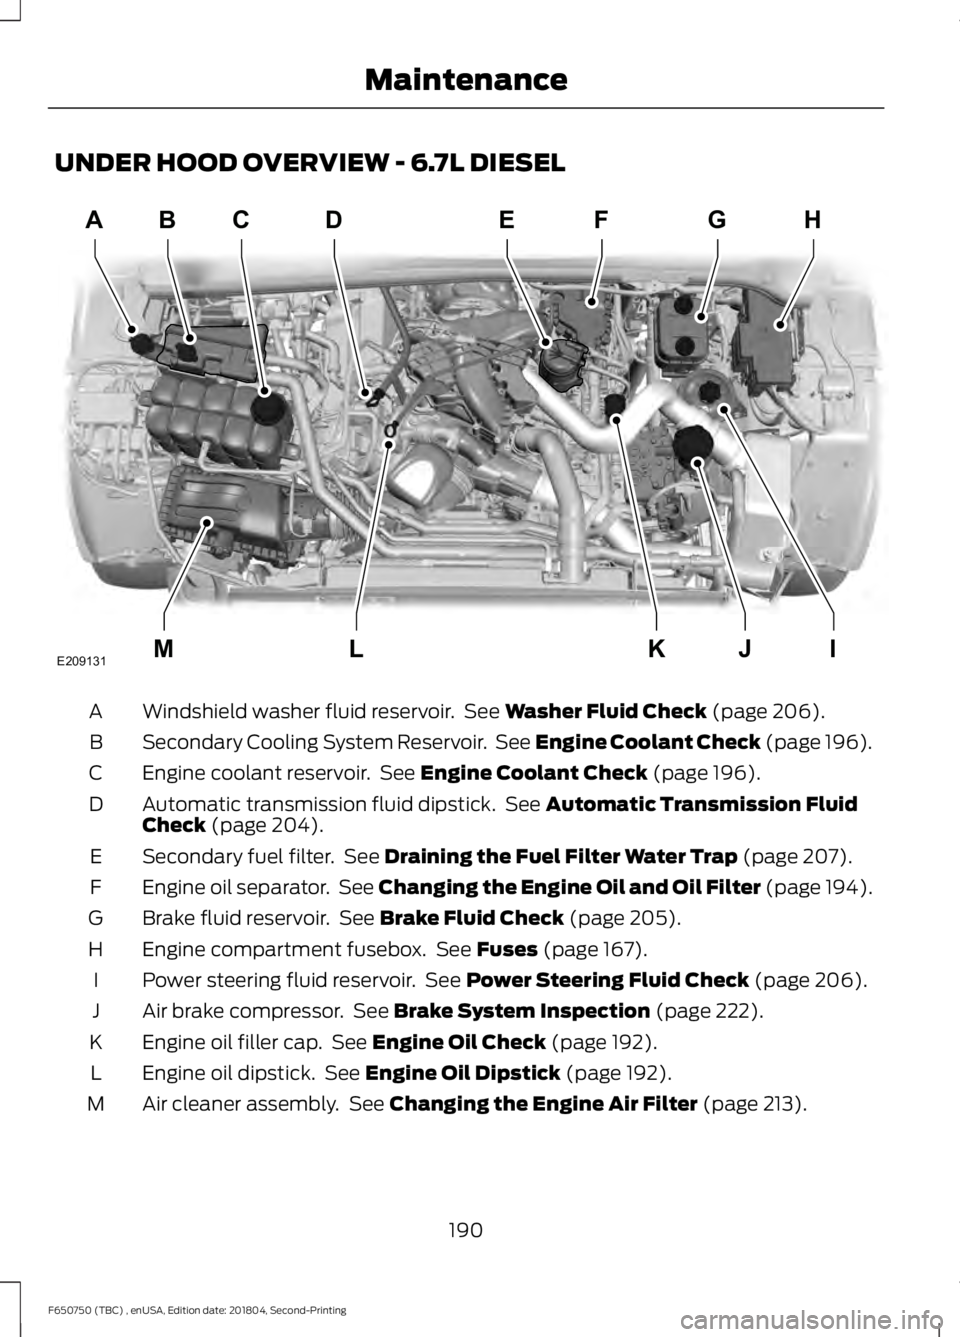
UNDER HOOD OVERVIEW - 6.7L DIESEL
Windshield washer fluid reservoir. See Washer Fluid Check (page 206).
A
Secondary Cooling System Reservoir. See Engine Coolant Check (page 196).
B
Engine coolant reservoir. See
Engine Coolant Check (page 196).
C
Automatic transmission fluid dipstick. See
Automatic Transmission Fluid
Check (page 204).
D
Secondary fuel filter. See
Draining the Fuel Filter Water Trap (page 207).
E
Engine oil separator. See
Changing the Engine Oil and Oil Filter (page 194).
F
Brake fluid reservoir. See
Brake Fluid Check (page 205).
G
Engine compartment fusebox. See
Fuses (page 167).
H
Power steering fluid reservoir. See
Power Steering Fluid Check (page 206).
I
Air brake compressor. See
Brake System Inspection (page 222).
J
Engine oil filler cap. See
Engine Oil Check (page 192).
K
Engine oil dipstick. See
Engine Oil Dipstick (page 192).
L
Air cleaner assembly. See
Changing the Engine Air Filter (page 213).
M
190
F650750 (TBC) , enUSA, Edition date: 201804, Second-Printing MaintenanceABD
IJKLM
FEGH
E209131C
Page 194 of 387
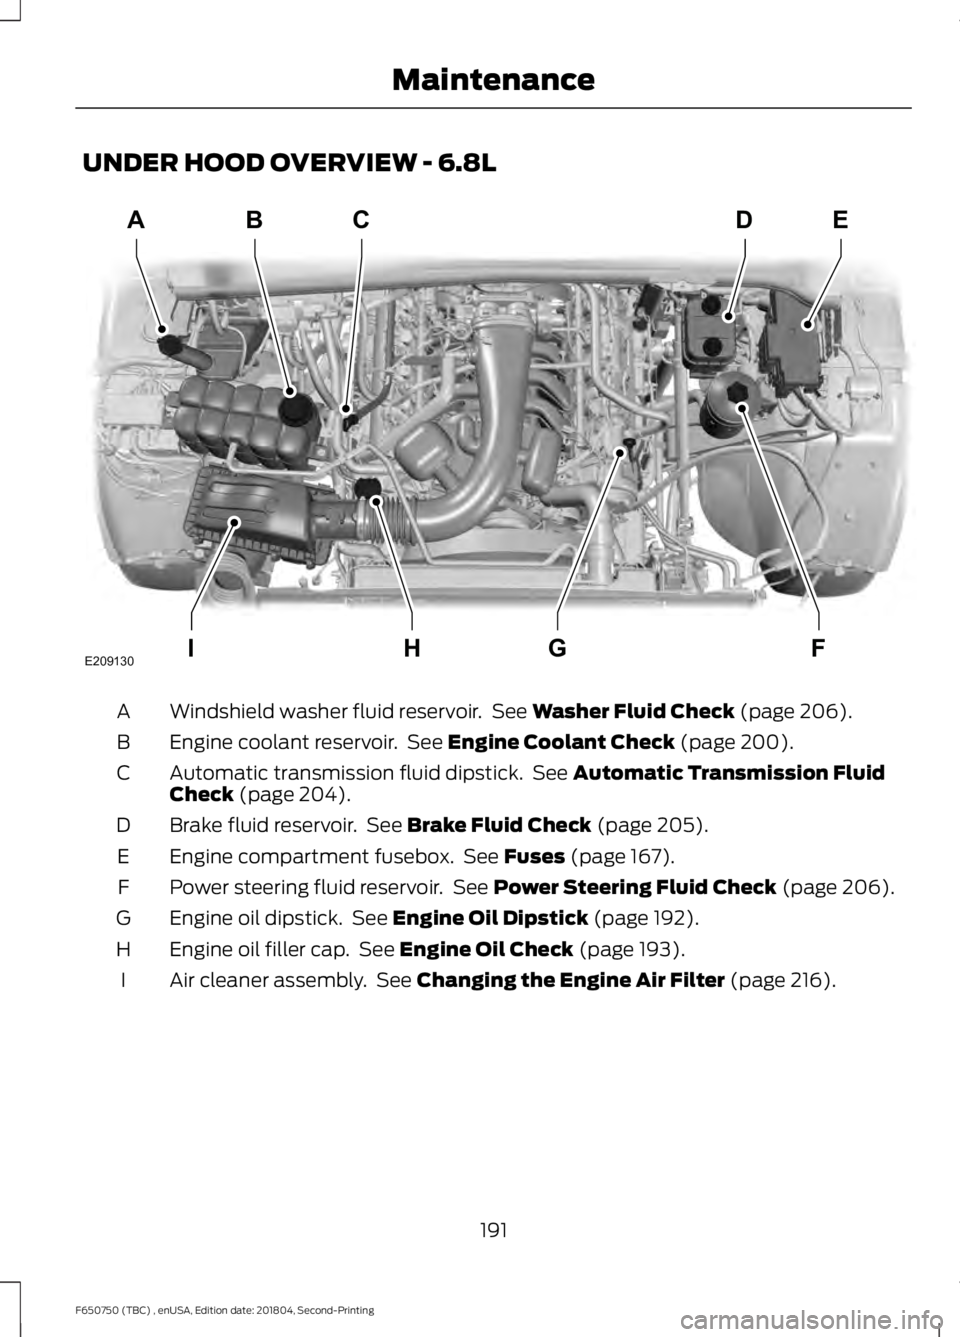
UNDER HOOD OVERVIEW - 6.8L
Windshield washer fluid reservoir. See Washer Fluid Check (page 206).
A
Engine coolant reservoir. See
Engine Coolant Check (page 200).
B
Automatic transmission fluid dipstick. See
Automatic Transmission Fluid
Check (page 204).
C
Brake fluid reservoir. See
Brake Fluid Check (page 205).
D
Engine compartment fusebox. See
Fuses (page 167).
E
Power steering fluid reservoir. See
Power Steering Fluid Check (page 206).
F
Engine oil dipstick. See
Engine Oil Dipstick (page 192).
G
Engine oil filler cap. See
Engine Oil Check (page 193).
H
Air cleaner assembly. See
Changing the Engine Air Filter (page 216).
I
191
F650750 (TBC) , enUSA, Edition date: 201804, Second-Printing MaintenanceABC
FGHI
DE
E209130
Page 207 of 387
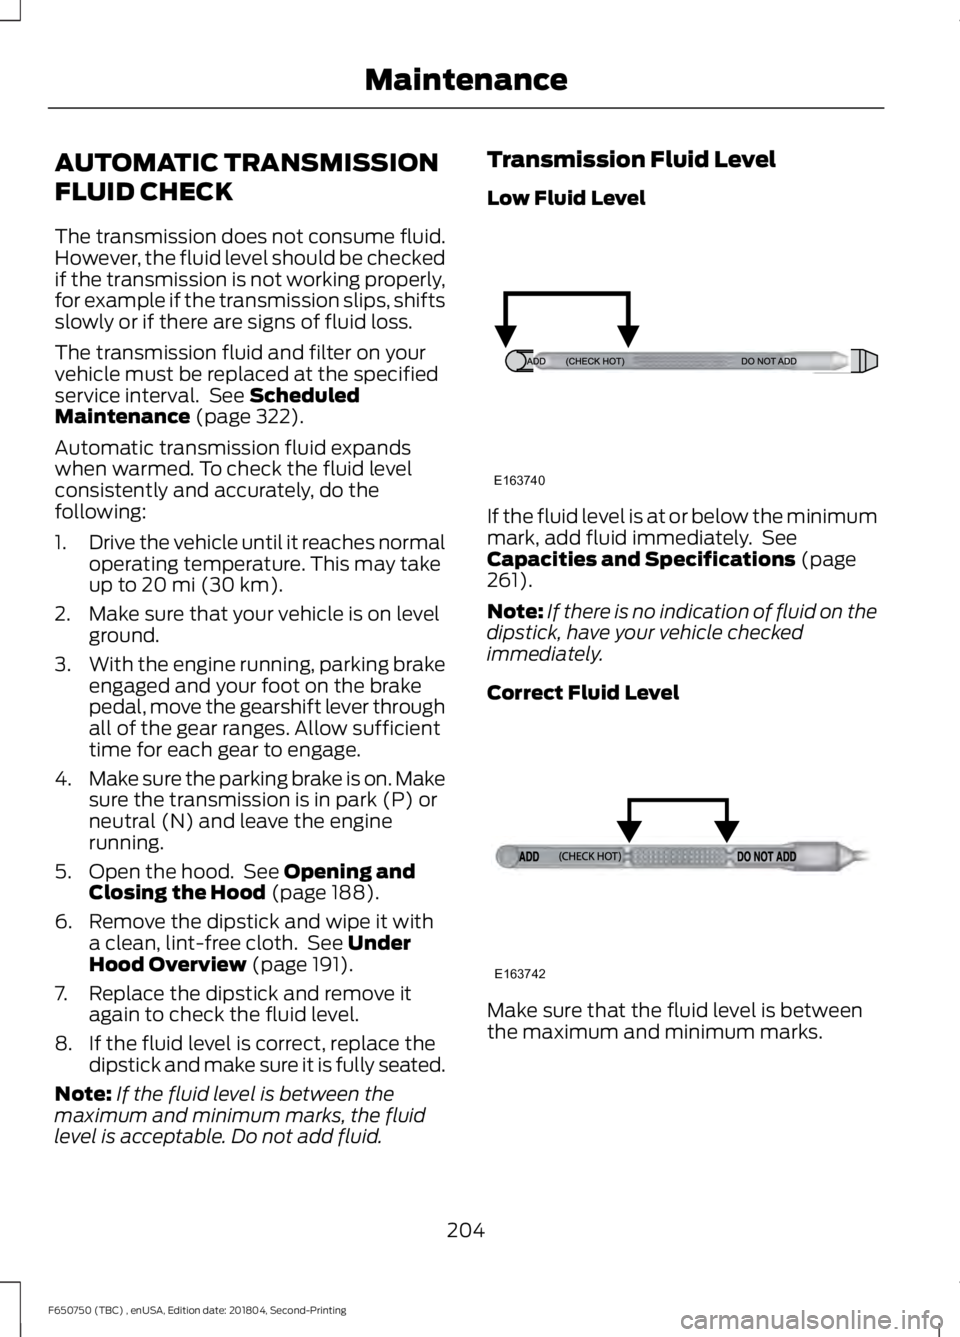
AUTOMATIC TRANSMISSION
FLUID CHECK
The transmission does not consume fluid.
However, the fluid level should be checked
if the transmission is not working properly,
for example if the transmission slips, shifts
slowly or if there are signs of fluid loss.
The transmission fluid and filter on your
vehicle must be replaced at the specified
service interval. See Scheduled
Maintenance (page 322).
Automatic transmission fluid expands
when warmed. To check the fluid level
consistently and accurately, do the
following:
1. Drive the vehicle until it reaches normal
operating temperature. This may take
up to
20 mi (30 km).
2. Make sure that your vehicle is on level ground.
3. With the engine running, parking brake
engaged and your foot on the brake
pedal, move the gearshift lever through
all of the gear ranges. Allow sufficient
time for each gear to engage.
4. Make sure the parking brake is on. Make
sure the transmission is in park (P) or
neutral (N) and leave the engine
running.
5. Open the hood. See
Opening and
Closing the Hood (page 188).
6. Remove the dipstick and wipe it with a clean, lint-free cloth. See
Under
Hood Overview (page 191).
7. Replace the dipstick and remove it again to check the fluid level.
8. If the fluid level is correct, replace the dipstick and make sure it is fully seated.
Note: If the fluid level is between the
maximum and minimum marks, the fluid
level is acceptable. Do not add fluid. Transmission Fluid Level
Low Fluid Level
If the fluid level is at or below the minimum
mark, add fluid immediately. See
Capacities and Specifications
(page
261).
Note: If there is no indication of fluid on the
dipstick, have your vehicle checked
immediately.
Correct Fluid Level Make sure that the fluid level is between
the maximum and minimum marks.
204
F650750 (TBC) , enUSA, Edition date: 201804, Second-Printing MaintenanceE163740 E163742
Page 208 of 387
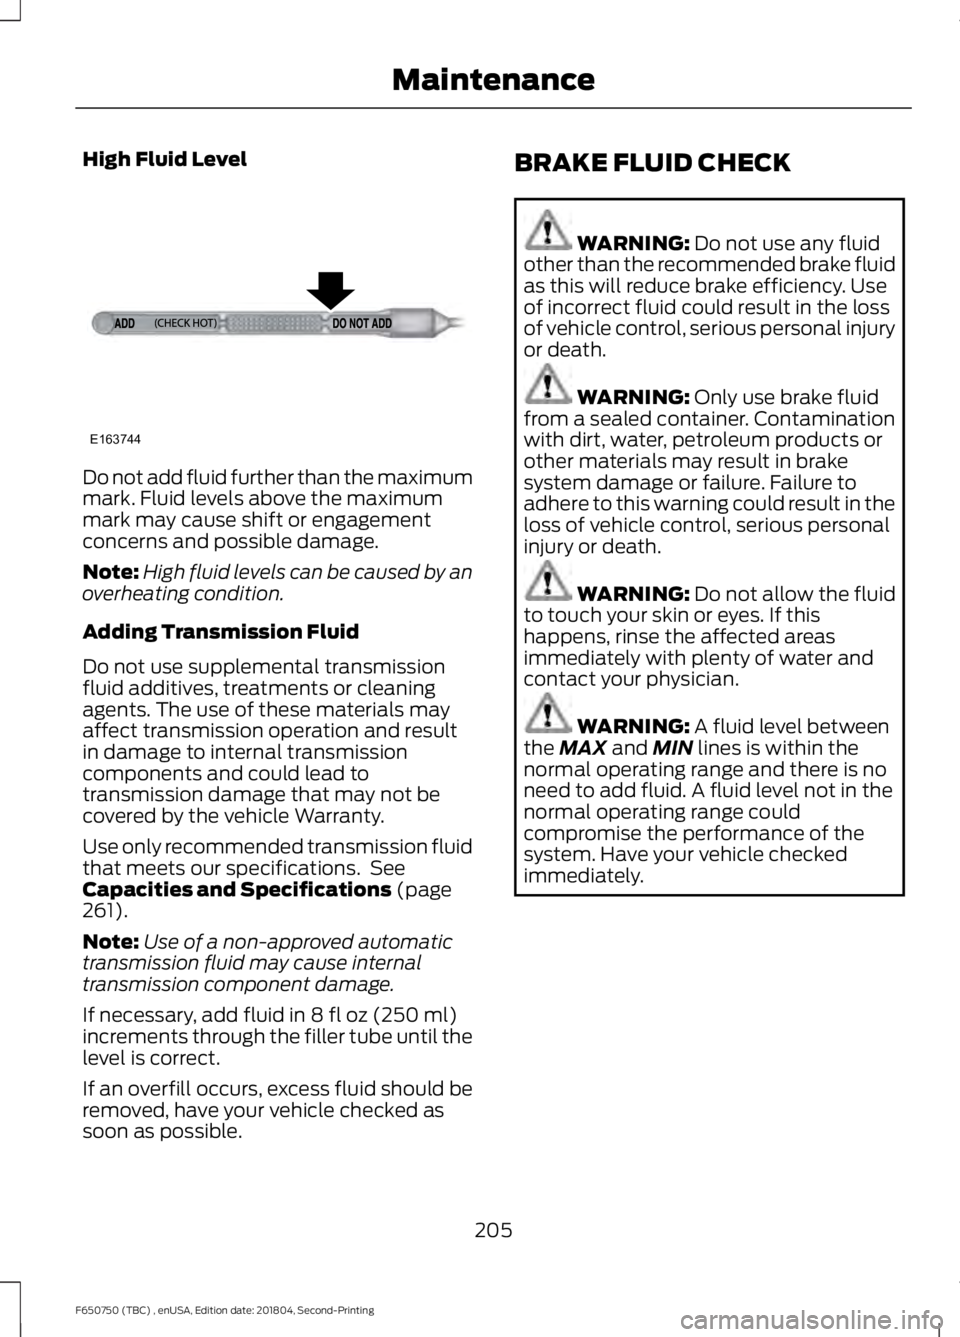
High Fluid Level
Do not add fluid further than the maximum
mark. Fluid levels above the maximum
mark may cause shift or engagement
concerns and possible damage.
Note:
High fluid levels can be caused by an
overheating condition.
Adding Transmission Fluid
Do not use supplemental transmission
fluid additives, treatments or cleaning
agents. The use of these materials may
affect transmission operation and result
in damage to internal transmission
components and could lead to
transmission damage that may not be
covered by the vehicle Warranty.
Use only recommended transmission fluid
that meets our specifications. See
Capacities and Specifications (page
261).
Note: Use of a non-approved automatic
transmission fluid may cause internal
transmission component damage.
If necessary, add fluid in
8 fl oz (250 ml)
increments through the filler tube until the
level is correct.
If an overfill occurs, excess fluid should be
removed, have your vehicle checked as
soon as possible. BRAKE FLUID CHECK WARNING:
Do not use any fluid
other than the recommended brake fluid
as this will reduce brake efficiency. Use
of incorrect fluid could result in the loss
of vehicle control, serious personal injury
or death. WARNING:
Only use brake fluid
from a sealed container. Contamination
with dirt, water, petroleum products or
other materials may result in brake
system damage or failure. Failure to
adhere to this warning could result in the
loss of vehicle control, serious personal
injury or death. WARNING:
Do not allow the fluid
to touch your skin or eyes. If this
happens, rinse the affected areas
immediately with plenty of water and
contact your physician. WARNING:
A fluid level between
the MAX and MIN lines is within the
normal operating range and there is no
need to add fluid. A fluid level not in the
normal operating range could
compromise the performance of the
system. Have your vehicle checked
immediately.
205
F650750 (TBC) , enUSA, Edition date: 201804, Second-Printing MaintenanceE163744
Page 230 of 387
SUSPENSION SYSTEM
INSPECTION
Note:
Do not adjust air suspension height
to any setting other than the specified
setting. Altering the height setting changes
the driveline angle and may result in
unwarrantable component damage, such
as transmission component damage.
Verify drive axle air suspension height and
height control valve performance at engine
oil change intervals.
Periodically check:
• Condition of spring leaves for evidence
of fatigue, bending or breakage.
• Condition of suspension mounting
brackets and bushings.
• Torque rod mounting fasteners for
tightness.
• For proper suspension alignment.
Maintain proper alignment at all times.
• U-bolts. After the chassis has been
operating under load for 1,000 mi
(1,600 km) or six months (whichever
comes first), the U-bolt nuts must be
re-torqued. Re-torque the U-bolt nuts
every
37,000 mi (60,000 km)
thereafter. Clean and lubricate the
U-bolt and nut threads and seats to
make sure a like new condition when
re-torqueing. See
Spring U-Bolt
Check (page 228).
FRAME AND TOW HOOK
INSPECTION
Your vehicle's chassis is manufactured
with frame rails of either HSLA steel or
heat-treated steel. Handle each in a
specific manner to make sure maximum
service life. Consult the service manual or
an authorized dealer before attempting
frame repair or modification. It is important, particularly on vehicles that
use tow hooks frequently, to inspect the
front and rear tow hooks for damage or a
loose mounting.
REAR AXLE FLUID CHECK
Your rear axle may have an optional
synthetic lubricant that allows the use of
extended service intervals. A tag on the
filler plug identifies the use of the synthetic
lubricant.
Only use a lubricant that meets
manufacturer specifications. Only use a
lubricant that meets manufacturer
specifications. Use of a non-approved rear
axle lubricant may cause internal axle
component damage. See Capacities and
Specifications
(page 261).
Checking the Fluid Level
1. Park your vehicle on level ground.
2. Set the parking brake and shift into position neutral (N) or park (P). Turn
the engine off.
3. Clean any dirt from around the axle filler plug.
4. Remove the filler plug and inspect the lubricant level. It should be at the
bottom of the filler plug opening.
5. Add lubricant, if necessary, through the
filler plug opening.
6. Clean and install the filler plug securely.
Changing the Fluid
Note: Drain the rear axle while the lubricant
is warm.
1. Park your vehicle on level ground.
2. Set the parking brake and shift into position neutral (N) or park (P). Turn
the engine off.
3. Clean any dirt from around the axle filler and drain plugs.
227
F650750 (TBC) , enUSA, Edition date: 201804, Second-Printing Maintenance
Page 265 of 387
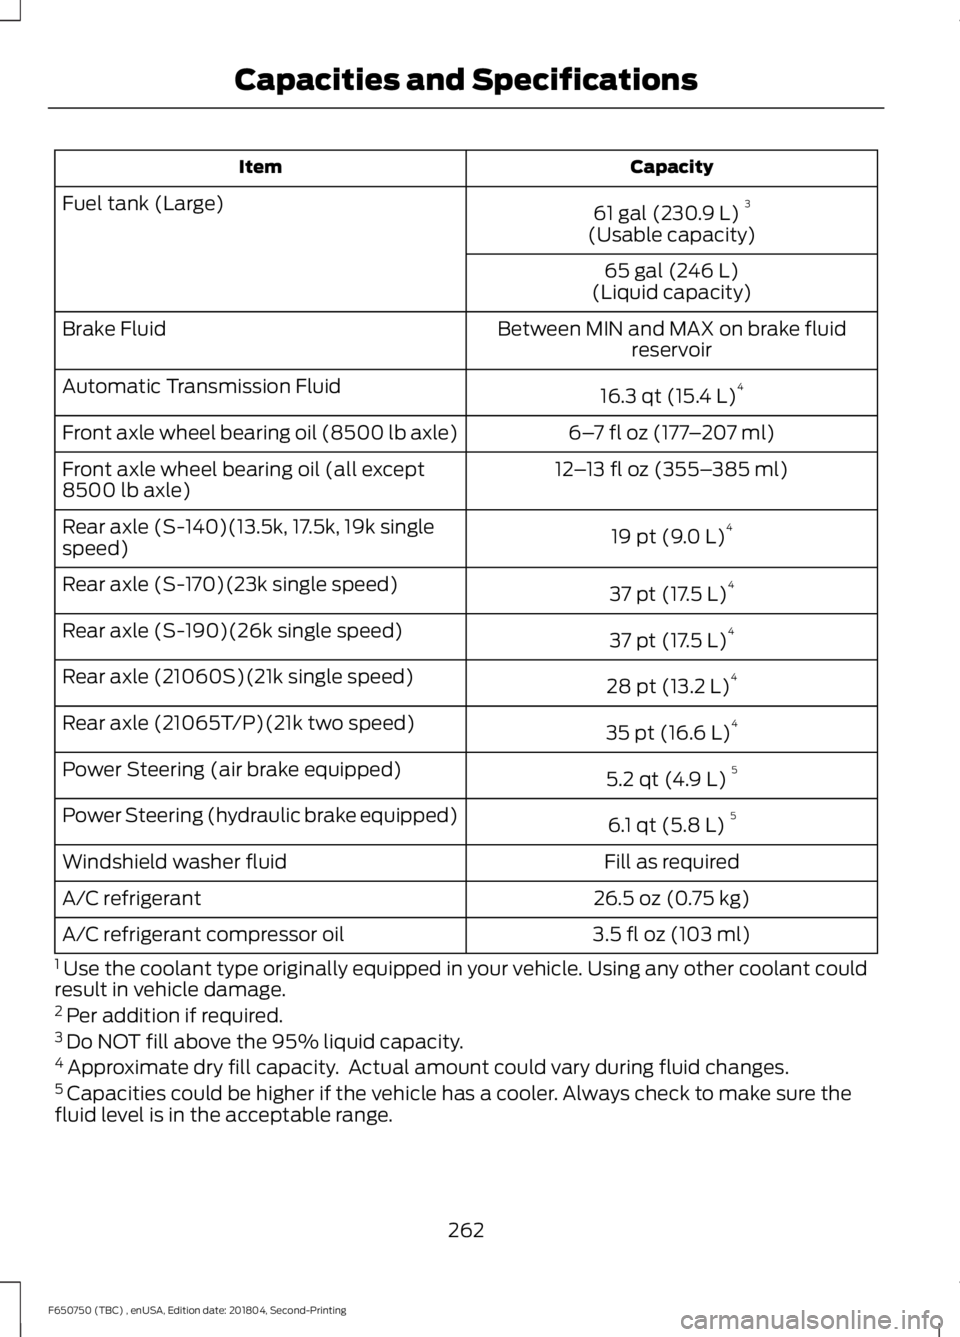
Capacity
Item
61 gal (230.9 L)3
Fuel tank (Large)
(Usable capacity)
65 gal (246 L)
(Liquid capacity)
Between MIN and MAX on brake fluid reservoir
Brake Fluid
16.3 qt (15.4 L)4
Automatic Transmission Fluid
6–7 fl oz (177 –207 ml)
Front axle wheel bearing oil (8500 lb axle)
12–13 fl oz (355– 385 ml)
Front axle wheel bearing oil (all except
8500 lb axle)
19 pt (9.0 L)4
Rear axle (S-140)(13.5k, 17.5k, 19k single
speed)
37 pt (17.5 L)4
Rear axle (S-170)(23k single speed)
37 pt (17.5 L)4
Rear axle (S-190)(26k single speed)
28 pt (13.2 L)4
Rear axle (21060S)(21k single speed)
35 pt (16.6 L)4
Rear axle (21065T/P)(21k two speed)
5.2 qt (4.9 L)5
Power Steering (air brake equipped)
6.1 qt (5.8 L)5
Power Steering (hydraulic brake equipped)
Fill as required
Windshield washer fluid
26.5 oz (0.75 kg)
A/C refrigerant
3.5 fl oz (103 ml)
A/C refrigerant compressor oil
1 Use the coolant type originally equipped in your vehicle. Using any other coolant could
result in vehicle damage.
2 Per addition if required.
3 Do NOT fill above the 95% liquid capacity.
4 Approximate dry fill capacity. Actual amount could vary during fluid changes.
5 Capacities could be higher if the vehicle has a cooler. Always check to make sure the
fluid level is in the acceptable range.
262
F650750 (TBC) , enUSA, Edition date: 201804, Second-Printing Capacities and Specifications
Page 267 of 387
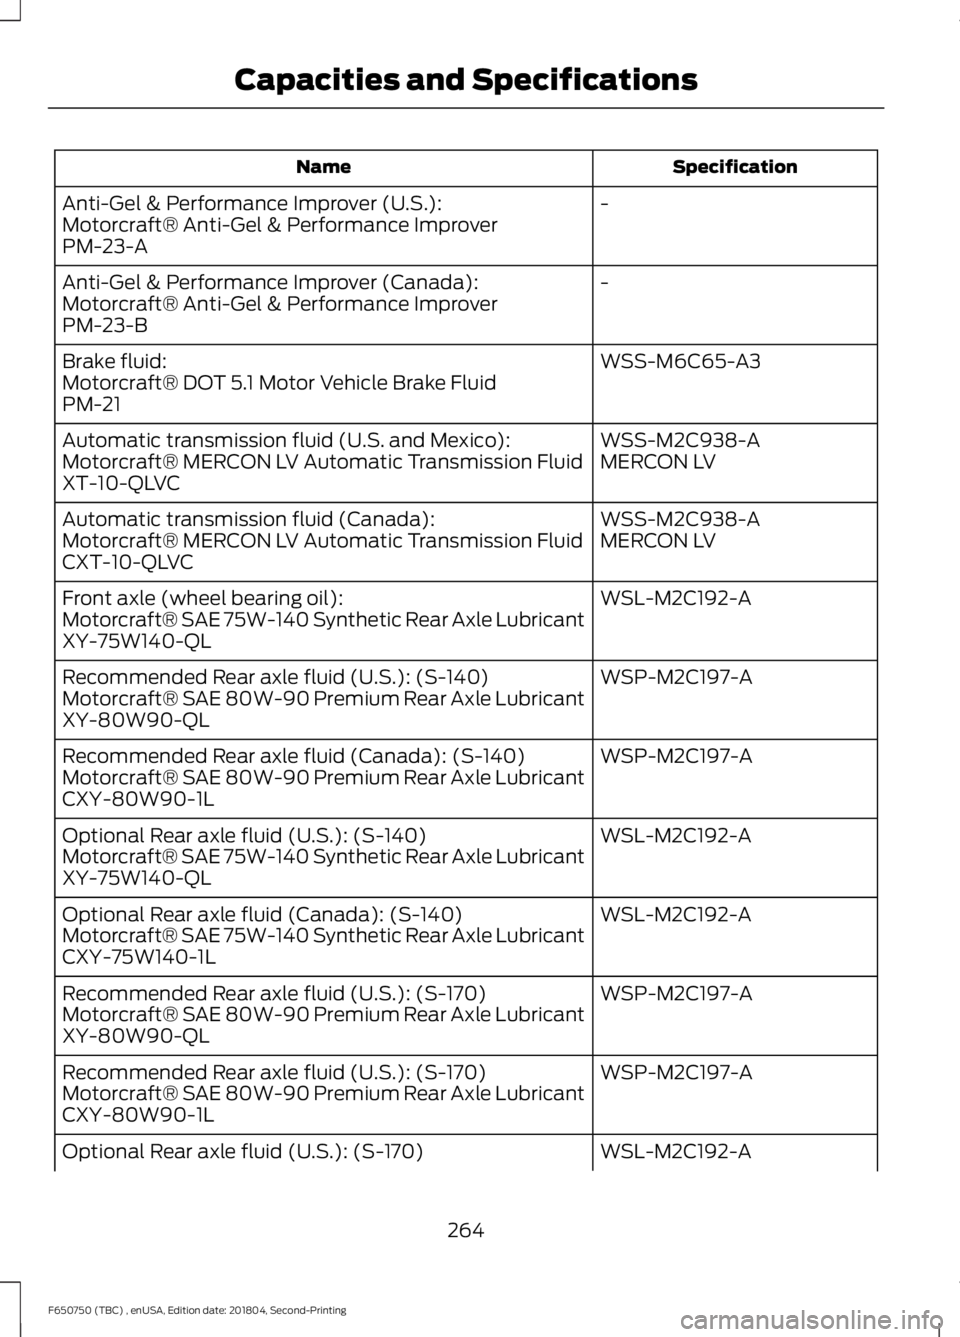
Specification
Name
-
Anti-Gel & Performance Improver (U.S.):
Motorcraft® Anti-Gel & Performance Improver
PM-23-A
-
Anti-Gel & Performance Improver (Canada):
Motorcraft® Anti-Gel & Performance Improver
PM-23-B
WSS-M6C65-A3
Brake fluid:
Motorcraft® DOT 5.1 Motor Vehicle Brake Fluid
PM-21
WSS-M2C938-A
Automatic transmission fluid (U.S. and Mexico):
MERCON LV
Motorcraft® MERCON LV Automatic Transmission Fluid
XT-10-QLVC
WSS-M2C938-A
Automatic transmission fluid (Canada):
MERCON LV
Motorcraft® MERCON LV Automatic Transmission Fluid
CXT-10-QLVC
WSL-M2C192-A
Front axle (wheel bearing oil):
Motorcraft® SAE 75W-140 Synthetic Rear Axle Lubricant
XY-75W140-QL
WSP-M2C197-A
Recommended Rear axle fluid (U.S.): (S-140)
Motorcraft® SAE 80W-90 Premium Rear Axle Lubricant
XY-80W90-QL
WSP-M2C197-A
Recommended Rear axle fluid (Canada): (S-140)
Motorcraft® SAE 80W-90 Premium Rear Axle Lubricant
CXY-80W90-1L
WSL-M2C192-A
Optional Rear axle fluid (U.S.): (S-140)
Motorcraft® SAE 75W-140 Synthetic Rear Axle Lubricant
XY-75W140-QL
WSL-M2C192-A
Optional Rear axle fluid (Canada): (S-140)
Motorcraft® SAE 75W-140 Synthetic Rear Axle Lubricant
CXY-75W140-1L
WSP-M2C197-A
Recommended Rear axle fluid (U.S.): (S-170)
Motorcraft® SAE 80W-90 Premium Rear Axle Lubricant
XY-80W90-QL
WSP-M2C197-A
Recommended Rear axle fluid (U.S.): (S-170)
Motorcraft® SAE 80W-90 Premium Rear Axle Lubricant
CXY-80W90-1L
WSL-M2C192-A
Optional Rear axle fluid (U.S.): (S-170)
264
F650750 (TBC) , enUSA, Edition date: 201804, Second-Printing Capacities and Specifications
Page 269 of 387
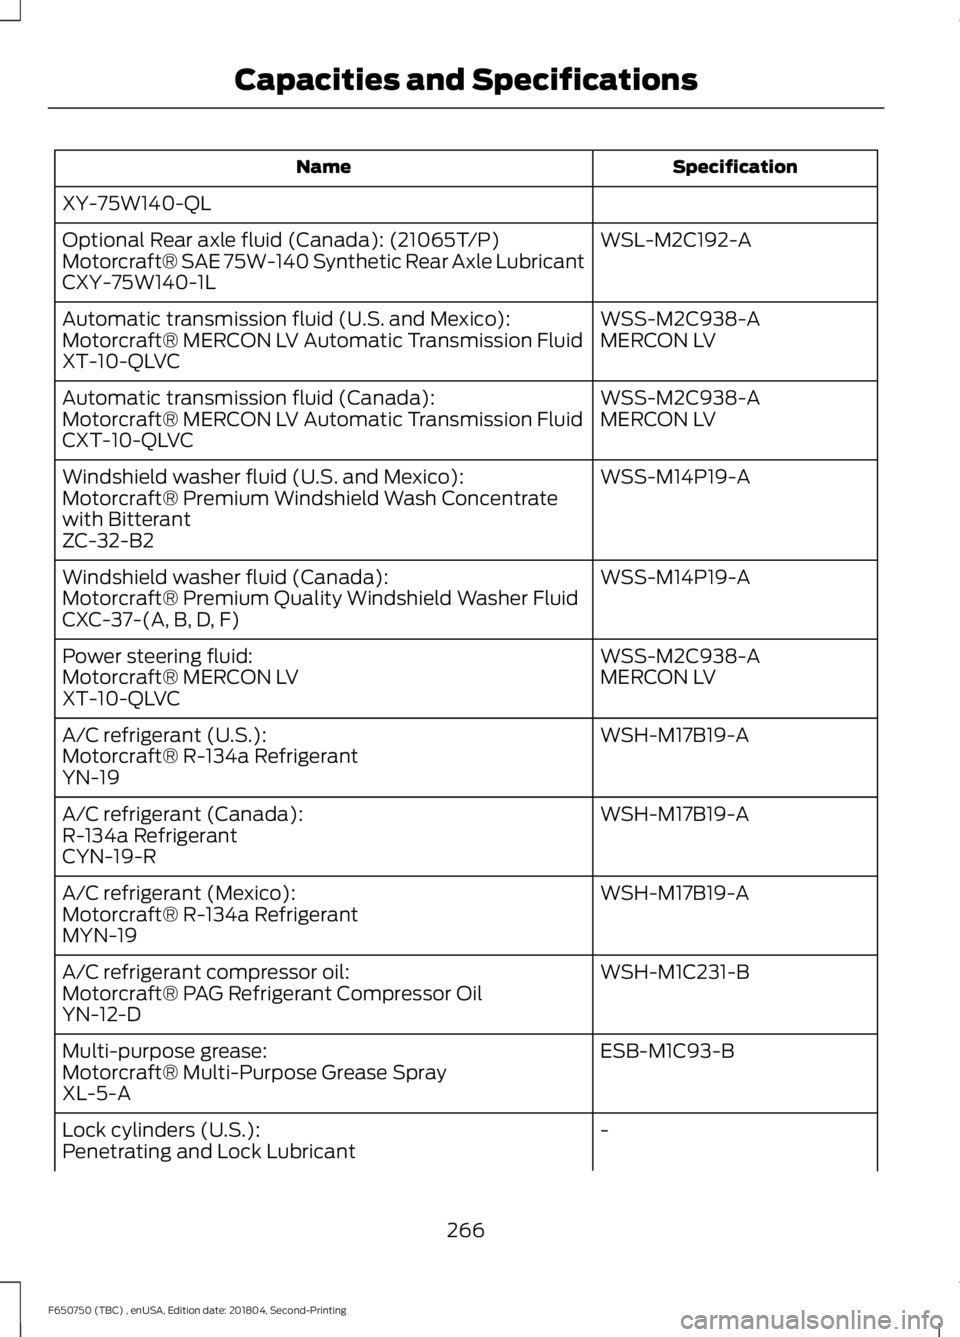
Specification
Name
XY-75W140-QL WSL-M2C192-A
Optional Rear axle fluid (Canada): (21065T/P)
Motorcraft® SAE 75W-140 Synthetic Rear Axle Lubricant
CXY-75W140-1L
WSS-M2C938-A
Automatic transmission fluid (U.S. and Mexico):
MERCON LV
Motorcraft® MERCON LV Automatic Transmission Fluid
XT-10-QLVC
WSS-M2C938-A
Automatic transmission fluid (Canada):
MERCON LV
Motorcraft® MERCON LV Automatic Transmission Fluid
CXT-10-QLVC
WSS-M14P19-A
Windshield washer fluid (U.S. and Mexico):
Motorcraft® Premium Windshield Wash Concentrate
with Bitterant
ZC-32-B2
WSS-M14P19-A
Windshield washer fluid (Canada):
Motorcraft® Premium Quality Windshield Washer Fluid
CXC-37-(A, B, D, F)
WSS-M2C938-A
Power steering fluid:
MERCON LV
Motorcraft® MERCON LV
XT-10-QLVC
WSH-M17B19-A
A/C refrigerant (U.S.):
Motorcraft® R-134a Refrigerant
YN-19
WSH-M17B19-A
A/C refrigerant (Canada):
R-134a Refrigerant
CYN-19-R
WSH-M17B19-A
A/C refrigerant (Mexico):
Motorcraft® R-134a Refrigerant
MYN-19
WSH-M1C231-B
A/C refrigerant compressor oil:
Motorcraft® PAG Refrigerant Compressor Oil
YN-12-D
ESB-M1C93-B
Multi-purpose grease:
Motorcraft® Multi-Purpose Grease Spray
XL-5-A
-
Lock cylinders (U.S.):
Penetrating and Lock Lubricant
266
F650750 (TBC) , enUSA, Edition date: 201804, Second-Printing Capacities and Specifications