key FORD FESTIVA 1991 Owner's Manual
[x] Cancel search | Manufacturer: FORD, Model Year: 1991, Model line: FESTIVA, Model: FORD FESTIVA 1991Pages: 454, PDF Size: 9.53 MB
Page 310 of 454
Back To Article
GENERAL SERVICING
1991 Ford Com pressor Overhaul
REMOVAL & INSTALLATION
FORD FS-6 6-CYL CLUTCH ASSEMBLY
Removal
1. Using Spanner (T70P-4067-A), remove compressor shaft nut. Thread Hub Remover (T80L-19703-B) into clutch plate. Tighten center
bolt in hub remover to remove clutch plate and shims.
2. Remove snap ring. Remove pulley assembly from compressor. If assembly cannot be easily removed, place Shaft Protector (T80L-
19703-G) over shaft. Using Puller (D81P-19703-B), remove pulley assembly. Remove clutch coil retaining snap ring. Remove clutch
coil.
3. If bearing replacement is required, place pulley on Support (T80L-19703-E). Drive bearing from pulley using Bearing Remover (T80L-
19703-J).
Installation
1. If bearing is to be installed, place pulley on support. Using Bearing Installer (T80L-19703-C), drive bearing into pulley. Stake pulley in
4 places to retain bearing.
2. Install clutch coil on compressor so locating pin on compressor engages with hole in clutch coil. Install snap ring. Using hammer and
Pulley Installer (T80L-19703-J), tap pulley assembly on compressor.
3. Install snap ring with beveled side away from compressor. Using Clutch Plate Installer (T80L-19703-F), install clutch plate and shims.
Install and tighten compressor shaft nut to 10-14 ft. lbs. (14-19 N.m).
4. Using feeler gauge, measure air gap between clutch plate and pulley surface in 3 locations around pulley. Rotate pulley 180 degrees and
recheck clearance. Proper clearance is .021-.036" (.05-.91 mm). Adjust shim thickness to obtain correct clearance.
FORD FS-6 6-CYL SHAFT SEAL
Removal
1. Discharge system using approved refrigerant recovery/recycling equipment and remove compressor. Drain oil from compressor and
record amount for reassembly.
2. Remove clutch assembly. See FORD FS-6 6-CYL CLUTCH ASSEMBLY R & I in this article. Ensure compressor outer surface is clean.
Attach compressor on Clamp & Holding Fixture (T81P-19623-D). Place fixture in vise.
3. Using Key Remover (T81P-19623-NH), remove key from compressor shaft. Remove front head-to-compressor retaining bolts. Remove
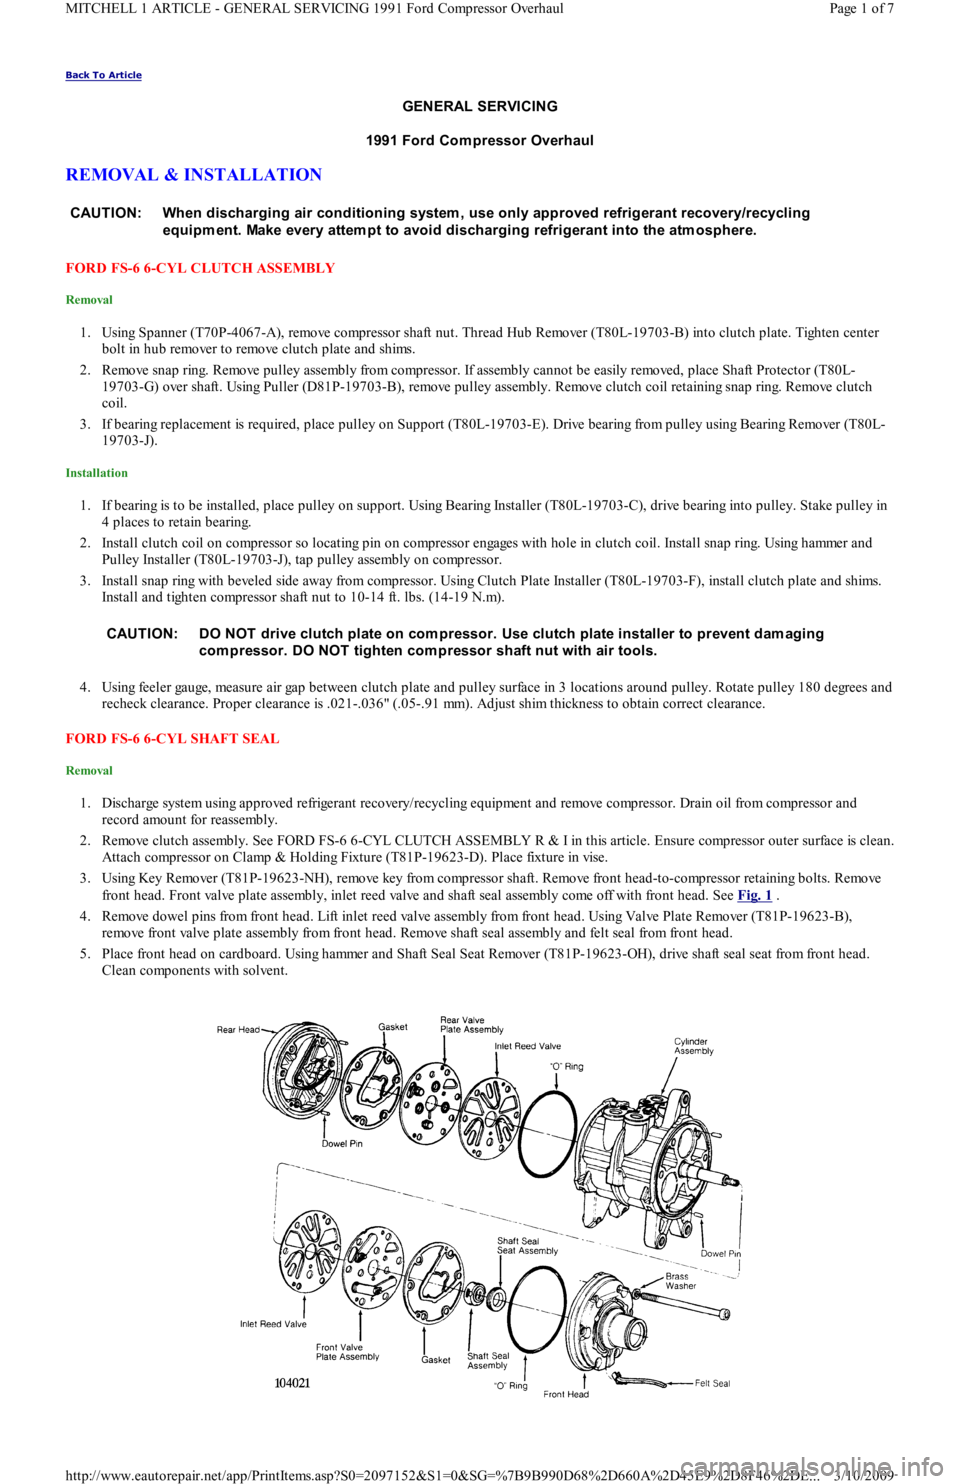
front head. Front valve plate assembly, inlet reed valve and shaft seal assembly come off with front head. See Fig. 1
.
4. Remove dowel pins from front head. Lift inlet reed valve assembly from front head. Using Valve Plate Remover (T81P-19623-B),
remove front valve plate assembly from front head. Remove shaft seal assembly and felt seal from front head.
5. Place front head on cardboard. Using hammer and Shaft Seal Seat Remover (T81P-19623-OH), drive shaft seal seat from front head.
Clean components with solvent. CAUT ION: When discharging air conditioning system , use only approved refrigerant recovery/recycling
equipm ent. Make every attem pt to avoid discharging refrigerant into the atm osphere.
CAUT ION: DO NOT drive clutch plate on com pressor. Use clutch plate installer to prevent dam aging
com pressor. DO NOT tighten com pressor shaft nut with air tools.
Page 1 of 7 MITCHELL 1 ARTICLE - GENERAL SERVICING 1991 Ford Compressor Overhaul
3/10/2009 http://www.eautorepair.net/app/PrintItems.asp?S0=2097152&S1=0&SG=%7B9B990D68%2D660A%2D45E9%2D8F46%2DE
...
Page 312 of 454
1. Discharge system using approved refrigerant recovery/recycling equipment and remove compressor. Using Spanner (T70P-4067-A),
remove clutch plate retaining bolt and discard. Using an 8-mm bolt threaded into clutch plate, remove clutch plate and shims. See Fig.
2 .
2. Remove shaft felt seal. Thoroughly clean seal area of compressor. Using snap ring pliers, remove shaft seal retaining snap ring.
3. Position Shaft Seal Remover (T89P-19623-BH) over compressor shaft. Push shaft seal remover downward against seal. Ensure end of
shaft seal remover is engaged with inside of seal.
4. Rotate shaft seal remover handle clockwise to expand remover tip inside seal. Pull shaft seal from compressor.
Installation
1. Shaft seal protector is included with replacement seal kit. Lubricate shaft seal protector and shaft seal with refrigerant oil.
2. Install shaft seal on shaft seal protector so lip of seal is toward compressor (large end of shaft seal protector). Install shaft seal protector
on compressor shaft.
3. Using Shaft Seal Installer (T89P-19623-AH), push shaft seal down shaft seal protector until seated. Remove shaft seal installer and
protector. Install NEW shaft seal retaining snap ring.
4. Install NEW shaft seal felt. Install clutch plate. Install new clutch plate retaining bolt and tighten to 96-120 INCH lbs. (11-14 N.m).
5. Using feeler gauge, check clearance between clutch plate and pulley assembly mating surfaces in 3 places. Clearance should be .018-
.033" (.46-.84 mm). If clearance is not correct, add or remove shims.
6. Install compressor. Evacuate and recharge system. Perform leak test.
NIPPONDENSO 6E-171 & 6P-148 CLUTCH ASSEMBLY
Removal
1. Using Spanner (T81P-19623-MH), hold clutch plate and remove crankshaft nut. Using Clutch Plate Remover (T80L-19703-B), pull
clutch plate from compressor. Remove clutch plate shims.
2. Remove snap ring and clutch pulley assembly. If pulley assembly cannot be removed by hand, use Shaft Protector (T80L-19703-G) and
3-jaw puller to remove pulley. Remove snap ring. Disconnect electrical wiring and remove clutch coil.
Installation
1. Install clutch coil over locating pin and install snap ring. Connect electrical wiring.
2. Using Pulley Installer (T80L-19703-J) and hammer (if necessary), install pulley assembly. Install snap ring with beveled side away from
compressor.
3. Install clutch plate shims. Ensure clutch plate aligns with crankshaft key. Using Clutch Plate Installer (T80L-19703-F), install clutch
plate.
4. Install crankshaft nut. Using spanner, tighten nut to 10-14 ft. lbs. (13-20 N.m). DO NOT tighten nut with air tools. Using feeler gauge,
check clearance between clutch plate and pulley.
5. Rotate compressor clutch and check clearance in more than one place. Proper clearance is .021-.035" (.53-.89 mm). If clearance is not
correct, add or remove shims.
NIPPONDENSO 6E-171 & 6P-148 SHAFT SEAL
Removal
1. Discharge system using approved refrigerant recovery/recycling equipment and remove compressor. Drain oil from suction port on
compressor and record amount for reassembly.
2. Remove clutch assembly. See NIPPONDENSO 6E-171 & 6P-148 CLUTCH ASSEMBLY R & I in this article. Ensure outer surface of
compressor is clean. Attach compressor on Clamp & Holding Fixture (T81P-19623-LH). Place fixture in vise.
3. Using Key Remover (T81P-19623-NH), remove key from compressor shaft. Remove front head-to-compressor retaining bolts and front
head. Front valve plate assembly, inlet reed valve and shaft seal assembly come off with front head. See Fig. 1
.
4. Remove dowel pins from front head. Lift inlet reed valve assembly from front head. Using Valve Plate Remover (T81P-19623-PH),
remove front valve plate assembly from front head. Remove shaft seal assembly and felt seal from front head.
5. Place front head on cardboard. Drive shaft seal seat from front head using hammer and Shaft Seal Seat Remover (T81P-19623-OH).
Clean components with solvent.
Installation
1. Place dowel pins in compressor. Lubricate inlet reed valve with refrigerant oil. Install inlet reed valve on compressor. Install front valve
plate assembly on compressor.
2. Lubricate shaft seal seat with refrigerant oil. Install Seat Installer (T81P-19623-C) on new seat so installer is placed on grooved side of
seat. Install shaft seal seat.
3. Install shaft seal assembly in front head so sealing surface is toward end of compressor shaft. Ensure flat areas on shaft seal assembly
engage with flat areas on compressor shaft.
4. Lubricate front head "O" ring with refrigerant oil. Install front head and "O" ring. Tighten retaining bolts in a crisscross pattern to 19 ft.
lbs. (26 N.m). DO NOT use air tools to tighten retaining bolts.
5. Install clutch assembly. Add same amount new refrigerant oil to compressor as was drained. Rotate compressor 10 revolutions to
distribute oil. Install compressor. Evacuate and recharge system. Perform leak test. NOTE:Rem ove com pressor when clearance is not adequate for clutch assem bly rem oval.
CAUT ION: DO NOT dry front valve plate assem bly or inlet reed valve with com pressed air.
CAUT ION: DO NOT touch sealing surfaces of shaft seal assem bly or shaft seat assem bly.
Page 3 of 7 MITCHELL 1 ARTICLE - GENERAL SERVICING 1991 Ford Compressor Overhaul
3/10/2009 http://www.eautorepair.net/app/PrintItems.asp?S0=2097152&S1=0&SG=%7B9B990D68%2D660A%2D45E9%2D8F46%2DE
...
Page 313 of 454
NIPPONDENSO 10P13 CLUTCH ASSEMBLY
Removal
1. Discharge system using approved refrigerant recovery/recycling equipment and remove compressor. Using Clutch Holder (1014), hold
clutch plate and remove crankshaft nut. Using Clutch Plate Remover (T80L-19703-B), pull clutch plate from compressor. Remove
clutch plate shims.
2. Remove snap ring and pulley assembly. If pulley assembly cannot be removed by hand, use Shaft Protector (T80L-19703-G) and 3-jaw
puller to remove pulley. Remove snap ring. Disconnect electrical wiring and remove clutch coil.
Installation
1. Install clutch coil over locating pin. Install snap ring with beveled side away from compressor.
2. Install pulley assembly using Pulley Installer (T80L-19703-J) and hammer (if necessary). Install snap ring with beveled side away from
compressor.
3. Install clutch plate shims. Ensure clutch plate aligns with crankshaft key. Install clutch plate using Clutch Plate Installer (T80L-19703-
F).
4. Install crankshaft nut. Using spanner, tighten nut to 10-14 ft. lbs. (13-20 N.m). DO NOT tighten nut with air tools. Using feeler gauge,
check clearance between clutch plate and pulley.
5. Rotate compressor clutch and check clearance in more than one place. Proper clearance is .021-.036" (.53-.91 mm). If clearance is not
correct, add or remove shims.
6. Add same amount new refrigerant oil to compressor as was drained. Rotate compressor 10 revolutions to distribute oil. Install
compressor. Evacuate and recharge system. Perform leak test.
NIPPONDENSO 10P13 SHAFT SEAL
Removal
1. Discharge system using approved refrigerant recovery/recycling equipment and remove compressor. Drain oil from compressor and
record amount for reassembly. Using Clutch Holder (1014), hold clutch plate and remove crankshaft nut.
2. Pull clutch plate from compressor using Clutch Plate Remover (T80L-19703-B). Remove clutch plate shims. Clean compressor area
around seal. Remove felt packing and dust seal retainer from nose of front cover. See Fig. 3
.
3. Using Key Remover (T81P-19623-NH), remove key from compressor shaft. Remove seal seat retaining snap ring. Remove seal seat from
compressor using Seal Seat Remover/Installer (T87P-19623-B).
4. Place Seal Remover/Installer (T87P-19623-C) on compressor. Rotate seal remover/installer clockwise until tangs engage in seal. Pull
seal from compressor.
Installation
1. Lubricate shaft seal, seal seat and inside of compressor nose with refrigerant oil. Install Seal Protector (T71P-19703-H) over compressor
shaft. Using seal remover/installer, install shaft seal in compressor.
2. Rotate seal on compressor shaft to align flat areas on seal with those on compressor shaft.
3. Using seal seat remover/installer, install seal seat until it contacts seal. Install snap ring. Install key in crankshaft with rounded edge
inward.
4. Install clutch plate shims. Ensure clutch plate is aligned with crankshaft key. Using Clutch Plate Installer (T80L-19703-F), install clutch
plate.
5. Install crankshaft nut. Using spanner, tighten nut to 10-14 ft. lbs. (13-20 N.m). DO NOT tighten nut with air tools. Using feeler gauge,
check clearance between clutch plate and pulley.
6. Rotate compressor clutch and check clearance in more than one place. Proper clearance is .021-.036" (.53-.91 mm). If clearance is not
correct, add or remove shims.
7. Add same amount new refrigerant oil to compressor as was drained. Rotate compressor 10 revolutions to distribute oil in compressor.
Install compressor. Evacuate and recharge system. Perform leak test. NOTE:After installing new clutch, cycle clutch 10 tim es with engine at idle speed to prevent clutch slippage.
Page 4 of 7 MITCHELL 1 ARTICLE - GENERAL SERVICING 1991 Ford Compressor Overhaul
3/10/2009 http://www.eautorepair.net/app/PrintItems.asp?S0=2097152&S1=0&SG=%7B9B990D68%2D660A%2D45E9%2D8F46%2DE
...
Page 314 of 454
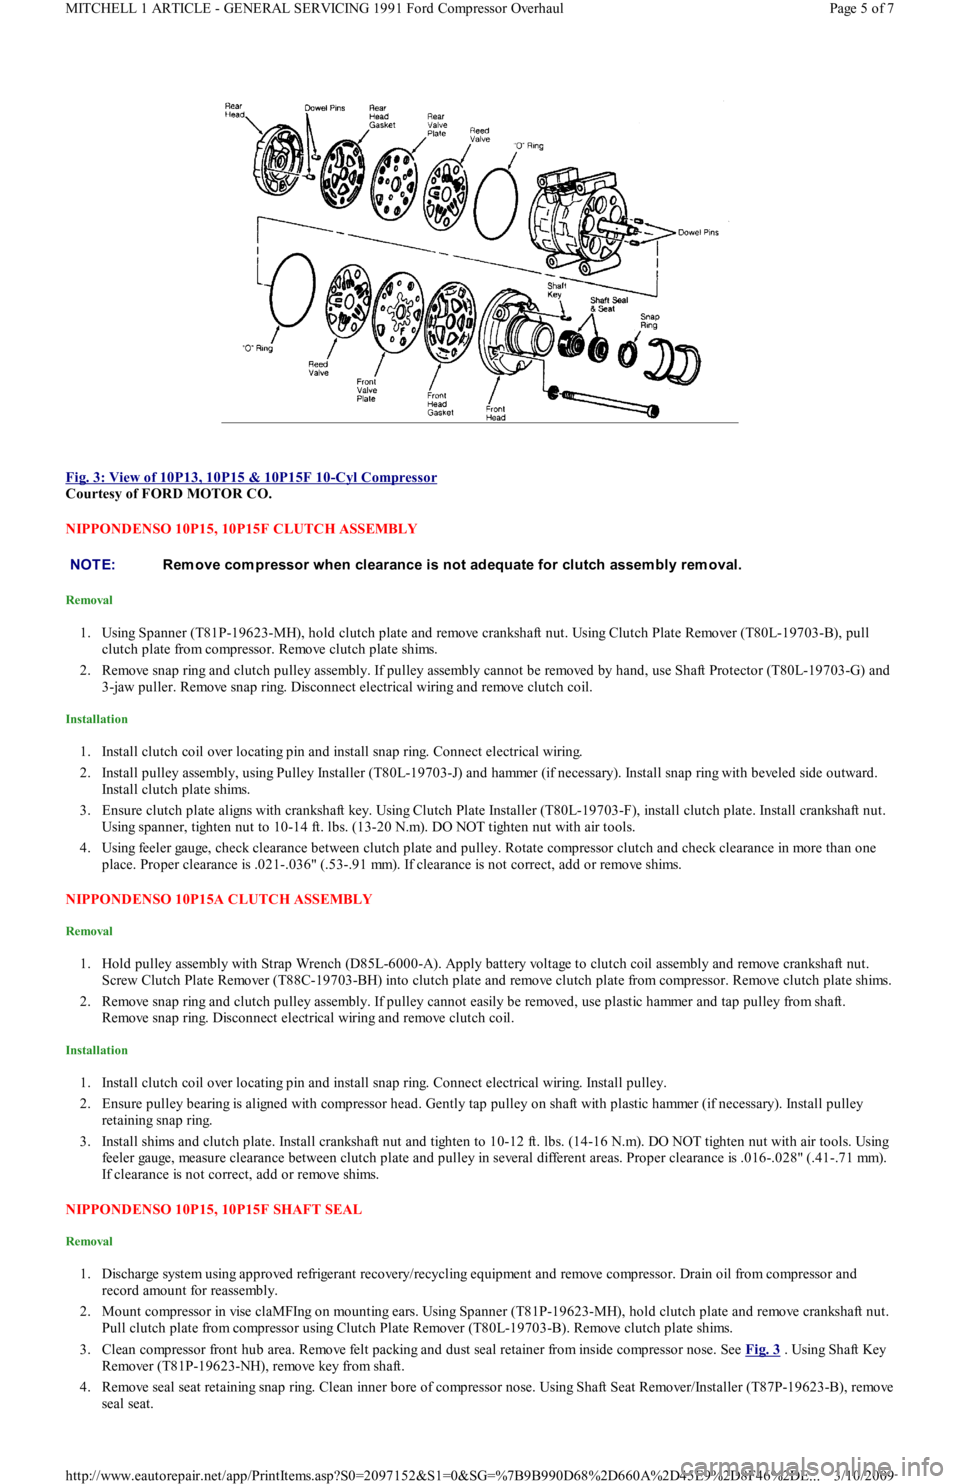
Fig. 3: View of 10P13, 10P15 & 10P15F 10
-Cyl Compressor
Courtesy of FORD MOTOR CO.
NIPPONDENSO 10P15, 10P15F CLUTCH ASSEMBLY
Removal
1. Using Spanner (T81P-19623-MH), hold clutch plate and remove crankshaft nut. Using Clutch Plate Remover (T80L-19703-B), pull
clutch plate from compressor. Remove clutch plate shims.
2. Remove snap ring and clutch pulley assembly. If pulley assembly cannot be removed by hand, use Shaft Protector (T80L-19703-G) and
3-jaw puller. Remove snap ring. Disconnect electrical wiring and remove clutch coil.
Installation
1. Install clutch coil over locating pin and install snap ring. Connect electrical wiring.
2. Install pulley assembly, using Pulley Installer (T80L-19703-J) and hammer (if necessary). Install snap ring with beveled side outward.
Install clutch plate shims.
3. Ensure clutch plate aligns with crankshaft key. Using Clutch Plate Installer (T80L-19703-F), install clutch plate. Install crankshaft nut.
Using spanner, tighten nut to 10-14 ft. lbs. (13-20 N.m). DO NOT tighten nut with air tools.
4. Using feeler gauge, check clearance between clutch plate and pulley. Rotate compressor clutch and check clearance in more than one
place. Proper clearance is .021-.036" (.53-.91 mm). If clearance is not correct, add or remove shims.
NIPPONDENSO 10P15A CLUTCH ASSEMBLY
Removal
1. Hold pulley assembly with Strap Wrench (D85L-6000-A). Apply battery voltage to clutch coil assembly and remove crankshaft nut.
Screw Clutch Plate Remover (T88C-19703-BH) into clutch plate and remove clutch plate from compressor. Remove clutch plate shims.
2. Remove snap ring and clutch pulley assembly. If pulley cannot easily be removed, use plastic hammer and tap pulley from shaft.
Remove snap ring. Disconnect electrical wiring and remove clutch coil.
Installation
1. Install clutch coil over locating pin and install snap ring. Connect electrical wiring. Install pulley.
2. Ensure pulley bearing is aligned with compressor head. Gently tap pulley on shaft with plastic hammer (if necessary). Install pulley
retaining snap ring.
3. Install shims and clutch plate. Install crankshaft nut and tighten to 10-12 ft. lbs. (14-16 N.m). DO NOT tighten nut with air tools. Using
feeler gauge, measure clearance between clutch plate and pulley in several different areas. Proper clearance is .016-.028" (.41-.71 mm).
If clearance is not correct, add or remove shims.
NIPPONDENSO 10P15, 10P15F SHAFT SEAL
Removal
1. Discharge system using approved refrigerant recovery/recycling equipment and remove compressor. Drain oil from compressor and
record amount for reassembly.
2. Mount compressor in vise claMFIng on mounting ears. Using Spanner (T81P-19623-MH), hold clutch plate and remove crankshaft nut.
Pull clutch plate from compressor using Clutch Plate Remover (T80L-19703-B). Remove clutch plate shims.
3. Clean compressor front hub area. Remove felt packing and dust seal retainer from inside compressor nose. See Fig. 3
. Using Shaft Key
Remover (T81P-19623-NH), remove key from shaft.
4. Remove seal seat retaining snap ring. Clean inner bore of compressor nose. Using Shaft Seat Remover/Installer (T87P-19623-B), remove
seal seat.
NOTE:Rem ove com pressor when clearance is not adequate for clutch assem bly rem oval.
Page 5 of 7 MITCHELL 1 ARTICLE - GENERAL SERVICING 1991 Ford Compressor Overhaul
3/10/2009 http://www.eautorepair.net/app/PrintItems.asp?S0=2097152&S1=0&SG=%7B9B990D68%2D660A%2D45E9%2D8F46%2DE
...
Page 315 of 454
5. Using Shaft Seal Remover/Installer (T87P-19623-C), remove seal by pushing downward on shaft seal remover/installer and rotating
clockwise to engage seal tangs. Pull seal from compressor.
Installation
1. Place Shaft Seal Protector (T71P-19703-H) over compressor shaft. Lubricate shaft seal and nose of compressor with new refrigerant oil.
DO NOT touch sealing surface of seal or shaft. Engage seal tangs on shaft seal remover/installer.
2. Align flats of seal with flats on crankshaft and push new seal on compressor shaft. Push downward on shaft seal remover/installer and
turn counterclockwise to disengage seal tangs.
3. Attach shaft seal seat to shaft seal seat remover/installer and lubricate with new refrigerant oil. Install seal seat and push inward against
seal. Install seal seat retaining snap ring.
4. Install dust seal retainer and felt packing. Install clutch plate shims. Ensure clutch plate aligns with crankshaft key. Using Clutch Plate
Installer (T80L-19703-F), install clutch plate.
5. Install crankshaft nut. Using spanner to hold clutch, tighten crankshaft nut to 10-14 ft. lbs. (13-20 N.m). DO NOT tighten nut with air
tools.
6. Using feeler gauge, check clearance between clutch plate and pulley. Rotate compressor clutch and check clearance in more than one
place. Proper clearance is .021-.036" (.53-.91 mm). If clearance is not correct, add or remove shims.
7. Add same amount new refrigerant oil to compressor as was drained. Rotate compressor 10 revolutions to distribute oil. Install
compressor. Evacuate and recharge system. Perform leak test.
NIPPONDENSO 10P15A SHAFT SEAL
Removal
1. Discharge system using approved refrigerant recovery/recycling equipment and remove compressor. Drain oil from compressor and
record amount for reassembly. Remove clutch assembly. See NIPPONDENSO 10P15A CLUTCH ASSEMBLY R & I in this article.
2. Remove manifold assembly from top of compressor. Clean compressor front hub area. Using Ring Remover (T71P-19703-C), remove
retaining ring from front of compressor shaft.
3. Remove felt seal from front of compressor. Remove front head retaining bolts and front head from compressor. Remove snap ring fro m
rear of front head. Remove seal from rear of front head.
Installation
1. Install seal and snap ring in front head. Install front head on compressor. Tighten bolts to 18-20 ft. lbs. (24-27 N.m). Install felt packing
and retaining ring.
2. Install manifold assembly and tighten bolts to 18-20 ft. lbs. (24-27 N.m). Add same amount of new refrigerant oil to compressor as that
drained from compressor. Rotate compressor 10 revolutions to distribute oil in compressor. Install compressor. Evacuate and recharge
system. Perform leak test.
NIPPONDENSO 10PA17 & 10PA17A CLUTCH ASSEMBLY
Removal
1. Remove compressor shaft bolt and discard. Remove clutch plate and shims. If clutch hub cannot be removed by hand, thread a 8-mm
bolt in center of clutch plate. Tighten bolt and remove clutch plate.
2. Remove pulley assembly retaining snap ring. Remove pulley assembly. Remove snap ring and disconnect clutch coil electrical wiring.
Remove clutch coil.
Installation
1. Install clutch coil so pin in back of coil aligns with hole in front housing. Install snap ring with beveled side away from compressor.
2. Install pulley assembly. Install snap ring with beveled side away from compressor. Coat splines of compressor shaft with White grease. I
f
reusing original clutch plate and pulley, old shims can be used.
3. If installing new components, install one thin shim. Install clutch plate. Tighten compressor shaft bolt to 10 ft. lbs. (14 N.m). DO NOT
air tools to tighten bolt.
4. Using feeler gauge, measure air gap between clutch plate and pulley surface in 3 areas. Proper clearance is .014-.026" (.35-.66 mm).
Adjust shim thickness to obtain correct clearance.
5. Once compressor shaft bolt is tightened, recheck clearance between clutch plate and pulley surface in 4 places. Readjust clearance if
necessary.
NIPPONDENSO 10PA17 & 10PA17A SHAFT SEAL
Removal
1. Discharge system using approved refrigerant recovery/recycling equipment and remove compressor. Drain oil from compressor and
record amount for reassembly. Install compressor in Holding Fixture (T89P-19623-D) and clamp fixture in a vise.
2. Remove clutch assembly. See NIPPONDENSO 10PA17 & 10PA17A CLUTCH ASSEMBLY R & I in this article. Remove front head
retaining bolts. Separate front head from compressor, using care not to scratch sealing surface. See Fig. 4
.
3. Using "O" Ring Remover (T71P-19703-C), remove felt dust seal and dust seal retainer from front head. Remove shaft seal retaining snap
ring. Position front head (nose up) on cardboard placed on a flat surface. Using Shaft Seal Remover (T89P-19623-E), push shaft seal
from front head. NOTE:After installing new clutch, ensure voltage is correct and cycle clutch with 5 seconds on and 5 seconds
off. Repeat cycle for approxim ately 20 tim es with A/C on, blower fan on high speed and engine RPM at
1500-2000. T his provides better clutch torque capability.
Page 6 of 7 MITCHELL 1 ARTICLE - GENERAL SERVICING 1991 Ford Compressor Overhaul
3/10/2009 http://www.eautorepair.net/app/PrintItems.asp?S0=2097152&S1=0&SG=%7B9B990D68%2D660A%2D45E9%2D8F46%2DE
...
Page 318 of 454
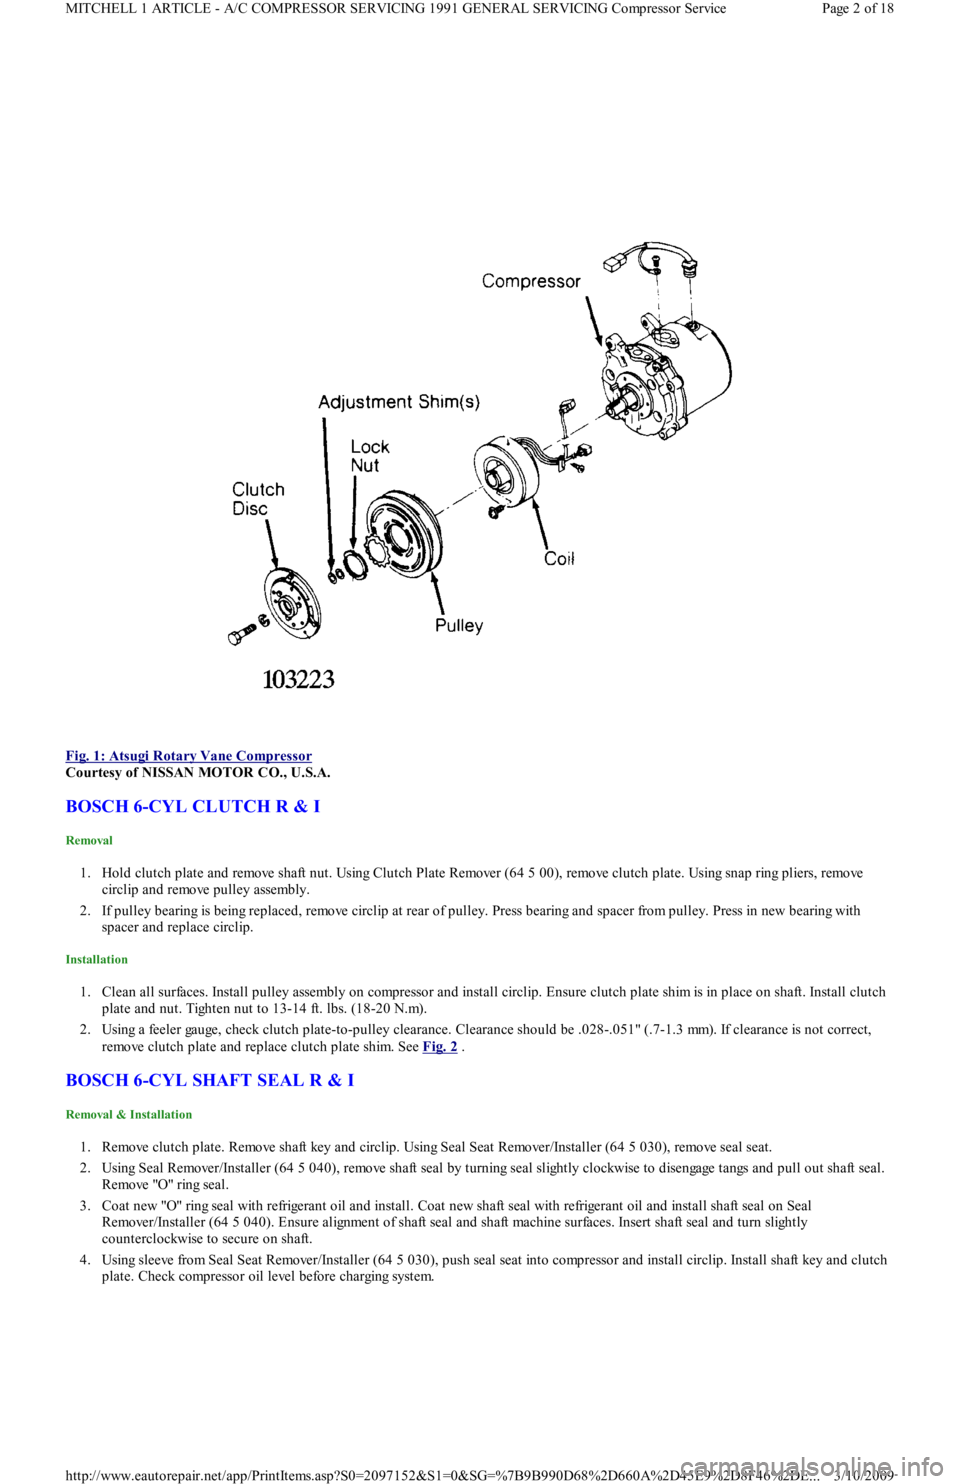
Fig. 1: Atsugi Rotary Vane Compressor
Courtesy of NISSAN MOTOR CO., U.S.A.
BOSCH 6-CYL CLUTCH R & I
Removal
1. Hold clutch plate and remove shaft nut. Using Clutch Plate Remover (64 5 00), remove clutch plate. Using snap ring pliers, remo ve
circlip and remove pulley assembly.
2. If pulley bearing is being replaced, remove circlip at rear of pulley. Press bearing and spacer from pulley. Press in new bearing with
spacer and replace circlip.
Installation
1. Clean all surfaces. Install pulley assembly on compressor and install circlip. Ensure clutch plate shim is in place on shaft. Install clutch
plate and nut. Tighten nut to 13-14 ft. lbs. (18-20 N.m).
2. Using a feeler gauge, check clutch plate-to-pulley clearance. Clearance should be .028-.051" (.7-1.3 mm). If clearance is not correct,
remove clutch plate and replace clutch plate shim. See Fig. 2
.
BOSCH 6-CYL SHAFT SEAL R & I
Removal & Installation
1. Remove clutch plate. Remove shaft key and circlip. Using Seal Seat Remover/Installer (64 5 030), remove seal seat.
2. Using Seal Remover/Installer (64 5 040), remove shaft seal by turning seal slightly clockwise to disengage tangs and pull out shaft seal.
Remo ve "O" rin g seal .
3. Coat new "O" ring seal with refrigerant oil and install. Coat new shaft seal with refrigerant oil and install shaft seal on Seal
Remover/Installer (64 5 040). Ensure alignment of shaft seal and shaft machine surfaces. Insert shaft seal and turn slightly
counterclockwise to secure on shaft.
4. Using sleeve from Seal Seat Remover/Installer (64 5 030), push seal seat into compressor and install circlip. Install shaft key and clutch
plate. Check compressor oil level before charging system.
Page 2 of 18 MITCHELL 1 ARTICLE - A/C COMPRESSOR SERVICING 1991 GENERAL SERVICING Compressor Service
3/10/2009 http://www.eautorepair.net/app/PrintItems.asp?S0=2097152&S1=0&SG=%7B9B990D68%2D660A%2D45E9%2D8F46%2DE
...
Page 320 of 454
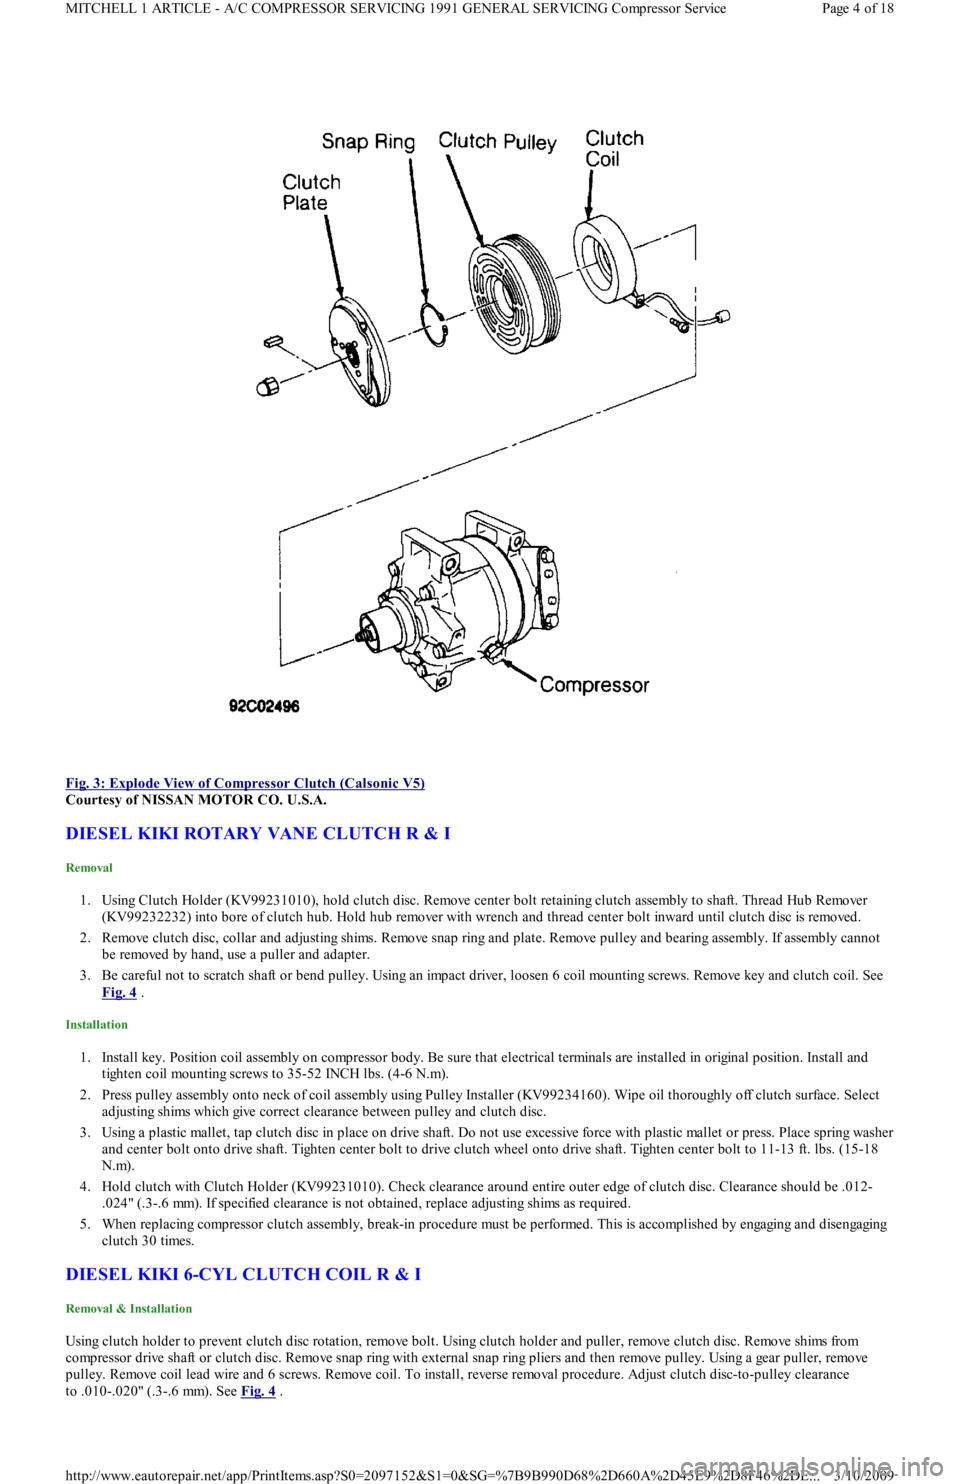
Fig. 3: Explode View of Compressor Clutch (Calsonic V5)
Courtesy of NISSAN MOTOR CO. U.S.A.
DIESEL KIKI ROTARY VANE CLUTCH R & I
Removal
1. Using Clutch Holder (KV99231010), hold clutch disc. Remove center bolt retaining clutch assembly to shaft. Thread Hub Remover
(KV99232232) into bore of clutch hub. Hold hub remover with wrench and thread center bolt inward until clutch disc is removed.
2. Remove clutch disc, collar and adjusting shims. Remove snap ring and plate. Remove pulley and bearing assembly. If assembly cannot
be removed by hand, use a puller and adapter.
3. Be careful not to scratch shaft or bend pulley. Using an impact driver, loosen 6 coil mounting screws. Remove key and clutch coil. See
Fig. 4
.
Installation
1. Install key. Position coil assembly on compressor body. Be sure that electrical terminals are installed in original position. Install and
tighten coil mounting screws to 35-52 INCH lbs. (4-6 N.m).
2. Press pulley assembly onto neck of coil assembly using Pulley Installer (KV99234160). Wipe oil thoroughly off clutch surface. Select
adjusting shims which give correct clearance between pulley and clutch disc.
3. Using a plastic mallet, tap clutch disc in place on drive shaft. Do not use excessive force with plastic mallet or press. Place spring washer
and center bolt onto drive shaft. Tighten center bolt to drive clutch wheel onto drive shaft. Tighten center bolt to 11-13 ft. lbs. (15-18
N.m).
4. Hold clutch with Clutch Holder (KV99231010). Check clearance around entire outer edge of clutch disc. Clearance should be .012-
.024" (.3-.6 mm). If specified clearance is not obtained, replace adjusting shims as required.
5. When replacing compressor clutch assembly, break-in procedure must be performed. This is accomplished by engaging and disengagin g
clutch 30 times.
DIESEL KIKI 6-CYL CLUTCH COIL R & I
Removal & Installation
Using clutch holder to prevent clutch disc rotation, remove bolt. Using clutch holder and puller, remove clutch disc. Remove shims from
compressor drive shaft or clutch disc. Remove snap ring with external snap ring pliers and then remove pulley. Using a gear puller, remove
pulley. Remove coil lead wire and 6 screws. Remove coil. To install, reverse removal procedure. Adjust clutch disc-to-pulley clearance
to .010-.020" (.3-.6 mm). See Fig. 4
.
Page 4 of 18 MITCHELL 1 ARTICLE - A/C COMPRESSOR SERVICING 1991 GENERAL SERVICING Compressor Service
3/10/2009 http://www.eautorepair.net/app/PrintItems.asp?S0=2097152&S1=0&SG=%7B9B990D68%2D660A%2D45E9%2D8F46%2DE
...
Page 323 of 454
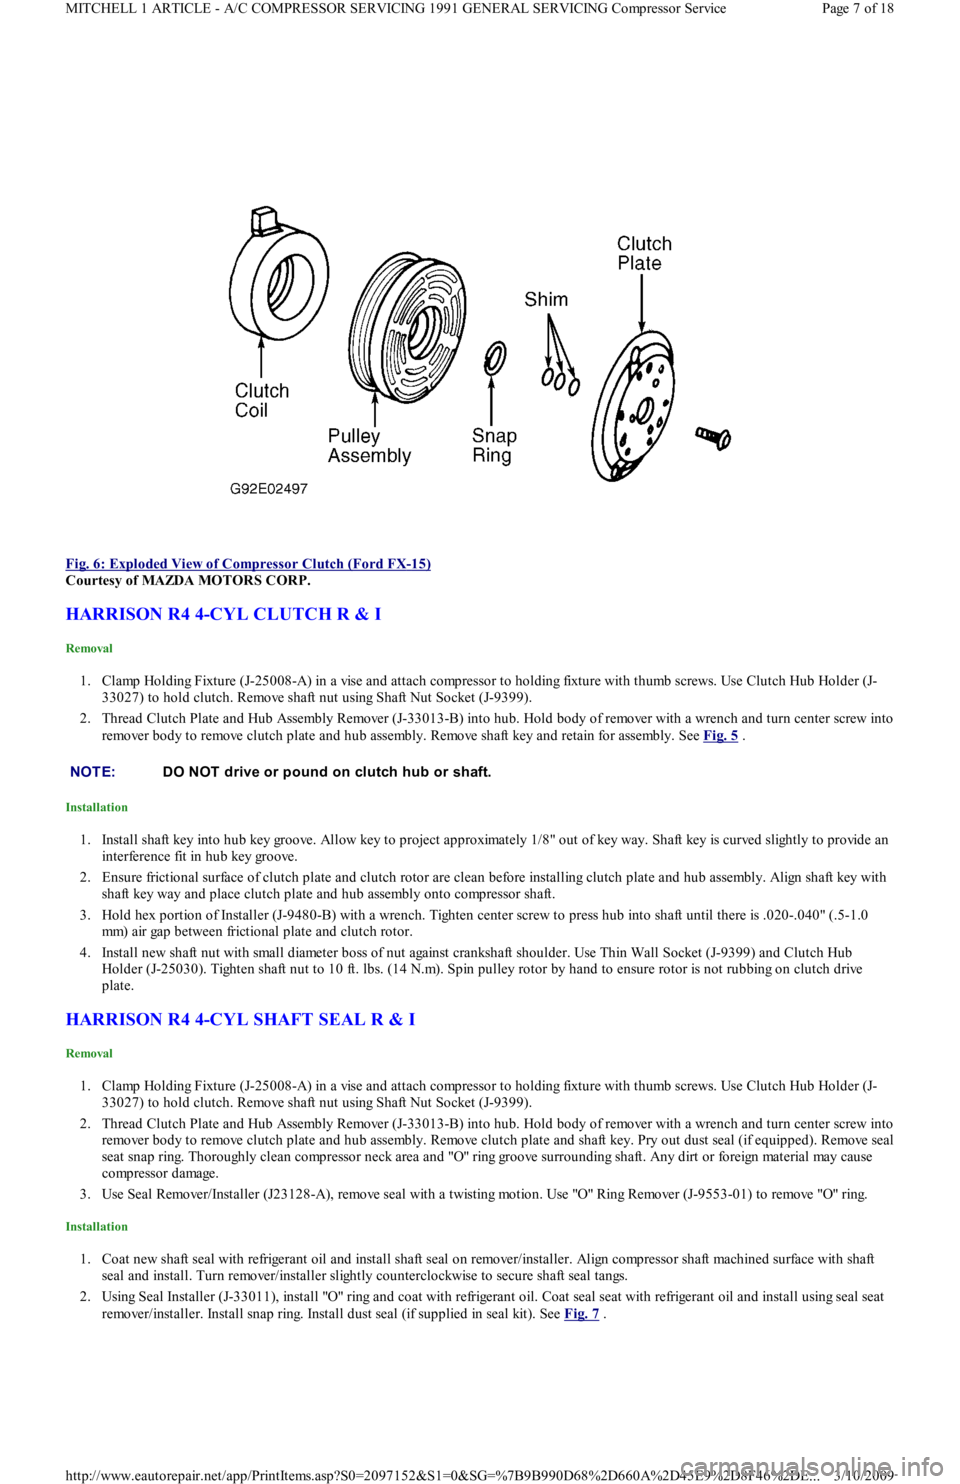
Fig. 6: Exploded View of Compressor Clutch (Ford FX
-15)
Courtesy of MAZDA MOTORS CORP.
HARRISON R4 4-CYL CLUTCH R & I
Removal
1. Clamp Holding Fixture (J-25008-A) in a vise and attach compressor to holding fixture with thumb screws. Use Clutch Hub Holder (J-
33027) to hold clutch. Remove shaft nut using Shaft Nut Socket (J-9399).
2. Thread Clutch Plate and Hub Assembly Remover (J-33013-B) into hub. Hold body of remover with a wrench and turn center screw into
remover body to remove clutch plate and hub assembly. Remove shaft key and retain for assembly. See Fig. 5
.
Installation
1. Install shaft key into hub key groove. Allow key to project approximately 1/8" out of key way. Shaft key is curved slightly to provide an
interference fit in hub key groove.
2. Ensure frictional surface of clutch plate and clutch rotor are clean before installing clutch plate and hub assembly. Align shaft key with
shaft key way and place clutch plate and hub assembly onto compressor shaft.
3. Hold hex portion of Installer (J-9480-B) with a wrench. Tighten center screw to press hub into shaft until there is .020-.040" (.5-1.0
mm) air gap between frictional plate and clutch rotor.
4. Install new shaft nut with small diameter boss of nut against crankshaft shoulder. Use Thin Wall Socket (J-9399) and Clutch Hub
Holder (J-25030). Tighten shaft nut to 10 ft. lbs. (14 N.m). Spin pulley rotor by hand to ensure rotor is not rubbing on clutch drive
plate.
HARRISON R4 4-CYL SHAFT SEAL R & I
Removal
1. Clamp Holding Fixture (J-25008-A) in a vise and attach compressor to holding fixture with thumb screws. Use Clutch Hub Holder (J-
33027) to hold clutch. Remove shaft nut using Shaft Nut Socket (J-9399).
2. Thread Clutch Plate and Hub Assembly Remover (J-33013-B) into hub. Hold body of remover with a wrench and turn center screw into
remover body to remove clutch plate and hub assembly. Remove clutch plate and shaft key. Pry out dust seal (if equipped). Remove seal
seat snap ring. Thoroughly clean compressor neck area and "O" ring groove surrounding shaft. Any dirt or foreign material may cause
compressor damage.
3. Use Seal Remover/Installer (J23128-A), remove seal with a twisting motion. Use "O" Ring Remover (J-9553-01) to remove "O" ring.
Installation
1. Coat new shaft seal with refrigerant oil and install shaft seal on remover/installer. Align compressor shaft machined surface with shaft
seal and install. Turn remover/installer slightly counterclockwise to secure shaft seal tangs.
2. Using Seal Installer (J-33011), install "O" ring and coat with refrigerant oil. Coat seal seat with refrigerant oil and install using seal seat
remover/installer. Install snap ring. Install dust seal (if supplied in seal kit). See Fig. 7
.
NOTE:DO NOT drive or pound on clutch hub or shaft.
Page 7 of 18 MITCHELL 1 ARTICLE - A/C COMPRESSOR SERVICING 1991 GENERAL SERVICING Compressor Service
3/10/2009 http://www.eautorepair.net/app/PrintItems.asp?S0=2097152&S1=0&SG=%7B9B990D68%2D660A%2D45E9%2D8F46%2DE
...
Page 324 of 454
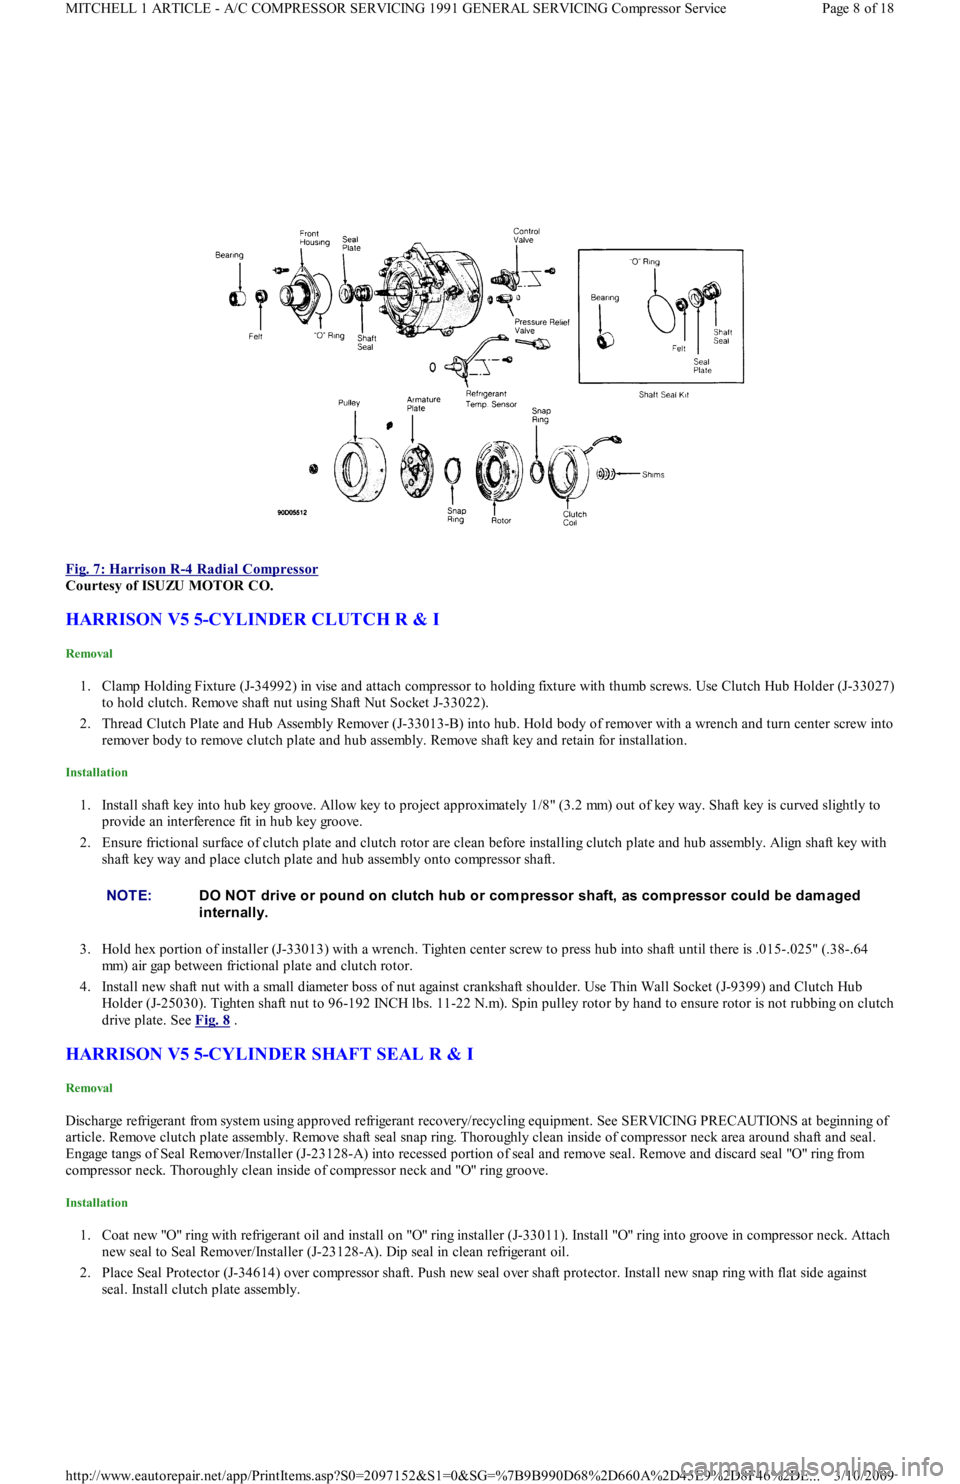
Fig. 7: Harrison R
-4 Radial Compressor
Courtesy of ISUZU MOTOR CO.
HARRISON V5 5-CYLINDER CLUTCH R & I
Removal
1. Clamp Holding Fixture (J-34992) in vise and attach compressor to holding fixture with thumb screws. Use Clutch Hub Holder (J-33027)
to hold clutch. Remove shaft nut using Shaft Nut Socket J-33022).
2. Thread Clutch Plate and Hub Assembly Remover (J-33013-B) into hub. Hold body of remover with a wrench and turn center screw into
remover body to remove clutch plate and hub assembly. Remove shaft key and retain for installation.
Installation
1. Install shaft key into hub key groove. Allow key to project approximately 1/8" (3.2 mm) out of key way. Shaft key is curved slightly to
provide an interference fit in hub key groove.
2. Ensure frictional surface of clutch plate and clutch rotor are clean before installing clutch plate and hub assembly. Align shaft key with
shaft key way and place clutch plate and hub assembly onto compressor shaft.
3. Hold hex portion of installer (J-33013) with a wrench. Tighten center screw to press hub into shaft until there is .015-.025" (.38-.64
mm) air gap between frictional plate and clutch rotor.
4. Install new shaft nut with a small diameter boss of nut against crankshaft shoulder. Use Thin Wall Socket (J-9399) and Clutch Hub
Holder (J-25030). Tighten shaft nut to 96-192 INCH lbs. 11-22 N.m). Spin pulley rotor by hand to ensure rotor is not rubbing on clutch
drive plate. See Fig. 8
.
HARRISON V5 5-CYLINDER SHAFT SEAL R & I
Removal
Discharge refrigerant from system using approved refrigerant recovery/recycling equipment. See SERVICING PRECAUTIONS at beginning of
article. Remove clutch plate assembly. Remove shaft seal snap ring. Thoroughly clean inside of compressor neck area around shaft and seal.
Engage tangs of Seal Remover/Installer (J-23128-A) into recessed portion of seal and remove seal. Remove and discard seal "O" ring from
compressor neck. Thoroughly clean inside of compressor neck and "O" ring groove.
Installation
1. Coat new "O" ring with refrigerant oil and install on "O" ring installer (J-33011). Install "O" ring into groove in compressor neck. Attach
new seal to Seal Remover/Installer (J-23128-A). Dip seal in clean refrigerant oil.
2. Place Seal Protector (J-34614) over compressor shaft. Push new seal over shaft protector. Install new snap ring with flat side against
seal. Install clutch plate assembly.
NOTE:DO NOT drive or pound on clutch hub or com pressor shaft, as com pressor could be dam aged
internally.
Page 8 of 18 MITCHELL 1 ARTICLE - A/C COMPRESSOR SERVICING 1991 GENERAL SERVICING Compressor Service
3/10/2009 http://www.eautorepair.net/app/PrintItems.asp?S0=2097152&S1=0&SG=%7B9B990D68%2D660A%2D45E9%2D8F46%2DE
...
Page 325 of 454
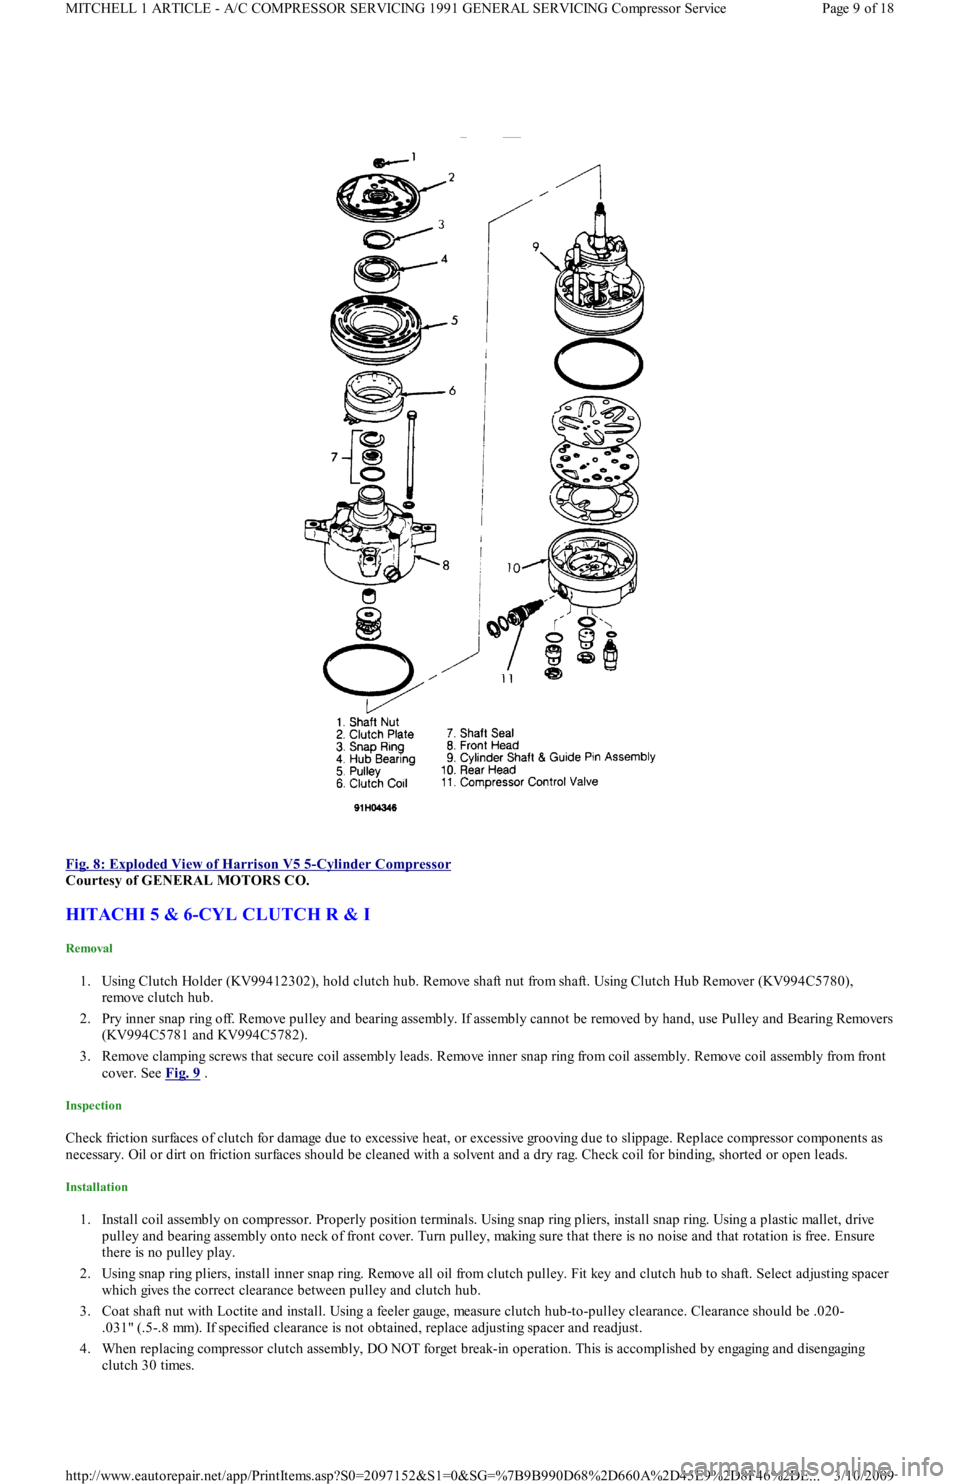
Fig. 8: Exploded View of Harrison V5 5
-Cylinder Compressor
Courtesy of GENERAL MOTORS CO.
HITACHI 5 & 6-CYL CLUTCH R & I
Removal
1. Using Clutch Holder (KV99412302), hold clutch hub. Remove shaft nut from shaft. Using Clutch Hub Remover (KV994C5780),
remove clutch hub.
2. Pry inner snap ring off. Remove pulley and bearing assembly. If assembly cannot be removed by hand, use Pulley and Bearing Remo vers
(KV994C5781 and KV994C5782).
3. Remove clamping screws that secure coil assembly leads. Remove inner snap ring from coil assembly. Remove coil assembly from fro n t
cover. See Fig. 9
.
Inspection
Check friction surfaces of clutch for damage due to excessive heat, or excessive grooving due to slippage. Replace compressor components as
necessary. Oil or dirt on friction surfaces should be cleaned with a solvent and a dry rag. Check coil for binding, shorted or open leads.
Installation
1. Install coil assembly on compressor. Properly position terminals. Using snap ring pliers, install snap ring. Using a plastic mallet, drive
pulley and bearing assembly onto neck of front cover. Turn pulley, making sure that there is no noise and that rotation is free. Ensure
there is no pulley play.
2. Using snap ring pliers, install inner snap ring. Remove all oil from clutch pulley. Fit key and clutch hub to shaft. Select adjusting spacer
which gives the correct clearance between pulley and clutch hub.
3. Coat shaft nut with Loctite and install. Using a feeler gauge, measure clutch hub-to-pulley clearance. Clearance should be .020-
.031" (.5-.8 mm). If specified clearance is not obtained, replace adjusting spacer and readjust.
4. When replacing compressor clutch assembly, DO NOT forget break-in operation. This is accomplished by engaging and disengaging
clutch 30 times.
Page 9 of 18 MITCHELL 1 ARTICLE - A/C COMPRESSOR SERVICING 1991 GENERAL SERVICING Compressor Service
3/10/2009 http://www.eautorepair.net/app/PrintItems.asp?S0=2097152&S1=0&SG=%7B9B990D68%2D660A%2D45E9%2D8F46%2DE
...