key FORD FIESTA 1989 Service User Guide
[x] Cancel search | Manufacturer: FORD, Model Year: 1989, Model line: FIESTA, Model: FORD FIESTA 1989Pages: 296, PDF Size: 10.65 MB
Page 64 of 296
5Disconnect the accelerator cable from the
throttle linkage as described in Chapter 4D.
Secure the cable clear of the engine/
transmission.
6 Remove the auxiliary drivebelt (see Chap-
ter 1).
7 Remove the three screws securing the
wiring “rail” to the rear of the manifold.
Releasing its wire clip, unplug the large
electrical connector (next to the fuel pressure
regulator) to disconnect the engine wiring from
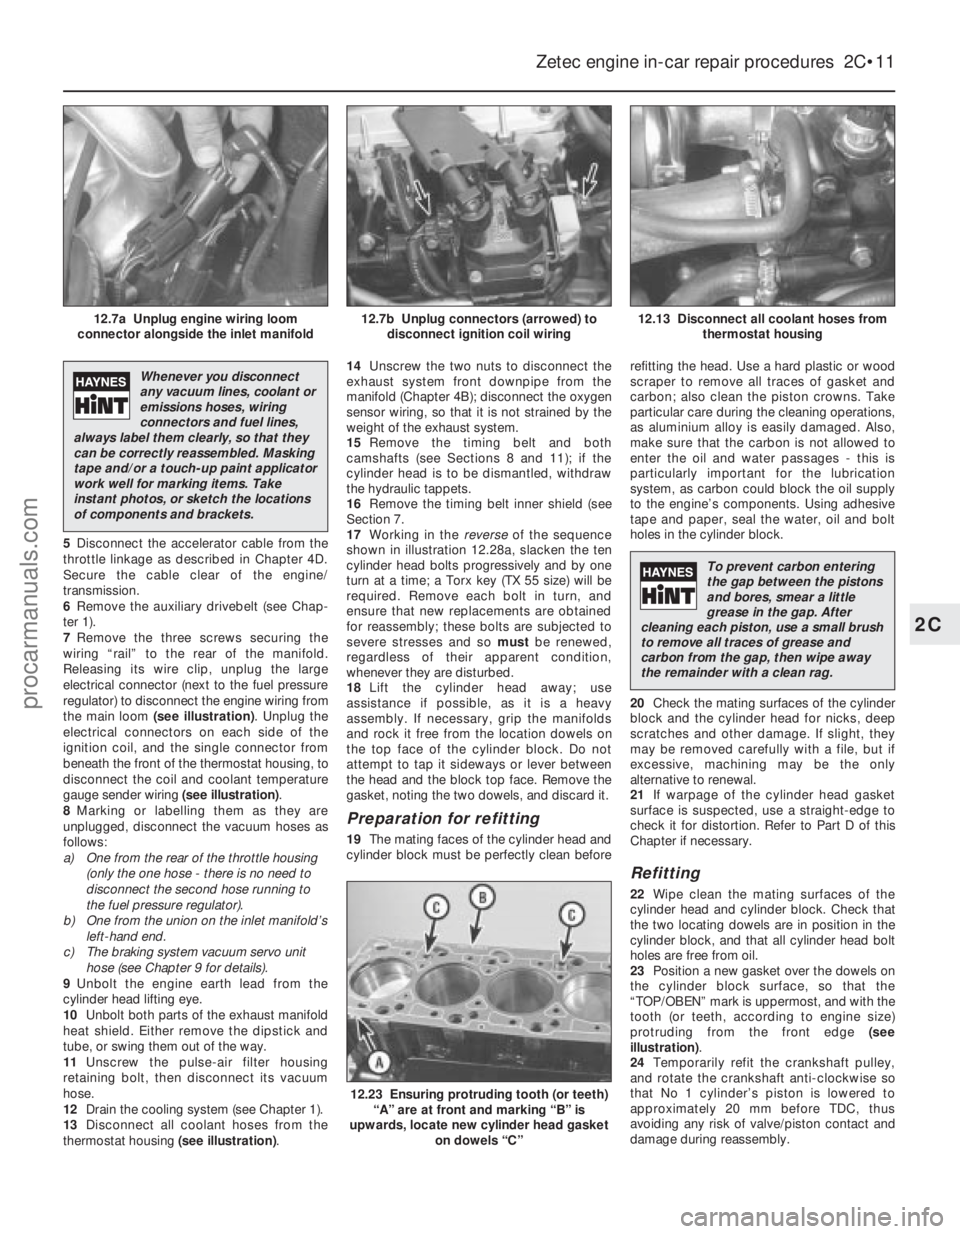
the main loom (see illustration) . Unplug the
electrical connectors on each side of the
ignition coil, and the single connector from
beneath the front of the thermostat housing, to
disconnect the coil and coolant temperature
gauge sender wiring (see illustration).
8 Marking or labelling them as they are
unplugged, disconnect the vacuum hoses as
follows:
a) One from the rear of the throttle housing
(only the one hose - there is no need to
disconnect the second hose running to
the fuel pressure regulator).
b) One from the union on the inlet manifold’s
left-hand end.
c) The braking system vacuum servo unit hose (see Chapter 9 for details).
9 Unbolt the engine earth lead from the
cylinder head lifting eye.
10 Unbolt both parts of the exhaust manifold
heat shield. Either remove the dipstick and
tube, or swing them out of the way.
11 Unscrew the pulse-air filter housing
retaining bolt, then disconnect its vacuum
hose.
12 Drain the cooling system (see Chapter 1).
13 Disconnect all coolant hoses from the
thermostat housing (see illustration).14
Unscrew the two nuts to disconnect the
exhaust system front downpipe from the
manifold (Chapter 4B); disconnect the oxygen
sensor wiring, so that it is not strained by the
weight of the exhaust system.
15 Remove the timing belt and both
camshafts (see Sections 8 and 11); if the
cylinder head is to be dismantled, withdraw
the hydraulic tappets.
16 Remove the timing belt inner shield (see
Section 7.
17 Working in the reverseof the sequence
shown in illustration 12.28a, slacken the ten
cylinder head bolts progressively and by one
turn at a time; a Torx key (TX 55 size) will be
required. Remove each bolt in turn, and
ensure that new replacements are obtained
for reassembly; these bolts are subjected to
severe stresses and so mustbe renewed,
regardless of their apparent condition,
whenever they are disturbed.
18 Lift the cylinder head away; use
assistance if possible, as it is a heavy
assembly. If necessary, grip the manifolds
and rock it free from the location dowels on
the top face of the cylinder block. Do not
attempt to tap it sideways or lever between
the head and the block top face. Remove the
gasket, noting the two dowels, and discard it.
Preparation for refitting
19 The mating faces of the cylinder head and
cylinder block must be perfectly clean before refitting the head. Use a hard plastic or wood
scraper to remove all traces of gasket and
carbon; also clean the piston crowns. Take
particular care during the cleaning operations,
as aluminium alloy is easily damaged. Also,
make sure that the carbon is not allowed to
enter the oil and water passages - this is
particularly important for the lubrication
system, as carbon could block the oil supply
to the engine’s components. Using adhesive
tape and paper, seal the water, oil and bolt
holes in the cylinder block.
20
Check the mating surfaces of the cylinder
block and the cylinder head for nicks, deep
scratches and other damage. If slight, they
may be removed carefully with a file, but if
excessive, machining may be the only
alternative to renewal.
21 If warpage of the cylinder head gasket
surface is suspected, use a straight-edge to
check it for distortion. Refer to Part D of this
Chapter if necessary.
Refitting
22 Wipe clean the mating surfaces of the
cylinder head and cylinder block. Check that
the two locating dowels are in position in the
cylinder block, and that all cylinder head bolt
holes are free from oil.
23 Position a new gasket over the dowels on
the cylinder block surface, so that the
“TOP/OBEN” mark is uppermost, and with the
tooth (or teeth, according to engine size)
protruding from the front edge (see
illustration) .
24 Temporarily refit the crankshaft pulley,
and rotate the crankshaft anti-clockwise so
that No 1 cylinder’s piston is lowered to
approximately 20 mm before TDC, thus
avoiding any risk of valve/piston contact and
damage during reassembly.
Zetec engine in-car repair procedures 2C•11
12.13 Disconnect all coolant hoses from thermostat housing12.7b Unplug connectors (arrowed) todisconnect ignition coil wiring12.7a Unplug engine wiring loom
connector alongside the inlet manifold
12.23 Ensuring protruding tooth (or teeth) “A” are at front and marking “B” is
upwards, locate new cylinder head gasket on dowels “C”
2C
1595Ford Fiesta Remake
Whenever you disconnect
any vacuum lines, coolant or
emissions hoses, wiring
connectors and fuel lines,
always label them clearly, so that they
can be correctly reassembled. Masking
tape and/or a touch-up paint applicator
work well for marking items. Take
instant photos, or sketch the locations
of components and brackets.
To prevent carbon entering
the gap between the pistons
and bores, smear a little
grease in the gap. After
cleaning each piston, use a small brush
to remove all traces of grease and
carbon from the gap, then wipe away
the remainder with a clean rag.
procarmanuals.com
http://vnx.su
Page 137 of 296
11On non-Turbo models, disconnect the
flexible hose between the air cleaner lid and
the air inlet duct.
12 On Turbo models, disconnect the idle
speed control valve air bypass hose from the
air inlet duct and the flexible hose between
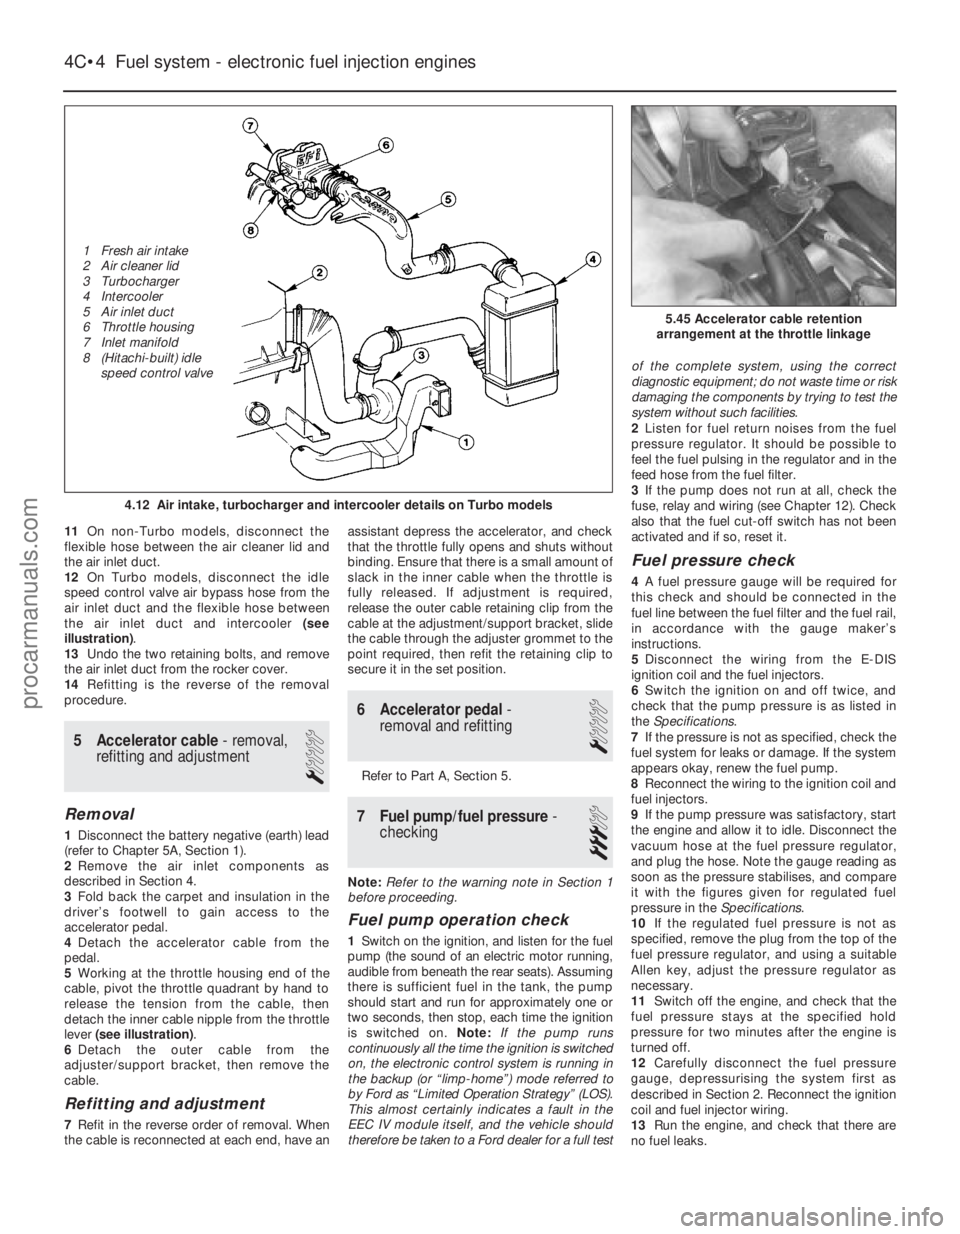
the air inlet duct and intercooler (see
illustration) .
13 Undo the two retaining bolts, and remove
the air inlet duct from the rocker cover.
14 Refitting is the reverse of the removal
procedure.
5 Accelerator cable - removal,
refitting and adjustment
1
Removal
1 Disconnect the battery negative (earth) lead
(refer to Chapter 5A, Section 1).
2 Remove the air inlet components as
described in Section 4.
3 Fold back the carpet and insulation in the
driver’s footwell to gain access to the
accelerator pedal.
4 Detach the accelerator cable from the
pedal.
5 Working at the throttle housing end of the
cable, pivot the throttle quadrant by hand to
release the tension from the cable, then
detach the inner cable nipple from the throttle
lever (see illustration) .
6 Detach the outer cable from the
adjuster/support bracket, then remove the
cable.
Refitting and adjustment
7 Refit in the reverse order of removal. When
the cable is reconnected at each end, have an assistant depress the accelerator, and check
that the throttle fully opens and shuts without
binding. Ensure that there is a small amount of
slack in the inner cable when the throttle is
fully released. If adjustment is required,
release the outer cable retaining clip from the
cable at the adjustment/support bracket, slide
the cable through the adjuster grommet to the
point required, then refit the retaining clip to
secure it in the set position.
6 Accelerator pedal
-
removal and refitting
1
Refer to Part A, Section 5.
7 Fuel pump/fuel pressure -
checking
3
Note: Refer to the warning note in Section 1
before proceeding.
Fuel pump operation check
1 Switch on the ignition, and listen for the fuel
pump (the sound of an electric motor running,
audible from beneath the rear seats). Assuming
there is sufficient fuel in the tank, the pump
should start and run for approximately one or
two seconds, then stop, each time the ignition
is switched on. Note:If the pump runs
continuously all the time the ignition is switched
on, the electronic control system is running in
the backup (or “limp-home”) mode referred to
by Ford as “Limited Operation Strategy” (LOS).
This almost certainly indicates a fault in the
EEC IV module itself, and the vehicle should
therefore be taken to a Ford dealer for a full test of the complete system, using the correct
diagnostic equipment; do not waste time or risk
damaging the components by trying to test the
system without such facilities.
2
Listen for fuel return noises from the fuel
pressure regulator. It should be possible to
feel the fuel pulsing in the regulator and in the
feed hose from the fuel filter.
3 If the pump does not run at all, check the
fuse, relay and wiring (see Chapter 12). Check
also that the fuel cut-off switch has not been
activated and if so, reset it.
Fuel pressure check
4 A fuel pressure gauge will be required for
this check and should be connected in the
fuel line between the fuel filter and the fuel rail,
in accordance with the gauge maker’s
instructions.
5 Disconnect the wiring from the E-DIS
ignition coil and the fuel injectors.
6 Switch the ignition on and off twice, and
check that the pump pressure is as listed in
the Specifications .
7 If the pressure is not as specified, check the
fuel system for leaks or damage. If the system
appears okay, renew the fuel pump.
8 Reconnect the wiring to the ignition coil and
fuel injectors.
9 If the pump pressure was satisfactory, start
the engine and allow it to idle. Disconnect the
vacuum hose at the fuel pressure regulator,
and plug the hose. Note the gauge reading as
soon as the pressure stabilises, and compare
it with the figures given for regulated fuel
pressure in the Specifications.
10 If the regulated fuel pressure is not as
specified, remove the plug from the top of the
fuel pressure regulator, and using a suitable
Allen key, adjust the pressure regulator as
necessary.
11 Switch off the engine, and check that the
fuel pressure stays at the specified hold
pressure for two minutes after the engine is
turned off.
12 Carefully disconnect the fuel pressure
gauge, depressurising the system first as
described in Section 2. Reconnect the ignition
coil and fuel injector wiring.
13 Run the engine, and check that there are
no fuel leaks.
4C•4 Fuel system - electronic fuel injection engines
5.45 Accelerator cable retention
arrangement at the throttle linkage
4.12 Air intake, turbocharger and intercooler details on Turbo models
1595Ford Fiesta Remake
1 Fresh air intake
2 Air cleaner lid
3 Turbocharger
4 Intercooler
5 Air inlet duct
6 Throttle housing
7 Inlet manifold
8 (Hitachi-built) idle
speed control valveprocarmanuals.com
http://vnx.su
Page 160 of 296

5A
1595Ford Fiesta Remake
General
System type . . . . . . . . . . . . . . . . . . . . . . . . . . . . . . . . . . . .\
. . . . . . . . . . 12 volt, negative earth
Battery
Rating - Cold cranking/Reserve capacity . . . . . . . . . . . . . . . . . . . . . . . . 270 A/50 RC, 360 A/60 RC, 500 A/70 RC, 590 A/90 RC or 650 A/130 RC
Charge condition:
Poor . . . . . . . . . . . . . . . . . . . . . . . . . . . . . . . . . . . .\
. . . . . . . . . . . . . . . . 12.5 volts
Normal . . . . . . . . . . . . . . . . . . . . . . . . . . . . . . . . . . . .\
. . . . . . . . . . . . . . 12.6 volts
Good . . . . . . . . . . . . . . . . . . . . . . . . . . . . . . . . . . . .\
. . . . . . . . . . . . . . . . 12.7 volts
Alternator
Make/type:
Bosch . . . . . . . . . . . . . . . . . . . . . . . . . . . . . . . . . . . .\
. . . . . . . . . . . . . . . K1-55A, K1-70A, KC-70A or KC-90A
Magneti-Marelli . . . . . . . . . . . . . . . . . . . . . . . . . . . . . . . . . . . .\
. . . . . . . . A127/55 or 127/70
Mitsubishi . . . . . . . . . . . . . . . . . . . . . . . . . . . . . . . . . . . .\
. . . . . . . . . . . . A5T or A002T
Output (nominal at 13.5 volts with engine speed of 6000 rpm) . . . . . . . 55, 70 or 90 amps
Regulating voltage at 4000 rpm engine speed and 3 to 7 amp load . . . 14.0 to 14.6 volts
Minimum brush length . . . . . . . . . . . . . . . . . . . . . . . . . . . . . . . . . . . .\
. . 5.0 mm
Starter motor
Make/type:
Bosch . . . . . . . . . . . . . . . . . . . . . . . . . . . . . . . . . . . .\
. . . . . . . . . . . . . . . DM, DW or EV
Magneti-Marelli . . . . . . . . . . . . . . . . . . . . . . . . . . . . . . . . . . . .\
. . . . . . . . M79 or M80R
Nippondenso . . . . . . . . . . . . . . . . . . . . . . . . . . . . . . . . . . . .\
. . . . . . . . . No type numbers given
Minimum brush length:
Bosch and Magneti-Marelli . . . . . . . . . . . . . . . . . . . . . . . . . . . . . . . . . . . 8.0 mm
Nippondenso . . . . . . . . . . . . . . . . . . . . . . . . . . . . . . . . . . . .\
. . . . . . . . . 9.0 mm
Torque wrench settingsNm lbf ft
Alternator mounting bolts . . . . . . . . . . . . . . . . . . . . . . . . . . . . . . . . . . . .\
25 18
Alternator adjustment bolt . . . . . . . . . . . . . . . . . . . . . . . . . . . . . . . . . . . 12 9
Alternator adjustment centre lockbolt . . . . . . . . . . . . . . . . . . . . . . . . . . 22 16
Adjuster link-to-mounting bracket bolt . . . . . . . . . . . . . . . . . . . . . . . . . . 12 9
Alternator pulley nut:
With key . . . . . . . . . . . . . . . . . . . . . . . . . . . . . . . . . . . .\
. . . . . . . . . . . . . 50 37
Without key . . . . . . . . . . . . . . . . . . . . . . . . . . . . . . . . . . . .\
. . . . . . . . . . . 60 44
Starter motor mounting bolts . . . . . . . . . . . . . . . . . . . . . . . . . . . . . . . . . 35 26
Starter motor support bracket bolt . . . . . . . . . . . . . . . . . . . . . . . . . . . . . 25 18
Chapter 5 Part A:
Starting and charging systems
Alternator - removal and refitting . . . . . . . . . . . . . . . . . . . . . . . . . . . 6
Alternator brushes and voltage regulator - renewal . . . . . . . . . . . . . 7
Auxiliary drivebelt check and renewal . . . . . . . . . . . . . . .See Chapter 1
Battery - removal and refitting . . . . . . . . . . . . . . . . . . . . . . . . . . . . . 4
Battery - testing and charging . . . . . . . . . . . . . . . . . . . . . . . . . . . . . . 3
Battery, bulbs and fuses . . . . . . . . . . . . . . . . . . .See
“Weekly Checks” Charging system - testing . . . . . . . . . . . . . . . . . . . . . . . . . . . . . . . . . 5
Electrical fault finding - general information . . . . . . . . . . . . . . . . . . . 2
General information, precautions and battery disconnection . . . . . . 1
Starter motor - removal and refitting . . . . . . . . . . . . . . . . . . . . . . . . . 9
Starter motor - testing and overhaul . . . . . . . . . . . . . . . . . . . . . . . . . 10
Starting system - testing . . . . . . . . . . . . . . . . . . . . . . . . . . . . . . . . . . 8
5A•1
Specifications Contents
Easy,
suitable for
novice with little
experience Fairly easy,
suitable
for beginner with
some experience Fairly difficult,
suitable for competent
DIY mechanic
Difficult,
suitable for
experienced DIY
mechanic Very difficult,
suitable for expert DIY
or professional
Degrees of difficulty
54321
procarmanuals.com
http://vnx.su
Page 161 of 296
1 General information,precautions and battery
disconnection
General information
The engine electrical system consists
mainly of the charging and starting systems.
Because of their engine-related functions,
these components are covered separately
from the body electrical devices such as the
lights, instruments, etc (which are covered in
Chapter 12). Information on the ignition
system is covered in Part B of this Chapter.
The electrical system is of the 12-volt
negative earth type. The battery is of the low maintenance or
“maintenance-free” (sealed for life) type and is
charged by the alternator, which is belt-driven
from the crankshaft pulley. The starter motor is of the pre-engaged
type incorporating an integral solenoid. On
starting, the solenoid moves the drive pinion
into engagement with the flywheel ring gear
before the starter motor is energised. Once
the engine has started, a one-way clutch
prevents the motor armature being driven by
the engine until the pinion disengages from
the flywheel.
Precautions
Further details of the various systems are
given in the relevant Sections of this Chapter.
While some repair procedures are given, the
usual course of action is to renew the
component concerned. The owner whose
interest extends beyond mere component
renewal should obtain a copy of the
“Automobile Electrical & Electronic Systems
Manual” , available from the publishers of this
manual. It is necessary to take extra care when
working on the electrical system to avoid
damage to semi-conductor devices (diodes
and transistors), and to avoid the risk of
personal injury. In addition to the precautions
given in “Safety first!” at the beginning of this
manual, observe the following when working
on the system:
Always remove rings, watches, etc before
working on the electrical system. Even with
the battery disconnected, capacitive
discharge could occur if a component’s live
terminal is earthed through a metal object.
This could cause a shock or nasty burn. Do not reverse the battery connections.
Components such as the alternator, electronic
control units, or any other components having
semi-conductor circuitry could be irreparably
damaged. If the engine is being started using jump
leads and a slave battery, connect the
batteries positive-to-positive and negative-to-
negative (see “Jump starting” ). This also
applies when connecting a battery charger.
Never disconnect the battery terminals, the
alternator, any electrical wiring or any test instruments when the engine is running.
Do not allow the engine to turn the
alternator when the alternator is not
connected. Never “test” for alternator output by
“flashing” the output lead to earth.
Never use an ohmmeter of the type
incorporating a hand-cranked generator for
circuit or continuity testing.
Always ensure that the battery negative lead
is disconnected when working on the
electrical system. Before using electric-arc welding
equipment on the car, disconnect the battery,
alternator and components such as the fuel
injection/ignition electronic control unit to
protect them from the risk of damage.
Battery disconnection
Several systems fitted to the vehicle require
battery power to be available at all times, either
to ensure that their continued operation (such as
the clock) or to maintain control unit memories
(such as that in the engine management
system’s ECU) which would be wiped if the
battery were to be disconnected. Whenever the
battery is to be disconnected therefore, first note
the following, to ensure that there are no
unforeseen consequences of this action:
a) First, on any vehicle with central locking, it is a wise precaution to remove the key
from the ignition, and to keep it with you,
so that it does not get locked in, if the
central locking should engage accidentally
when the battery is reconnected.
b) On cars equipped with an engine
management system, the system’s ECU will
lose the information stored in its memory -
referred to by Ford as the “KAM” (Keep-
Alive Memory) - when the battery is
disconnected. This includes idling and
operating values, and any fault codes
detected - in the case of the fault codes, if
it is thought likely that the system has
developed a fault for which the
corresponding code has been logged, the
vehicle must be taken to a Ford dealer for
the codes to be read, using the special
diagnostic equipment necessary for this.
Whenever the battery is disconnected, the
information relating to idle speed control
and other operating values will have to be
re-programmed into the unit’s memory.
The ECU does this by itself, but until then,
there may be surging, hesitation, erratic idle
and a generally inferior level of
performance. To allow the ECU to relearn
these values, start the engine and run it as
close to idle speed as possible until it
reaches its normal operating temperature,
then run it for approximately two minutes at
1200 rpm. Next, drive the vehicle as far as
necessary - approximately 5 miles of varied
driving conditions is usually sufficient - to
complete the relearning process.
c) If the battery is disconnected while the alarm system is armed or activated, the
alarm will remain in the same state when the battery is reconnected. The same
applies to the engine immobiliser system
(where fitted).
d) If a Ford “Keycode” audio unit is fitted,
and the unit and/or the battery is
disconnected, the unit will not function
again on reconnection until the correct
security code is entered. Details of this
procedure, which varies according to the
unit and model year, are given in the
“Ford Audio Systems Operating Guide”
supplied with the vehicle when new, with
the code itself being given in a “Radio
Passport” and/or a “Keycode Label” at
the same time. Ensure you have the
correct code before you disconnect the
battery. For obvious security reasons, the
procedure is not given in this manual. If
you do not have the code or details of the
correct procedure, but can supply proof
of ownership and a legitimate reason for
wanting this information, the vehicle’s
selling dealer may be able to help.
Devices known as “memory-savers” (or
“code-savers”) can be used to avoid some of
the above problems. Precise details vary
according to the device used. Typically, it is
plugged into the cigarette lighter, and is
connected by its own wires to a spare battery;
the vehicle’s own battery is then disconnected
from the electrical system, leaving the
“memory-saver” to pass sufficient current to
maintain audio unit security codes and ECU
memory values, and also to run permanently-
live circuits such as the clock, all the while
isolating the battery in the event of a short-
circuit occurring while work is carried out.
Warning: Some of these devices
allow a considerable amount of
current to pass, which can mean
that many of the vehicle’s
systems are still operational when the
main battery is disconnected. If a
“memory-saver” is used, ensure that the
circuit concerned is actually “dead” before
carrying out any work on it!
2 Electrical fault finding - general information
Refer to Chapter 12.
3 Battery -testing and charging
1
Standard and low maintenance
battery - testing
1If the vehicle covers a small annual mileage,
it is worthwhile checking the specific gravity
of the electrolyte every three months to
determine the state of charge of the battery.
Use a hydrometer to make the check and
compare the results with the following table.
5A•2 Starting and charging systems
1595Ford Fiesta Remakeprocarmanuals.com
http://vnx.su
Page 164 of 296

withdraw the assembly from the rear of the
alternator (see illustrations) .
4 Check the brush lengths (see illustration).
If either is less than, or close to, the minimum
specified length, renew them by unsoldering
the brush wiring connectors and withdrawing
the brushes and their springs.
5 Clean the slip rings with a solvent-
moistened cloth, then check for signs of
scoring, burning or severe pitting. If evident,
the slip rings should be attended to by an
automobile electrician.
6 Refit in the reverse order of removal.
Magneti-Marelli
7Remove the three screws securing the
regulator/brush box unit on the rear face of the
alternator, partially withdraw the assembly,
detach the field connector, and remove the
unit from the alternator (see illustrations).
8 If the brushes are worn beyond the
minimum allowable length specified, a new
regulator and brush box unit must be fitted;
the brushes are not available separately.
9 Clean the slip rings with a solvent-moistened
cloth, then check for signs of scoring, burning
or severe pitting. If evident, the slip rings should
be attended to by an automobile electrician.
10 Refit in the reverse order of removal.
Mitsubishi
11Hold the pulley nut stationary using an
8 mm Allen key, unscrew the pulley nut and
remove the washer (see illustration).12
Withdraw the pulley, cooling fan, spacer
and dust shield from the rotor shaft.
13 Mark the relative fitted positions of the front
housing, stator and rear housing (to ensure correct re-alignment when reassembling).
Unscrew the through-bolts and remove the front
housing from the rotor shaft, followed by the
dust seal and the thin spacer
(see illustrations).
Starting and charging systems 5A•5
7.4 Measuring the brush lengths (Bosch
alternator)7.3b . . . withdraw the brush box/regulatorunit (Bosch alternator)
7.11 Pulley nut removal on the Mitsubishi alternator
7.13a Exploded view of the Mitsubishi A5T alternator
7.7b Disconnecting the field connector(Magneti-Marelli alternator)7.7a Removing the regulator and brushboxassembly securing screws (Magneti- Marelli alternator)
5A
1595Ford Fiesta Remake
7.3a Undo the retaining screw and . . .
A Pulley
B Fan
C Thick spacer
D Through-bolt
E Dust shield
F Drive end unit
G Bearing
H Bearing retainer
J Dust cap
K Thin spacer
L Rotor
M Seal
N Bearing
O Commutator end
P Diode pack
R Brush box
S Stator
procarmanuals.com
http://vnx.su
Page 165 of 296

14Remove the rotor from the rear housing
and the stator. If difficulty is experienced, heat
the rear housing with a 200-watt soldering
iron for three or four minutes.
15 Unbolt the rectifier/brush box and stator
assembly from the rear housing (see
illustration) .
16 Unsolder the stator and brush box from
the rectifier, using the very minimum of heat.
Use a pair of pliers as a heat sink to reduce
the heat transference to the diodes
(overheating may cause diode failure).
17 Renew the brushes if they are worn down
to, or beyond, the minimum specified length.
Unsolder the brush wires at the points
indicated (see illustration) , then solder the
new brush leads so that the wear limit line
projects 2 to 3 mm from the end of the holder
(see illustration) .
18 Clean the slip rings with a solvent-
moistened cloth, then check for signs of
scoring, burning or severe pitting. If evident,
the slip rings should be attended to by an
automobile electrician. 19
Refit in the reverse order of removal.
Insert a piece of wire through the access hole
in the rear housing to hold the brushes in the
retracted position as the rotor is refitted (see
illustration) . Do not forget to release the
brushes when assembled.
8 Starting system - testing
1
Note:Refer to the precautions in Section 1
before starting work.
1 If the starter motor fails to operate when the
ignition key is turned to the appropriate
position, the following possible causes may
be to blame.
a) The battery is faulty.
b) The electrical connections between the
switch, solenoid, battery and starter
motor are somewhere failing to pass the
necessary current from the battery
through the starter to earth.
c) The solenoid is faulty.
d) The starter motor is mechanically or
electrically defective. 2
To check the battery, switch on the
headlights. If they dim after a few seconds,
this indicates that the battery is discharged -
recharge (see Section 3) or renew the battery.
If the headlights glow brightly, operate the
ignition switch and observe the lights. If they
dim, then this indicates that current is
reaching the starter motor, therefore the fault
must lie in the starter motor. If the lights
continue to glow brightly (and no clicking
sound can be heard from the starter motor
solenoid), this indicates that there is a fault in
the circuit or solenoid - see following
paragraphs. If the starter motor turns slowly
when operated, but the battery is in good
condition, then this indicates that either the
starter motor is faulty, or there is considerable
resistance somewhere in the circuit.
3 If a fault in the circuit is suspected,
disconnect the battery leads (including the
earth connection to the body), the starter/
solenoid wiring and the engine/transmission
earth strap. Thoroughly clean the
connections, and reconnect the leads and
wiring, then use a voltmeter or test lamp to
check that full battery voltage is available at
the battery positive lead connection to the
solenoid, and that the earth is sound. Smear
petroleum jelly around the battery terminals to
prevent corrosion - corroded connections are
amongst the most frequent causes of
electrical system faults.
5A•6 Starting and charging systems
7.19 Use a length of wire rod to hold
brushes in the retracted position when
reassembling the rotor to the housing on
the Mitsubishi alternator
7.17b Fitted position of new brush on a Mitsubishi alternator7.17a Unsoldering a brush wire on aMitsubishi alternator
7.15 Rectifier/brush box (1) and regulatorunit (3) retaining nuts on the Mitsubishialternator. Note that cap (2) covers the regulator nut
A Pulley nut
B Spring washer
C Pulley
D Through-bolt
E Retainer plate screw
F Drive end housing
G Bearing
H Bearing retaining plate J Spacer
K Rotor
L Spacer
M Slip ring end bearing
N Plug
P Cap
Q Terminal insulator
R Slip ring end housing S Rectifier
T Dust cover
V Regulator
W Brush spring
X Brush
Y Regulator screw
Z Stator
1595Ford Fiesta Remake
7.13b Exploded view of the AOO2T Mitsubishi alternatorprocarmanuals.com
http://vnx.su
Page 199 of 296
16Using a suitable punch, tap the outer
bearing outer race at diametrically-opposed
points and remove the bearing assembly from
the spindle carrier. Do not allow the bearing to
tilt during its withdrawal from the housing, or it
will jam and possibly damage the surface of
the bore. Any burrs left in a bearing bore will
prevent the new bearing from seating
correctly.
17 Turn the spindle carrier over and remove
the inner bearing assembly in the same way.
18 Thoroughly clean the bearing bore and
hub, then secure the spindle carrier in the vice
in an upright position.
19 Draw the new outer bearing assembly into
the spindle carrier using a length of metal tube
of diameter slightly less than the outer race.
Do not apply any pressure to the inner race.
Alternatively, a long threaded rod or bolt, a nut
and large flat washers may be used to draw
the bearing into position (see illustration 3.7).
Once the bearing has been installed, take care
not to dislodge the inner race and seal.
20 Using the same method as for the outer
bearing, draw in the new inner bearing
assembly from the other side of the spindle
carrier. Again, take care not to dislodge the
inner race and seal once the bearing is in
position.
21 Using the same tooling arrangement as
before, and with the metal tube or washers
contacting the inner bearing inner race, draw
the hub fully into the bearings. Alternatively, if
a press is available, support the hub face
down on the press bed and using a metal tube
in contact with the inner bearing inner race,
press the spindle carrier onto the hub.
22 Check that the hub spins freely in the
bearings, then refit the spindle carrier as
described in Section 2.4 Front suspension strut -
removal and refitting
3
Removal
1 Chock the rear wheels then jack up the
front of the car and support it on axle stands
(see “Jacking and Vehicle Support” ). Remove
the appropriate front roadwheel.
2 Open and support the bonnet. Prise free
the protective cap from the suspension strut
top-mount retaining nut, then slacken the nut,
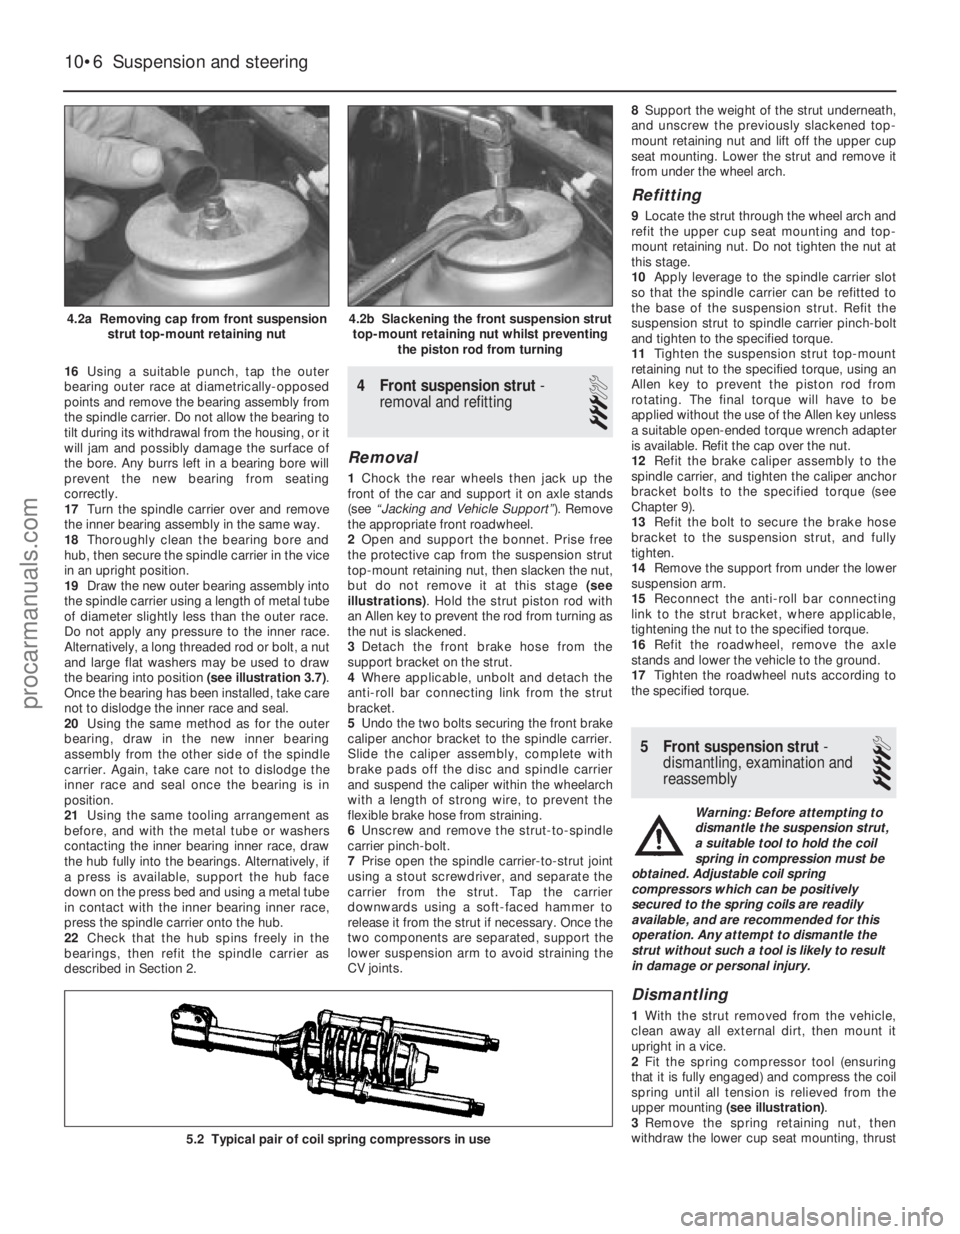
but do not remove it at this stage (see
illustrations) . Hold the strut piston rod with
an Allen key to prevent the rod from turning as
the nut is slackened.
3 Detach the front brake hose from the
support bracket on the strut.
4 Where applicable, unbolt and detach the
anti-roll bar connecting link from the strut
bracket.
5 Undo the two bolts securing the front brake
caliper anchor bracket to the spindle carrier.
Slide the caliper assembly, complete with
brake pads off the disc and spindle carrier
and suspend the caliper within the wheelarch
with a length of strong wire, to prevent the
flexible brake hose from straining.
6 Unscrew and remove the strut-to-spindle
carrier pinch-bolt.
7 Prise open the spindle carrier-to-strut joint
using a stout screwdriver, and separate the
carrier from the strut. Tap the carrier
downwards using a soft-faced hammer to
release it from the strut if necessary. Once the
two components are separated, support the
lower suspension arm to avoid straining the
CV joints. 8
Support the weight of the strut underneath,
and unscrew the previously slackened top-
mount retaining nut and lift off the upper cup
seat mounting. Lower the strut and remove it
from under the wheel arch.
Refitting
9 Locate the strut through the wheel arch and
refit the upper cup seat mounting and top-
mount retaining nut. Do not tighten the nut at
this stage.
10 Apply leverage to the spindle carrier slot
so that the spindle carrier can be refitted to
the base of the suspension strut. Refit the
suspension strut to spindle carrier pinch-bolt
and tighten to the specified torque.
11 Tighten the suspension strut top-mount
retaining nut to the specified torque, using an
Allen key to prevent the piston rod from
rotating. The final torque will have to be
applied without the use of the Allen key unless
a suitable open-ended torque wrench adapter
is available. Refit the cap over the nut.
12 Refit the brake caliper assembly to the
spindle carrier, and tighten the caliper anchor
bracket bolts to the specified torque (see
Chapter 9).
13 Refit the bolt to secure the brake hose
bracket to the suspension strut, and fully
tighten.
14 Remove the support from under the lower
suspension arm.
15 Reconnect the anti-roll bar connecting
link to the strut bracket, where applicable,
tightening the nut to the specified torque.
16 Refit the roadwheel, remove the axle
stands and lower the vehicle to the ground.
17 Tighten the roadwheel nuts according to
the specified torque.
5 Front suspension strut -
dismantling, examination and
reassembly
4
Warning: Before attempting to
dismantle the suspension strut,
a suitable tool to hold the coil
spring in compression must be
obtained. Adjustable coil spring
compressors which can be positively
secured to the spring coils are readily
available, and are recommended for this
operation. Any attempt to dismantle the
strut without such a tool is likely to result
in damage or personal injury.
Dismantling
1 With the strut removed from the vehicle,
clean away all external dirt, then mount it
upright in a vice.
2 Fit the spring compressor tool (ensuring
that it is fully engaged) and compress the coil
spring until all tension is relieved from the
upper mounting (see illustration) .
3 Remove the spring retaining nut, then
withdraw the lower cup seat mounting, thrust
10•6 Suspension and steering
5.2 Typical pair of coil spring compressors in use
4.2b Slackening the front suspension strut
top-mount retaining nut whilst preventing the piston rod from turning4.2a Removing cap from front suspensionstrut top-mount retaining nut
1595Ford Fiesta Remakeprocarmanuals.com
http://vnx.su
Page 205 of 296
mountings for signs of wear. Test the
operation of the unit, holding it in an upright
position, by moving the piston through a full
stroke, and then through short strokes of 50
to 100 mm. In both cases, the resistance felt
should be smooth and continuous. If the
resistance is jerky, or uneven, or if there is any
visible sign of wear or damage, the shock
absorber should be renewed. Note that if
either unit is to be renewed, it is good practice
to renew both together as a matched pair.
Refitting
4Locate the unit in position and refit the
mounting bolts and nut. Do not fully tighten
the mountings at this stage.
5 Lower the vehicle to the ground and rock it
to settle the suspension. Raise the vehicle
again, as necessary, until the shock absorber
is at an angle of 50° ± 5° to the horizontal.
With the shock absorber in this position,
tighten the upper and lower mountings to the
specified torque.
17 Rear suspension assembly (Courier models) -
removal and refitting
3
Removal
1 Chock the front wheels then jack up the
rear of the car and support it on axle stands
(see “Jacking and Vehicle Support” ). Remove
the rear roadwheels.
2 Refer to Chapter 9 for details, and
disconnect the handbrake cable equaliser
from the primary cable. Remove the
handbrake rear cable from its adjuster and its
fixed body locations. Release the exhaust
system mountings as necessary to allow the
handbrake cable to be withdrawn over the
rear of the exhaust.
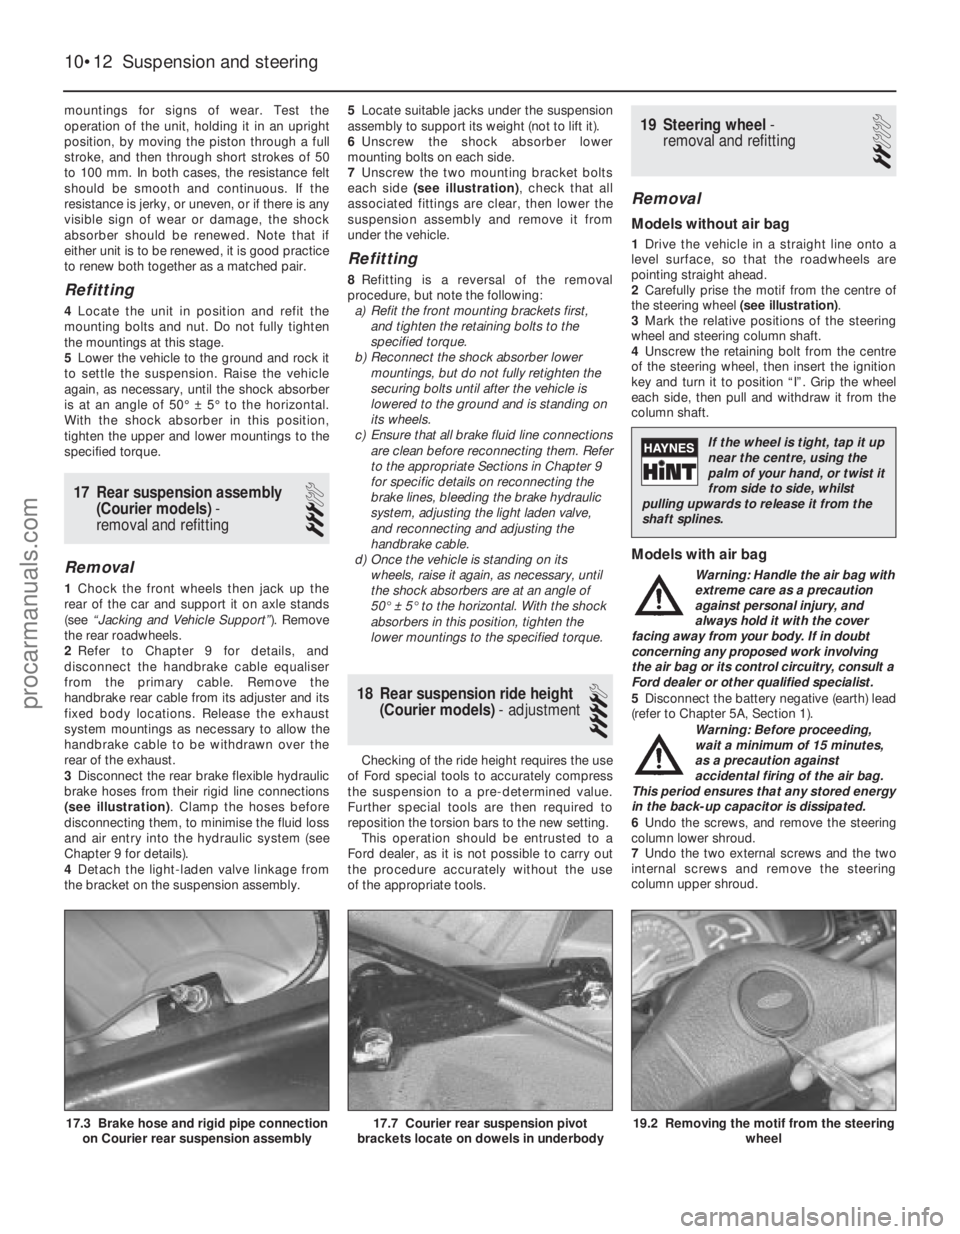
3 Disconnect the rear brake flexible hydraulic
brake hoses from their rigid line connections
(see illustration) . Clamp the hoses before
disconnecting them, to minimise the fluid loss
and air entry into the hydraulic system (see
Chapter 9 for details).
4 Detach the light-laden valve linkage from
the bracket on the suspension assembly. 5
Locate suitable jacks under the suspension
assembly to support its weight (not to lift it).
6 Unscrew the shock absorber lower
mounting bolts on each side.
7 Unscrew the two mounting bracket bolts
each side (see illustration) , check that all
associated fittings are clear, then lower the
suspension assembly and remove it from
under the vehicle.
Refitting
8 Refitting is a reversal of the removal
procedure, but note the following: a) Refit the front mounting brackets first,
and tighten the retaining bolts to the
specified torque.
b) Reconnect the shock absorber lower
mountings, but do not fully retighten the
securing bolts until after the vehicle is
lowered to the ground and is standing on
its wheels.
c) Ensure that all brake fluid line connections are clean before reconnecting them. Refer
to the appropriate Sections in Chapter 9
for specific details on reconnecting the
brake lines, bleeding the brake hydraulic
system, adjusting the light laden valve,
and reconnecting and adjusting the
handbrake cable.
d) Once the vehicle is standing on its
wheels, raise it again, as necessary, until
the shock absorbers are at an angle of
50° ± 5° to the horizontal. With the shock
absorbers in this position, tighten the
lower mountings to the specified torque.
18 Rear suspension ride height (Courier models) - adjustment
4
Checking of the ride height requires the use
of Ford special tools to accurately compress
the suspension to a pre-determined value.
Further special tools are then required to
reposition the torsion bars to the new setting.
This operation should be entrusted to a
Ford dealer, as it is not possible to carry out
the procedure accurately without the use
of the appropriate tools.
19 Steering wheel -
removal and refitting
2
Removal
Models without air bag
1 Drive the vehicle in a straight line onto a
level surface, so that the roadwheels are
pointing straight ahead.
2 Carefully prise the motif from the centre of
the steering wheel (see illustration).
3 Mark the relative positions of the steering
wheel and steering column shaft.
4 Unscrew the retaining bolt from the centre
of the steering wheel, then insert the ignition
key and turn it to position “I”. Grip the wheel
each side, then pull and withdraw it from the
column shaft.
Models with air bag
Warning: Handle the air bag with
extreme care as a precaution
against personal injury, and
always hold it with the cover
facing away from your body. If in doubt
concerning any proposed work involving
the air bag or its control circuitry, consult a
Ford dealer or other qualified specialist.
5 Disconnect the battery negative (earth) lead
(refer to Chapter 5A, Section 1).
Warning: Before proceeding,
wait a minimum of 15 minutes,
as a precaution against
accidental firing of the air bag.
This period ensures that any stored energy
in the back-up capacitor is dissipated.
6 Undo the screws, and remove the steering
column lower shroud.
7 Undo the two external screws and the two
internal screws and remove the steering
column upper shroud.
10•12 Suspension and steering
19.2 Removing the motif from the steering wheel17.7 Courier rear suspension pivot
brackets locate on dowels in underbody17.3 Brake hose and rigid pipe connection on Courier rear suspension assembly
1595Ford Fiesta Remake
If the wheel is tight, tap it up
near the centre, using the
palm of your hand, or twist it
from side to side, whilst
pulling upwards to release it from the
shaft splines.
procarmanuals.com
http://vnx.su
Page 206 of 296
8Turn the steering wheel as necessary so
that one of the air bag module retaining bolts
becomes accessible from the rear of the
steering wheel. Undo the bolt, then turn
the steering wheel again until the second bolt
is accessible. Undo this bolt also.
9 Withdraw the air bag module from the
steering wheel far enough to access the
wiring multi-plug. Some force may be needed
to free the module from the additional steering
wheel spoke retainers.
10 Disconnect the multi-plug from the rear of
the module, and remove the module from the
vehicle. Warning: Position the air bag
module in a safe place, with the
mechanism facing downwards
as a precaution against
accidental operation.
11 Release the wiring harness from the side
of the steering column and disconnect the air
bag module wiring multi-plug (yellow lead).
12 Where applicable, undo the single screw
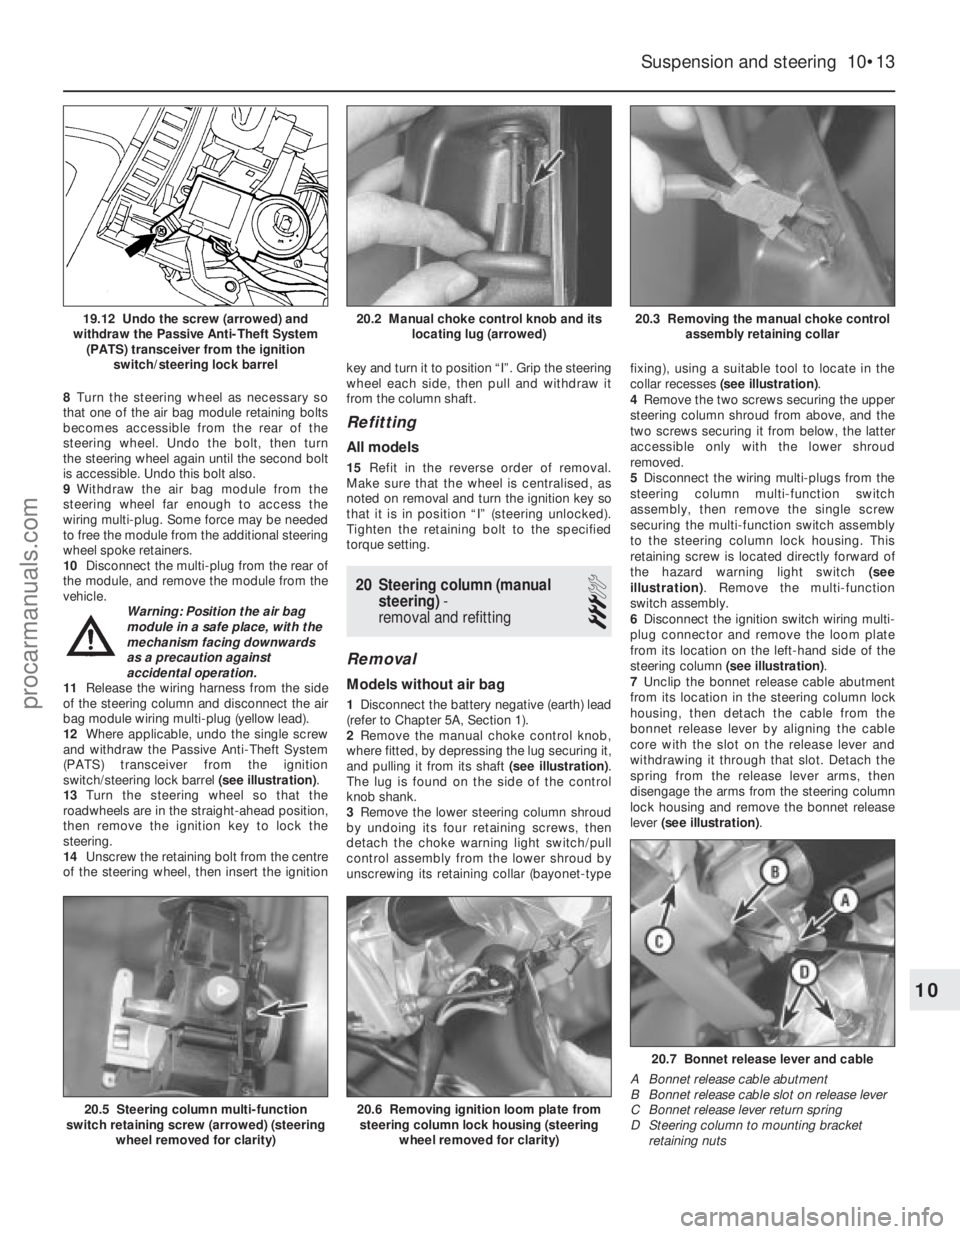
and withdraw the Passive Anti-Theft System
(PATS) transceiver from the ignition
switch/steering lock barrel (see illustration).
13 Turn the steering wheel so that the
roadwheels are in the straight-ahead position,
then remove the ignition key to lock the
steering.
14 Unscrew the retaining bolt from the centre
of the steering wheel, then insert the ignition key and turn it to position “I”. Grip the steering
wheel each side, then pull and withdraw it
from the column shaft.
Refitting
All models
15
Refit in the reverse order of removal.
Make sure that the wheel is centralised, as
noted on removal and turn the ignition key so
that it is in position “I” (steering unlocked).
Tighten the retaining bolt to the specified
torque setting.
20 Steering column (manual steering) -
removal and refitting
3
Removal
Models without air bag
1 Disconnect the battery negative (earth) lead
(refer to Chapter 5A, Section 1).
2 Remove the manual choke control knob,
where fitted, by depressing the lug securing it,
and pulling it from its shaft (see illustration).
The lug is found on the side of the control
knob shank.
3 Remove the lower steering column shroud
by undoing its four retaining screws, then
detach the choke warning light switch/pull
control assembly from the lower shroud by
unscrewing its retaining collar (bayonet-type fixing), using a suitable tool to locate in the
collar recesses
(see illustration) .
4 Remove the two screws securing the upper
steering column shroud from above, and the
two screws securing it from below, the latter
accessible only with the lower shroud
removed.
5 Disconnect the wiring multi-plugs from the
steering column multi-function switch
assembly, then remove the single screw
securing the multi-function switch assembly
to the steering column lock housing. This
retaining screw is located directly forward of
the hazard warning light switch (see
illustration) . Remove the multi-function
switch assembly.
6 Disconnect the ignition switch wiring multi-
plug connector and remove the loom plate
from its location on the left-hand side of the
steering column (see illustration) .
7 Unclip the bonnet release cable abutment
from its location in the steering column lock
housing, then detach the cable from the
bonnet release lever by aligning the cable
core with the slot on the release lever and
withdrawing it through that slot. Detach the
spring from the release lever arms, then
disengage the arms from the steering column
lock housing and remove the bonnet release
lever (see illustration) .
Suspension and steering 10•13
20.3 Removing the manual choke control
assembly retaining collar20.2 Manual choke control knob and its locating lug (arrowed)19.12 Undo the screw (arrowed) and
withdraw the Passive Anti-Theft System (PATS) transceiver from the ignition switch/steering lock barrel
20.7 Bonnet release lever and cable
A Bonnet release cable abutment
B Bonnet release cable slot on release lever
C Bonnet release lever return spring
D Steering column to mounting bracket retaining nuts
20.6 Removing ignition loom plate fromsteering column lock housing (steering
wheel removed for clarity)20.5 Steering column multi-function
switch retaining screw (arrowed) (steering
wheel removed for clarity)
10
1595Ford Fiesta Remakeprocarmanuals.com
http://vnx.su
Page 207 of 296
8Remove the nuts securing the steering
column mounting bracket.
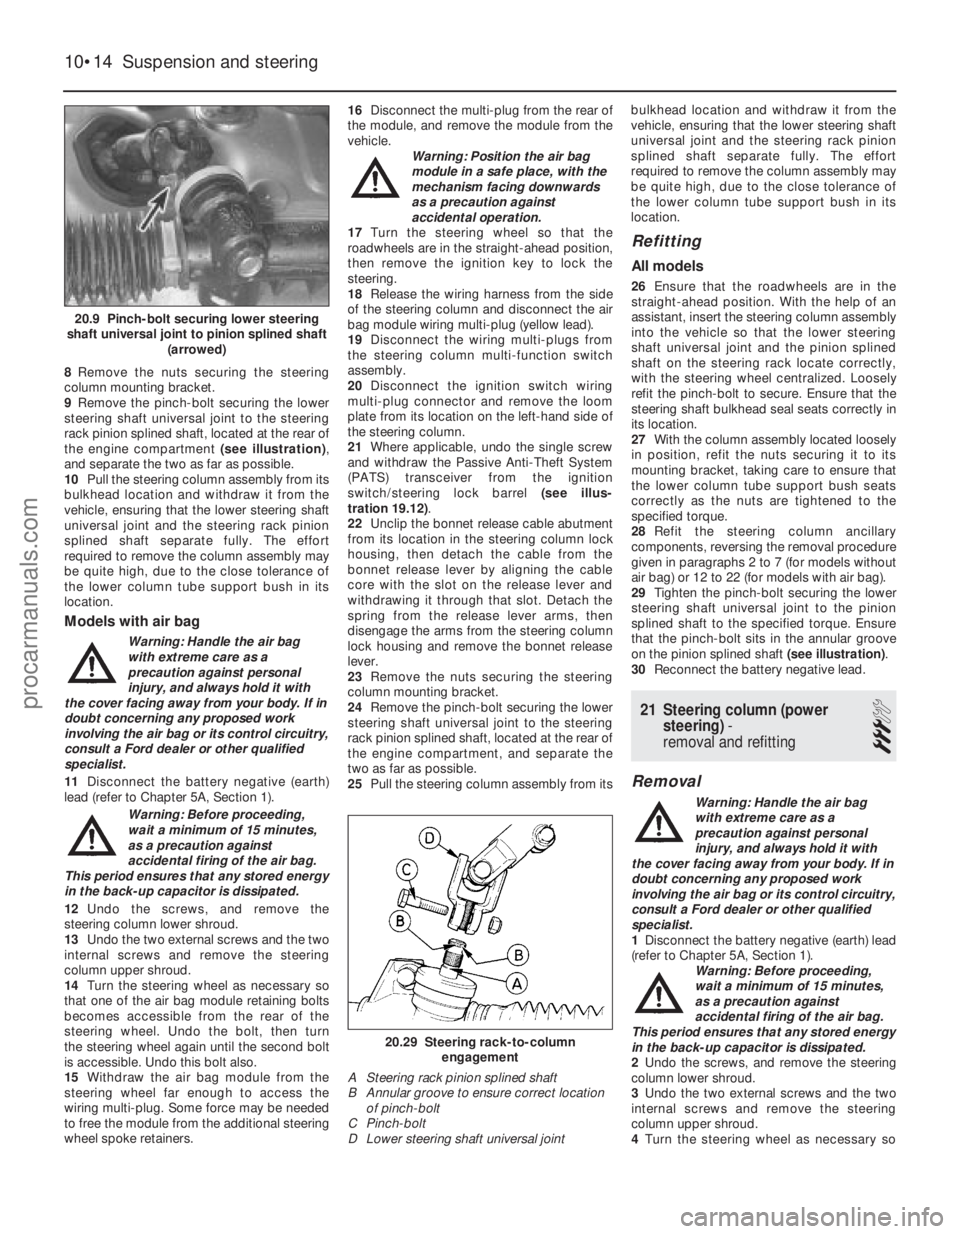
9 Remove the pinch-bolt securing the lower
steering shaft universal joint to the steering
rack pinion splined shaft, located at the rear of
the engine compartment (see illustration),
and separate the two as far as possible.
10 Pull the steering column assembly from its
bulkhead location and withdraw it from the
vehicle, ensuring that the lower steering shaft
universal joint and the steering rack pinion
splined shaft separate fully. The effort
required to remove the column assembly may
be quite high, due to the close tolerance of
the lower column tube support bush in its
location.
Models with air bag
Warning: Handle the air bag
with extreme care as a
precaution against personal
injury, and always hold it with
the cover facing away from your body. If in
doubt concerning any proposed work
involving the air bag or its control circuitry,
consult a Ford dealer or other qualified
specialist.
11 Disconnect the battery negative (earth)
lead (refer to Chapter 5A, Section 1).
Warning: Before proceeding,
wait a minimum of 15 minutes,
as a precaution against
accidental firing of the air bag.
This period ensures that any stored energy
in the back-up capacitor is dissipated.
12 Undo the screws, and remove the
steering column lower shroud.
13 Undo the two external screws and the two
internal screws and remove the steering
column upper shroud.
14 Turn the steering wheel as necessary so
that one of the air bag module retaining bolts
becomes accessible from the rear of the
steering wheel. Undo the bolt, then turn
the steering wheel again until the second bolt
is accessible. Undo this bolt also.
15 Withdraw the air bag module from the
steering wheel far enough to access the
wiring multi-plug. Some force may be needed
to free the module from the additional steering
wheel spoke retainers. 16
Disconnect the multi-plug from the rear of
the module, and remove the module from the
vehicle. Warning: Position the air bag
module in a safe place, with the
mechanism facing downwards
as a precaution against
accidental operation.
17 Turn the steering wheel so that the
roadwheels are in the straight-ahead position,
then remove the ignition key to lock the
steering.
18 Release the wiring harness from the side
of the steering column and disconnect the air
bag module wiring multi-plug (yellow lead).
19 Disconnect the wiring multi-plugs from
the steering column multi-function switch
assembly.
20 Disconnect the ignition switch wiring
multi-plug connector and remove the loom
plate from its location on the left-hand side of
the steering column.
21 Where applicable, undo the single screw
and withdraw the Passive Anti-Theft System
(PATS) transceiver from the ignition
switch/steering lock barrel (see illus-
tration 19.12) .
22 Unclip the bonnet release cable abutment
from its location in the steering column lock
housing, then detach the cable from the
bonnet release lever by aligning the cable
core with the slot on the release lever and
withdrawing it through that slot. Detach the
spring from the release lever arms, then
disengage the arms from the steering column
lock housing and remove the bonnet release
lever.
23 Remove the nuts securing the steering
column mounting bracket.
24 Remove the pinch-bolt securing the lower
steering shaft universal joint to the steering
rack pinion splined shaft, located at the rear of
the engine compartment, and separate the
two as far as possible.
25 Pull the steering column assembly from its bulkhead location and withdraw it from the
vehicle, ensuring that the lower steering shaft
universal joint and the steering rack pinion
splined shaft separate fully. The effort
required to remove the column assembly may
be quite high, due to the close tolerance of
the lower column tube support bush in its
location.
Refitting
All models
26
Ensure that the roadwheels are in the
straight-ahead position. With the help of an
assistant, insert the steering column assembly
into the vehicle so that the lower steering
shaft universal joint and the pinion splined
shaft on the steering rack locate correctly,
with the steering wheel centralized. Loosely
refit the pinch-bolt to secure. Ensure that the
steering shaft bulkhead seal seats correctly in
its location.
27 With the column assembly located loosely
in position, refit the nuts securing it to its
mounting bracket, taking care to ensure that
the lower column tube support bush seats
correctly as the nuts are tightened to the
specified torque.
28 Refit the steering column ancillary
components, reversing the removal procedure
given in paragraphs 2 to 7 (for models without
air bag) or 12 to 22 (for models with air bag).
29 Tighten the pinch-bolt securing the lower
steering shaft universal joint to the pinion
splined shaft to the specified torque. Ensure
that the pinch-bolt sits in the annular groove
on the pinion splined shaft (see illustration).
30 Reconnect the battery negative lead.
21 Steering column (power
steering) -
removal and refitting
3
Removal
Warning: Handle the air bag
with extreme care as a
precaution against personal
injury, and always hold it with
the cover facing away from your body. If in
doubt concerning any proposed work
involving the air bag or its control circuitry,
consult a Ford dealer or other qualified
specialist.
1 Disconnect the battery negative (earth) lead
(refer to Chapter 5A, Section 1). Warning: Before proceeding,
wait a minimum of 15 minutes,
as a precaution against
accidental firing of the air bag.
This period ensures that any stored energy
in the back-up capacitor is dissipated.
2 Undo the screws, and remove the steering
column lower shroud.
3 Undo the two external screws and the two
internal screws and remove the steering
column upper shroud.
4 Turn the steering wheel as necessary so
10•14 Suspension and steering
20.29 Steering rack-to-column
engagement
A Steering rack pinion splined shaft
B Annular groove to ensure correct location of pinch-bolt
C Pinch-bolt
D Lower steering shaft universal joint
20.9 Pinch-bolt securing lower steering
shaft universal joint to pinion splined shaft (arrowed)
1595Ford Fiesta Remakeprocarmanuals.com
http://vnx.su