bonnet FORD FIESTA 1989 Service Owner's Manual
[x] Cancel search | Manufacturer: FORD, Model Year: 1989, Model line: FIESTA, Model: FORD FIESTA 1989Pages: 296, PDF Size: 10.65 MB
Page 144 of 296

Application .")
4D
1595Ford Fiesta Remake
General
System type . . . . . . . . . . . . . . . . . . . . . . . . . . . . . . . . . . . .\
. . . . . . . . . . Sequential Electronic Fuel injection (SEFi)
Application . . . . . . . . . . . . . . . . . . . . . . . . . . . . . . . . . . . .\
. . . . . . . . . . . 1.4 litre PTE engines and 1.6 and 1.8 litre Zetec engines
Fuel grade
Fuel octane requirement . . . . . . . . . . . . . . . . . . . . . . . . . . . . . . . . . . . .\
. 95 RON unleaded
Fuel pressure
Regulated fuel pressure:*Pressure regulator vacuum hose disconnected . . . . . . . . . . . . . . . . . 2.7 ± 0.2 bars
With engine running and pressure regulator vacuum hose connected . . . . . . . . . . . . . . . . . . . . . . . . . . . . . . . . . . . .\
. . . . . . . . 2.1 ± 0.2 bars
Hold pressure - engine stopped after five minutes* . . . . . . . . . . . . . . . . 1.8 bars minimum
*The figures quoted are specific to Zetec engines. No values are quoted \
by the manufacturer for PTE engines, however they are likely to be similar.
Torque wrench settingsNm lbf ft
PTE engines
Inlet air duct to cylinder head cover . . . . . . . . . . . . . . . . . . . . . . . . . . . . 9 7
Inlet manifold to cylinder head . . . . . . . . . . . . . . . . . . . . . . . . . . . . . . . . 18 13
Inlet manifold upper to lower sections . . . . . . . . . . . . . . . . . . . . . . . . . . 18 13
Inlet air temperature sensor . . . . . . . . . . . . . . . . . . . . . . . . . . . . . . . . . . 15 11
Fuel rail-to-lower inlet manifold . . . . . . . . . . . . . . . . . . . . . . . . . . . . . . . 23 17
Camshaft position sensor . . . . . . . . . . . . . . . . . . . . . . . . . . . . . . . . . . . .\
6 4
Oxygen sensor . . . . . . . . . . . . . . . . . . . . . . . . . . . . . . . . . . . .\
. . . . . . . . 60 44
Zetec engines
Throttle housing-to-inlet manifold screws . . . . . . . . . . . . . . . . . . . . . . . 9 7
Inlet manifold to cylinder head . . . . . . . . . . . . . . . . . . . . . . . . . . . . . . . . 18 13
Idle speed control valve bolts . . . . . . . . . . . . . . . . . . . . . . . . . . . . . . . . . 6 4
Inlet air temperature sensor . . . . . . . . . . . . . . . . . . . . . . . . . . . . . . . . . . 15 11
Fuel pressure regulator bolts . . . . . . . . . . . . . . . . . . . . . . . . . . . . . . . . . 6 4
Fuel injector bolts . . . . . . . . . . . . . . . . . . . . . . . . . . . . . . . . . . . .\
. . . . . . 6 4
Fuel rail-to-inlet manifold bolts . . . . . . . . . . . . . . . . . . . . . . . . . . . . . . . . 9 7
Camshaft position sensor . . . . . . . . . . . . . . . . . . . . . . . . . . . . . . . . . . . .\
8 6
Oxygen sensor . . . . . . . . . . . . . . . . . . . . . . . . . . . . . . . . . . . .\
. . . . . . . . 60 44
Chapter 4 Part D: Fuel system -
sequential electronic fuel injection engines
Accelerator cable - removal, refitting and adjustment . . . . . . . . . . . 5
Accelerator pedal - removal and refitting . . . . . . . . . . . . . . . . . . . . . 6
Air cleaner assembly and air inlet components - removal and
refitting . . . . . . . . . . . . . . . . . . . . . . . . . . . . . . . . . . . .\
. . . . . . . . . . 4
Air cleaner element renewal . . . . . . . . . . . . . . . . . . . . . .See Chapter 1
Fuel cut-off switch - removal and refitting . . . . . . . . . . . . . . . . . . . . 12
Fuel filter renewal . . . . . . . . . . . . . . . . . . . . . . . . . . \
. . . . .See Chapter 1
Fuel injection system - checking . . . . . . . . . . . . . . . . . . . . . . . . . . . . 13
Fuel injection system components - removal and refitting . . . . . . . . 14
Fuel lines and fittings - general information . . . . . . . . . . . . . . . . . . . 3
Fuel pump/fuel gauge sender unit - removal and refitting . . . . . . . . 9 Fuel pump/fuel pressure - checking . . . . . . . . . . . . . . . . . . . . . . . . . 7
Fuel system - depressurisation . . . . . . . . . . . . . . . . . . . . . . . . . . . . . 2
Fuel tank - removal, inspection and refitting . . . . . . . . . . . . . . . . . . . 8
Fuel tank filler pipe - removal and refitting . . . . . . . . . . . . . . . . . . . . 11
Fuel tank ventilation tube - removal and refitting . . . . . . . . . . . . . . . 10
General fuel system checks . . . . . . . . . . . . . . . . . . . . . .See Chapter 1
General information and precautions . . . . . . . . . . . . . . . . . . . . . . . . 1
Inlet manifold - removal and refitting . . . . . . . . . . . . . . . . . . . . . . . . 15
Underbody fuel/brake line check . . . . . . . . . . . . . . . . . . .See\
Chapter 1
Underbonnet check for fluid leaks and hose condition . .See Chapter 1
4D•1
Specifications Contents
Easy,
suitable for
novice with little
experience Fairly easy,
suitable
for beginner with
some experience Fairly difficult,
suitable for competent
DIY mechanic
Difficult,
suitable for
experienced DIY
mechanic Very difficult,
suitable for expert DIY
or professional
Degrees of difficulty
54321
procarmanuals.com
http://vnx.su
Page 152 of 296
4E
1595Ford Fiesta Remake
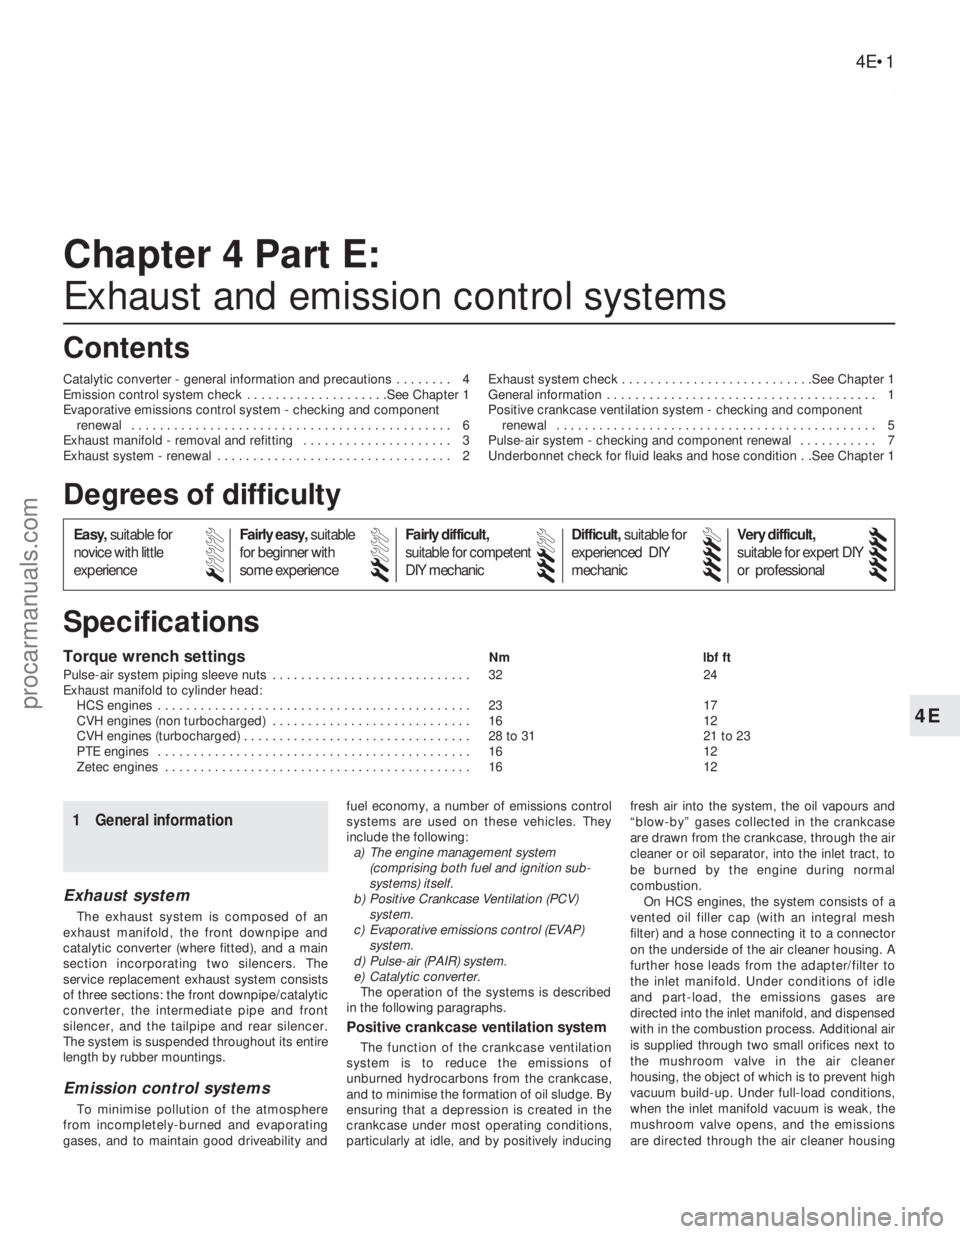
Torque wrench settingsNmlbf ft
Pulse-air system piping sleeve nuts . . . . . . . . . . . . . . . . . . . . . . . . . . . . 32 24
Exhaust manifold to cylinder head: HCS engines . . . . . . . . . . . . . . . . . . . . . . . . . . . . . . . . . . . .\
. . . . . . . . 23 17
CVH engines (non turbocharged) . . . . . . . . . . . . . . . . . . . . . . . . . . . . 16 12
CVH engines (turbocharged) . . . . . . . . . . . . . . . . . . . . . . . . . . . . . . . . 28 to 31 21 to 23
PTE engines . . . . . . . . . . . . . . . . . . . . . . . . . . . . . . . . . . . .\
. . . . . . . . 16 12
Zetec engines . . . . . . . . . . . . . . . . . . . . . . . . . . . . . . . . . . . .\
. . . . . . . 16 12
Chapter 4 Part E:
Exhaust and emission control systems
Catalytic converter - general information and precautions . . . . . . . . 4
Emission control system check . . . . . . . . . . . . . . . . . . . .See Chapter 1
Evaporative emissions control system - checking and component
renewal . . . . . . . . . . . . . . . . . . . . . . . . . . . . . . . . . . . .\
. . . . . . . . . 6
Exhaust manifold - removal and refitting . . . . . . . . . . . . . . . . . . . . . 3
Exhaust system - renewal . . . . . . . . . . . . . . . . . . . . . . . . . . . . . . . . . 2 Exhaust system check . . . . . . . . . . . . . . . . . . . . . . . . . . .See Chapter 1
General information . . . . . . . . . . . . . . . . . . . . . . . . . . . . . . . . . . . .\
. . 1
Positive crankcase ventilation system - checking and component
renewal . . . . . . . . . . . . . . . . . . . . . . . . . . . . . . . . . . . .\
. . . . . . . . . 5
Pulse-air system - checking and component renewal . . . . . . . . . . . 7
Underbonnet check for fluid leaks and hose condition . .See Chapter 1
4E•1
Specifications Contents
Easy, suitable for
novice with little
experience Fairly easy,
suitable
for beginner with
some experience Fairly difficult,
suitable for competent
DIY mechanic
Difficult,
suitable for
experienced DIY
mechanic Very difficult,
suitable for expert DIY
or professional
Degrees of difficulty
54321
1 General information
Exhaust system
The exhaust system is composed of an
exhaust manifold, the front downpipe and
catalytic converter (where fitted), and a main
section incorporating two silencers. The
service replacement exhaust system consists
of three sections: the front downpipe/catalytic
converter, the intermediate pipe and front
silencer, and the tailpipe and rear silencer.
The system is suspended throughout its entire
length by rubber mountings.
Emission control systems
To minimise pollution of the atmosphere
from incompletely-burned and evaporating
gases, and to maintain good driveability and fuel economy, a number of emissions control
systems are used on these vehicles. They
include the following:
a) The engine management system
(comprising both fuel and ignition sub-
systems) itself.
b) Positive Crankcase Ventilation (PCV) system.
c) Evaporative emissions control (EVAP) system.
d) Pulse-air (PAIR) system.
e) Catalytic converter. The operation of the systems is described
in the following paragraphs.
Positive crankcase ventilation system
The function of the crankcase ventilation
system is to reduce the emissions of
unburned hydrocarbons from the crankcase,
and to minimise the formation of oil sludge. By
ensuring that a depression is created in the
crankcase under most operating conditions,
particularly at idle, and by positively inducing fresh air into the system, the oil vapours and
“blow-by” gases collected in the crankcase
are drawn from the crankcase, through the air
cleaner or oil separator, into the inlet tract, to
be burned by the engine during normal
combustion.
On HCS engines, the system consists of a
vented oil filler cap (with an integral mesh
filter) and a hose connecting it to a connector
on the underside of the air cleaner housing. A
further hose leads from the adapter/filter to
the inlet manifold. Under conditions of idle
and part-load, the emissions gases are
directed into the inlet manifold, and dispensed
with in the combustion process. Additional air
is supplied through two small orifices next to
the mushroom valve in the air cleaner
housing, the object of which is to prevent high
vacuum build-up. Under full-load conditions,
when the inlet manifold vacuum is weak, the
mushroom valve opens, and the emissions
are directed through the air cleaner housing
procarmanuals.com
http://vnx.su
Page 199 of 296
16Using a suitable punch, tap the outer
bearing outer race at diametrically-opposed
points and remove the bearing assembly from
the spindle carrier. Do not allow the bearing to
tilt during its withdrawal from the housing, or it
will jam and possibly damage the surface of
the bore. Any burrs left in a bearing bore will
prevent the new bearing from seating
correctly.
17 Turn the spindle carrier over and remove
the inner bearing assembly in the same way.
18 Thoroughly clean the bearing bore and
hub, then secure the spindle carrier in the vice
in an upright position.
19 Draw the new outer bearing assembly into
the spindle carrier using a length of metal tube
of diameter slightly less than the outer race.
Do not apply any pressure to the inner race.
Alternatively, a long threaded rod or bolt, a nut
and large flat washers may be used to draw
the bearing into position (see illustration 3.7).
Once the bearing has been installed, take care
not to dislodge the inner race and seal.
20 Using the same method as for the outer
bearing, draw in the new inner bearing
assembly from the other side of the spindle
carrier. Again, take care not to dislodge the
inner race and seal once the bearing is in
position.
21 Using the same tooling arrangement as
before, and with the metal tube or washers
contacting the inner bearing inner race, draw
the hub fully into the bearings. Alternatively, if
a press is available, support the hub face
down on the press bed and using a metal tube
in contact with the inner bearing inner race,
press the spindle carrier onto the hub.
22 Check that the hub spins freely in the
bearings, then refit the spindle carrier as
described in Section 2.4 Front suspension strut -
removal and refitting
3
Removal
1 Chock the rear wheels then jack up the
front of the car and support it on axle stands
(see “Jacking and Vehicle Support” ). Remove
the appropriate front roadwheel.
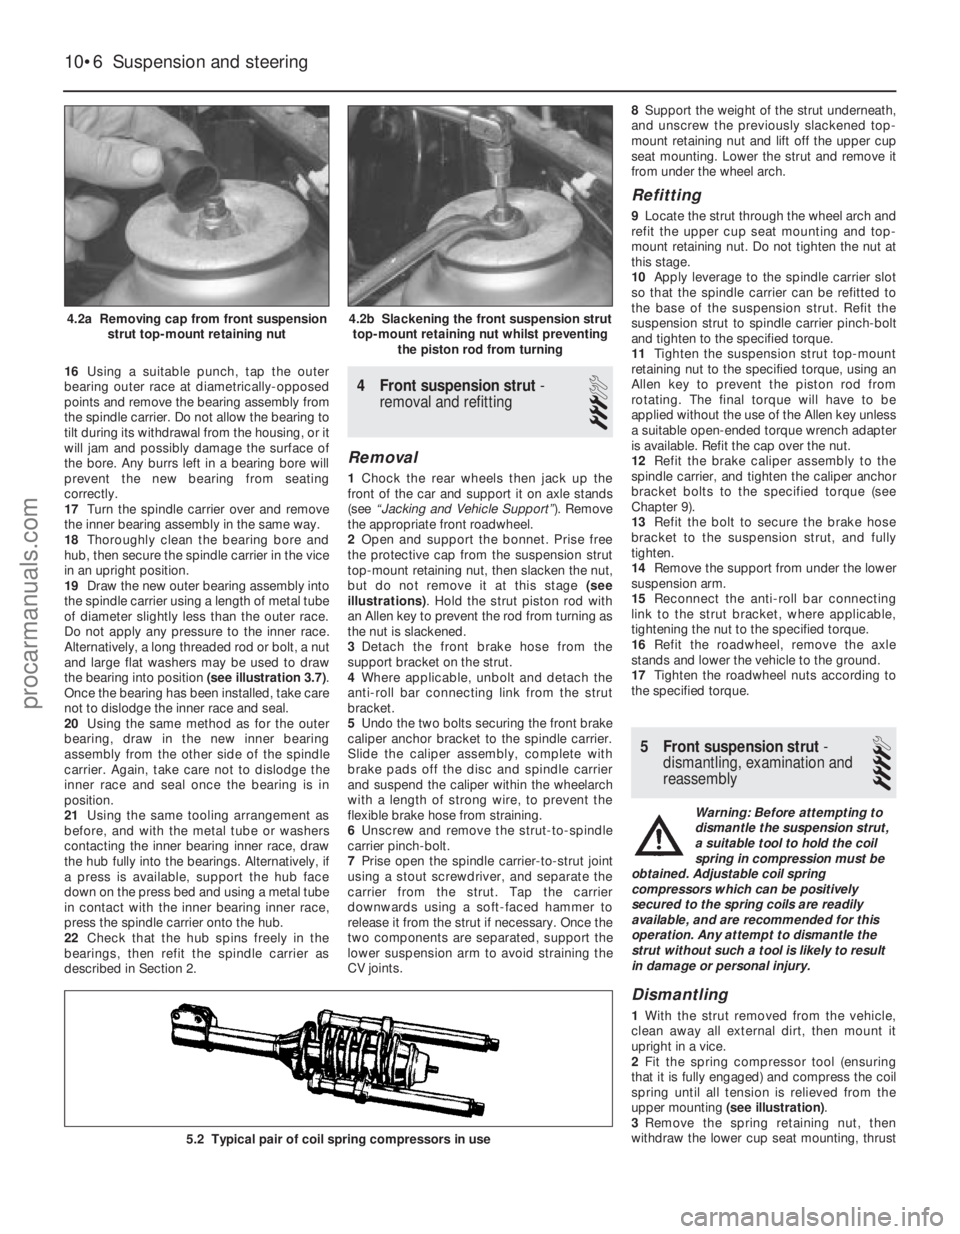
2 Open and support the bonnet. Prise free
the protective cap from the suspension strut
top-mount retaining nut, then slacken the nut,
but do not remove it at this stage (see
illustrations) . Hold the strut piston rod with
an Allen key to prevent the rod from turning as
the nut is slackened.
3 Detach the front brake hose from the
support bracket on the strut.
4 Where applicable, unbolt and detach the
anti-roll bar connecting link from the strut
bracket.
5 Undo the two bolts securing the front brake
caliper anchor bracket to the spindle carrier.
Slide the caliper assembly, complete with
brake pads off the disc and spindle carrier
and suspend the caliper within the wheelarch
with a length of strong wire, to prevent the
flexible brake hose from straining.
6 Unscrew and remove the strut-to-spindle
carrier pinch-bolt.
7 Prise open the spindle carrier-to-strut joint
using a stout screwdriver, and separate the
carrier from the strut. Tap the carrier
downwards using a soft-faced hammer to
release it from the strut if necessary. Once the
two components are separated, support the
lower suspension arm to avoid straining the
CV joints. 8
Support the weight of the strut underneath,
and unscrew the previously slackened top-
mount retaining nut and lift off the upper cup
seat mounting. Lower the strut and remove it
from under the wheel arch.
Refitting
9 Locate the strut through the wheel arch and
refit the upper cup seat mounting and top-
mount retaining nut. Do not tighten the nut at
this stage.
10 Apply leverage to the spindle carrier slot
so that the spindle carrier can be refitted to
the base of the suspension strut. Refit the
suspension strut to spindle carrier pinch-bolt
and tighten to the specified torque.
11 Tighten the suspension strut top-mount
retaining nut to the specified torque, using an
Allen key to prevent the piston rod from
rotating. The final torque will have to be
applied without the use of the Allen key unless
a suitable open-ended torque wrench adapter
is available. Refit the cap over the nut.
12 Refit the brake caliper assembly to the
spindle carrier, and tighten the caliper anchor
bracket bolts to the specified torque (see
Chapter 9).
13 Refit the bolt to secure the brake hose
bracket to the suspension strut, and fully
tighten.
14 Remove the support from under the lower
suspension arm.
15 Reconnect the anti-roll bar connecting
link to the strut bracket, where applicable,
tightening the nut to the specified torque.
16 Refit the roadwheel, remove the axle
stands and lower the vehicle to the ground.
17 Tighten the roadwheel nuts according to
the specified torque.
5 Front suspension strut -
dismantling, examination and
reassembly
4
Warning: Before attempting to
dismantle the suspension strut,
a suitable tool to hold the coil
spring in compression must be
obtained. Adjustable coil spring
compressors which can be positively
secured to the spring coils are readily
available, and are recommended for this
operation. Any attempt to dismantle the
strut without such a tool is likely to result
in damage or personal injury.
Dismantling
1 With the strut removed from the vehicle,
clean away all external dirt, then mount it
upright in a vice.
2 Fit the spring compressor tool (ensuring
that it is fully engaged) and compress the coil
spring until all tension is relieved from the
upper mounting (see illustration) .
3 Remove the spring retaining nut, then
withdraw the lower cup seat mounting, thrust
10•6 Suspension and steering
5.2 Typical pair of coil spring compressors in use
4.2b Slackening the front suspension strut
top-mount retaining nut whilst preventing the piston rod from turning4.2a Removing cap from front suspensionstrut top-mount retaining nut
1595Ford Fiesta Remakeprocarmanuals.com
http://vnx.su
Page 206 of 296
8Turn the steering wheel as necessary so
that one of the air bag module retaining bolts
becomes accessible from the rear of the
steering wheel. Undo the bolt, then turn
the steering wheel again until the second bolt
is accessible. Undo this bolt also.
9 Withdraw the air bag module from the
steering wheel far enough to access the
wiring multi-plug. Some force may be needed
to free the module from the additional steering
wheel spoke retainers.
10 Disconnect the multi-plug from the rear of
the module, and remove the module from the
vehicle. Warning: Position the air bag
module in a safe place, with the
mechanism facing downwards
as a precaution against
accidental operation.
11 Release the wiring harness from the side
of the steering column and disconnect the air
bag module wiring multi-plug (yellow lead).
12 Where applicable, undo the single screw
and withdraw the Passive Anti-Theft System
(PATS) transceiver from the ignition
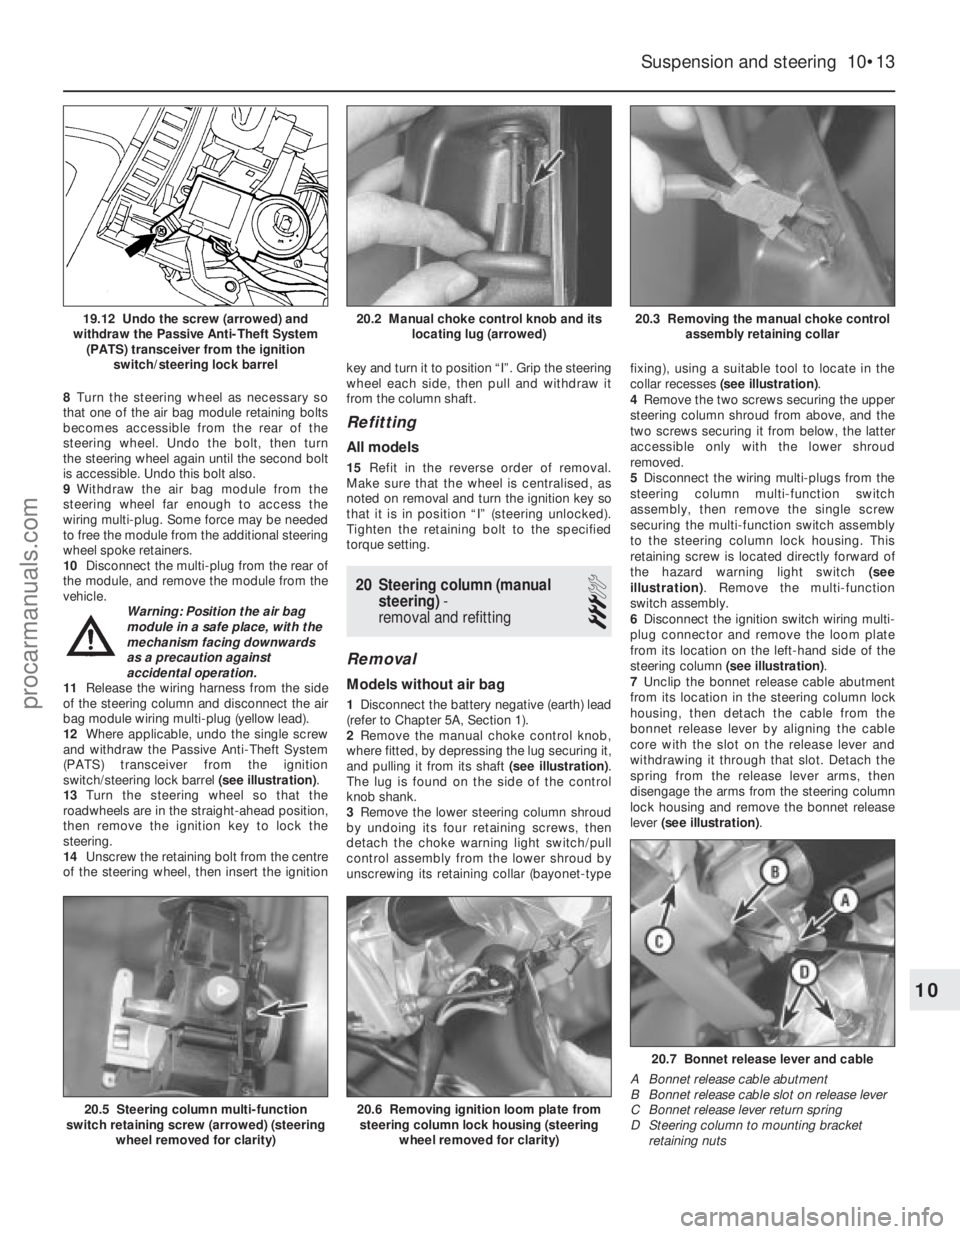
switch/steering lock barrel (see illustration).
13 Turn the steering wheel so that the
roadwheels are in the straight-ahead position,
then remove the ignition key to lock the
steering.
14 Unscrew the retaining bolt from the centre
of the steering wheel, then insert the ignition key and turn it to position “I”. Grip the steering
wheel each side, then pull and withdraw it
from the column shaft.
Refitting
All models
15
Refit in the reverse order of removal.
Make sure that the wheel is centralised, as
noted on removal and turn the ignition key so
that it is in position “I” (steering unlocked).
Tighten the retaining bolt to the specified
torque setting.
20 Steering column (manual steering) -
removal and refitting
3
Removal
Models without air bag
1 Disconnect the battery negative (earth) lead
(refer to Chapter 5A, Section 1).
2 Remove the manual choke control knob,
where fitted, by depressing the lug securing it,
and pulling it from its shaft (see illustration).
The lug is found on the side of the control
knob shank.
3 Remove the lower steering column shroud
by undoing its four retaining screws, then
detach the choke warning light switch/pull
control assembly from the lower shroud by
unscrewing its retaining collar (bayonet-type fixing), using a suitable tool to locate in the
collar recesses
(see illustration) .
4 Remove the two screws securing the upper
steering column shroud from above, and the
two screws securing it from below, the latter
accessible only with the lower shroud
removed.
5 Disconnect the wiring multi-plugs from the
steering column multi-function switch
assembly, then remove the single screw
securing the multi-function switch assembly
to the steering column lock housing. This
retaining screw is located directly forward of
the hazard warning light switch (see
illustration) . Remove the multi-function
switch assembly.
6 Disconnect the ignition switch wiring multi-
plug connector and remove the loom plate
from its location on the left-hand side of the
steering column (see illustration) .
7 Unclip the bonnet release cable abutment
from its location in the steering column lock
housing, then detach the cable from the
bonnet release lever by aligning the cable
core with the slot on the release lever and
withdrawing it through that slot. Detach the
spring from the release lever arms, then
disengage the arms from the steering column
lock housing and remove the bonnet release
lever (see illustration) .
Suspension and steering 10•13
20.3 Removing the manual choke control
assembly retaining collar20.2 Manual choke control knob and its locating lug (arrowed)19.12 Undo the screw (arrowed) and
withdraw the Passive Anti-Theft System (PATS) transceiver from the ignition switch/steering lock barrel
20.7 Bonnet release lever and cable
A Bonnet release cable abutment
B Bonnet release cable slot on release lever
C Bonnet release lever return spring
D Steering column to mounting bracket retaining nuts
20.6 Removing ignition loom plate fromsteering column lock housing (steering
wheel removed for clarity)20.5 Steering column multi-function
switch retaining screw (arrowed) (steering
wheel removed for clarity)
10
1595Ford Fiesta Remakeprocarmanuals.com
http://vnx.su
Page 207 of 296
8Remove the nuts securing the steering
column mounting bracket.
9 Remove the pinch-bolt securing the lower
steering shaft universal joint to the steering
rack pinion splined shaft, located at the rear of
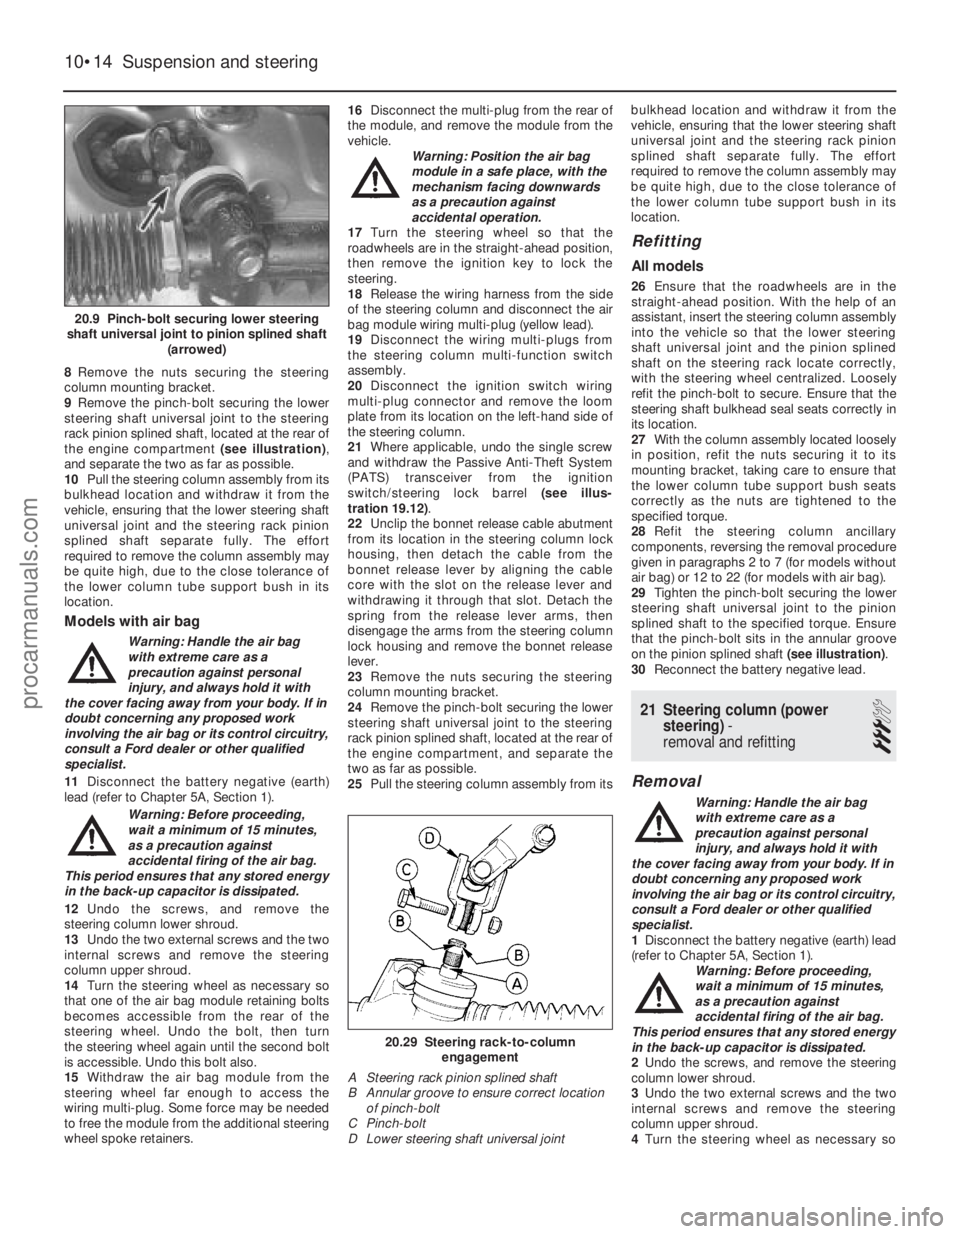
the engine compartment (see illustration),
and separate the two as far as possible.
10 Pull the steering column assembly from its
bulkhead location and withdraw it from the
vehicle, ensuring that the lower steering shaft
universal joint and the steering rack pinion
splined shaft separate fully. The effort
required to remove the column assembly may
be quite high, due to the close tolerance of
the lower column tube support bush in its
location.
Models with air bag
Warning: Handle the air bag
with extreme care as a
precaution against personal
injury, and always hold it with
the cover facing away from your body. If in
doubt concerning any proposed work
involving the air bag or its control circuitry,
consult a Ford dealer or other qualified
specialist.
11 Disconnect the battery negative (earth)
lead (refer to Chapter 5A, Section 1).
Warning: Before proceeding,
wait a minimum of 15 minutes,
as a precaution against
accidental firing of the air bag.
This period ensures that any stored energy
in the back-up capacitor is dissipated.
12 Undo the screws, and remove the
steering column lower shroud.
13 Undo the two external screws and the two
internal screws and remove the steering
column upper shroud.
14 Turn the steering wheel as necessary so
that one of the air bag module retaining bolts
becomes accessible from the rear of the
steering wheel. Undo the bolt, then turn
the steering wheel again until the second bolt
is accessible. Undo this bolt also.
15 Withdraw the air bag module from the
steering wheel far enough to access the
wiring multi-plug. Some force may be needed
to free the module from the additional steering
wheel spoke retainers. 16
Disconnect the multi-plug from the rear of
the module, and remove the module from the
vehicle. Warning: Position the air bag
module in a safe place, with the
mechanism facing downwards
as a precaution against
accidental operation.
17 Turn the steering wheel so that the
roadwheels are in the straight-ahead position,
then remove the ignition key to lock the
steering.
18 Release the wiring harness from the side
of the steering column and disconnect the air
bag module wiring multi-plug (yellow lead).
19 Disconnect the wiring multi-plugs from
the steering column multi-function switch
assembly.
20 Disconnect the ignition switch wiring
multi-plug connector and remove the loom
plate from its location on the left-hand side of
the steering column.
21 Where applicable, undo the single screw
and withdraw the Passive Anti-Theft System
(PATS) transceiver from the ignition
switch/steering lock barrel (see illus-
tration 19.12) .
22 Unclip the bonnet release cable abutment
from its location in the steering column lock
housing, then detach the cable from the
bonnet release lever by aligning the cable
core with the slot on the release lever and
withdrawing it through that slot. Detach the
spring from the release lever arms, then
disengage the arms from the steering column
lock housing and remove the bonnet release
lever.
23 Remove the nuts securing the steering
column mounting bracket.
24 Remove the pinch-bolt securing the lower
steering shaft universal joint to the steering
rack pinion splined shaft, located at the rear of
the engine compartment, and separate the
two as far as possible.
25 Pull the steering column assembly from its bulkhead location and withdraw it from the
vehicle, ensuring that the lower steering shaft
universal joint and the steering rack pinion
splined shaft separate fully. The effort
required to remove the column assembly may
be quite high, due to the close tolerance of
the lower column tube support bush in its
location.
Refitting
All models
26
Ensure that the roadwheels are in the
straight-ahead position. With the help of an
assistant, insert the steering column assembly
into the vehicle so that the lower steering
shaft universal joint and the pinion splined
shaft on the steering rack locate correctly,
with the steering wheel centralized. Loosely
refit the pinch-bolt to secure. Ensure that the
steering shaft bulkhead seal seats correctly in
its location.
27 With the column assembly located loosely
in position, refit the nuts securing it to its
mounting bracket, taking care to ensure that
the lower column tube support bush seats
correctly as the nuts are tightened to the
specified torque.
28 Refit the steering column ancillary
components, reversing the removal procedure
given in paragraphs 2 to 7 (for models without
air bag) or 12 to 22 (for models with air bag).
29 Tighten the pinch-bolt securing the lower
steering shaft universal joint to the pinion
splined shaft to the specified torque. Ensure
that the pinch-bolt sits in the annular groove
on the pinion splined shaft (see illustration).
30 Reconnect the battery negative lead.
21 Steering column (power
steering) -
removal and refitting
3
Removal
Warning: Handle the air bag
with extreme care as a
precaution against personal
injury, and always hold it with
the cover facing away from your body. If in
doubt concerning any proposed work
involving the air bag or its control circuitry,
consult a Ford dealer or other qualified
specialist.
1 Disconnect the battery negative (earth) lead
(refer to Chapter 5A, Section 1). Warning: Before proceeding,
wait a minimum of 15 minutes,
as a precaution against
accidental firing of the air bag.
This period ensures that any stored energy
in the back-up capacitor is dissipated.
2 Undo the screws, and remove the steering
column lower shroud.
3 Undo the two external screws and the two
internal screws and remove the steering
column upper shroud.
4 Turn the steering wheel as necessary so
10•14 Suspension and steering
20.29 Steering rack-to-column
engagement
A Steering rack pinion splined shaft
B Annular groove to ensure correct location of pinch-bolt
C Pinch-bolt
D Lower steering shaft universal joint
20.9 Pinch-bolt securing lower steering
shaft universal joint to pinion splined shaft (arrowed)
1595Ford Fiesta Remakeprocarmanuals.com
http://vnx.su
Page 208 of 296
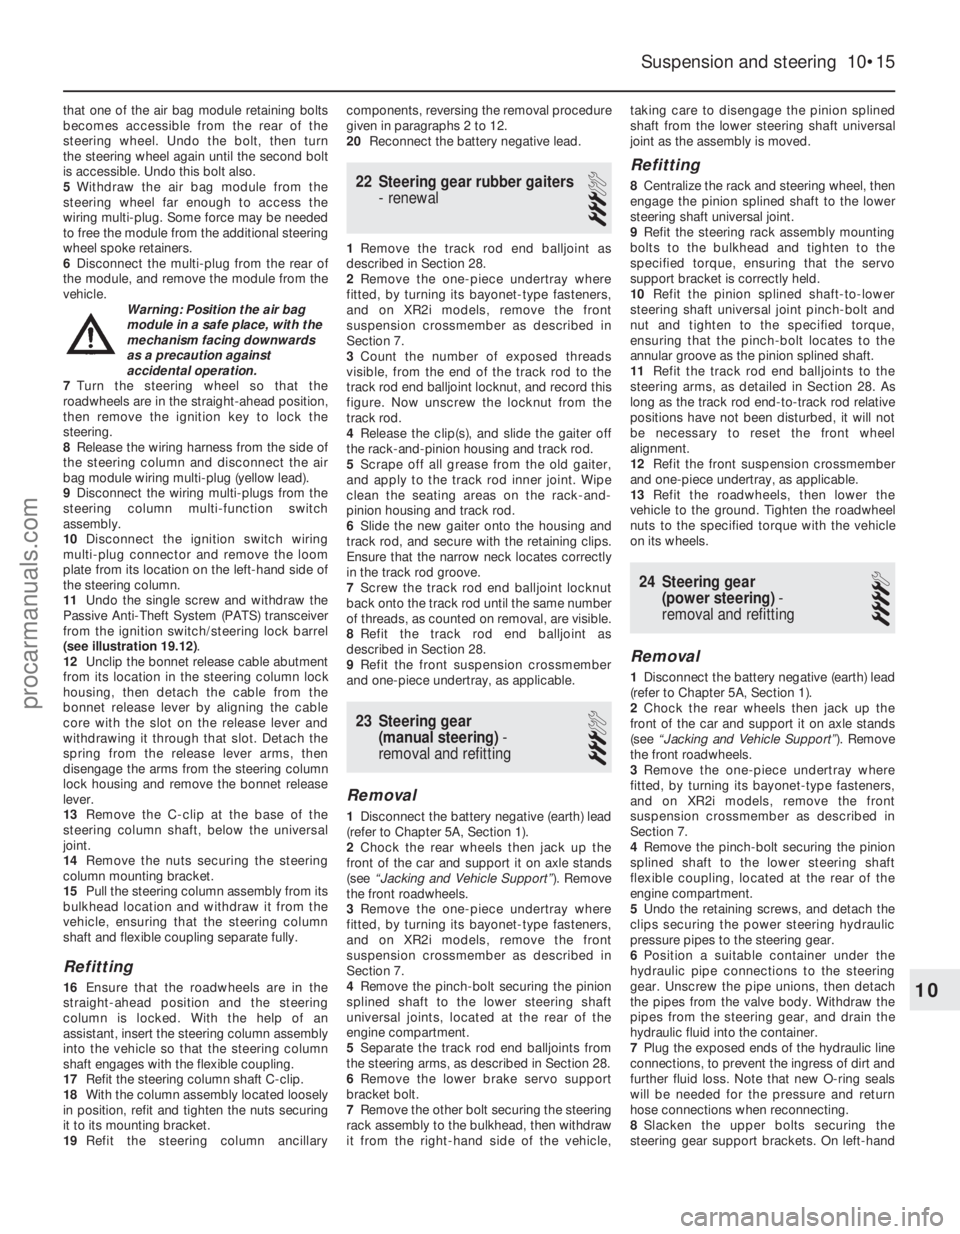
that one of the air bag module retaining bolts
becomes accessible from the rear of the
steering wheel. Undo the bolt, then turn
the steering wheel again until the second bolt
is accessible. Undo this bolt also.
5Withdraw the air bag module from the
steering wheel far enough to access the
wiring multi-plug. Some force may be needed
to free the module from the additional steering
wheel spoke retainers.
6 Disconnect the multi-plug from the rear of
the module, and remove the module from the
vehicle. Warning: Position the air bag
module in a safe place, with the
mechanism facing downwards
as a precaution against
accidental operation.
7 Turn the steering wheel so that the
roadwheels are in the straight-ahead position,
then remove the ignition key to lock the
steering.
8 Release the wiring harness from the side of
the steering column and disconnect the air
bag module wiring multi-plug (yellow lead).
9 Disconnect the wiring multi-plugs from the
steering column multi-function switch
assembly.
10 Disconnect the ignition switch wiring
multi-plug connector and remove the loom
plate from its location on the left-hand side of
the steering column.
11 Undo the single screw and withdraw the
Passive Anti-Theft System (PATS) transceiver
from the ignition switch/steering lock barrel
(see illustration 19.12) .
12 Unclip the bonnet release cable abutment
from its location in the steering column lock
housing, then detach the cable from the
bonnet release lever by aligning the cable
core with the slot on the release lever and
withdrawing it through that slot. Detach the
spring from the release lever arms, then
disengage the arms from the steering column
lock housing and remove the bonnet release
lever.
13 Remove the C-clip at the base of the
steering column shaft, below the universal
joint.
14 Remove the nuts securing the steering
column mounting bracket.
15 Pull the steering column assembly from its
bulkhead location and withdraw it from the
vehicle, ensuring that the steering column
shaft and flexible coupling separate fully.
Refitting
16 Ensure that the roadwheels are in the
straight-ahead position and the steering
column is locked. With the help of an
assistant, insert the steering column assembly
into the vehicle so that the steering column
shaft engages with the flexible coupling.
17 Refit the steering column shaft C-clip.
18 With the column assembly located loosely
in position, refit and tighten the nuts securing
it to its mounting bracket.
19 Refit the steering column ancillary components, reversing the removal procedure
given in paragraphs 2 to 12.
20
Reconnect the battery negative lead.
22 Steering gear rubber gaiters
- renewal
3
1Remove the track rod end balljoint as
described in Section 28.
2 Remove the one-piece undertray where
fitted, by turning its bayonet-type fasteners,
and on XR2i models, remove the front
suspension crossmember as described in
Section 7.
3 Count the number of exposed threads
visible, from the end of the track rod to the
track rod end balljoint locknut, and record this
figure. Now unscrew the locknut from the
track rod.
4 Release the clip(s), and slide the gaiter off
the rack-and-pinion housing and track rod.
5 Scrape off all grease from the old gaiter,
and apply to the track rod inner joint. Wipe
clean the seating areas on the rack-and-
pinion housing and track rod.
6 Slide the new gaiter onto the housing and
track rod, and secure with the retaining clips.
Ensure that the narrow neck locates correctly
in the track rod groove.
7 Screw the track rod end balljoint locknut
back onto the track rod until the same number
of threads, as counted on removal, are visible.
8 Refit the track rod end balljoint as
described in Section 28.
9 Refit the front suspension crossmember
and one-piece undertray, as applicable.
23 Steering gear (manual steering) -
removal and refitting
3
Removal
1 Disconnect the battery negative (earth) lead
(refer to Chapter 5A, Section 1).
2 Chock the rear wheels then jack up the
front of the car and support it on axle stands
(see “Jacking and Vehicle Support” ). Remove
the front roadwheels.
3 Remove the one-piece undertray where
fitted, by turning its bayonet-type fasteners,
and on XR2i models, remove the front
suspension crossmember as described in
Section 7.
4 Remove the pinch-bolt securing the pinion
splined shaft to the lower steering shaft
universal joints, located at the rear of the
engine compartment.
5 Separate the track rod end balljoints from
the steering arms, as described in Section 28.
6 Remove the lower brake servo support
bracket bolt.
7 Remove the other bolt securing the steering
rack assembly to the bulkhead, then withdraw
it from the right-hand side of the vehicle, taking care to disengage the pinion splined
shaft from the lower steering shaft universal
joint as the assembly is moved.
Refitting
8
Centralize the rack and steering wheel, then
engage the pinion splined shaft to the lower
steering shaft universal joint.
9 Refit the steering rack assembly mounting
bolts to the bulkhead and tighten to the
specified torque, ensuring that the servo
support bracket is correctly held.
10 Refit the pinion splined shaft-to-lower
steering shaft universal joint pinch-bolt and
nut and tighten to the specified torque,
ensuring that the pinch-bolt locates to the
annular groove as the pinion splined shaft.
11 Refit the track rod end balljoints to the
steering arms, as detailed in Section 28. As
long as the track rod end-to-track rod relative
positions have not been disturbed, it will not
be necessary to reset the front wheel
alignment.
12 Refit the front suspension crossmember
and one-piece undertray, as applicable.
13 Refit the roadwheels, then lower the
vehicle to the ground. Tighten the roadwheel
nuts to the specified torque with the vehicle
on its wheels.
24 Steering gear (power steering) -
removal and refitting
4
Removal
1 Disconnect the battery negative (earth) lead
(refer to Chapter 5A, Section 1).
2 Chock the rear wheels then jack up the
front of the car and support it on axle stands
(see “Jacking and Vehicle Support” ). Remove
the front roadwheels.
3 Remove the one-piece undertray where
fitted, by turning its bayonet-type fasteners,
and on XR2i models, remove the front
suspension crossmember as described in
Section 7.
4 Remove the pinch-bolt securing the pinion
splined shaft to the lower steering shaft
flexible coupling, located at the rear of the
engine compartment.
5 Undo the retaining screws, and detach the
clips securing the power steering hydraulic
pressure pipes to the steering gear.
6 Position a suitable container under the
hydraulic pipe connections to the steering
gear. Unscrew the pipe unions, then detach
the pipes from the valve body. Withdraw the
pipes from the steering gear, and drain the
hydraulic fluid into the container.
7 Plug the exposed ends of the hydraulic line
connections, to prevent the ingress of dirt and
further fluid loss. Note that new O-ring seals
will be needed for the pressure and return
hose connections when reconnecting.
8 Slacken the upper bolts securing the
steering gear support brackets. On left-hand
Suspension and steering 10•15
10
1595Ford Fiesta Remakeprocarmanuals.com
http://vnx.su
Page 210 of 296
Refitting
All models
38Refitting is a reversal of removal, bearing
in mind the following points:
a) Tighten all nuts and bolts to the specified torque. Remove the plugs from the
disconnected pipes, hoses and unions
and ensure that the pipes are located
correctly so that they do not foul any
surrounding components.
b) Refit the auxiliary drivebelt as described in
Chapter 1.
c) Where drained, refill the cooling system as described in Chapter 1.
d) Refit or reconnect any additional
components removed for access as
described in the relevant Sections and
Chapters of this manual.
e) On completion, bleed the power steering
hydraulic system as described in Section
27. Check for any signs of fluid leakage
from the system hoses and connections.
26 Power steering fluid cooler -
removal and refitting
2
Removal
1 Disconnect the battery negative (earth) lead
(refer to Chapter 5A, Section 1).
2 Position a suitable container beneath the
power steering fluid cooler hose connections,
then disconnect the hoses at the quick-fit
couplings on the fluid cooler. Allow the fluid to
drain from the hose and reservoir into the
container.
3 Plug the exposed ends of the hose and the
reservoir, to prevent the ingress of dirt and
excessive fluid loss.
4 Refer to Chapter 11 and remove the bonnet
lock assembly and the front bumper.
5 Undo the bolts securing the cooler side
support bracket and the bonnet lock stay, and
remove the fluid cooler and bonnet lock stay
as an assembly.
6 Undo the two bolts and remove the stay
from the fluid cooler.
Refitting
7 Refitting is a reversal of removal. On
completion, bleed the power steering
hydraulic system as described in Section 27.
27 Power steering hydraulic system - bleeding
2
1Following any operation in which the power
steering fluid lines have been disconnected,
the power steering system must be bled to
remove any trapped air.
2 With the front wheel in the straight-ahead
position, check the power steering fluid level
in the reservoir and, if low, top-up with fresh fluid to the “MAX” or “MAX COLD” level mark.
Pour the fluid slowly to prevent air bubbles
forming, and use only the specified fluid (refer
to
“Lubricants, fluids and tyre pressures” ).
3 Start the engine and allow it to idle. Check
the hoses and connections for leaks.
4 Stop the engine and recheck the fluid level.
Add more, if necessary, up to the “MAX” or
“MAX COLD” level mark.
5 Start the engine again, allow it to idle, then
bleed the system by slowly moving the
steering from lock-to-lock several times. This
should purge the system of all internal air.
However, if air remains in the system
(indicated by the steering operation being very
noisy), leave the vehicle overnight and repeat
the procedure again the next day.
6 If air still remains in the system, it may be
necessary to resort to the Ford method of
bleeding, which uses a vacuum pump and a
modified reservoir filler cap to which the pump
can be connected. Turn the steering to the
right until it is near the stop, then fit the
vacuum pump to the fluid reservoir, and apply
0.51 bars of vacuum. Maintain the vacuum for
a minimum of 5 minutes, then repeat
the procedure with the steering turned to the
left.
7 Keep the fluid level topped-up throughout
the bleeding procedure; note that the fluid
temperature increases, the level will rise.
8 On completion, switch the engine off, and
return the wheels to the straight-ahead
position.
28 Track rod end balljoint -
removal and refitting
2
Removal
1 Chock the rear wheels then jack up the
front of the car and support it on axle stands
(see “Jacking and Vehicle Support” ). Remove
the appropriate front roadwheel.
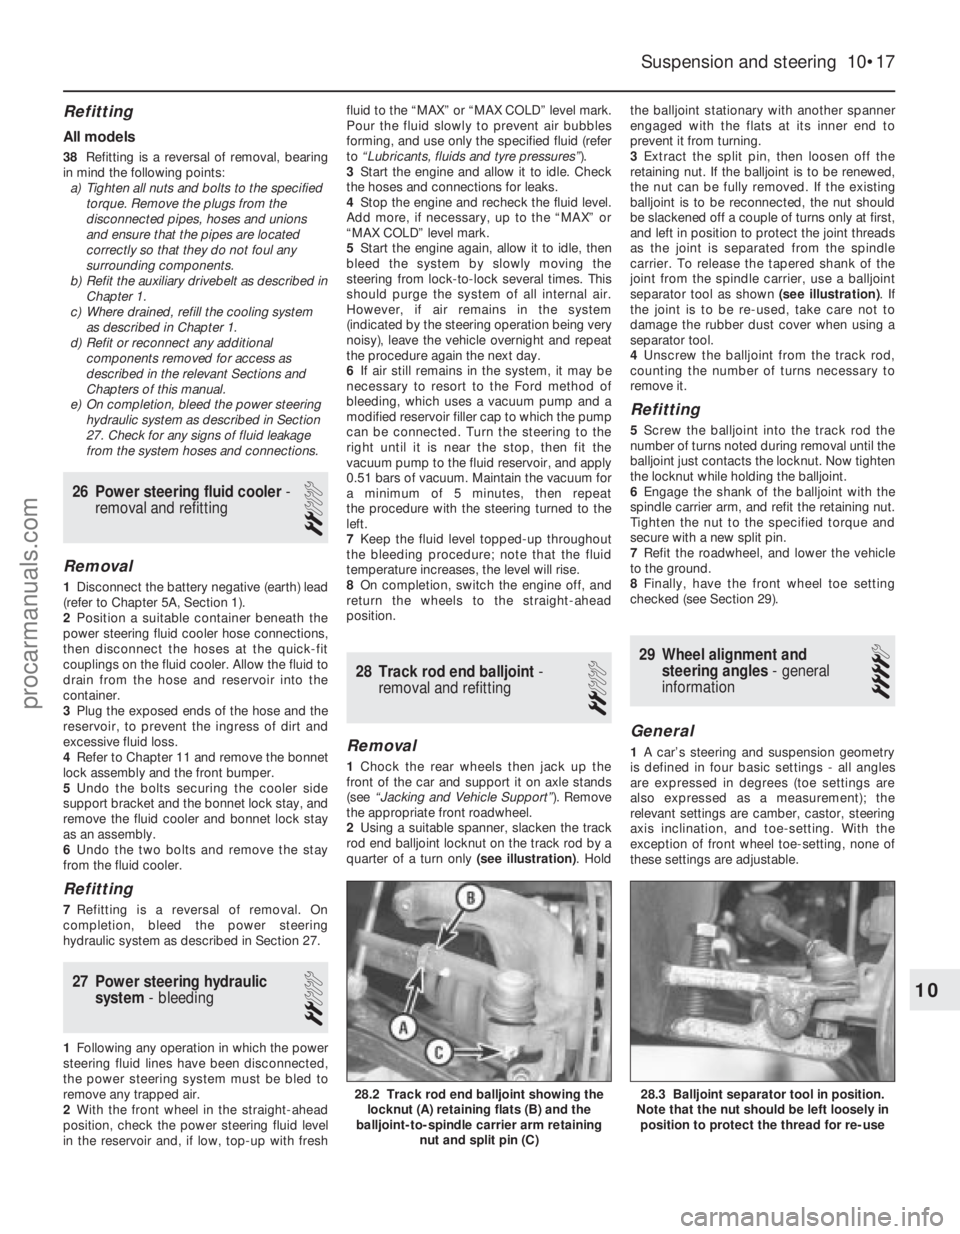
2 Using a suitable spanner, slacken the track
rod end balljoint locknut on the track rod by a
quarter of a turn only (see illustration). Holdthe balljoint stationary with another spanner
engaged with the flats at its inner end to
prevent it from turning.
3
Extract the split pin, then loosen off the
retaining nut. If the balljoint is to be renewed,
the nut can be fully removed. If the existing
balljoint is to be reconnected, the nut should
be slackened off a couple of turns only at first,
and left in position to protect the joint threads
as the joint is separated from the spindle
carrier. To release the tapered shank of the
joint from the spindle carrier, use a balljoint
separator tool as shown (see illustration). If
the joint is to be re-used, take care not to
damage the rubber dust cover when using a
separator tool.
4 Unscrew the balljoint from the track rod,
counting the number of turns necessary to
remove it.
Refitting
5 Screw the balljoint into the track rod the
number of turns noted during removal until the
balljoint just contacts the locknut. Now tighten
the locknut while holding the balljoint.
6 Engage the shank of the balljoint with the
spindle carrier arm, and refit the retaining nut.
Tighten the nut to the specified torque and
secure with a new split pin.
7 Refit the roadwheel, and lower the vehicle
to the ground.
8 Finally, have the front wheel toe setting
checked (see Section 29).
29 Wheel alignment and steering angles - general
information
4
General
1 A car’s steering and suspension geometry
is defined in four basic settings - all angles
are expressed in degrees (toe settings are
also expressed as a measurement); the
relevant settings are camber, castor, steering
axis inclination, and toe-setting. With the
exception of front wheel toe-setting, none of
these settings are adjustable.
Suspension and steering 10•17
28.3 Balljoint separator tool in position.
Note that the nut should be left loosely in position to protect the thread for re-use28.2 Track rod end balljoint showing the locknut (A) retaining flats (B) and the
balljoint-to-spindle carrier arm retaining
nut and split pin (C)
10
1595Ford Fiesta Remakeprocarmanuals.com
http://vnx.su
Page 212 of 296
11
1595Ford Fiesta Remake
Torque wrench settingsNmlbf ft
Front seat slide mechanism-to-floor mounting bolts . . . . . . . . . . . . . . . 25 to 32 18 to 24
Rear seat backrest hinge to backrest . . . . . . . . . . . . . . . . . . . . . . . . . . . 3.7 to 4.6 2.7 to 3.4
Rear seat backrest hinge to body . . . . . . . . . . . . . . . . . . . . . . . . . . . . . 21 to 25 15 to 18
Rear seat belt anchors and stalks to body . . . . . . . . . . . . . . . . . . . . . . . 25 to 45 18 to 34
Rear seat belt retractor assembly to body . . . . . . . . . . . . . . . . . . . . . . . 25 to 45 18 to 34
Front seat belt stalks to floorpan . . . . . . . . . . . . . . . . . . . . . . . . . . . . . . 25 to 45 18 to 34
Front seat belt lower anchor bolt to body . . . . . . . . . . . . . . . . . . . . . . . 25 to 45 18 to 34
Front seat belt lower anchor slide bar bolt to body . . . . . . . . . . . . . . . . 25 to 45 18 to 34
Front seat belt retractor to B-pillar bolt . . . . . . . . . . . . . . . . . . . . . . . . . 25 to 45 18 to 34
Front seat belt upper anchor bolt to B-pillar (non-adjustable type) . . . . 25 to 45 18 to 34
Front seat belt upper anchor adjuster plate-to-B-pillar bolts . . . . . . . . . 19 to 28 14 to 22
Front seat belt upper anchor bolt to adjuster slide . . . . . . . . . . . . . . . . 25 to 45 18 to 34
Bonnet hinge-to-bonnet bolts . . . . . . . . . . . . . . . . . . . . . . . . . . . . . . . . 8.5 to 12 6.5 to 9
Bonnet latch retaining bolts . . . . . . . . . . . . . . . . . . . . . . . . . . . . . . . . . . 8 to 12 6 to 9
Tailgate hinge-to-tailgate bolts . . . . . . . . . . . . . . . . . . . . . . . . . . . . . . . . 8.5 to 12 6.5 to 9
Tailgate latch retaining bolts . . . . . . . . . . . . . . . . . . . . . . . . . . . . . . . . . . 8 to 12 6 to 9
Rear door lower hinge cap bolts . . . . . . . . . . . . . . . . . . . . . . . . . . . . . . 8.5 to 12 6.5 to 9
Rear door latch retaining bolts . . . . . . . . . . . . . . . . . . . . . . . . . . . . . . . . 8.5 to 12 6.5 to 9
Front and rear bumper retaining nuts . . . . . . . . . . . . . . . . . . . . . . . . . . . 8 to 12 6 to 9
Chapter 11
Bodywork and fittings
Body adhesive emblems - renewal . . . . . . . . . . . . . . . . . . . . . . . . . . 9
Body trim mouldings - removal and refitting . . . . . . . . . . . . . . . . . . . 10
Bodywork, paint and exterior trim check . . . . . . . . . . . .See Chapter 1
Bonnet - removal, refitting and adjustment . . . . . . . . . . . . . . . . . . . . 6
Bonnet latch - adjustment . . . . . . . . . . . . . . . . . . . . . . . . . . . . . . . . . 8
Bonnet release mechanism - removal and refitting . . . . . . . . . . . . . 7
Bumper and rear quarter mouldings - renewal . . . . . . . . . . . . . . . . . 17
Bumpers - removal and refitting . . . . . . . . . . . . . . . . . . . . . . . . . . . . 16
Centre console - removal and refitting . . . . . . . . . . . . . . . . . . . . . . . 45
Door aperture weatherstrip - removal and refitting . . . . . . . . . . . . . . 11
Door window glass - removal and refitting . . . . . . . . . . . . . . . . . . . . 32
Door window regulator - removal and refitting . . . . . . . . . . . . . . . . . 31
Door, tailgate and bonnet check and lubrication . . . . . .See Chapter 1
Exterior mirror and glass - removal and refitting . . . . . . . . . . . . . . . . 18
Facia - removal and refitting . . . . . . . . . . . . . . . . . . . . . . . . . . . . . . . 46
Front seat and slide assembly - removal and refitting . . . . . . . . . . . 39
Full-length sunroof - general information . . . . . . . . . . . . . . . . . . . . . 38
General information . . . . . . . . . . . . . . . . . . . . . . . . . . . . . . . . . . . .\
. . 1
Interior mirror - removal and refitting . . . . . . . . . . . . . . . . . . . . . . . . 19
Interior trim panels - removal and refitting . . . . . . . . . . . . . . . . . . . . 42
Maintenance - bodywork and underframe . . . . . . . . . . . . . . . . . . . . 2
Maintenance - upholstery and carpets . . . . . . . . . . . . . . . . . . . . . . . 3
Major body damage - repair . . . . . . . . . . . . . . . . . . . . . . . . . . . . . . . 5
Minor body damage - repair . . . . . . . . . . . . . . . . . . . . . . . . . . . . . . . 4
Parcel shelf support/loudspeaker housing - removal and refitting . . 43 Passenger grab handle - removal and refitting . . . . . . . . . . . . . . . . . 44
Rear door inner trim panels (Courier models) - removal and refitting . . 29
Rear door lock, catches and handles (Courier models) -
removal and refitting . . . . . . . . . . . . . . . . . . . . . . . . . . . . . . . . . . . 30
Rear doors (Courier models) - removal and refitting . . . . . . . . . . . . . 28
Rear seat - removal and refitting . . . . . . . . . . . . . . . . . . . . . . . . . . . . 40
Seat belt check . . . . . . . . . . . . . . . . . . . . . . . . . . . . . . . .See Chap\
ter 1
Seat belts - removal and refitting . . . . . . . . . . . . . . . . . . . . . . . . . . . 41
Side door inner trim panel - removal and refitting . . . . . . . . . . .\
. . . . 21
Side door lock, lock cylinder and handles - removal and refitting . . 22
Side doors - removal and refitting . . . . . . . . . . . . . . . . . . . . . . . . . . . 20
Side window glass - removal and refitting . . . . . . . . . . . . . . . . . . . . 33
Sill extension moulding - removal and refitting . . . . . . . . . . . . . . . . . 12
Sunroof panel - removal and refitting . . . . . . . . . . . . . . . . . . . . . . . . 35
Sunroof panel seal - renewal . . . . . . . . . . . . . . . . . . . . . . . . . . . . . . . 36
Sunroof weatherseal - removal and refitting . . . . . . . . . . . . . . . . . . . 37
Tailgate - removal and refitting . . . . . . . . . . . . . . . . . . . . . . . . . . . . . 24
Tailgate inner trim panel - removal and refitting . . . . . . . . . . . . . . . . 26
Tailgate lock components - removal and refitting . . . . . . . . . . . . . . . 27
Tailgate spoiler - removal and refitting . . . . . . . . . . . . . . . . . . . . . . . 25
Tailgate support strut - removal and refitting . . . . . . . . . . . . . . . . . . 23
Wheelarch liners - removal and refitting . . . . . . . . . . . . . . . . . . . . . . 13
Wheelarch mouldings - removal and refitting . . . . . . . . . . . . . . . . . . 14
Wind deflector/radiator grille slat - removal and refitting . . . . . . . . . 15
Windscreen and tailgate window glass - removal and refitting . . . . 34
11•1
Specifications Contents
Easy, suitable for
novice with little
experience Fairly easy,
suitable
for beginner with
some experience Fairly difficult,
suitable for competent
DIY mechanic
Difficult,
suitable for
experienced DIY
mechanic Very difficult,
suitable for expert DIY
or professional
Degrees of difficulty
54321
procarmanuals.com
http://vnx.su
Page 215 of 296

7.3a Removing the bonnet release latch
15 minutes after spraying on the final coat of
paint.Allow the new paint at least two weeks to
harden, then, using a paintwork renovator, or
a very fine cutting paste, blend the edges of
the paint into the existing paintwork. Finally,
apply wax polish.
Plastic components
With the use of more and more plastic body
components by the vehicle manufacturers (eg
bumpers. spoilers, and in some cases major
body panels), rectification of more serious
damage to such items has become a matter
of either entrusting repair work to a specialist
in this field, or renewing complete
components. Repair of such damage by the
DIY owner is not really feasible, owing to the
cost of the equipment and materials required
for effecting such repairs. The basic technique
involves making a groove along the line of the
crack in the plastic, using a rotary burr in a
power drill. The damaged part is then welded
back together, using a hot-air gun to heat up
and fuse a plastic filler rod into the groove.
Any excess plastic is then removed, and the
area rubbed down to a smooth finish. It is
important that a filler rod of the correct plastic
is used, as body components can be made of
a variety of different types (eg polycarbonate,
ABS, polypropylene). Damage of a less serious nature (abrasions,
minor cracks etc) can be repaired by the DIY
owner using a two-part epoxy filler repair
material. Once mixed in equal proportions,
this is used in similar fashion to the bodywork
filler used on metal panels. The filler is usually
cured in twenty to thirty minutes, ready for
sanding and painting. If the owner is renewing a complete
component himself, or if he has repaired it
with epoxy filler, he will be left with the
problem of finding a suitable paint for finishing
which is compatible with the type of plastic
used. At one time, the use of a universal paint
was not possible, owing to the complex range
of plastics encountered in body component
applications. Standard paints, generally
speaking, will not bond to plastic or rubber
satisfactorily. However, it is now possible to
obtain a plastic body parts finishing kit which
consists of a pre-primer treatment, a primer and coloured top coat. Full instructions are
normally supplied with a kit, but basically, the
method of use is to first apply the pre-primer
to the component concerned, and allow it to
dry for up to 30 minutes. Then the primer is
applied, and left to dry for about an hour
before finally applying the special-coloured
top coat. The result is a correctly-coloured
component, where the paint will flex with the
plastic or rubber, a property that standard
paint does not normally possess.
5 Major body damage
-
repair
5
Where serious damage has occurred, or
large areas need renewal due to neglect, it
means that complete new panels will need
welding-in, and this is best left to
professionals. If the damage is due to impact,
it will also be necessary to check completely
the alignment of the bodyshell, and this can
only be carried out accurately by a Ford
dealer, using special jigs. If the body is left
misaligned, it is primarily dangerous, as the
car will not handle properly; secondly, uneven
stresses will be imposed on the steering,
suspension and possibly transmission,
causing abnormal wear, or complete failure,
particularly to such items as the tyres.
6 Bonnet - removal,
refitting and adjustment
1
Removal
1 Raise the bonnet and support it on its stay.
2 Using a felt tip marker pen or similar, mark
around the hinge positions on the bonnet.
3 Cut the windscreen washer jet hose in the
engine compartment, or release it from its one-
way valve (if already fitted), then release the hose
from the bonnet hinge clip (see illustration).
4 With the aid of an assistant, support the
bonnet assembly and remove the four bolts
securing it to its hinges. Remove the bonnet
assembly, taking care to disengage the stay
before the bonnet is moved.
Refitting and adjustment
5 To refit, first align the marks made on the
bonnet with the hinges, then refit and fully
tighten the four securing bolts. Support the
bonnet on its stay.
6 Refit the windscreen washer jet hose into
the bonnet hinge clip, and join it up using a
one-way (non-return) valve, having ensured
correct routing. Ensure that the valve is
installed the correct way round, allowing flow
to the jets but resisting return flow back to the
reservoir.
7 Close the bonnet and ensure that there is
an equal gap at each side, between the
bonnet and the wings, and that it sits flush in
relation to its surrounding panels.
8 The bonnet should close smoothly and
positively with no excessive pressure being
applied. If this is not the case, adjustment will
be necessary.
9 To adjust the bonnet closure, adjustable
bump stops are fitted to the closure panel
(see illustration) . These may be raised or
lowered by screwing in or out, as necessary.
The bonnet latch may also be adjusted, as
required, and this is covered in Section 8 of
this Chapter.
7 Bonnet release mechanism - removal and refitting
1
Removal
1Remove the screws securing the lower
steering column shroud to its location and,
where applicable, detach the choke warning
light switch/pull control assembly, from it.
2 Operate the bonnet release lever then raise
and support the bonnet. If the release cable is
broken, it will be necessary to detach the
latch from its body location by undoing the
three latch retaining screws through the gap
between the leading edge of the bonnet and
the radiator grille slot.
3 With the bonnet open, remove the three
screws securing the latch to the body.
Disengage the release cable from the latch
(see illustrations) .
11•4 Bodywork and fittings
6.9 Altering the setting of a bonnet closure
bump stop
6.3 Windscreen washer jet hose in enginecompartment
A Hose located to bonnet hinge clip
B Position of cut
1595Ford Fiesta Remakeprocarmanuals.com
http://vnx.su
Page 216 of 296
4Pull the latch end of the cable into the
engine compartment, noting cable routing and
clips fitted. Remove the cable from its clips.
5 Detach the cable from its release lever on
the steering column, by aligning the cable
core with the slot on the release lever and
withdrawing the end fixing. Detach the cable
from its outer core abutment on the steering
column lock housing.
6 Unclip the cable from its pedal box
location, then detach the bulkhead grommet
and pass the cable through into the engine
compartment. Withdraw the cable from the
vehicle.
7 The release lever on the steering column
may be removed, if required, by unhooking
the spring from its retaining arms, then
disengaging its retaining arms from the
steering column lock housing.
Refitting
8 Refit the release lever, if removed, by
reversing the method of removal.
9 To install the release cable, first pass the
latch end of the cable down the right-hand
side of the steering column, through its
bulkhead location, and out into the engine
compartment.
10 Fit the cable to its clip on the pedal box
assembly, then reconnect the cable to the
release lever and the steering column lock
housing abutment by reversing the method of
removal.
11 Where applicable, refit the choke warning
light switch/pull control assembly, to the lower steering column shroud, by reversing the
method of removal. Refit the shroud.
12
Seat the release cable grommet into the
bulkhead.
13 Route and secure the release cable in the
engine compartment.
14 Reconnect the release cable to the latch,
then refit the latch to the body, setting the
latch at its maximum height position, and
tightening only the bottom retaining screw.
15 Adjust the latch for flush bonnet closure in
accordance with Section 8.
8 Bonnet latch - adjustment
1
1To adjust the bonnet latch, remove the two
upper latch retaining screws, then with the
latch raised to its maximum height position
and secured with the lower retaining screw,
close the bonnet.
2 Slacken the lower latch retaining screw,
through the gap between the leading edge of
the bonnet and the radiator grille slot, then
set the bonnet so it sits flush with its
surrounding panels - it may be necessary to
adjust the height of the bump stops (see
Section 6) if they have been moved in any
way, or if fitting a new bonnet.
3 With the desired bonnet closure obtained,
fully tighten the lower latch retaining screw,
then open the bonnet and refit the two upper
latch retaining screws, tightening to the
specified torque.
9 Body adhesive emblems -
renewal
1
1 Using a length of strong thin diameter cord
(fishing line is ideal), break the adhesive bond
between the emblem and the panel.
2 Thoroughly clean all traces of the old
adhesive from the emblem location, using
methylated spirit, taking all normal safety
precautions. Allow the emblem location to
dry.
3 Gently heat the new emblem until it is warm
to the touch. 4
Peel the protective backing paper from the
emblem then, taking care not to touch the
adhesive, position the emblem on the panel.
Maintain hand pressure evenly for at least
thirty seconds to ensure a good bond.
10 Body trim mouldings -
removal and refitting
1
Roof drip rail moulding (all
models except Courier)
Removal
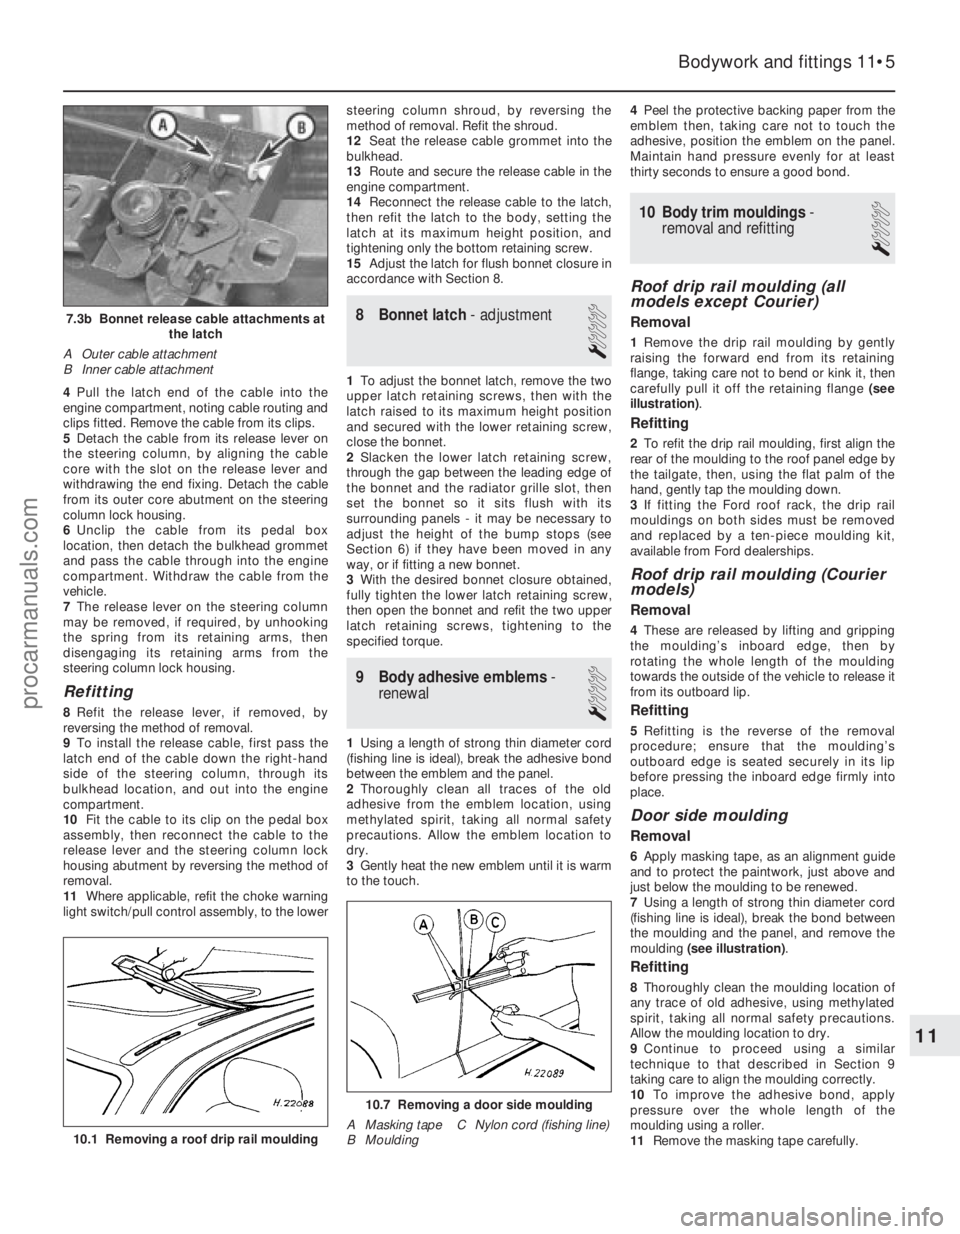
1 Remove the drip rail moulding by gently
raising the forward end from its retaining
flange, taking care not to bend or kink it, then
carefully pull it off the retaining flange (see
illustration) .
Refitting
2To refit the drip rail moulding, first align the
rear of the moulding to the roof panel edge by
the tailgate, then, using the flat palm of the
hand, gently tap the moulding down.
3 If fitting the Ford roof rack, the drip rail
mouldings on both sides must be removed
and replaced by a ten-piece moulding kit,
available from Ford dealerships.
Roof drip rail moulding (Courier
models)
Removal
4 These are released by lifting and gripping
the moulding’s inboard edge, then by
rotating the whole length of the moulding
towards the outside of the vehicle to release it
from its outboard lip.
Refitting
5 Refitting is the reverse of the removal
procedure; ensure that the moulding’s
outboard edge is seated securely in its lip
before pressing the inboard edge firmly into
place.
Door side moulding
Removal
6 Apply masking tape, as an alignment guide
and to protect the paintwork, just above and
just below the moulding to be renewed.
7 Using a length of strong thin diameter cord
(fishing line is ideal), break the bond between
the moulding and the panel, and remove the
moulding (see illustration) .
Refitting
8Thoroughly clean the moulding location of
any trace of old adhesive, using methylated
spirit, taking all normal safety precautions.
Allow the moulding location to dry.
9 Continue to proceed using a similar
technique to that described in Section 9
taking care to align the moulding correctly.
10 To improve the adhesive bond, apply
pressure over the whole length of the
moulding using a roller.
11 Remove the masking tape carefully.
Bodywork and fittings 11•5
7.3b Bonnet release cable attachments at
the latch
A Outer cable attachment
B Inner cable attachment
10.7 Removing a door side moulding
A Masking tape C Nylon cord (fishing line)
B Moulding
10.1 Removing a roof drip rail moulding
11
1595Ford Fiesta Remakeprocarmanuals.com
http://vnx.su