lock FORD FIESTA 1989 Service Service Manual
[x] Cancel search | Manufacturer: FORD, Model Year: 1989, Model line: FIESTA, Model: FORD FIESTA 1989Pages: 296, PDF Size: 10.65 MB
Page 57 of 296
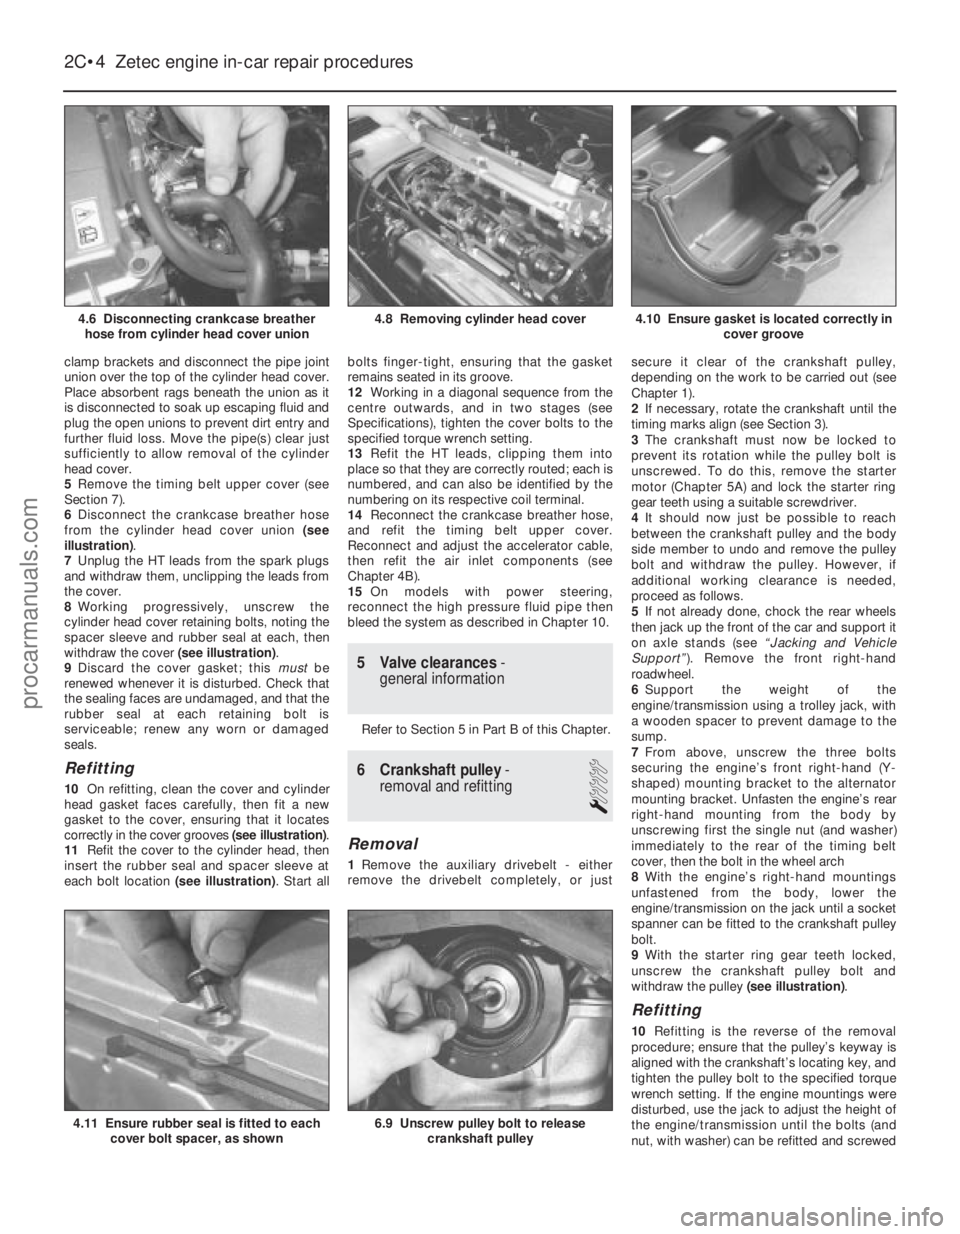
clamp brackets and disconnect the pipe joint
union over the top of the cylinder head cover.
Place absorbent rags beneath the union as it
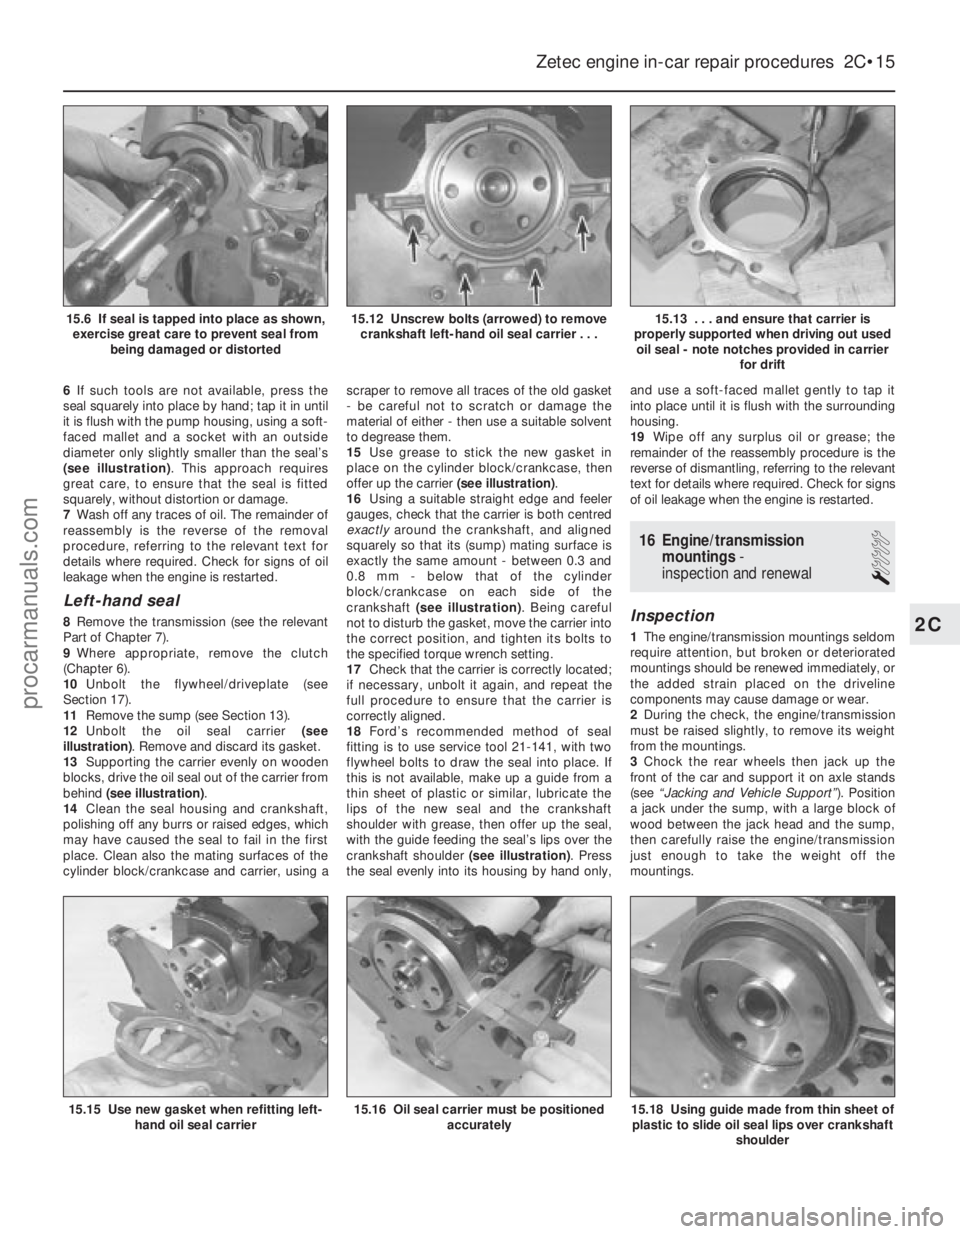
is disconnected to soak up escaping fluid and
plug the open unions to prevent dirt entry and
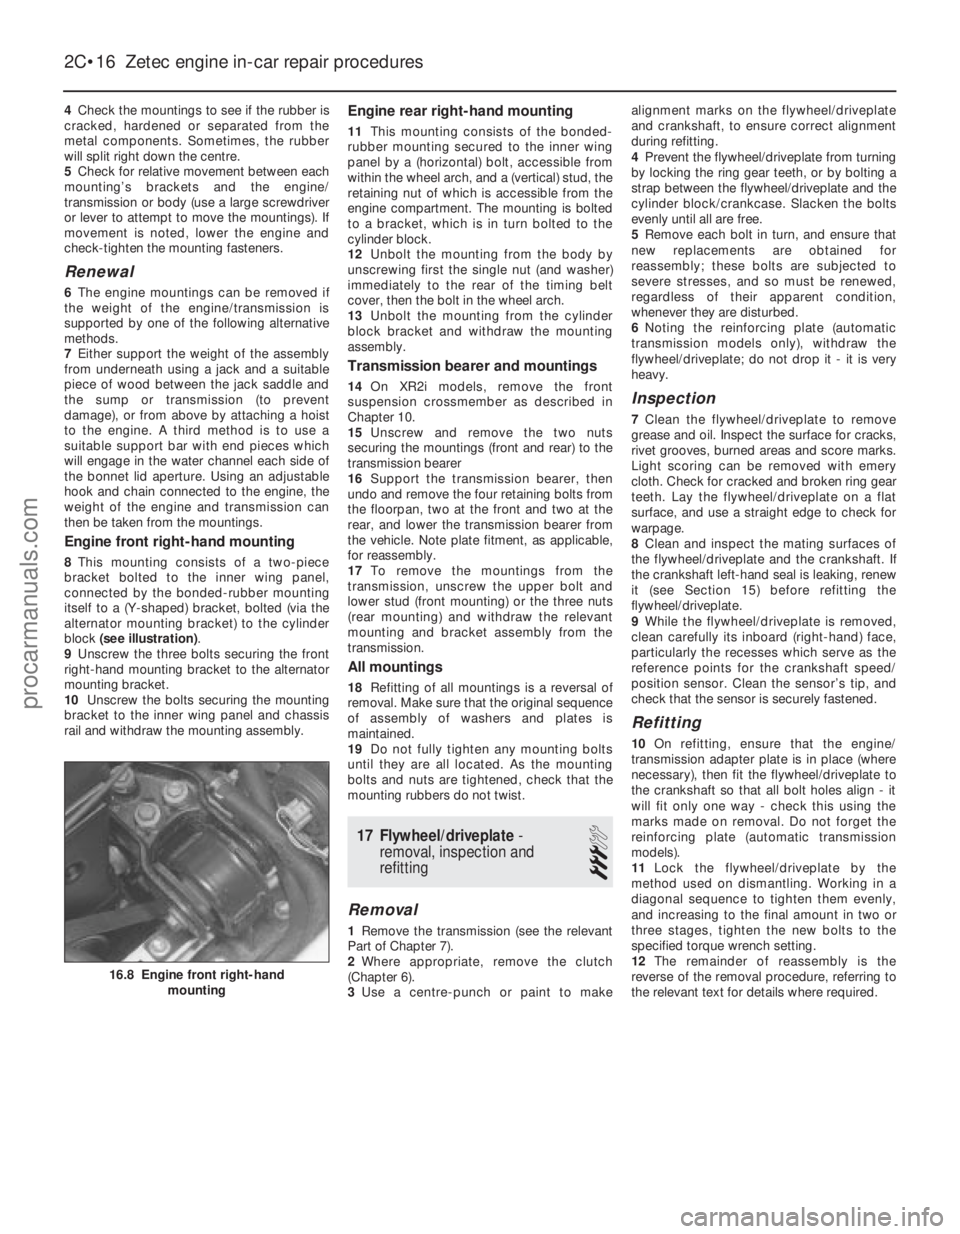
further fluid loss. Move the pipe(s) clear just
sufficiently to allow removal of the cylinder
head cover.
5Remove the timing belt upper cover (see
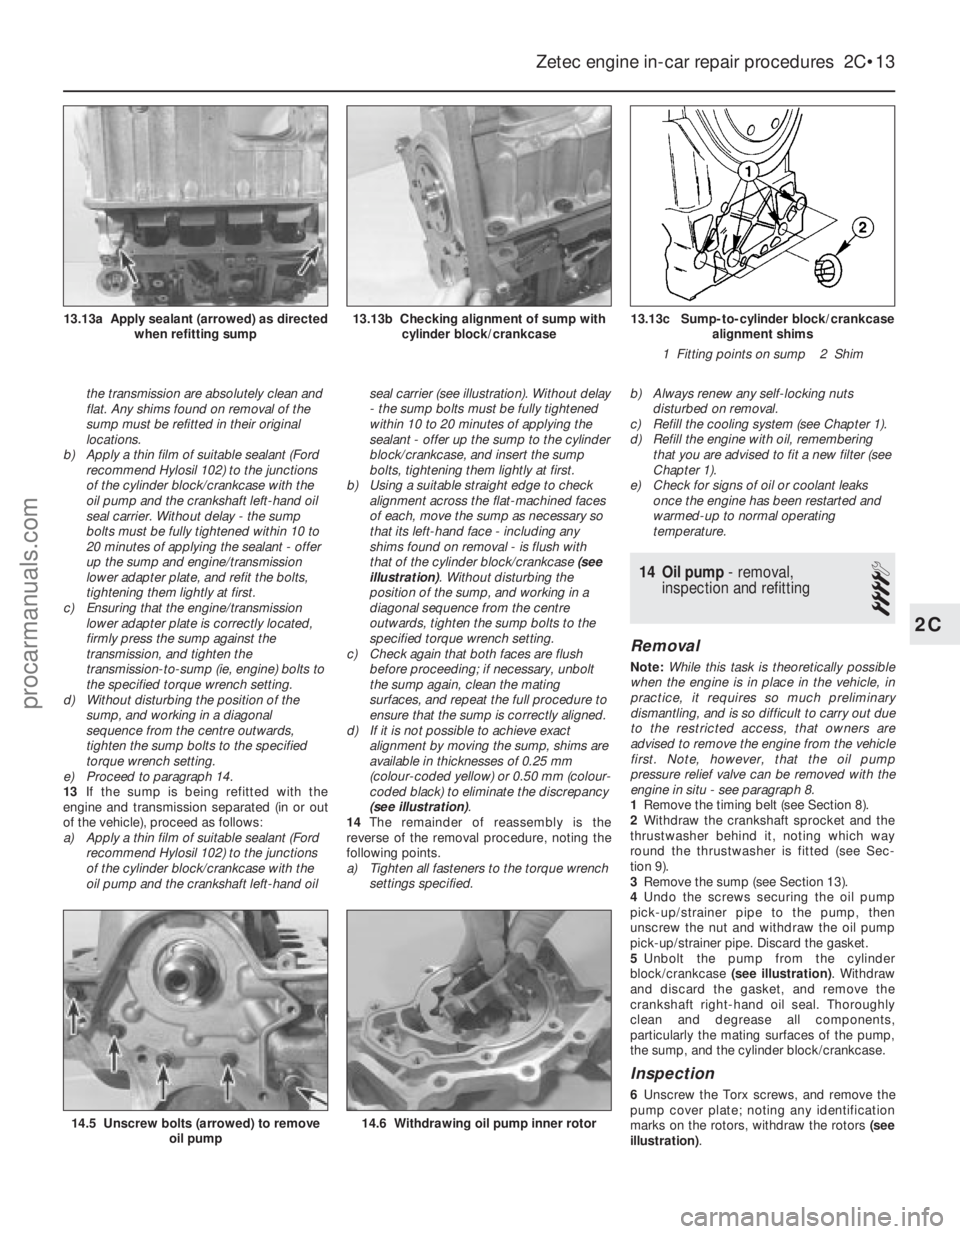
Section 7).
6 Disconnect the crankcase breather hose
from the cylinder head cover union (see
illustration) .
7 Unplug the HT leads from the spark plugs
and withdraw them, unclipping the leads from
the cover.
8 Working progressively, unscrew the
cylinder head cover retaining bolts, noting the
spacer sleeve and rubber seal at each, then
withdraw the cover (see illustration).
9 Discard the cover gasket; this mustbe
renewed whenever it is disturbed. Check that
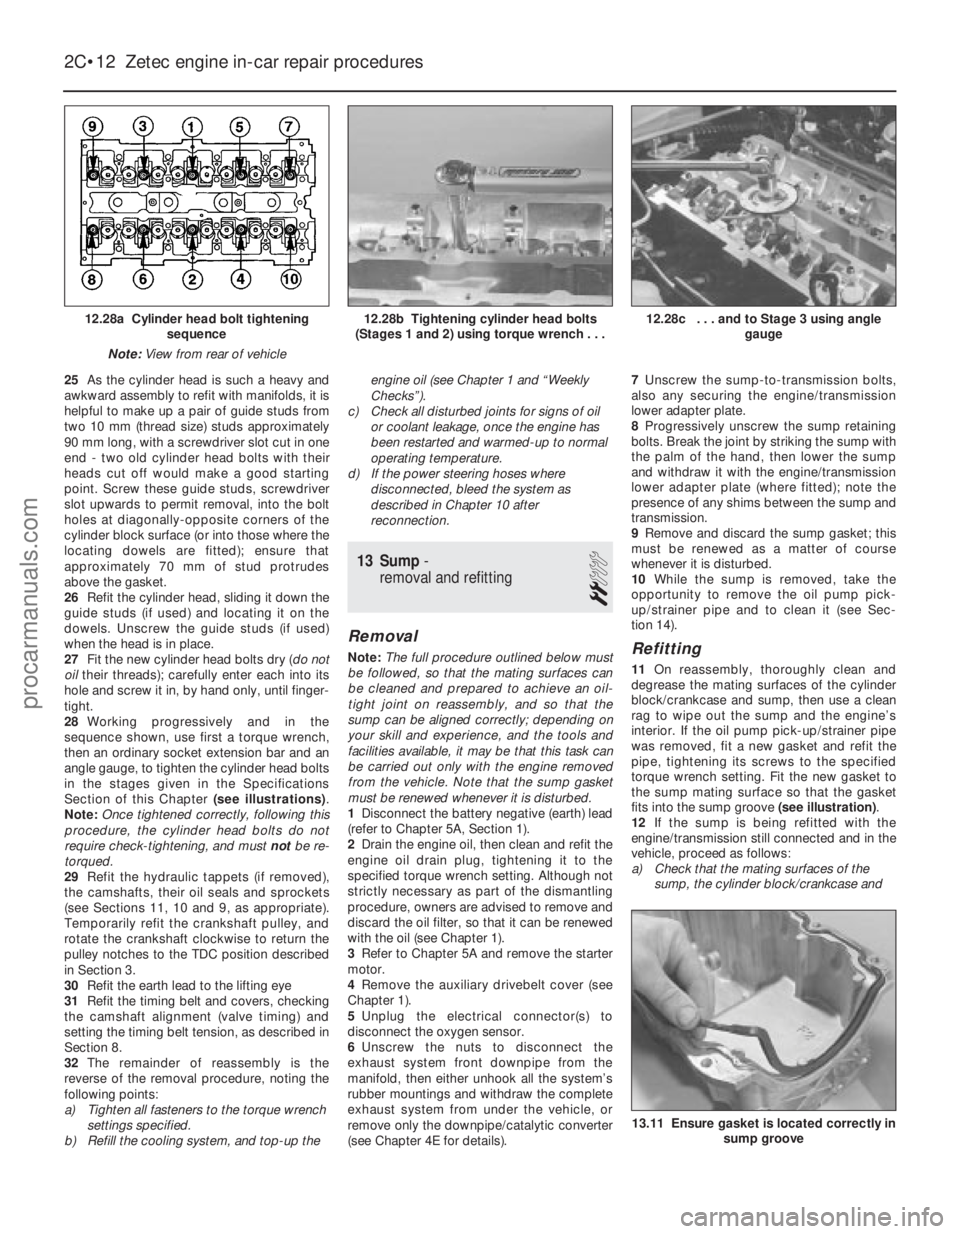
the sealing faces are undamaged, and that the
rubber seal at each retaining bolt is
serviceable; renew any worn or damaged
seals.
Refitting
10 On refitting, clean the cover and cylinder
head gasket faces carefully, then fit a new
gasket to the cover, ensuring that it locates
correctly in the cover grooves (see illustration).
11 Refit the cover to the cylinder head, then
insert the rubber seal and spacer sleeve at
each bolt location (see illustration). Start allbolts finger-tight, ensuring that the gasket
remains seated in its groove.
12
Working in a diagonal sequence from the
centre outwards, and in two stages (see
Specifications), tighten the cover bolts to the
specified torque wrench setting.
13 Refit the HT leads, clipping them into
place so that they are correctly routed; each is
numbered, and can also be identified by the
numbering on its respective coil terminal.
14 Reconnect the crankcase breather hose,
and refit the timing belt upper cover.
Reconnect and adjust the accelerator cable,
then refit the air inlet components (see
Chapter 4B).
15 On models with power steering,
reconnect the high pressure fluid pipe then
bleed the system as described in Chapter 10.
5 Valve clearances -
general information
Refer to Section 5 in Part B of this Chapter.
6 Crankshaft pulley -
removal and refitting
1
Removal
1 Remove the auxiliary drivebelt - either
remove the drivebelt completely, or just secure it clear of the crankshaft pulley,
depending on the work to be carried out (see
Chapter 1).
2
If necessary, rotate the crankshaft until the
timing marks align (see Section 3).
3 The crankshaft must now be locked to
prevent its rotation while the pulley bolt is
unscrewed. To do this, remove the starter
motor (Chapter 5A) and lock the starter ring
gear teeth using a suitable screwdriver.
4 It should now just be possible to reach
between the crankshaft pulley and the body
side member to undo and remove the pulley
bolt and withdraw the pulley. However, if
additional working clearance is needed,
proceed as follows.
5 If not already done, chock the rear wheels
then jack up the front of the car and support it
on axle stands (see “Jacking and Vehicle
Support” ). Remove the front right-hand
roadwheel.
6 Support the weight of the
engine/transmission using a trolley jack, with
a wooden spacer to prevent damage to the
sump.
7 From above, unscrew the three bolts
securing the engine’s front right-hand (Y-
shaped) mounting bracket to the alternator
mounting bracket. Unfasten the engine’s rear
right-hand mounting from the body by
unscrewing first the single nut (and washer)
immediately to the rear of the timing belt
cover, then the bolt in the wheel arch
8 With the engine’s right-hand mountings
unfastened from the body, lower the
engine/transmission on the jack until a socket
spanner can be fitted to the crankshaft pulley
bolt.
9 With the starter ring gear teeth locked,
unscrew the crankshaft pulley bolt and
withdraw the pulley (see illustration).
Refitting
10Refitting is the reverse of the removal
procedure; ensure that the pulley’s keyway is
aligned with the crankshaft’s locating key, and
tighten the pulley bolt to the specified torque
wrench setting. If the engine mountings were
disturbed, use the jack to adjust the height of
the engine/transmission until the bolts (and
nut, with washer) can be refitted and screwed
2C•4 Zetec engine in-car repair procedures
6.9 Unscrew pulley bolt to release
crankshaft pulley4.11 Ensure rubber seal is fitted to eachcover bolt spacer, as shown
4.10 Ensure gasket is located correctly in cover groove4.8 Removing cylinder head cover
1595Ford Fiesta Remake
4.6 Disconnecting crankcase breather
hose from cylinder head cover unionprocarmanuals.com
http://vnx.su
Page 59 of 296
it into the slot in the left-hand end of both
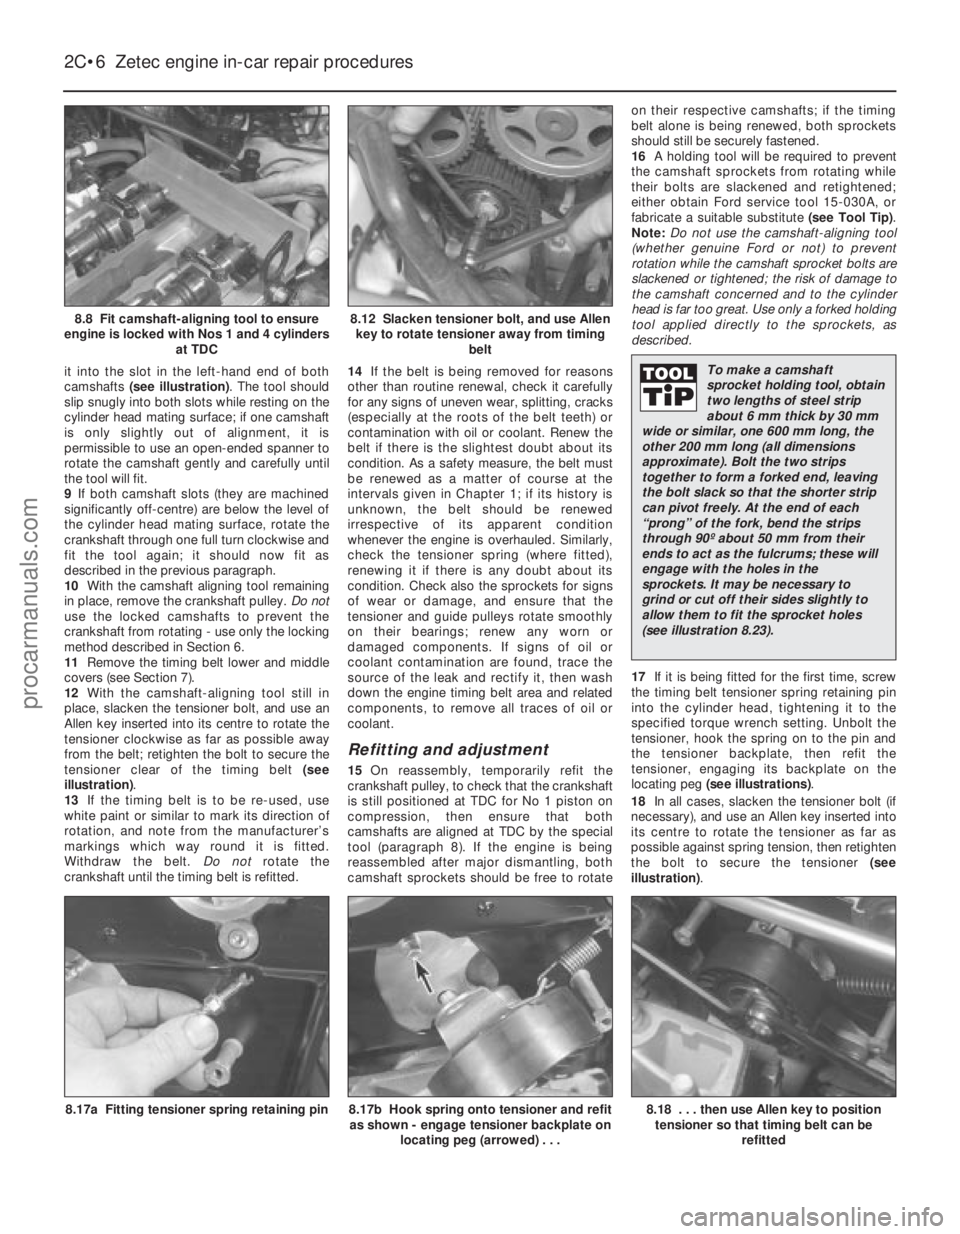
camshafts (see illustration) . The tool should
slip snugly into both slots while resting on the
cylinder head mating surface; if one camshaft
is only slightly out of alignment, it is
permissible to use an open-ended spanner to
rotate the camshaft gently and carefully until
the tool will fit.
9 If both camshaft slots (they are machined
significantly off-centre) are below the level of
the cylinder head mating surface, rotate the
crankshaft through one full turn clockwise and
fit the tool again; it should now fit as
described in the previous paragraph.
10 With the camshaft aligning tool remaining
in place, remove the crankshaft pulley. Do not
use the locked camshafts to prevent the
crankshaft from rotating - use only the locking
method described in Section 6.
11 Remove the timing belt lower and middle
covers (see Section 7).
12 With the camshaft-aligning tool still in
place, slacken the tensioner bolt, and use an
Allen key inserted into its centre to rotate the
tensioner clockwise as far as possible away
from the belt; retighten the bolt to secure the
tensioner clear of the timing belt (see
illustration) .
13 If the timing belt is to be re-used, use
white paint or similar to mark its direction of
rotation, and note from the manufacturer’s
markings which way round it is fitted.
Withdraw the belt. Do notrotate the
crankshaft until the timing belt is refitted. 14
If the belt is being removed for reasons
other than routine renewal, check it carefully
for any signs of uneven wear, splitting, cracks
(especially at the roots of the belt teeth) or
contamination with oil or coolant. Renew the
belt if there is the slightest doubt about its
condition. As a safety measure, the belt must
be renewed as a matter of course at the
intervals given in Chapter 1; if its history is
unknown, the belt should be renewed
irrespective of its apparent condition
whenever the engine is overhauled. Similarly,
check the tensioner spring (where fitted),
renewing it if there is any doubt about its
condition. Check also the sprockets for signs
of wear or damage, and ensure that the
tensioner and guide pulleys rotate smoothly
on their bearings; renew any worn or
damaged components. If signs of oil or
coolant contamination are found, trace the
source of the leak and rectify it, then wash
down the engine timing belt area and related
components, to remove all traces of oil or
coolant.
Refitting and adjustment
15 On reassembly, temporarily refit the
crankshaft pulley, to check that the crankshaft
is still positioned at TDC for No 1 piston on
compression, then ensure that both
camshafts are aligned at TDC by the special
tool (paragraph 8). If the engine is being
reassembled after major dismantling, both
camshaft sprockets should be free to rotate on their respective camshafts; if the timing
belt alone is being renewed, both sprockets
should still be securely fastened.
16
A holding tool will be required to prevent
the camshaft sprockets from rotating while
their bolts are slackened and retightened;
either obtain Ford service tool 15-030A, or
fabricate a suitable substitute (see Tool Tip).
Note: Do not use the camshaft-aligning tool
(whether genuine Ford or not) to prevent
rotation while the camshaft sprocket bolts are
slackened or tightened; the risk of damage to
the camshaft concerned and to the cylinder
head is far too great. Use only a forked holding
tool applied directly to the sprockets, as
described.
17 If it is being fitted for the first time, screw
the timing belt tensioner spring retaining pin
into the cylinder head, tightening it to the
specified torque wrench setting. Unbolt the
tensioner, hook the spring on to the pin and
the tensioner backplate, then refit the
tensioner, engaging its backplate on the
locating peg (see illustrations) .
18 In all cases, slacken the tensioner bolt (if
necessary), and use an Allen key inserted into
its centre to rotate the tensioner as far as
possible against spring tension, then retighten
the bolt to secure the tensioner (see
illustration) .
2C•6Zetec engine in-car repair procedures
8.18 . . . then use Allen key to position
tensioner so that timing belt can be
refitted8.17b Hook spring onto tensioner and refitas shown - engage tensioner backplate on
locating peg (arrowed) . . .8.17a Fitting tensioner spring retaining pin
8.12 Slacken tensioner bolt, and use Allenkey to rotate tensioner away from timing belt8.8 Fit camshaft-aligning tool to ensure
engine is locked with Nos 1 and 4 cylinders at TDC
1595Ford Fiesta Remake
To make a camshaft
sprocket holding tool, obtain
two lengths of steel strip
about 6 mm thick by 30 mm
wide or similar, one 600 mm long, the
other 200 mm long (all dimensions
approximate). Bolt the two strips
together to form a forked end, leaving
the bolt slack so that the shorter strip
can pivot freely. At the end of each
“prong” of the fork, bend the strips
through 90º about 50 mm from their
ends to act as the fulcrums; these will
engage with the holes in the
sprockets. It may be necessary to
grind or cut off their sides slightly to
allow them to fit the sprocket holes
(see illustration 8.23).
procarmanuals.com
http://vnx.su
Page 60 of 296
19Fit the timing belt; if the original is being
refitted, ensure that the marks and notes
made on removal are followed, so that the belt
is refitted the same way round, and to run in
the same direction. Starting at the crankshaft
sprocket, work anti-clockwise around the
camshaft sprockets and tensioner, finishing
off at the rear guide pulley. The front run,
between the crankshaft and the exhaust
camshaft sprockets, mustbe kept taut,
without altering the position either of the
crankshaft or of the camshaft(s) - if necessary,
the position of the camshaft sprockets can be
altered by rotating each on its camshaft
(which remains fixed by the aligning tool).
Where the sprocket is still fastened, use the
holding tool described above to prevent the
sprocket from rotating while its retaining bolt
is slackened - the sprocket can then be
rotated on the camshaft until the belt will slip
into place; retighten the sprocket bolt.
20 When the belt is in place, slacken the
tensioner bolt gently until the spring pulls the
tensioner against the belt; the tensioner
should be retained correctly against the timing
belt inner shield and cylinder head, but must
be just free to respond to changes in belt
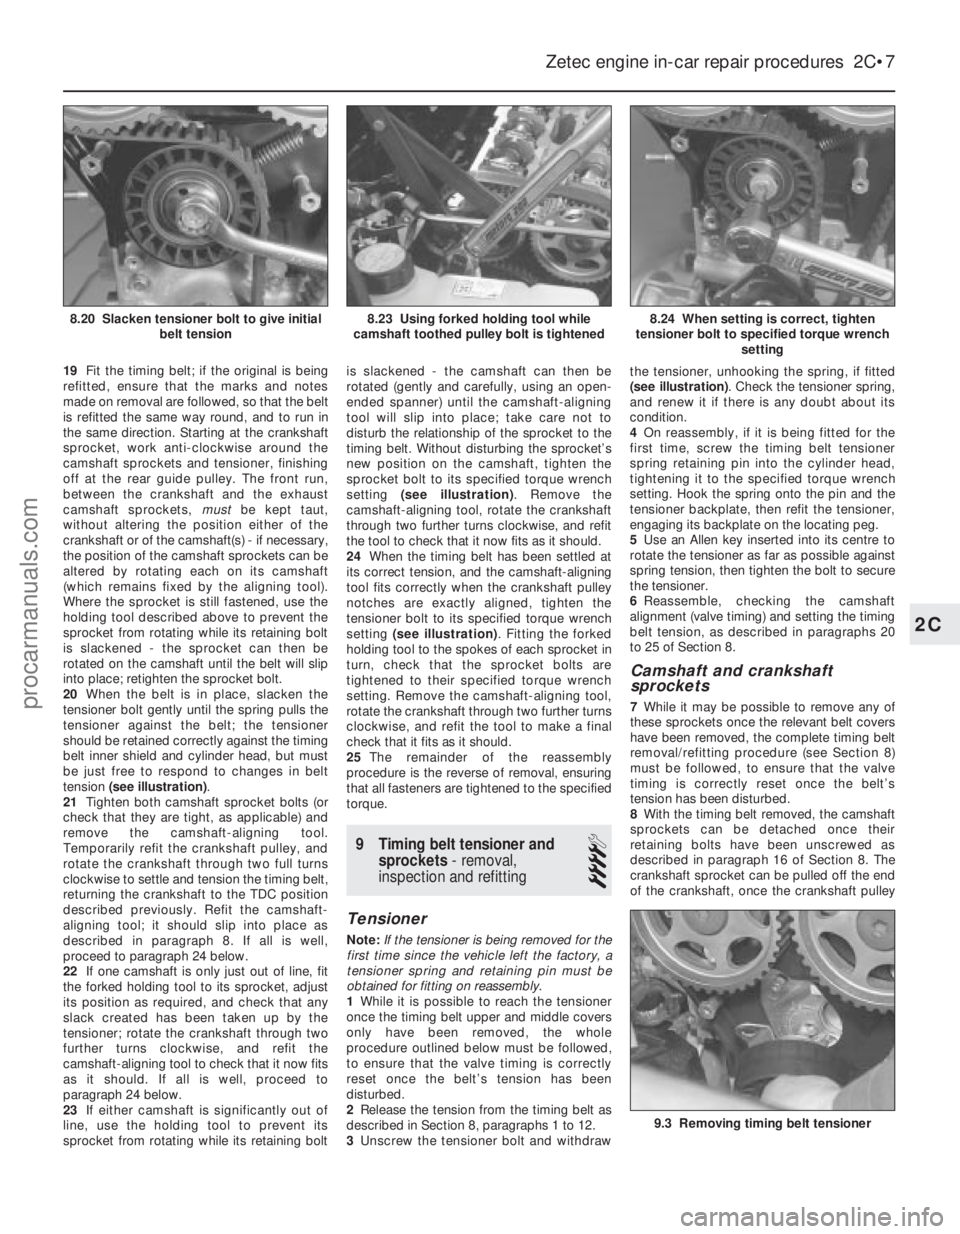
tension (see illustration) .
21 Tighten both camshaft sprocket bolts (or
check that they are tight, as applicable) and
remove the camshaft-aligning tool.
Temporarily refit the crankshaft pulley, and
rotate the crankshaft through two full turns
clockwise to settle and tension the timing belt,
returning the crankshaft to the TDC position
described previously. Refit the camshaft-
aligning tool; it should slip into place as
described in paragraph 8. If all is well,
proceed to paragraph 24 below.
22 If one camshaft is only just out of line, fit
the forked holding tool to its sprocket, adjust
its position as required, and check that any
slack created has been taken up by the
tensioner; rotate the crankshaft through two
further turns clockwise, and refit the
camshaft-aligning tool to check that it now fits
as it should. If all is well, proceed to
paragraph 24 below.
23 If either camshaft is significantly out of
line, use the holding tool to prevent its
sprocket from rotating while its retaining bolt is slackened - the camshaft can then be
rotated (gently and carefully, using an open-
ended spanner) until the camshaft-aligning
tool will slip into place; take care not to
disturb the relationship of the sprocket to the
timing belt. Without disturbing the sprocket’s
new position on the camshaft, tighten the
sprocket bolt to its specified torque wrench
setting
(see illustration) . Remove the
camshaft-aligning tool, rotate the crankshaft
through two further turns clockwise, and refit
the tool to check that it now fits as it should.
24 When the timing belt has been settled at
its correct tension, and the camshaft-aligning
tool fits correctly when the crankshaft pulley
notches are exactly aligned, tighten the
tensioner bolt to its specified torque wrench
setting (see illustration) . Fitting the forked
holding tool to the spokes of each sprocket in
turn, check that the sprocket bolts are
tightened to their specified torque wrench
setting. Remove the camshaft-aligning tool,
rotate the crankshaft through two further turns
clockwise, and refit the tool to make a final
check that it fits as it should.
25 The remainder of the reassembly
procedure is the reverse of removal, ensuring
that all fasteners are tightened to the specified
torque.
9 Timing belt tensioner and
sprockets - removal,
inspection and refitting
4
Tensioner
Note: If the tensioner is being removed for the
first time since the vehicle left the factory, a
tensioner spring and retaining pin must be
obtained for fitting on reassembly.
1 While it is possible to reach the tensioner
once the timing belt upper and middle covers
only have been removed, the whole
procedure outlined below must be followed,
to ensure that the valve timing is correctly
reset once the belt’s tension has been
disturbed.
2 Release the tension from the timing belt as
described in Section 8, paragraphs 1 to 12.
3 Unscrew the tensioner bolt and withdraw the tensioner, unhooking the spring, if fitted
(see illustration)
. Check the tensioner spring,
and renew it if there is any doubt about its
condition.
4 On reassembly, if it is being fitted for the
first time, screw the timing belt tensioner
spring retaining pin into the cylinder head,
tightening it to the specified torque wrench
setting. Hook the spring onto the pin and the
tensioner backplate, then refit the tensioner,
engaging its backplate on the locating peg.
5 Use an Allen key inserted into its centre to
rotate the tensioner as far as possible against
spring tension, then tighten the bolt to secure
the tensioner.
6 Reassemble, checking the camshaft
alignment (valve timing) and setting the timing
belt tension, as described in paragraphs 20
to 25 of Section 8.
Camshaft and crankshaft
sprockets
7 While it may be possible to remove any of
these sprockets once the relevant belt covers
have been removed, the complete timing belt
removal/refitting procedure (see Section 8)
must be followed, to ensure that the valve
timing is correctly reset once the belt’s
tension has been disturbed.
8 With the timing belt removed, the camshaft
sprockets can be detached once their
retaining bolts have been unscrewed as
described in paragraph 16 of Section 8. The
crankshaft sprocket can be pulled off the end
of the crankshaft, once the crankshaft pulley
Zetec engine in-car repair procedures 2C•7
8.24 When setting is correct, tighten
tensioner bolt to specified torque wrench setting8.23 Using forked holding tool while
camshaft toothed pulley bolt is tightened8.20 Slacken tensioner bolt to give initial belt tension
9.3 Removing timing belt tensioner
2C
1595Ford Fiesta Remakeprocarmanuals.com
http://vnx.su
Page 64 of 296
5Disconnect the accelerator cable from the
throttle linkage as described in Chapter 4D.
Secure the cable clear of the engine/
transmission.
6 Remove the auxiliary drivebelt (see Chap-
ter 1).
7 Remove the three screws securing the
wiring “rail” to the rear of the manifold.
Releasing its wire clip, unplug the large
electrical connector (next to the fuel pressure
regulator) to disconnect the engine wiring from
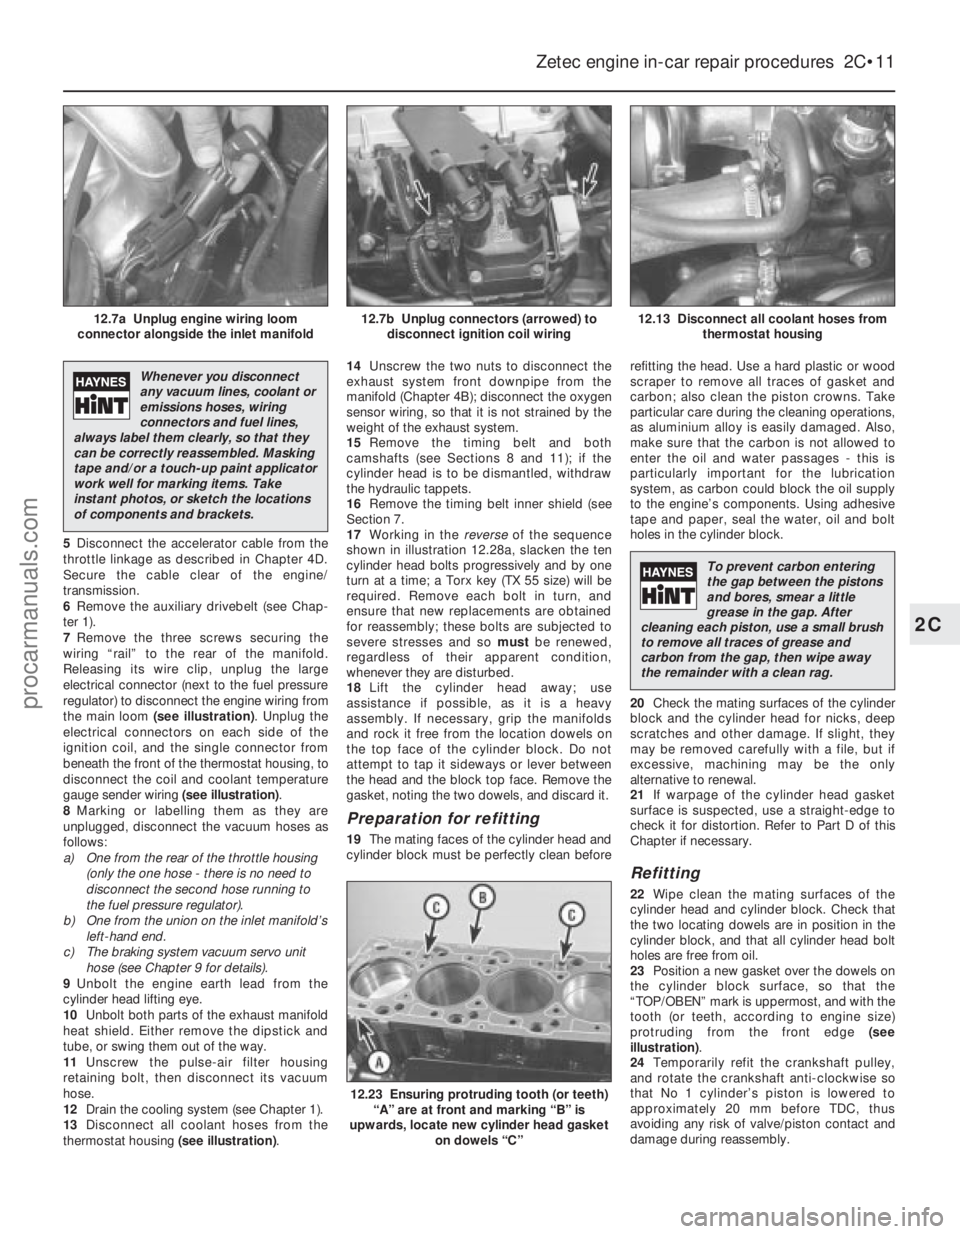
the main loom (see illustration) . Unplug the
electrical connectors on each side of the
ignition coil, and the single connector from
beneath the front of the thermostat housing, to
disconnect the coil and coolant temperature
gauge sender wiring (see illustration).
8 Marking or labelling them as they are
unplugged, disconnect the vacuum hoses as
follows:
a) One from the rear of the throttle housing
(only the one hose - there is no need to
disconnect the second hose running to
the fuel pressure regulator).
b) One from the union on the inlet manifold’s
left-hand end.
c) The braking system vacuum servo unit hose (see Chapter 9 for details).
9 Unbolt the engine earth lead from the
cylinder head lifting eye.
10 Unbolt both parts of the exhaust manifold
heat shield. Either remove the dipstick and
tube, or swing them out of the way.
11 Unscrew the pulse-air filter housing
retaining bolt, then disconnect its vacuum
hose.
12 Drain the cooling system (see Chapter 1).
13 Disconnect all coolant hoses from the
thermostat housing (see illustration).14
Unscrew the two nuts to disconnect the
exhaust system front downpipe from the
manifold (Chapter 4B); disconnect the oxygen
sensor wiring, so that it is not strained by the
weight of the exhaust system.
15 Remove the timing belt and both
camshafts (see Sections 8 and 11); if the
cylinder head is to be dismantled, withdraw
the hydraulic tappets.
16 Remove the timing belt inner shield (see
Section 7.
17 Working in the reverseof the sequence
shown in illustration 12.28a, slacken the ten
cylinder head bolts progressively and by one
turn at a time; a Torx key (TX 55 size) will be
required. Remove each bolt in turn, and
ensure that new replacements are obtained
for reassembly; these bolts are subjected to
severe stresses and so mustbe renewed,
regardless of their apparent condition,
whenever they are disturbed.
18 Lift the cylinder head away; use
assistance if possible, as it is a heavy
assembly. If necessary, grip the manifolds
and rock it free from the location dowels on
the top face of the cylinder block. Do not
attempt to tap it sideways or lever between
the head and the block top face. Remove the
gasket, noting the two dowels, and discard it.
Preparation for refitting
19 The mating faces of the cylinder head and
cylinder block must be perfectly clean before refitting the head. Use a hard plastic or wood
scraper to remove all traces of gasket and
carbon; also clean the piston crowns. Take
particular care during the cleaning operations,
as aluminium alloy is easily damaged. Also,
make sure that the carbon is not allowed to
enter the oil and water passages - this is
particularly important for the lubrication
system, as carbon could block the oil supply
to the engine’s components. Using adhesive
tape and paper, seal the water, oil and bolt
holes in the cylinder block.
20
Check the mating surfaces of the cylinder
block and the cylinder head for nicks, deep
scratches and other damage. If slight, they
may be removed carefully with a file, but if
excessive, machining may be the only
alternative to renewal.
21 If warpage of the cylinder head gasket
surface is suspected, use a straight-edge to
check it for distortion. Refer to Part D of this
Chapter if necessary.
Refitting
22 Wipe clean the mating surfaces of the
cylinder head and cylinder block. Check that
the two locating dowels are in position in the
cylinder block, and that all cylinder head bolt
holes are free from oil.
23 Position a new gasket over the dowels on
the cylinder block surface, so that the
“TOP/OBEN” mark is uppermost, and with the
tooth (or teeth, according to engine size)
protruding from the front edge (see
illustration) .
24 Temporarily refit the crankshaft pulley,
and rotate the crankshaft anti-clockwise so
that No 1 cylinder’s piston is lowered to
approximately 20 mm before TDC, thus
avoiding any risk of valve/piston contact and
damage during reassembly.
Zetec engine in-car repair procedures 2C•11
12.13 Disconnect all coolant hoses from thermostat housing12.7b Unplug connectors (arrowed) todisconnect ignition coil wiring12.7a Unplug engine wiring loom
connector alongside the inlet manifold
12.23 Ensuring protruding tooth (or teeth) “A” are at front and marking “B” is
upwards, locate new cylinder head gasket on dowels “C”
2C
1595Ford Fiesta Remake
Whenever you disconnect
any vacuum lines, coolant or
emissions hoses, wiring
connectors and fuel lines,
always label them clearly, so that they
can be correctly reassembled. Masking
tape and/or a touch-up paint applicator
work well for marking items. Take
instant photos, or sketch the locations
of components and brackets.
To prevent carbon entering
the gap between the pistons
and bores, smear a little
grease in the gap. After
cleaning each piston, use a small brush
to remove all traces of grease and
carbon from the gap, then wipe away
the remainder with a clean rag.
procarmanuals.com
http://vnx.su
Page 65 of 296
25As the cylinder head is such a heavy and
awkward assembly to refit with manifolds, it is
helpful to make up a pair of guide studs from
two 10 mm (thread size) studs approximately
90 mm long, with a screwdriver slot cut in one
end - two old cylinder head bolts with their
heads cut off would make a good starting
point. Screw these guide studs, screwdriver
slot upwards to permit removal, into the bolt
holes at diagonally-opposite corners of the
cylinder block surface (or into those where the
locating dowels are fitted); ensure that
approximately 70 mm of stud protrudes
above the gasket.
26 Refit the cylinder head, sliding it down the
guide studs (if used) and locating it on the
dowels. Unscrew the guide studs (if used)
when the head is in place.
27 Fit the new cylinder head bolts dry ( do not
oil their threads); carefully enter each into its
hole and screw it in, by hand only, until finger-
tight.
28 Working progressively and in the
sequence shown, use first a torque wrench,
then an ordinary socket extension bar and an
angle gauge, to tighten the cylinder head bolts
in the stages given in the Specifications
Section of this Chapter (see illustrations).
Note: Once tightened correctly, following this
procedure, the cylinder head bolts do not
require check-tightening, and must notbe re-
torqued.
29 Refit the hydraulic tappets (if removed),
the camshafts, their oil seals and sprockets
(see Sections 11, 10 and 9, as appropriate).
Temporarily refit the crankshaft pulley, and
rotate the crankshaft clockwise to return the
pulley notches to the TDC position described
in Section 3.
30 Refit the earth lead to the lifting eye
31 Refit the timing belt and covers, checking
the camshaft alignment (valve timing) and
setting the timing belt tension, as described in
Section 8.
32 The remainder of reassembly is the
reverse of the removal procedure, noting the
following points:
a) Tighten all fasteners to the torque wrench settings specified.
b) Refill the cooling system, and top-up the engine oil (see Chapter 1 and “Weekly
Checks”).
c) Check all disturbed joints for signs of oil or coolant leakage, once the engine has
been restarted and warmed-up to normal
operating temperature.
d) If the power steering hoses where
disconnected, bleed the system as
described in Chapter 10 after
reconnection.
13 Sump -
removal and refitting
2
Removal
Note: The full procedure outlined below must
be followed, so that the mating surfaces can
be cleaned and prepared to achieve an oil-
tight joint on reassembly, and so that the
sump can be aligned correctly; depending on
your skill and experience, and the tools and
facilities available, it may be that this task can
be carried out only with the engine removed
from the vehicle. Note that the sump gasket
must be renewed whenever it is disturbed.
1 Disconnect the battery negative (earth) lead
(refer to Chapter 5A, Section 1).
2 Drain the engine oil, then clean and refit the
engine oil drain plug, tightening it to the
specified torque wrench setting. Although not
strictly necessary as part of the dismantling
procedure, owners are advised to remove and
discard the oil filter, so that it can be renewed
with the oil (see Chapter 1).
3 Refer to Chapter 5A and remove the starter
motor.
4 Remove the auxiliary drivebelt cover (see
Chapter 1).
5 Unplug the electrical connector(s) to
disconnect the oxygen sensor.
6 Unscrew the nuts to disconnect the
exhaust system front downpipe from the
manifold, then either unhook all the system’s
rubber mountings and withdraw the complete
exhaust system from under the vehicle, or
remove only the downpipe/catalytic converter
(see Chapter 4E for details). 7
Unscrew the sump-to-transmission bolts,
also any securing the engine/transmission
lower adapter plate.
8 Progressively unscrew the sump retaining
bolts. Break the joint by striking the sump with
the palm of the hand, then lower the sump
and withdraw it with the engine/transmission
lower adapter plate (where fitted); note the
presence of any shims between the sump and
transmission.
9 Remove and discard the sump gasket; this
must be renewed as a matter of course
whenever it is disturbed.
10 While the sump is removed, take the
opportunity to remove the oil pump pick-
up/strainer pipe and to clean it (see Sec-
tion 14).Refitting
11 On reassembly, thoroughly clean and
degrease the mating surfaces of the cylinder
block/crankcase and sump, then use a clean
rag to wipe out the sump and the engine’s
interior. If the oil pump pick-up/strainer pipe
was removed, fit a new gasket and refit the
pipe, tightening its screws to the specified
torque wrench setting. Fit the new gasket to
the sump mating surface so that the gasket
fits into the sump groove (see illustration).
12 If the sump is being refitted with the
engine/transmission still connected and in the
vehicle, proceed as follows:
a) Check that the mating surfaces of the sump, the cylinder block/crankcase and
2C•12 Zetec engine in-car repair procedures
13.11 Ensure gasket is located correctly in sump groove
12.28c . . . and to Stage 3 using angle gauge12.28b Tightening cylinder head bolts
(Stages 1 and 2) using torque wrench . . .12.28a Cylinder head bolt tightening sequence
Note: View from rear of vehicle
1595Ford Fiesta Remakeprocarmanuals.com
http://vnx.su
Page 66 of 296
the transmission are absolutely clean and
flat. Any shims found on removal of the
sump must be refitted in their original
locations.
b) Apply a thin film of suitable sealant (Ford
recommend Hylosil 102) to the junctions
of the cylinder block/crankcase with the
oil pump and the crankshaft left-hand oil
seal carrier. Without delay - the sump
bolts must be fully tightened within 10 to
20 minutes of applying the sealant - offer
up the sump and engine/transmission
lower adapter plate, and refit the bolts,
tightening them lightly at first.
c) Ensuring that the engine/transmission
lower adapter plate is correctly located,
firmly press the sump against the
transmission, and tighten the
transmission-to-sump (ie, engine) bolts to
the specified torque wrench setting.
d) Without disturbing the position of the
sump, and working in a diagonal
sequence from the centre outwards,
tighten the sump bolts to the specified
torque wrench setting.
e) Proceed to paragraph 14.
13 If the sump is being refitted with the
engine and transmission separated (in or out
of the vehicle), proceed as follows:
a) Apply a thin film of suitable sealant (Ford recommend Hylosil 102) to the junctions
of the cylinder block/crankcase with the
oil pump and the crankshaft left-hand oil seal carrier (see illustration). Without delay
- the sump bolts must be fully tightened
within 10 to 20 minutes of applying the
sealant - offer up the sump to the cylinder
block/crankcase, and insert the sump
bolts, tightening them lightly at first.
b) Using a suitable straight edge to check
alignment across the flat-machined faces
of each, move the sump as necessary so
that its left-hand face - including any
shims found on removal - is flush with
that of the cylinder block/crankcase (see
illustration) . Without disturbing the
position of the sump, and working in a
diagonal sequence from the centre
outwards, tighten the sump bolts to the
specified torque wrench setting.
c) Check again that both faces are flush
before proceeding; if necessary, unbolt
the sump again, clean the mating
surfaces, and repeat the full procedure to
ensure that the sump is correctly aligned.
d) If it is not possible to achieve exact
alignment by moving the sump, shims are
available in thicknesses of 0.25 mm
(colour-coded yellow) or 0.50 mm (colour-
coded black) to eliminate the discrepancy
(see illustration) .
14 The remainder of reassembly is the
reverse of the removal procedure, noting the
following points.
a) Tighten all fasteners to the torque wrench settings specified. b)
Always renew any self-locking nuts
disturbed on removal.
c) Refill the cooling system (see Chapter 1).
d) Refill the engine with oil, remembering
that you are advised to fit a new filter (see
Chapter 1).
e) Check for signs of oil or coolant leaks once the engine has been restarted and
warmed-up to normal operating
temperature.
14 Oil pump - removal,
inspection and refitting
4
Removal
Note: While this task is theoretically possible
when the engine is in place in the vehicle, in
practice, it requires so much preliminary
dismantling, and is so difficult to carry out due
to the restricted access, that owners are
advised to remove the engine from the vehicle
first. Note, however, that the oil pump
pressure relief valve can be removed with the
engine in situ - see paragraph 8.
1 Remove the timing belt (see Section 8).
2 Withdraw the crankshaft sprocket and the
thrustwasher behind it, noting which way
round the thrustwasher is fitted (see Sec-
tion 9).
3 Remove the sump (see Section 13).
4 Undo the screws securing the oil pump
pick-up/strainer pipe to the pump, then
unscrew the nut and withdraw the oil pump
pick-up/strainer pipe. Discard the gasket.
5 Unbolt the pump from the cylinder
block/crankcase (see illustration). Withdraw
and discard the gasket, and remove the
crankshaft right-hand oil seal. Thoroughly
clean and degrease all components,
particularly the mating surfaces of the pump,
the sump, and the cylinder block/crankcase.
Inspection
6 Unscrew the Torx screws, and remove the
pump cover plate; noting any identification
marks on the rotors, withdraw the rotors (see
illustration) .
Zetec engine in-car repair procedures 2C•13
13.13c Sump-to-cylinder block/crankcase
alignment shims
1 Fitting points on sump 2 Shim13.13b Checking alignment of sump with cylinder block/crankcase13.13a Apply sealant (arrowed) as directed when refitting sump
14.6 Withdrawing oil pump inner rotor14.5 Unscrew bolts (arrowed) to remove oil pump
2C
1595Ford Fiesta Remakeprocarmanuals.com
http://vnx.su
Page 67 of 296

7Inspect the rotors for obvious signs of wear
or damage, and renew if necessary; if either
rotor, the pump body, or its cover plate are
scored or damaged, the complete oil pump
assembly must be renewed.
8 The oil pressure relief valve can be
dismantled, if required, without disturbing the
pump. Chock the rear wheels then jack up the
front of the car and support it on axle stands
(see “Jacking and Vehicle Support” ). Remove
the front right-hand roadwheel and auxiliary
drivebelt cover (see Chapter 1) to provide
access to the valve.
9 Unscrew the threaded plug, and recover
the valve spring and plunger (see
illustrations) . If the plug’s sealing O-ring is
worn or damaged, a new one must be
obtained, to be fitted on reassembly.
10 Reassembly is the reverse of the dismantling procedure; ensure the spring and
valve are refitted the correct way round, and
tighten the threaded plug securely.
Refitting
11
The oil pump must be primed on
installation, by pouring clean engine oil into it,
and rotating its inner rotor a few turns.
12 Using grease to stick the new gasket in
place on the cylinder block/crankcase, and
rotating the pump’s inner rotor to align with
the flats on the crankshaft, refit the pump and
insert the bolts, tightening them lightly at first
(see illustration) .
13 Using a suitable straight edge and feeler
gauges, check that the pump is both centred
exactly around the crankshaft, and aligned
squarely so that its (sump) mating surface is
exactly the same amount - between 0.3 and
0.8 mm - below that of the cylinder
block/crankcase on each side of the
crankshaft (see illustration) . Being careful
not to disturb the gasket, move the pump into
the correct position, and tighten its bolts
to the specified torque wrench setting.
14 Check that the pump is correctly located;
if necessary, unbolt it again, and repeat the
full procedure to ensure that the pump is
correctly aligned.
15 Fit a new crankshaft right-hand oil seal
(see Section 15).
16 Using grease to stick the gasket in place
on the pump, refit the pick-up/strainer pipe,
tightening its screws and nut to their specified
torque wrench settings (see illustration).17
The remainder of reassembly is the
reverse of the removal procedure, referring to
the relevant text for details where required.15 Crankshaft oil seals -
renewal
4
Note: Don’t try to prise these seals out without
removing the oil pump or seal carrier - the
seals are too soft, and the amount of space
available is too small, for this to be possible
without considerable risk of damage to the seal
housing and/or the crankshaft journal. Follow
exactly the procedure given below.
Right-hand seal
1 Remove the oil pump (see Section 14).
2 Drive the oil seal out of the pump from
behind (see illustration) .
3 Clean the seal housing and crankshaft,
polishing off any burrs or raised edges, which
may have caused the seal to fail in the first
place.
4 Refit the oil pump (see Section 14). Grease
the lips and periphery of the new seal, to ease
installation.
5 To fit a new seal, Ford recommend the use
of their service tool 21-093A, with the
crankshaft pulley bolt, to draw the seal into
place; an alternative can be arranged using a
socket of suitable size, with a washer to
match the crankshaft pulley bolt (see
illustration) .
2C•14Zetec engine in-car repair procedures
15.5 Socket of correct size can be used to
replace Ford service tool, drawing new
seal into place as described15.2 Driving out crankshaft right-hand oil seal14.16 Use new gasket when refitting oilpick-up pipe to pump
14.13 Oil pump must be positioned accurately
14.12 Use new gasket when refitting oil pump14.9b . . . to withdraw oil pressure reliefvalve spring and plunger14.9a Unscrew threaded plug - seenthrough right-hand wheel arch . . .
1595Ford Fiesta Remakeprocarmanuals.com
http://vnx.su
Page 68 of 296
6If such tools are not available, press the
seal squarely into place by hand; tap it in until
it is flush with the pump housing, using a soft-
faced mallet and a socket with an outside
diameter only slightly smaller than the seal’s
(see illustration) . This approach requires
great care, to ensure that the seal is fitted
squarely, without distortion or damage.
7 Wash off any traces of oil. The remainder of
reassembly is the reverse of the removal
procedure, referring to the relevant text for
details where required. Check for signs of oil
leakage when the engine is restarted.
Left-hand seal
8 Remove the transmission (see the relevant
Part of Chapter 7).
9 Where appropriate, remove the clutch
(Chapter 6).
10 Unbolt the flywheel/driveplate (see
Section 17).
11 Remove the sump (see Section 13).
12 Unbolt the oil seal carrier (see
illustration) . Remove and discard its gasket.
13 Supporting the carrier evenly on wooden
blocks, drive the oil seal out of the carrier from
behind (see illustration) .
14 Clean the seal housing and crankshaft,
polishing off any burrs or raised edges, which
may have caused the seal to fail in the first
place. Clean also the mating surfaces of the
cylinder block/crankcase and carrier, using a scraper to remove all traces of the old gasket
- be careful not to scratch or damage the
material of either - then use a suitable solvent
to degrease them.
15
Use grease to stick the new gasket in
place on the cylinder block/crankcase, then
offer up the carrier (see illustration).
16 Using a suitable straight edge and feeler
gauges, check that the carrier is both centred
exactly around the crankshaft, and aligned
squarely so that its (sump) mating surface is
exactly the same amount - between 0.3 and
0.8 mm - below that of the cylinder
block/crankcase on each side of the
crankshaft (see illustration) . Being careful
not to disturb the gasket, move the carrier into
the correct position, and tighten its bolts to
the specified torque wrench setting.
17 Check that the carrier is correctly located;
if necessary, unbolt it again, and repeat the
full procedure to ensure that the carrier is
correctly aligned.
18 Ford’s recommended method of seal
fitting is to use service tool 21-141, with two
flywheel bolts to draw the seal into place. If
this is not available, make up a guide from a
thin sheet of plastic or similar, lubricate the
lips of the new seal and the crankshaft
shoulder with grease, then offer up the seal,
with the guide feeding the seal’s lips over the
crankshaft shoulder (see illustration) . Press
the seal evenly into its housing by hand only, and use a soft-faced mallet gently to tap it
into place until it is flush with the surrounding
housing.
19
Wipe off any surplus oil or grease; the
remainder of the reassembly procedure is the
reverse of dismantling, referring to the relevant
text for details where required. Check for signs
of oil leakage when the engine is restarted.
16 Engine/transmission mountings -
inspection and renewal
1
Inspection
1 The engine/transmission mountings seldom
require attention, but broken or deteriorated
mountings should be renewed immediately, or
the added strain placed on the driveline
components may cause damage or wear.
2 During the check, the engine/transmission
must be raised slightly, to remove its weight
from the mountings.
3 Chock the rear wheels then jack up the
front of the car and support it on axle stands
(see “Jacking and Vehicle Support” ). Position
a jack under the sump, with a large block of
wood between the jack head and the sump,
then carefully raise the engine/transmission
just enough to take the weight off the
mountings.
Zetec engine in-car repair procedures 2C•15
15.13 . . . and ensure that carrier is
properly supported when driving out used oil seal - note notches provided in carrier for drift15.12 Unscrew bolts (arrowed) to removecrankshaft left-hand oil seal carrier . . .15.6 If seal is tapped into place as shown,exercise great care to prevent seal from being damaged or distorted
15.18 Using guide made from thin sheet ofplastic to slide oil seal lips over crankshaft
shoulder15.16 Oil seal carrier must be positionedaccurately15.15 Use new gasket when refitting left-hand oil seal carrier
2C
1595Ford Fiesta Remakeprocarmanuals.com
http://vnx.su
Page 69 of 296
4Check the mountings to see if the rubber is
cracked, hardened or separated from the
metal components. Sometimes, the rubber
will split right down the centre.
5 Check for relative movement between each
mounting’s brackets and the engine/
transmission or body (use a large screwdriver
or lever to attempt to move the mountings). If
movement is noted, lower the engine and
check-tighten the mounting fasteners.
Renewal
6 The engine mountings can be removed if
the weight of the engine/transmission is
supported by one of the following alternative
methods.
7 Either support the weight of the assembly
from underneath using a jack and a suitable
piece of wood between the jack saddle and
the sump or transmission (to prevent
damage), or from above by attaching a hoist
to the engine. A third method is to use a
suitable support bar with end pieces which
will engage in the water channel each side of
the bonnet lid aperture. Using an adjustable
hook and chain connected to the engine, the
weight of the engine and transmission can
then be taken from the mountings.
Engine front right-hand mounting
8 This mounting consists of a two-piece
bracket bolted to the inner wing panel,
connected by the bonded-rubber mounting
itself to a (Y-shaped) bracket, bolted (via the
alternator mounting bracket) to the cylinder
block (see illustration) .
9 Unscrew the three bolts securing the front
right-hand mounting bracket to the alternator
mounting bracket.
10 Unscrew the bolts securing the mounting
bracket to the inner wing panel and chassis
rail and withdraw the mounting assembly.
Engine rear right-hand mounting
11 This mounting consists of the bonded-
rubber mounting secured to the inner wing
panel by a (horizontal) bolt, accessible from
within the wheel arch, and a (vertical) stud, the
retaining nut of which is accessible from the
engine compartment. The mounting is bolted
to a bracket, which is in turn bolted to the
cylinder block.
12 Unbolt the mounting from the body by
unscrewing first the single nut (and washer)
immediately to the rear of the timing belt
cover, then the bolt in the wheel arch.
13 Unbolt the mounting from the cylinder
block bracket and withdraw the mounting
assembly.
Transmission bearer and mountings
14 On XR2i models, remove the front
suspension crossmember as described in
Chapter 10.
15 Unscrew and remove the two nuts
securing the mountings (front and rear) to the
transmission bearer
16 Support the transmission bearer, then
undo and remove the four retaining bolts from
the floorpan, two at the front and two at the
rear, and lower the transmission bearer from
the vehicle. Note plate fitment, as applicable,
for reassembly.
17 To remove the mountings from the
transmission, unscrew the upper bolt and
lower stud (front mounting) or the three nuts
(rear mounting) and withdraw the relevant
mounting and bracket assembly from the
transmission.
All mountings
18 Refitting of all mountings is a reversal of
removal. Make sure that the original sequence
of assembly of washers and plates is
maintained.
19 Do not fully tighten any mounting bolts
until they are all located. As the mounting
bolts and nuts are tightened, check that the
mounting rubbers do not twist.
17 Flywheel/driveplate -
removal, inspection and
refitting
3
Removal
1 Remove the transmission (see the relevant
Part of Chapter 7).
2 Where appropriate, remove the clutch
(Chapter 6).
3 Use a centre-punch or paint to make alignment marks on the flywheel/driveplate
and crankshaft, to ensure correct alignment
during refitting.
4
Prevent the flywheel/driveplate from turning
by locking the ring gear teeth, or by bolting a
strap between the flywheel/driveplate and the
cylinder block/crankcase. Slacken the bolts
evenly until all are free.
5 Remove each bolt in turn, and ensure that
new replacements are obtained for
reassembly; these bolts are subjected to
severe stresses, and so must be renewed,
regardless of their apparent condition,
whenever they are disturbed.
6 Noting the reinforcing plate (automatic
transmission models only), withdraw the
flywheel/driveplate; do not drop it - it is very
heavy.
Inspection
7 Clean the flywheel/driveplate to remove
grease and oil. Inspect the surface for cracks,
rivet grooves, burned areas and score marks.
Light scoring can be removed with emery
cloth. Check for cracked and broken ring gear
teeth. Lay the flywheel/driveplate on a flat
surface, and use a straight edge to check for
warpage.
8 Clean and inspect the mating surfaces of
the flywheel/driveplate and the crankshaft. If
the crankshaft left-hand seal is leaking, renew
it (see Section 15) before refitting the
flywheel/driveplate.
9 While the flywheel/driveplate is removed,
clean carefully its inboard (right-hand) face,
particularly the recesses which serve as the
reference points for the crankshaft speed/
position sensor. Clean the sensor’s tip, and
check that the sensor is securely fastened.
Refitting
10 On refitting, ensure that the engine/
transmission adapter plate is in place (where
necessary), then fit the flywheel/driveplate to
the crankshaft so that all bolt holes align - it
will fit only one way - check this using the
marks made on removal. Do not forget the
reinforcing plate (automatic transmission
models).
11 Lock the flywheel/driveplate by the
method used on dismantling. Working in a
diagonal sequence to tighten them evenly,
and increasing to the final amount in two or
three stages, tighten the new bolts to the
specified torque wrench setting.
12 The remainder of reassembly is the
reverse of the removal procedure, referring to
the relevant text for details where required.
2C•16 Zetec engine in-car repair procedures
16.8 Engine front right-hand mounting
1595Ford Fiesta Remakeprocarmanuals.com
http://vnx.su
Page 70 of 296
 . . . . . . . . . . . . . . . . . . . . . . . . . . . . . . . . . . . .\")
2D
1595Ford Fiesta Remake
HCS engines
Cylinder head
Maximum permissible gasket surface distortion (measured over
full length) . . . . . . . . . . . . . . . . . . . . . . . . . . . . . . . . . . . .\
. . . . . . . . . . . . 0.15 mm
Valve seat angle (inlet and exhaust) . . . . . . . . . . . . . . . . . . . . . . . . . . . . 45º
Valve seat width (inlet and exhaust) . . . . . . . . . . . . . . . . . . . . . . . . . . . . 1.18 to 1.75 mm*
*The inlet and exhaust valves have special inserts which cannot be recut\
using conventional tools.
Valves - generalInletExhaust
Valve length . . . . . . . . . . . . . . . . . . . . . . . . . . . . . . . . . . . .\
. . . . . . . . . . 103.7 to 104.4 mm 104.2 to 104.7 mm
Valve head diameter: 1.0 and 1.1 litre engines . . . . . . . . . . . . . . . . . . . . . . . . . . . . . . . . . . . 32.90 to 33.10 mm 28.90 to 29.10 mm
1.3 litre engines . . . . . . . . . . . . . . . . . . . . . . . . . . . . . . . . . . . .\
. . . . . . 34.40 to 34.60 mm 28.90 to 29.10 mm
Valve stem diameter . . . . . . . . . . . . . . . . . . . . . . . . . . . . . . . . . . . .\
. . . . 7.0 mm 7.0 mm
Valve stem-to-guide clearance . . . . . . . . . . . . . . . . . . . . . . . . . . . . . . . . 0.020 to 0.069 0.046 to 0.095
Cylinder block
Cylinder bore diameter: 1.0 and 1.1 litre engines:
Standard class 1 (or A) . . . . . . . . . . . . . . . . . . . . . . . . . . . . . . . . . . 68.68 to 68.69 mm
Standard class 2 (or B) . . . . . . . . . . . . . . . . . . . . . . . . . . . . . . . . . . 68.69 to 68.70 mm
Standard class 3 (or C) . . . . . . . . . . . . . . . . . . . . . . . . . . . . . . . . . . 68.70 to 68.71 mm
Oversize 0.5 mm . . . . . . . . . . . . . . . . . . . . . . . . . . . . . . . . . . . .\
. . . 69.20 to 69.21 mm
Oversize 1.0 mm . . . . . . . . . . . . . . . . . . . . . . . . . . . . . . . . . . . .\
. . . 69.70 to 69.71 mm
1.3 litre engines:
Standard class 1 . . . . . . . . . . . . . . . . . . . . . . . . . . . . . . . . . . . .\
. . . 73.94 to 73.95 mm
Standard class 2 . . . . . . . . . . . . . . . . . . . . . . . . . . . . . . . . . . . .\
. . . 73.50 to 73.96 mm
Standard class 3 . . . . . . . . . . . . . . . . . . . . . . . . . . . . . . . . . . . .\
. . . 73.96 to 73.97 mm
Oversize 0.5 mm . . . . . . . . . . . . . . . . . . . . . . . . . . . . . . . . . . . .\
. . . 74.50 to 74.51 mm
Oversize 1.0 mm . . . . . . . . . . . . . . . . . . . . . . . . . . . . . . . . . . . .\
. . . 75.00 to 75.01 mm
Chapter 2 Part D:
Engine removal and overhaul procedures
Camshaft and tappets - removal, inspection and refitting (HCS engines) . . . . . . . . . . . . . . . . . . . . . . . . . . . . . . . . . . . .\
. . . . 10
Crankshaft - refitting and main bearing running clearance check . . . . . . . . . . . . . . . . . . . . . . . . . . . . . . . . . . . .\
. . . . . . . . . . . 17
Crankshaft - removal and inspection . . . . . . . . . . . . . . . . . . . . . . . . 12
Cylinder block/crankcase - cleaning and inspection . . . . . . . . . . . . 13
Cylinder head - dismantling . . . . . . . . . . . . . . . . . . . . . . . . . . . . . . . 7
Cylinder head - reassembly . . . . . . . . . . . . . . . . . . . . . . . . . . . . . . . 9
Cylinder head and valve components - cleaning and inspection . . . 8
Engine - initial start-up after overhaul . . . . . . . . . . . . . . . . . . . . . . . . 19
Engine - removal and refitting (HCS engines) . . . . . . . . . . . . . . . . . . 3
Engine overhaul - preliminary information . . . . . . . . . . . . . . . . . . . . . 6 Engine overhaul - reassembly sequence . . . . . . . . . . . . . . . . . . . . . 15
Engine/transmission removal - preparation and precautions . . . . . . 2
Engine/transmission - removal and refitting (CVH and
PTE engines) . . . . . . . . . . . . . . . . . . . . . . . . . . . . . . . . . . . .\
. . . . . 4
Engine/transmission - removal and refitting (Zetec engines) . . . . . . 5
General information . . . . . . . . . . . . . . . . . . . . . . . . . . . . . . . . . . . .\
. . 1
Main and big-end bearings - inspection . . . . . . . . . . . . . . . . . . . . . . 14
Piston/connecting rod assemblies - refitting and big-end
bearing running clearance check . . . . . . . . . . . . . . . . . . . . . . . . . 18
Piston/connecting rod assemblies - removal and inspection . . . . . . 11
Piston rings - refitting . . . . . . . . . . . . . . . . . . . . . . . . . . . . . . . . . . . .\
16
2D•1
Specifications Contents
Easy, suitable for
novice with little
experience Fairly easy,
suitable
for beginner with
some experience Fairly difficult,
suitable for competent
DIY mechanic
Difficult,
suitable for
experienced DIY
mechanic Very difficult,
suitable for expert DIY
or professional
Degrees of difficulty
54321
procarmanuals.com
http://vnx.su