lock FORD FIESTA 1989 Service Manual PDF
[x] Cancel search | Manufacturer: FORD, Model Year: 1989, Model line: FIESTA, Model: FORD FIESTA 1989Pages: 296, PDF Size: 10.65 MB
Page 100 of 296
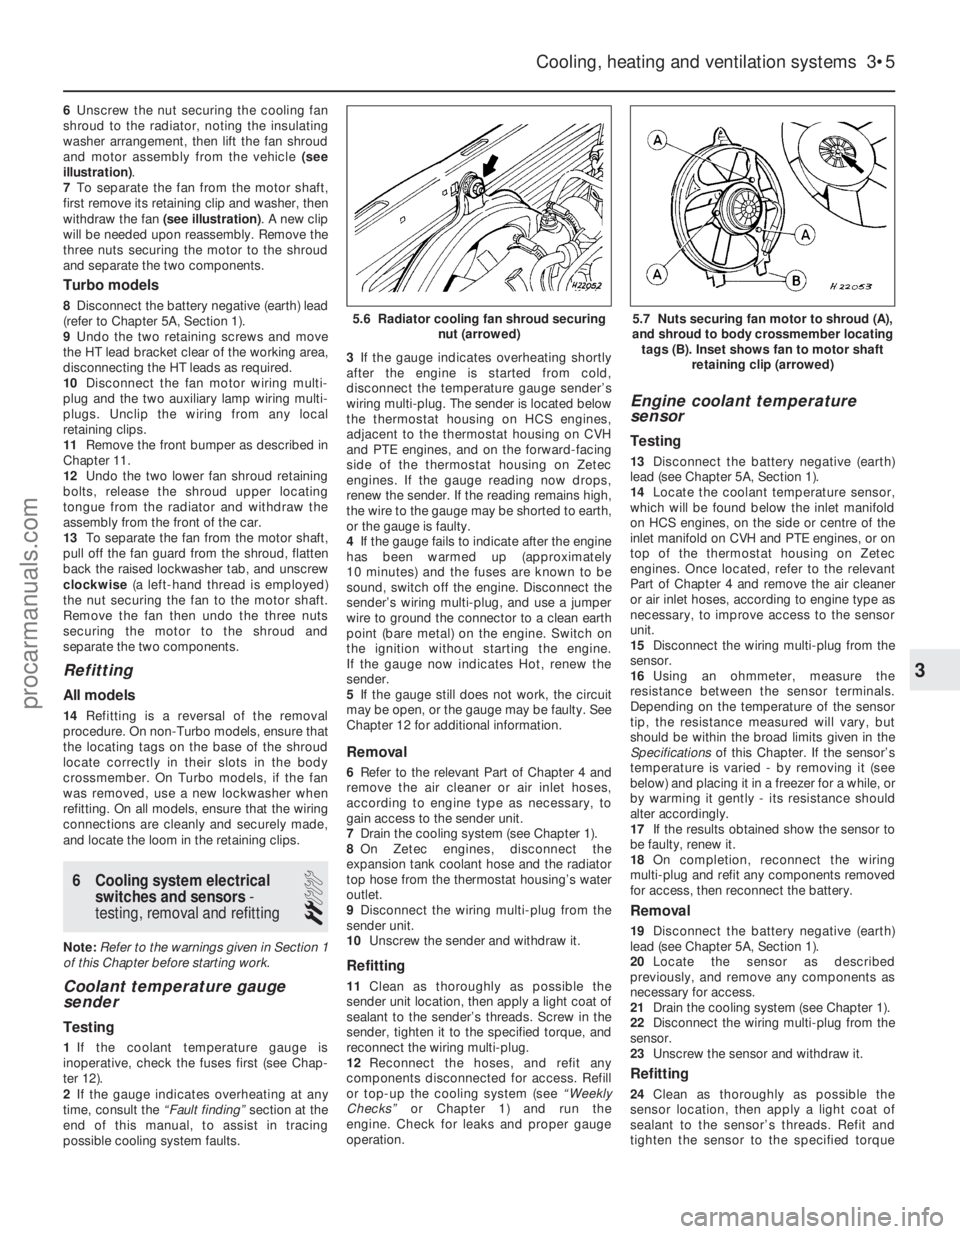
6Unscrew the nut securing the cooling fan
shroud to the radiator, noting the insulating
washer arrangement, then lift the fan shroud
and motor assembly from the vehicle (see
illustration) .
7 To separate the fan from the motor shaft,
first remove its retaining clip and washer, then
withdraw the fan (see illustration) . A new clip
will be needed upon reassembly. Remove the
three nuts securing the motor to the shroud
and separate the two components.
Turbo models
8 Disconnect the battery negative (earth) lead
(refer to Chapter 5A, Section 1).
9 Undo the two retaining screws and move
the HT lead bracket clear of the working area,
disconnecting the HT leads as required.
10 Disconnect the fan motor wiring multi-
plug and the two auxiliary lamp wiring multi-
plugs. Unclip the wiring from any local
retaining clips.
11 Remove the front bumper as described in
Chapter 11.
12 Undo the two lower fan shroud retaining
bolts, release the shroud upper locating
tongue from the radiator and withdraw the
assembly from the front of the car.
13 To separate the fan from the motor shaft,
pull off the fan guard from the shroud, flatten
back the raised lockwasher tab, and unscrew
clockwise (a left-hand thread is employed)
the nut securing the fan to the motor shaft.
Remove the fan then undo the three nuts
securing the motor to the shroud and
separate the two components.
Refitting
All models
14 Refitting is a reversal of the removal
procedure. On non-Turbo models, ensure that
the locating tags on the base of the shroud
locate correctly in their slots in the body
crossmember. On Turbo models, if the fan
was removed, use a new lockwasher when
refitting. On all models, ensure that the wiring
connections are cleanly and securely made,
and locate the loom in the retaining clips.
6 Cooling system electrical switches and sensors -
testing, removal and refitting
2
Note: Refer to the warnings given in Section 1
of this Chapter before starting work.
Coolant temperature gauge
sender
Testing
1 If the coolant temperature gauge is
inoperative, check the fuses first (see Chap-
ter 12).
2 If the gauge indicates overheating at any
time, consult the “Fault finding” section at the
end of this manual, to assist in tracing
possible cooling system faults. 3
If the gauge indicates overheating shortly
after the engine is started from cold,
disconnect the temperature gauge sender’s
wiring multi-plug. The sender is located below
the thermostat housing on HCS engines,
adjacent to the thermostat housing on CVH
and PTE engines, and on the forward-facing
side of the thermostat housing on Zetec
engines. If the gauge reading now drops,
renew the sender. If the reading remains high,
the wire to the gauge may be shorted to earth,
or the gauge is faulty.
4 If the gauge fails to indicate after the engine
has been warmed up (approximately
10 minutes) and the fuses are known to be
sound, switch off the engine. Disconnect the
sender’s wiring multi-plug, and use a jumper
wire to ground the connector to a clean earth
point (bare metal) on the engine. Switch on
the ignition without starting the engine.
If the gauge now indicates Hot, renew the
sender.
5 If the gauge still does not work, the circuit
may be open, or the gauge may be faulty. See
Chapter 12 for additional information.
Removal
6 Refer to the relevant Part of Chapter 4 and
remove the air cleaner or air inlet hoses,
according to engine type as necessary, to
gain access to the sender unit.
7 Drain the cooling system (see Chapter 1).
8 On Zetec engines, disconnect the
expansion tank coolant hose and the radiator
top hose from the thermostat housing’s water
outlet.
9 Disconnect the wiring multi-plug from the
sender unit.
10 Unscrew the sender and withdraw it.
Refitting
11Clean as thoroughly as possible the
sender unit location, then apply a light coat of
sealant to the sender’s threads. Screw in the
sender, tighten it to the specified torque, and
reconnect the wiring multi-plug.
12 Reconnect the hoses, and refit any
components disconnected for access. Refill
or top-up the cooling system (see “Weekly
Checks” or Chapter 1) and run the
engine. Check for leaks and proper gauge
operation.
Engine coolant temperature
sensor
Testing
13 Disconnect the battery negative (earth)
lead (see Chapter 5A, Section 1).
14 Locate the coolant temperature sensor,
which will be found below the inlet manifold
on HCS engines, on the side or centre of the
inlet manifold on CVH and PTE engines, or on
top of the thermostat housing on Zetec
engines. Once located, refer to the relevant
Part of Chapter 4 and remove the air cleaner
or air inlet hoses, according to engine type as
necessary, to improve access to the sensor
unit.
15 Disconnect the wiring multi-plug from the
sensor.
16 Using an ohmmeter, measure the
resistance between the sensor terminals.
Depending on the temperature of the sensor
tip, the resistance measured will vary, but
should be within the broad limits given in the
Specifications of this Chapter. If the sensor’s
temperature is varied - by removing it (see
below) and placing it in a freezer for a while, or
by warming it gently - its resistance should
alter accordingly.
17 If the results obtained show the sensor to
be faulty, renew it.
18 On completion, reconnect the wiring
multi-plug and refit any components removed
for access, then reconnect the battery.
Removal
19 Disconnect the battery negative (earth)
lead (see Chapter 5A, Section 1).
20 Locate the sensor as described
previously, and remove any components as
necessary for access.
21 Drain the cooling system (see Chapter 1).
22 Disconnect the wiring multi-plug from the
sensor.
23 Unscrew the sensor and withdraw it.
Refitting
24Clean as thoroughly as possible the
sensor location, then apply a light coat of
sealant to the sensor’s threads. Refit and
tighten the sensor to the specified torque
Cooling, heating and ventilation systems 3•5
5.7 Nuts securing fan motor to shroud (A),
and shroud to body crossmember locating tags (B). Inset shows fan to motor shaft retaining clip (arrowed)5.6 Radiator cooling fan shroud securing nut (arrowed)
3
1595Ford Fiesta Remakeprocarmanuals.com
http://vnx.su
Page 102 of 296

Refitting
23Refit in the reverse order of removal. Top-
up the cooling system as described in
“Weekly Checks”.
8 Water pump (HCS engines) -
removal and refitting
2
Note: Refer to the warnings given in Section 1
of this Chapter before starting work.
Removal
1 Disconnect the battery negative (earth) lead
(refer to Chapter 5A, Section 1).
2 Drain the cooling system (see Chapter 1).
3 Slacken the water pump pulley retaining
bolts, then remove the auxiliary drivebelt as
described in Chapter 1 (see illustration).
4 Remove the retaining bolts, and remove the
drivebelt pulley from the water pump.
5 Loosen off the coolant hose securing clips,
and disconnect the hoses from the water
pump.
6 Unscrew the retaining bolts, and withdraw
the water pump from the engine (see
illustration) .
7 No provision is made for the repair of the
water pump; if it is noisy or defective in any
way, it must be renewed.
Refitting
8 Clean all traces of gasket from the engine
and the water pump mating faces. Ensure that
the mating faces are clean and dry. Note
that the water pump gasket fitted during
production is integral with the timing cover
gasket, and this will need to be cut away
using a sharp knife, keeping as close to the
timing cover as possible.
9 Refitting is a reversal of the removal
procedure. Use a new gasket, lightly smeared
with jointing compound, and tighten the
retaining bolts to the specified torque.
10 Refit and adjust the auxiliary drivebelt as
described in Chapter 1.
11 Refill the cooling system as described in
Chapter 1, and reconnect the battery.
9 Water pump (CVH and PTE engines) -
removal and refitting
4
Note: Refer to the warnings given in Section 1
of this Chapter before starting work.
Removal
1 Disconnect the battery negative (earth) lead
(refer to Chapter 5A, Section 1).
2 Drain the cooling system (see Chapter 1).
3 Remove the timing belt and tensioner (see
Chapter 2B). If the belt is fouled with coolant,
it must be renewed as a matter of course.
4 Loosen off the coolant hose retaining clip,
and detach the coolant hose from the water
pump.
5 Unscrew and remove the four bolts
securing the water pump to the front end face
of the cylinder block, and then withdraw the
pump from the vehicle (see illustration).
Refitting
6Clean the engine water pump mating faces.
Ensure that the mating faces are clean and
dry.
7 No provision is made for the repair of the
water pump; if it is noisy or defective in any
way, it must be renewed.
8 Refitting is a reversal of the removal
procedure. Tighten the retaining bolts to the
specified torque, and ensure that the coolant
hose connection to the water pump is
securely made. 9
Refit the timing belt and tensioner as
described in Chapter 2B.
10 Refill the cooling system as described in
Chapter 1, and reconnect the battery.
10 Water pump (Zetec engines) - removal and refitting
4
Note: Refer to the warnings given in Section 1
of this Chapter before starting work.
Removal
1 Disconnect the battery negative (earth) lead
(refer to Chapter 5A, Section 1).
2 Drain the cooling system (see Chapter 1).
3 Remove the timing belt and tensioner (see
Chapter 2C). If the belt is fouled with coolant,
it must be renewed as a matter of course.
4 Disconnect the radiator bottom hose from
the pump union.
5 Unbolt and remove the water pump (see
illustrations) . If the pump is to be renewed,
unbolt the timing belt guide pulleys, and
transfer them to the new pump.
Refitting
6 Clean the mating surfaces carefully; the
gasket must be renewed whenever it is
disturbed.
7 On refitting, use grease to stick the new
gasket in place, refit the pump, and tighten
the pump bolts to the specified torque.
8 The remainder of refitting is a reversal of the
Cooling, heating and ventilation systems 3•7
9.5 CVH engine timing belt tensioner
retaining bolts (A) and water pump securing bolts (B)8.6 HCS engine water pump removal8.3 HCS engine water pump pulleyretaining bolts (arrowed)
10.5b . . . and remove the Zetec engine water pump10.5a Unscrew the bolts (arrowed) . . .
3
1595Ford Fiesta Remakeprocarmanuals.com
http://vnx.su
Page 108 of 296
1 General information andprecautions
General information
The fuel system on all models with
carburettor induction comprises a rear-
mounted fuel tank, a mechanical diaphragm
fuel pump, a carburettor and an air cleaner. The fuel tank is mounted at the rear, under
the floorpan behind the rear seats. The tank
has a “ventilation-to-atmosphere system”
through a combined roll-over/anti-trickle fill
valve assembly, located in the left-hand rear
wheel arch. A filler neck sensing pipe, integral
with the fuel tank filler pipe, will shut off the
petrol pump filler gun when the predetermined
maximum level of fuel is reached in the tank,
so preventing spillage and wastage. A
conventional fuel level sender unit is mounted
in the top face of the fuel tank. One of two fuel pump types will be fitted,
depending on the engine type. On HCS
engines, the fuel pump is operated by a
pivoting rocker arm; one end rests on an
eccentric lobe on the engine camshaft, and
the other end is attached to the fuel pump
diaphragm. The pump fitted to the CVH
engine is operated by a separate pushrod,
one end rests on an eccentric lobe on the
engine camshaft, and the other rests on the
pump actuating rod which operates the
diaphragm. Both types of mechanical pump
incorporate a nylon mesh filter, and are of
sealed type (they cannot be serviced or
overhauled). Four different types of Weber carburettor
are featured in the range, further details being
given in later Sections of this Chapter. The air cleaner incorporates a “waxstat”
controlled air inlet, supplying either hot air
from a shroud mounted around the exhaust
manifold, or cool air from a duct in the front of
the vehicle.
Precautions
Warning: Petrol is extremely
flammable - great care must be
taken when working on any part of the fuel system. Do not smoke or allow
any naked flames or uncovered light bulbs
near the work area. Note that gas powered
domestic appliances with pilot flames,
such as heaters, boilers and tumble
dryers, also present a fire hazard - bear
this in mind if you are working in an area
where such appliances are present.
Always keep a suitable fire extinguisher
close to the work area and familiarise
yourself with its operation before starting
work. Wear eye protection when working
on fuel systems and wash off any fuel spilt
on bare skin immediately with soap and
water. Note that fuel vapour is just as
dangerous as liquid fuel; a vessel that has
just been emptied of liquid fuel will still
contain vapour and can be potentially
explosive. Petrol is a highly dangerous and
volatile liquid, and the precautions
necessary when handling it cannot be
overstressed.
Many of the operations described in this
Chapter involve the disconnection of fuel
lines, which may cause an amount of fuel
spillage. Before commencing work, refer
to the above Warning and the information
in “Safety first” at the beginning of this
manual.
When working with fuel system
components, pay particular attention to
cleanliness - dirt entering the fuel system
may cause blockages which will lead to
poor running.
Certain adjustment points in the fuel system
are protected by tamperproof caps, plugs or
seals. In some territories, it is an offence to
drive a vehicle with broken or missing
tamperproof seals. Before disturbing a
tamperproof seal, first check that no local or
national laws will be broken by doing so, and
fit a new tamperproof seal after adjustment is
complete, where required by law. Do not
break tamperproof seals on any vehicle whilst
it is still under warranty. Carburettors are delicate instruments, and
care must be taken not to disturb any
components unnecessarily. Before attempting
work on a carburettor, ensure that the relevant
spares are available; it should be noted that a complete strip down of a carburettor is
unlikely to cure a fault which is not
immediately obvious, without introducing new
problems. If persistent problems occur, it is
recommended that the services of a Ford
dealer or a carburettor specialist are sought.
Most dealers will be able to provide
carburettor rejetting and servicing facilities.
Where necessary, it may be possible to
purchase a reconditioned carburettor.
2 Air cleaner
-
removal and refitting
1
Note: Air cleaner element renewal and air
cleaner temperature control system checks
are described in Chapter 1.
Removal
1 Disconnect the battery negative (earth) lead
(refer to Chapter 5A, Section 1).
2 On CVH engine models, pull free and
release the accelerator cable from the locating
clip on the side of the air cleaner.
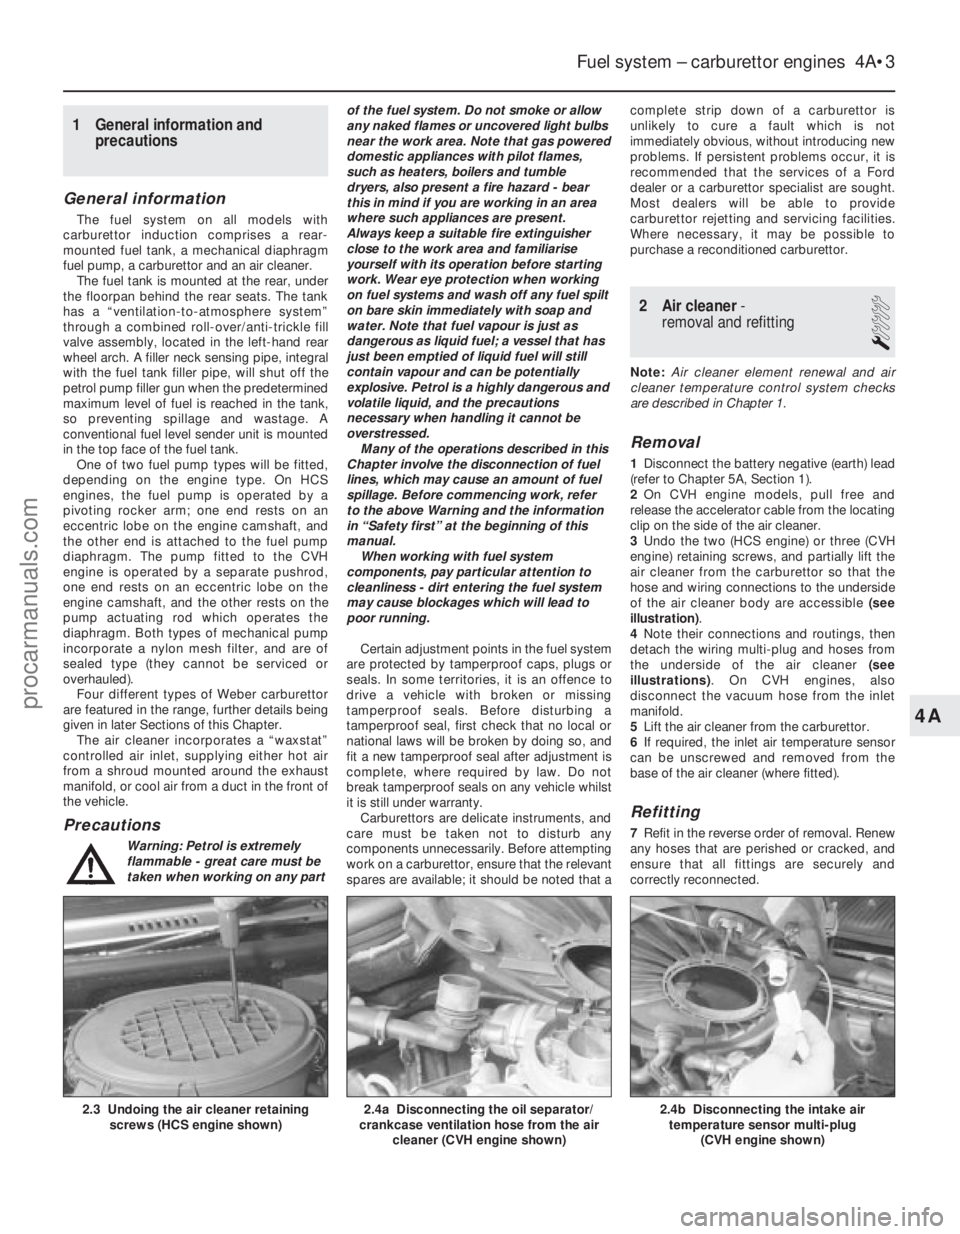
3 Undo the two (HCS engine) or three (CVH
engine) retaining screws, and partially lift the
air cleaner from the carburettor so that the
hose and wiring connections to the underside
of the air cleaner body are accessible (see
illustration) .
4 Note their connections and routings, then
detach the wiring multi-plug and hoses from
the underside of the air cleaner (see
illustrations) . On CVH engines, also
disconnect the vacuum hose from the inlet
manifold.
5 Lift the air cleaner from the carburettor.
6 If required, the inlet air temperature sensor
can be unscrewed and removed from the
base of the air cleaner (where fitted).
Refitting
7 Refit in the reverse order of removal. Renew
any hoses that are perished or cracked, and
ensure that all fittings are securely and
correctly reconnected.
Fuel system – carburettor engines 4A•3
2.4b Disconnecting the intake air temperature sensor multi-plug
(CVH engine shown)2.4a Disconnecting the oil separator/
crankcase ventilation hose from the air
cleaner (CVH engine shown)2.3 Undoing the air cleaner retainingscrews (HCS engine shown)
4A
1595Ford Fiesta Remakeprocarmanuals.com
http://vnx.su
Page 110 of 296
position at the carburettor, then secure the
outer cable with its retaining clip.
Adjustment
12To check that the choke cable is correctly
adjusted, the control knob must be pulled out
to the full-on position and the choke lever
must be in contact with its stop. Adjust as
required if necessary.
13 Press the choke knob fully in (to the off
position), then check that the choke linkage at
the carburettor has fully returned to its off
position and the choke valve plate in the
carburettor is at a right angle (90º) to the
venturi.
14 Refit the air cleaner.
15 Reconnect the battery, turn the ignition
on, operate the choke and check that the
choke warning light operates correctly.
7 Fuel pump -
testing, removal and refitting
2
Note: Refer to the warning note in Section 1
before proceeding.
Testing
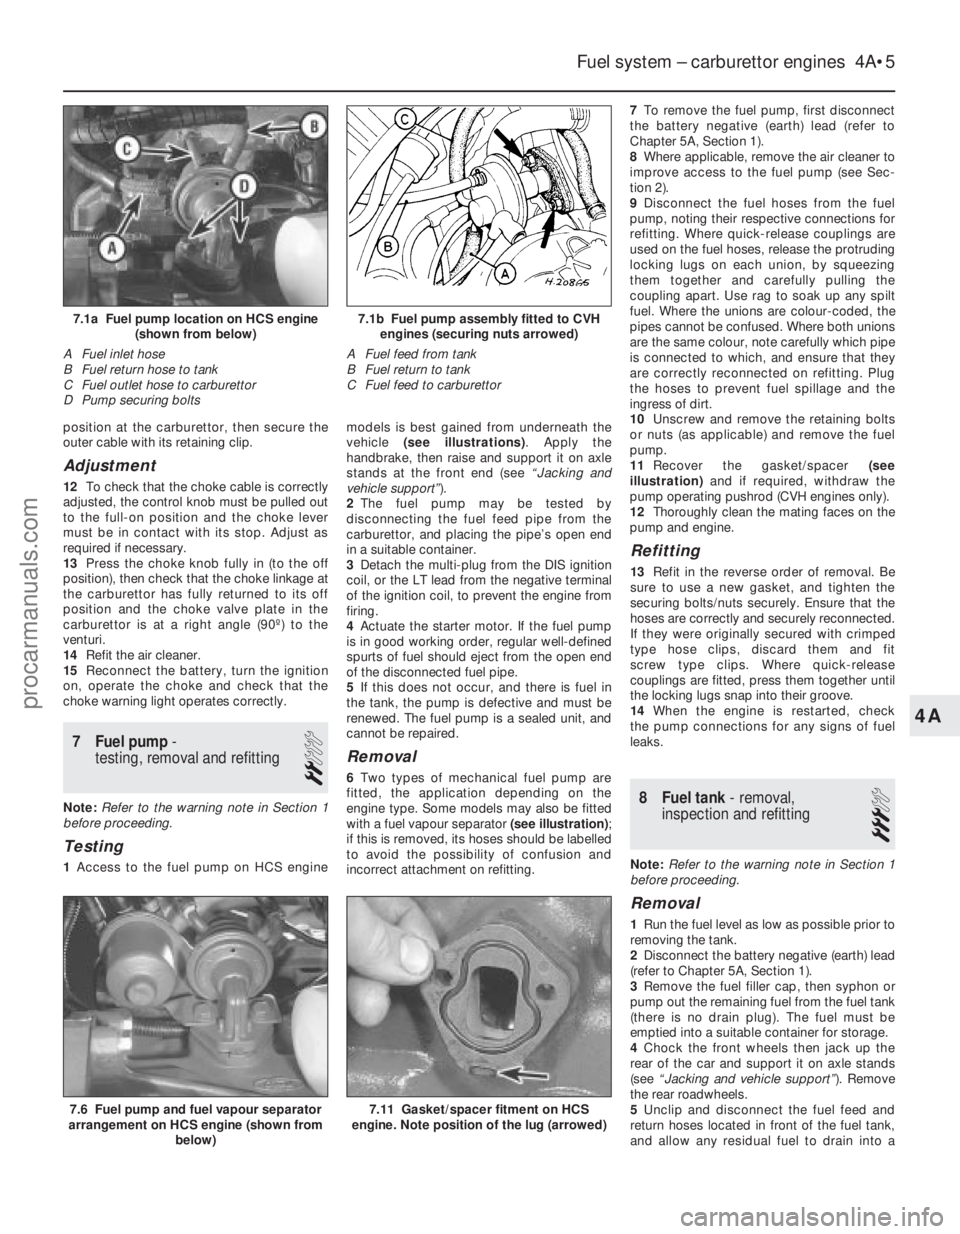
1 Access to the fuel pump on HCS engine models is best gained from underneath the
vehicle
(see illustrations) . Apply the
handbrake, then raise and support it on axle
stands at the front end (see “Jacking and
vehicle support” ).
2 The fuel pump may be tested by
disconnecting the fuel feed pipe from the
carburettor, and placing the pipe’s open end
in a suitable container.
3 Detach the multi-plug from the DIS ignition
coil, or the LT lead from the negative terminal
of the ignition coil, to prevent the engine from
firing.
4 Actuate the starter motor. If the fuel pump
is in good working order, regular well-defined
spurts of fuel should eject from the open end
of the disconnected fuel pipe.
5 If this does not occur, and there is fuel in
the tank, the pump is defective and must be
renewed. The fuel pump is a sealed unit, and
cannot be repaired.
Removal
6 Two types of mechanical fuel pump are
fitted, the application depending on the
engine type. Some models may also be fitted
with a fuel vapour separator (see illustration) ;
if this is removed, its hoses should be labelled
to avoid the possibility of confusion and
incorrect attachment on refitting. 7
To remove the fuel pump, first disconnect
the battery negative (earth) lead (refer to
Chapter 5A, Section 1).
8 Where applicable, remove the air cleaner to
improve access to the fuel pump (see Sec-
tion 2).
9 Disconnect the fuel hoses from the fuel
pump, noting their respective connections for
refitting. Where quick-release couplings are
used on the fuel hoses, release the protruding
locking lugs on each union, by squeezing
them together and carefully pulling the
coupling apart. Use rag to soak up any spilt
fuel. Where the unions are colour-coded, the
pipes cannot be confused. Where both unions
are the same colour, note carefully which pipe
is connected to which, and ensure that they
are correctly reconnected on refitting. Plug
the hoses to prevent fuel spillage and the
ingress of dirt.
10 Unscrew and remove the retaining bolts
or nuts (as applicable) and remove the fuel
pump.
11 Recover the gasket/spacer (see
illustration) and if required, withdraw the
pump operating pushrod (CVH engines only).
12 Thoroughly clean the mating faces on the
pump and engine.
Refitting
13 Refit in the reverse order of removal. Be
sure to use a new gasket, and tighten the
securing bolts/nuts securely. Ensure that the
hoses are correctly and securely reconnected.
If they were originally secured with crimped
type hose clips, discard them and fit
screw type clips. Where quick-release
couplings are fitted, press them together until
the locking lugs snap into their groove.
14 When the engine is restarted, check
the pump connections for any signs of fuel
leaks.
8 Fuel tank - removal,
inspection and refitting
3
Note: Refer to the warning note in Section 1
before proceeding.
Removal
1 Run the fuel level as low as possible prior to
removing the tank.
2 Disconnect the battery negative (earth) lead
(refer to Chapter 5A, Section 1).
3 Remove the fuel filler cap, then syphon or
pump out the remaining fuel from the fuel tank
(there is no drain plug). The fuel must be
emptied into a suitable container for storage.
4 Chock the front wheels then jack up the
rear of the car and support it on axle stands
(see “Jacking and vehicle support” ). Remove
the rear roadwheels.
5 Unclip and disconnect the fuel feed and
return hoses located in front of the fuel tank,
and allow any residual fuel to drain into a
Fuel system – carburettor engines 4A•5
7.6 Fuel pump and fuel vapour separator
arrangement on HCS engine (shown from
below)
7.1b Fuel pump assembly fitted to CVHengines (securing nuts arrowed)
A Fuel feed from tank
B Fuel return to tank
C Fuel feed to carburettor7.1a Fuel pump location on HCS engine (shown from below)
A Fuel inlet hose
B Fuel return hose to tank
C Fuel outlet hose to carburettor
D Pump securing bolts
7.11 Gasket/spacer fitment on HCS
engine. Note position of the lug (arrowed)
4A
1595Ford Fiesta Remakeprocarmanuals.com
http://vnx.su
Page 111 of 296
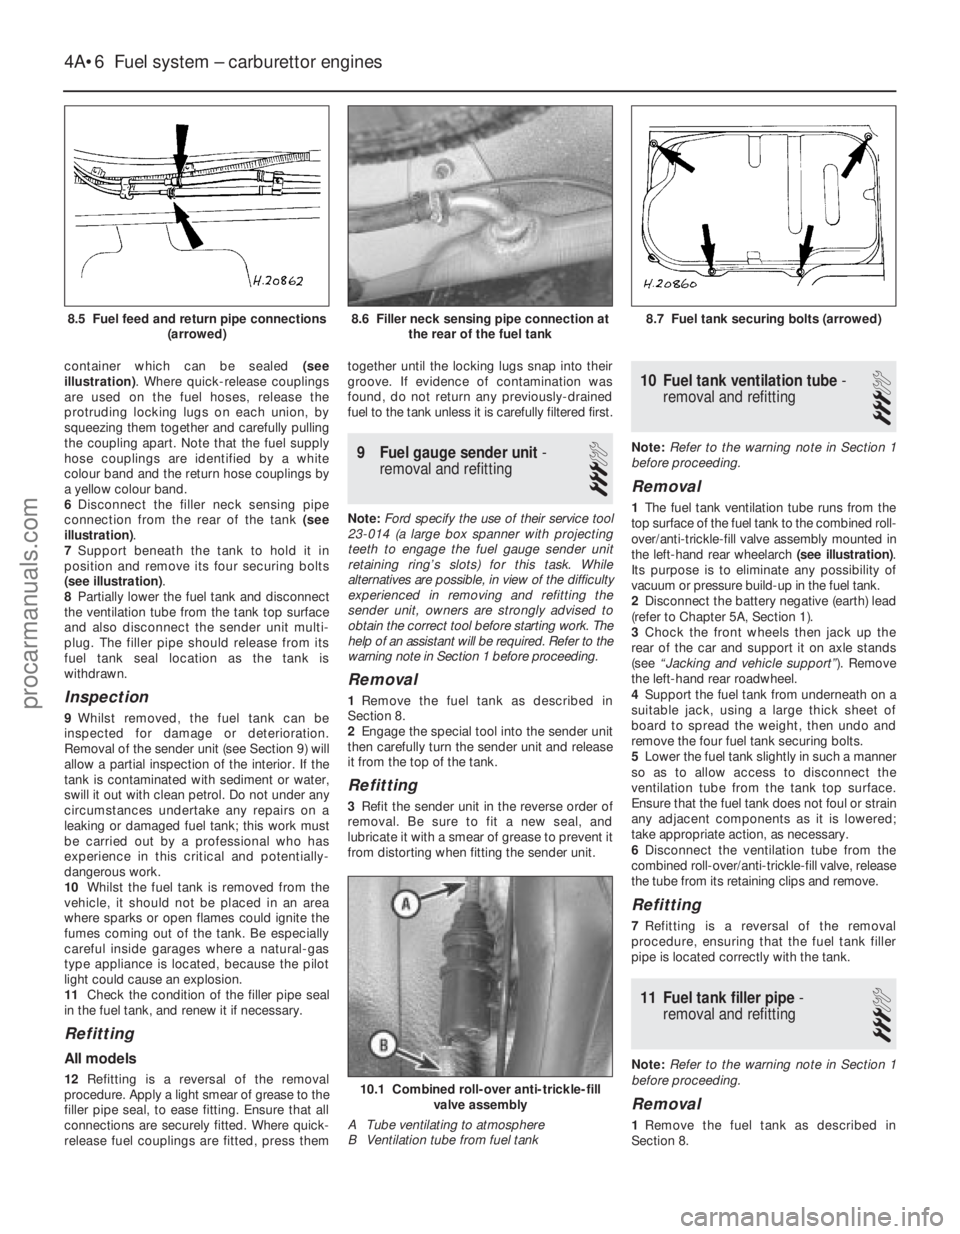
container which can be sealed (see
illustration) . Where quick-release couplings
are used on the fuel hoses, release the
protruding locking lugs on each union, by
squeezing them together and carefully pulling
the coupling apart. Note that the fuel supply
hose couplings are identified by a white
colour band and the return hose couplings by
a yellow colour band.
6 Disconnect the filler neck sensing pipe
connection from the rear of the tank (see
illustration) .
7 Support beneath the tank to hold it in
position and remove its four securing bolts
(see illustration) .
8 Partially lower the fuel tank and disconnect
the ventilation tube from the tank top surface
and also disconnect the sender unit multi-
plug. The filler pipe should release from its
fuel tank seal location as the tank is
withdrawn.
Inspection
9 Whilst removed, the fuel tank can be
inspected for damage or deterioration.
Removal of the sender unit (see Section 9) will
allow a partial inspection of the interior. If the
tank is contaminated with sediment or water,
swill it out with clean petrol. Do not under any
circumstances undertake any repairs on a
leaking or damaged fuel tank; this work must
be carried out by a professional who has
experience in this critical and potentially-
dangerous work.
10 Whilst the fuel tank is removed from the
vehicle, it should not be placed in an area
where sparks or open flames could ignite the
fumes coming out of the tank. Be especially
careful inside garages where a natural-gas
type appliance is located, because the pilot
light could cause an explosion.
11 Check the condition of the filler pipe seal
in the fuel tank, and renew it if necessary.
Refitting
All models
12 Refitting is a reversal of the removal
procedure. Apply a light smear of grease to the
filler pipe seal, to ease fitting. Ensure that all
connections are securely fitted. Where quick-
release fuel couplings are fitted, press them together until the locking lugs snap into their
groove. If evidence of contamination was
found, do not return any previously-drained
fuel to the tank unless it is carefully filtered first.
9
Fuel gauge sender unit -
removal and refitting
3
Note: Ford specify the use of their service tool
23-014 (a large box spanner with projecting
teeth to engage the fuel gauge sender unit
retaining ring’s slots) for this task. While
alternatives are possible, in view of the difficulty
experienced in removing and refitting the
sender unit, owners are strongly advised to
obtain the correct tool before starting work. The
help of an assistant will be required. Refer to the
warning note in Section 1 before proceeding.
Removal
1 Remove the fuel tank as described in
Section 8.
2 Engage the special tool into the sender unit
then carefully turn the sender unit and release
it from the top of the tank.
Refitting
3 Refit the sender unit in the reverse order of
removal. Be sure to fit a new seal, and
lubricate it with a smear of grease to prevent it
from distorting when fitting the sender unit.
10 Fuel tank ventilation tube -
removal and refitting
3
Note: Refer to the warning note in Section 1
before proceeding.
Removal
1 The fuel tank ventilation tube runs from the
top surface of the fuel tank to the combined roll-
over/anti-trickle-fill valve assembly mounted in
the left-hand rear wheelarch (see illustration).
Its purpose is to eliminate any possibility of
vacuum or pressure build-up in the fuel tank.
2 Disconnect the battery negative (earth) lead
(refer to Chapter 5A, Section 1).
3 Chock the front wheels then jack up the
rear of the car and support it on axle stands
(see “Jacking and vehicle support” ). Remove
the left-hand rear roadwheel.
4 Support the fuel tank from underneath on a
suitable jack, using a large thick sheet of
board to spread the weight, then undo and
remove the four fuel tank securing bolts.
5 Lower the fuel tank slightly in such a manner
so as to allow access to disconnect the
ventilation tube from the tank top surface.
Ensure that the fuel tank does not foul or strain
any adjacent components as it is lowered;
take appropriate action, as necessary.
6 Disconnect the ventilation tube from the
combined roll-over/anti-trickle-fill valve, release
the tube from its retaining clips and remove.
Refitting
7 Refitting is a reversal of the removal
procedure, ensuring that the fuel tank filler
pipe is located correctly with the tank.
11 Fuel tank filler pipe -
removal and refitting
3
Note: Refer to the warning note in Section 1
before proceeding.
Removal
1 Remove the fuel tank as described in
Section 8.
4A•6 Fuel system – carburettor engines
10.1 Combined roll-over anti-trickle-fill valve assembly
A Tube ventilating to atmosphere
B Ventilation tube from fuel tank
8.7 Fuel tank securing bolts (arrowed)8.6 Filler neck sensing pipe connection at the rear of the fuel tank
1595Ford Fiesta Remake
8.5 Fuel feed and return pipe connections
(arrowed)procarmanuals.com
http://vnx.su
Page 114 of 296
as described in Section 16. The power valve
assembly can also be removed in a similar
fashion.
5Prise free the accelerator pump discharge
tube, but take care not to damage it or the
carburettor body.
6 Remove the jets and emulsion tubes as
required, making careful notes of their
respective locations for reassembly.
Cleaning and inspection
7 Soak out the fuel in the float chamber using
a clean rag; this must be safely disposed of.
Clean the float chamber, jets, drillings and
passages with clean petrol. The careful use of
an air line (or footpump) is ideal to blow out
the upper and lower bodies. Never use a
piece of wire for cleaning purposes.
8 Examine all of the carburettor components
for signs of damage or wear, paying particular
attention to the diaphragms, throttle spindle
and plates, and needle valve. Renew all
diaphragms, sealing washers and gaskets as
a matter of course.
Reassembly
9 Refit the emulsion tubes and jets to their
locations as noted during dismantling.
10 Refit the accelerator pump discharge
tube.
11 Refit the accelerator pump and power
valve assemblies as described in Section 16.
12 Refit the needle valve and the float, and
adjust the float setting as described in Sec-
tion 14.
13 Locate a new gasket onto the mating
face, then refit the carburettor upper body to
the main body. As they are reassembled, take
care not to snag the float on the carburettor
main body. Fit and tighten the retaining
screws to secure.
14 On completion, refit the carburettor as
described in Section 15.
18 Carburettor (Weber TLDM) -
description
The carburettor is of twin venturi,
downdraught type, featuring a fixed size main
jet system, adjustable idle system, a
mechanically-operated accelerator pump, and
a vacuum-operated power valve. A manually-
operated cold start choke is fitted, and a
throttle kicker is used on certain models.
In order to comply with emission control
regulations and maintain good fuel
consumption, the main jets are calibrated to
suit the 1/4 to 3/4 throttle range. The power
valve is therefore only used to supply
additional fuel during full-throttle conditions. The accelerator pump is fitted to ensure a
smooth transmission from the idle circuit to
the main jet system. As the accelerator pedal
is depressed, a linkage moves the diaphragm
within the accelerator pump, and a small quantity of fuel is injected into the venturi, to
prevent a momentary weak mixture and
resultant engine hesitation.
The manually-operated choke features a
vacuum-operated pull-down mechanism
which controls the single choke plate under
certain vacuum conditions. On CTX automatic transmission models,
the throttle kicker acts as an idle speed
compensator for when the transmission shift
lever positions R, D or L are selected. The
throttle kicker is operated by vacuum supplied
from the inlet manifold. When the appropriate
transmission shift lever position is selected,
the throttle kicker control solenoid allows the
vacuum to pass to the throttle kicker which
maintains the idle speed by means of a
diaphragm and mechanical linkage. On manual transmission models, the
throttle kicker (when fitted) acts as a damper
by slowing down the closing action of the
throttle plate. Under deceleration, this
maintains the combustion of the air/fuel
mixture entering the cylinders, thus improving
the exhaust emission levels. A vacuum
sustain valve controls the carburettor-sourced
vacuum applied to the throttle kicker unit; this
allows the vacuum slowly to decay, allowing
normal engine idling speed to be achieved. An anti-dieseling (fuel cut-off) solenoid is
fitted to prevent the possibility of the engine
running on after the ignition is switched off. Idle speed and mixture adjustment
procedures are described in Chapter 1, but it
is important to note that accurate adjustments
can only be made using the necessary
equipment.
19 Carburettor (Weber TLDM) -
fast-idle speed adjustment
4
Note: Before carrying out any carburettor
adjustments, ensure that the spark plug gaps
are set as specified, and that all electrical and
vacuum connections are secure. To carry out
checks and adjustments, an accurate
tachometer and an exhaust gas analyser (CO
meter) will be required.
1 Check the idle speed and mixture settings are as specified (as described in Chapter 1).
These must be correct before
checking/adjusting the fast-idle speed.
2
With the engine at its normal operating
temperature, and a tachometer connected in
accordance with the manufacturer’s
instructions, switch the engine off, then
remove the air cleaner (if not already done) as
described in Section 2.
3 Actuate the choke by pulling the control
knob fully out, then start the engine and note
the engine fast-idle speed. Compare it with
the specified speed.
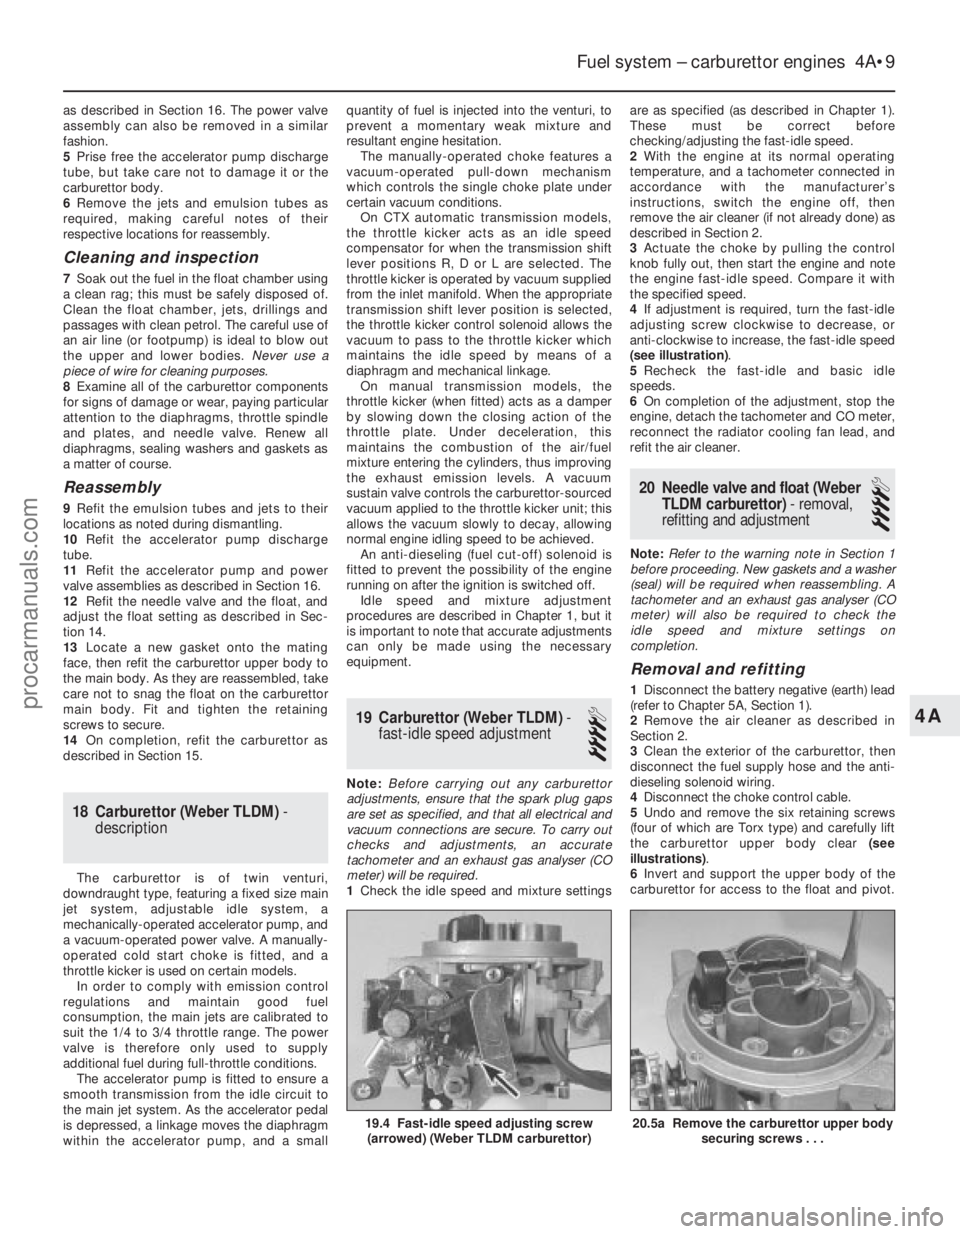
4 If adjustment is required, turn the fast-idle
adjusting screw clockwise to decrease, or
anti-clockwise to increase, the fast-idle speed
(see illustration) .
5 Recheck the fast-idle and basic idle
speeds.
6 On completion of the adjustment, stop the
engine, detach the tachometer and CO meter,
reconnect the radiator cooling fan lead, and
refit the air cleaner.
20 Needle valve and float (Weber
TLDM carburettor) - removal,
refitting and adjustment
4
Note: Refer to the warning note in Section 1
before proceeding. New gaskets and a washer
(seal) will be required when reassembling. A
tachometer and an exhaust gas analyser (CO
meter) will also be required to check the
idle speed and mixture settings on
completion.
Removal and refitting
1 Disconnect the battery negative (earth) lead
(refer to Chapter 5A, Section 1).
2 Remove the air cleaner as described in
Section 2.
3 Clean the exterior of the carburettor, then
disconnect the fuel supply hose and the anti-
dieseling solenoid wiring.
4 Disconnect the choke control cable.
5 Undo and remove the six retaining screws
(four of which are Torx type) and carefully lift
the carburettor upper body clear (see
illustrations) .
6 Invert and support the upper body of the
carburettor for access to the float and pivot.
Fuel system – carburettor engines 4A•9
19.4 Fast-idle speed adjusting screw (arrowed) (Weber TLDM carburettor)
4A
1595Ford Fiesta Remake
20.5a Remove the carburettor upper body securing screws . . .
procarmanuals.com
http://vnx.su
Page 126 of 296
This is used to refine the calculations made by
the module, when determining the correct
amount of fuel required to achieve the ideal
air/fuel mixture ratio.A throttle position sensor is mounted on the
end of the throttle valve spindle, to provide
the EEC IV module with a constantly-varying
(analogue) voltage signal corresponding to the
throttle opening. This allows the module to
register the driver’s input when determining
the amount of fuel required by the engine. Road speed is monitored by the vehicle
speed sensor. This component is a Hall-effect
generator, mounted on the transmission’s
speedometer drive. It supplies the EEC IV
module with a series of pulses corresponding
to the vehicle’s road speed, enabling the
module to control features such as the fuel
shut-off on overrun. A manifold absolute pressure sensor
measures inlet manifold vacuum, and supplies
this information to the module for calculation
of engine load at any given throttle position. Where power steering is fitted, a pressure-
operated switch is screwed into the power
steering system’s high-pressure pipe. The
switch sends a signal to the EEC IV module to
reduce engine speed should the power
steering fluid pressure become excessively
high. Certain later engines may be fitted with a
heater in the inlet manifold. This is controlled
by the EEC IV module to ensure that, even
before the effect of the coolant heating
becomes apparent, the manifold is warmed-
up. This prevents fuel droplets condensing in
the manifold, thus improving driveability and
reducing exhaust emissions when the engine
is cold.
The oxygen sensor in the exhaust system
provides the EEC IV module with constant
feedback - “closed-loop” control - which
enables it to adjust the mixture to provide the
best possible conditions for the catalytic
converter to operate.
Precautions
Warning: Petrol is extremely
flammable - great care must be
taken when working on any part
of the fuel system. Do not
smoke or allow any naked flames or
uncovered light bulbs near the work area.
Note that gas powered domestic
appliances with pilot flames, such as
heaters, boilers and tumble dryers, also
present a fire hazard - bear this in mind if
you are working in an area where such
appliances are present. Always keep a
suitable fire extinguisher close to the work
area and familiarise yourself with its
operation before starting work. Wear eye
protection when working on fuel systems
and wash off any fuel spilt on bare skin
immediately with soap and water. Note
that fuel vapour is just as dangerous as
liquid fuel; a vessel that has just been
emptied of liquid fuel will still contain vapour and can be potentially explosive.
Petrol is a highly dangerous and volatile
liquid, and the precautions necessary
when handling it cannot be overstressed.
Many of the operations described in this
Chapter involve the disconnection of fuel
lines, which may cause an amount of fuel
spillage. Before commencing work, refer
to the above Warning and the information
in “Safety first” at the beginning of this
manual. When working with fuel system
components, pay particular attention to
cleanliness - dirt entering the fuel system
may cause blockages which will lead to
poor running.
Note: Residual pressure will remain in the fuel
lines long after the vehicle was last used,
when disconnecting any fuel line, it will be
necessary to depressurise the fuel system as
described in Section 2 .
2 Fuel system-
depressurisation
1
Note: Refer to the warning note in Section 1
before proceeding.
Warning: The following
procedure will merely relieve the
pressure in the fuel system -
remember that fuel will still be present in
the system components, and take
precautions accordingly before
disconnecting any of them.
1 The fuel system referred to in this Chapter
is defined as the fuel tank and tank-mounted
fuel pump/fuel gauge sender unit, the fuel
filter, the fuel injector, fuel pressure regulator,
and the metal pipes and flexible hoses of the
fuel lines between these components. All
these contain fuel, which will be under
pressure while the engine is running and/or
while the ignition is switched on.
2 The pressure will remain for some time after
the ignition has been switched off, and must
be relieved before any of these components is
disturbed for servicing work.
3 The simplest depressurisation method is to
disconnect the fuel pump electrical supply by
removing the fuel pump fuse (No 19) and
starting the engine; allow the engine to idle
until it dies through lack of fuel pressure. Turn
the engine over once or twice on the starter to
ensure that all pressure is released, then
switch off the ignition; do not forget to refit the
fuse when work is complete.
4 Note that, once the fuel system has been
depressurised and drained (even partially), it
will take significantly longer to restart the
engine - perhaps several seconds of cranking
- before the system is refilled and pressure
restored.
3 Fuel lines and fittings -
general information
Note: Refer to the warning note in Section 1
before proceeding.
Disconnecting and connecting
quick-release couplings
1 Quick-release couplings are employed at
many of the unions in the fuel feed and return
lines.
2 Before disconnecting any fuel system
component, relieve the residual pressure in
the system (see Section 2), and equalise tank
pressure by removing the fuel filler cap.
Warning: This procedure will
merely relieve the increased
pressure necessary for the
engine to run - remember that
fuel will still be present in the system
components, and take precautions
accordingly before disconnecting any of
them.
3 Release the protruding locking lugs on each
union, by squeezing them together and
carefully pulling the coupling apart. Use rag to
soak up any spilt fuel. Where the unions are
colour-coded, the pipes cannot be confused.
Where both unions are the same colour, note
carefully which pipe is connected to which,
and ensure that they are correctly
reconnected on refitting.
4 To reconnect one of these couplings, press
them together until the locking lugs snap into
their groove. Switch the ignition on and off
five times to pressurise the system, and check
for any sign of fuel leakage around the
disturbed coupling before attempting to start
the engine.
Checking
5 Checking procedures for the fuel lines are
included in Chapter 1.
Component renewal
6 If any damaged sections are to be renewed,
use original-equipment replacement hoses or
pipes, constructed from exactly the same
material as the section being replaced. Do not
install substitutes constructed from inferior or
inappropriate material; this could cause a fuel
leak or a fire.
7 Before detaching or disconnecting any part
of the fuel system, note the routing of all
hoses and pipes, and the orientation of all
clamps and clips. Replacement sections must
be installed in exactly the same manner.
8 Before disconnecting any part of the fuel
system, be sure to relieve the fuel system
pressure (see Section 2), and equalise tank
pressure by removing the fuel filler cap. Also
disconnect the battery negative (earth) lead -
see Chapter 5A, Section 1. Cover the fitting
being disconnected with a rag, to absorb any
fuel that may spray out.
Fuel system - central fuel injection engines 4B•3
4B
1595Ford Fiesta Remakeprocarmanuals.com
http://vnx.su
Page 128 of 296
The seal ring must be renewed whenever the
pump/sender unit is withdrawn from the tank.
Refitting
4Refit in the reverse order of removal. Lightly
coat the new unit seal ring with grease to ease
fitting, and ensure that the seal is not
distorted as the unit is fitted into position.
Insert the unit so that the lug of the unit is in
engagement with the slot in the tank aperture,
then turn the unit to lock and secure.
10 Fuel tank ventilation tube -
removal and refitting
3
Refer to Part A, Section 10, but note that on
models with evaporative emission control, the
ventilation tube connects to the combined
roll-over/anti-trickle-fill valve assembly but,
instead of venting to atmosphere, a further
tube runs the length of the vehicle to a carbon
canister in the front right-hand corner of the
engine compartment. Further information on the evaporative
emission control system is contained in Part E
of this Chapter.
11 Fuel tank filler pipe -
removal and refitting
3
Refer to Part A, Section 11.
12 Fuel cut-off switch -
removal and refitting
2
Removal
1 Disconnect the battery negative (earth) lead
(refer to Chapter 5A, Section 1).
2 Remove the left-hand sill scuff plate as
described in Chapter 11, Section 42. 3
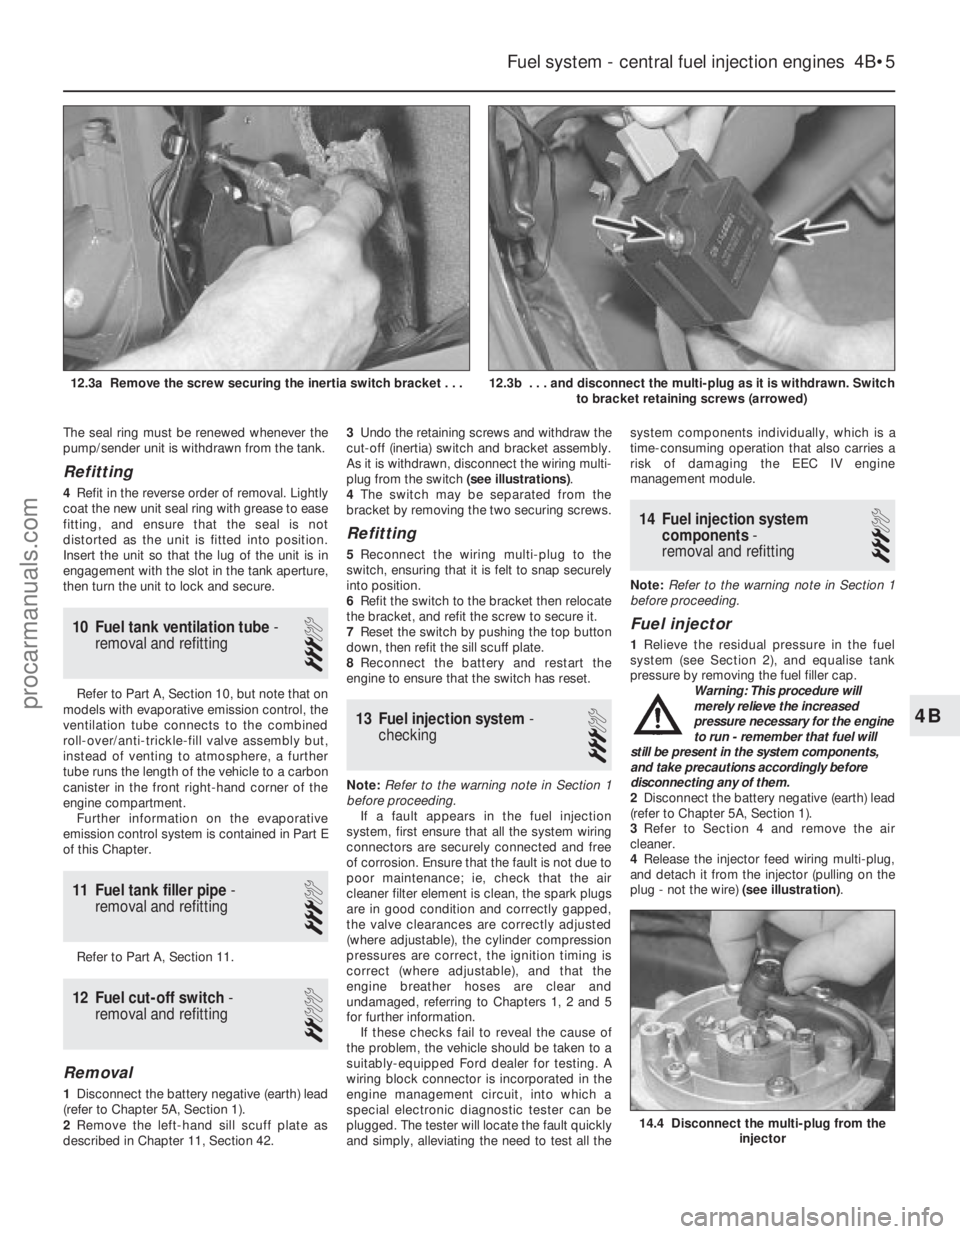
Undo the retaining screws and withdraw the
cut-off (inertia) switch and bracket assembly.
As it is withdrawn, disconnect the wiring multi-
plug from the switch (see illustrations).
4 The switch may be separated from the
bracket by removing the two securing screws.
Refitting
5 Reconnect the wiring multi-plug to the
switch, ensuring that it is felt to snap securely
into position.
6 Refit the switch to the bracket then relocate
the bracket, and refit the screw to secure it.
7 Reset the switch by pushing the top button
down, then refit the sill scuff plate.
8 Reconnect the battery and restart the
engine to ensure that the switch has reset.
13 Fuel injection system -
checking
3
Note: Refer to the warning note in Section 1
before proceeding. If a fault appears in the fuel injection
system, first ensure that all the system wiring
connectors are securely connected and free
of corrosion. Ensure that the fault is not due to
poor maintenance; ie, check that the air
cleaner filter element is clean, the spark plugs
are in good condition and correctly gapped,
the valve clearances are correctly adjusted
(where adjustable), the cylinder compression
pressures are correct, the ignition timing is
correct (where adjustable), and that the
engine breather hoses are clear and
undamaged, referring to Chapters 1, 2 and 5
for further information. If these checks fail to reveal the cause of
the problem, the vehicle should be taken to a
suitably-equipped Ford dealer for testing. A
wiring block connector is incorporated in the
engine management circuit, into which a
special electronic diagnostic tester can be
plugged. The tester will locate the fault quickly
and simply, alleviating the need to test all the system components individually, which is a
time-consuming operation that also carries a
risk of damaging the EEC IV engine
management module.
14 Fuel injection system
components -
removal and refitting
3
Note: Refer to the warning note in Section 1
before proceeding.
Fuel injector
1 Relieve the residual pressure in the fuel
system (see Section 2), and equalise tank
pressure by removing the fuel filler cap.
Warning: This procedure will
merely relieve the increased
pressure necessary for the engine
to run - remember that fuel will
still be present in the system components,
and take precautions accordingly before
disconnecting any of them.
2 Disconnect the battery negative (earth) lead
(refer to Chapter 5A, Section 1).
3 Refer to Section 4 and remove the air
cleaner.
4 Release the injector feed wiring multi-plug,
and detach it from the injector (pulling on the
plug - not the wire) (see illustration).
Fuel system - central fuel injection engines 4B•5
12.3b . . . and disconnect the multi-plug as it is withdrawn. Switch
to bracket retaining screws (arrowed)12.3a Remove the screw securing the inertia switch bracket . . .
14.4 Disconnect the multi-plug from the injector
4B
1595Ford Fiesta Remakeprocarmanuals.com
http://vnx.su
Page 129 of 296
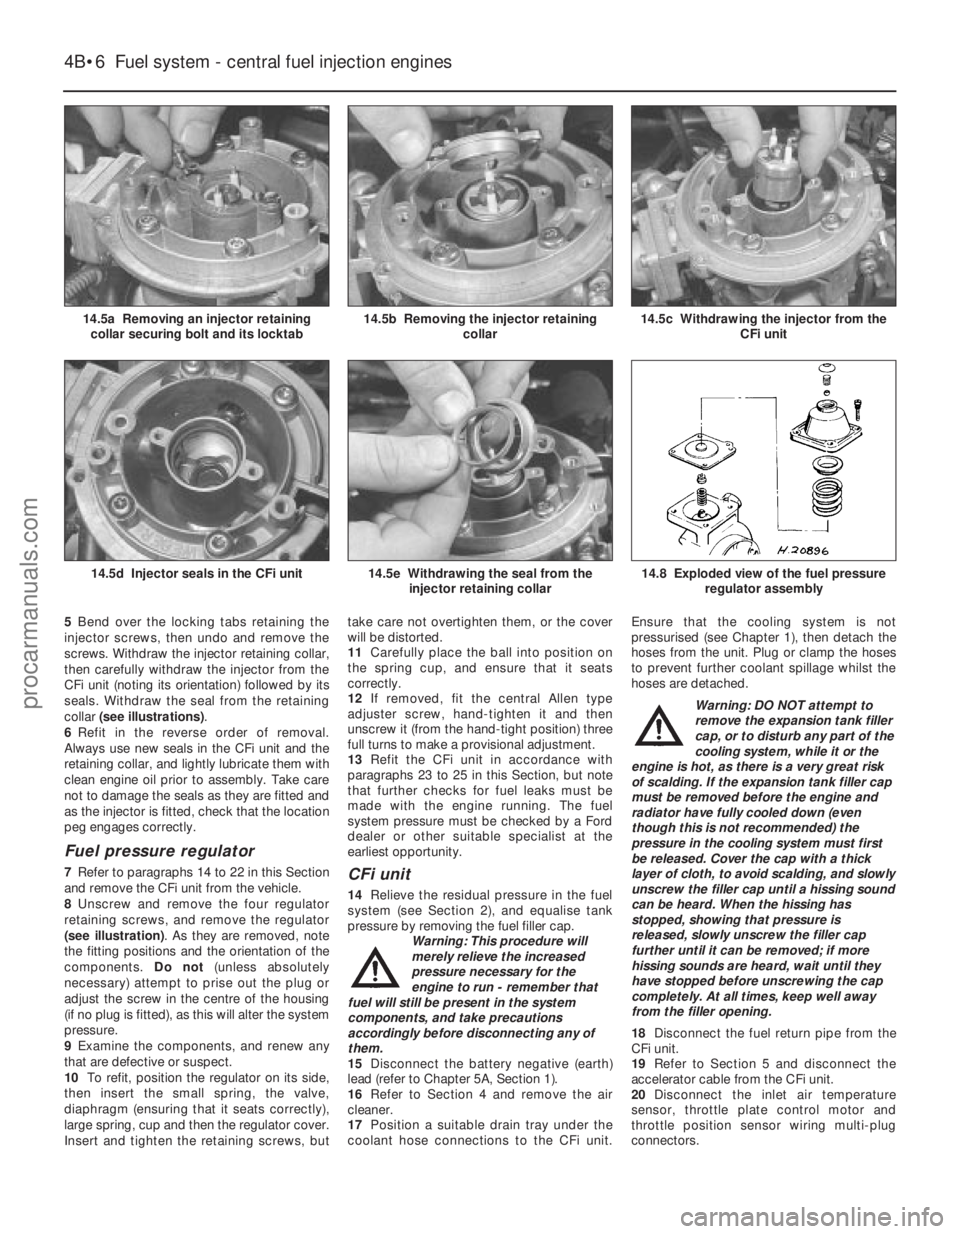
5Bend over the locking tabs retaining the
injector screws, then undo and remove the
screws. Withdraw the injector retaining collar,
then carefully withdraw the injector from the
CFi unit (noting its orientation) followed by its
seals. Withdraw the seal from the retaining
collar (see illustrations) .
6 Refit in the reverse order of removal.
Always use new seals in the CFi unit and the
retaining collar, and lightly lubricate them with
clean engine oil prior to assembly. Take care
not to damage the seals as they are fitted and
as the injector is fitted, check that the location
peg engages correctly.
Fuel pressure regulator
7 Refer to paragraphs 14 to 22 in this Section
and remove the CFi unit from the vehicle.
8 Unscrew and remove the four regulator
retaining screws, and remove the regulator
(see illustration) . As they are removed, note
the fitting positions and the orientation of the
components. Do not(unless absolutely
necessary) attempt to prise out the plug or
adjust the screw in the centre of the housing
(if no plug is fitted), as this will alter the system
pressure.
9 Examine the components, and renew any
that are defective or suspect.
10 To refit, position the regulator on its side,
then insert the small spring, the valve,
diaphragm (ensuring that it seats correctly),
large spring, cup and then the regulator cover.
Insert and tighten the retaining screws, but take care not overtighten them, or the cover
will be distorted.
11
Carefully place the ball into position on
the spring cup, and ensure that it seats
correctly.
12 If removed, fit the central Allen type
adjuster screw, hand-tighten it and then
unscrew it (from the hand-tight position) three
full turns to make a provisional adjustment.
13 Refit the CFi unit in accordance with
paragraphs 23 to 25 in this Section, but note
that further checks for fuel leaks must be
made with the engine running. The fuel
system pressure must be checked by a Ford
dealer or other suitable specialist at the
earliest opportunity.CFi unit
14 Relieve the residual pressure in the fuel
system (see Section 2), and equalise tank
pressure by removing the fuel filler cap. Warning: This procedure will
merely relieve the increased
pressure necessary for the
engine to run - remember that
fuel will still be present in the system
components, and take precautions
accordingly before disconnecting any of
them.
15 Disconnect the battery negative (earth)
lead (refer to Chapter 5A, Section 1).
16 Refer to Section 4 and remove the air
cleaner.
17 Position a suitable drain tray under the
coolant hose connections to the CFi unit. Ensure that the cooling system is not
pressurised (see Chapter 1), then detach the
hoses from the unit. Plug or clamp the hoses
to prevent further coolant spillage whilst the
hoses are detached.
Warning: DO NOT attempt to
remove the expansion tank filler
cap, or to disturb any part of the
cooling system, while it or the
engine is hot, as there is a very great risk
of scalding. If the expansion tank filler cap
must be removed before the engine and
radiator have fully cooled down (even
though this is not recommended) the
pressure in the cooling system must first
be released. Cover the cap with a thick
layer of cloth, to avoid scalding, and slowly
unscrew the filler cap until a hissing sound
can be heard. When the hissing has
stopped, showing that pressure is
released, slowly unscrew the filler cap
further until it can be removed; if more
hissing sounds are heard, wait until they
have stopped before unscrewing the cap
completely. At all times, keep well away
from the filler opening.
18 Disconnect the fuel return pipe from the
CFi unit.
19 Refer to Section 5 and disconnect the
accelerator cable from the CFi unit.
20 Disconnect the inlet air temperature
sensor, throttle plate control motor and
throttle position sensor wiring multi-plug
connectors.
4B•6 Fuel system - central fuel injection engines
14.8 Exploded view of the fuel pressure
regulator assembly14.5e Withdrawing the seal from theinjector retaining collar14.5d Injector seals in the CFi unit
14.5c Withdrawing the injector from the CFi unit14.5b Removing the injector retainingcollar14.5a Removing an injector retainingcollar securing bolt and its locktab
1595Ford Fiesta Remakeprocarmanuals.com
http://vnx.su
Page 136 of 296
Engine temperature information is supplied
by the coolant temperature sensor. This
component is an NTC (Negative Temperature
Coefficient) thermistor - that is, a semi-
conductor whose electrical resistance
decreases as its temperature increases. It
provides the EEC IV module with a constantly-
varying (analogue) voltage signal, corre-
sponding to the temperature of the engine
coolant. This is used to refine the calculations
made by the module, when determining the
correct amount of fuel required to achieve the
ideal air/fuel mixture ratio. Inlet air temperature information is supplied
by the inlet air temperature sensor. This
component is also an NTC thermistor - see the
previous paragraph - providing the module with
a signal corresponding to the temperature of air
passing into the engine. This is used to refine
the calculations made by the module, when
determining the correct amount of fuel required
to achieve the ideal air/fuel mixture ratio. A throttle position sensor is mounted on the
end of the throttle valve spindle, to provide
the EEC IV module with a constantly-varying
(analogue) voltage signal corresponding to the
throttle opening. This allows the module to
register the driver’s input when determining
the amount of fuel required by the engine. Road speed is monitored by the vehicle
speed sensor. This component is a Hall-effect
generator, mounted on the transmission’s
speedometer drive. It supplies the module with a
series of pulses corresponding to the vehicle’s
road speed, enabling the module to control
features such as the fuel shut-off on overrun. A manifold absolute pressure sensor
measures inlet manifold vacuum, and supplies
this information to the EEC IV module for
calculation of engine load at any given throttle
position. Where power steering is fitted, a pressure-
operated switch is screwed into the power
steering system’s high-pressure pipe. The
switch sends a signal to the EEC IV module to
reduce engine speed should the power steering
fluid pressure become excessively high. On models with a catalytic converter, the
oxygen sensor in the exhaust system provides
the EEC IV module with constant feedback -
“closed-loop” control - which enables it to
adjust the mixture to provide the best possible
conditions for the catalytic converter to operate. On turbocharged engines, control of the
turbocharger boost pressure is also governed
by the EEC IV module, acting through the
boost control valve. This allows inlet manifold
depression to be applied to the turbocharger
wastegate control. The turbocharger consists of a turbine that
is driven by the exhaust gases, to suck air
through the air filter and to compress it into the
engine. An air-cooled intercooler, mounted
next to the radiator, cools the inlet air (heated
by its passage through the turbocharger); this
increases the density of the compressed
fuel/air mixture entering the engine, thus
improving the engine’s power output.Precautions
Warning: Petrol is extremely
flammable - great care must be
taken when working on any part
of the fuel system. Do not
smoke or allow any naked flames or
uncovered light bulbs near the work area.
Note that gas powered domestic
appliances with pilot flames, such as
heaters, boilers and tumble dryers, also
present a fire hazard - bear this in mind if
you are working in an area where such
appliances are present. Always keep a
suitable fire extinguisher close to the work
area and familiarise yourself with its
operation before starting work. Wear eye
protection when working on fuel systems
and wash off any fuel spilt on bare skin
immediately with soap and water. Note
that fuel vapour is just as dangerous as
liquid fuel; a vessel that has just been
emptied of liquid fuel will still contain
vapour and can be potentially explosive.
Petrol is a highly dangerous and volatile
liquid, and the precautions necessary
when handling it cannot be overstressed. Many of the operations described in this
Chapter involve the disconnection of fuel
lines, which may cause an amount of fuel
spillage. Before commencing work, refer
to the above Warning and the information
in “Safety first” at the beginning of this
manual. When working with fuel system
components, pay particular attention to
cleanliness - dirt entering the fuel system
may cause blockages which will lead to
poor running.
Note: Residual pressure will remain in the fuel
lines long after the vehicle was last used,
when disconnecting any fuel line, it will be
necessary to depressurise the fuel system as
described in Section 2 .
Note: Refer to Section 16 for specific
precautions relating to turbocharged engines.
2 Fuel system -
depressurisation
1
Refer to Part B, Section 2.
3 Fuel lines and fittings -
general information
Refer to Part B, Section 3.
4 Air cleaner assembly and air inlet components - removal
and refitting
1
Note: Air cleaner element renewal and air
cleaner temperature control system checks
(where applicable) are described in Chapter 1.
Air cleaner assembly
1 Disconnect the battery negative (earth) lead
(refer to Chapter 5A, Section 1).
2 If the idle speed control valve is mounted
on the air cleaner, disconnect the multi-plug
and the air bypass hose from the valve.
3 Disconnect the flexible hose between the
air cleaner lid and the air inlet duct or
turbocharger air inlet.
4 Disconnect the crankcase breather hose
from the front of the air cleaner housing.
5 Unclip and remove the air cleaner lid, then
withdraw the element.
6 Remove the two bolts securing the forward
end of the air cleaner housing, free the
rearward end of the housing from its location
and carefully withdraw from the vehicle (see
illustration) .
7 Refitting is a reversal of the removal
procedure.
Air inlet components
8 Disconnect the battery negative (earth) lead
(refer to Chapter 5A, Section 1).
9 If the idle speed control valve is mounted
on the air cleaner, disconnect the multi-plug
and the air bypass hose from the valve (see
illustration) .
10 Disconnect the HT leads from the spark
plugs, labelling them if necessary to avoid
confusion on refitting.
Fuel system - electronic fuel injection engines 4C•3
4.9 General view of the air inlet
components on non-Turbo models
A Air inlet duct
B Air inlet duct securing bolts
C Spark plug HT lead connectors
D Air cleaner lid
E Idle speed control valve multi-plug
F Air bypass hose
4.6 Air cleaner housing attachments A Bolts B Grommet
4C
1595Ford Fiesta Remakeprocarmanuals.com
http://vnx.su