715 FORD FIESTA 2007 Owner's Manual
[x] Cancel search | Manufacturer: FORD, Model Year: 2007, Model line: FIESTA, Model: FORD FIESTA 2007Pages: 1226, PDF Size: 61.26 MB
Page 1031 of 1226
Automatic Transmission/Transaxle -
Vehicles With: 4-Speed Automatic
307-01 -71 Transmission (AW81-40) 307-01 -71
REMOVAL AND INSTALLATION
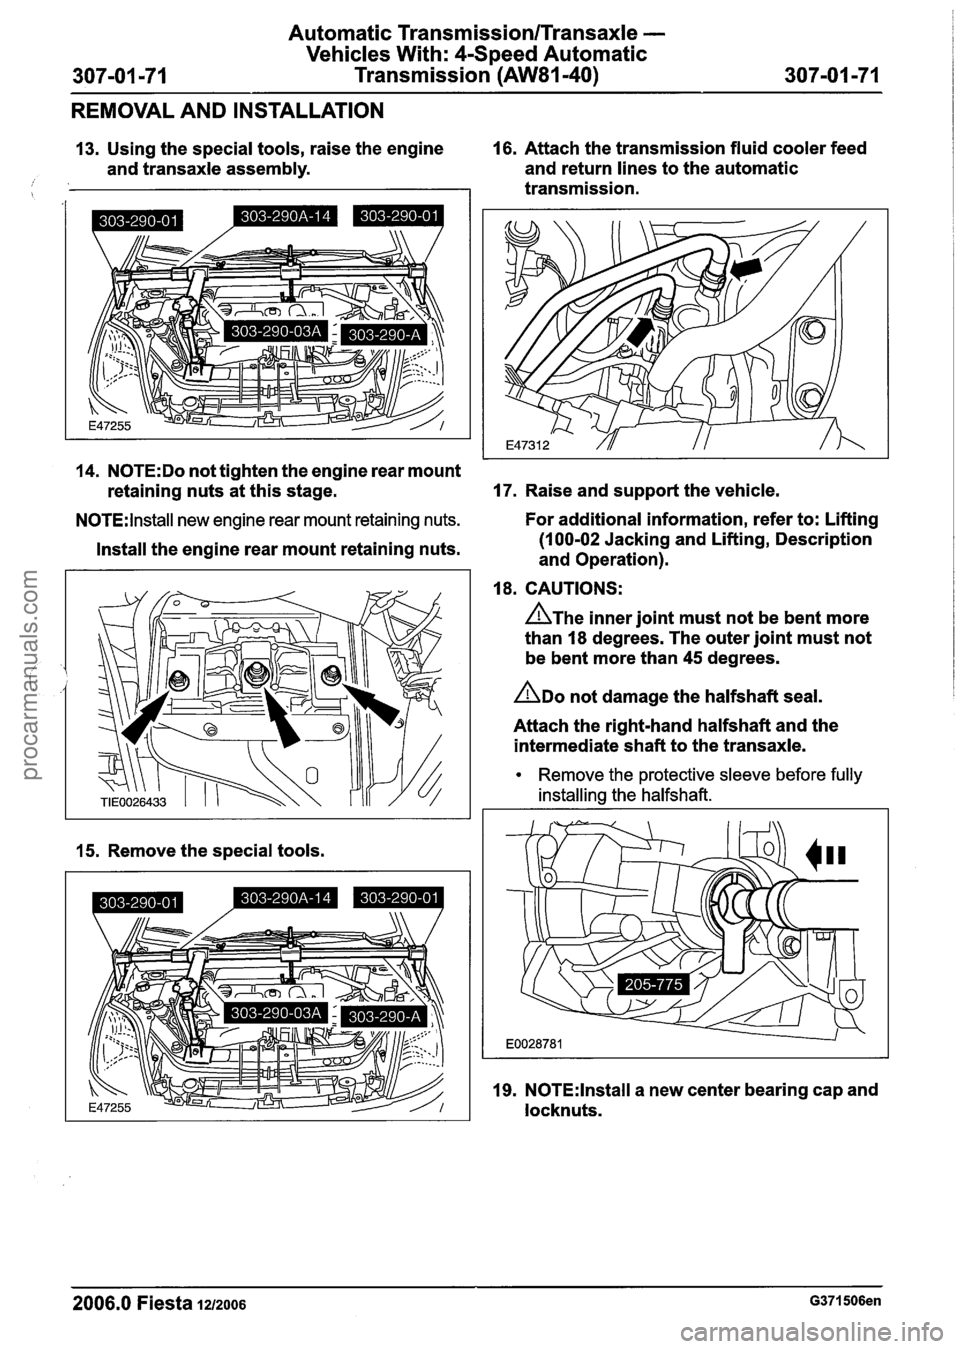
13. Using the special tools, raise the engine 16. Attach the transmission fluid cooler feed
and transaxle assembly. and
return lines to the automatic
I I transmission.
14. N0TE:Do not tighten the engine rear mount
retaining nuts at this stage.
17. Raise and support the vehicle.
N0TE:lnstall new engine rear mount retaining nuts. For
additional information, refer to: Lifting - -
Install the engine rear mount retaining nuts.
15. Remove the special tools.
(1 00-02 Jacking and Lifting, Description
and Operation).
18. CAUTIONS:
A~he inner joint must not be bent more
than
18 degrees. The outer joint must not
be bent more than
45 degrees.
ADO not damage the halfshaft seal.
Attach the right-hand halfshaft and the
intermediate shaft to the transaxle.
Remove the protective sleeve before fully
installing the halfshaft.
19. N0TE:lnstall a new center bearing cap and
locknuts.
2006.0 Fiesta 1212006 G371506en
procarmanuals.com
Page 1032 of 1226
Automatic Tra
Vehicles Wit
307-01 -72 Transm nsmission/Transaxle -
h: 4-Speed Automatic
ission
(AW81-40) 307-01 -72
REMOVAL AND INSTALLATION
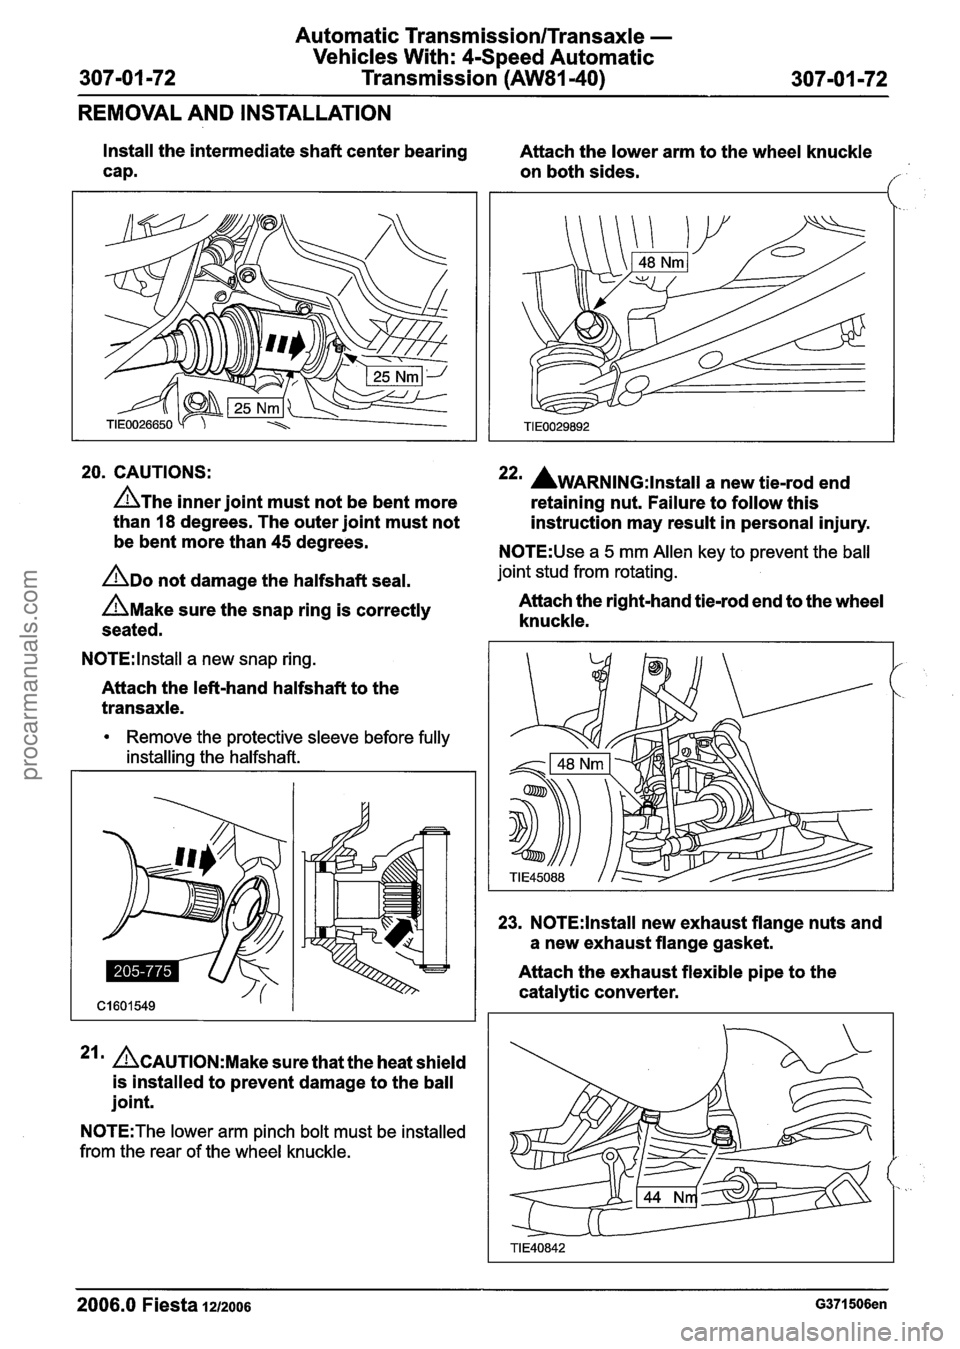
Install the intermediate shaft center bearing
cap. Attach
the lower arm to the wheel knuckle
on both sides.
f
20. CAUTIONS: 22m AwARNING:~~~~~~~ a new tie-rod end
A~he inner joint must not be bent more
retaining nut. Failure to follow this
than
18 degrees. The outer joint must not
instruction may result in personal injury.
be bent more than 45 degrees.
N0TE:Use a 5 mm Allen key to prevent the ball
ADO not damage the halfshaft seal. joint stud from rotating.
A~ake sure the snap ring is correctly Attach the right-hand tie-rod end
to the wheel
seated. knuckle.
N0TE:lnstall a
new snap ring.
Attach the left-hand halfshaft to the
transaxle.
Remove the protective sleeve before fully
installing the halfshaft.
ACAUTION:M~~~ sure that the heat shield
is installed to prevent damage to the ball
joint.
N0TE:The lower arm pinch bolt must be installed
from the rear of the wheel knuckle.
23. N0TE:lnstall new exhaust flange nuts and
a new exhaust flange gasket.
Attach the exhaust flexible pipe to the
catalytic converter.
2006.0 Fiesta 1212006 G371506en
procarmanuals.com
Page 1033 of 1226
Automatic Transmission/Transaxle -
Vehicles With: 4-Speed Automatic
Transmission (AW81-40)
REMOVAL AND INSTALLATION
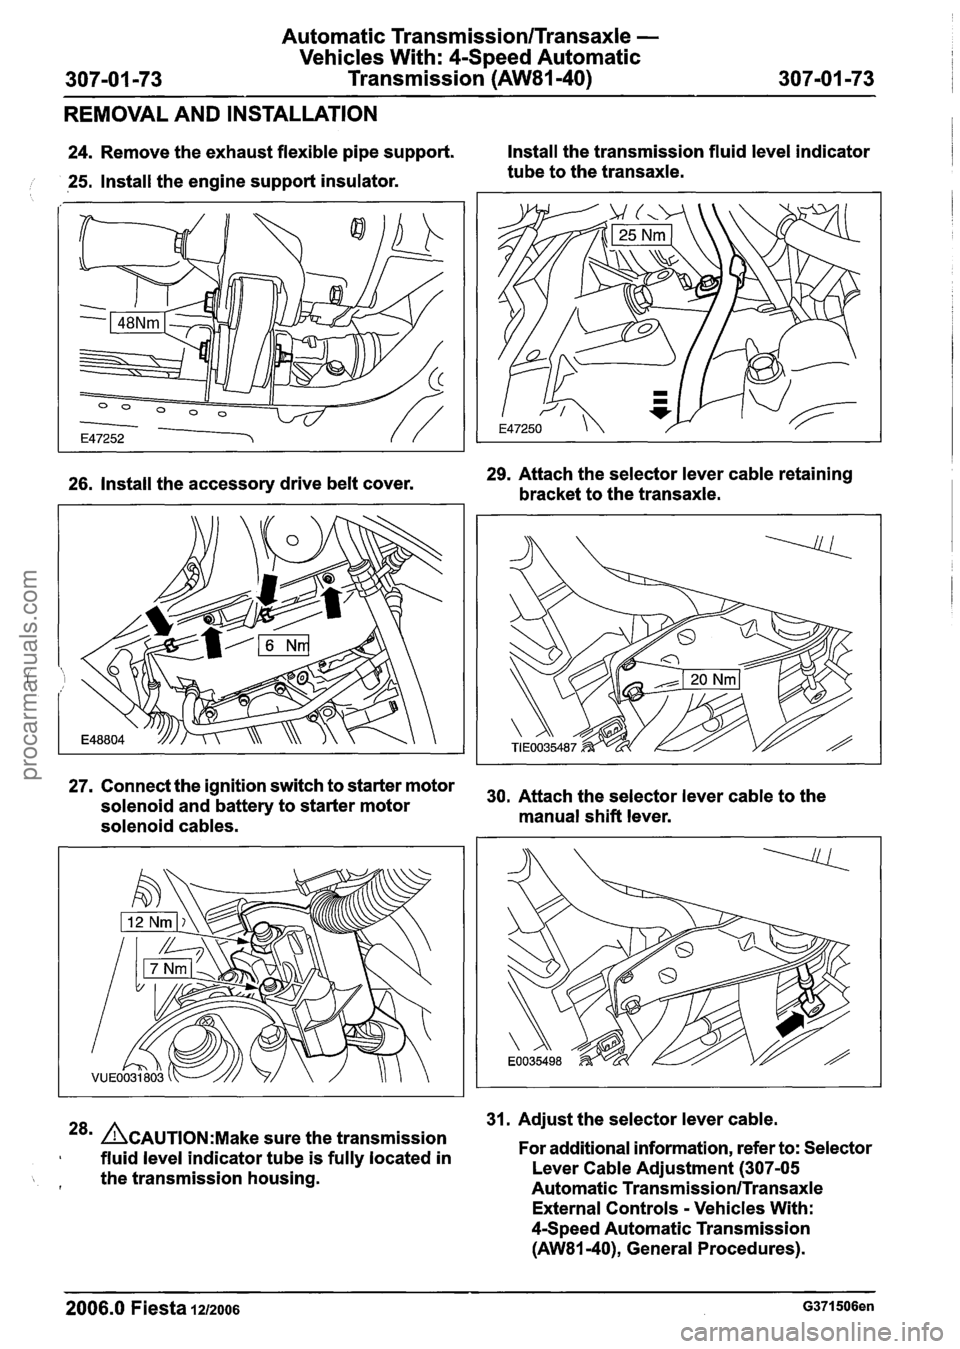
24. Remove the exhaust flexible pipe support. Install
the transmission fluid level indicator
, 25. Install the engine support insulator. tube
to the transaxle.
26. Install the accessory drive belt cover. 29.
Attach the selector lever cable retaining
bracket to the transaxle.
27. Connect the ignition switch to starter motor
30, Attach the selector lever cable to the solenoid and battery to starter motor
solenoid cables. manual
shift lever.
31. Adjust the selector lever cable.
28m ACAUTION:M~~~ sure the transmission
fluid level indicator tube is fully located in For
additional information, refer to: Selector
the transmission housing. Lever Cable
Adjustment (307-05 f Automatic Transmission/Transaxle
External Controls - Vehicles With:
4Speed Automatic Transmission
(AW81-40), General Procedures).
2006.0 Fiesta 1212006 G371506en
procarmanuals.com
Page 1034 of 1226
Automatic Transmission/Transaxle -
Vehicles With: 4-Speed Automatic
Transmission (AW81-40)
REMOVAL AND INSTALLATION
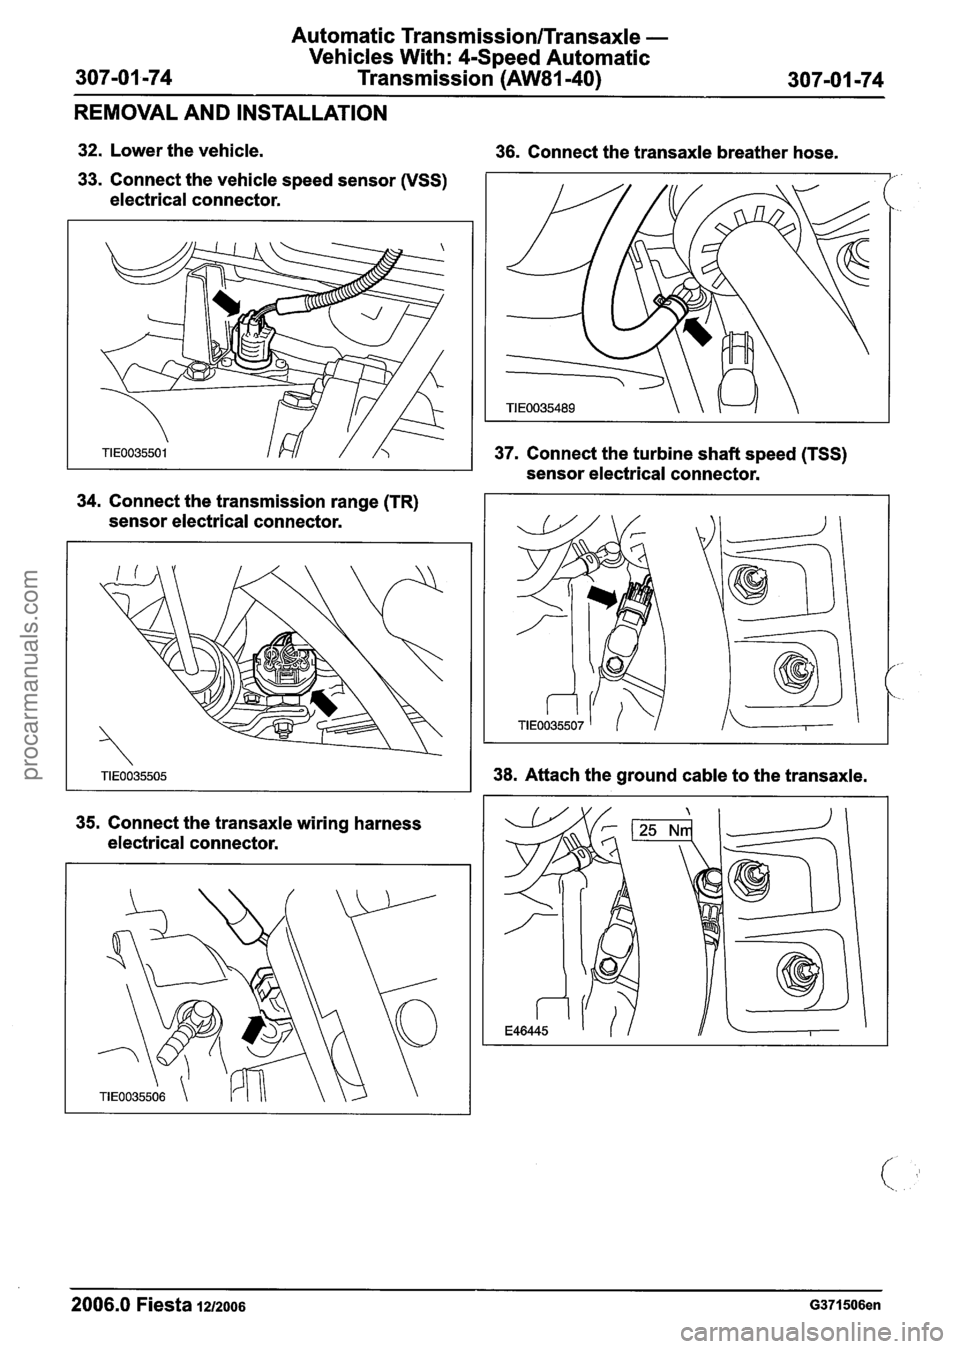
32. Lower the vehicle.
36. Connect the transaxle breather hose.
33. Connect the vehicle speed sensor (VSS)
electrical connector.
34. Connect the transmission range (TR)
sensor electrical connector.
35. Connect the transaxle wiring harness
electrical connector. 37. Connect
the turbine shaft speed (TSS)
sensor electrical connector.
I I
38. Attach the ground cable to the transaxle.
2006.0 Fiesta 1212006 G371506en
procarmanuals.com
Page 1035 of 1226
Automatic Transmission/Transaxle -
Vehicles With: 4-Speed Automatic
Transmission (AW81-40)
REMOVAL AND INSTALLATION
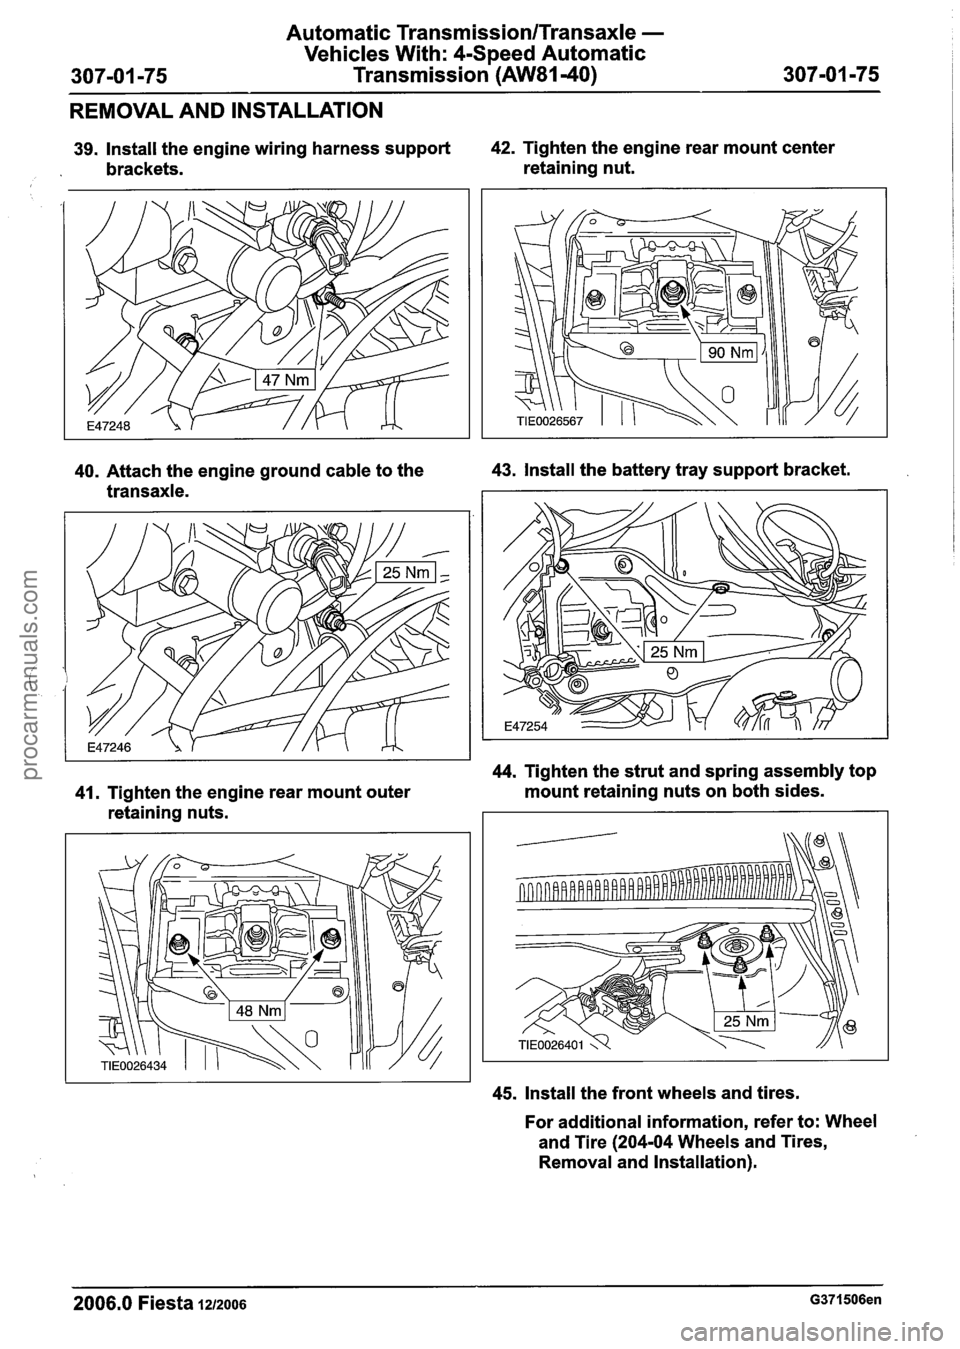
39. Install the engine wiring harness support 42. Tighten the engine rear mount center
brackets. retaining nut.
40. Attach the engine ground cable to the 43. Install the battery tray support bracket.
transaxle.
44. Tighten the strut and spring assembly top
41. Tighten the engine rear mount outer mount
retaining nuts on both sides.
retaining nuts.
45. Install the front wheels and tires.
For additional information, refer to: Wheel
and Tire
(204-04 Wheels and Tires,
Removal and Installation).
2006.0 Fiesta 1212006 G371506en
procarmanuals.com
Page 1036 of 1226
Automatic Transmission/Transaxle -
Vehicles With: 4-Speed Automatic
307-01 -76 Transmission
(AW81-40) 307-01 -76
REMOVAL AND INSTALLATION
46. Install the battery tray.
For
additional information, refer to: Battery
Tray (414-01 Battery, Mounting and
Cables, Removal and Installation).
47. Connect the powertrain control module
(PCM) electrical connector to the PCM.
For
additional information, refer to:
Powertrain
Control Module (PCM) - 1.25L
Duratec-1 6V (Sigma)ll.4L Duratec-1 6V
(Sigma)ll .6L Duratec-1 6V (Sigma) (303-1 4
Electronic Engine Controls, Removal and
Installation).
48. Install the air cleaner.
For additional information, refer to: Air
Cleaner - 1.25L Duratec-1 6V (Sigma)ll.4L
Duratec-1 6V (Sigma)ll.GL Duratec-1 6V
(Sigma) (303-1 2 Intake Air Distribution
and
Filtering, Removal and Installation).
49. Check the transmission fluid level and top
up with
clean automatic transmission fluid
if necessary.
For
additional information, refer to:
Transmission
Fluid Level Check (307-01
Automatic
Transmission/Transaxle -
Vehicles With: 4-Speed Automatic
Transmission
(AW81-40), General
Procedures).
50.
N0TE:Only carry out the following step
when a new
transaxle has been installed.
Using worldwide diagnostic system (WDS),
reset the transmission control module (TCM).
2006.0 Fiesta 1212006 G371506en
procarmanuals.com