engine FORD FIESTA 2007 Owner's Guide
[x] Cancel search | Manufacturer: FORD, Model Year: 2007, Model line: FIESTA, Model: FORD FIESTA 2007Pages: 1226, PDF Size: 61.26 MB
Page 75 of 1226
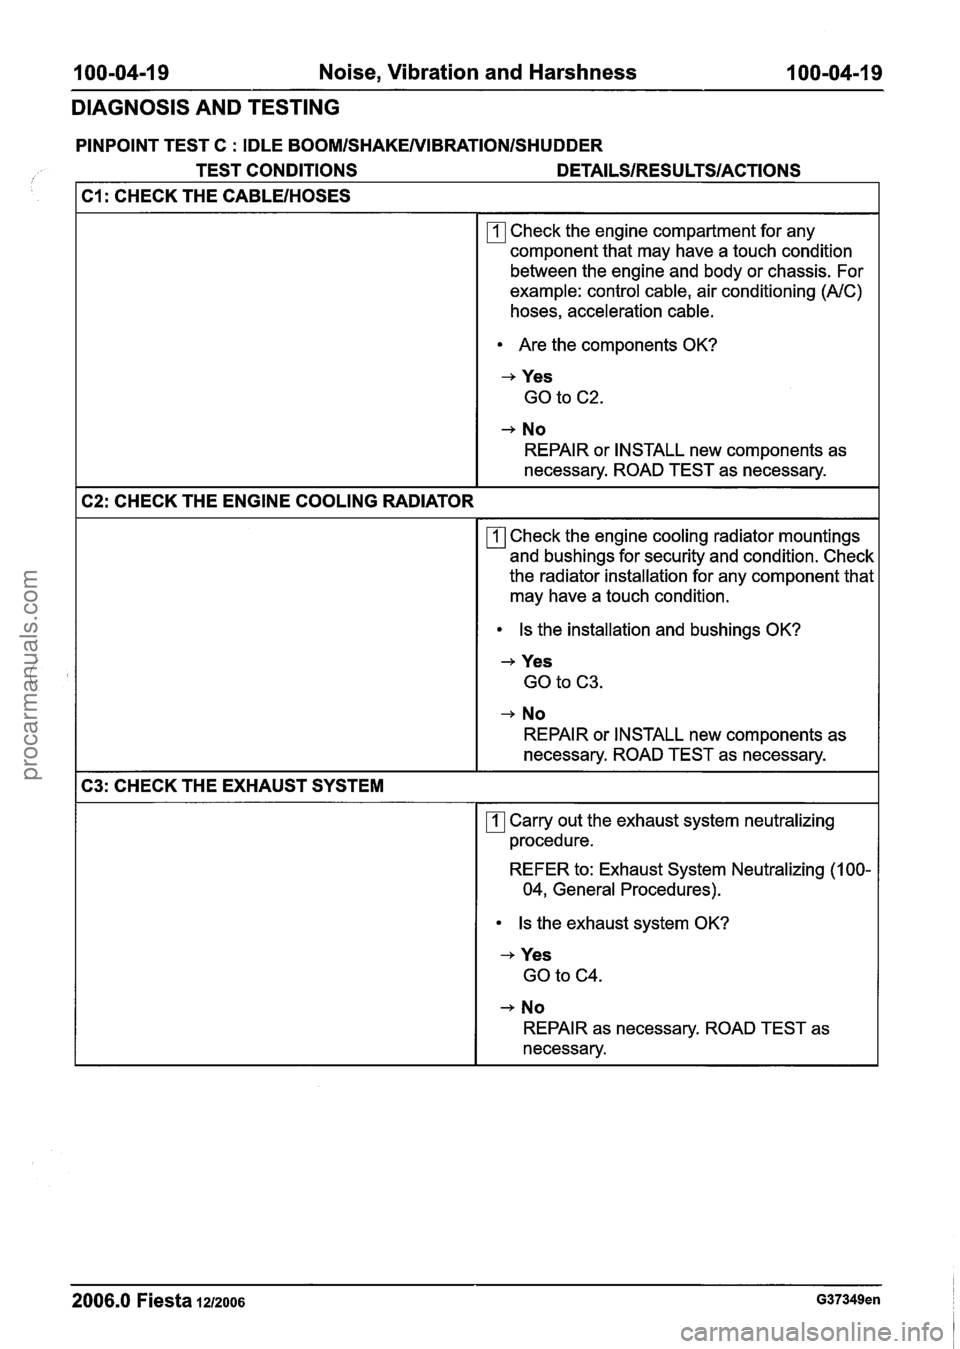
I 00-04-1 9 Noise, Vibration and Harshness 100-04-19
DIAGNOSIS AND TESTING
PINPOINT TEST C : IDLE BOOMISHAKENIBRATIONISHUDDER
1 TEST CONDITIONS DETAILSIRESU LTSIACTIONS
C1: CHECK THE CABLEIHOSES
rn Check the engine compartment for any
component that may have a touch condition
between the engine and body or chassis. For
example: control cable, air conditioning
(AIC)
hoses, acceleration cable.
Are the components OK?
-+ Yes
GO to C2.
+ No
REPAIR or INSTALL new components as
necessary. ROAD TEST as necessary.
C2: CHECK THE ENGINE COOLING RADIATOR
rn Check the engine cooling radiator mountings
and bushings for security and condition. Check
the radiator installation for any component that
may have a touch condition.
Is the installation and bushings OK?
+ Yes
GO to C3.
-+ No
REPAIR or INSTALL new components as
necessary. ROAD TEST as necessary.
C3: CHECK THE EXHAUST SYSTEM
rn Carry out the exhaust system neutralizing
procedure.
REFER to: Exhaust System Neutralizing
(1 00-
04, General Procedures).
Is the exhaust system OK?
+ Yes
GO to C4.
+ No
REPAIR as necessary. ROAD TEST as
necessary.
2006.0 Fiesta 1212006 G37349en
procarmanuals.com
Page 100 of 1226
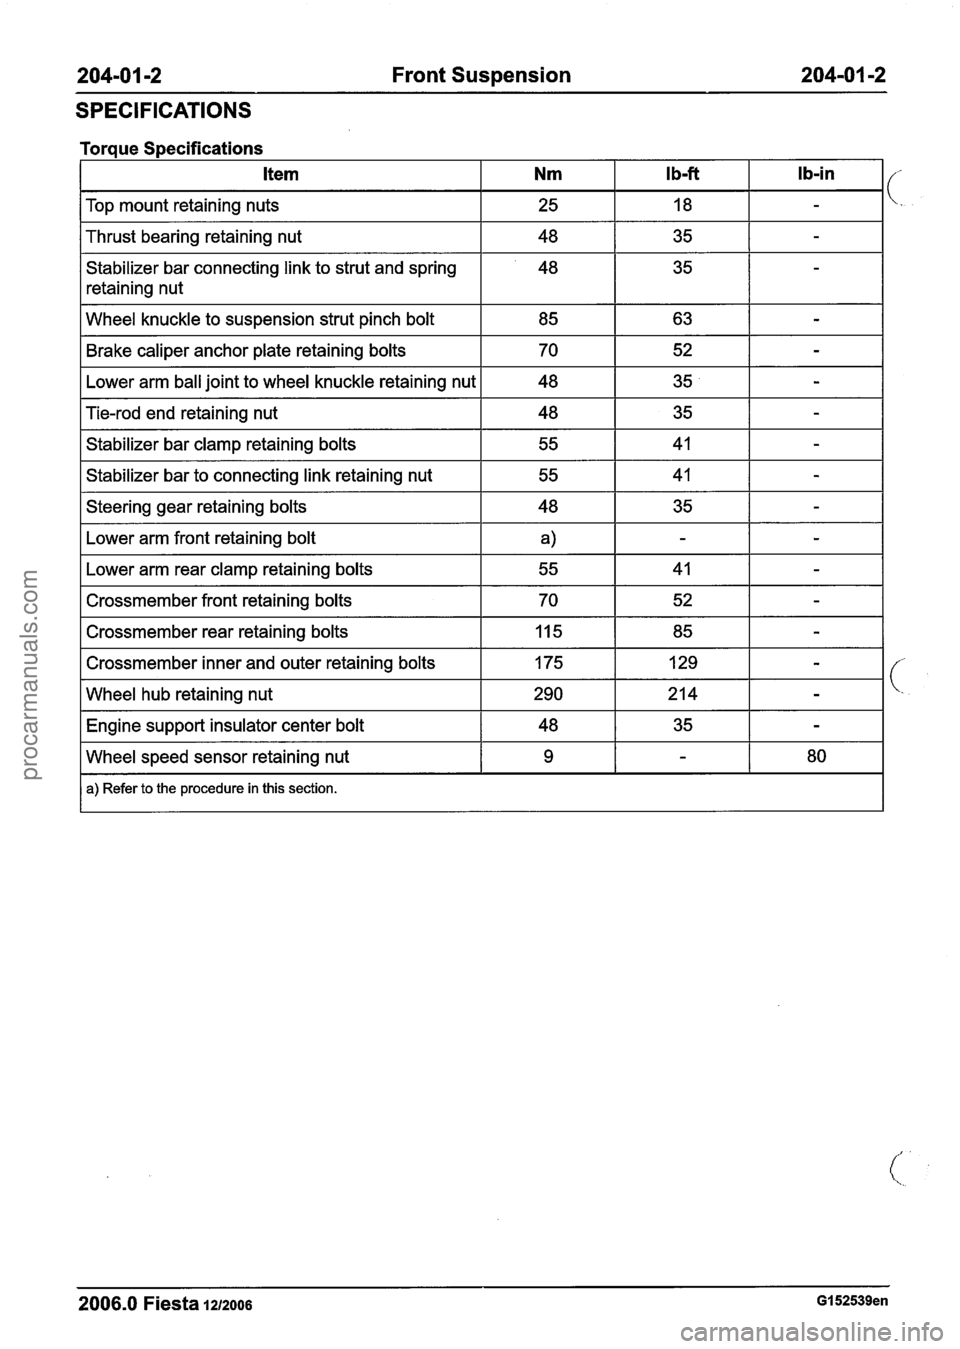
204-01 -2 Front Suspension 204-01 -2
SPECIFICATIONS
I Top mount retaining nuts I 25 I 18 I - I
Torque Specifications
I Thrust bearing retaining nut I 48 I 35 I - I
Stabilizer bar connecting link to strut and spring
retaining nut Ib-in
I Wheel
knuckle to suspension strut pinch bolt I 85 I 63 I - I
Ib-ft Item Nm
Brake caliper anchor plate retaining bolts
Lower arm ball joint to wheel knuckle retaining nut
I Steering gear retaining bolts I 48 I 35 I - I
Tie-rod end retaining nut
Stabilizer bar clamp retaining bolts
Stabilizer bar to connecting link retaining nut
Fb.wer arm front retaining bolt I
70
48
I Lower arm rear clamp retaining bolts I 55 I 41 I - I
48
55
55
I Crossmember front retaining bolts I 70 I 52 I - I
52
35
I Crossmember rear retaining bolts 1 Iq5 1 85 I - I
-
-
35
41
41
I Crossmember inner and outer retaining bolts 1 175 1 129 1 - I
-
-
-
I Wheel hub retaining nut 1290 1214 1 - I
I Engine support insulator center bolt I 48 I 35 I - I
2006.0 Fiesta 1212006 GI 52539en
Wheel speed sensor retaining nut
a) Refer to the procedure in this section.
9 - 80
procarmanuals.com
Page 107 of 1226
204-01 -9 Front Suspension 204-0 I -9
REMOVAL AND INSTALLATION
Front Stabilizer Bar(l4 752 0)
i , Special Tool(s1
General Equipment
205524
I Transmission jack 1
Alignment Pins, Subframe
205-524 (1 5-1 22)
I Wooden block I
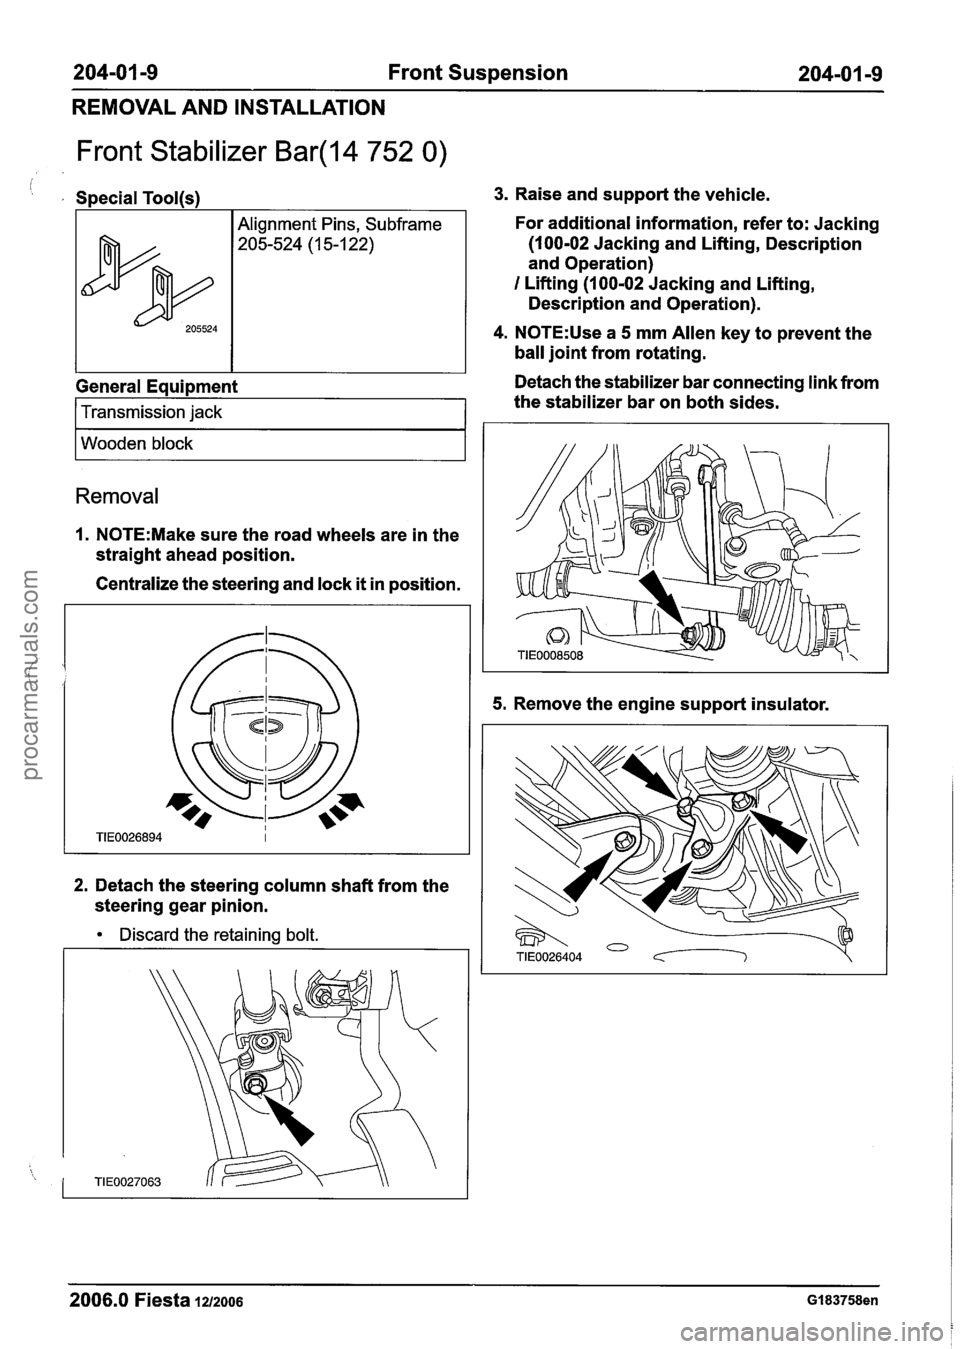
Removal
1. N0TE:Make sure the road wheels are in the
straight ahead position.
Centralize the steering and lock
it in position.
2. Detach the steering column shaft from the
steering gear pinion.
Discard the retaining bolt.
3. Raise and support the vehicle.
For additional information, refer to: Jacking
(100-02 Jacking and Lifting, Description
and Operation)
I Lifting (1 00-02 Jacking and Lifting,
Description and Operation).
4. N0TE:Use a 5 mm Allen key to prevent the
ball joint from rotating.
Detach the stabilizer bar connecting link from
the stabilizer bar on both sides.
5. Remove the engine support insulator.
2006.0 Fiesta 1212006 GI 83758en
procarmanuals.com
Page 110 of 1226
204-01 -1 2 Front Suspension 204-01 -1 2 ---- - -
REMOVAL AND INSTALLATION
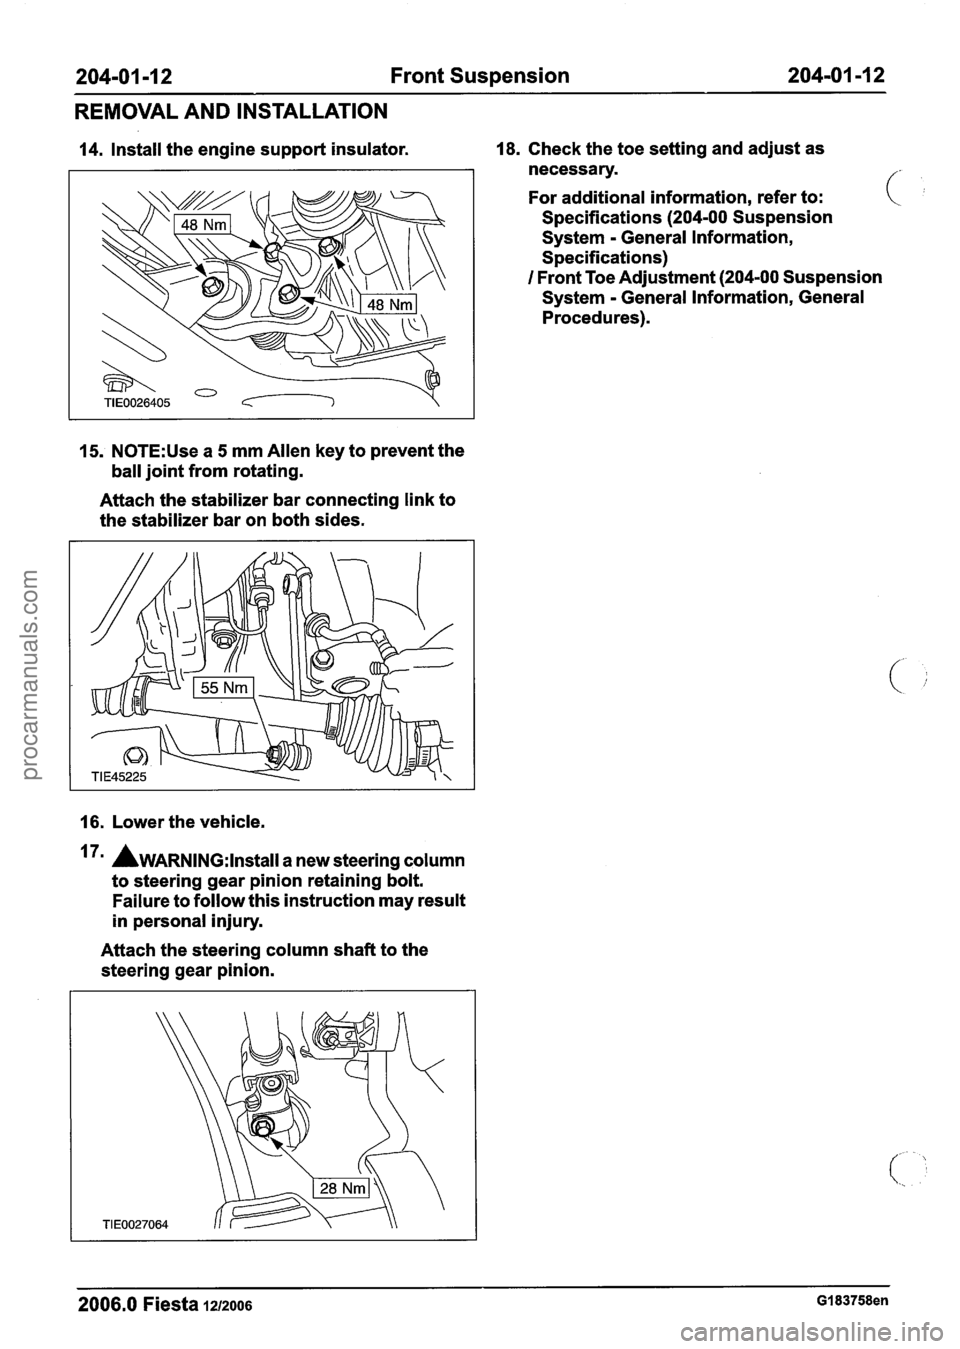
14. Install the engine support insulator. 18. Check the toe setting and adjust as
necessary.
For additional information, refer to:
Specifications
(204-00 Suspension
System
- General Information,
Specifications)
I Front Toe Adjustment (204-00 Suspension
System
- General Information, General
Procedures).
15. N0TE:Use a 5 mm Allen key to prevent the
ball joint from rotating.
Attach the stabilizer bar connecting link to
the stabilizer bar on both sides.
16. Lower the vehicle.
7m AWARNING:I~~~~II a new steering column
to steering gear pinion retaining bolt.
Failure to follow this instruction may result
in personal injury.
Attach the steering column shaft to the
steering gear pinion.
2006.0 Fiesta 1212006 GI 83758en
procarmanuals.com
Page 119 of 1226
204-01 -21 Front Suspension 204-01 -21
REMOVAL AND INSTALLATION
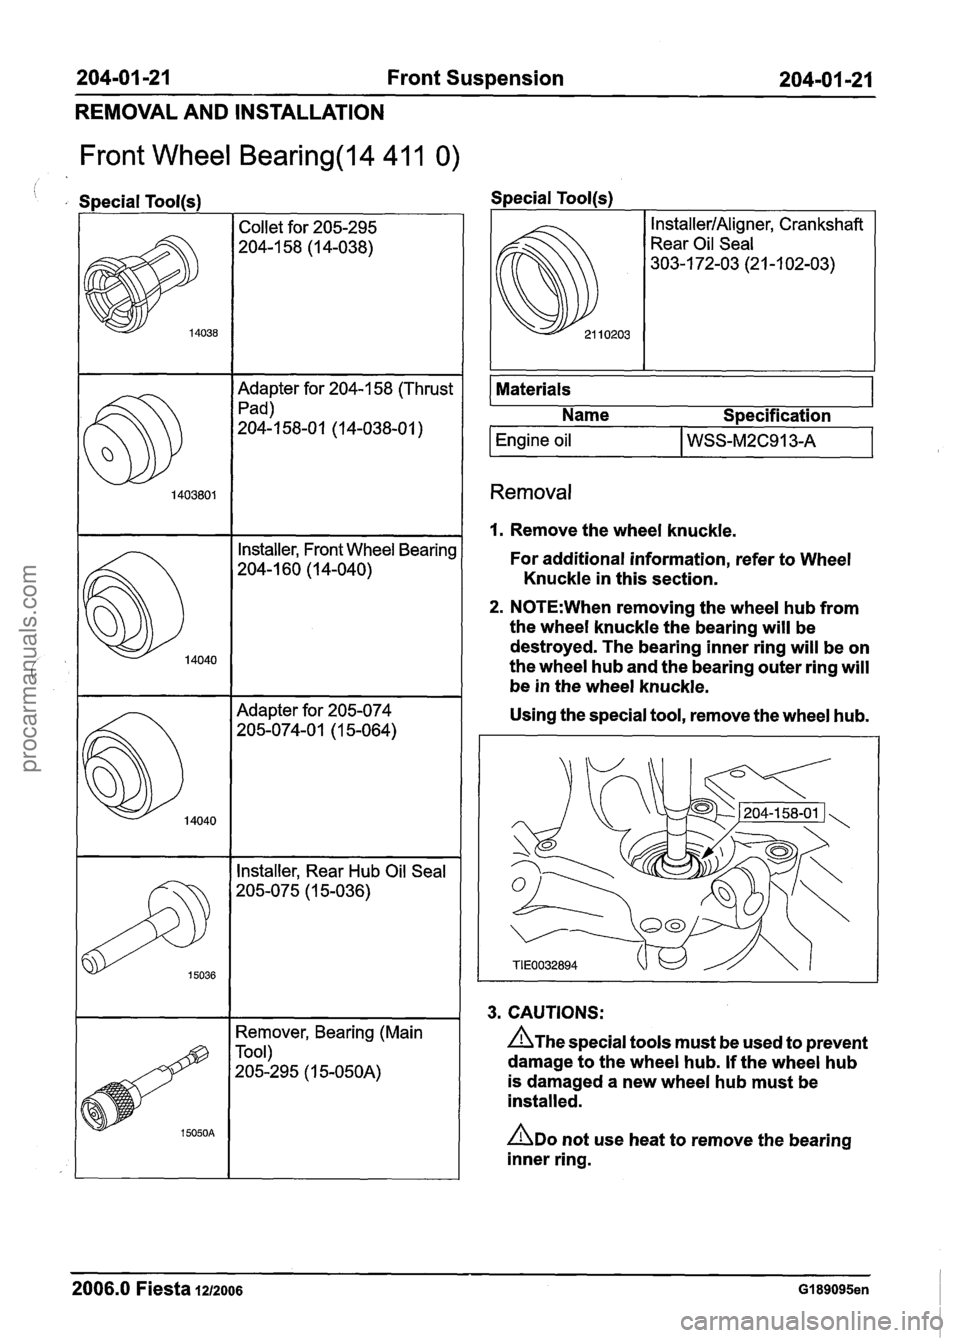
Front Wheel Bearing(l4 41 1 0)
, Special Toolls) Special Tool(s)
Adapter for 204-1 58 (Thrust
Pad)
204-1 58-01 (1 4-038-01
)
Installer, Rear Hub Oil Seal
205-075 (1 5-036)
14040
14040
Remover, Bearing (Main
Tool)
205-295 (1
5-050A)
Installer, Front Wheel Bearing
204-1 60 (1 4-040)
Adapter for 205-074
205-074-0 1 (1 5-064)
I I
Materials 1
@l 0203
I Name I Specification
Engine oil I WSS-M2C913-A
InstallerIAligner, Crankshaft
Rear Oil Seal
303-1 72-03 (2 1 -1 02-03)
Removal
I. Remove the wheel knuckle.
For additional information, refer to Wheel
Knuckle in this section.
2. N0TE:When removing the wheel hub from
the wheel knuckle the bearing will be
destroyed. The bearing inner ring will be on
the wheel hub and the bearing outer ring will
be in the wheel knuckle.
Using the special tool, remove the wheel hub.
3. CAUTIONS:
n~he special tools must be used to prevent
damage to the wheel hub. If the wheel hub
is damaged a new wheel hub must be
installed.
ADO not use heat to remove the bearing
inner ring.
2006.0 Fiesta 1212006 GI 89095en
procarmanuals.com
Page 120 of 1226
204-01 -22 Front Suspension 204101 122
REMOVAL AND INSTALLATION
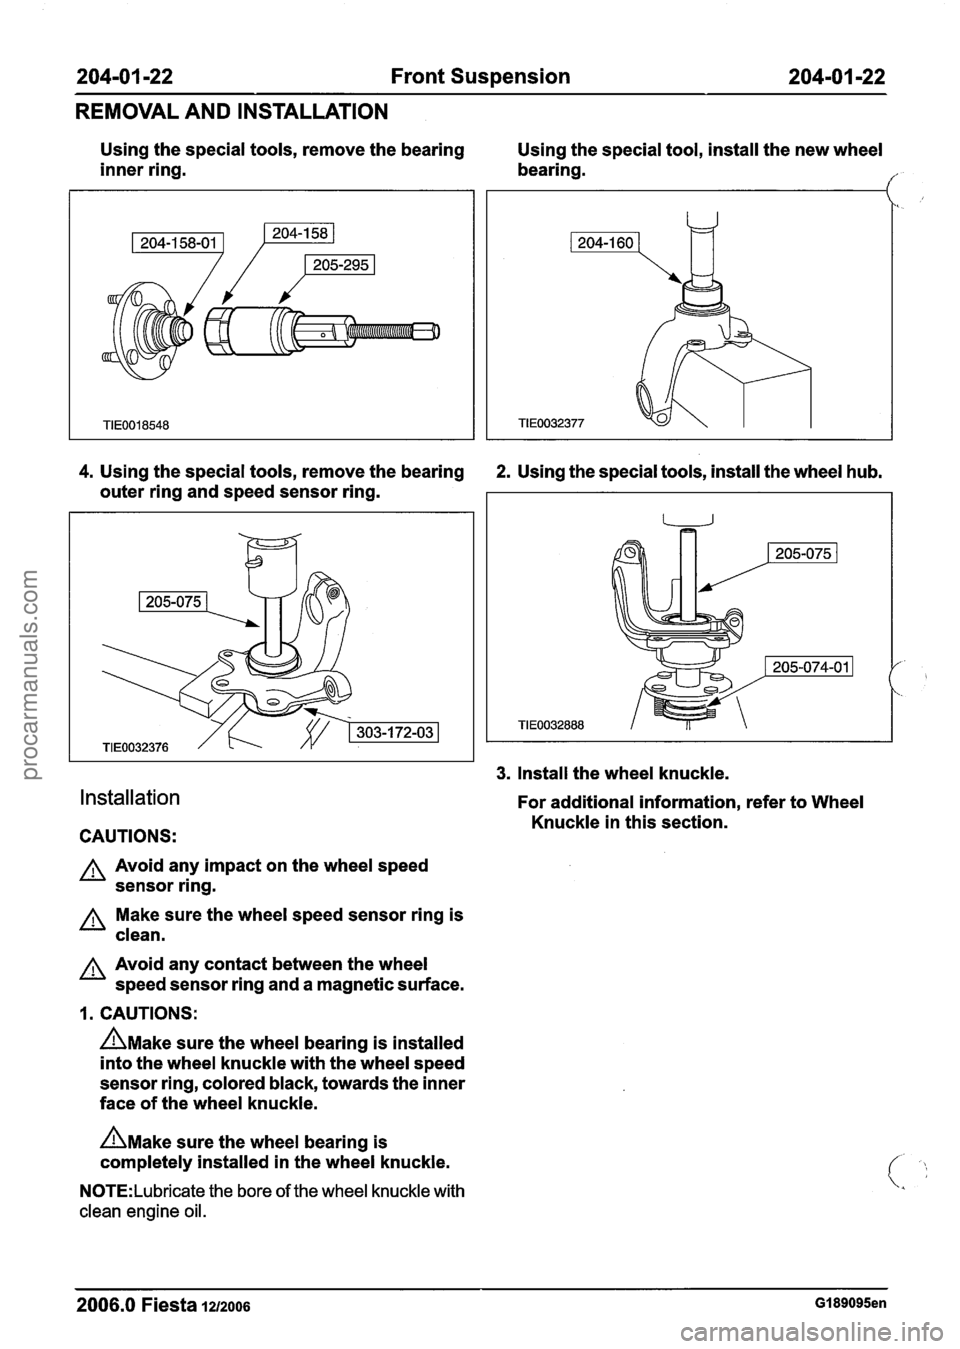
Using the special tools, remove the bearing
Using the special tool, install the new wheel
inner ring. bearing.
I"
4. Using the special tools, remove the bearing 2. Using the special tools, install the wheel hub.
outer ring and speed sensor ring.
Installation
CAUTIONS:
A Avoid any impact on the wheel speed
sensor ring.
Make sure the wheel speed sensor ring is
clean.
A Avoid any contact between the wheel
speed sensor ring and a magnetic surface.
1. CAUTIONS:
n~ake sure the wheel bearing is installed
into the wheel knuckle with the wheel speed
sensor ring, colored black, towards the inner
face of the wheel knuckle.
n~ake sure the wheel bearing is
completely installed in the wheel knuckle.
N0TE:Lubricate the bore of the wheel knuckle with
clean engine oil.
3. Install the wheel knuckle.
For additional information, refer to Wheel
Knuckle in this section.
--
2006.0 Fiesta 1212006 GI 89095en
procarmanuals.com
Page 147 of 1226
204-04-3 Wheels and Tires 204-04-3
DIAGNOSIS AND TESTING
Wheels and Tires
lnspection and Verification
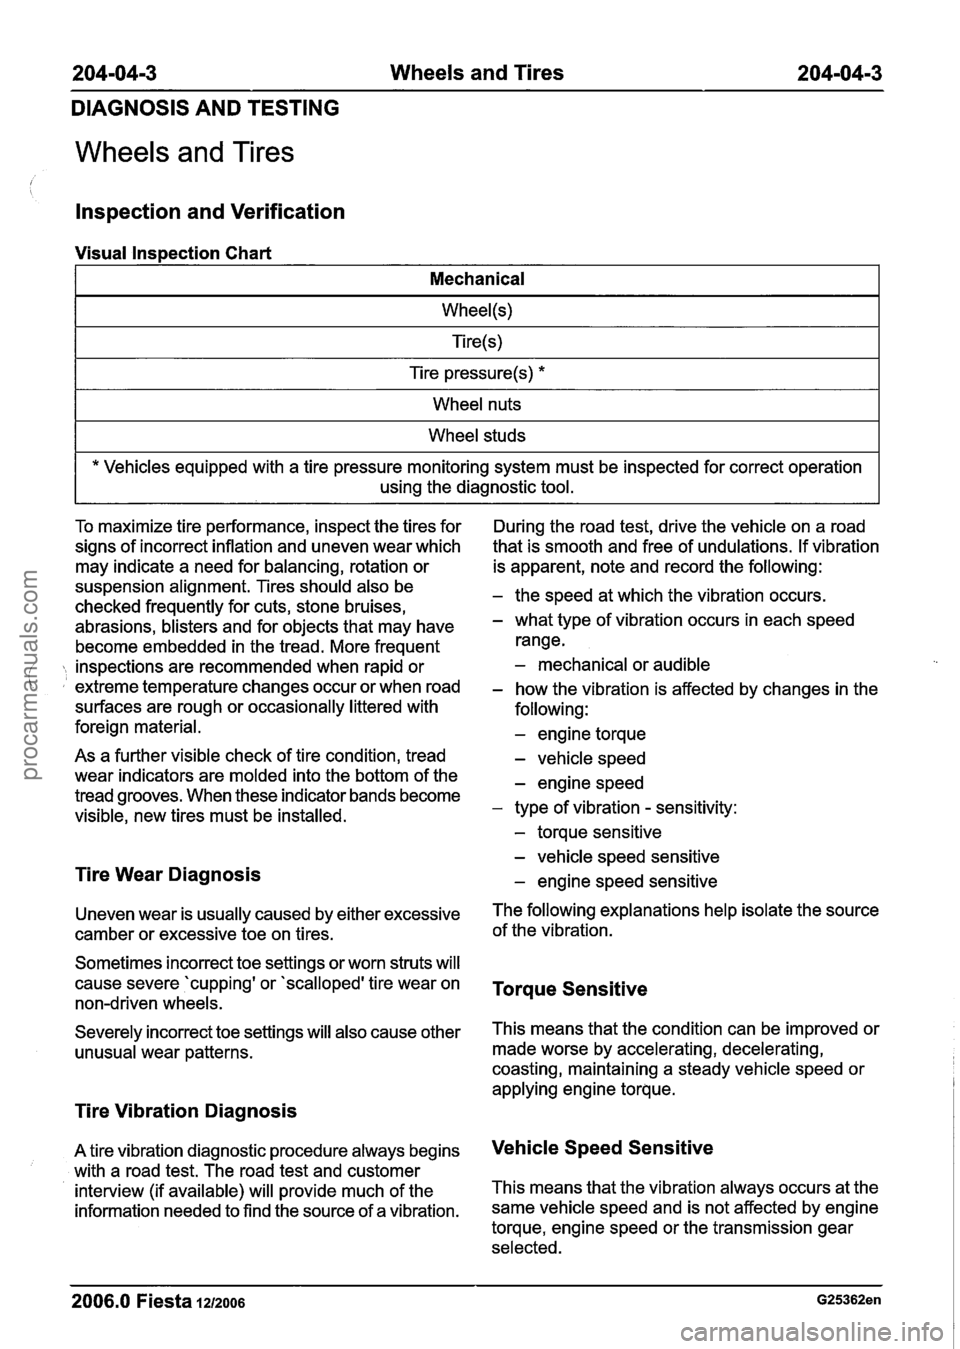
Visual Inspection Chart
I Mechanical I
I Tire pressure(s) * I
I Wheel nuts I
I Wheel studs I
* Vehicles equipped with a tire pressure monitoring system must be inspected for correct operation
using the diagnostic tool.
To maximize tire performance, inspect the tires for
signs of incorrect inflation and uneven wear which
may indicate a need for balancing, rotation or
suspension alignment. Tires should also be
checked frequently for cuts, stone bruises,
abrasions, blisters and for objects that may have
become embedded in the tread. More frequent
inspections are recommended when rapid or ( extreme temperature changes occur or when road
surfaces are rough or occasionally littered with
foreign material.
As a further visible check of tire condition, tread
wear indicators are molded into the bottom of the
tread grooves. When these indicator bands become
visible, new tires must be installed.
Tire Wear Diagnosis
Uneven wear is usually caused by either excessive
camber or excessive toe on tires.
Sometimes incorrect toe settings or worn struts will
cause severe 'cupping' or 'scalloped' tire wear on
non-driven wheels.
Severely incorrect toe settings will also cause other unusual wear patterns.
Tire Vibration Diagnosis
A tire vibration diagnostic procedure always begins
with a road test. The road test and customer
interview (if available) will provide much of the
information needed to find the source of a vibration. During
the road test, drive the vehicle on a road
that is smooth and free of undulations. If vibration
is apparent, note and record the following:
- the speed at which the vibration occurs.
- what type of vibration occurs in each speed
range.
- mechanical or audible
- how the vibration is affected by changes in the
following:
- engine torque
- vehicle speed
- engine speed
- type of vibration - sensitivity:
- torque sensitive
- vehicle speed sensitive
- engine speed sensitive
The following explanations help isolate the source
of the vibration.
Torque Sensitive
This means that the condition can be improved or
made worse by accelerating, decelerating,
coasting, maintaining a steady vehicle speed or
applying engine torque.
Vehicle Speed Sensitive
This means that the vibration always occurs at the
same vehicle speed and is not affected by engine
torque, engine speed or the transmission gear
selected.
2006.0 Fiesta 1212006
procarmanuals.com
Page 148 of 1226
204-0414 Wheels and Tires 204-04-4
DIAGNOSIS AND TESTING
Engine Speed Sensitive A thumping noise usually means that the tire is flat
or has soft spots making a noise as they slap the
This means that the vibration occurs at varying
roadway. Tire whine can be distinguished from axle
vehicle speeds when a different transmission gear
noise. Tire whine remains the same over a range
is selected. It can sometimes be isolated by
of speeds.
increasing Or decreasing engine with the A complete road test procedure is described in transmission in NEUTRAL or by stall testing with Section the transmission in gear. If the condition is engine
speed sensitive, the-cause is probably not related
REFER to: Noise, Vibration and Harshness (NVH)
to the tires. (1
00-04 Noise, Vibration and Harshness,
If the road test indicates that there is tire whine, Diagnosis and
Testing).
but no shake or vibration, the noise originates with
the contact between the tire and the road surface.
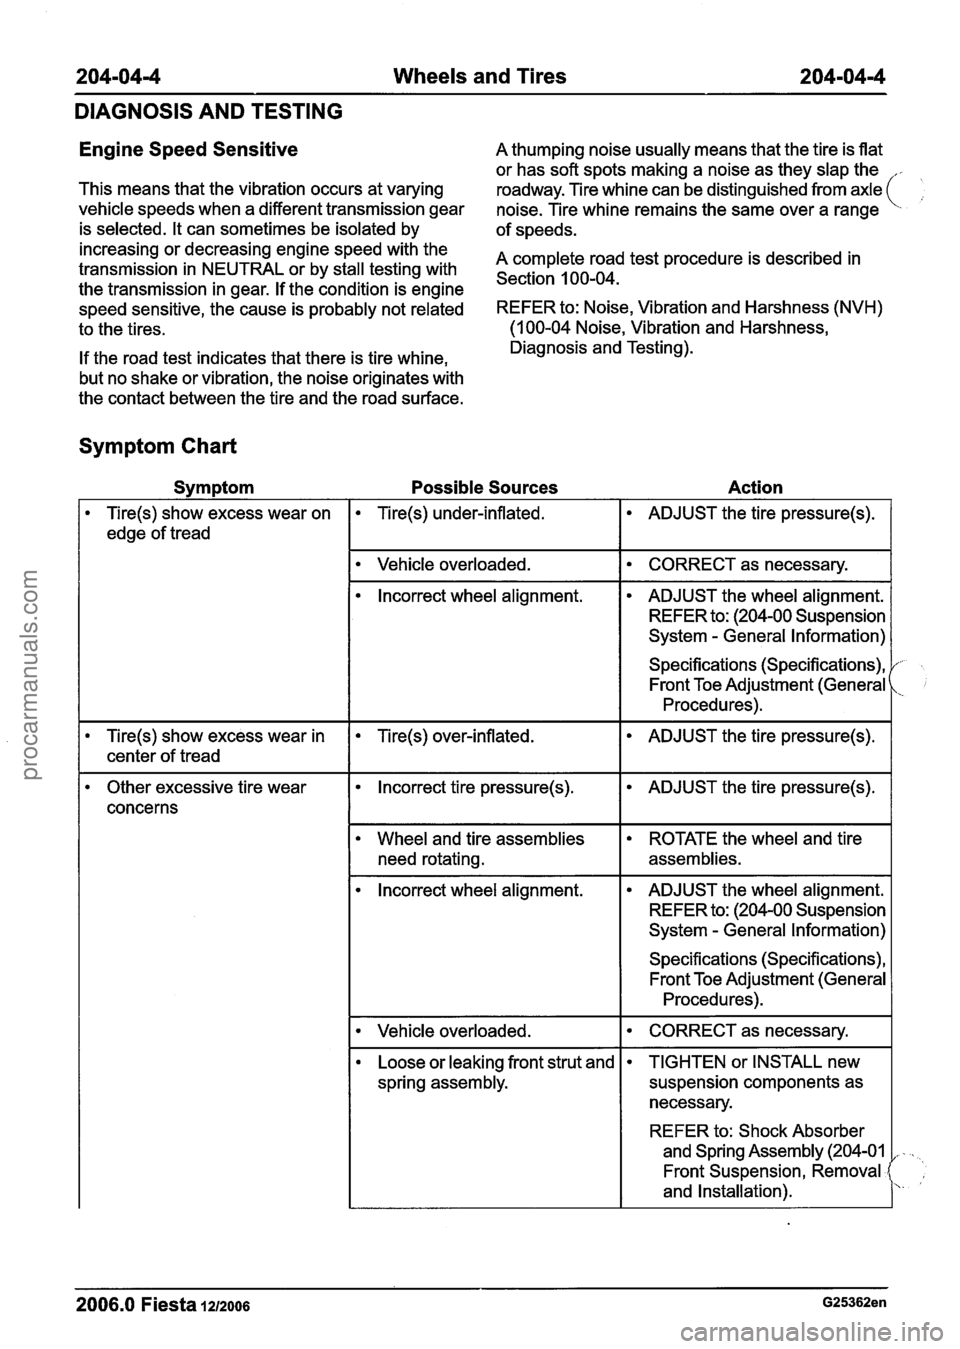
Symptom Chart
Symptom Possible Sources Action
Tire(s) show excess wear on
edge of tread
I Vehicle overloaded. I CORRECT as necessary. I
Tire(s) under-inflated.
lncorrect wheel alignment. ADJUST the tire pressure(s).
ADJUST the wheel alignment.
REFER to: (204-00 Suspension
System
- General Information)
Specifications (Specifications), Front Toe Adjustment (General
Procedures).
Tire(s) show excess wear in Tire(s) over-inflated.
I I
ADJUST the tire pressure(s).
I center of tread
Other excessive tire wear Incorrect tire pressure(s).
concerns
need rotating.
ADJUST the tire pressure(s).
ROTATE the wheel and tire
assemblies.
lncorrect wheel alignment. ADJUST the wheel alignment.
REFER to: (204-00 Suspension
System
- General Information)
Specifications (Specifications), Front Toe Adjustment (General
Procedures).
I Vehicle overloaded.
Loose or leaking front strut and
spring assembly. CORRECT as necessary.
I
2006.0 Fiesta 1212006 G25362en
TIGHTEN
or INSTALL new
suspension components as
necessary.
REFER to: Shock Absorber
and Spring Assembly (204-01
,
Front Suspension, Removal
and Installation).
procarmanuals.com
Page 155 of 1226
205-04-3 Front Drive Halfshafts 205-04-3
DESCRIPTION AND OPERATION
Front Drive Halfshafts
Drives hafts
Conventional driveshafts are used on the front axle.
For servicing purposes it is important to note that
the inner tripod joints are pressed onto the shaft.
This has made it possible to reduce noise levels
when the vehicle is pulling away from standing.
The outer joint has not been approved for service
repairs, so in the event of a fault it is necessary to
replace the complete shaft and outer joint
assembly. The inner joints are dismantled with the
aid of a puller. The driveshaft needs to be removed
first.
In order to install a new boot on the outer joint, it
is first necessary to remove the driveshaft and then
disassemble the inner joint. A special service kit is
available in service for this purpose, consisting of
the inner and outer boot and the necessary small
parts.
The same amount of grease is used to pack the
inner and outer joints.
- The PAC nut used for securing the driveshaft to ' the wheel hub must not be reused.
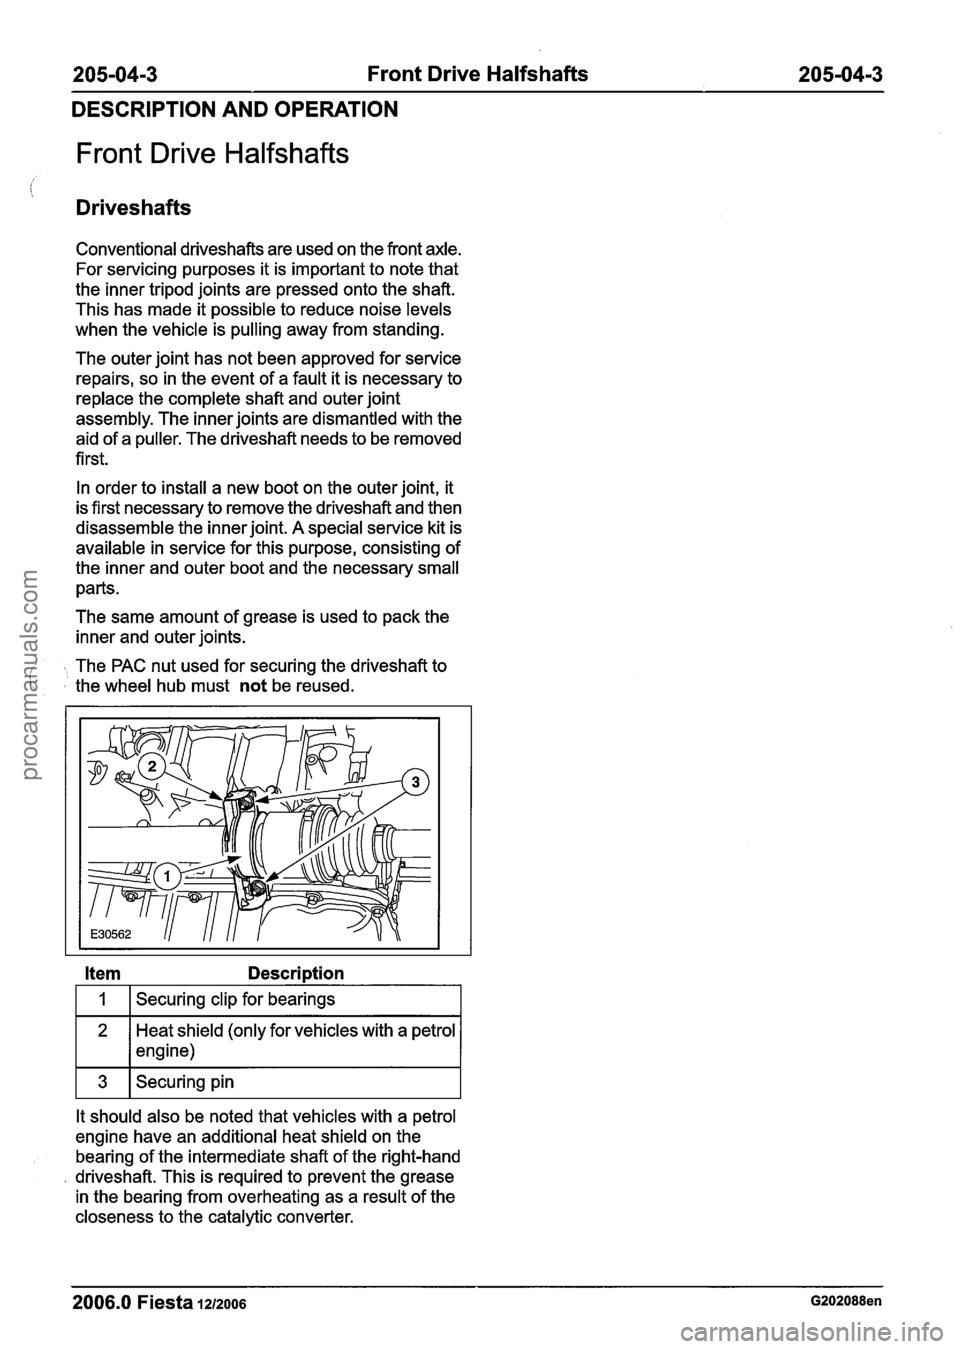
Item Description
I 1 I Securing clip for bearings I
Heat shield (only for vehicles with a petrol
1 * 1 engine)
It should also be noted that vehicles with a petrol
engine have an additional heat shield on the bearing of the intermediate shaft of the right-hand
driveshaft. This is required to prevent the grease
in the bearing from overheating as a result of the
closeness to the catalytic converter.
2006.0 Fiesta 1212006 G202088en
procarmanuals.com
Page 157 of 1226
205-04-5 Front Drive Halfshafts 205-04-5
DIAGNOSIS AND TESTING
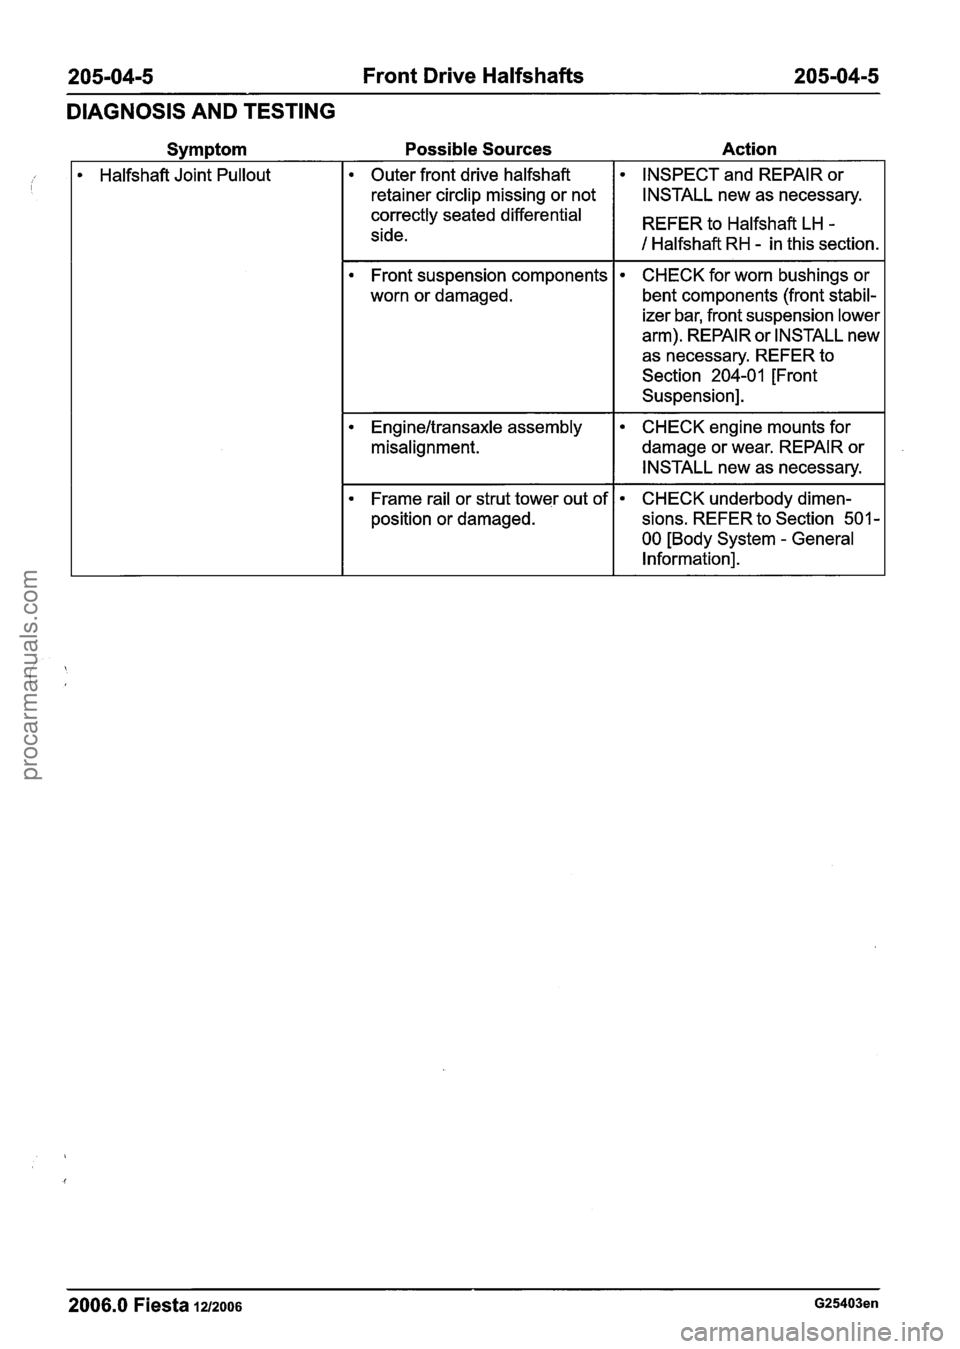
Possible Sources Action
Halfshaft Joint Pullout Outer front drive halfshaft INSPECT
and REPAIR or
retainer circlip missing or not
I I INSTALL new as necessary.
Front suspension components
worn or damaged.
correctly seated differential
side. CHECK
for worn bushings or
bent components (front stabil-
izer bar, front suspension lower
arm). REPAIR or INSTALL new
as necessary. REFER to
Section
204-01 [Front
Suspension]. REFER to Halfshaft
LH
-
1 Halfshaft RH - in this section.
Engineltransaxle assembly
misalignment. CHECK engine mounts for
damage or wear. REPAIR or
INSTALL new as necessary.
Frame rail or strut tower out of
position or damaged. CHECK underbody dimen-
sions. REFER to Section
501 -
00 [Body System - General
Information].
-- - --
2006.0 Fiesta 1212006 G25403en
procarmanuals.com