oil FORD FLEX 2015 1.G User Guide
[x] Cancel search | Manufacturer: FORD, Model Year: 2015, Model line: FLEX, Model: FORD FLEX 2015 1.GPages: 571, PDF Size: 5.52 MB
Page 290 of 571
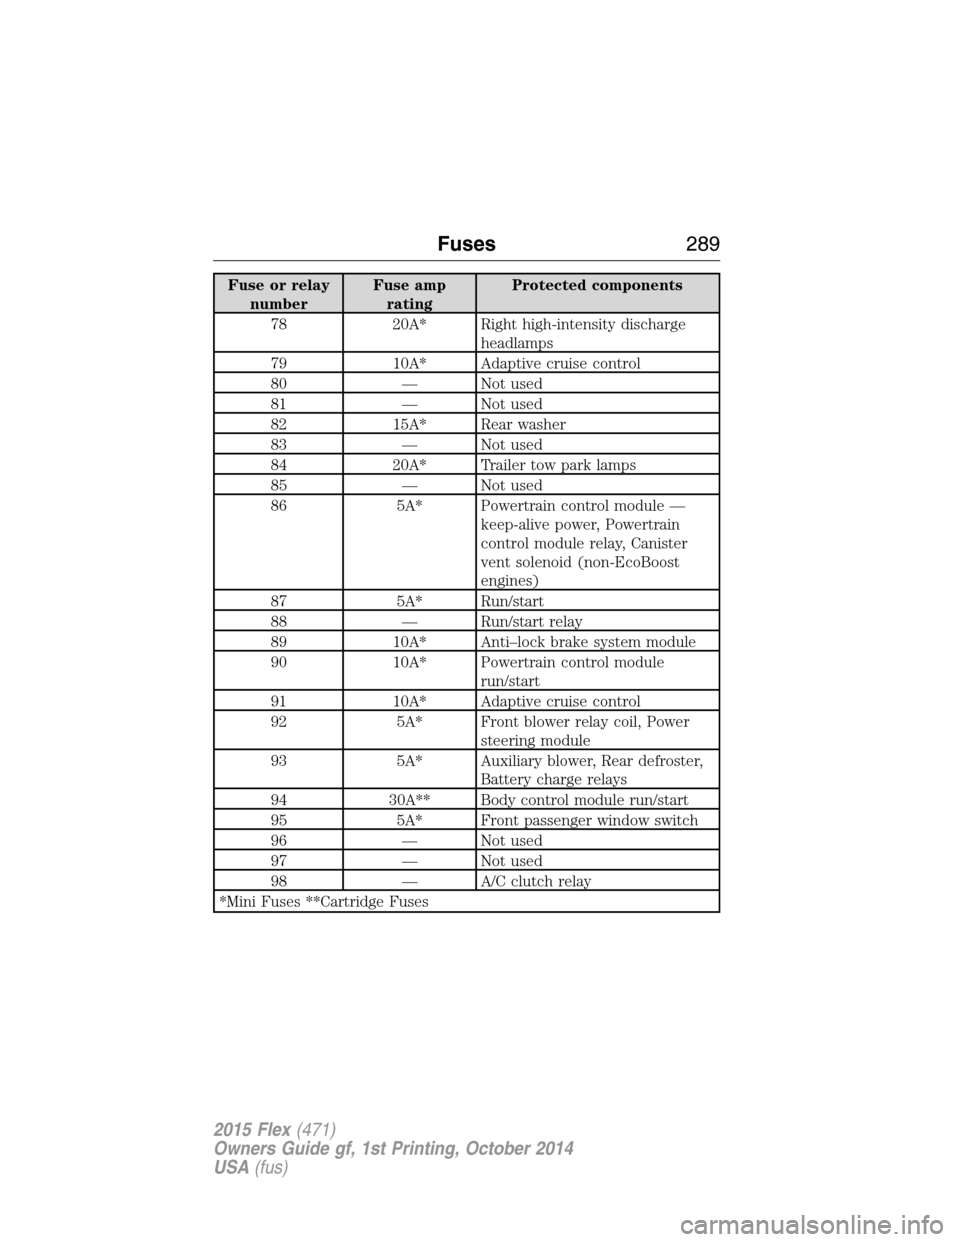
Fuse or relay
numberFuse amp
ratingProtected components
78 20A* Right high-intensity discharge
headlamps
79 10A* Adaptive cruise control
80 — Not used
81 — Not used
82 15A* Rear washer
83 — Not used
84 20A* Trailer tow park lamps
85 — Not used
86 5A* Powertrain control module —
keep-alive power, Powertrain
control module relay, Canister
vent solenoid (non-EcoBoost
engines)
87 5A* Run/start
88 — Run/start relay
89 10A* Anti–lock brake system module
90 10A* Powertrain control module
run/start
91 10A* Adaptive cruise control
92 5A* Front blower relay coil, Power
steering module
93 5A* Auxiliary blower, Rear defroster,
Battery charge relays
94 30A** Body control module run/start
95 5A* Front passenger window switch
96 — Not used
97 — Not used
98 — A/C clutch relay
*Mini Fuses **Cartridge Fuses
Fuses289
2015 Flex(471)
Owners Guide gf, 1st Printing, October 2014
USA(fus)
Page 296 of 571
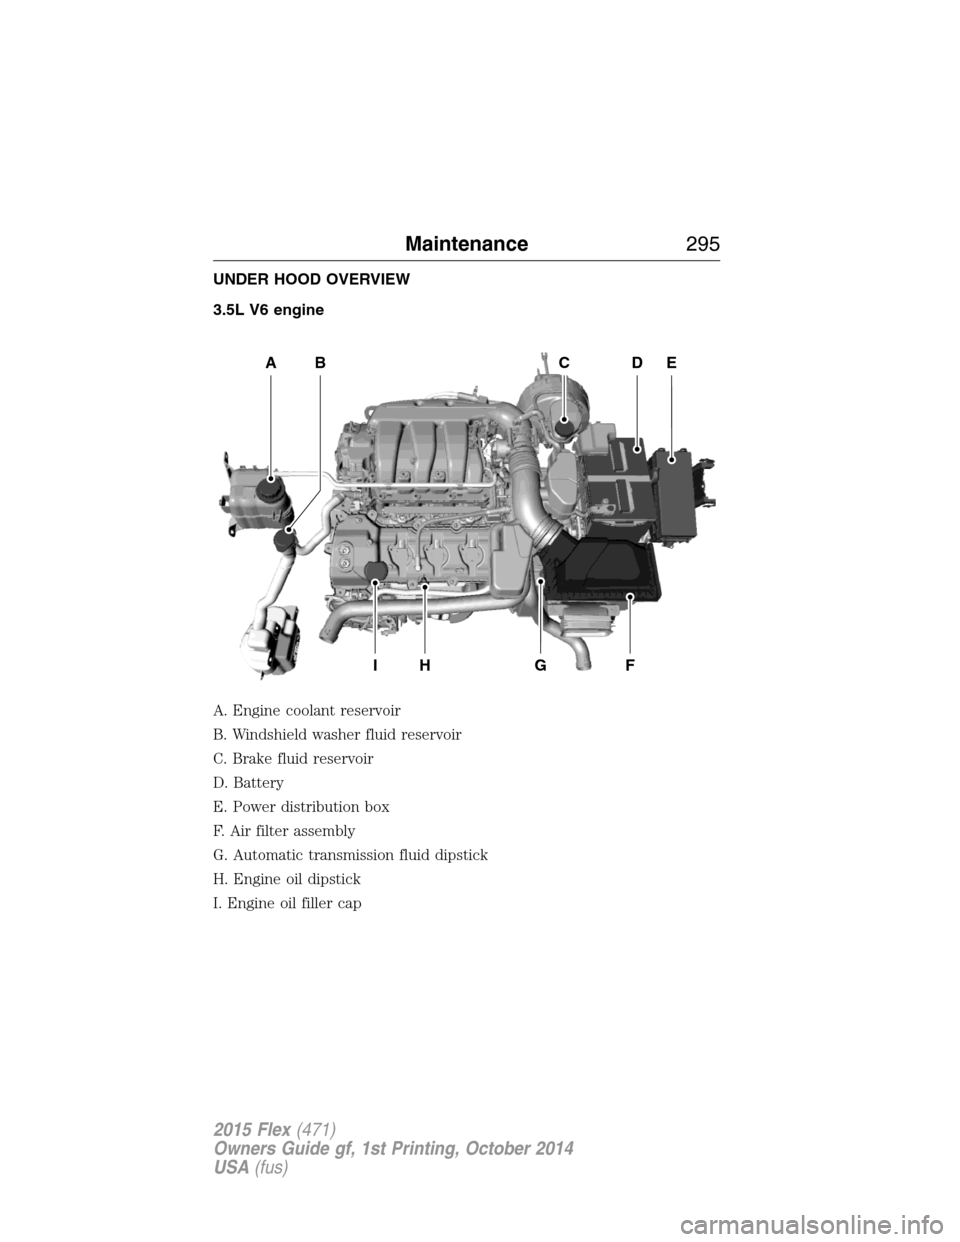
UNDER HOOD OVERVIEW
3.5L V6 engine
A. Engine coolant reservoir
B. Windshield washer fluid reservoir
C. Brake fluid reservoir
D. Battery
E. Power distribution box
F. Air filter assembly
G. Automatic transmission fluid dipstick
H. Engine oil dipstick
I. Engine oil filler cap
A
IHGF
BCDE
Maintenance295
2015 Flex(471)
Owners Guide gf, 1st Printing, October 2014
USA(fus)
Page 297 of 571
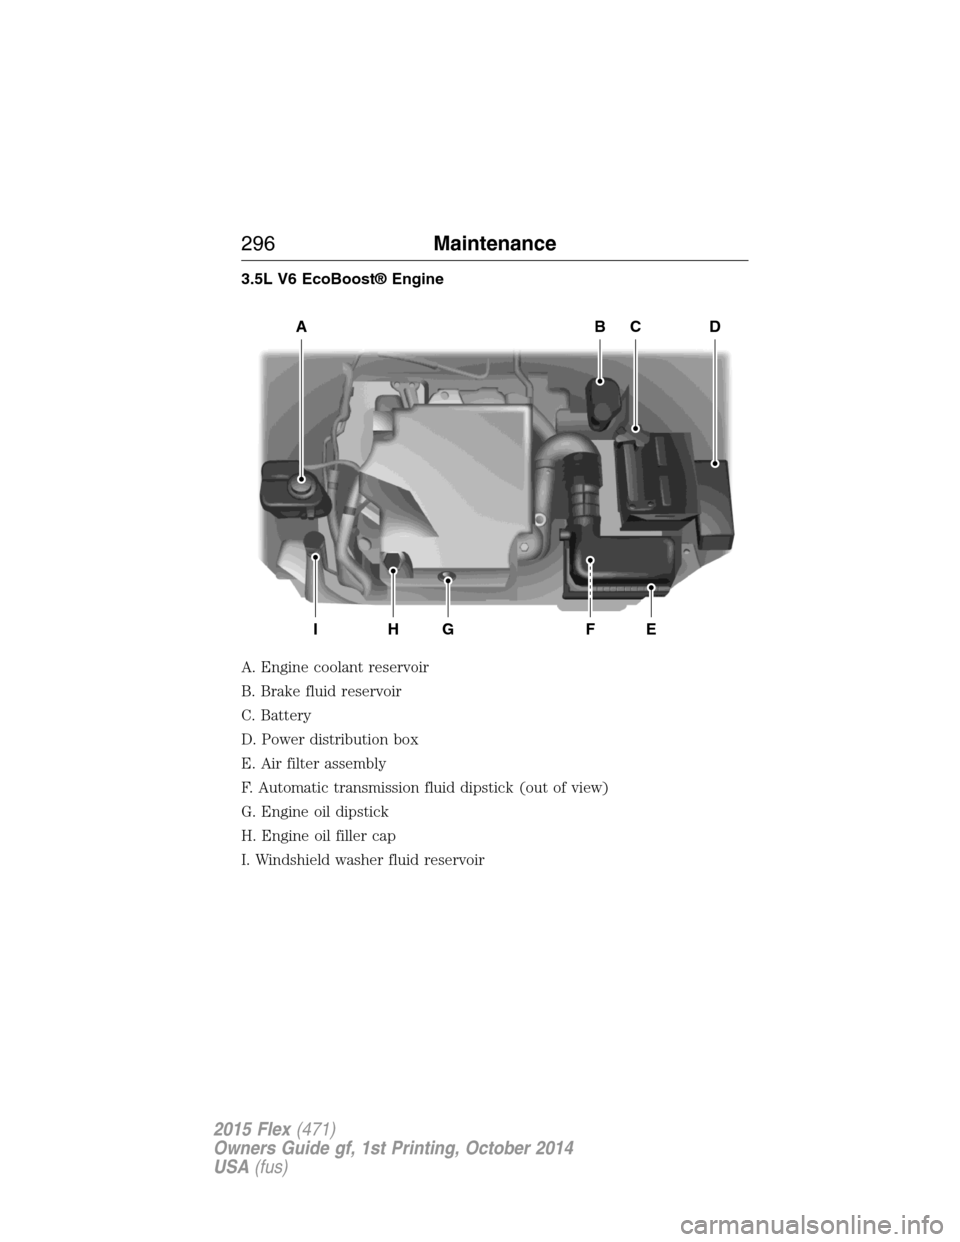
3.5L V6 EcoBoost® Engine
A. Engine coolant reservoir
B. Brake fluid reservoir
C. Battery
D. Power distribution box
E. Air filter assembly
F. Automatic transmission fluid dipstick (out of view)
G. Engine oil dipstick
H. Engine oil filler cap
I. Windshield washer fluid reservoir
ABCD
EFGHI
296Maintenance
2015 Flex(471)
Owners Guide gf, 1st Printing, October 2014
USA(fus)
Page 298 of 571

Engine shield
Some vehicles may be equipped with an aero-shield under the engine.
This shield needs to be removed for service, including oil and filter
changes. It is secured with four quick release fasteners.
ENGINE OIL DIPSTICK
3.5L and 3.5L EcoBoost
A. MIN
B. MAX
ENGINE OIL CHECK
Note:Check the level before starting the engine.
Note:Make sure that the level is between the MIN and MAX marks.
1. Make sure that your vehicle is on level ground.
2. Turn the engine off and wait 10 minutes for the oil to drain into the
oil pan.
3. Remove the dipstick and wipe it with a clean, lint-free cloth. Replace
the dipstick and remove it again to check the oil level.
If the level is at the MIN mark, add oil immediately.
AB
Maintenance297
2015 Flex(471)
Owners Guide gf, 1st Printing, October 2014
USA(fus)
Page 299 of 571
Adding Engine Oil
Note:Do not remove the filler cap when the engine is running.
Note:Do not add engine oil further than the MAX mark. Oil levels above
the MAX mark may cause engine damage.
Only use oils certified for gasoline engines by the
American Petroleum Institute (API). An oil with this
trademark symbol conforms to the current engine and
emission system protection standards and fuel
economy requirements of the International Lubricants
Specification Advisory Council (ILSAC), comprised of
U.S. and Japanese automobile manufacturers.
1. Remove the filler cap.
2. Add engine oil that meets Ford specifications. SeeCapacities and
Specificationsfor more information.
3. Wipe off any spilled oil.
4. Replace the filler cap. Turn it until you feel a strong resistance.
ENGINE COOLANT CHECK
Checking the Engine Coolant
The concentration and level of engine coolant should be checked at the
intervals listed inScheduled Maintenance Information.
Note:Make sure that the level is between the MIN and MAX marks on
the coolant reservoir.
Note:Coolant expands when it is hot. The level may extend beyond the
MAX mark.
If the level is at the MIN mark, below the MIN mark, or empty, add
coolant immediately. SeeAdding Engine Coolantin this chapter.
The coolant concentration should be maintained within 48% to 50%, which
equates to a freeze point between -30°F (-34°C) and -34°F (-37°C).
Note:For best results, coolant concentration should be tested with a
refractometer such as Robinair Coolant and Battery Refractometer
75240. We do not recommend the use of hydrometers or coolant test
strips for measuring coolant concentrations.
Note:Automotive fluids are not interchangeable; do not use engine
coolant/antifreeze or windshield washer fluid outside of its specified
function and vehicle location.
298Maintenance
2015 Flex(471)
Owners Guide gf, 1st Printing, October 2014
USA(fus)
Page 317 of 571
Replacing headlamp bulbs
WARNING:Handle a halogen headlamp bulb carefully and keep
out of children’s reach. Grasp the bulb only by its plastic base
and do not touch the glass. The oil from your hand could cause the
bulb to break the next time the headlamps are operated.
Note:If the bulb is accidentally touched, it should be cleaned with
rubbing alcohol before being used.
1. Make sure headlamp switch is in the off position, then open the hood.
2. Reach in behind the headlamp assembly to access the bulb sockets
and connectors.
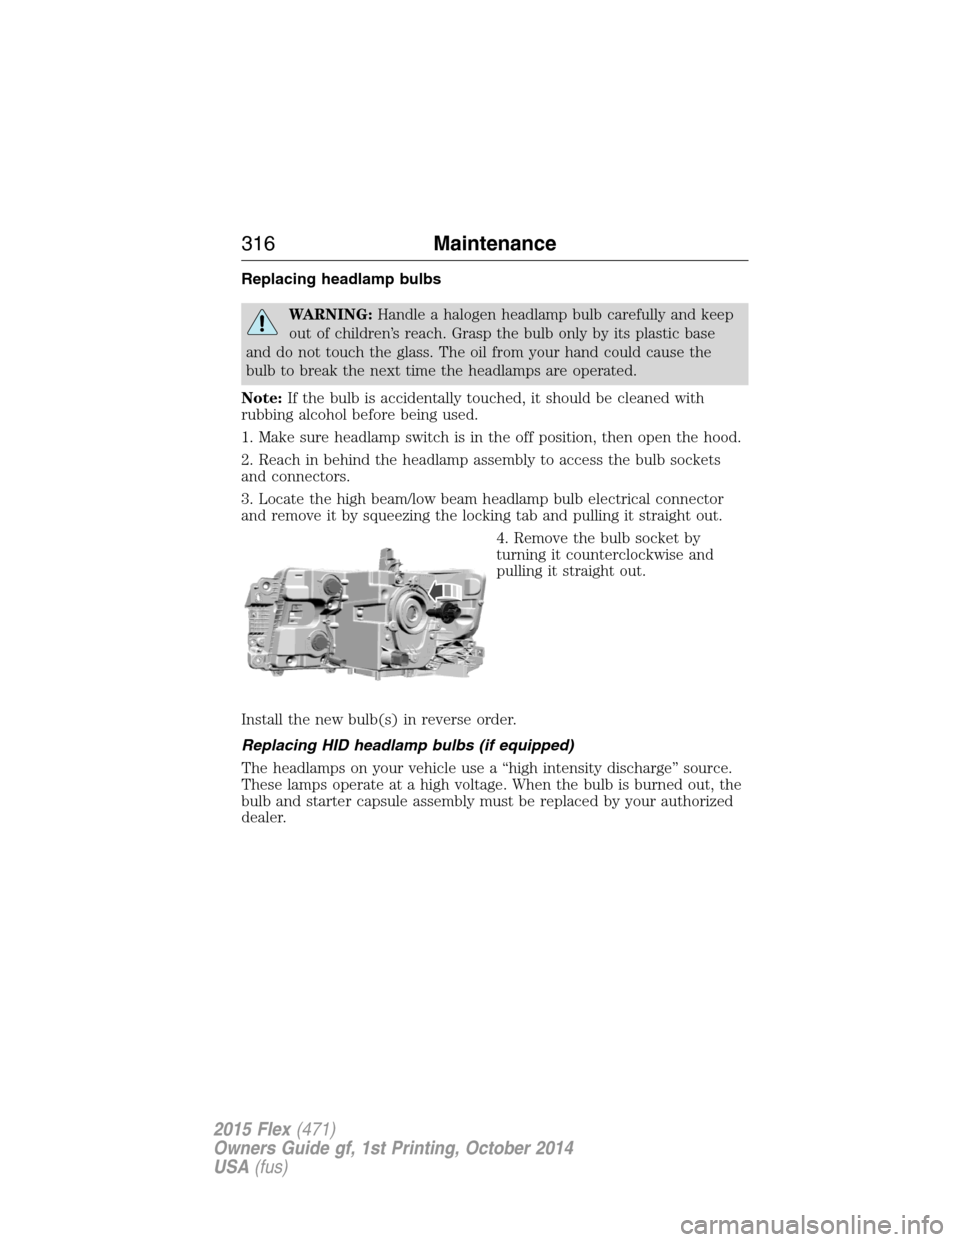
3. Locate the high beam/low beam headlamp bulb electrical connector
and remove it by squeezing the locking tab and pulling it straight out.
4. Remove the bulb socket by
turning it counterclockwise and
pulling it straight out.
Install the new bulb(s) in reverse order.
Replacing HID headlamp bulbs (if equipped)
The headlamps on your vehicle use a “high intensity discharge” source.
These lamps operate at a high voltage. When the bulb is burned out, the
bulb and starter capsule assembly must be replaced by your authorized
dealer.
316Maintenance
2015 Flex(471)
Owners Guide gf, 1st Printing, October 2014
USA(fus)
Page 324 of 571
•Spray Motorcraft Engine Shampoo and Degreaser on all parts that
require cleaning and pressure rinse clean. In Canada, use Motorcraft
Engine Shampoo.
•Never wash or rinse the engine while it is hot or running; water in the
running engine may cause internal damage.
•Never wash or rinse any ignition coil, spark plug wire or spark plug
well, or the area in and around these locations.
•Cover the battery, power distribution box, and air filter assembly to
prevent water damage when cleaning the engine.
CLEANING THE WINDOWS AND WIPER BLADES
The windows and wiper blades should be cleaned regularly. If the wipers
do not wipe properly, substances on the vehicle’s glass or the wiper
blades may cause squeaking or chatter noise from the blades, and
streaking and smearing of the windshield. To clean these items, follow
these tips:
•The windows may be cleaned with a non-abrasive cleaner such as
Motorcraft® Ultra-Clear Spray Glass Cleaner (U.S.) or Motorcraft
Premium Glass Cleaner (Canada).
•The wiper blades can be cleaned with isopropyl (rubbing) alcohol or
Motorcraft Premium Windshield Washer Concentrates in the U.S., or
Motorcraft Premium Quality Windshield Washer Fluid in Canada.
Replace your wiper blades when they appear worn or do not function
properly.
•Do not use abrasive materials, as they may cause scratches.
•Do not use fuel, kerosene, or paint thinner to clean any parts.
If you cannot remove those streaks after cleaning with the glass cleaner
or if the wipers chatter and move in a jerky motion, clean the outer
surface of the windshield and the wiper blades using a sponge or soft
cloth with a neutral detergent or mild-abrasive cleaning solution. After
cleaning, rinse the windshield and wiper blades with clean water. The
windshield is clean if beads do not form when you rinse the windshield
with water.
Note:Do not use sharp objects, such as a razor blade, to clean the
inside of the rear window or to remove decals, as it may cause damage
to the rear window defroster’s heated grid lines.
Vehicle Care323
2015 Flex(471)
Owners Guide gf, 1st Printing, October 2014
USA(fus)
Page 326 of 571
•Avoid cleaners or polishes that increase the gloss of the upper portion
of the instrument panel. The dull finish in this area helps protect the
driver from undesirable windshield reflection.
•Be certain to wash or wipe your hands clean if you have been in
contact with certain products, such as insect repellent and suntan
lotion, in order to avoid possible damage to the interior painted
surfaces.
•Do not use household or glass cleaners as these may damage the
finish of the instrument panel, interior trim and cluster lens.
•Do not allow air fresheners and hand sanitizers to spill on interior
surfaces. If a spill occurs, wipe off immediately. Damage may not be
covered by your warranty.
If a staining liquid like coffee or juice has been spilled on the instrument
panel or on interior trim surfaces, clean as follows:
1. Wipe up spilled liquid using a clean, white, cotton cloth.
2. Use Motorcraft Premium Leather and Vinyl Cleaner or a commercially
available leather cleaning product for automotive interiors. Test any
cleaner or stain remover on an inconspicuous area.
3. Alternatively, wipe the surface with a damp, clean, white, cotton cloth
and a mild soap and water solution. Dry the area with a clean, soft cloth.
4. If necessary, apply more soap and water solution or cleaning product
to a clean, white, cotton cloth and press the cloth onto the soiled area.
Allow this to set at room temperature for 30 minutes.
5. Remove the soaked cloth, then with a clean, damp cloth, use a rubbing
motion for 60 seconds on the soiled area.
6. Following this, wipe area dry with a clean, white, cotton cloth.
CLEANING LEATHER SEATS (IF EQUIPPED)
Note:Follow the same procedure as cleaning leather seats for cleaning
leather instrument panels and leather interior trim surfaces.
For routine cleaning, wipe the surface with a soft, damp cloth and a mild
soap and water solution. Dry the area with a clean, soft cloth.
For cleaning and removing spots and stains such as dye transfer, use
Motorcraft Premium Leather and Vinyl Cleaner or a commercially
available leather cleaning product for automotive interiors.
Note:Test any cleaner or stain remover on an inconspicuous area.
Vehicle Care325
2015 Flex(471)
Owners Guide gf, 1st Printing, October 2014
USA(fus)
Page 327 of 571
You should:
•Remove dust and loose dirt with a vacuum cleaner.
•Clean and treat spills and stains as soon as possible.
Do not use the following products as these may damage the leather:
•Oil and petroleum or silicone-based leather conditioners.
•Household cleaners.
•Alcohol solutions.
•Solvents or cleaners intended specifically for rubber, vinyl and
plastics.Motorcraft
Note:Do not use Motorcraft Premium Leather and Vinyl Cleaner ZC-56
on Lincoln Black Label, Presidential or Reserve Leathers because it can
damage these and other semi-aniline leather seating fabrics. It can also
damage surrounding microfiber accent surfaces. To clean Lincoln Black
Label, Presidential or Reserve Leather, first vacuum the seats to remove
loose dirt. Then wipe the leather with a clean soft cloth dampened with
lukewarm water and a mild soap. Wipe the leather again with a slightly
damp cloth to remove soap residue, and dry with a soft cloth. To
maintain the leather’s resiliency, it should be cleaned whenever soiled.
CLEANING THE ALLOY WHEELS
Note:Do not use chrome cleaner, metal cleaner or polish on wheels and
wheel covers.
A clearcoat paint finish coats aluminum wheels and wheel covers. In
order to maintain their condition:
•Clean weekly with Motorcraft Wheel and Tire Cleaner. Use a sponge to
remove heavy deposits of dirt and brake dust accumulation. Rinse
thoroughly with a strong stream of water when you have completed
the cleaning process.
•To remove tar and grease, use Motorcraft Bug and Tar Remover.
•Never apply any cleaning chemical to hot or warm wheel rims or
covers.
•Some automatic car washes may cause damage to the finish on your
wheel rims or covers.
•Industrial-strength (heavy-duty) cleaners, or cleaning chemicals, in
combination with brush agitation to remove brake dust and dirt, could
wear away the clearcoat finish over time.
326Vehicle Care
2015 Flex(471)
Owners Guide gf, 1st Printing, October 2014
USA(fus)
Page 328 of 571
•Do not use hydrofluoric acid-based or high caustic-based wheel
cleaners, steel wool, fuels or strong household detergent.
•If you intend on parking your vehicle for an extended period after
cleaning the wheels with a wheel cleaner, drive your vehicle for a few
minutes before doing so. This reduces the risk of increased corrosion
of the brake discs.
VEHICLE STORAGE
If you plan on storing your vehicle for an extended period of time
(30 days or more), read the following maintenance recommendations to
make sure your vehicle stays in good operating condition.
All motor vehicles and their components were engineered and tested for
reliable, regular driving. Long-term storage under various conditions may
lead to component degradation or failure unless specific precautions are
taken to preserve the components.
General
•Store all vehicles in a dry, ventilated place.
•Protect from sunlight, if possible.
•If vehicles are stored outside, they require regular maintenance to
protect against rust and damage.
Body
•Wash vehicle thoroughly to remove dirt, grease, oil, tar or mud from
exterior surfaces, rear-wheel housing and underside of front fenders.
•Periodically wash vehicles stored in exposed locations.
•Touch up raw or primed metal to prevent rust.
•Cover chrome and stainless steel parts with a thick coat of auto wax
to prevent discoloration. Re-wax as necessary when the vehicle is
washed.
•Lubricate hood latch, all door latches and trunk lid hinges with a light
grade oil.
•Cover interior trim to prevent fading.
•Keep all rubber parts free from oil and solvents.
Vehicle Care327
2015 Flex(471)
Owners Guide gf, 1st Printing, October 2014
USA(fus)