display FORD GT 2020 Service Manual
[x] Cancel search | Manufacturer: FORD, Model Year: 2020, Model line: GT, Model: FORD GT 2020Pages: 316, PDF Size: 6.25 MB
Page 161 of 316
1.
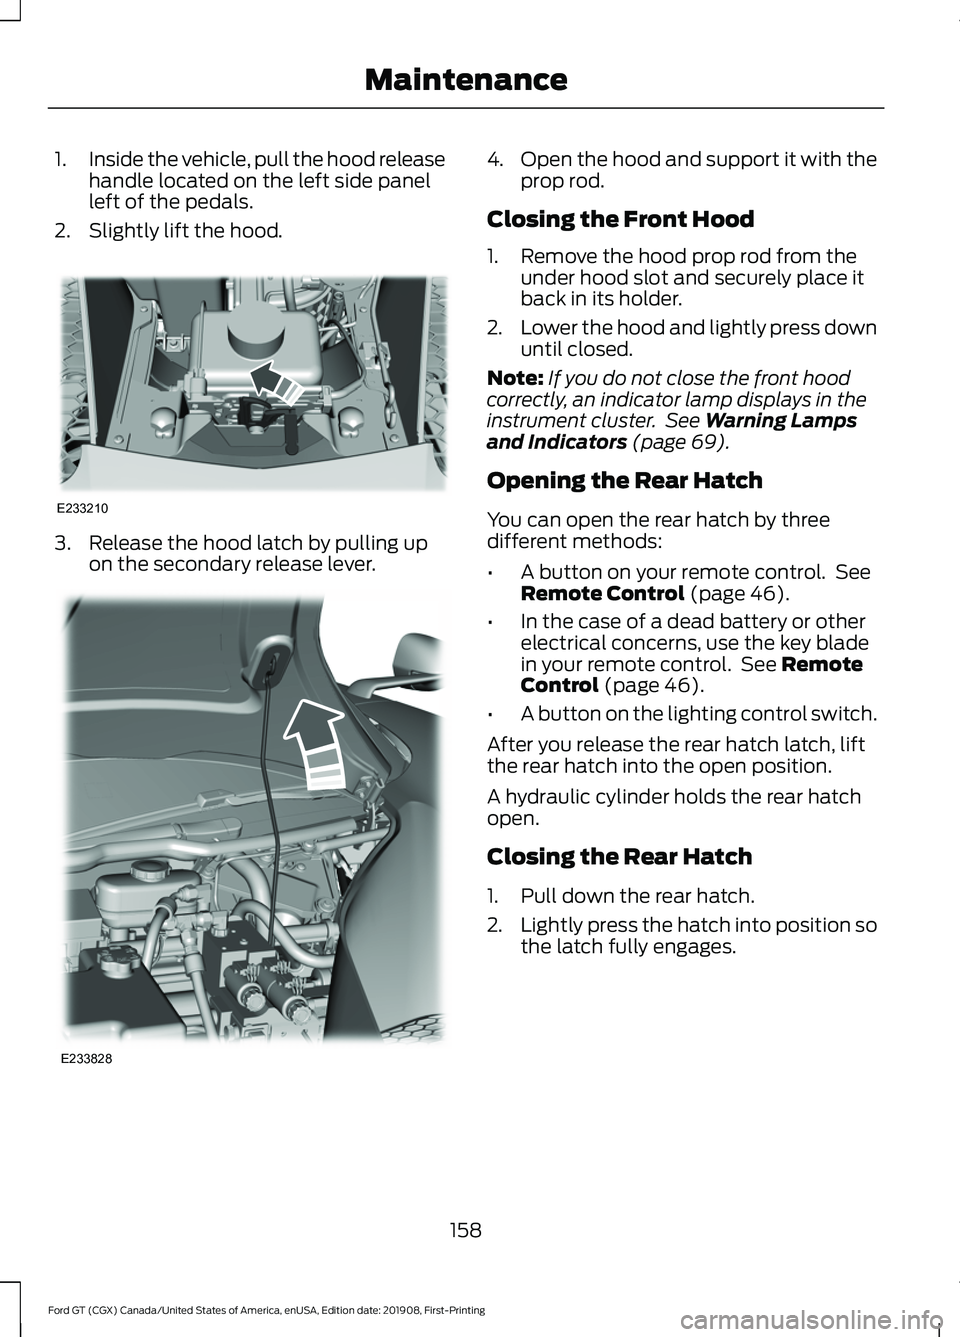
Inside the vehicle, pull the hood release
handle located on the left side panel
left of the pedals.
2. Slightly lift the hood. 3. Release the hood latch by pulling up
on the secondary release lever. 4.
Open the hood and support it with the
prop rod.
Closing the Front Hood
1. Remove the hood prop rod from the under hood slot and securely place it
back in its holder.
2. Lower the hood and lightly press down
until closed.
Note: If you do not close the front hood
correctly, an indicator lamp displays in the
instrument cluster. See Warning Lamps
and Indicators (page 69).
Opening the Rear Hatch
You can open the rear hatch by three
different methods:
• A button on your remote control. See
Remote Control
(page 46).
• In the case of a dead battery or other
electrical concerns, use the key blade
in your remote control. See
Remote
Control (page 46).
• A button on the lighting control switch.
After you release the rear hatch latch, lift
the rear hatch into the open position.
A hydraulic cylinder holds the rear hatch
open.
Closing the Rear Hatch
1. Pull down the rear hatch.
2. Lightly press the hatch into position so
the latch fully engages.
158
Ford GT (CGX) Canada/United States of America, enUSA, Edition date: 201908, First-Printing MaintenanceE233210 E233828
Page 167 of 316
How Fail-Safe Cooling Works
If the engine begins to overheat, the
coolant temperature gauge moves toward
the red zone:
A warning lamp illuminates and
a message may appear in the
information display.
If the engine reaches a preset
over-temperature condition, the engine
automatically switches to alternating
cylinder operation. Each disabled cylinder
acts as an air pump and cools the engine.
When this occurs, your vehicle still
operates, however:
• Engine power is limited.
• The air conditioning system turns off.
Continued operation increases the engine
temperature, causing the engine to
completely shut down. Your steering and
braking effort increases in this situation.
When the engine temperature cools, you
can re-start the engine. Have your vehicle
checked as soon as possible to minimize
engine damage.
When Fail-Safe Mode Is Activated WARNING: Fail-safe mode is for
use during emergencies only. Operate
your vehicle in fail-safe mode only as
long as necessary to bring your vehicle
to rest in a safe location and seek
immediate repairs. When in fail-safe
mode, your vehicle will have limited
power, will not be able to maintain high-speed operation, and may
completely shut down without warning,
potentially losing engine power, power
steering assist, and power brake assist,
which may increase the possibility of a
crash resulting in serious injury.
WARNING:
Never remove the
coolant reservoir cap when the engine is
running or hot.
Your vehicle has limited engine power
when in the fail-safe mode, drive your
vehicle with caution. Your vehicle does not
maintain high-speed operation and the
engine may operate poorly.
Remember that the engine is capable of
automatically shutting down to prevent
engine damage. In this situation:
1. Pull off the road as soon as safely possible and switch the engine off.
2. Contact the Ford GT Concierge to obtain assistance.
See About This
Manual (page 5).
3. If this is not possible, wait a short period for the engine to cool.
4. Check the coolant level. If the coolant level is at or below the minimum mark,
add prediluted coolant immediately.
5. When the engine temperature cools, you can re-start the engine. Have your
vehicle checked as soon as possible to
minimize engine damage.
Note: Driving your vehicle without repair
increases the chance of engine damage.
164
Ford GT (CGX) Canada/United States of America, enUSA, Edition date: 201908, First-Printing Maintenance
Page 168 of 316
Engine Coolant Temperature
Management
WARNING: To reduce the risk
of crash and injury, be prepared that the
vehicle speed may reduce and the
vehicle may not be able to accelerate
with full power until the coolant
temperature reduces.
At this time, you may notice the coolant
temperature gauge moves toward the red
zone and a message may appear in the
information display.
You may notice a reduction in vehicle
speed caused by reduced engine power in
order to manage the engine coolant
temperature. Your vehicle may enter this
mode if certain high-temperature and
high-load conditions take place. The
amount of speed reduction depends on
vehicle loading, grade and ambient
temperature. If this occurs, there is no need
to pull off the road. You can continue to
drive your vehicle.
The air conditioning may automatically
turn on and off during severe operating
conditions to protect the engine from
overheating. When the coolant
temperature decreases to the normal
operating temperature, the air conditioning
turns on.
If the coolant temperature gauge moves
fully into the red zone, or if the coolant
temperature warning or service engine
soon messages appear in your information
display, do the following:
1. Pull off the road as soon as safely possible and shift the transmission into
park
(P). 2. Leave the engine running until the
coolant temperature gauge needle
returns to the normal position. After
several minutes, if the temperature
does not drop, follow the remaining
steps.
3. Switch the engine off and wait for it to
cool. Check the coolant level.
4. If the coolant level is at or below the minimum mark, add prediluted coolant
immediately.
5. If the coolant level is normal, restart the engine and continue.
AUTOMATIC TRANSMISSION
FLUID CHECK
If required, have an authorized dealer check
and change the transmission fluid at the
correct service interval. See
Scheduled
Maintenance (page 263).
The automatic transmission does not have
a transmission fluid dipstick.
Refer to your scheduled maintenance
information for scheduled intervals for fluid
checks and changes. Your transmission
does not consume fluid. However, if the
transmission slips, shifts slowly or if you
notice a sign of leaking fluid, contact an
authorized dealer.
Do not use supplemental transmission
fluid additives, treatments or cleaning
agents. The use of these materials may
affect transmission operation and result
in damage to internal transmission
components.
165
Ford GT (CGX) Canada/United States of America, enUSA, Edition date: 201908, First-Printing Maintenance
Page 177 of 316
WHAT IS LAUNCH CONTROL
Note:
Only use this feature in a controlled
environment, such as a track. Launch control
is not for use in normal driving.
Note: Launch control is not available when
in the Wet drive mode.
Your vehicle has a launch control feature
that uses clutch and engine controls to
reduce wheel spin or slip on a hard
acceleration from a standing start.
To operate launch control, your vehicle
must meet the following conditions:
• You must be in any drive mode other
than Wet drive mode.
• You must close the doors, front hood
and rear hatch.
• Your vehicle should be on a level
surface.
• You must disengage the electric park
brake.
• You must be at a complete stop with
the brake pedal applied and the
transmission selector in drive (D).
• Transmission clutch fluid temperature
must be in the normal operating
temperature range.
• No powertrain or brake system warning
indicators are active.
Launch Control remains active until:
• You switch the feature off through the
display screen.
• Your vehicle no longer meets the
conditions required for launch control
to operate. USING LAUNCH CONTROL
To use Launch Control:
•
Activate the launch control feature
through the display screen. See
General Information (page 74).
• When activated, the LC icon appears
in white inside the instrument cluster.
• With your vehicle at a complete stop,
hold the brake pedal firmly and press
the accelerator pedal to wide open
throttle.
• When the engine reaches the required
RPM and your vehicle meets all other
system requirements, the LC icon turns
from white to green and the vehicle is
ready to launch.
• Quickly release the brake pedal and
carefully steer your vehicle when it
accelerates from a stop. The launch
control feature controls wheel spin as
you accelerate.
• After completing the run and stopping,
the LC icon returns to white.
• If any operating conditions are not
within specification, the LC icon turns
grey with a strikethrough.
• You can switch launch control off
through the display screen.
See
General Information (page 74).
174
Ford GT (CGX) Canada/United States of America, enUSA, Edition date: 201908, First-Printing Launch Control
Page 180 of 316
Raising the Rear Wing
For routine cleaning, raise the wing.
Using the information display select the
following:
1. Rear wing deployment.
2. Select Raised.
After you have cleaned your vehicle, to
return the wing to the lowered position you
must drive the car at 15 mph (25 km/h) or
above. The wing will return to the lowered
position.
Note:
You cannot lower the wing when your
vehicle is stationary.
Exterior Plastic Parts
For routine cleaning we recommend
Motorcraft® Detail Wash. If tar or grease
spots are present, we recommend
Motorcraft® Bug and Tar Remover.
Under Hood
For removing black rubber marks from
under the hood we recommend
Motorcraft® Wheel and Tire Cleaner or
Motorcraft® Bug and Tar Remover.
WAXING
Note: If your vehicle has a matte paint
finish, do not wax your vehicle.
Regular waxing is necessary to protect your
car's paint from the elements. We
recommend that you wash and wax the
painted surface once or twice a year.
When washing and waxing, park your
vehicle in a shaded area out of direct
sunlight. Always wash your vehicle before
applying wax.
• Use a quality wax that does not contain
abrasives.
• Follow the manufacturer ’s instructions
to apply and remove the wax. •
Apply a small amount of wax in a
back-and-forth motion, not in circles.
• Do not allow wax to come in contact
with any non-body (low-gloss black)
colored trim. The wax will discolor or
stain the parts over time.
• Do not apply wax to glass areas.
• After waxing, your car's paint should
feel smooth, and be free of streaks and
smudges.
CLEANING THE ENGINE
Engines are more efficient when they are
clean because grease and dirt buildup keep
the engine warmer than normal.
When washing:
• Do not spray a hot engine with cold
water to avoid cracking the engine
block or other engine components.
• Spray Motorcraft® Engine Shampoo
and Degreaser on all parts that require
cleaning and pressure rinse clean. In
Canada, use Motorcraft Engine
Shampoo.
• Never wash or rinse the engine while it
is hot or running; water in the running
engine may cause internal damage.
• Never wash or rinse any ignition coil,
spark plug wire or spark plug well, or
the area in and around these locations.
• Never spray water on electrical
components such as modules,
connectors and fuse boxes. Cover all
electrical components before cleaning
to prevent water damage.
177
Ford GT (CGX) Canada/United States of America, enUSA, Edition date: 201908, First-Printing Vehicle Care
Page 206 of 316
This device complies with Part 15 of the
FCC Rules and with Licence exempt RSS
Standards of Industry Canada. Operation
is subject to the following two conditions:
•
This device may not cause harmful
interference, and
• This device must accept any
interference received, including
interference that may cause undesired
operation. WARNING: Changes or
modifications not expressively approved
by the party responsible for compliance
could void the user's authority to operate
the equipment. The term "IC:" before the
radio certification number only signifies
that Industry Canada technical
specifications were met.
Changing Tires With a Tire
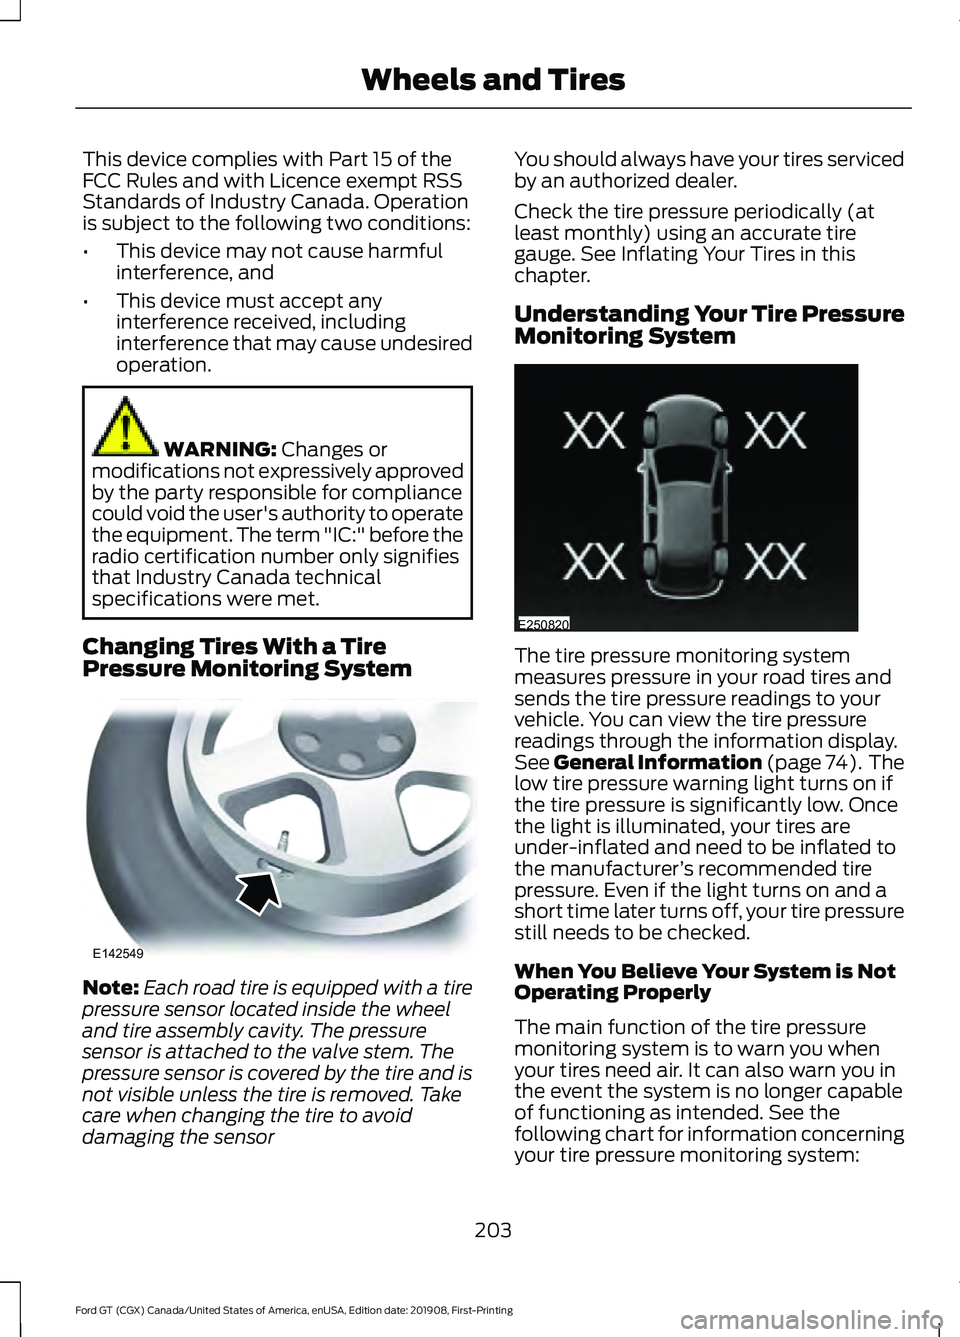
Pressure Monitoring System Note:
Each road tire is equipped with a tire
pressure sensor located inside the wheel
and tire assembly cavity. The pressure
sensor is attached to the valve stem. The
pressure sensor is covered by the tire and is
not visible unless the tire is removed. Take
care when changing the tire to avoid
damaging the sensor You should always have your tires serviced
by an authorized dealer.
Check the tire pressure periodically (at
least monthly) using an accurate tire
gauge. See Inflating Your Tires in this
chapter.
Understanding Your Tire Pressure
Monitoring System
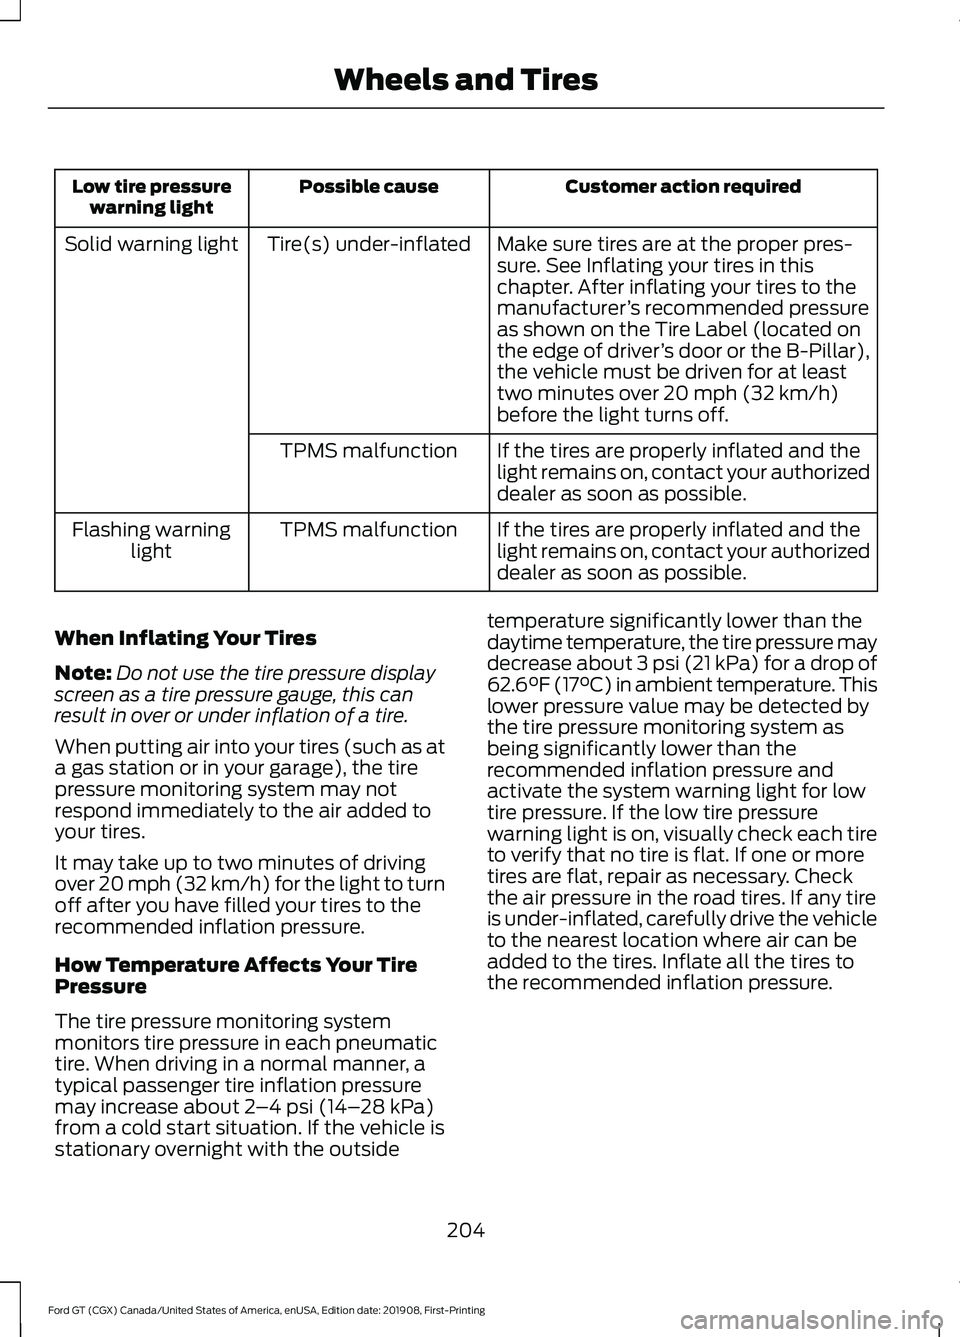
The tire pressure monitoring system
measures pressure in your road tires and
sends the tire pressure readings to your
vehicle. You can view the tire pressure
readings through the information display.
See
General Information (page 74). The
low tire pressure warning light turns on if
the tire pressure is significantly low. Once
the light is illuminated, your tires are
under-inflated and need to be inflated to
the manufacturer ’s recommended tire
pressure. Even if the light turns on and a
short time later turns off, your tire pressure
still needs to be checked.
When You Believe Your System is Not
Operating Properly
The main function of the tire pressure
monitoring system is to warn you when
your tires need air. It can also warn you in
the event the system is no longer capable
of functioning as intended. See the
following chart for information concerning
your tire pressure monitoring system:
203
Ford GT (CGX) Canada/United States of America, enUSA, Edition date: 201908, First-Printing Wheels and TiresE142549 E250820
Page 207 of 316
Customer action required
Possible cause
Low tire pressure
warning light
Make sure tires are at the proper pres-
sure. See Inflating your tires in this
chapter. After inflating your tires to the
manufacturer’s recommended pressure
as shown on the Tire Label (located on
the edge of driver ’s door or the B-Pillar),
the vehicle must be driven for at least
two minutes over 20 mph (32 km/h)
before the light turns off.
Tire(s) under-inflated
Solid warning light
If the tires are properly inflated and the
light remains on, contact your authorized
dealer as soon as possible.
TPMS malfunction
If the tires are properly inflated and the
light remains on, contact your authorized
dealer as soon as possible.
TPMS malfunction
Flashing warning
light
When Inflating Your Tires
Note: Do not use the tire pressure display
screen as a tire pressure gauge, this can
result in over or under inflation of a tire.
When putting air into your tires (such as at
a gas station or in your garage), the tire
pressure monitoring system may not
respond immediately to the air added to
your tires.
It may take up to two minutes of driving
over 20 mph (32 km/h) for the light to turn
off after you have filled your tires to the
recommended inflation pressure.
How Temperature Affects Your Tire
Pressure
The tire pressure monitoring system
monitors tire pressure in each pneumatic
tire. When driving in a normal manner, a
typical passenger tire inflation pressure
may increase about
2 –4 psi (14– 28 kPa)
from a cold start situation. If the vehicle is
stationary overnight with the outside temperature significantly lower than the
daytime temperature, the tire pressure may
decrease about 3 psi (21 kPa) for a drop of
62.6°F (17°C) in ambient temperature. This
lower pressure value may be detected by
the tire pressure monitoring system as
being significantly lower than the
recommended inflation pressure and
activate the system warning light for low
tire pressure. If the low tire pressure
warning light is on, visually check each tire
to verify that no tire is flat. If one or more
tires are flat, repair as necessary. Check
the air pressure in the road tires. If any tire
is under-inflated, carefully drive the vehicle
to the nearest location where air can be
added to the tires. Inflate all the tires to
the recommended inflation pressure.
204
Ford GT (CGX) Canada/United States of America, enUSA, Edition date: 201908, First-Printing Wheels and Tires
Page 221 of 316

AUDIO UNIT
WARNING: Driving while
distracted can result in loss of vehicle
control, crash and injury. We strongly
recommend that you use extreme
caution when using any device that may
take your focus off the road. Your
primary responsibility is the safe
operation of your vehicle. We
recommend against the use of any
hand-held device while driving and
encourage the use of voice-operated
systems when possible. Make sure you
are aware of all applicable local laws
that may affect the use of electronic
devices while driving.
You can access your audio features with
the touchscreen and steering wheel
controls. See your SYNC information.
The power button is to the left of the
display screen.
USB PORT
The USB port is on the bottom of the
instrument panel.
The USB port allows you to plug in media
playing devices, memory sticks and charge
devices (if supported). See your SYNC
information.
218
Ford GT (CGX) Canada/United States of America, enUSA, Edition date: 201908, First-Printing Audio System
Page 228 of 316
Navigation Voice Commands (If
Equipped)
Setting a Destination
You can use any of the following
commands to set a destination or find a point of interest.
___ is a dynamic listing, meaning that for
navigation voice commands it can be a POI
category or a major brand name, where
major brand name is a chain with more
than 20 locations
You can find an address, a point of interest (POI), or search for points of interest
by category: Description
Voice command
Allows you to enter the address search functionality. You can
also search for an address in a specific state or province.
Find an Address
State the name of the POI category or major brand name you
would like to search for such as "Find restaurants".
Find a ___
Allows you to enter the POI search functionality.
Find a POI
Allows you to enter the intersection search functionality.
Find an Intersection
State the name of a POI category or major brand name you would
like to search for.
Find the Nearest
Allows you to see a list of your previous destinations.
Show Previous
Destinations
Allows you to see a list of your favorite destinations.
Show Favorites
Allows you to route to your home address.
Drive Home
Allows you to route to your work address.
Drive to Work
In addition, you can say these commands when a route is active: Description
Voice command
Cancels the current route.
Cancel Route
Allows you to select an alternate route.
Detour
Repeats the last guidance prompt.
Repeat Instruction
Displays the active route.
Show Route
Displays the list of upcoming maneuvers.
Route Summary
225
Ford GT (CGX) Canada/United States of America, enUSA, Edition date: 201908, First-Printing SYNC™ 3
Page 230 of 316
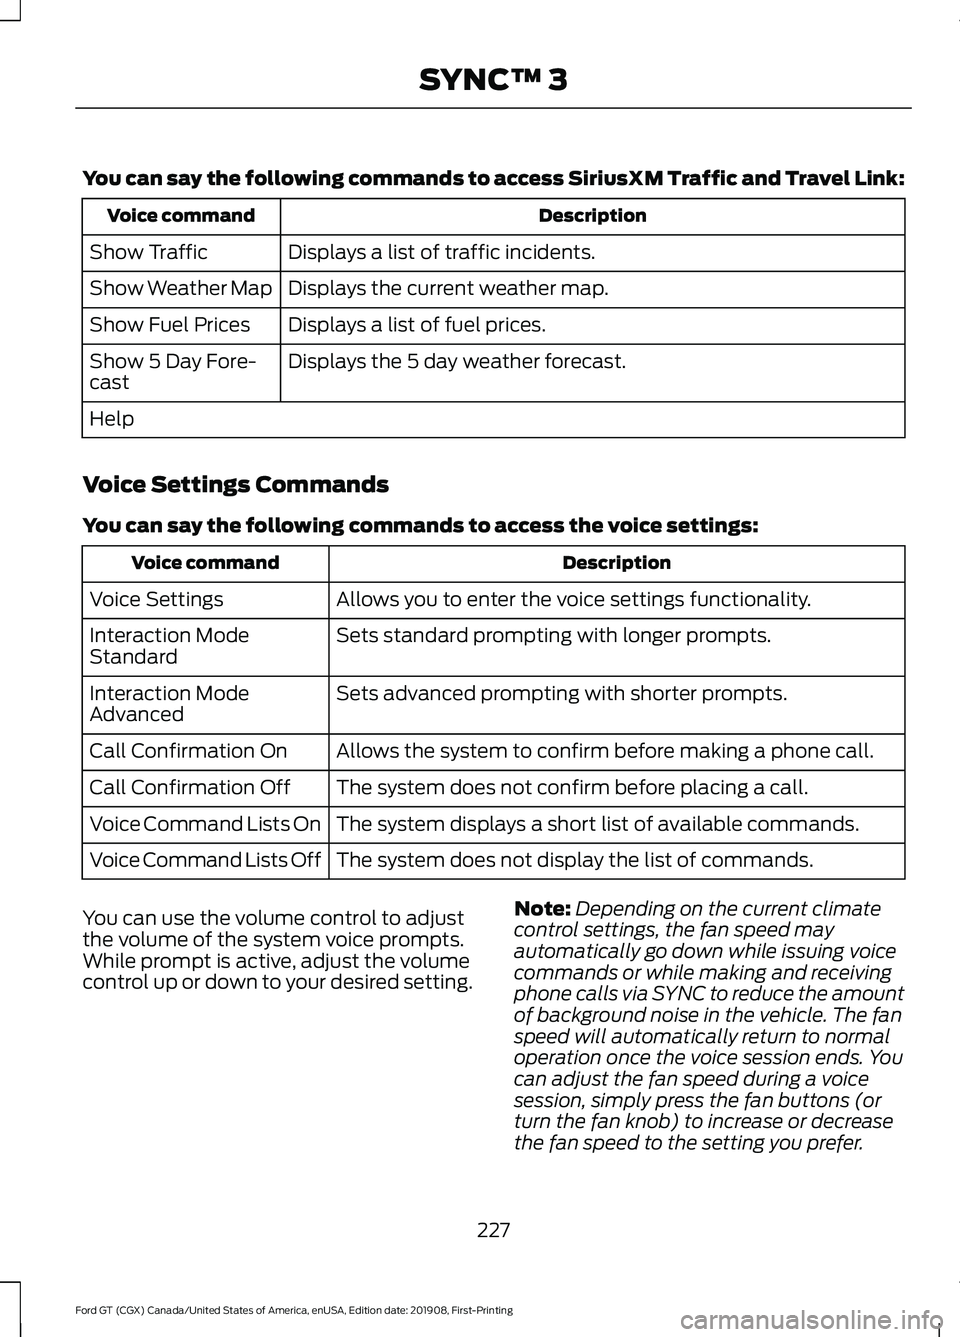
You can say the following commands to access SiriusXM Traffic and Travel Link:
Description
Voice command
Displays a list of traffic incidents.
Show Traffic
Displays the current weather map.
Show Weather Map
Displays a list of fuel prices.
Show Fuel Prices
Displays the 5 day weather forecast.
Show 5 Day Fore-
cast
Help
Voice Settings Commands
You can say the following commands to access the voice settings: Description
Voice command
Allows you to enter the voice settings functionality.
Voice Settings
Sets standard prompting with longer prompts.
Interaction Mode
Standard
Sets advanced prompting with shorter prompts.
Interaction Mode
Advanced
Allows the system to confirm before making a phone call.
Call Confirmation On
The system does not confirm before placing a call.
Call Confirmation Off
The system displays a short list of available commands.
Voice Command Lists On
The system does not display the list of commands.
Voice Command Lists Off
You can use the volume control to adjust
the volume of the system voice prompts.
While prompt is active, adjust the volume
control up or down to your desired setting. Note:
Depending on the current climate
control settings, the fan speed may
automatically go down while issuing voice
commands or while making and receiving
phone calls via SYNC to reduce the amount
of background noise in the vehicle. The fan
speed will automatically return to normal
operation once the voice session ends. You
can adjust the fan speed during a voice
session, simply press the fan buttons (or
turn the fan knob) to increase or decrease
the fan speed to the setting you prefer.
227
Ford GT (CGX) Canada/United States of America, enUSA, Edition date: 201908, First-Printing SYNC™ 3