FORD KUGA 2010 1.G Manual PDF
Manufacturer: FORD, Model Year: 2010, Model line: KUGA, Model: FORD KUGA 2010 1.GPages: 226, PDF Size: 8.07 MB
Page 71 of 226
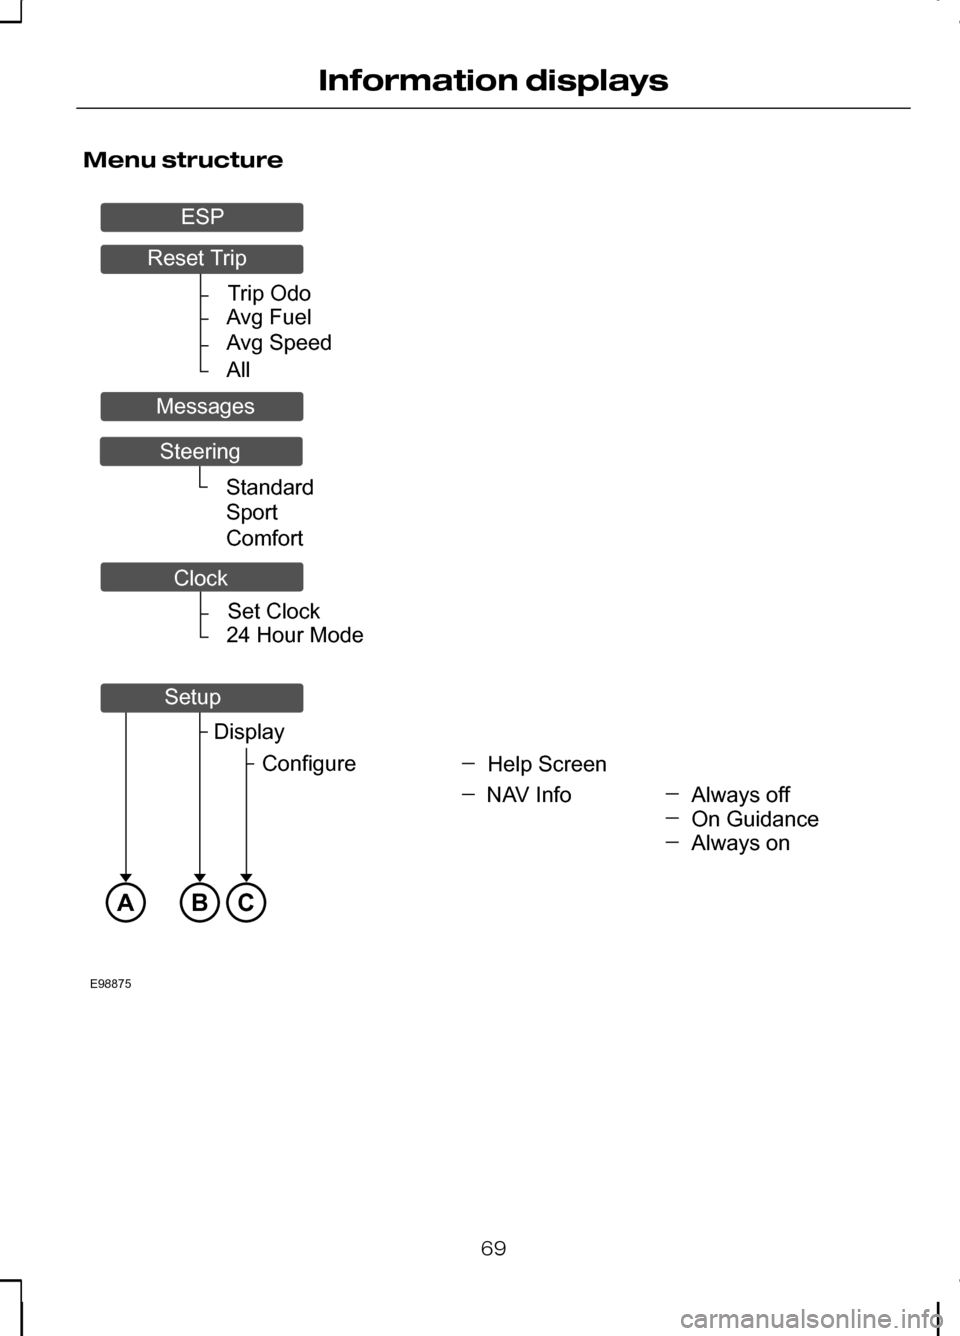
Menu structure
69
Information displaysTripOdoAvgFuelAvgSpeedAllSetClock24HourModeABCE98875StandardSportComfortAlwaysoffHelpScreenDisplayConfigureNAVInfoOnGuidanceAlwaysonResetTripMessagesSteeringESPClockSetup
Page 72 of 226
70
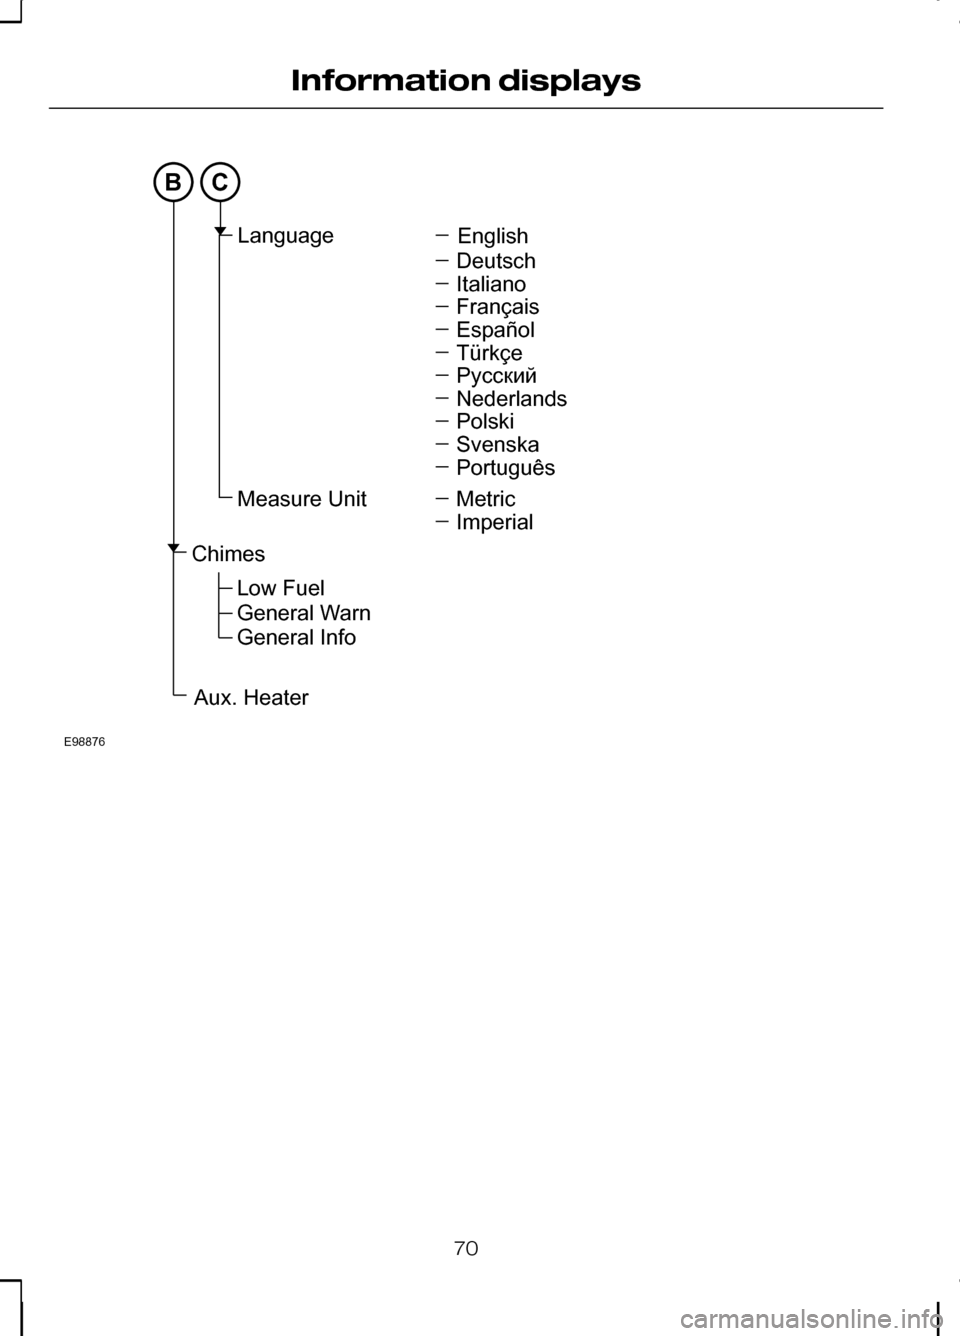
Information displaysBCE98876EnglishLanguageMeasureUnitDeutschItalianoFrançaisEspañolTürkçePyccкийNederlandsPolskiSvenskaPortuguêsMetricImperialChimesAux.HeaterLowFuelGeneralWarnGeneralInfo
Page 73 of 226
PERSONALISED SETTINGS
1. Use the rotary to enter the main
menu.
2. Press the SET/RESET button to
choose a sub-menu and adjust the
settings.
ESP
Select this option to activate or deactivate
ESP.
1. Use the rotary control to enter the main menu. 2.
Highlight ESPand press the
SET/RESET.
3. Highlight Backand repeatedly press
the SET/RESET button to return to
the main menu.
Steering
Note:For road safety reasons, changes
in the Steering menu can only be made
while the vehicle is stationary. If this menu or one of its sub-menus is open when thevehicle begins to move, the informationdisplay will automatically exit the
Steering menu.
Note:When the vehicle is stationary, the
steering assistance is optimized in all three settings and does not differ noticeably.
Standard: The standard setting is
suitable for all driving styles.
Sport: The steering assistance is
reduced. This suits a sportier driving style
by increasing the feedback through the
steering wheel. The sport setting is also
an advantage when driving on icy and
snowy road conditions.
Comfort: The steering assistance is
increased. The steering will feel lighter and
you will not need to exert as much force
on the wheel.
1. Use the rotary control to enter the main menu.
2. Highlight Steering and press the
SET/RESET button.
3. Highlight the desired setting and press
the SET/RESET button to confirm
the setting.
4. Highlight Backand repeatedly press
the SET/RESET button to return to
the main menu.
Clock setting
1. Use the rotary control to enter the main menu.
71
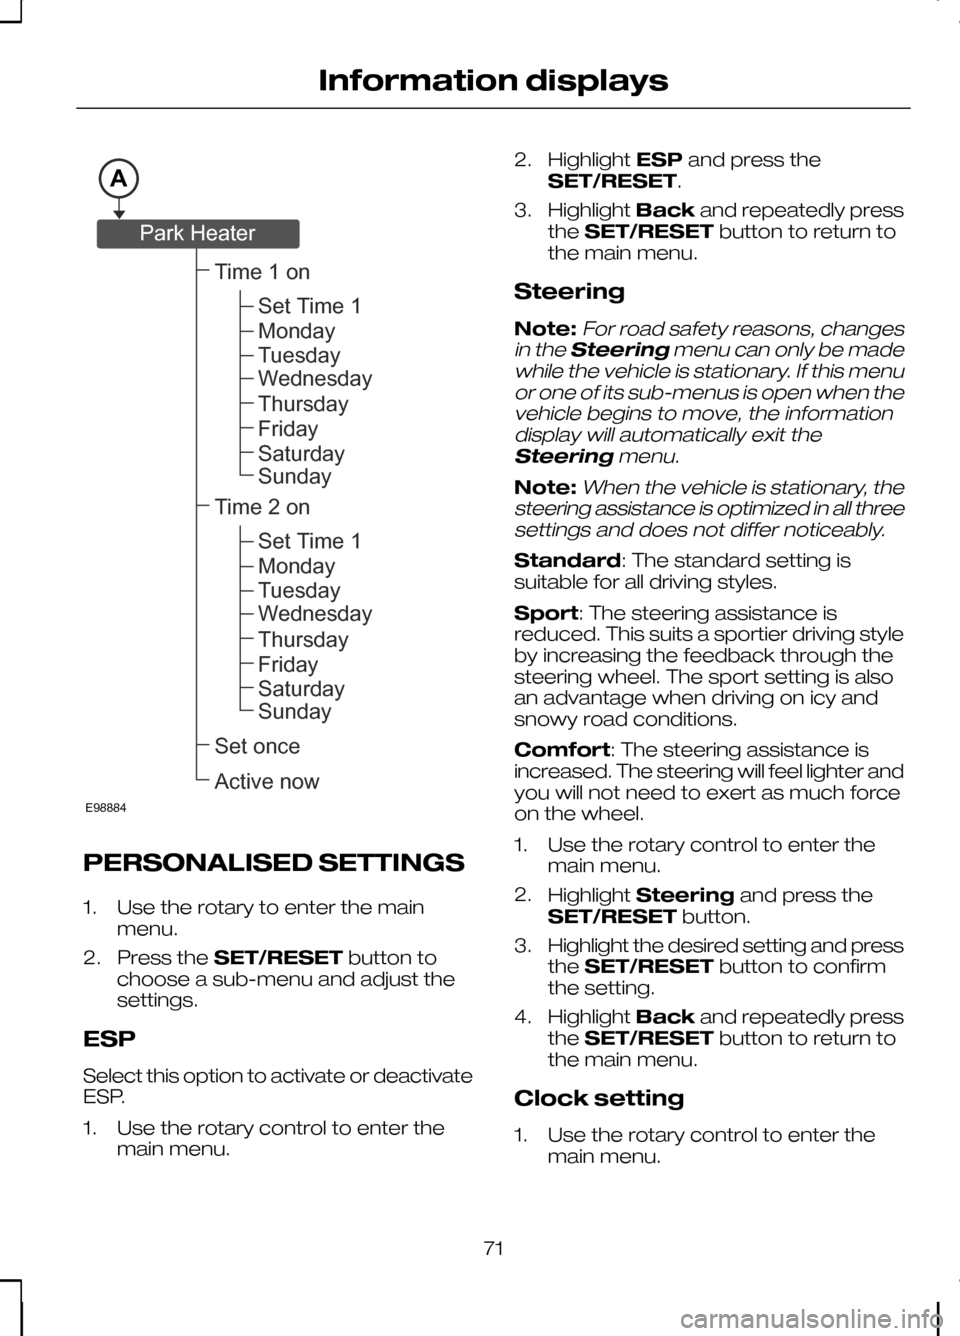
Information displaysAE98884Time1onSetonceActivenowSetTime1MondayTuesdayWednesdayThursdayFridaySaturdaySundayTime2onSetTime1MondayTuesdayWednesdayThursdayFridaySaturdaySundayParkHeater
Page 74 of 226
2.
Highlight Clockand press the
SET/RESET button.
3. Highlight Set Clock and press the
SET/RESET button. The hours start
to flash.
4. Use the rotary control to adjust the hours to the desired setting.
5. Press the SET/RESET button to
confirm the setting. The minutes start
to flash.
6. Proceed in the same way to set the minutes and the date.
7. Press the SET/RESET button to
confirm the setting.
8. Highlight Backand repeatedly press
the SET/RESET button to return to
the main menu.
Help screen and navigation
information
The help screen appears for a few
seconds when you switch the ignition on.
If the navigation is operating, information
relating to this system is displayed in the
information display.
To select which information is displayed
in the information display:
1. Use the rotary control to enter the main menu.
2. Highlight Setupand press the
SET/RESET button.
3. Highlight Display and press the
SET/RESET button.
4. Highlight Configure and press the
SET/RESET button.
5. Highlight the desired setting and press
the SET/RESET button to confirm
the setting.
6. Highlight Backand repeatedly press
the SET/RESET button to return to
the main menu. Navigation information
You can also choose when the navigation
information is displayed in the information
display. Three options are available:
•
Always off: No navigation
information is displayed in the
information display.
• On guidance: The navigation
information will only appear when the
navigation system provides a
guidance instruction. This function is
only available on certain navigation
systems.
• Always on: Navigation information
will always appear in the information
display when the navigation system is
operating.
To set when navigation information should
be displayed:
1. Use the rotary control to enter the main menu.
2. Highlight Setupand press the
SET/RESET button.
3. Highlight Display and press the
SET/RESET button.
4. Highlight Configure and press the
SET/RESET button.
5. Highlight Nav Info and press the
SET/RESET button.
6. Highlight the desired setting and press
the SET/RESET button to confirm
the setting.
7. Highlight Backand repeatedly press
the SET/RESET button to return to
the main menu.
Language setting
A choice of eleven languages are
available.
English, German, Italian, French, Spanish,
Turkish, Russian, Dutch, Polish, Swedish
and Portuguese.
72
Information displays
Page 75 of 226
1. Use the rotary control to enter the
main menu.
2. Highlight Setupand press the
SET/RESET button.
3. Highlight Display and press the
SET/RESET button.
4. Highlight Language and press the
SET/RESET button.
5. Highlight the desired setting and press
the SET/RESET button to confirm
the setting.
6. Highlight Backand repeatedly press
the SET/RESET button to return to
the main menu.
Units of measure
To select metric or imperial units:
Toggling the units of measure using this
display will affect the following displays:
• Distance to empty.
• Average fuel consumption.
• Instantaneous fuel consumption.
• Average speed.
• Outside air temperature.
• The temperature display in the
automatic climate control.
Note:The units of measure for outside
air temperature and the automatic climate control can be toggled independent ofthe other displays. When showing theoutside air temperature, press and hold
the SET/RESET button for a short time.
1. Use the rotary control to enter the
main menu.
2. Highlight Setupand press the
SET/RESET button.
3. Highlight Display and press the
SET/RESET button.
4. Highlight Measure Unit and press
the SET/RESET button. 5.
Highlight the desired setting and press
the SET/RESET button to confirm
the setting.
6. Highlight Backand repeatedly press
the SET/RESET button to return to
the main menu.
Chime deactivation
The following chimes can be deactivated:
• Low fuel warning.
• General warning messages.
• General information messages.
1. Use the rotary control to enter the main menu.
2. Highlight Setupand press the
SET/RESET button.
3. Highlight Chimes and press the
SET/RESET button.
4. Highlight the desired setting and press
the SET/RESET button to confirm
the setting.
5. Highlight Backand repeatedly press
the SET/RESET button to return to
the main menu.
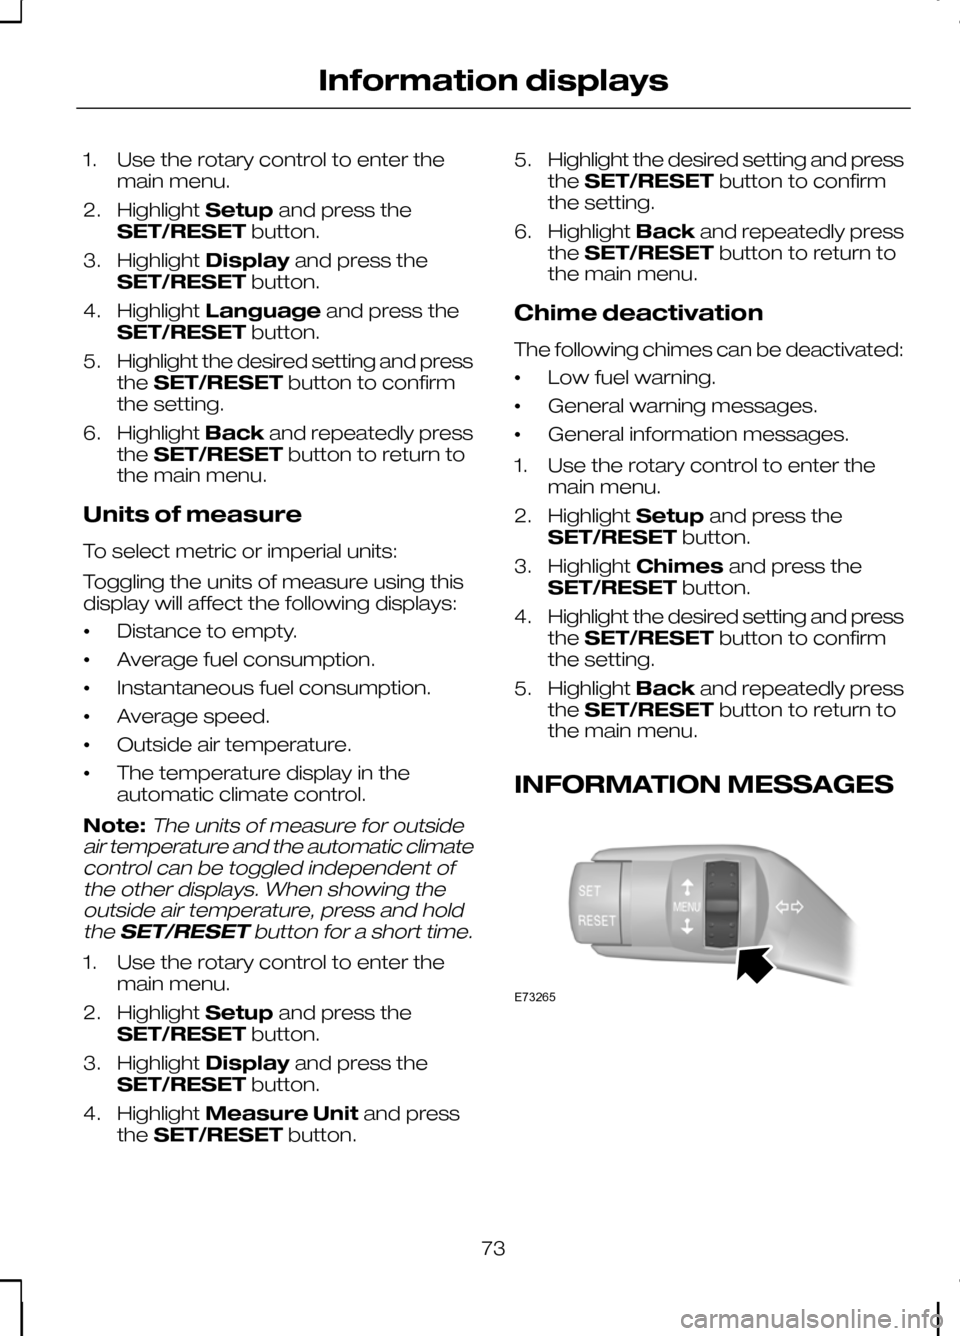
INFORMATION MESSAGES 73
Information displaysE73265
Page 76 of 226
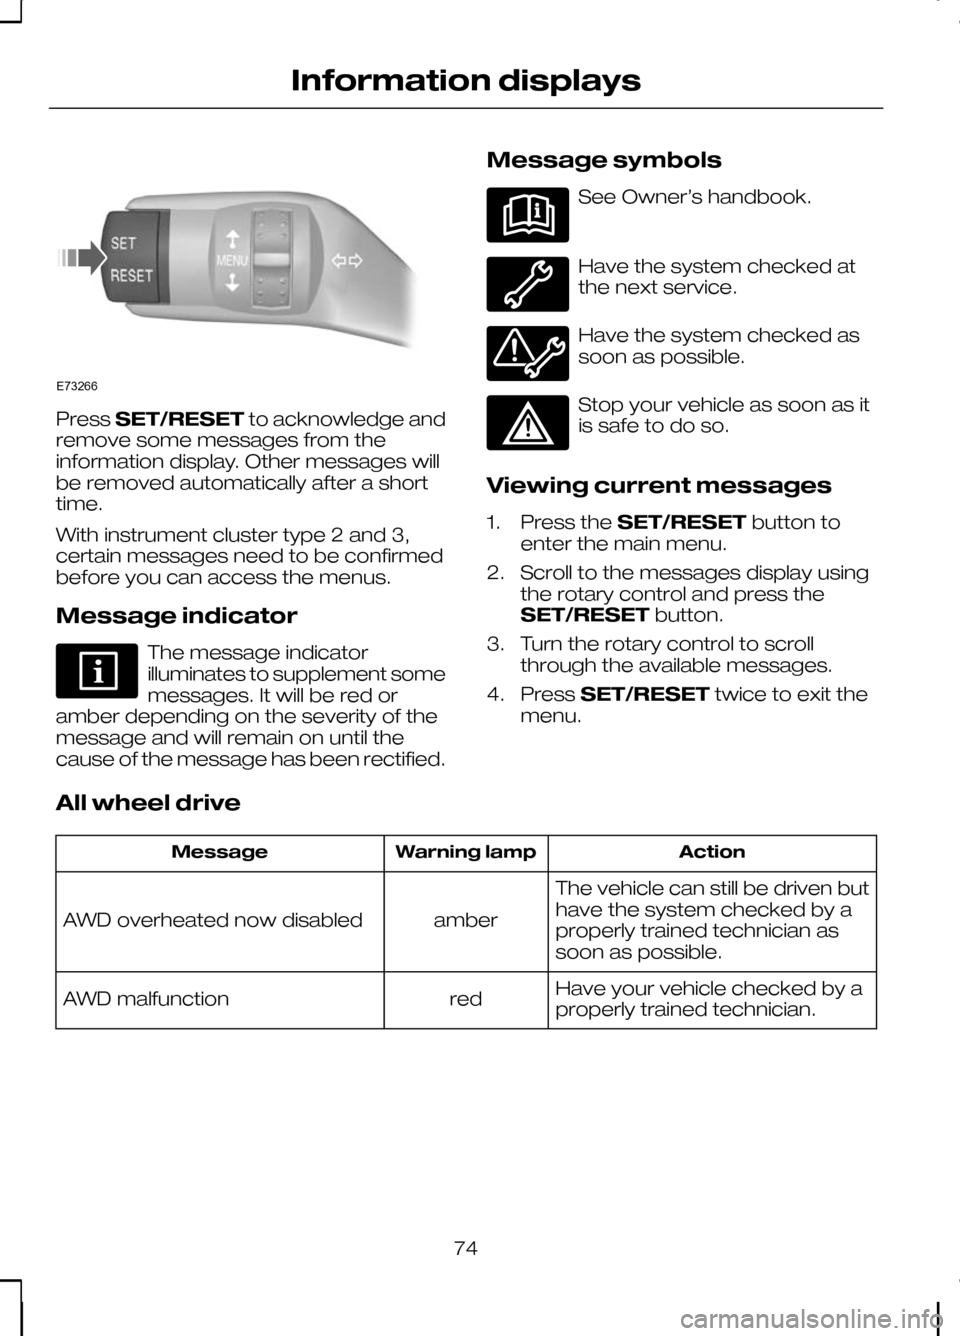
Press
SET/RESET to acknowledge and
remove some messages from the
information display. Other messages will
be removed automatically after a short
time.
With instrument cluster type 2 and 3,
certain messages need to be confirmed
before you can access the menus.
Message indicator The message indicator
illuminates to supplement some
messages. It will be red or
amber depending on the severity of the
message and will remain on until the
cause of the message has been rectified. Message symbols See Owner’s handbook.
Have the system checked at
the next service.
Have the system checked as
soon as possible.
Stop your vehicle as soon as it
is safe to do so.
Viewing current messages
1. Press the SET/RESET button to
enter the main menu.
2. Scroll to the messages display using the rotary control and press the
SET/RESET button.
3. Turn the rotary control to scroll through the available messages.
4. Press SET/RESET twice to exit the
menu.
All wheel drive Action
Warning lamp
Message
The vehicle can still be driven but
have the system checked by a
properly trained technician as
soon as possible.
amber
AWD overheated now disabled
Have your vehicle checked by a
properly trained technician.
red
AWD malfunction
74
Information displaysE73266
Page 77 of 226
Doors open
Action
Warning lamp
Message
Vehicle is moving. Stop the
vehicle as soon as safely possible
and close.
red
Driver door open
Vehicle is moving. Stop the
vehicle as soon as safely possible
and close.
red
Driver side rear door open
Vehicle is moving. Stop the
vehicle as soon as safely possible
and close.
red
Passenger door open
Vehicle is moving. Stop the
vehicle as soon as safely possible
and close.
red
Passenger side rear door open
Vehicle is moving. Stop the
vehicle as soon as safely possible
and close.
red
Luggage comp. open
Vehicle is moving. Stop the
vehicle as soon as safely possible
and close.
red
Bonnet open
Vehicle not moving. Close.
amber
Door ajar close door
Keyless system Action
Warning lamp
Message
Have the system checked by a
properly trained technician.
red
Immobiliser malfunction
You willONLYbe able restart
your vehicle up to a maximum of
five times or for a period of up to
56 hours after which the vehicle
cannot be started. Have the
system checked by a properly
trained technician as soon as
possible.
red
Steering malfunction
SeeKeyless entry (page 31).
amber
Key not detected
SeeKeyless entry (page 31).
amber
Key outside car
75
Information displays
Page 78 of 226
Action
Warning lamp
Message
SeeChanging the remote
control battery (page 27).
amber
Remote key battery low
Have the system checked by a
properly trained technician.
-
Steering malfunction
SeeKeyless starting (page
101).
-
To start press brake
SeeKeyless starting (page
101).
-
To start press clutch
Lighting Action
Warning lamp
Message
Brake lamp switch. The vehicle
can be driven as normal.
However, cruise control cannot
be switched on. Have the system
checked by a properly trained
technician as soon as possible.
red
Brake light fault
Have the system checked by a
properly trained technician.
amber
Adaptive front light failure
Maintenance Action
Warning lamp
Message
Have the system checked by a
properly trained technician.
red
High engine temperature
SeeBrake and clutch fluid
check (page 149).
red
Low brake fluid level
Stop the vehicle as soon as safely
possible and switch off the engine
immediately. Have the system
checked by a properly trained
technician immediately.
red
Engine malfunction
76
Information displays
Page 79 of 226
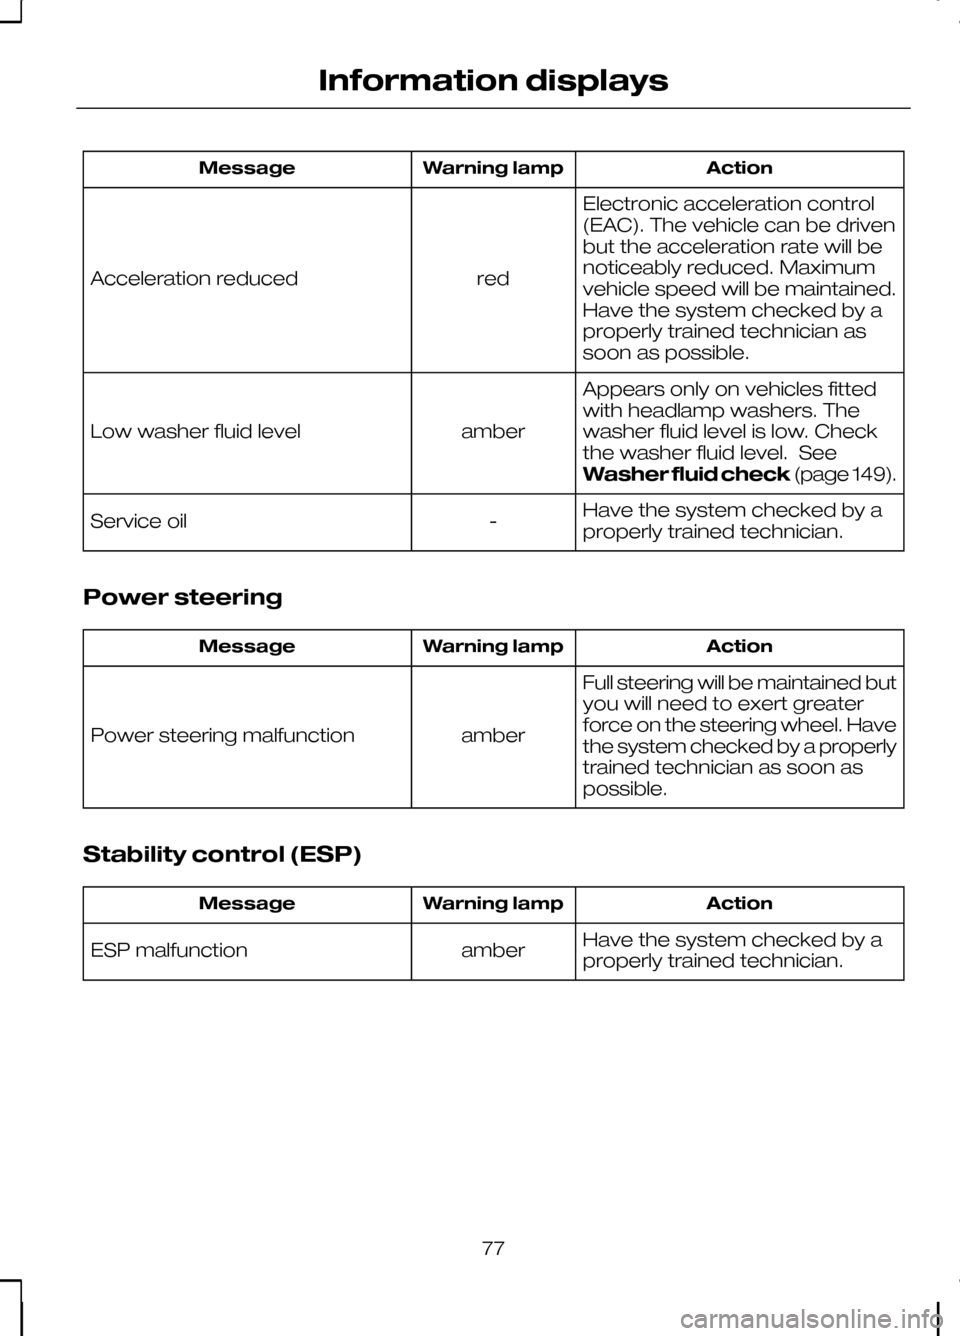
Action
Warning lamp
Message
Electronic acceleration control
(EAC). The vehicle can be driven
but the acceleration rate will be
noticeably reduced. Maximum
vehicle speed will be maintained.
Have the system checked by a
properly trained technician as
soon as possible.
red
Acceleration reduced
Appears only on vehicles fitted
with headlamp washers. The
washer fluid level is low. Check
the washer fluid level. See
Washer fluid check(page 149).
amber
Low washer fluid level
Have the system checked by a
properly trained technician.
-
Service oil
Power steering Action
Warning lamp
Message
Full steering will be maintained but
you will need to exert greater
force on the steering wheel. Have
the system checked by a properly
trained technician as soon as
possible.
amber
Power steering malfunction
Stability control (ESP) Action
Warning lamp
Message
Have the system checked by a
properly trained technician.
amber
ESP malfunction
77
Information displays
Page 80 of 226
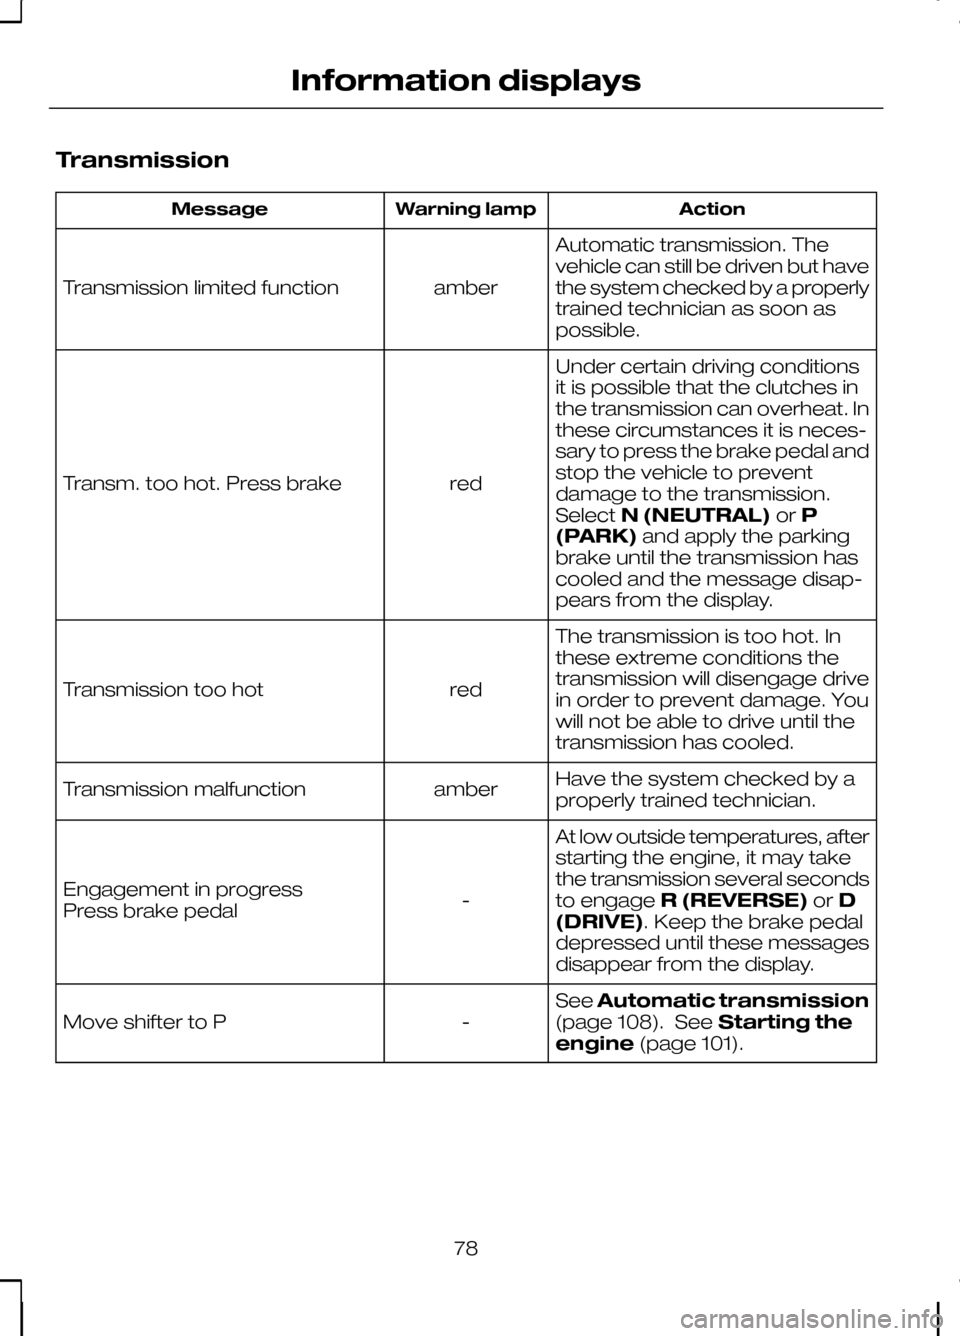
Transmission
Action
Warning lamp
Message
Automatic transmission. The
vehicle can still be driven but have
the system checked by a properly
trained technician as soon as
possible.
amber
Transmission limited function
Under certain driving conditions
it is possible that the clutches in
the transmission can overheat. In
these circumstances it is neces-
sary to press the brake pedal and
stop the vehicle to prevent
red
Transm. too hot. Press brake
damage to the transmission.
SelectN (NEUTRAL) orP
(PARK) and apply the parking
brake until the transmission has
cooled and the message disap-
pears from the display.
The transmission is too hot. In
these extreme conditions the
transmission will disengage drive
in order to prevent damage. You
will not be able to drive until the
transmission has cooled.
red
Transmission too hot
Have the system checked by a
properly trained technician.
amber
Transmission malfunction
At low outside temperatures, after
starting the engine, it may take
the transmission several seconds
to engageR (REVERSE) orD
(DRIVE). Keep the brake pedal
depressed until these messages
disappear from the display.
-
Engagement in progress
Press brake pedal
SeeAutomatic transmission
(page 108). See Starting the
engine (page 101).
-
Move shifter to P
78
Information displays