clock FORD MONDEO 2014 4.G Owners Manual
[x] Cancel search | Manufacturer: FORD, Model Year: 2014, Model line: MONDEO, Model: FORD MONDEO 2014 4.GPages: 446, PDF Size: 29.09 MB
Page 26 of 446
Downloaded from www.Manualslib.com manuals search engine CHILD SAFETY LOCKS -
VEHICLES WITH: REMOTE
CHILD PROOF LOCKS
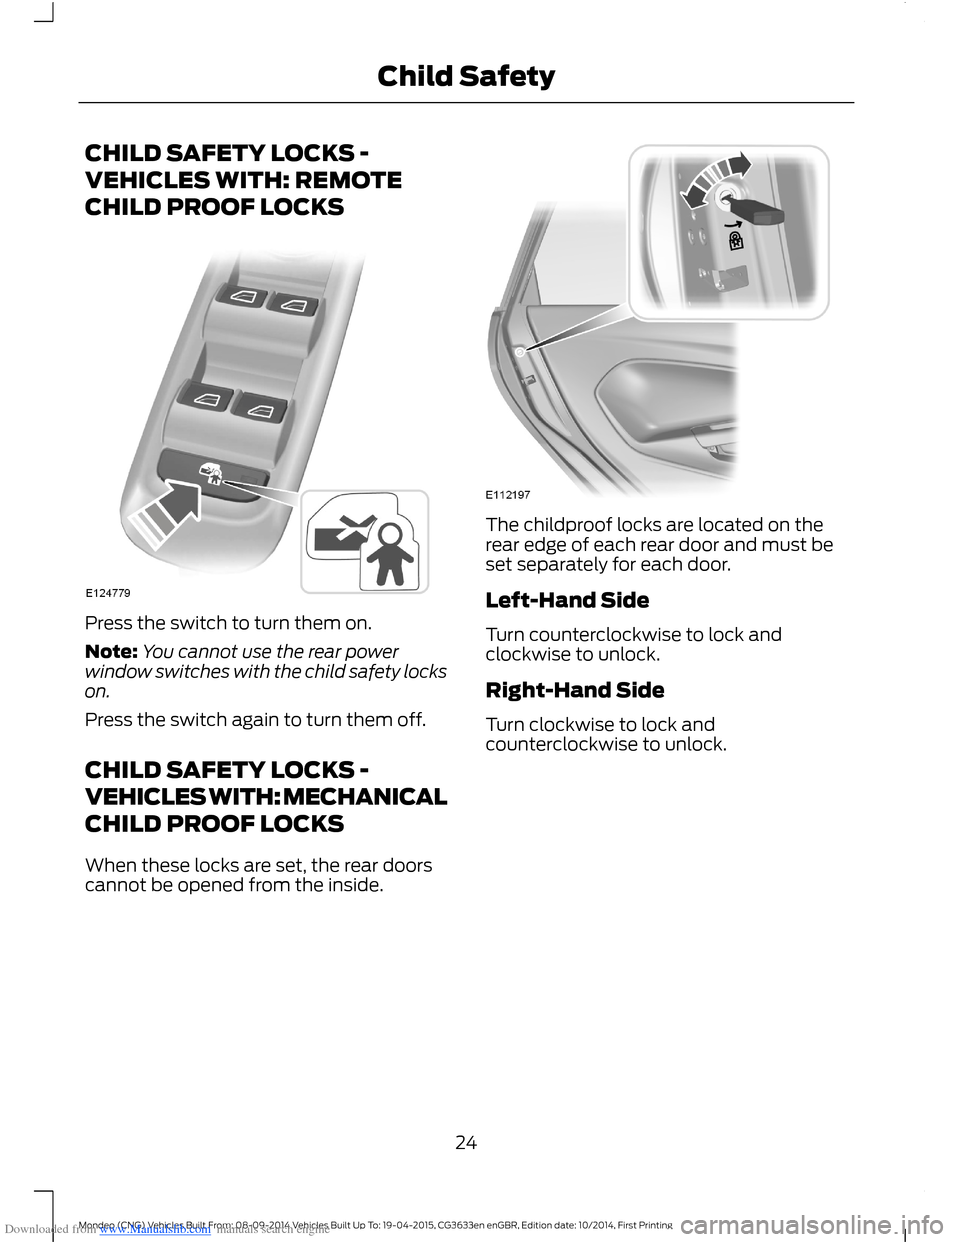
Press the switch to turn them on.
Note:You cannot use the rear powerwindow switches with the child safety lockson.
Press the switch again to turn them off.
CHILD SAFETY LOCKS -
VEHICLES WITH: MECHANICAL
CHILD PROOF LOCKS
When these locks are set, the rear doorscannot be opened from the inside.
The childproof locks are located on therear edge of each rear door and must beset separately for each door.
Left-Hand Side
Turn counterclockwise to lock andclockwise to unlock.
Right-Hand Side
Turn clockwise to lock andcounterclockwise to unlock.
24Mondeo (CNG) Vehicles Built From: 08-09-2014 Vehicles Built Up To: 19-04-2015, CG3633en enGBR, Edition date: 10/2014, First PrintingChild Safety
Page 47 of 446
Downloaded from www.Manualslib.com manuals search engine Automatic Relocking
The doors automatically relock if you donot open a door within 45 seconds ofunlocking the doors with the remotecontrol. The door locks and the alarmreturn to their previous state.
Locking and Unlocking the DoorsFrom Inside
Use the power door lock control locatedon the driver and front passenger doorpanels.
Locking and Unlocking the Doorswith the Key Blade
Locking with the Key Blade
Turn the top of the key toward the front ofyour vehicle.
Double Locking with the Key Blade
Turn the top of the key toward the front ofyour vehicle twice within three seconds.
Unlocking with the Key Blade
Turn the top of the key toward the rear ofyour vehicle.
Note:If the child safety locks are on andyou pull the interior door handle, you willonly switch off the emergency locking, notthe child safety lock. You can only open thedoors using the exterior door handle.
Locking and Unlocking the DoorsIndividually with the Key Blade
Locking
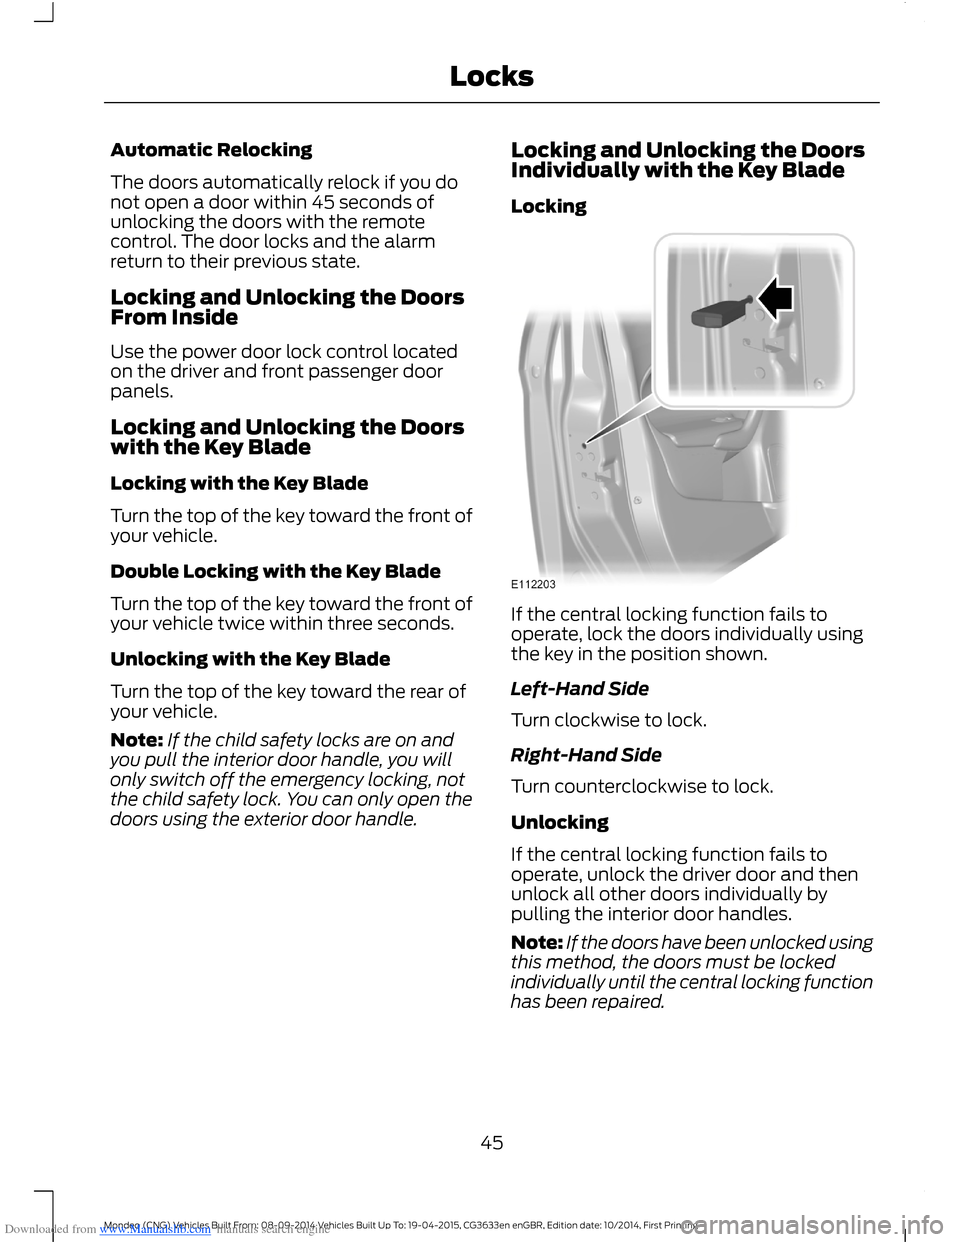
If the central locking function fails tooperate, lock the doors individually usingthe key in the position shown.
Left-Hand Side
Turn clockwise to lock.
Right-Hand Side
Turn counterclockwise to lock.
Unlocking
If the central locking function fails tooperate, unlock the driver door and thenunlock all other doors individually bypulling the interior door handles.
Note:If the doors have been unlocked usingthis method, the doors must be lockedindividually until the central locking functionhas been repaired.
45Mondeo (CNG) Vehicles Built From: 08-09-2014 Vehicles Built Up To: 19-04-2015, CG3633en enGBR, Edition date: 10/2014, First PrintingLocks
Page 124 of 446
Downloaded from www.Manualslib.com manuals search engine Do not use razor blades or other sharpobjects to clean or remove decals fromthe inside of the heated rear window.The vehicle warranty does not coverdamage caused to the heated rearwindow grid lines.
Heated Exterior Mirror (If Equipped)
When you switch the heated rear windowon, the heated exterior mirrors willautomatically turn on.
Note:Do not remove ice from the mirrorswith a scraper or adjust the mirror glasswhen it is frozen in place.
Note:Do not clean the mirror housing orglass with harsh abrasives, fuel or otherpetroleum-based cleaning products.
HEATED WINDSHIELD
Press the button to clear theheated windshield of thin ice andfog. The heated windshield willautomatically turn off after a short periodof time. Start the engine before you switchthe heated windshield on.
AUXILIARY HEATER
Fuel Operated Parking Heater
WARNING
Do not use the fuel operated parkingheater at fuel filling stations or nearsources of combustible vapors, dustor in enclosed spaces. This could result inserious personal injury or death.
The system warms the engine and thevehicle interior; it uses fuel from the vehiclefuel tank. The system only operates whenyour vehicle is stationary with the engineswitched off.
Used correctly the system:
•Warms the engine and the vehicleinterior.
•Keeps the windows clear of ice in theevent of frost and preventscondensation.
•Avoids cold starts to assist the engineto reach operating temperature sooner.
Following a heating cycle, if you do notstart the engine the system will not turnon the next programmed heating cycle.
Following a heating cycle, we recommendthat you drive your vehicle for at least thesame period of time as the heating cycle.This prevents the vehicle battery fromrunning out of charge.
We recommend you switch the system onfor approximately 10 minutes every monthto prevent the water pump or heater motorseizing.
The system only operates if there is aminimum of 16 liters (3.5 gallons) of fuelin the vehicle fuel tank and the outside airtemperature is below 59°F (15°C). Thesystem does not operate if the batterycharge level is low.
Note:When the system is operating,exhaust fumes will come from under yourvehicle. This is normal.
Note:On vehicles with manual climatecontrol, heating the vehicle interior dependson the heater control settings. See ClimateControl (page 111).
Programming the Fuel OperatedParking Heater
Use the information display controls onthe steering wheel. See InformationDisplays (page 86).
Note:The time and date on your vehicle’sclock must be set correctly. See SYNC™ 2(page 343).
122Mondeo (CNG) Vehicles Built From: 08-09-2014 Vehicles Built Up To: 19-04-2015, CG3633en enGBR, Edition date: 10/2014, First PrintingClimate Control
Page 219 of 446
Downloaded from www.Manualslib.com manuals search engine 1.Press the button. An audible doubletone (low pitch followed by a highpitch) sounds to let you know thesystem is operating.
2.Press the button again within fourseconds to swivel the tow ball arm. Aseries of audible tones sounds and theLED flashes while the tow ball armswivels.
3.When the tow ball arm finishesswiveling, the LED stops flashing andan audible double tone (high pitchfollowed by a low pitch) sounds.
The tow ball arm is ready for use when itfinishes swiveling into the towing position.
Swiveling the Tow Ball Arm In
Before swiveling the tow ball arm in:
•Unhitch the trailer or dismantle loadcarriers and their attachments.
•Dismantle attachments for trackingstabilization.
•Remove the plug for the trailer powersupply and the adapter from the trailersocket. Failure to do so may causedamage to the bumper when the towball arm swivels into its stowedposition.
To start swiveling the tow ball arm in, pressthe swivel button twice within fourseconds.
The tow ball arm swivels into the stowedposition automatically.
Tow Ball Arm Fault Conditions
If the LED on the swivel button is rapidlyflashing and an audible tone sequence(high pitch) sounds, repeat the swivelprocess. If this does not resolve theproblem, see an authorized dealer.
A message may appear in the informationdisplay. See Information Messages(page 96).
Driving with a Trailer
WARNINGS
In the event of a vehicle breakdown,disconnect the trailer before towingthe vehicle.
If any of the conditions below cannotbe met, do not use the tow bar andhave it checked by a properly trainedtechnician. Before starting your journey,make sure that the tow ball arm is properlylocked.
Check that:
•There is a last audible low pitch tonewhen the locking procedure finishes.
•The tow ball arm properly locks. Makesure it does not move when jerked.
Maintenance
Note:The towing hitch and control unit aremaintenance-free. Do not grease or oil thesecomponents.
Note:Do not attempt to service the towinghitch. Only the manufacturer should carryout repairs or dismantle the hitch.
Note:When cleaning the vehicle with asteam jet, do not direct the high-pressurejet directly onto the swivel joint of the towball arm and socket. After cleaning thevehicle, unplug the connector or open thetrailer socket to make sure no water entered.If water is present, dry the socket.
TOWING POINTS
WARNING
The towing eye has a left-handthread. Turn it counterclockwise toinstall it. Make sure that the towingeye is fully tightened. Failure to do so couldresult in the towing eye becoming loose.
217Mondeo (CNG) Vehicles Built From: 08-09-2014 Vehicles Built Up To: 19-04-2015, CG3633en enGBR, Edition date: 10/2014, First PrintingTowing
Page 253 of 446
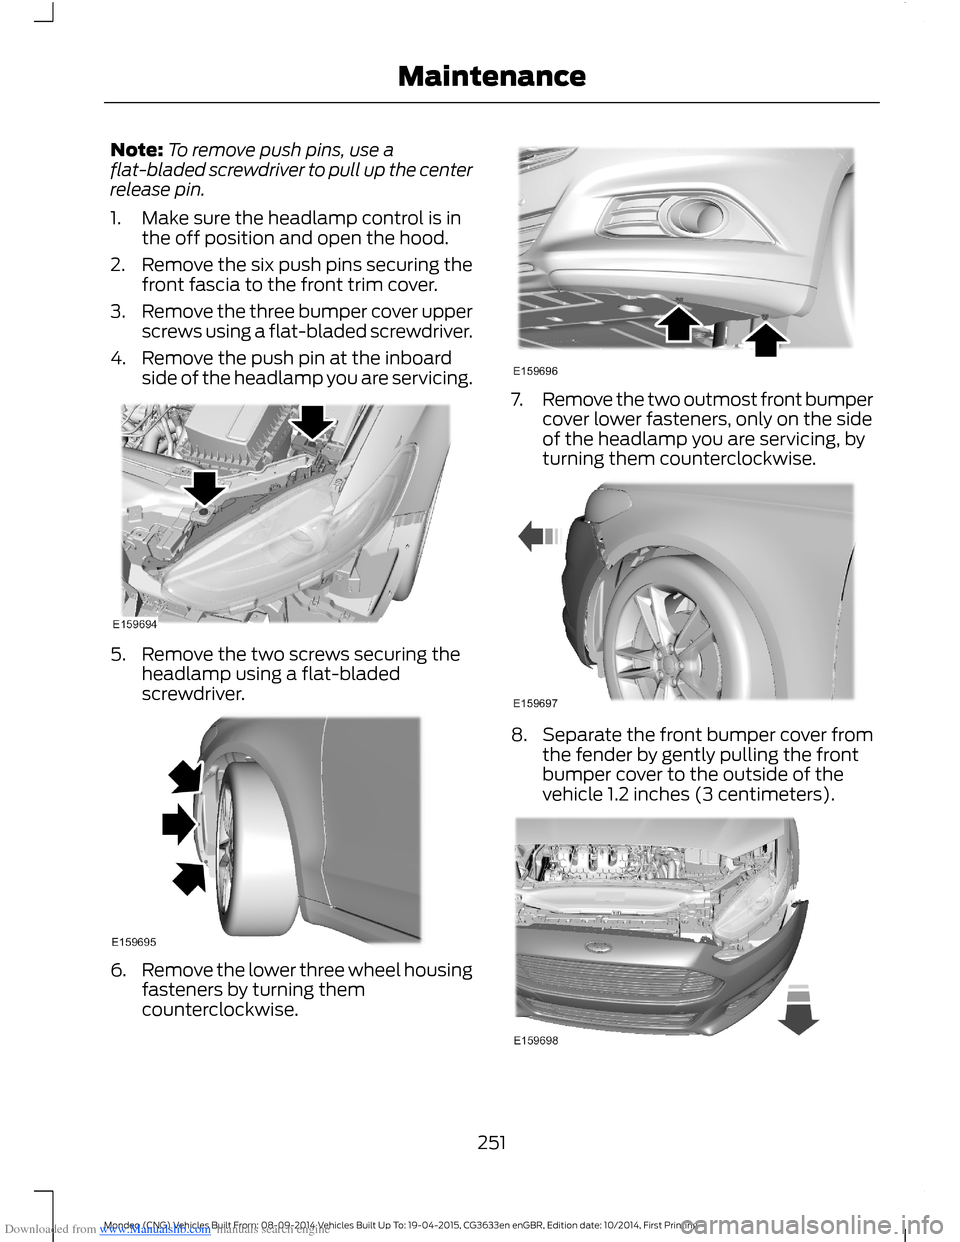
Downloaded from www.Manualslib.com manuals search engine Note:To remove push pins, use aflat-bladed screwdriver to pull up the centerrelease pin.
1.Make sure the headlamp control is inthe off position and open the hood.
2.Remove the six push pins securing thefront fascia to the front trim cover.
3.Remove the three bumper cover upperscrews using a flat-bladed screwdriver.
4.Remove the push pin at the inboardside of the headlamp you are servicing.
5.Remove the two screws securing theheadlamp using a flat-bladedscrewdriver.
6.Remove the lower three wheel housingfasteners by turning themcounterclockwise.
7.Remove the two outmost front bumpercover lower fasteners, only on the sideof the headlamp you are servicing, byturning them counterclockwise.
8.Separate the front bumper cover fromthe fender by gently pulling the frontbumper cover to the outside of thevehicle 1.2 inches (3 centimeters).
251Mondeo (CNG) Vehicles Built From: 08-09-2014 Vehicles Built Up To: 19-04-2015, CG3633en enGBR, Edition date: 10/2014, First PrintingMaintenance
Page 254 of 446
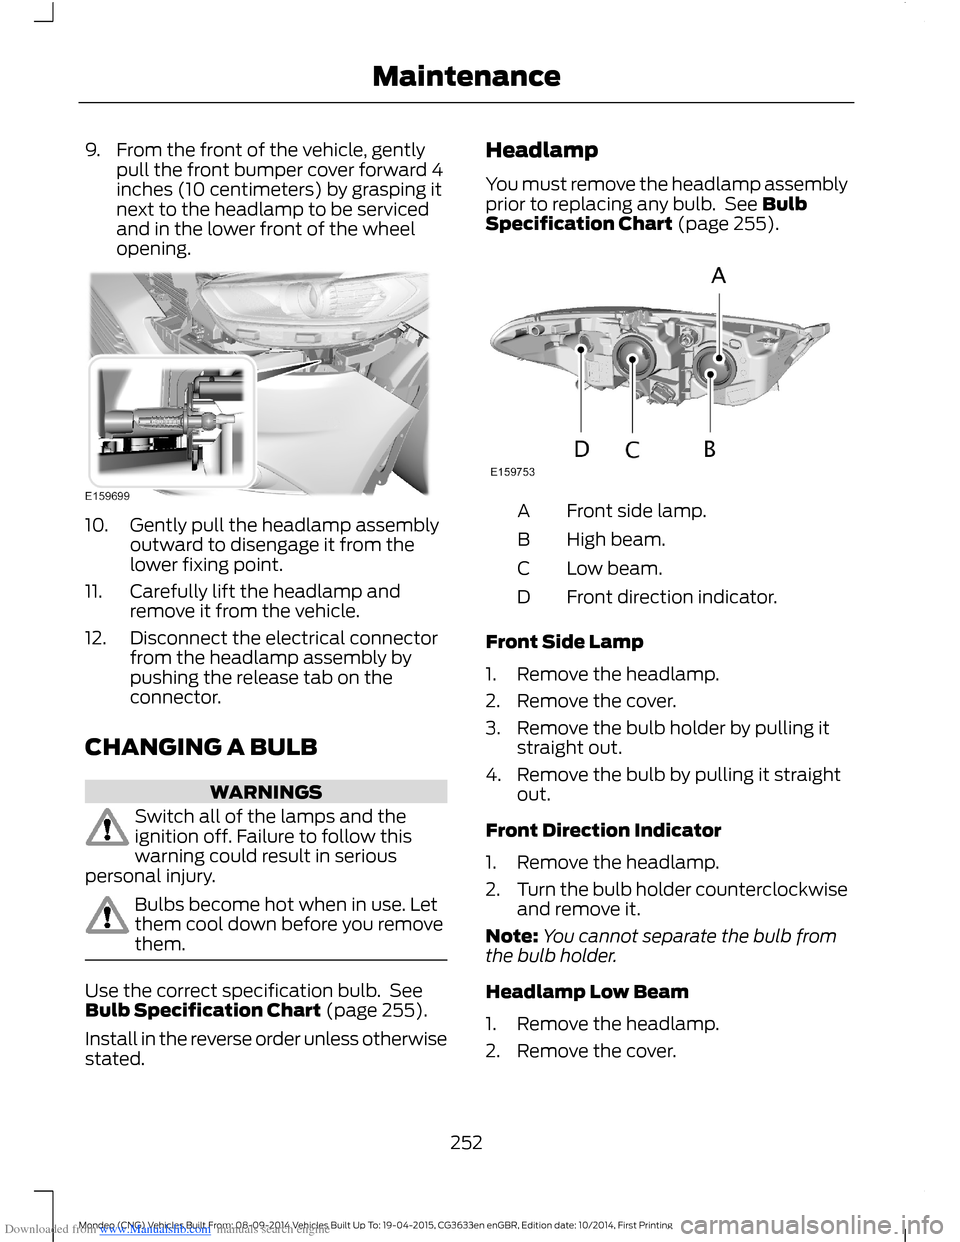
Downloaded from www.Manualslib.com manuals search engine 9.From the front of the vehicle, gentlypull the front bumper cover forward 4inches (10 centimeters) by grasping itnext to the headlamp to be servicedand in the lower front of the wheelopening.
10.Gently pull the headlamp assemblyoutward to disengage it from thelower fixing point.
11.Carefully lift the headlamp andremove it from the vehicle.
12.Disconnect the electrical connectorfrom the headlamp assembly bypushing the release tab on theconnector.
CHANGING A BULB
WARNINGS
Switch all of the lamps and theignition off. Failure to follow thiswarning could result in seriouspersonal injury.
Bulbs become hot when in use. Letthem cool down before you removethem.
Use the correct specification bulb. SeeBulb Specification Chart (page 255).
Install in the reverse order unless otherwisestated.
Headlamp
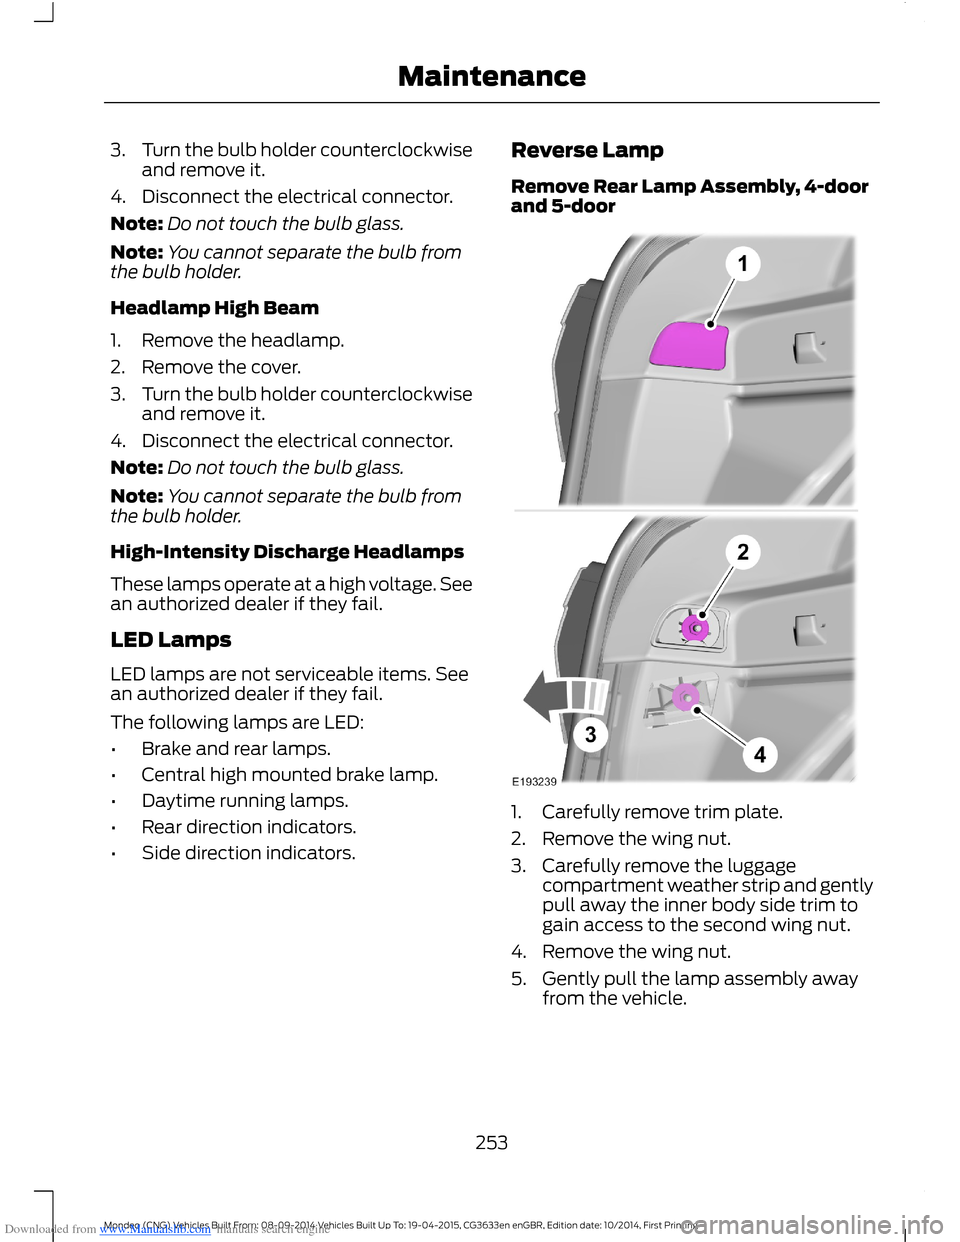
You must remove the headlamp assemblyprior to replacing any bulb. See BulbSpecification Chart (page 255).
Front side lamp.A
High beam.B
Low beam.C
Front direction indicator.D
Front Side Lamp
1.Remove the headlamp.
2.Remove the cover.
3.Remove the bulb holder by pulling itstraight out.
4.Remove the bulb by pulling it straightout.
Front Direction Indicator
1.Remove the headlamp.
2.Turn the bulb holder counterclockwiseand remove it.
Note:You cannot separate the bulb fromthe bulb holder.
Headlamp Low Beam
1.Remove the headlamp.
2.Remove the cover.
252Mondeo (CNG) Vehicles Built From: 08-09-2014 Vehicles Built Up To: 19-04-2015, CG3633en enGBR, Edition date: 10/2014, First PrintingMaintenance
Page 255 of 446
Downloaded from www.Manualslib.com manuals search engine 3.Turn the bulb holder counterclockwiseand remove it.
4.Disconnect the electrical connector.
Note:Do not touch the bulb glass.
Note:You cannot separate the bulb fromthe bulb holder.
Headlamp High Beam
1.Remove the headlamp.
2.Remove the cover.
3.Turn the bulb holder counterclockwiseand remove it.
4.Disconnect the electrical connector.
Note:Do not touch the bulb glass.
Note:You cannot separate the bulb fromthe bulb holder.
High-Intensity Discharge Headlamps
These lamps operate at a high voltage. Seean authorized dealer if they fail.
LED Lamps
LED lamps are not serviceable items. Seean authorized dealer if they fail.
The following lamps are LED:
•Brake and rear lamps.
•Central high mounted brake lamp.
•Daytime running lamps.
•Rear direction indicators.
•Side direction indicators.
Reverse Lamp
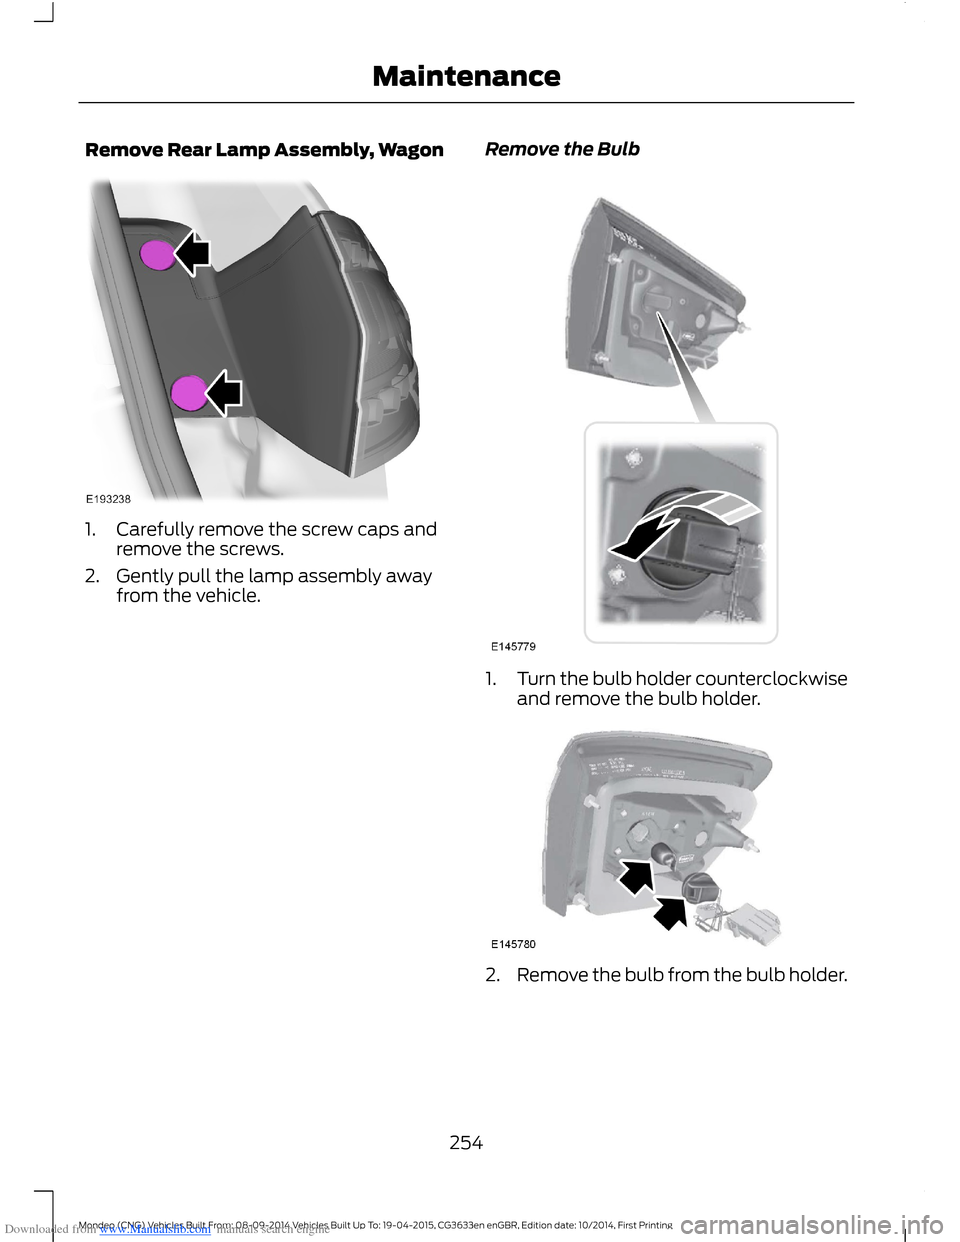
Remove Rear Lamp Assembly, 4-doorand 5-door
1.Carefully remove trim plate.
2.Remove the wing nut.
3.Carefully remove the luggagecompartment weather strip and gentlypull away the inner body side trim togain access to the second wing nut.
4.Remove the wing nut.
5.Gently pull the lamp assembly awayfrom the vehicle.
253Mondeo (CNG) Vehicles Built From: 08-09-2014 Vehicles Built Up To: 19-04-2015, CG3633en enGBR, Edition date: 10/2014, First PrintingMaintenance
Page 256 of 446
Downloaded from www.Manualslib.com manuals search engine Remove Rear Lamp Assembly, Wagon
1.Carefully remove the screw caps andremove the screws.
2.Gently pull the lamp assembly awayfrom the vehicle.
Remove the Bulb
1.Turn the bulb holder counterclockwiseand remove the bulb holder.
2.Remove the bulb from the bulb holder.
254Mondeo (CNG) Vehicles Built From: 08-09-2014 Vehicles Built Up To: 19-04-2015, CG3633en enGBR, Edition date: 10/2014, First PrintingMaintenance
Page 297 of 446
Downloaded from www.Manualslib.com manuals search engine Cursor arrows and OK: Use the up and down arrow buttons to select thevarious settings. When you make your selection, press the left and right arrowbuttons to change the settings. Press OK to set or press MENU to exit.
J
CD slot: Insert a CD.K
Pick-up or Make phone call: Press this button to either pick-up an incomingphone call or to make a phone call.L
Seek: In radio mode, select a frequency band and press this button. The systemstops at the first station down the band. Press and hold the button to movequickly to the previous strong radio station. In CD mode, press this button toselect the previous track. Press and hold the button to move quickly backwardthrough the current track.
M
Play/Pause: Press to either play or pause a track when listening to a CD.N
VOL and Power: Press this button to switch the system off and on. Turn it toadjust the volume.O
PHONE: Press this button to access the phone features of the SYNC® system.See SYNC™ (page 305).P
MENU: Press this button to access different audio system features. See MenuStructure later in this chapter.Q
MEDIA: Press this button to access your auxiliary input jack or switch betweendevices you plug into the input jack or USB port.R
Clock: Press this button to access the clock setting. Use the center arrowcontrols to change the hours and minutes. You can also set the clock by pressingthe MENU button and scrolling to Clock Settings.
S
RADIO: Press this button to listen to the radio or change radio frequency bands.Press the function buttons below the radio screen to select different radiofunctions.
T
TA: The system interrupts the active audio source to provide incoming trafficannouncements.U
295Mondeo (CNG) Vehicles Built From: 08-09-2014 Vehicles Built Up To: 19-04-2015, CG3633en enGBR, Edition date: 10/2014, First PrintingAudio System
Page 302 of 446
Downloaded from www.Manualslib.com manuals search engine Audio Settings
Automatically adjusts the volume tocompensate for speed and wind noise. Youcan set the system between 0 and +7.
Speed Compensated Volume
Select to adjust settings for Treble,Midrange, Bass, Fade and Balance.Sound
Select to optimize sound quality for thechosen seating position.Occupancy Mode
Choose between STEREO SURROUNDmode and STEREO mode. Only with theexternal sound systems.
DPS
CD Settings
Select to scan all disc selections.Scan All
Select to scan all music in the current MP3 folder.Scan Folder
Clock Settings
Select to set the time.Set Time
Select to set the calendar date.Set Date
Select to view clock time in a 12-hour mode or 24-hourmode.24h Mode
Display Settings
Select to change display brightness.Dimming
Select to display the language in English, French orSpanish.Language
Select to display the outside temperature in Fahrenheitor Celsius.Temp. setting
300Mondeo (CNG) Vehicles Built From: 08-09-2014 Vehicles Built Up To: 19-04-2015, CG3633en enGBR, Edition date: 10/2014, First PrintingAudio System