head light FORD MUSTANG 1969 Volume One Chassis
[x] Cancel search | Manufacturer: FORD, Model Year: 1969, Model line: MUSTANG, Model: FORD MUSTANG 1969Pages: 413, PDF Size: 75.81 MB
Page 239 of 413

04-04-08
Rear Axle — Ford Light-Duty (WER)
04-04-08
E 1577-A
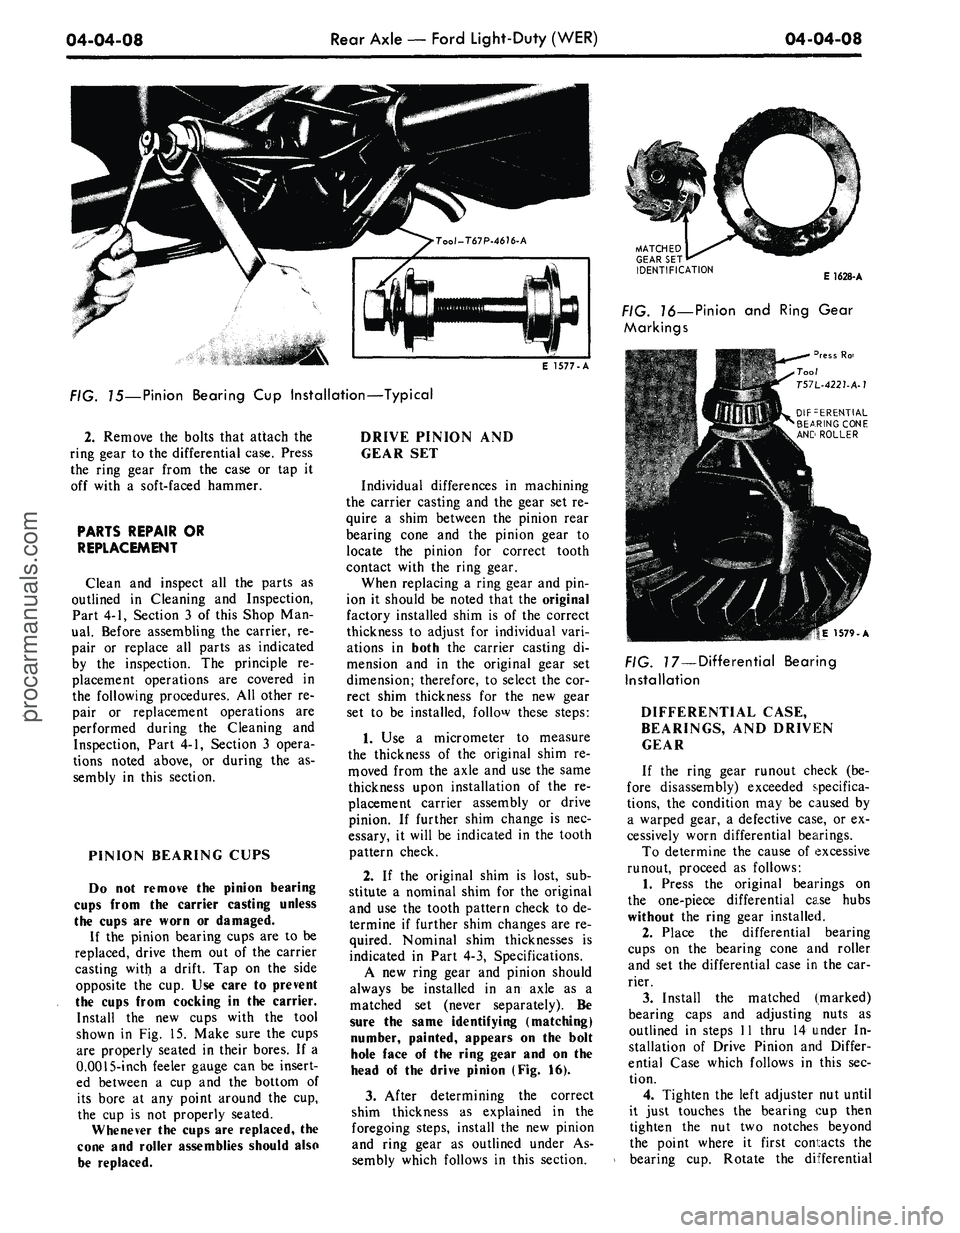
75—Pinion Bearing
Cup
Installation—Typical
2.
Remove
the
bolts that attach
the
ring gear
to the
differential case. Press
the ring gear from
the
case
or tap it
off with
a
soft-faced hammer.
PARTS REPAIR
OR
REPLACEMENT
Clean
and
inspect
all the
parts
as
outlined
in
Cleaning
and
Inspection,
Part 4-1, Section
3 of
this Shop
Man-
ual.
Before assembling
the
carrier,
re-
pair
or
replace
all
parts
as
indicated
by
the
inspection.
The
principle
re-
placement operations
are
covered
in
the following procedures.
All
other
re-
pair
or
replacement operations
are
performed during
the
Cleaning
and
Inspection, Part 4-1, Section
3
opera-
tions noted above,
or
during
the as-
sembly
in
this section.
PINION BEARING CUPS
Do
not
remove
the
pinion bearing
cups from
the
carrier casting unless
the cups
are
worn
or
damaged.
If
the
pinion bearing cups
are to be
replaced, drive them
out of the
carrier
casting with
a
drift.
Tap on the
side
opposite
the cup. Use
care
to
prevent
the cups from cocking
in the
carrier.
Install
the new
cups with
the
tool
shown
in Fig. 15.
Make sure
the
cups
are properly seated
in
their bores.
If a
0.0015-inch feeler gauge
can be
insert-
ed between
a cup and the
bottom
of
its bore
at any
point around
the cup,
the
cup is not
properly seated.
Whenever
the
cups
are
replaced,
the
cone
and
roller assemblies should also
be replaced.
DRIVE PINION
AND
GEAR
SET
Individual differences
in
machining
the carrier casting
and the
gear
set re-
quire
a
shim between
the
pinion rear
bearing cone
and the
pinion gear
to
locate
the
pinion
for
correct tooth
contact with
the
ring gear.
When replacing
a
ring gear
and pin-
ion
it
should
be
noted that
the
original
factory installed shim
is of the
correct
thickness
to
adjust
for
individual vari-
ations
in
both
the
carrier casting
di-
mension
and in the
original gear
set
dimension; therefore,
to
select
the cor-
rect shim thickness
for the new
gear
set
to be
installed, follow these steps:
1.
Use a
micrometer
to
measure
the thickness
of the
original shim
re-
moved from
the
axle
and use the
same
thickness upon installation
of the re-
placement carrier assembly
or
drive
pinion.
If
further shim change
is nec-
essary,
it
will
be
indicated
in the
tooth
pattern check.
2.
If the
original shim
is
lost,
sub-
stitute
a
nominal shim
for the
original
and
use the
tooth pattern check
to de-
termine
if
further shim changes
are re-
quired. Nominal shim thicknesses
is
indicated
in
Part
4-3,
Specifications.
A
new
ring gear
and
pinion should
always
be
installed
in an
axle
as a
matched
set
(never separately).
Be
sure
the
same identifying (matching)
number, painted, appears
on the
bolt
hole face
of the
ring gear
and on the
head
of the
drive pinion
(Fig. 16).
3.
After determining
the
correct
shim thickness
as
explained
in the
foregoing steps, install
the new
pinion
and ring gear
as
outlined under
As-
sembly which follows
in
this section.
MATCHED
GEAR
SET
IDENTIFICATION
E 1628-A
. ?6—Pinion
and
Ring Gear
Markings
3ress
Ro-
Tool
T57L-4221-A-1
DIFFERENTIAL
BEARING CONE
ANC ROLLER
|E 1579-A
PIG. 77—Differential Bearing
Installation
DIFFERENTIAL CASE,
BEARINGS,
AND
DRIVEN
GEAR
If
the
ring gear runout check
(be-
fore disassembly) exceeded specifica-
tions,
the
condition
may be
caused
by
a warped gear,
a
defective case,
or ex-
cessively worn differential bearings.
To determine
the
cause
of
excessive
runout, proceed
as
follows:
1.
Press
the
original bearings
on
the one-piece differential case hubs
without
the
ring gear installed.
2.
Place
the
differential bearing
cups
on the
bearing cone
and
roller
and
set the
differential case
in the car-
rier.
3.
Install
the
matched (marked)
bearing caps
and
adjusting nuts
as
outlined
in
steps
11
thru
14
under
In-
stallation
of
Drive Pinion
and
Differ-
ential Case which follows
in
this
sec-
tion.
4.
Tighten
the
left adjuster
nut
until
it just touches
the
bearing
cup
then
tighten
the nut two
notches beyond
the point where
it
first contacts
the
bearing
cup.
Rotate
the
differentialprocarmanuals.com
Page 295 of 413

07-01-04
General Transmission Service
07-01-04
taching bolts to the proper torque. If
necessary, replace the gasket.
Check the fluid filler tube connec-
tion at the transmission case or pan.
If leakage is found here, install a new
O-ring or tighten the fitting to the
specified torque.
Check the fluid lines and fittings
between the transmission and the
cooler in the radiator tank for loose-
ness,
wear, or damage. If leakage can-
not be stopped by tightening a fitting,
replace the damaged parts.
Check the engine coolant in the ra-
diator. If transmission fluid is present
in the coolant, the cooler in the radia-
tor is probably leaking.
The cooler can be further checked
for leaks by disconnecting the lines
from the cooler fittings and applying
50-75 psi air pressure to the fittings.
Remove the radiator cap to relieve the
pressure build at the exterior of the oil
cooler tank. If the cooler is leaking
and will not hold this pressure the
cooler must be replaced. Cooler re-
placement is described in the Cooling
System Section of Group 11.
If leakage is found at either the
downshift control lever shaft or the
manual lever shaft, replace either or
both seals.
Inspect the pipe plug on the left
side of the transmission case at the
front. If the plug shows leakage, tor-
que the plug to specifications. If tight-
ening does not stop the leaks, replace
the plug. On a C6 transmission, a TV
pressure plug is also provided on the
right rear side of the case.
When converter drain plugs leak,
remove drain plugs with a six-point
wrench. Coat the threads with FoMo-
Co Perfect Seal Sealing Compound or
its equivalent, and install the plugs.
Torque the drain plugs to specifica-
tion. Fluid leakage from the converter
housing may be caused by engine oil
leaking past the rear main bearing or
from oil gallery plugs, or power steer-
ing oil leakage from steering system.
Be sure to determine the exact cause
of the leak before repair procedures
are started.
Oil-soluble aniline or fluorescent dyes
premixed at the rate of 1/2 teaspoon
of dye powder to 1/2 pint of transmis-
sion fluid have proved helpful in locat-
ing the source of the fluid leakage.
Such dyes may be used to determine
whether an engine oil or transmission
fluid leak is present or if the fluid in
the oil cooler leaks into the engine
coolant system. A black light, how-
ever, must be used with the fluorescent
dye solution.
DISHED OR
FLAT WASHER
" O.D.,
a" STEEL PLATE
5/8"X \W,
DRILL TO SUIT
HEX. HEAD SCREW
3/8"-24 X Vl
HEX. NUT W—
24
WELD
TOGETHER
WING
NUT
>/2"_13
THREAD
CHAIN,
10"
LONG
RUBBER PLUG
1
Vi" DIA. X 2"
LONG Vl"
HOLE THRU
APPROXIMATELY
40 DUROMETER
FLAT WASHER
Vs" O.D.
PLUG
VALVE
STANDARD BOLT
W-13
X 4Vl"
LONG SQUARE
THREAD
END
REMOVE HEAD
AND WELD
TO
WASHER
STANDARD 1/8" FITTING-87971-S FOR
RETAPPED DRAIN PLUG THREADS-USE
1/4" OVERSIZE FITTING-87973-S
D 1067-B
WELD TOGETHER
SECURELY—MUST
NOT LEAK
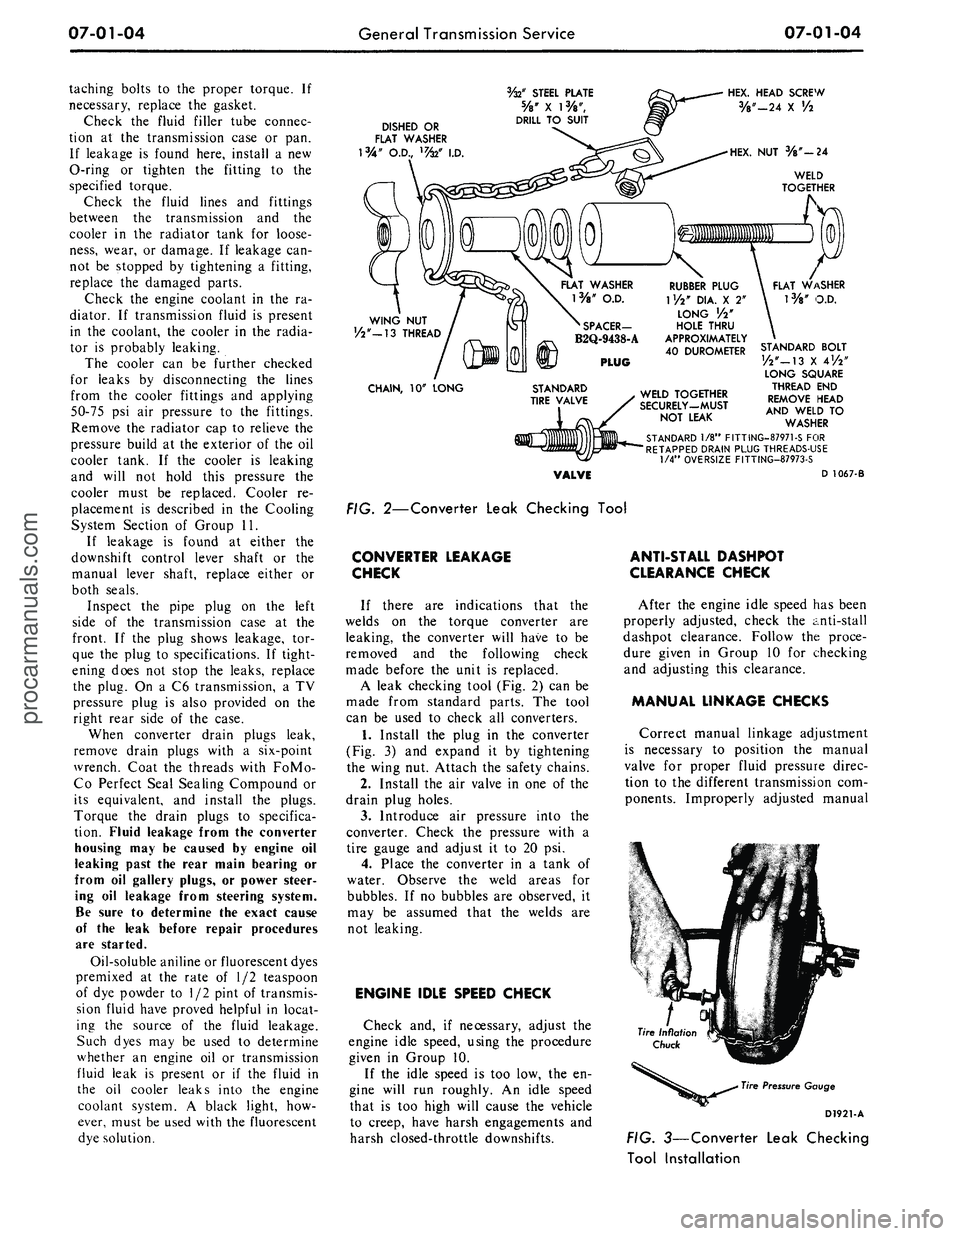
FIG. 2—Converter Leak Checking Tool
CONVERTER LEAKAGE
CHECK
If there are indications that the
welds on the torque converter are
leaking, the converter will have to be
removed and the following check
made before the unit is replaced.
A leak checking tool (Fig. 2) can be
made from standard parts. The tool
can be used to check all converters.
1.
Install the plug in the converter
(Fig. 3) and expand it by tightening
the wing nut. Attach the safety chains.
2.
Install the air valve in one of the
drain plug holes.
3.
Introduce air pressure into the
converter. Check the pressure with a
tire gauge and adjust it to 20 psi.
4.
Place the converter in a tank of
water. Observe the weld areas for
bubbles. If no bubbles are observed, it
may be assumed that the welds are
not leaking.
ENGINE IDLE SPEED CHECK
Check and, if necessary, adjust the
engine idle speed, using the procedure
given in Group 10.
If the idle speed is too low, the en-
gine will run roughly. An idle speed
that is too high will cause the vehicle
to creep, have harsh engagements and
harsh closed-throttle downshifts.
ANTI-STALL DASHPOT
CLEARANCE CHECK
After the engine idle speed has been
properly adjusted, check the anti-stall
dashpot clearance. Follow the proce-
dure given in Group 10 for checking
and adjusting this clearance.
MANUAL LINKAGE CHECKS
Correct manual linkage adjustment
is necessary to position the manual
valve for proper fluid pressure direc-
tion to the different transmission com-
ponents. Improperly adjusted manual
Tire Pressure Gauge
D1921-A
FIG. 3—Converter Leak Checking
Tool Installationprocarmanuals.com