low oil pressure FORD MUSTANG 1969 Volume One Chassis
[x] Cancel search | Manufacturer: FORD, Model Year: 1969, Model line: MUSTANG, Model: FORD MUSTANG 1969Pages: 413, PDF Size: 75.81 MB
Page 26 of 413
02-02-07
Brake System
02-02-07
ANTI-SKID CONTROL SYSTEM
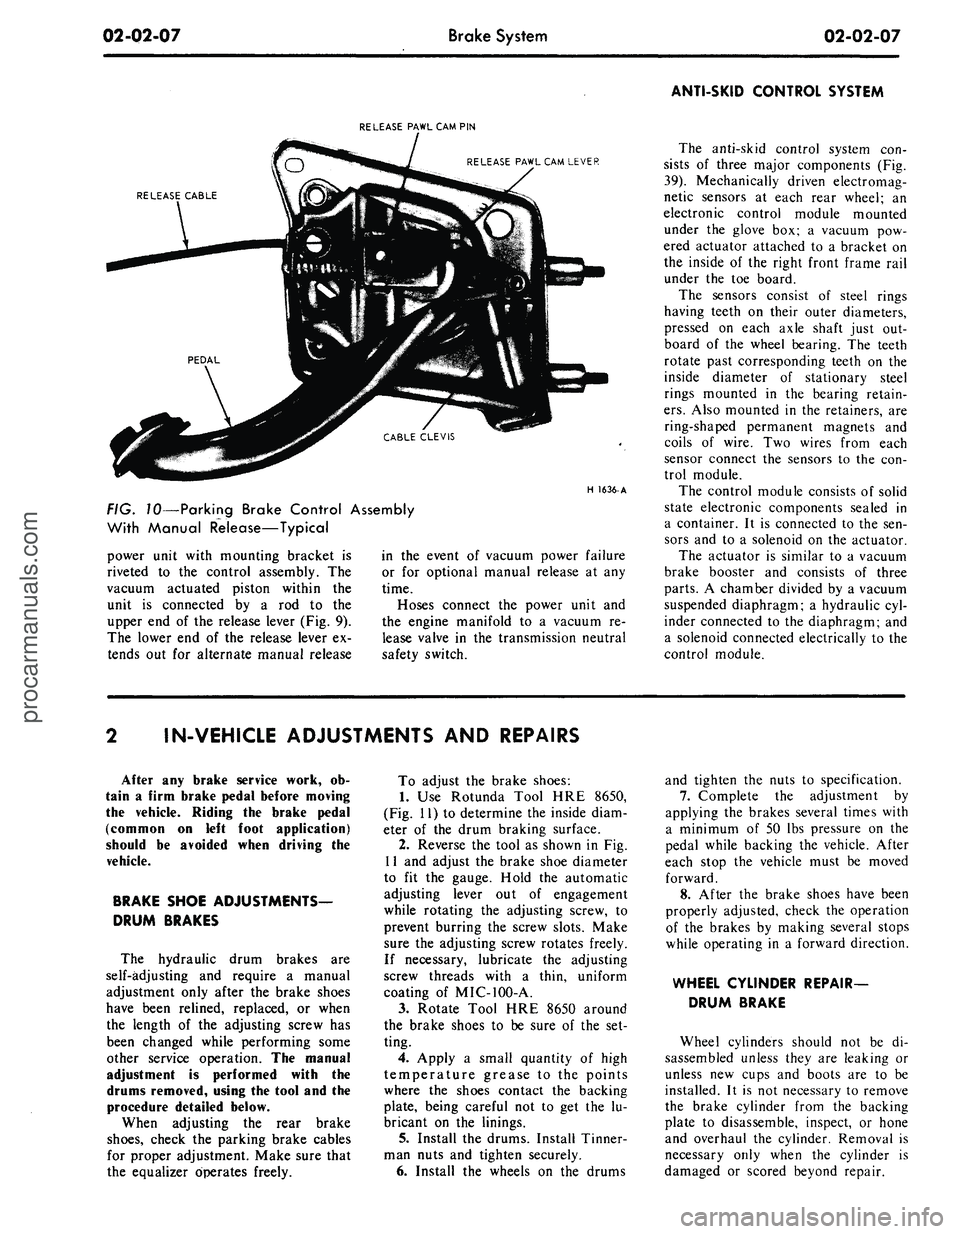
RELEASE PAWL CAM PIN
RELEASE PAWL CAM LEVER
RELEASE CABLE
H
1636-
A
FIG. 10—Parking Brake Control Assembly
With Manual Release—Typical
power unit with mounting bracket is
riveted to the control assembly. The
vacuum actuated piston within the
unit is connected by a rod to the
upper end of the release lever (Fig. 9).
The lower end of the release lever ex-
tends out for alternate manual release
in the event of vacuum power failure
or for optional manual release at any
time.
Hoses connect the power unit and
the engine manifold to a vacuum re-
lease valve in the transmission neutral
safety switch.
The anti-skid control system con-
sists of three major components (Fig.
39).
Mechanically driven electromag-
netic sensors at each rear wheel; an
electronic control module mounted
under the glove box; a vacuum pow-
ered actuator attached to a bracket on
the inside of the right front frame rail
under the toe board.
The sensors consist of steel rings
having teeth on their outer diameters,
pressed on each axle shaft just out-
board of the wheel bearing. The teeth
rotate past corresponding teeth on the
inside diameter of stationary steel
rings mounted in the bearing retain-
ers.
Also mounted in the retainers, are
ring-shaped permanent magnets and
coils of wire. Two wires from each
sensor connect the sensors to the con-
trol module.
The control module consists of solid
state electronic components sealed in
a container. It is connected to the sen-
sors and to a solenoid on the actuator.
The actuator is similar to a vacuum
brake booster and consists of three
parts.
A chamber divided by a vacuum
suspended diaphragm; a hydraulic cyl-
inder connected to the diaphragm; and
a solenoid connected electrically to the
control module.
IN-VEHICLE ADJUSTMENTS AND REPAIRS
After any brake service work, ob-
tain a firm brake pedal before moving
the vehicle. Riding the brake pedal
(common on left foot application)
should be avoided when driving the
vehicle.
BRAKE SHOE ADJUSTMENTS—
DRUM BRAKES
The hydraulic drum brakes are
self-adjusting and require a manual
adjustment only after the brake shoes
have been relined, replaced, or when
the length of the adjusting screw has
been changed while performing some
other service operation. The manual
adjustment is performed with the
drums removed, using the tool and the
procedure detailed below.
When adjusting the rear brake
shoes,
check the parking brake cables
for proper adjustment. Make sure that
the equalizer operates freely.
To adjust the brake shoes:
1.
Use Rotunda Tool HRE 8650,
(Fig. 11) to determine the inside diam-
eter of the drum braking surface.
2.
Reverse the tool as shown in Fig.
11 and adjust the brake shoe diameter
to fit the gauge. Hold the automatic
adjusting lever out of engagement
while rotating the adjusting screw, to
prevent burring the screw slots. Make
sure the adjusting screw rotates freely.
If necessary, lubricate the adjusting
screw threads with a thin, uniform
coating of MIC-100-A.
3.
Rotate Tool HRE 8650 around
the brake shoes to be sure of the set-
ting.
4.
Apply a small quantity of high
temperature grease to the points
where the shoes contact the backing
plate, being careful not to get the lu-
bricant on the linings.
5. Install the drums. Install Tinner-
man nuts and tighten securely.
6. Install the wheels on the drums
and tighten the nuts to specification.
7.
Complete the adjustment by
applying the brakes several times with
a minimum of 50 lbs pressure on the
pedal while backing the vehicle. After
each stop the vehicle must be moved
forward.
8. After the brake shoes have been
properly adjusted, check the operation
of the brakes by making several stops
while operating in a forward direction.
WHEEL CYLINDER REPAIR-
DRUM BRAKE
Wheel cylinders should not be di-
sassembled unless they are leaking or
unless new cups and boots are to be
installed. It is not necessary to remove
the brake cylinder from the backing
plate to disassemble, inspect, or hone
and overhaul the cylinder. Removal is
necessary only when the cylinder is
damaged or scored beyond repair.procarmanuals.com
Page 37 of 413
02-02-18
Brake System
02-02-18
the brake hose connector
and
bracket
assembly.
3.
Remove
the two
bolts retaining
the brake hose bracket
and
caliper
as-
sembly
to the
spindle. Take care
to
avoid loosening
the
bridge bolts that
hold
the two
halves
of the
caliper
to-
gether.
4.
Lift
the
caliper assembly
off the
rotor
and
place
it on the
bench.
Installation
1.
If the
caliper assembly
is to be
replaced, transfer
the
steel tubing
and
the bleeder screw
to the new
caliper.
2.
Position
the
caliper assembly
on
the rotor,
and
mate
the
mounting bolt
holes
in the
caliper with those
in the
spindle.
It may be
necessary
to
push
the caliper pistons into
the
cylinder
bores
to
obtain clearance between
the
shoe
and
lining assembly
and the
rotor.
The
shoe
and
lining assemblies
should
be
seated properly
on the
bridges.
3.
Install
the
caliper
to
spindle
re-
taining bolts
and
torque them
to
spec-
ification. Check
to
insure that
the
rotor runs squarely
and
centrally
be-
tween
the two
halves
of the
caliper.
These should
be
approximately 0.090-
0.120 inch clearance between
the
cali-
per
and the
rotor outside diameter
(Fig.
6).
4.
Position
the
steel transfer tube
brake hose bracket
and
caliper assem-
bly
to the
spindle. Install
the
retaining
bolts then torque them
to
specifica-
tion.
5.
Connect
the
front wheel steel
transfer tube from
the
caliper
to the
front brake hose connector. Check
the
hose
for
proper installation
(Fig. 21).
6. Bleed
the
brake system
and cen-
tralize
the
differential valve
as out-
lined
in
Part
2-1.
Check
the
master
cylinder fluid level
and add the
speci-
fied fluid,
as
required. Pump
the
brake pedal several times
to
actuate
the piston seals
and to
position
the
shoe
and
lining assemblies.
7.
Install
the
wheel
and
tire assem-
bly
and the
wheel cover.
8. Road test
the
vehicle.
DISC BRAKE SHOE
AND
LINING
ALL MODELS EXCEPT
LINCOLN CONTINENTAL
Removal
1.
Remove
the
wheel
and
tire from
the
hub and
rotor assembly.
2.
Remove
the
caliper from
the ve-
hicle following
the
procedures outlined
under Disc Brake Caliper Assembly.
3.
To
facilitate removal
of the
cali-
per assemblies,
the
piston
may
have
to
be pushed into
its
bore. Apply
a
steady inward pressure against
the
inner shoe
and
lining assembly. Main-
tain
the
pressure
for at
least
a
minute.
4.
Slide
the two
outer shoe retain-
ing clips
off the
retaining pins
(Fig.
23).
5.
Remove
the two
retaining pins
from
the
outer shoe, then remove
the
shoe from
the
stationary caliper.
6. Slide
the
inner brake shoe
out-
ward until
it is
free
of the
hold-down
springs, then remove
the
brake shoe.
7.
Remove
the
caliper locating pins
and stabilizer attaching bolts, then
re-
move
and
discard
the
stabilizer
or sta-
bilizers.
8. Remove
the
locating
pin
insula-
tors from
the
anchor plate.
Installation
When installing
new
shoes
and lin-
ings
it
will
be
necessary
to
force
the
piston
to the
bottom
of its
bore.
Apply sufficient pressure
to
overcome
the grip
of the
piston seal
on the pis-
ton.
1.
Install
new
caliper locating
pin
insulators
in the
anchor plate.
2.
Position
the
caliper assembly
in
the anchor plate.
3.
Position
the new
stabilizer
or
stabilizers
and
install
the
caliper locat-
ing pins
to
engage approximately four
threads.
If
the
caliper locating pins
are
rust-
ed
or
corroded they should
be re-
placed.
Apply water
or
isopropyl alcohol
to
the caliper locating pins before instal-
lation.
Oil or
grease must
not be
used
on
the
locating pins.
4.
Position
the
outer brake shoe
on
the caliper
and
install
the two
retain-
ing pins
and
clips.
5.
Install
the
inner brake shoe
so
that
the
ears
of
shoe
are on top of the
anchor plate bosses
and
under
the
shoe hold-down springs.
6. Position
the
shoe
and
lining
assemblies
so
that
the
caliper assem-
bly
can be
placed over
the
rotor.
Ro-
tate
a
hammer handle between
the lin-
ings
to
reset
the
stabilizers.
7.
Install
the
caliper assembly over
the rotor
and on the
spindle. Install
the
two
caliper attaching bolts,
and
torque them
to
specifications.
The
upper bolt must
be
tightened first.
In-
stall
the
safety wire
and
twist
the
ends
at least five turns. Push
the
wire ends
against
the
spindle
to
avoid interfer-
ence with
the
brake hose
and the
steering stop.
8. With moderate pressure applied
to
the
brake pedal, torque
the
stabiliz-
er attaching screws
and
caliper locat-
ing pins
to
specification.
LINCOLN CONTINENTAL
Removal
1.
Remove
the
wheel
and
tire
as-
sembly from
the hub and
rotor assem-
bly.
Be
careful
to
avoid damage
or in-
terference with
the
caliper splash
shield, bleeder screw fitting
or
transfer
tube.
2.
Remove
the two
bolts that retain
the caliper splash shield,
and
remove
the shield
(Fig. 4).
3.
To
facilitate removal
and
instal-
lation
of the
shoe
and
lining assem-
blies,
the
pistons must
be
pushed into
their bores. Apply
a
steady inward
pressure against each shoe
and
lining
assembly toward
its
respective caliper
housing
on
each side
of the
rotor
(Fig.
6).
Maintain
the
pressure
for at
least
a minute.
If the
pistons will
not go ifi
easily, force them
in
with water pump
pliers.
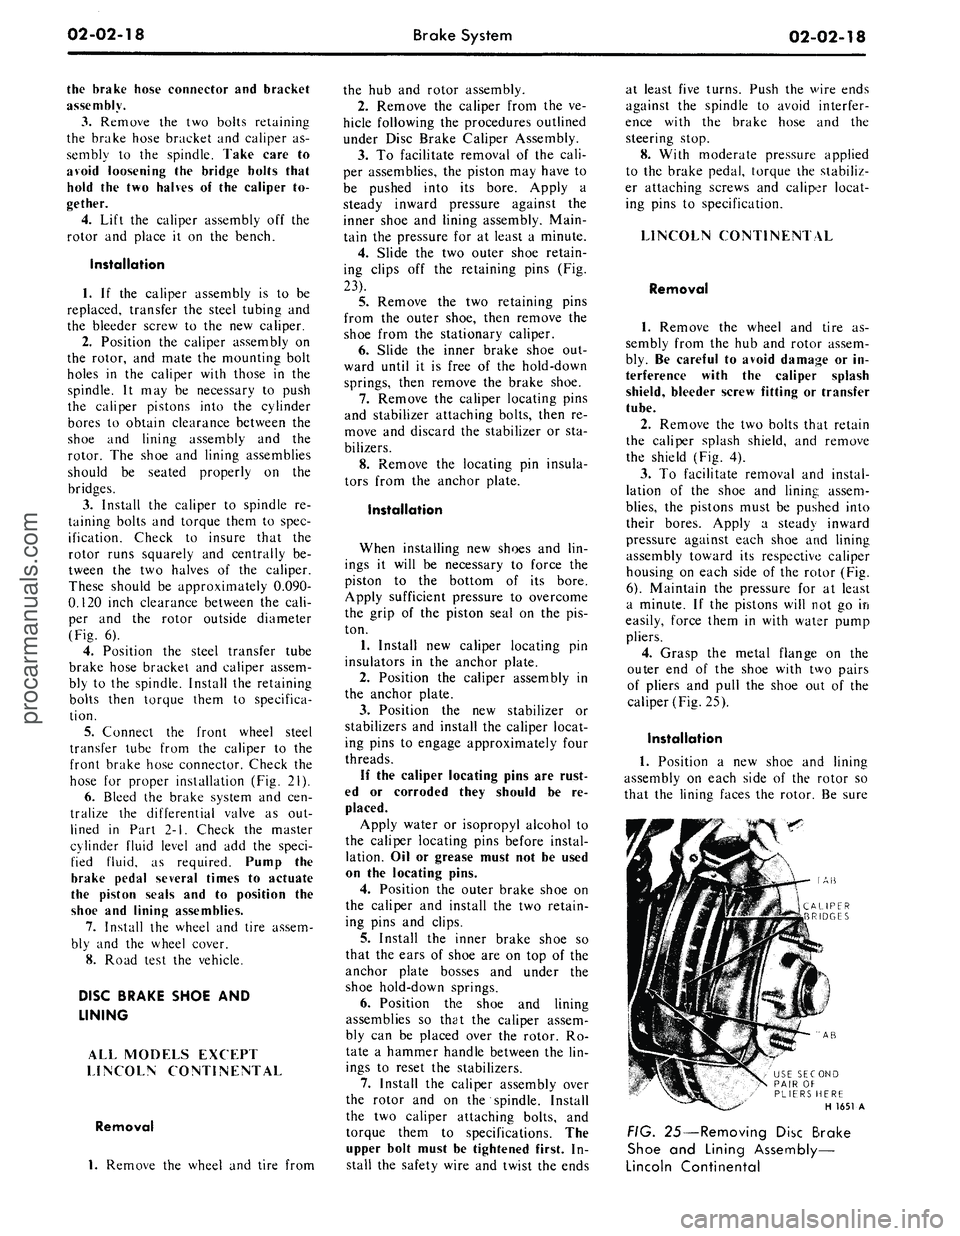
4.
Grasp
the
metal flange
on the
outer
end of the
shoe with
two
pairs
of pliers
and
pull
the
shoe
out of the
caliper (Fig.
25).
Installation
1.
Position
a new
shoe
and
lining
assembly
on
each side
of the
rotor
so
that
the
lining faces
the
rotor.
Be
sure
AB
AB
USE SECOND
PAIR
OF
PLIERS HERE
H 1651
A
FIG. 25—Removing Disc Brake
Shoe
and
Lining Assembly—
Lincoln Continentalprocarmanuals.com
Page 39 of 413
02-02-20
Brake System
02-02-20
1.
Disconnect the stoplight switch
wires at the connector. Remove the
spring retainer. Slide the stop light
switch off the brake pedal pin just far
enough to clear the end of the pin,
then liftfthe switch straight upward
from the pin. Use care to avoid switch
damage during removal.
2.
Slide the master cylinder push
rod and the nylon washers and bush-
ings off the brake pedal pin.
3.
Remove the brake tube from the
primary and secondary outlet ports of
the master cylinder.
4.
Remove the cap screws and lock-
washers that secure the master cylin-
der to the dirSh panel and lift the cyl-
inder forward and upward from the
vehicle.
Installation
1.
Position the boot on the push
rod and secure the boot to the master
cylinder. Carefully insert the master
cylinder push rod and boot through
the dash panel opening and position
the master cylinder on the panel.
2.
Install the cap screws at the dash
panel and torque them to specifica-
tion.
3.
Coat the nylon bushings with
SAE 10W oil. Install the nylon wash-
er and bushing on the brake pedal pin.
4.
Position the stop light switch on
the brake pedal pin, install the nylon
bushing and washer and secure them
in position with the spring retainer.
5.
Connect the wires at the stop
light switch connector.
6. Connect the brake lines to the
master cylinder leaving the brake line
fittings loose.
7.
Fill the master cylinder with the
specified brake fluid to within 1/4
inch of the top of the dual reservoirs.
Use Ford Brake Fluid— Extra Heavy
Duty-Part Number C6AZ-19542-A
(ESA-M6C25-A) or equivalent for all
drum brake applications. The extra
heavy duty brake system fluid is col-
ored blue for identification. Do not
mix low temperature brake fluids with
the specified fluid for the power disc
brake system.
8. Bleed the dual-master cylinder
and the primary and secondary brake
systems. Centralize the pressure dif-
ferential valve. Refer to Hydraulic
System Bleeding and Centralizing of
the Differential Valve, Part 2-1, Sec-
tion 2 for proper procedure.
9. Operate the brakes several times,
then check for external hydraulic
leaks.
FAIRLANE, MONTEGO,
FALCON, MUSTANG AND
COUGAR
Removal
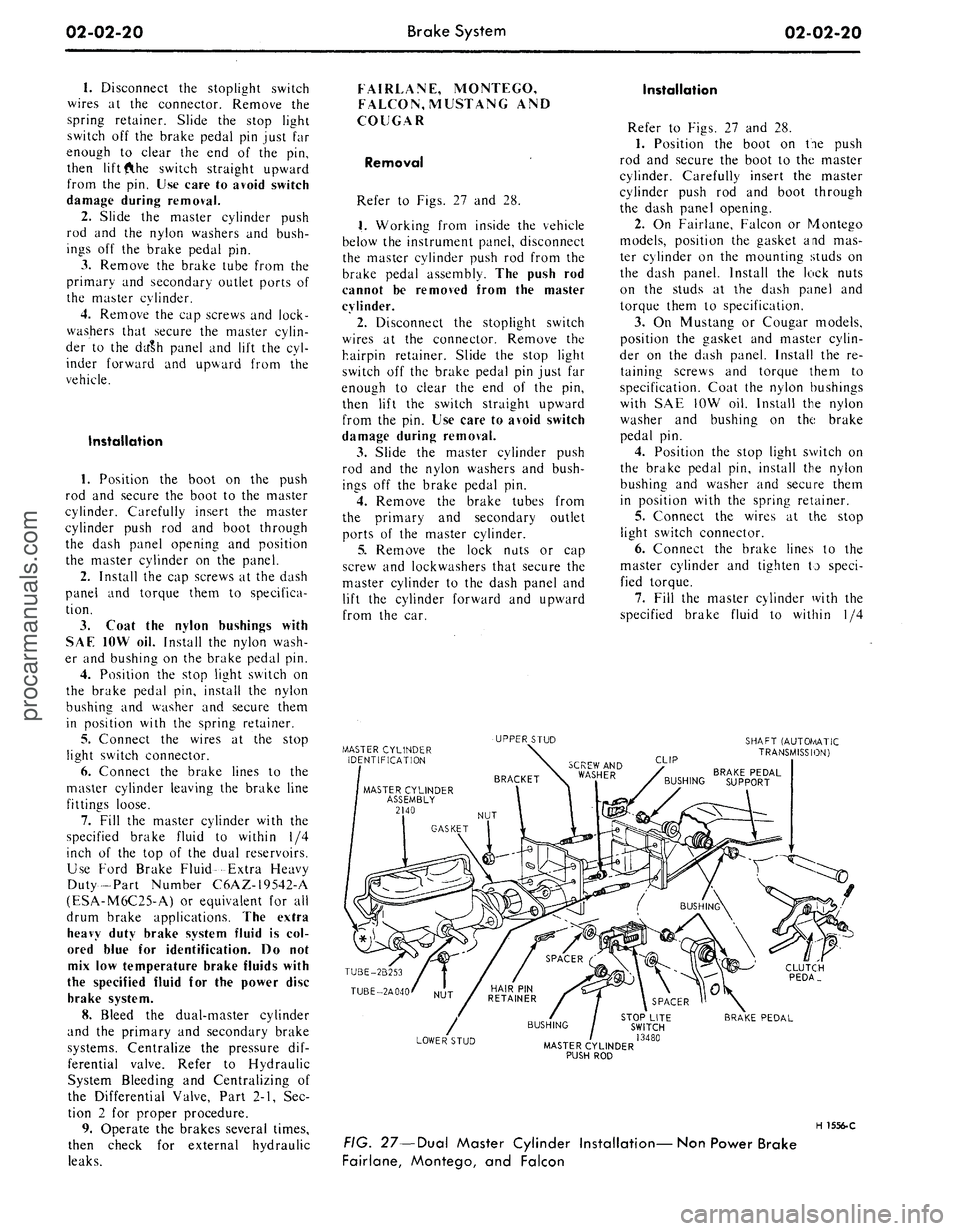
Refer to Figs. 27 and 28.
1.
Working from inside the vehicle
below the instrument panel, disconnect
the master cylinder push rod from the
brake pedal assembly. The push rod
cannot be removed from the master
cylinder.
2.
Disconnect the stoplight switch
wires at the connector. Remove the
hairpin retainer. Slide the stop light
switch off the brake pedal pin just far
enough to clear the end of the pin,
then lift the switch straight upward
from the pin. Use care to avoid switch
damage during removal.
3.
Slide the master cylinder push
rod and the nylon washers and bush-
ings off the brake pedal pin.
4.
Remove the brake tubes from
the primary and secondary outlet
ports of the master cylinder.
5.
Remove the lock nuts or cap
screw and lockwashers that secure the
master cylinder to the dash panel and
lift the cylinder forward and upward
from the car.
Installation
Refer to Figs. 27 and 28.
1.
Position the boot on tie push
rod and secure the boot to the master
cylinder. Carefully insert the master
cylinder push rod and boot through
the dash panel opening.
2.
On Fairlane, Falcon or Montego
models, position the gasket and mas-
ter cylinder on the mounting studs on
the dash panel. Install the lock nuts
on the studs at the dash panel and
torque them to specification.
3.
On Mustang or Cougar models,
position the gasket and master cylin-
der on the dash panel. Install the re-
taining screws and torque them to
specification. Coat the nylon bushings
with SAE 10W oil. Install the nylon
washer and bushing on the brake
pedal pin.
4.
Position the stop light switch on
the brake pedal pin, install the nylon
bushing and washer and secure them
in position with the spring retainer.
5.
Connect the wires at the stop
light switch connector.
6. Connect the brake lines to the
master cylinder and tighten to speci-
fied torque.
7.
Fill the master cylinder with the
specified brake fluid to within 1/4
MASTER CYLINDER
IDENTIFICATION
UPPER STUD
SHAFT (AUTOf/lATIC
TRANSMISSION)
CLIP
BRAKE PEDAL
BUSHING SUPPORT
TUBE-2B253
TUBE-2A040
CLUTCH
PEDA_
LOWER STUD
STOP LITE
SWITCH
/ 13480
MASTER CYLINDER
PUSH ROD
BRAKE PEDAL
H 1556-C
FIG. 27—Dual Master Cylinder Installation—Non Power Brake
Fairlane, Montego, and Falconprocarmanuals.com
Page 74 of 413
03-01-09
Suspension — Steering, Wheels And Tires — General Service
03-01-09
the reading exceeds specifications
(Part 3-13), replace the upper ball
joint.
LOWER BALL JOINT
INSPECTION
Ford,
Mercury, Meteor,
Thunderbird, Lincoln Continental
and Continental Mark III
1.
Raise the vehicle and place
jacks under the lower arms as shown
in Fig. 12. This will unload the lower
ball joints.
2.
Adjust the wheel bearings as des-
cribed in Part 3-12.
3.
Attach a dial indicator to the
lower arm and position the indicator
so that the plunger rests against the
inner side of the wheel rim adjacent to
the lower ball joint.
4.
Grasp the tire at the top and
bottom and slowly move the tire in
and out (Fig. 19). Note the reading
(radial play) on the dial indicator. If
the reading exceeds specifications
(Part 3-13), replace the lower ball
joint.
Cougar, Fairlane, Falcon,
Montego, Mustang
1.
Raise the vehicle on a frame
contact hoist or by floor jacks placed
beneath the underbody until the wheel
falls to the full down position.
2.
Ask an assistant to grasp the
lower edge of the tire and move the
wheel in and out.
3.
As the wheel is being moved in
and out, observe the lower end of the
spindle and the lower arm.
4.
Any movement between the
lower end of the spindle and the lower
arm indicates ball joint wear and loss
of preload. If any such movement is
observed, replace the lower arm.
During the foregoing check, the
upper ball joint will be unloaded and
may move. Disregard all such move-
ment of the upper ball joint. Also, do
not mistake loose wheel bearings for a
worn ball joint.
POWER STEERING GEAR
CLEANING
Disassembly and assembly of the
steering gear and. the sub-assemblies
must be made on a clean workbench.
As in repairing any hydraulically op-
erated unit, cleanliness is of utmost
importance. The bench, tools, and
parts must be kept clean at all times.
Thoroughly clean the exterior of the
unit with a suitable solvent and, when
necessary drain as much of the hy-
draulic fluid as possible. Handle all
parts very carefully to avoid nicks,
burrs,
scratches and dirt, which could
make the parts unfit for use.
Do not clean, wash or soak seals in
cleaning solvent.
INSPECTION
1.
Check the sector shaft contact
surface in the cover for wear. If worn,
replace the cover.
2.
Inspect the input shaft bearing
for cracked races and the balls for
looseness, wear, pitting, end play or
other damage. Check the fit of the
bearing on the input shaft. Replace
the bearing, if required.
3.
Inspect the valve housing for
wear, scoring or burrs.
4.
Inspect the tube seats in the
pressure and return ports in the valve
body for nicks, etc. If necessary, re-
move and replace.
5.
Check the sector shaft contact
surface in the housing for wear. If
worn, replace the bushing or the hous-
ing.
6. Check all fluid passages for ob-
struction or leakage.
7.
Inspect the steering gear housing
for cracks, stripped threads, and mat-
ing surfaces for burrs. Inspect the pis-
ton bore of the housing for scoring or
wear. If necessary, replace the hous-
ing.
8. Check the input shaft bearing
after installation to be sure that it ro-
tates freely.
9. If the valve spool is not free in
the valve housing, check for burrs at
the outward edges of the working
lands in the housing and remove with
a hard stone. Check the valve spool
for burrs and if burrs are found, stone
the valve in a radial direction only.
Check for freedom of the valve again.
10.
Check the piston rack teeth and
sector shaft teeth for nicks and burrs.
FLUSHING THE POWER
STEERING SYSTEM—ALL EXCEPT
LINCOLN CONTINENTAL AND
CONTINENTAL MARK III
Should it be necessary to replace an
inoperative power steering pump, the
need for flushing the steering system
is required when installing the new
pump.
1.
Remove the power steering pump
and remove the pulley as outlined in
Part 3-10.
2.
Install the pulley on a new
pump. Install the pump and connect
only the pressure hose to the pump
(Part 3-10).
3.
Place the fluid return line in a
suitable container and plug the reser-
voir return pipe.
4.
Fill the reservoir with lubricant
(C1AZ-19582-A).
5.
Disconnect the coil wire to pre-
vent the engine from starting and raise
the front wheels off the ground.
6. While approximately two quarts
of steering gear fluid are being poured
into the reservoir, turn the engine over
using the ignition key, at the same
time cycle the steering wheel from
stop to stop.
7.
As soon as all of the lubricant
has been poured in, turn off the igni-
tion key, and attach the coil wire.
8. Remove the plug from the reser-
voir return pipe, and attach the return
hose to the reservoir.
9. Check the reservoir fluid level; if
low, add fluid to the proper level. Do
not overfill.
10.
Lower the vehicle.
11.
Start the engine and cycle the
steering from stop to stop to expel
any trapped air from the system.
POWER STEERING PUMP—ALL
EXCEPT LINCOLN
CONTINENTAL AND
CONTINENTAL MARK III
CLEANING
Wash all parts (except seals) in a
Naptha or Chlorinated-type solvent
and dry with compressed air.
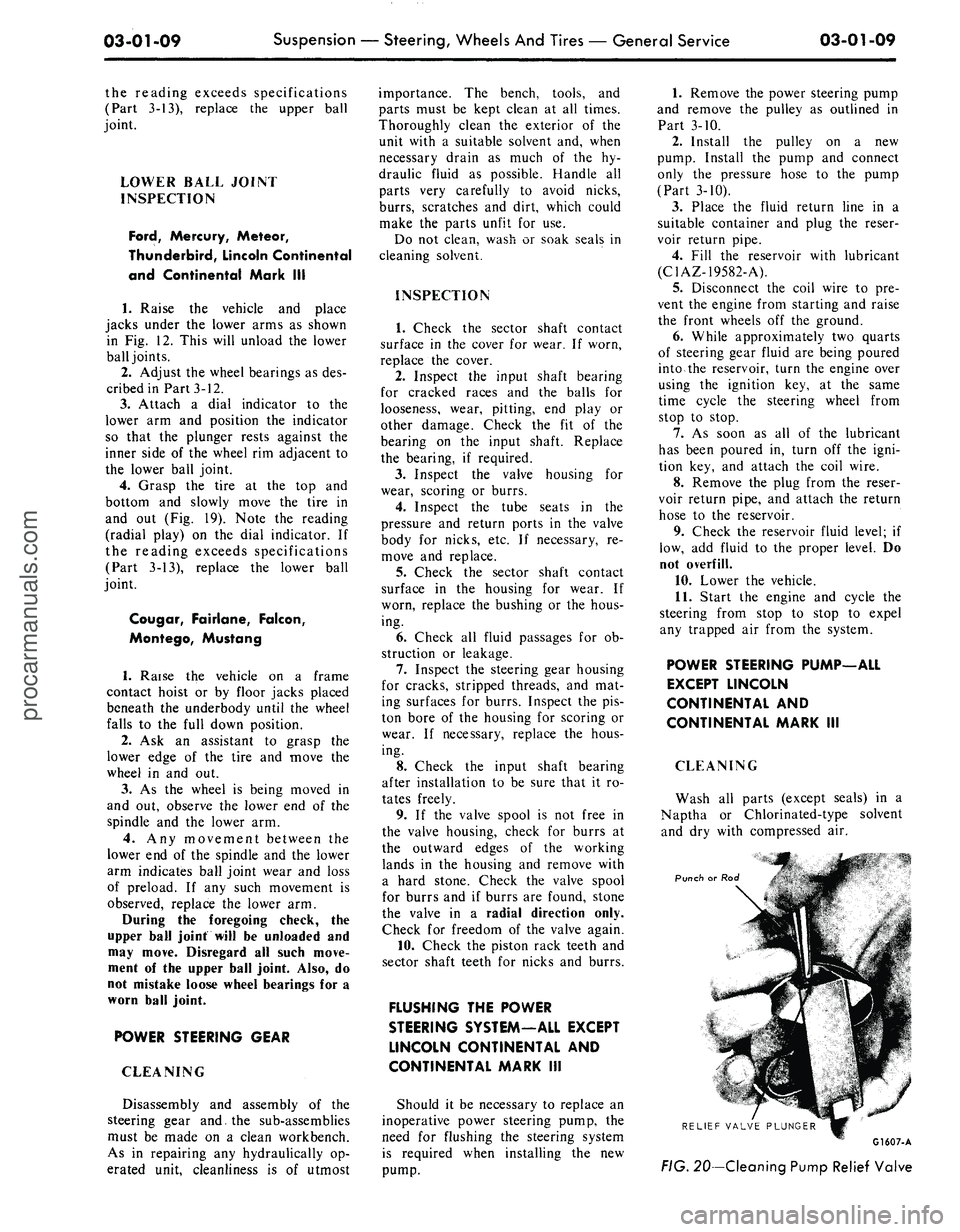
Punch or Rod
RELIEF VALVE PLUNGER
G1607-A
FIG.
20—Cleaning Pump Relief Valveprocarmanuals.com
Page 75 of 413
03-01-10
Suspension — Steering, Wheels And Tires — General Service
03-01-10
The following procedure should be
followed when cleaning the relief valve
which is a part of the pump valve as-
sembly.
1.
Using a punch or rod of suitable
diameter, apply an even pressure in a
straight line to the tip of the relief
valve pin (Fig. 20). Depress the valve
two or three times to exhaust the oil
which is trapped in the assembly. Do
not hammer on the valve pin or hous-
ing.
2.
Submerge the assembly in a con-
tainer of clean solvent. Again applying
an even pressure to the tip of the relief
valve pin, (a sudden strong force could
push the pin through the relief valve
spool) move the valve in and out sev-
eral times, thereby thoroughly flushing
the assembly. Pressure created within
the valve bore when the valve is moved
inward should force the cleaning fluid
out through the sensing orifice. If this
does not occur, the sensing orifice
should be cleaned with a piece of wire.
The valve must move freely and even-
ly. If the pin is bent or damaged, or if
the valve binds, the pump valve must
be replaced.
INSPECTION
The following describes the compo-
nents of the power steering pump
which must be replaced regardless of
condition and how to determine when
other components should be replaced.
The outlet fitting hex nut may be
reused if the corners of the hex are
not rounded. The housing bolts may
be reused if the threads are not dam-
aged.
All gaskets and seals must be re-
placed with new components except
the rotor shaft seal which should be
reused unless it was leaking.
The reservoir assembly may be
reused if the reservoir seal and gasket
areas are not damaged (dents, scratch-
es,
etc.). The soldered joints of the re-
turn and fill tubes must not be loose
or bent. Be sure to check for a broken
baffle.
The housing or housing assembly
may be reused if there is no damage
(scratches, etc.) at reservoir gasket,
outlet fitting or cover seal areas.
If the outlet fitting is damaged, the
pump housing must be replaced. The
pressure plate springs may be reused
providing they are not bent, broken or
have not taken a set.
Do not reuse the retainer end plate
if it is burred or damaged. The upper
pressure plate may be reused if there
is no scoring on the wear surface. It is
acceptable to polish the phosphate
coating.
The rotor and cam assembly can be
reused if there is no wear other than
the removal of the phosphate coating
on the cam contour. Do not disas-
semble the rotor and cam assembly.
Push the rotor part way out the cam
insert taking care not to let the slip-
pers and springs fall out. Check the
cam ID for scoring and burning.
Check the rotor faces and OD for
scoring and chipping. Do not attempt
to repair or refinish the lower and
upper pressure plates, cam or rotor
assembly. When wear or burning is
encountered, replace, them with new
components.
Install a new rotor and cam assem-
bly if the slippers are worn. Replace
the springs if they are bent or broken.
Polishing the phosphate coating of the
slipper sealing surface is permissable.
The rotor shaft can be reused if the
front and rear thrust faces, the bush-
ing diameter and the shaft seal diame-
ter are not excessively worn or scored.
The housing plate and bushing as-
sembly may be reused if all of the
threaded holes are not damaged
beyond repair and the bushing diame-
ter is not scored or worn .0005 inch
over the maximum dimension of .6897
inch. Threaded holes can be repaired
by drilling out the damaged threads
and installing a helicoil insert. If the
bushing is scored or excessively worn,
a new plate and bushing assembly
must be installed.
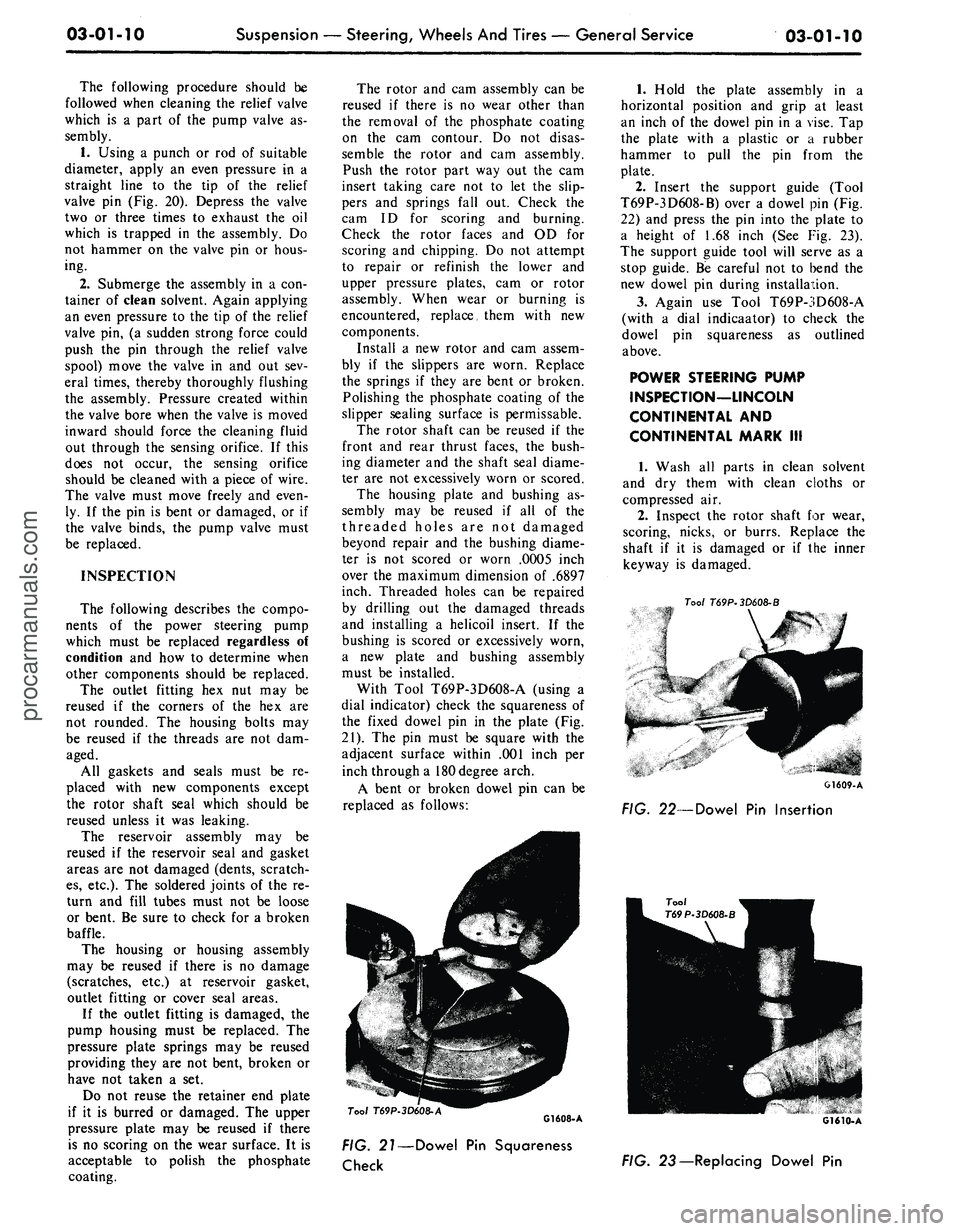
With Tool T69P-3D608-A (using a
dial indicator) check the squareness of
the fixed dowel pin in the plate (Fig.
21).
The pin must be square with the
adjacent surface within .001 inch per
inch through a 180 degree arch.
A bent or broken dowel pin can be
replaced as follows:
1.
Hold the plate assembly in a
horizontal position and grip at least
an inch of the dowel pin in a vise. Tap
the plate with a plastic or a rubber
hammer to pull the pin from the
plate.
2.
Insert the support guide (Tool
T69P-3D608-B) over a dowel pin (Fig.
22) and press the pin into the plate to
a height of 1.68 inch (See Fig. 23).
The support guide tool will serve as a
stop guide. Be careful not to bend the
new dowel pin during installation.
3.
Again use Tool T69P-3D608-A
(with a dial indicaator) to check the
dowel pin squareness as outlined
above.
POWER STEERING PUMP
INSPECTION—LINCOLN
CONTINENTAL AND
CONTINENTAL MARK III
1.
Wash all parts in clean solvent
and dry them with clean cloths or
compressed air.
2.
Inspect the rotor shaft for wear,
scoring, nicks, or burrs. Replace the
shaft if it is damaged or if the inner
keyway is damaged.
Tool
T69P-3D608-B
G1609-A
FIG. 22—Dowel Pin Insertion
Tool
T69P-3D608-A
G1608-A
FIG. 21—Dowel Pin Squareness
Check
FIG. 23 — Replacing Dowel Pinprocarmanuals.com
Page 86 of 413
03-02-10
Suspension
03-02-10
lower
arm
free
to
drop
as
coil spring
tension
is
eased.
If a
chain hoist
or a
jack that
has
a
narrow contact
pad is
to
be
used
on the
bumper
to
raise
the
car, distribute
the
load along
the
bumper
by
using
a
steel plate
3 or 4
inches long
as a
contact
pad to pre-
vent damaging
the
bumper.
2.
If the
ball joint
is
riveted
to the
arm, drill
a
1/8-inch
pilot hole
com-
pletely through each rivet. Then drill
off
the
rivet head through
the
pilot
hole with
a
3/8-inch drill,
and
drive
out both rivets.
3.
Position
a
jack
or
safety stand
under
the
lower
arm, and
lower
the
vehicle about
6
inches
to
offset
the
coil spring tension.
4.
Remove
the
cotter
pin
from
the
ball joint stud,
and
remove
the nut.
5.
Place
a box
wrench over
the
lower
end
of the
tool shown
in
Fig.
7,
and position
the
tool.
The
tool should
seat firmly against
the end of
both
studs,
and
not
against
the
upper stud
nut.
6. Turn
the
wrench until both studs
are under tension,
and
then, with
a
hammer,
tap the
spindle near
the
lower stud
to
loosen
the
stud from
the
spindle.
Do not
loosen
the
stud with
tool pressure alone. Remove
the
ball
joint.
7.
Clean
the end of the arm, and
remove
all
burrs from
the
hole edges.
Check
for
cracks
in the
metal
at the
holes,
and
replace
the arm if it is
cracked.
8. Position
the
stud
of
the
ball joint
to
the
spindle bore,
and
install
the at-
taching
nut
finger-tight.
9. Attach
the
ball joint
to
the
lower
arm.
Use
only
the
specified bolts
and
nuts.
Do not
rivet
the new
ball joint
to
the
arm.
Torque nuts
to
specification.
10.
Torque
the
ball joint stud
nut
to specification,
and
install
a
new cot-
ter
pin.
11.
Remove
the
jack.
12.
Check
and, if
necessary, adjust
caster, camber,
and
toe-in. Whenever
any part
of the
front suspension
has
been removed
and
installed, front
wheel alignment must
be
checked.
BALL JOINT REPLACEMENT
LINCOLN CONTINENTAL
The lower ball joint
is
riveted
to
the
lower
arm
wheras
the
upper ball joint
is bolted
to the
upper
arm.
When
re-
placing
a
ball joint,
use all the
parts
supplied
in the kit.
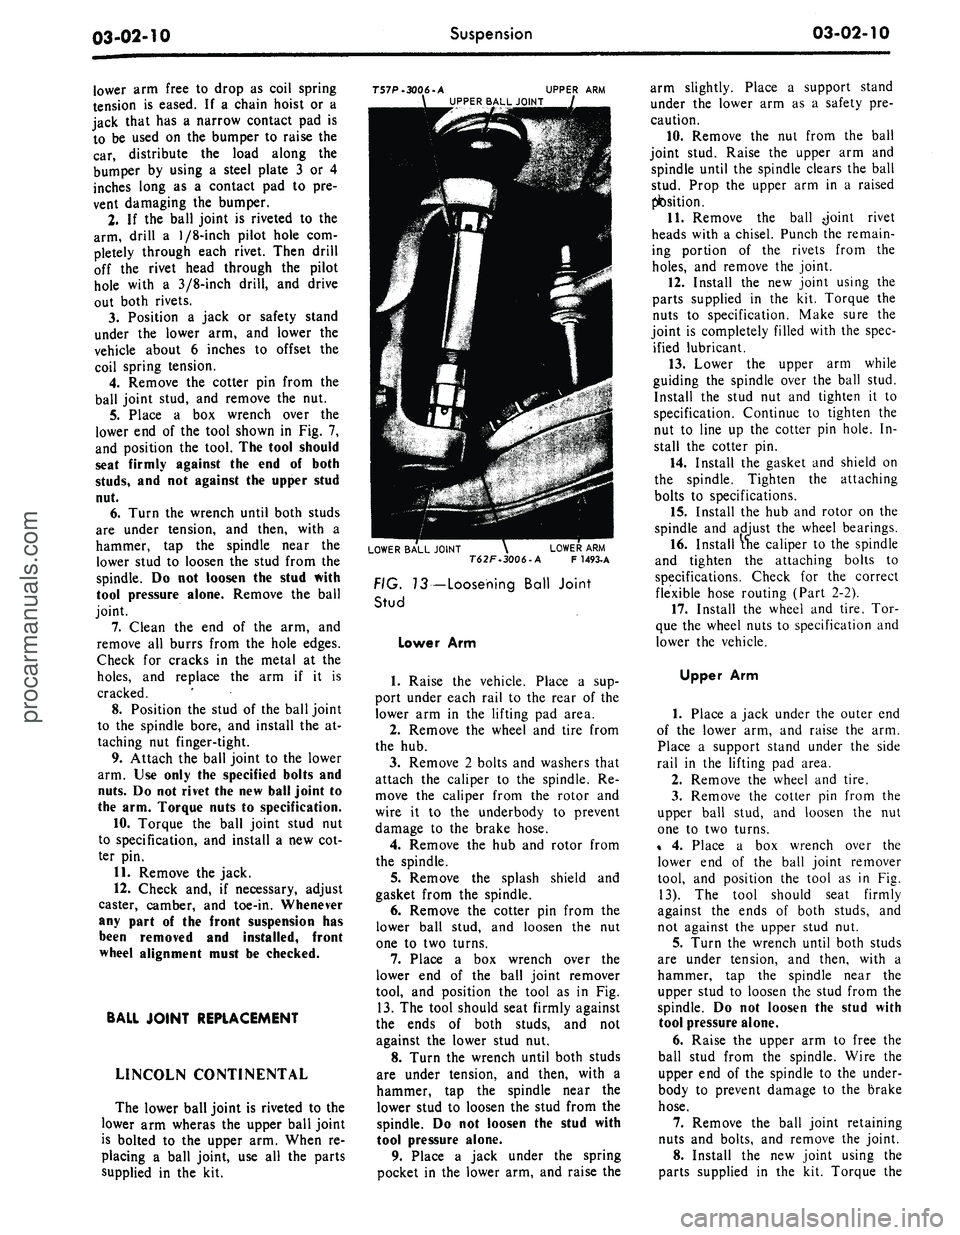
T57P-3006-A
UPPER
ARM
UPPER BALL JOINT
LOWER BALL JOINT
\
LOWER
ARM
T62F.3006-A
F
1493-A
FIG. 13— Loosening Ball Joint
Stud
Lower
Arm
1.
Raise
the
vehicle. Place
a sup-
port under each rail
to the
rear
of
the
lower
arm in the
lifting
pad
area.
2.
Remove
the
wheel
and
tire from
the
hub.
3.
Remove
2
bolts
and
washers that
attach
the
caliper
to the
spindle.
Re-
move
the
caliper from
the
rotor
and
wire
it to the
underbody
to
prevent
damage
to the
brake hose.
4.
Remove
the hub and
rotor from
the spindle.
5.
Remove
the
splash shield
and
gasket from
the
spindle.
6. Remove
the
cotter
pin
from
the
lower ball stud,
and
loosen
the nut
one
to two
turns.
7.
Place
a box
wrench over
the
lower
end of the
ball joint remover
tool,
and
position
the
tool
as in Fig.
13.
The
tool should seat firmly against
the ends
of
both studs,
and not
against
the
lower stud
nut.
8. Turn
the
wrench until both studs
are under tension,
and
then, with
a
hammer,
tap the
spindle near
the
lower stud
to
loosen
the
stud from
the
spindle.
Do not
loosen
the
stud with
tool pressure alone.
9. Place
a
jack under
the
spring
pocket
in the
lower
arm, and
raise
the
arm slightly. Place
a
support stand
under
the
lower
arm as a
safety
pre-
caution.
10.
Remove
the nut
from
the
ball
joint stud. Raise
the
upper
arm and
spindle until
the
spindle clears
the
ball
stud. Prop
the
upper
arm in a
raised
position.
11.
Remove
the
ball -joint rivet
heads with
a
chisel. Punch
the
remain-
ing portion
of the
rivets from
the
holes,
and
remove
the
joint.
12.
Install
the
new
joint using
the
parts supplied
in the kit.
Torque
the
nuts
to
specification. Make sure
the
joint
is
completely filled with
the
spec-
ified lubricant.
13.
Lower
the
upper
arm
while
guiding
the
spindle over
the
ball stud.
Install
the
stud
nut and
tighten
it to
specification. Continue
to
tighten
the
nut
to
line
up the
cotter
pin
hole.
In-
stall
the
cotter
pin.
14.
Install
the
gasket
and
shield
on
the spindle. Tighten
the
attaching
bolts
to
specifications.
15.
Install
the
hub and
rotor
on the
spindle
and
adjust
the
wheel bearings.
16.
Install
the
caliper
to
the
spindle
and tighten
the
attaching bolts
to
specifications. Check
for the
correct
flexible hose routing (Part
2-2).
17.
Install
the
wheel
and
tire.
Tor-
que
the
wheel nuts
to
specification
and
lower
the
vehicle.
Upper
Arm
1.
Place
a
jack under
the
outer
end
of
the
lower
arm,
and
raise
the arm.
Place
a
support stand under
the
side
rail
in the
lifting
pad
area.
2.
Remove
the
wheel
and
tire.
3.
Remove
the
cotter
pin
from
the
upper ball stud,
and
loosen
the nut
one
to two
turns.
%
4.
Place
a box
wrench over
the
lower
end of the
ball joint remover
tool,
and
position
the
tool
as in Fig.
13).
The
tool should seat firmly
against
the
ends
of
both studs,
and
not against
the
upper stud
nut.
5.
Turn
the
wrench until both studs
are under tension,
and
then, with
a
hammer,
tap the
spindle near
the
upper stud
to
loosen
the
stud from
the
spindle.
Do not
loosen
the
stud with
tool pressure alone.
6. Raise
the
upper
arm to
free
the
ball stud from
the
spindle. Wire
the
upper
end
of
the
spindle
to the
under-
body
to
prevent damage
to the
brake
hose.
7.
Remove
the
ball joint retaining
nuts
and
bolts,
and
remove
the
joint.
8. Install
the new
joint using
the
parts supplied
in the kit.
Torque
theprocarmanuals.com
Page 92 of 413
03-02-16
Suspension
03-02-16
2.
Place a jack under the outer end
of the arm.
3.
Tape the upper and lower spring
insulators to the spring.
4.
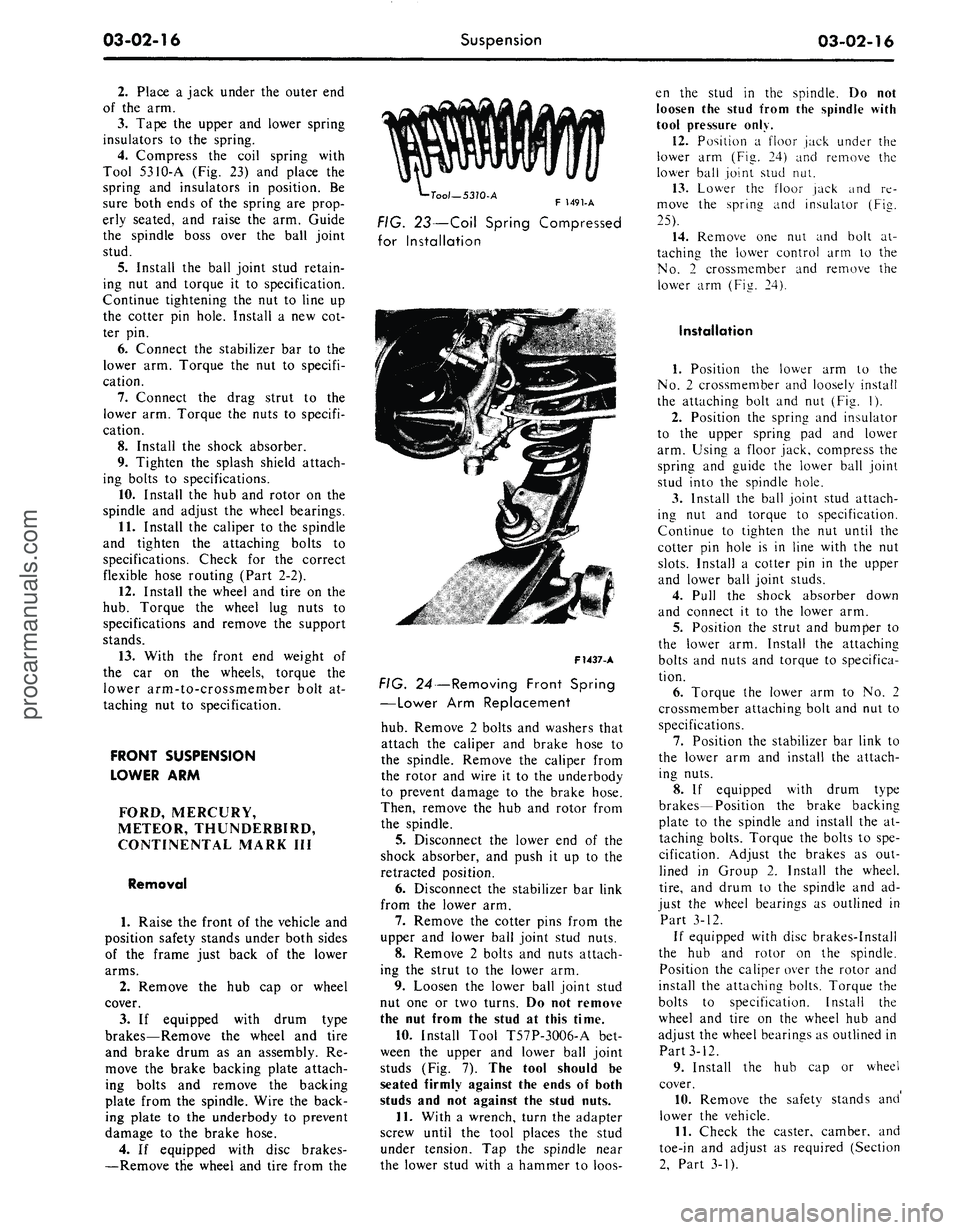
Compress the coil spring with
Tool 5310-A (Fig. 23) and place the
spring and insulators in position. Be
sure both ends of the spring are prop-
erly seated, and raise the arm. Guide
the spindle boss over the ball joint
stud.
5.
Install the ball joint stud retain-
ing nut and torque it to specification.
Continue tightening the nut to line up
the cotter pin hole. Install a new cot-
ter pin.
6. Connect the stabilizer bar to the
lower arm. Torque the nut to specifi-
cation.
7.
Connect the drag strut to the
lower arm. Torque the nuts to specifi-
cation.
8. Install the shock absorber.
9. Tighten the splash shield attach-
ing bolts to specifications.
10.
Install the hub and rotor on the
spindle and adjust the wheel bearings.
11.
Install the caliper to the spindle
and tighten the attaching bolts to
specifications. Check for the correct
flexible hose routing (Part 2-2).
12.
Install the wheel and tire on the
hub.
Torque the wheel lug nuts to
specifications and remove the support
stands.
13.
With the front end weight of
the car on the wheels, torque the
lower arm-to-crossmember bolt at-
taching nut to specification.
FRONT SUSPENSION
LOWER ARM
FORD, MERCURY,
METEOR, THUNDERBIRD,
CONTINENTAL MARK III
Removal
1.
Raise the front of the vehicle and
position safety stands under both sides
of the frame just back of the lower
arms.
2.
Remove the hub cap or wheel
cover.
3.
If equipped with drum type
brakes—Remove the wheel and tire
and brake drum as an assembly. Re-
move the brake backing plate attach-
ing bolts and remove the backing
plate from the spindle. Wire the back-
ing plate to the underbody to prevent
damage to the brake hose.
4.
If equipped with disc brakes-
—Remove the wheel and tire from the
•Tool—5310-A
F 1491-A
FIG. 23—Coil Spring Compressed
for Installation
F1437-A
FIG. 24—Removing Front Spring
—Lower Arm Replacement
hub.
Remove 2 bolts and washers that
attach the caliper and brake hose to
the spindle. Remove the caliper from
the rotor and wire it to the underbody
to prevent damage to the brake hose.
Then, remove the hub and rotor from
the spindle.
5.
Disconnect the lower end of the
shock absorber, and push it up to the
retracted position.
6. Disconnect the stabilizer bar link
from the lower arm.
7.
Remove the cotter pins from the
upper and lower ball joint stud nuts.
8. Remove 2 bolts and nuts attach-
ing the strut to the lower arm.
9. Loosen the lower ball joint stud
nut one or two turns. Do not remove
the nut from the stud at this time.
10.
Install Tool T57P-3OO6-A bet-
ween the upper and lower ball joint
studs (Fig. 7). The tool should be
seated firmly against the ends of both
studs and not against the stud nuts.
11.
With a wrench, turn the adapter
screw until the tool places the stud
under tension. Tap the spindle near
the lower stud with a hammer to loos-
en the stud in the spindle. Do not
loosen the stud from the spindle with
tool pressure only.
12.
Position a floor jack under the
lower arm (Fig. 24) and remove the
lower ball joint stud nut.
13.
Lower the floor jack and re-
move the sprina and insulator (Fie.
25).
14.
Remove one nut and bolt at-
taching the lower control arm to the
No.
2 crossmember and remove the
lower arm (Fig. 24).
Installation
1.
Position the lower arm to the
No.
2 crossmember and loosely install
the attaching bolt and nut (Fig. 1).
2.
Position the spring and insulator
to the upper spring pad and lower
arm. Using a floor jack, compress the
spring and guide the lower ball joint
stud into the spindle hole.
3.
Install the ball joint stud attach-
ing nut and torque to specification.
Continue to tighten the nut until the
cotter pin hole is in line with the nut
slots.
Install a cotter pin in the upper
and lower ball joint studs.
4.
Pull the shock absorber down
and connect it to the lower arm.
5.
Position the strut and bumper to
the lower arm. Install the attaching
bolts and nuts and torque to specifica-
tion.
6. Torque the lower arm to No. 2
crossmember attaching bolt and nut to
specifications.
7.
Position the stabilizer bar link to
the lower arm and install the attach-
ing nuts.
8. If equipped with drum type
brakes—Position the brake backing
plate to the spindle and install the at-
taching bolts. Torque the bolts to spe-
cification. Adjust the brakes as out-
lined in Group 2. Install the wheel,
tire,
and drum to the spindle and ad-
just the wheel bearings as outlined in
Part 3-12.
If equipped with disc brakes-Install
the hub and rotor on the spindle.
Position the caliper over the rotor and
install the attaching bolts. Torque the
bolts to specification. Install the
wheel and tire on the wheel hub and
adjust the wheel bearings as outlined in
Part 3-12.
9. Install the hub cap or wheel
cover.
10.
Remove the safety stands and'
lower the vehicle.
11.
Check the caster, camber, and
toe-in and adjust as required (Section
2,
Part 3-1).procarmanuals.com
Page 94 of 413
03-02-18
Suspension
03-02-18
5.
Remove the cotter pin from the
upper ball joint stud nut.
6. Loosen the upper ball joint stud
nut one or two turns. Do not remove
the nut from the stud at this time.
7.
Install tool T57P-3006-A be-
tween the upper and lower ball joint
studs with the adapter screw on top
(Fig. 13). The tool should be seated
firmly against the ends of both studs
and not against the nuts or lower stud
cotter pin.
8. With a wrench, turn the adapter
screw until the tool places the stua
under tension. Tap the spindle near
the upper stud with a hammer to loos-
en the stud in the spindle. Do not
loosen the stud from the spindle with
tool pressure only.
9. Remove the tool from between
the ball joint studs and place a floor
jack under the lower arm.
10.
Raise the floor jack to relieve
the pressure from the upper ball joint
stud nut and remove the nut.
11.
Remove the upper arm inner
shaft attaching bolts. Remove the
upper arm and inner shaft as an as-
sembly (Fig. 1).
12.
Remove the bumpei from the
upper arm.
Installation
1.
Position the bumper to the upper
arm and install the nut and washer.
Torque the nut to specifications.
2.
Position the upper arm inner
shaft to the frame side rail and install
the 2 attaching bolts and washers
snug.
3.
Connect the upper ball joint stud
to the spindle and install the attaching
nut. Torque the nut to specification
and continue to tighten the nut until
the cotter pin hole in the stud is in
line with the nut slots. Then, install
the cotter pin.
4.
If equipped with drum type bra-
kes—Adjust the brakes as outlined in
Part 2-2. Install the wheel, tire, and
drum to the spindle and adjust the
wheel bearings as outlined in Part
3-12.
5.
If equipped with disc brak-
es—Install the wheel and tire on the
hub and adjust the wheel bearings as
outlined in Part 3-12.
6. Install the hub cap or wheel
cover.
7.
Remove the safety stands and
lower the front of the vehicle.
8. Check caster, camber, and toe-in
and adjust as required (Section 2, Part
3-D.
COUGAR, FAIRLANE,
FALCON, MONTEGO,
MUSTANG
Removal
1.
Raise the front of the vehicle,
position safety stands under the
frame, and lower the vehicle slightly.
2.
Remove the wheel and tire.
3.
Remove the shock absorber
lower attaching nuts and washers.
4.
Remove the shock absorber
upper mounting bracket attaching
nuts,
and remove the shock absorber
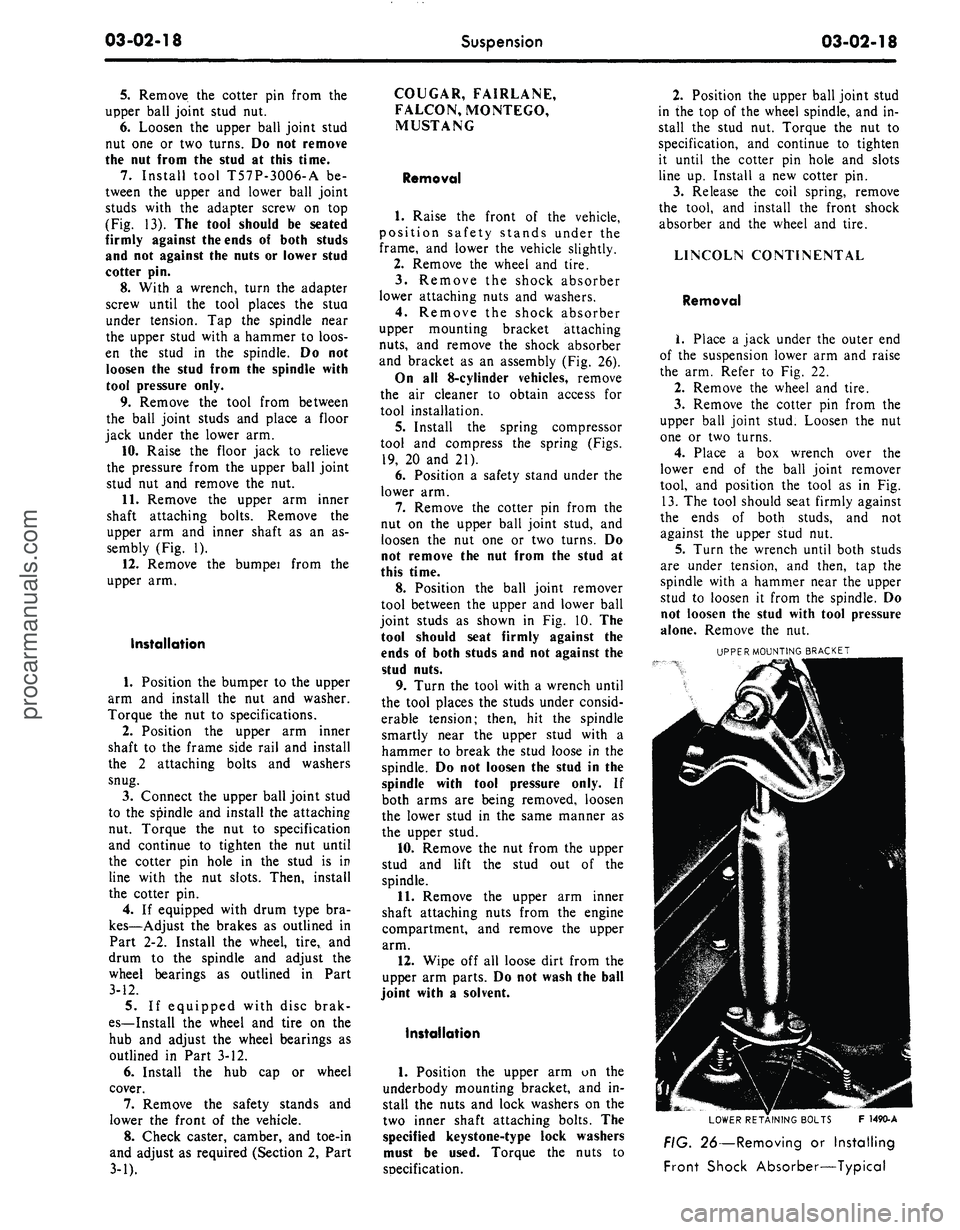
and bracket as an assembly (Fig. 26).
On all 8-cylinder vehicles, remove
the air cleaner to obtain access for
tool installation.
5.
Install the spring compressor
tool and compress the spring (Figs.
19,
20 and 21).
6. Position a safety stand under the
lower arm.
7.
Remove the cotter pin from the
nut on the upper ball joint stud, and
loosen the nut one or two turns. Do
not remove the nut from the stud at
this time.
8. Position the ball joint remover
tool between the upper and lower ball
joint studs as shown in Fig. 10. The
tool should seat firmly against the
ends of both studs and not against the
stud nuts.
9. Turn the tool with a wrench until
the tool places the studs under consid-
erable tension; then, hit the spindle
smartly near the upper stud with a
hammer to break the stud loose in the
spindle. Do not loosen the stud in the
spindle with tool pressure only. If
both arms are being removed, loosen
the lower stud in the same manner as
the upper stud.
10.
Remove the nut from the upper
stud and lift the stud out of the
spindle.
11.
Remove the upper arm inner
shaft attaching nuts from the engine
compartment, and remove the upper
arm.
12.
Wipe off all loose dirt from the
upper arm parts. Do not wash the ball
joint with a solvent.
Installation
1.
Position the upper arm on the
underbody mounting bracket, and in-
stall the nuts and lock washers on the
two inner shaft attaching bolts. The
specified keystone-type lock washers
must be used. Torque the nuts to
soecification.
2.
Position the upper ball joint stud
in the top of the wheel spindle, and in-
stall the stud nut. Torque the nut to
specification, and continue to tighten
it until the cotter pin hole and slots
line up. Install a new cotter pin.
3.
Release the coil spring, remove
the tool, and install the front shock
absorber and the wheel and tire.
LINCOLN CONTINENTAL
Removal
1.
Place a jack under the outer end
of the suspension lower arm and raise
the arm. Refer to Fig. 22.
2.
Remove the wheel and tire.
3.
Remove the cotter pin from the
upper ball joint stud. Loosen the nut
one or two turns.
4.
Place a box wrench over the
lower end of the ball joint remover
tool, and position the tool as in Fig.
13.
The tool should seat firmly against
the ends of both studs, and not
against the upper stud nut.
5.
Turn the wrench until both studs
are under tension, and then, tap the
spindle with a hammer near the upper
stud to loosen it from the spindle. Do
not loosen the stud with tool pressure
alone. Remove the nut.
UPPER MOUNTING BRACKET
LOWER RETAINING BOLTS F 1490-A
FIG. 26—Removing or Installing
Front Shock Absorber—Typicalprocarmanuals.com
Page 97 of 413
03-02-21
Suspension
03-02-21
8. Place a box wrench over the
lower end of the ball joint remover
tool, and position the tool as in Fig.
13.
The tool should seat firmly against
the ends of both studs, and not
against the stud nuts.
9. Turn the wrench until both studs
are under tension, and then, tap the
spindle with a hammer near the studs
to loosen them from the spindle. Do
not loosen
the
studs with tool pressure
alone.
10.
Place a jack under the outer
end of the lower arm, and raise the
arm several inches. Remove both ball
stud nuts, and remove t^e spindle.
Installation
1.
Position the new spindle onto the
upper and lower ball joint studs, in-
stall the stud nuts and tighten the nuts
to specifications. Continue to tighten
both nuts until the cotter pin holes
line up with the slots, then install new
cotter pines.
2.
Connect the spindle connecting
rod to the spindle arm. Install the re-
taining nut and tighten the nut to
specification. Continue to tighten the
nut until the cotter pin hole lines up
with the slot, then install a new cotter
pin.
3.
Install the gasket and splash
shield on the spindle. Tighten the at-
taching bolts to specifications.
4.
Install the hub and rotor on the
spindle.
5.
Install the caliper to the spindle
and tighten the attaching bolts to spe-
cifications. Check for the correct flex-
ible hose routing (Part 2-2).
6. Install the wheel and tire and ad-
just the wheel bearings (Part 3-12).
7.
Lubricate the steering stop on
the lower arm and the mating flat on
the spindle with the specified lubri-
cant.
8. Remove the safety stands, lower
the car and check camber, caster and
toe-in.
FRONT SHOCK ABSORBER
REPLACEMENT
FORD, MERCURY,
METEOR, THUNDERBIRD,
CONTINENTAL MARK III
1.
Remove the nut, washer, and
bushing from the shock absorber
upper end.
2.
Raise the vehicle on a hoist and
install safety stands.
3.
Remove 2 bolts attaching the
shock absorber to the lower arm and
remove the shock absorber.
4.
Place a washer and bushing on
the shock absorber top stud and posi-
tion the shock absorber inside the
front spring. Install the 2 lower at-
taching bolts and torque them to spe-
cifications.
5.
Remove the safety stands and
lower the vehicle.
6. Place a bushing and washer on
the shock absorber top stud and in-
stall the attaching nut. Torque it to
specification.
COUGAR, FAIRLANE,
FALCON, MONTEGO,
MUSTANG
Removal
1. Raise the hood and remove 3
shock absorber upper mounting
bracket-to-spring tower attaching
nuts.
2.
Raise the front of the vehicle and
place safety stands under the lower
arms.
3.
Remove 2 shock absorber lower
attaching nuts and washers.
4.
Lift the shock absorber and
upper bracket from the spring tower
(Fig. 26) and remove the bracket from
the shock absorber.
Installation
1. Install the upper mounting
bracket on the shock absorber and
torque to specification.
2.
Position the shock absorber and
upper mounting bracket in the spring
tower, making sure the shock absor-
ber lower studs are in the pivot plate
holes.
3.
Install the 2 washers and attach-
ing nuts on the shock absorber lower
studs and torque to specification.
4.
Install the 3 shock absorber
upper mounting bracket-to-spring
tower attaching nuts and torque to
specification. Then, remove the safety
stands and lower the vehicle.
LINCOLN CONTINENTAL
Removal
1.
Remove the stud nut at the
upper eye of the shock absorber. Re-
move the upper eye stud bracket to
crossmember attaching bolt and re-
move the stud bracket. Refer to Fig.
22.
2.
Remove the bolts which attach
the shock absorber to the suspension
lower arm. Lower, and remove the
shock absorber.
3.
Examine the shock absorber unit
and rubber bushings. Replace parts
that are defective, deteriorated, or
worn.
Installation
1. Fully extend the shock absorber
and position it inside the coil spring.
Connect the lower end of the shock
absorber to the suspension lower arm.
Torque the attaching nuts to specifica-
tion.
2.
Insert the upper bracket stud
through the bushing in the shock ab-
sorber upper eye. Install the stud
bracket to crossmember attaching
bolt. Do not tighten the bolt: at this
time.
3.
Install the upper eye bracket
stud nut. Torque the nut to specifica-
tion.
4.
Torque the stud bracket- to-
crossmember attaching bolt to specifi-
cation.
The
shock absorber upper
eye
stud
nut
must
be
tightened
to com-
press
the
rubber bushing before
the
stud bracket
is
bolted
to the
crossmember;
otherwise,
the
upper
at-
tachment could
be
loose
and
noisy.
REAR SHOCK ABSORBER
REPLACEMENT
FORD, MERCURY,
METEOR, THUNDERBIRD,
CONTINENTAL MARK 1(11
1.
Raise the vehicle on a hoist.
2.
Remove the shock absorber at-
taching nut, washer and insulator
from the upper stud at the upper side
of the spring upper seat. Compress the
shock absorber to clear the hole in the
spring seat, and remove the inner in-
sulator and washer from the upper at-
taching stud.
3.
Remove the self-locking attach-
ing nut, and disconnect the shock ab-
sorber lower stud from the mounting
bracket on the rear axle housing (Fig.
4).
4.
Expel all air by performing step
3 On Vehicle Tests in Part 3-1.
5.
Place the inner washer and insu-
lator on the upper attaching stud, and
position the shock absorber so that
the upper attaching stud enters the
hole in the spring upper seat. While
holding the shock absorber in this po-
sition, install the outer insulator andprocarmanuals.com
Page 100 of 413
03-02-24
Suspension
03-02-24
LOCK NUT
INSULATOR
NG
NUT
MOUNTING STUD
WASHER
LOCK WASHER
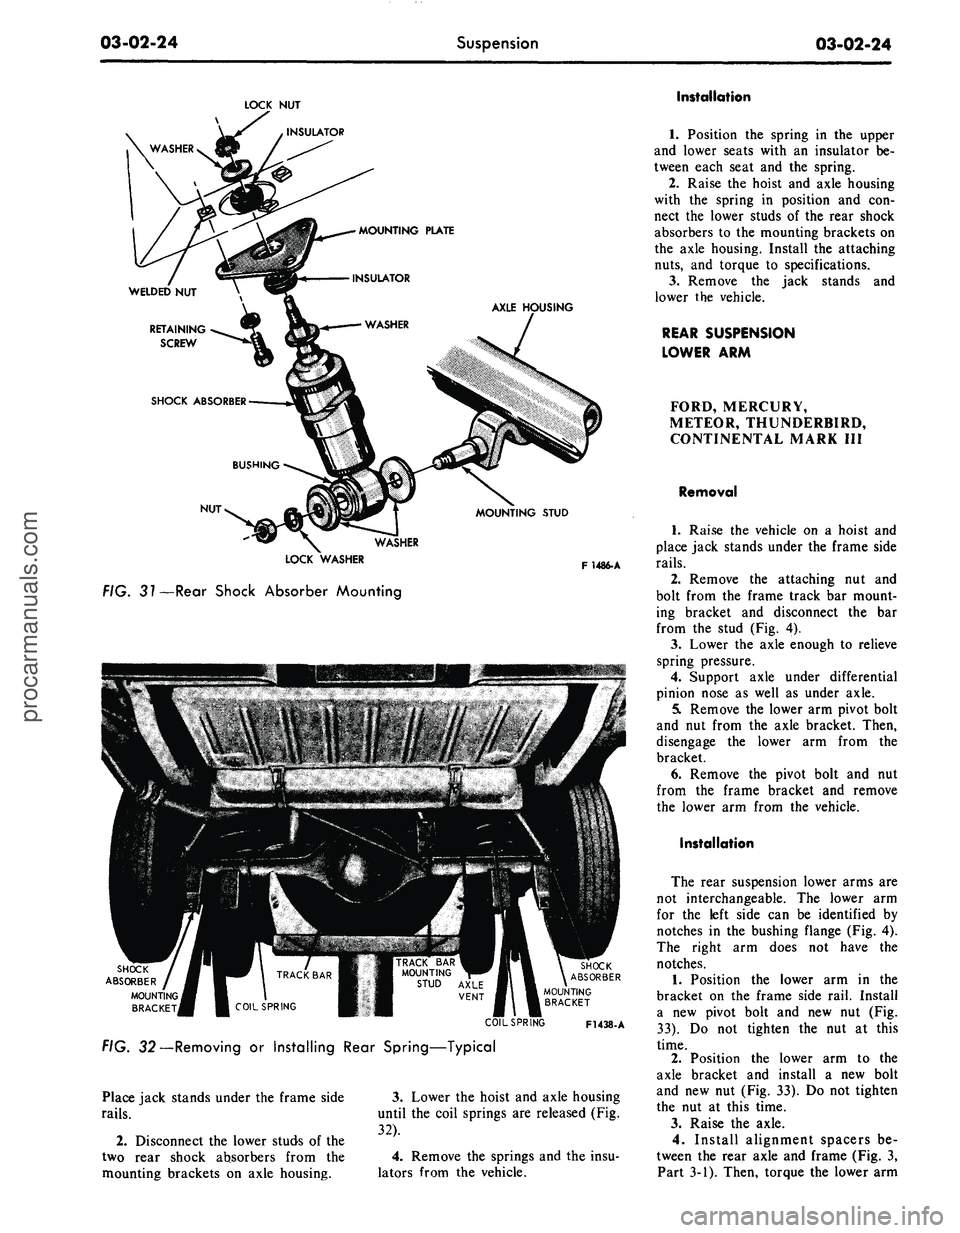
FIG. 31—Rear Shock Absorber Mounting
F1486-A
TRACK BAR
MOUNTING
STUD AXLE
VENT
SHOCK
ABSORBER
MOUNTING
BRACKET
SHOCK
ABSORBER
MOUNTING
BRACKET
V-V.
FIG. 32—Removing or Installing Rear Spring—Typical
COIL SPRING
F1438-A
Place jack stands under the frame side
rails.
2.
Disconnect the lower studs of the
two rear shock absorbers from the
mounting brackets on axle housing.
3.
Lower the hoist and axle housing
until the coil springs are released (Fig.
32).
4.
Remove the springs and the insu-
lators from the vehicle.
Installation
1.
Position the spring in the upper
and lower seats with an insulator be-
tween each seat and the spring.
2.
Raise the hoist and axle housing
with the spring in position and con-
nect the lower studs of the rear shock
absorbers to the mounting brackets on
the axle housing. Install the attaching
nuts,
and torque to specifications.
3.
Remove the jack stands and
lower the vehicle.
REAR SUSPENSION
LOWER ARM
FORD, MERCURY,
METEOR, THUNDERBIRD,
CONTINENTAL MARK III
Removal
1.
Raise the vehicle on a hoist and
place jack stands under the frame side
rails.
2.
Remove the attaching nut and
bolt from the frame track bar mount-
ing bracket and disconnect the bar
from the stud (Fig. 4).
3.
Lower the axle enough to relieve
spring pressure.
4.
Support axle under differential
pinion nose as well as under axle.
5.
Remove the lower arm pivot bolt
and nut from the axle bracket. Then,
disengage the lower arm from the
bracket.
6. Remove the pivot bolt and nut
from the frame bracket and remove
the lower arm from the vehicle.
Installation
The rear suspension lower arms are
not interchangeable. The lower arm
for the left side can be identified by
notches in the bushing flange (Fig. 4).
The right arm does not have the
notches.
1.
Position the lower arm in the
bracket on the frame side rail. Install
a new pivot bolt and new nut (Fig.
33).
Do not tighten the nut at this
time.
2.
Position the lower arm to the
axle bracket and install a new bolt
and new nut (Fig. 33). Do not tighten
the nut at this time.
3.
Raise the axle.
4.
Install alignment spacers be-
tween the rear axle and frame (Fig. 3,
Part 3-1). Then, torque the lower armprocarmanuals.com