clock reset FORD MUSTANG 2021 Owners Manual
[x] Cancel search | Manufacturer: FORD, Model Year: 2021, Model line: MUSTANG, Model: FORD MUSTANG 2021Pages: 530, PDF Size: 10.22 MB
Page 264 of 530

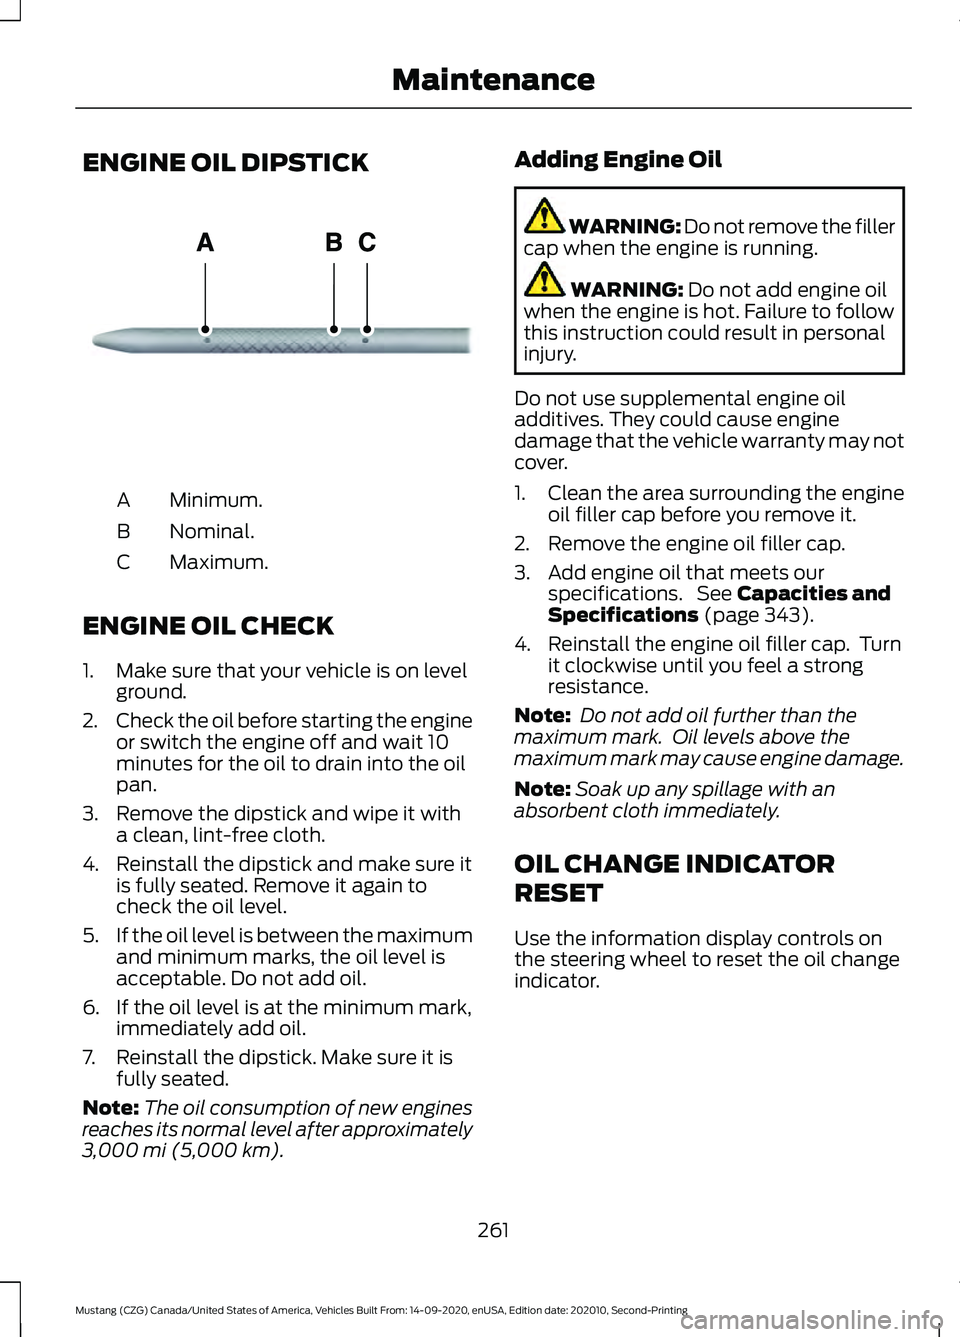
ENGINE OIL DIPSTICK
Minimum.
A
Nominal.
B
Maximum.
C
ENGINE OIL CHECK
1. Make sure that your vehicle is on level ground.
2. Check the oil before starting the engine
or switch the engine off and wait 10
minutes for the oil to drain into the oil
pan.
3. Remove the dipstick and wipe it with a clean, lint-free cloth.
4. Reinstall the dipstick and make sure it is fully seated. Remove it again to
check the oil level.
5. If the oil level is between the maximum
and minimum marks, the oil level is
acceptable. Do not add oil.
6. If the oil level is at the minimum mark, immediately add oil.
7. Reinstall the dipstick. Make sure it is fully seated.
Note: The oil consumption of new engines
reaches its normal level after approximately
3,000 mi (5,000 km). Adding Engine Oil WARNING: Do not remove the filler
cap when the engine is running. WARNING:
Do not add engine oil
when the engine is hot. Failure to follow
this instruction could result in personal
injury.
Do not use supplemental engine oil
additives. They could cause engine
damage that the vehicle warranty may not
cover.
1. Clean the area surrounding the engine oil filler cap before you remove it.
2. Remove the engine oil filler cap.
3. Add engine oil that meets our specifications. See
Capacities and
Specifications (page 343).
4. Reinstall the engine oil filler cap. Turn it clockwise until you feel a strong
resistance.
Note: Do not add oil further than the
maximum mark. Oil levels above the
maximum mark may cause engine damage.
Note: Soak up any spillage with an
absorbent cloth immediately.
OIL CHANGE INDICATOR
RESET
Use the information display controls on
the steering wheel to reset the oil change
indicator.
261
Mustang (CZG) Canada/United States of America, Vehicles Built From: 14-09-2020, enUSA, Edition date: 202010, Second-Printing MaintenanceE270482
Page 275 of 530

Note:
Prior to relearning the battery state
of charge, the battery management system
may temporarily disable some electrical
systems.
Electrical Accessory Installation
To make sure the battery management
system works correctly, do not connect an
electrical device ground connection
directly to the battery negative post. This
can cause inaccurate measurements of
the battery condition and potential
incorrect system operation.
Note: If you add electrical accessories or
components to the vehicle, it may adversely
affect battery performance and durability.
This may also affect the performance of
other electrical systems in the vehicle.
Remove and Reinstall the Battery
To disconnect or remove the battery, do
the following:
1. Apply the parking brake and switch the
ignition off.
2. Switch all electrical equipment off, for
example lights and radio.
3. Wait a minimum of two minutes before
disconnecting the battery.
Note: The engine management system has
a power hold function and remains powered
for a period of time after you switch the
ignition off. This is to allow diagnostic and
adaptive tables to be stored. Disconnecting
the battery without waiting can cause
damage not covered by the vehicle
Warranty.
4. Disconnect the negative battery cable terminal.
5. Disconnect the positive battery cable terminal.
6. Remove the battery securing clamp.
7. Remove the battery. 8. To install, reverse the removal
procedure.
Note: Before reconnecting the battery,
make sure the ignition remains switched off.
Note: Make sure the battery cable terminals
are fully tightened.
If you disconnect or replace the vehicle
battery, you must reset the following
features:
• Window bounce-back. See Power
Windows (page 86).
• Clock Settings.
• Pre-set radio stations.
Battery Disposal Make sure that you dispose of
old batteries in an
environmentally friendly way.
Seek advice from your local authority
about recycling old batteries.
ADJUSTING THE HEADLAMPS
Vertical Aim Adjustment
The headlamps on your vehicle are
properly aimed at the assembly plant. If
your vehicle has been in an accident, have
the alignment of your headlamps checked
by an authorized dealer.
272
Mustang (CZG) Canada/United States of America, Vehicles Built From: 14-09-2020, enUSA, Edition date: 202010, Second-Printing MaintenanceE107998
Page 426 of 530

Action and Description
Menu Item
Select to choose from a listing of
weather locations.
Area
Touch this button to view scores and schedules from a variety
of sports. You can also save up to 10 favorite teams for easier
access. The score automatically refreshes when a game is in
progress.
Sports Info
Touch this button to view ski conditions for a specific area.
Ski Conditions
SETTINGS Press the button to enter the
settings menu.
Once you select a tile, press the
button next to a menu item to
view an explanation of the
feature or setting.
Sound
Select this tile to adjust the sound settings.
Clock
Select this tile to adjust the clock settings.
Bluetooth®
Select this tile to switch Bluetooth® on
and off and adjust the settings.
Phone
Select this tile to connect, disconnect, and
manage the connected device settings.
Audio
Select this tile to adjust the audio settings. Driver Assist
(If Equipped)
Select this tile to adjust Driver Assist
features like Parking Aids, Lane Keeping
System, Pedestrian Detection, and
Auto-Start-Stop.
Vehicle
Select this tile to adjust vehicle settings
like windows, alarm, lighting, and MyKey
settings.
FordPass
Select this tile to adjust the FordPass
settings.
General
Select this tile to adjust settings like
language, measurement units, or to reset
the system.
911 Assist
(If Equipped)
Select this tile to switch 911 Assist on and
off.
Automatic Updates
Select this tile to adjust the automatic
update settings.
Mobile Apps
Select this tile to adjust permissions,
enable, disable, and update mobile apps.
423
Mustang (CZG) Canada/United States of America, Vehicles Built From: 14-09-2020, enUSA, Edition date: 202010, Second-Printing SYNC™ 3
(If Equipped)E280315 E268570