spare tire FORD SUPER DUTY 2014 3.G Owner's Manual
[x] Cancel search | Manufacturer: FORD, Model Year: 2014, Model line: SUPER DUTY, Model: FORD SUPER DUTY 2014 3.GPages: 458, PDF Size: 5.3 MB
Page 286 of 458
WARNINGS
Do not attempt to change a tire on
the side of the vehicle close to
moving traffic. Pull far enough off the
road to avoid the danger of being hit when
operating the jack or changing the wheel. Always use the jack provided as
original equipment with your vehicle.
If using a jack other than the one
provided as original equipment with your
vehicle, make sure the jack capacity is
adequate for the vehicle weight, including
any vehicle cargo or modifications. Note:
Passengers should not remain in the
vehicle when the vehicle is being jacked.
Park on a level surface, set the parking
brake and activate the hazard flashers. 1.
Turn the engine off and block the wheel
that is diagonally opposite of the flat
tire using the wheel chock. Note: Lock
the manual hub on the wheel if the
vehicle is a 4x4.
2. Remove the jack, jack handle, lug wrench and spare tire from the
stowage locations.
3. Use the tip of the lug wrench to remove
any wheel trim.
4. Loosen each wheel lug nut ½ turn counterclockwise, but do not remove
them until the wheel is raised off the
ground. F-250 and F-350 single rear wheel
vehicles
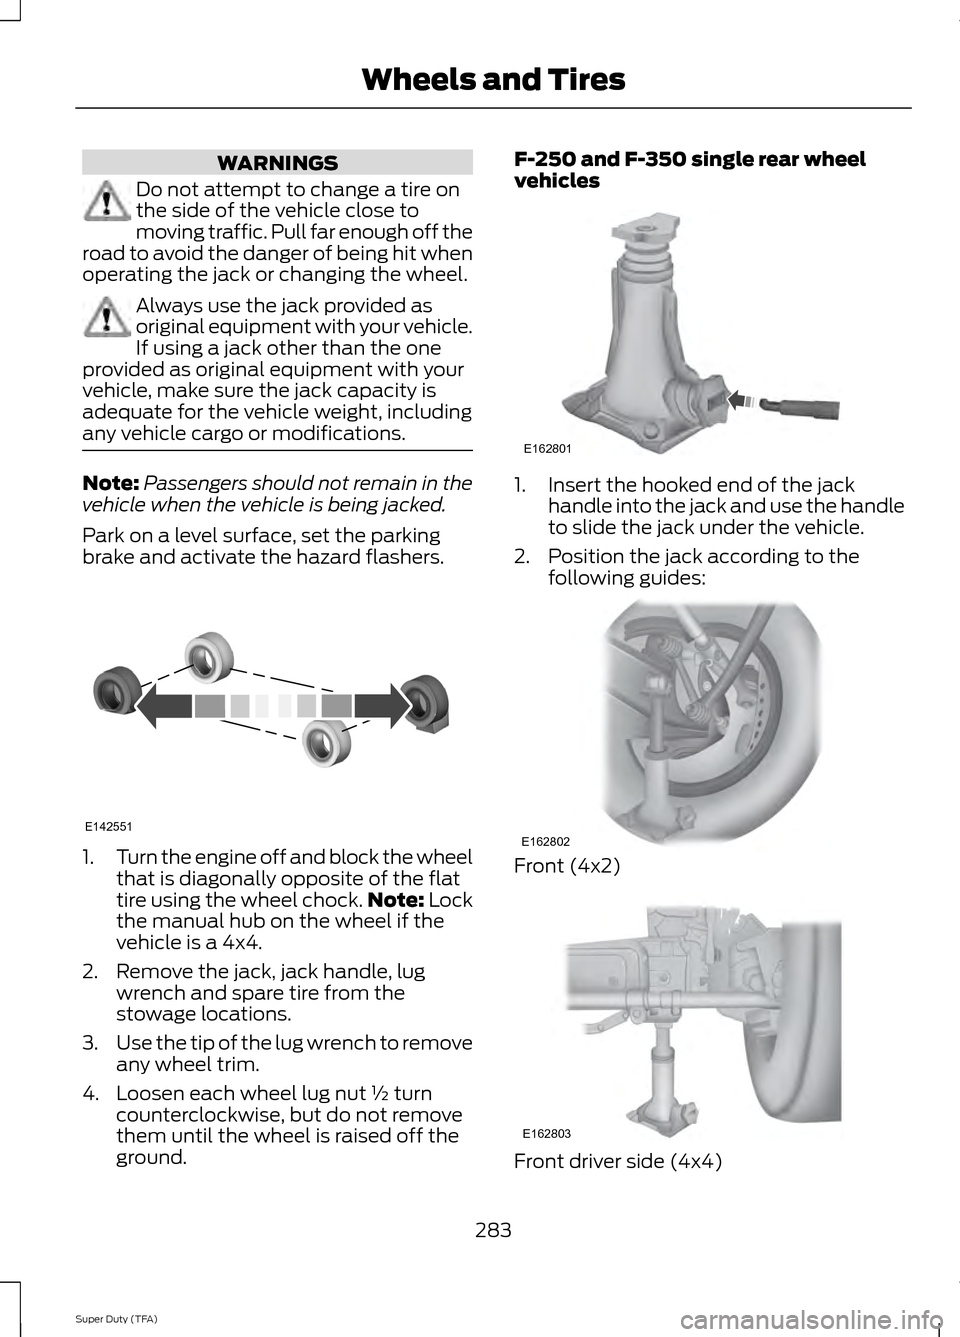
1. Insert the hooked end of the jack
handle into the jack and use the handle
to slide the jack under the vehicle.
2. Position the jack according to the following guides: Front (4x2)
Front driver side (4x4)
283
Super Duty (TFA) Wheels and TiresE142551 E162801 E162802 E162803
Page 287 of 458
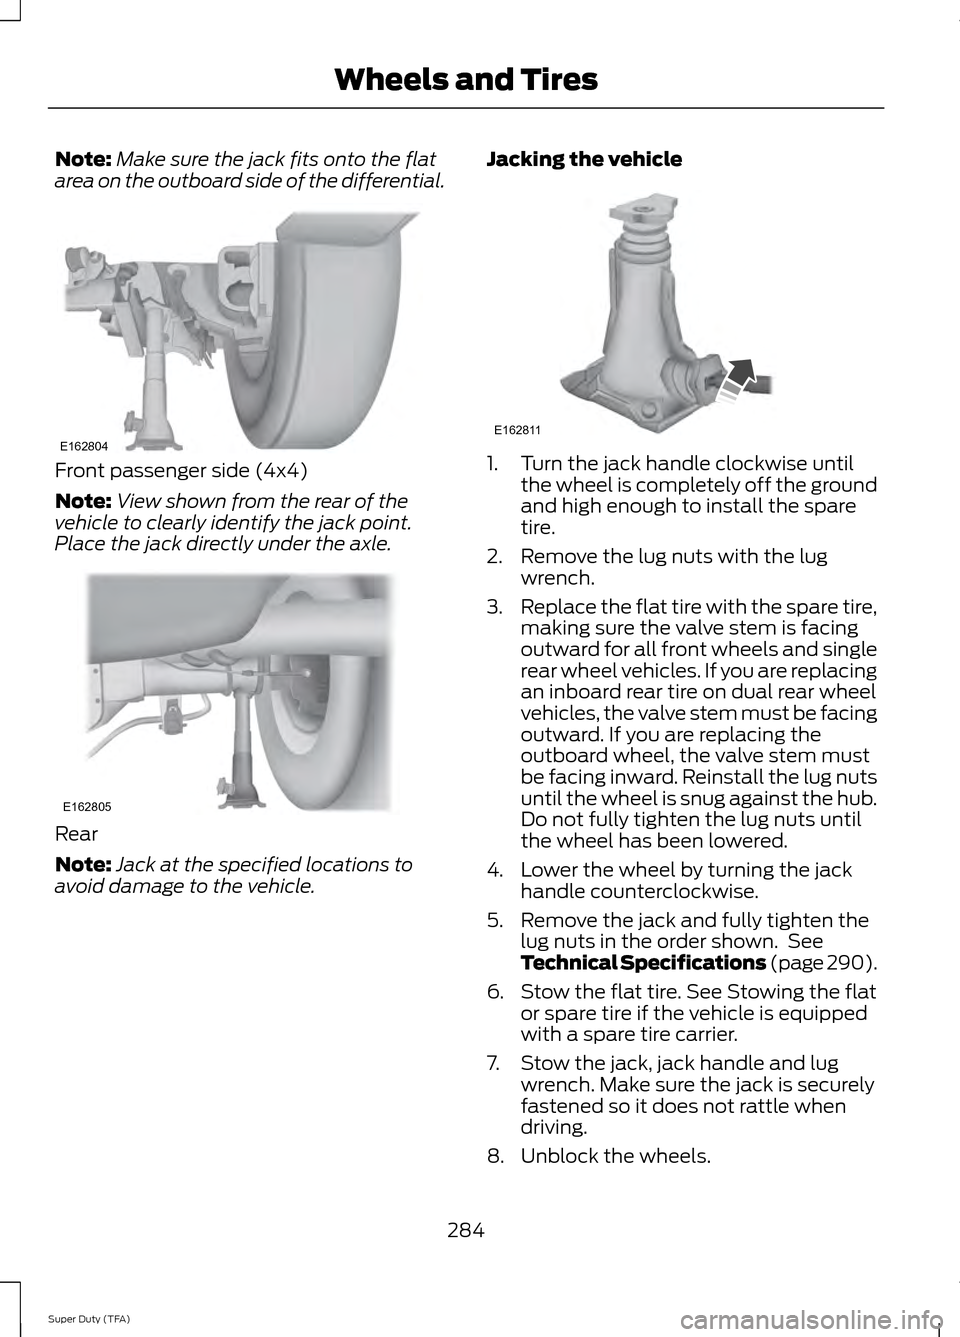
Note:
Make sure the jack fits onto the flat
area on the outboard side of the differential. Front passenger side (4x4)
Note:
View shown from the rear of the
vehicle to clearly identify the jack point.
Place the jack directly under the axle. Rear
Note:
Jack at the specified locations to
avoid damage to the vehicle. Jacking the vehicle 1. Turn the jack handle clockwise until
the wheel is completely off the ground
and high enough to install the spare
tire.
2. Remove the lug nuts with the lug wrench.
3. Replace the flat tire with the spare tire,
making sure the valve stem is facing
outward for all front wheels and single
rear wheel vehicles. If you are replacing
an inboard rear tire on dual rear wheel
vehicles, the valve stem must be facing
outward. If you are replacing the
outboard wheel, the valve stem must
be facing inward. Reinstall the lug nuts
until the wheel is snug against the hub.
Do not fully tighten the lug nuts until
the wheel has been lowered.
4. Lower the wheel by turning the jack handle counterclockwise.
5. Remove the jack and fully tighten the lug nuts in the order shown. See
Technical Specifications (page 290).
6. Stow the flat tire. See Stowing the flat or spare tire if the vehicle is equipped
with a spare tire carrier.
7. Stow the jack, jack handle and lug wrench. Make sure the jack is securely
fastened so it does not rattle when
driving.
8. Unblock the wheels.
284
Super Duty (TFA) Wheels and TiresE162804 E162805 E162811
Page 290 of 458
Jacking the Vehicle
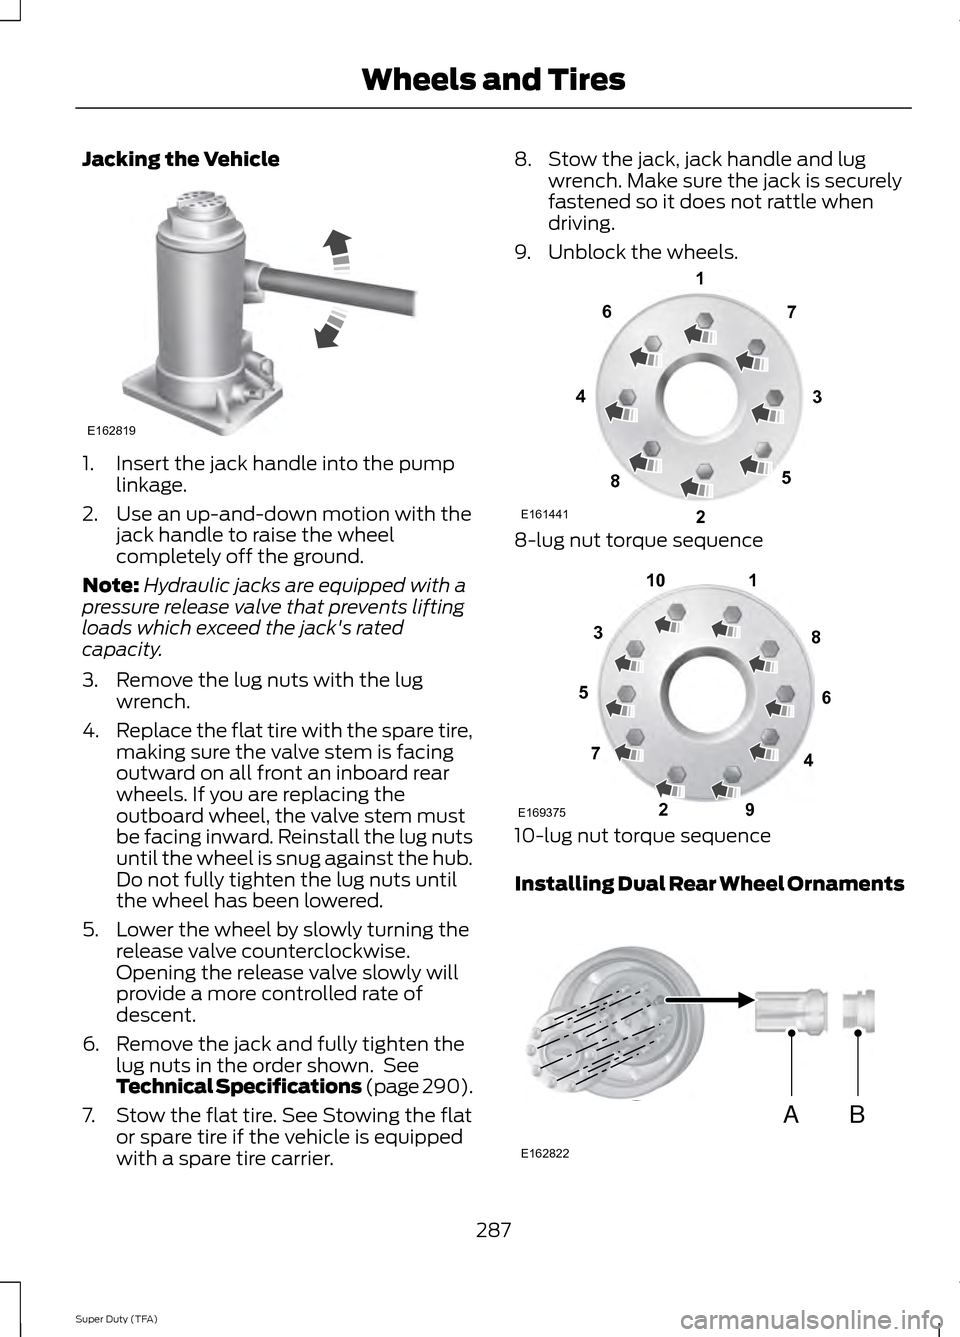
1. Insert the jack handle into the pump
linkage.
2. Use an up-and-down motion with the jack handle to raise the wheel
completely off the ground.
Note: Hydraulic jacks are equipped with a
pressure release valve that prevents lifting
loads which exceed the jack's rated
capacity.
3. Remove the lug nuts with the lug wrench.
4. Replace the flat tire with the spare tire,
making sure the valve stem is facing
outward on all front an inboard rear
wheels. If you are replacing the
outboard wheel, the valve stem must
be facing inward. Reinstall the lug nuts
until the wheel is snug against the hub.
Do not fully tighten the lug nuts until
the wheel has been lowered.
5. Lower the wheel by slowly turning the release valve counterclockwise.
Opening the release valve slowly will
provide a more controlled rate of
descent.
6. Remove the jack and fully tighten the lug nuts in the order shown. See
Technical Specifications (page 290).
7. Stow the flat tire. See Stowing the flat or spare tire if the vehicle is equipped
with a spare tire carrier. 8. Stow the jack, jack handle and lug
wrench. Make sure the jack is securely
fastened so it does not rattle when
driving.
9. Unblock the wheels. 8-lug nut torque sequence
10-lug nut torque sequence
Installing Dual Rear Wheel Ornaments
287
Super Duty (TFA) Wheels and TiresE162819 E161441
13
4
27
6
5
8 1
2
3
4
5
6
7 8
9
10
E169375 AB
E162822
Page 291 of 458
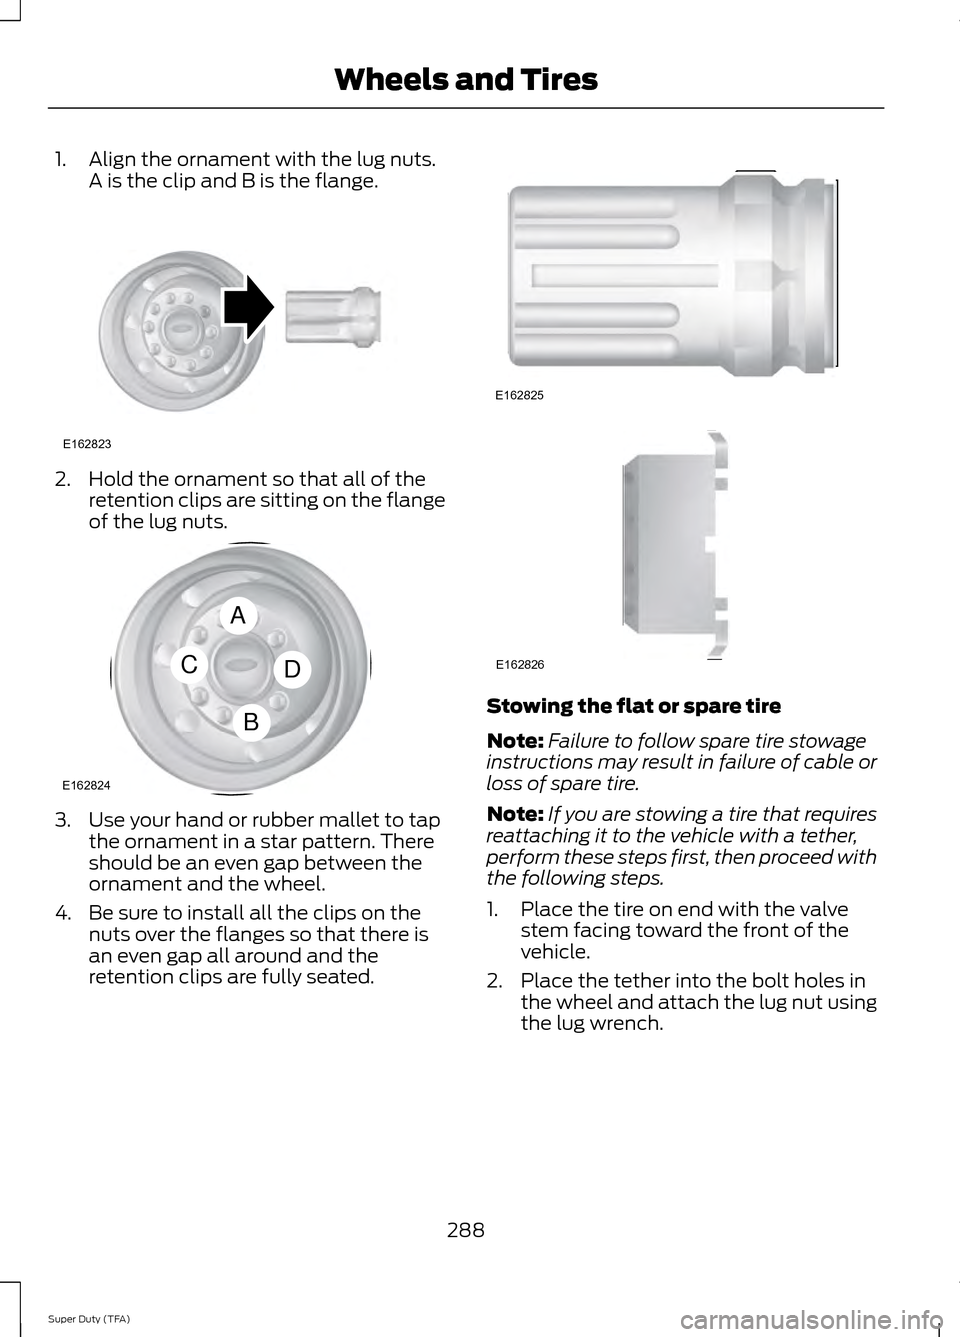
1. Align the ornament with the lug nuts.
A is the clip and B is the flange. 2. Hold the ornament so that all of the
retention clips are sitting on the flange
of the lug nuts. 3. Use your hand or rubber mallet to tap
the ornament in a star pattern. There
should be an even gap between the
ornament and the wheel.
4. Be sure to install all the clips on the nuts over the flanges so that there is
an even gap all around and the
retention clips are fully seated. Stowing the flat or spare tire
Note:
Failure to follow spare tire stowage
instructions may result in failure of cable or
loss of spare tire.
Note: If you are stowing a tire that requires
reattaching it to the vehicle with a tether,
perform these steps first, then proceed with
the following steps.
1. Place the tire on end with the valve stem facing toward the front of the
vehicle.
2. Place the tether into the bolt holes in the wheel and attach the lug nut using
the lug wrench.
288
Super Duty (TFA) Wheels and TiresE162823 A
C
B
D
E162824 E162825 E162826
Page 292 of 458
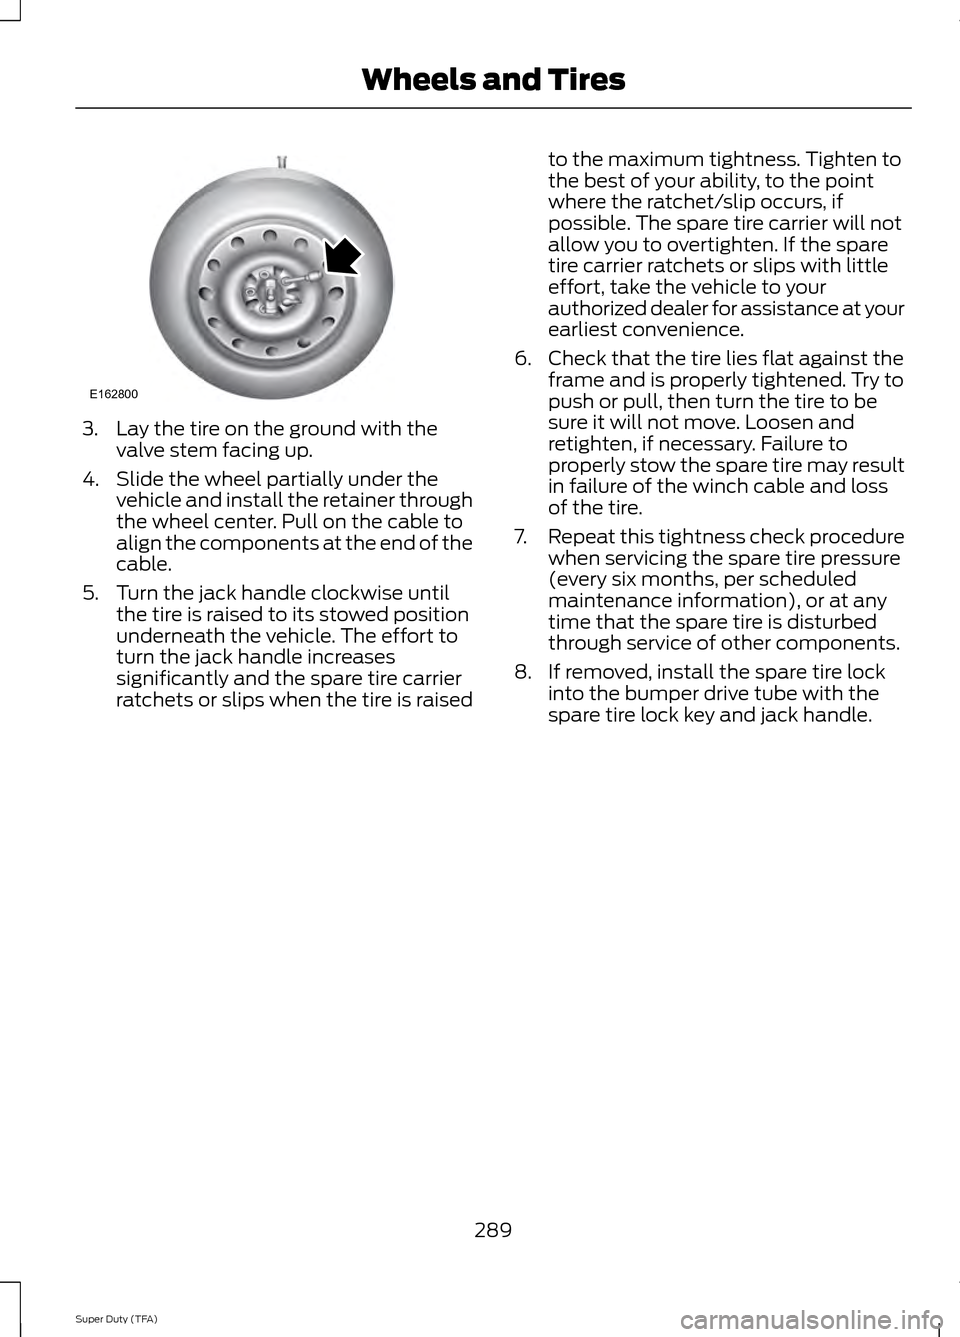
3. Lay the tire on the ground with the
valve stem facing up.
4. Slide the wheel partially under the vehicle and install the retainer through
the wheel center. Pull on the cable to
align the components at the end of the
cable.
5. Turn the jack handle clockwise until the tire is raised to its stowed position
underneath the vehicle. The effort to
turn the jack handle increases
significantly and the spare tire carrier
ratchets or slips when the tire is raised to the maximum tightness. Tighten to
the best of your ability, to the point
where the ratchet/slip occurs, if
possible. The spare tire carrier will not
allow you to overtighten. If the spare
tire carrier ratchets or slips with little
effort, take the vehicle to your
authorized dealer for assistance at your
earliest convenience.
6. Check that the tire lies flat against the frame and is properly tightened. Try to
push or pull, then turn the tire to be
sure it will not move. Loosen and
retighten, if necessary. Failure to
properly stow the spare tire may result
in failure of the winch cable and loss
of the tire.
7. Repeat this tightness check procedure
when servicing the spare tire pressure
(every six months, per scheduled
maintenance information), or at any
time that the spare tire is disturbed
through service of other components.
8. If removed, install the spare tire lock into the bumper drive tube with the
spare tire lock key and jack handle.
289
Super Duty (TFA) Wheels and TiresE162800
Page 432 of 458
Ford Motor Company has recommended
maintenance intervals for various parts
and component systems based upon
engineering testing. Ford Motor Company
relies upon this testing to determine the
most appropriate mileage for replacement
of oils and fluids to protect your vehicle at
the lowest overall cost to you and
recommends against maintenance
schedules that deviate from the scheduled
maintenance information.
We strongly recommend the use of only
genuine Ford, Motorcraft or
Ford-authorized re-manufactured
replacement parts engineered for your
vehicle.
Additives and Chemicals
This owner's manual and the Ford
Workshop Manual list the recommended
additives and chemicals for your vehicle.
We do not recommend using chemicals or
additives not approved by us as part of
your vehicle
’s normal maintenance. Please
consult your warranty information. Oils, Fluids and Flushing
In many cases, fluid discoloration is a
normal operating characteristic and, by
itself, does not necessarily indicate a
concern or that the fluid needs to be
changed. However, a qualified expert, such
as the factory-trained technicians at your
dealership, should inspect discolored fluids
that also show signs of overheating or
foreign material contamination
immediately.
Make sure to change your vehicle
’s oils and
fluids at the specified intervals or in
conjunction with a repair. Flushing is a
viable way to change fluid for many vehicle
sub-systems during scheduled
maintenance. It is critical that systems are
flushed only with new fluid that is the same
as that required to fill and operate the
system or using a Ford-approved flushing
chemical.
Owner Checks and Services
Make sure you perform the following basic
maintenance checks and inspections every
month or at six-month intervals. Check every month
Engine oil level.
Function of all interior and exterior lights.
Tires (including spare) for wear and proper pressure. Windshield washer fluid level. Check every six months
Battery connections. Clean if necessary.
Body and door drain holes for obstructions. Clean if necessary. Cooling system fluid level and coolant strength.
Door weatherstrips for wear. Lubricate if necessary.
429
Super Duty (TFA) Scheduled Maintenance
Page 433 of 458
Check every six months
Hinges, latches and outside locks for proper operation. Lubricate if necessary. Parking brake for proper operation.
Safety belts and seat latches for wear and function.
Safety warning lamps (brake, ABS, airbag and safety belt) for operation.
Washer spray and wiper operation. Clean or replace blades as necessary.
Multi-point Inspection
In order to keep your vehicle running right,
it is important to have the systems on your
vehicle checked regularly. This can help
identify potential issues and prevent major
problems. We recommend having the
following multi-point inspection performed
at every scheduled maintenance interval
to help make sure your vehicle keeps
running great. Multi-point inspection
Horn operation
Accessory drive belt(s)
Radiator, cooler, heater and A/C hoses
Battery performance
Suspension component for leaks ordamage
Engine air filter
Steering and linkage
Exhaust system
Tires (including spare) for wear and properpressure**
Exterior lamps and hazard warning system
operation
Windshield for cracks, chips or pits
Fluid levels *
; fill if necessary
Washer spray and wiper operation
For oil and fluid leaks
* Brake, coolant recovery reservoir, automatic transmission, power steering and window
washer.
** If your vehicle is equipped with a temporary mobility kit, check the tire sealant expiration
Use By date on the canister. Replace as needed.
430
Super Duty (TFA) Scheduled Maintenance
Page 449 of 458
Car Wash
See: Cleaning the Exterior.............................. 246
Center Console..............................................128
Removable Front Cupholders........................ 128
Changing a Bulb
..........................................240
Lamp Assembly Condensation................... 240
Replacing Brake/Tail/Turn/Reverse Lamp Bulbs................................................................... 241
Replacing Cargo Lamp and High-mount Brake Lamp Bulbs......................................... 241
Replacing Fog Lamp Bulbs (If Equipped........................................................... 241
Replacing Front Clearance and Identification Lamp Bulbs (If
Equipped)....................................................... 240
Replacing the License Plate Lamp Bulb.................................................................... 242
Changing a Fuse
............................................213
Fuses........................................................................\
213
Changing a Road Wheel
............................279
Dissimilar Spare Wheel and Tire Assembly
Information...................................................... 279
Location of the Spare Tire and Tools........280
Removing the Spare Tire (With Spare Tire Carrier Only).................................................... 281
Tire Change Procedure.................................... 282
Changing the 12V Battery.........................234 Battery Management System (If
Equipped)........................................................ 235
Changing the Engine Air Filter................244
Changing the Wiper Blades.....................236
Checking MyKey System Status................51
Checking the Wiper Blades
.....................236
Child Restraint and Safety Belt Maintenance.................................................34
Child Safety.......................................................14 General Information............................................. 14
Child Safety Locks.........................................26
Child Seat Positioning..................................25
Cleaning Leather Seats
.............................250
Cleaning Products.......................................246
Cleaning the Alloy Wheels
........................251
Cleaning the Engine....................................247
Cleaning the Exhaust.................................248 Cleaning the Exterior..................................246
Cleaning Plastic Exterior Parts...................... 247
Exterior Chrome................................................. 246
Stripes or Graphics (if equipped)................246
Underbody............................................................ 247
Cleaning the Instrument Panel and Instrument Cluster Lens........................249
Cleaning the Interior...................................249
Cleaning the Windows and Wiper Blades...........................................................248
Clearing All MyKeys
........................................51
Climate............................................................396 Climate Control Voice Commands.............397
Climate Control
.............................................102
Coolant Check See: Engine Coolant Check............................ 226
Crash Sensors and Airbag Indicator........43
Creating a MyKey
...........................................49
Programming/Changing Configurable
Settings............................................................... 50
Cruise Control.................................................60 Principle of Operation........................................ 172
Cruise control See: Using Cruise Control................................. 172
Customer Assistance
.................................207
D
Data Recording
..................................................9
Event Data Recording........................................... 9
Service Data Recording........................................ 9
Daytime Running Lamps.............................65
Digital Audio..................................................305 HD Radio Reception and Station
Troubleshooting........................................... 306
Direction Indicators
.......................................66
Lane Change.......................................................... 66
Driver and Passenger Airbags...................36 Children and Airbags............................................ 41
Passenger Airbag On and Off Switch ..........36
Proper Driver and Front Passenger Seating Adjustment....................................................... 40
Driving Aids
......................................................173
Driving Hints...................................................198
Driving Through Water
...............................199
DRL See: Daytime Running Lamps......................... 65
446
Super Duty (TFA) Index