FORD SUPER DUTY 2023 Owners Manual
Manufacturer: FORD, Model Year: 2023, Model line: SUPER DUTY, Model: FORD SUPER DUTY 2023Pages: 738, PDF Size: 18.49 MB
Page 441 of 738
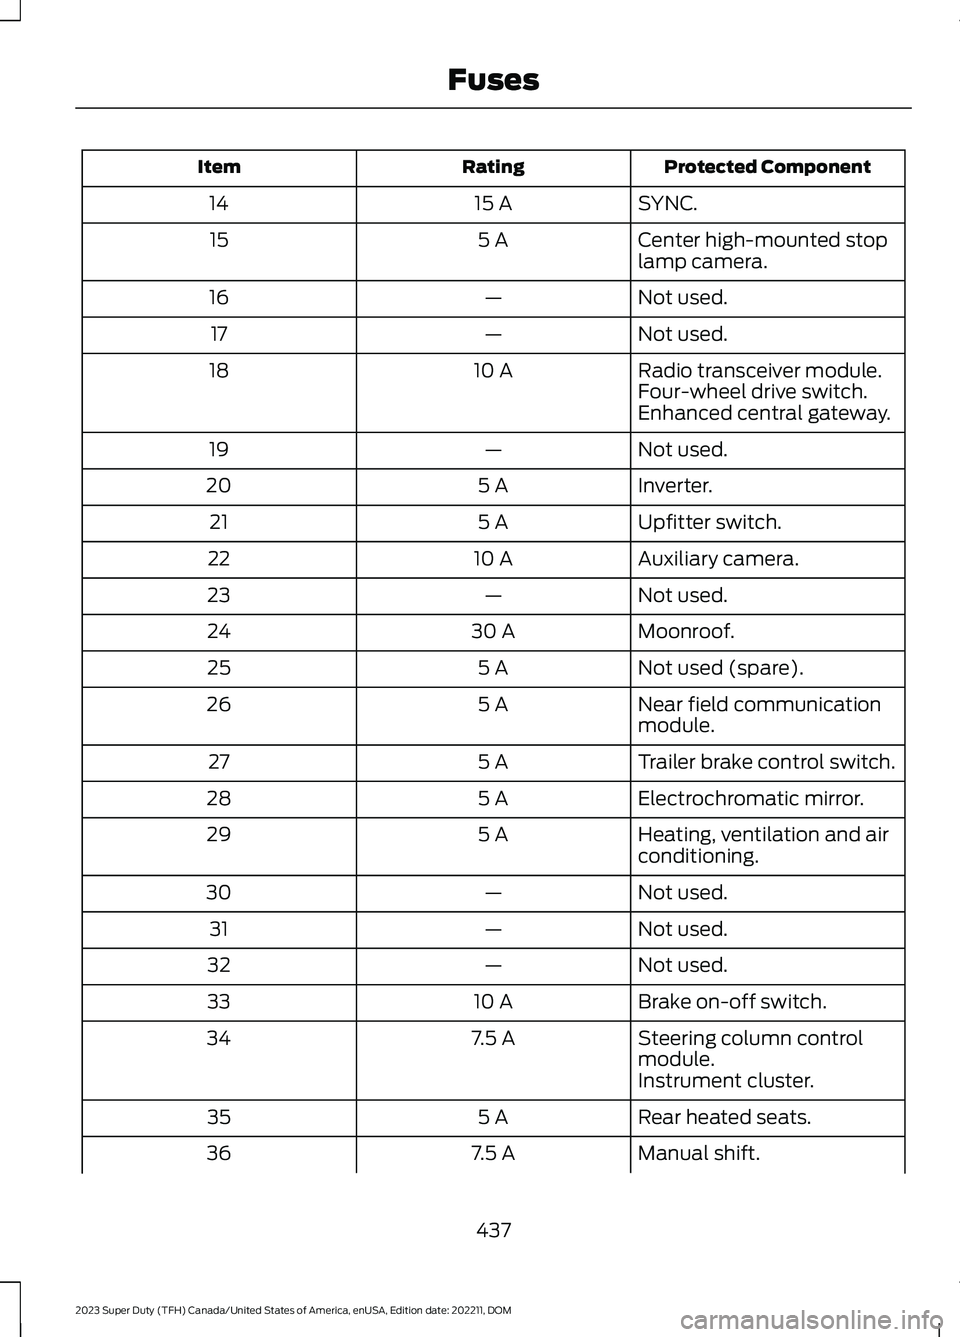
Protected ComponentRatingItem
SYNC.15 A14
Center high-mounted stoplamp camera.5 A15
Not used.—16
Not used.—17
Radio transceiver module.10 A18Four-wheel drive switch.Enhanced central gateway.
Not used.—19
Inverter.5 A20
Upfitter switch.5 A21
Auxiliary camera.10 A22
Not used.—23
Moonroof.30 A24
Not used (spare).5 A25
Near field communicationmodule.5 A26
Trailer brake control switch.5 A27
Electrochromatic mirror.5 A28
Heating, ventilation and airconditioning.5 A29
Not used.—30
Not used.—31
Not used.—32
Brake on-off switch.10 A33
Steering column controlmodule.7.5 A34
Instrument cluster.
Rear heated seats.5 A35
Manual shift.7.5 A36
437
2023 Super Duty (TFH) Canada/United States of America, enUSA, Edition date: 202211, DOMFuses
Page 442 of 738
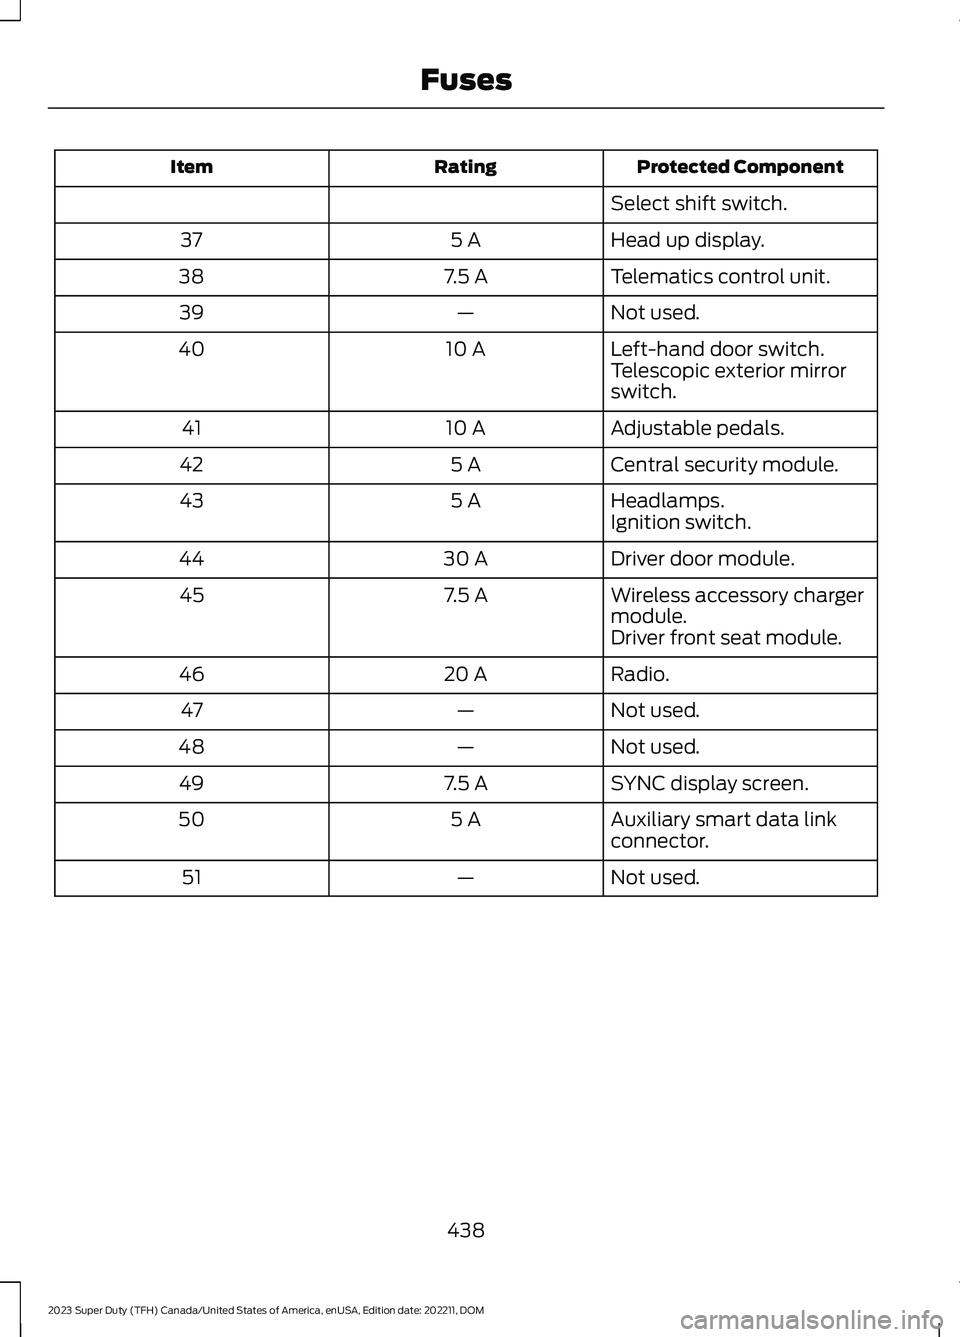
Protected ComponentRatingItem
Select shift switch.
Head up display.5 A37
Telematics control unit.7.5 A38
Not used.—39
Left-hand door switch.10 A40Telescopic exterior mirrorswitch.
Adjustable pedals.10 A41
Central security module.5 A42
Headlamps.5 A43Ignition switch.
Driver door module.30 A44
Wireless accessory chargermodule.7.5 A45
Driver front seat module.
Radio.20 A46
Not used.—47
Not used.—48
SYNC display screen.7.5 A49
Auxiliary smart data linkconnector.5 A50
Not used.—51
438
2023 Super Duty (TFH) Canada/United States of America, enUSA, Edition date: 202211, DOMFuses
Page 443 of 738
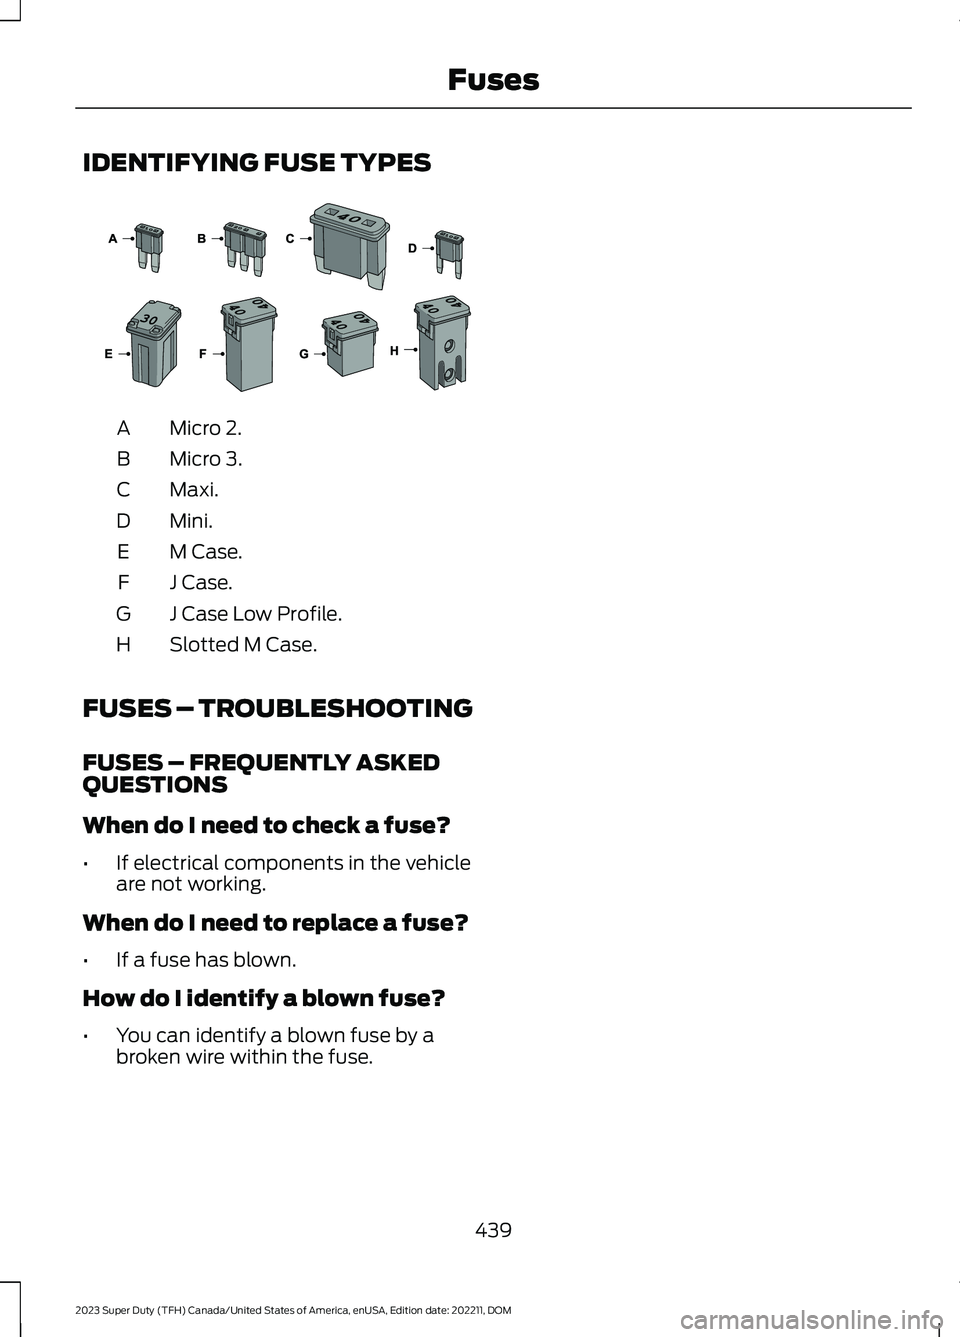
IDENTIFYING FUSE TYPES
Micro 2.A
Micro 3.B
Maxi.C
Mini.D
M Case.E
J Case.F
J Case Low Profile.G
Slotted M Case.H
FUSES – TROUBLESHOOTING
FUSES – FREQUENTLY ASKEDQUESTIONS
When do I need to check a fuse?
•If electrical components in the vehicleare not working.
When do I need to replace a fuse?
•If a fuse has blown.
How do I identify a blown fuse?
•You can identify a blown fuse by abroken wire within the fuse.
439
2023 Super Duty (TFH) Canada/United States of America, enUSA, Edition date: 202211, DOMFuses E267379
Page 444 of 738
MAINTENANCE PRECAUTIONS
Service your vehicle regularly to helpmaintain its roadworthiness and resalevalue. There is a large network ofauthorized dealers that are there to helpyou with their professional servicingexpertise. We believe that their speciallytrained technicians are best qualified toservice your vehicle properly and expertly.They are supported by a wide range ofhighly specialized tools developedspecifically for servicing your vehicle.
If your vehicle requires professional service,an authorized dealer can provide thenecessary parts and service. Check yourwarranty information to find out whichparts and services are covered.
Use only recommended fuels, lubricants,fluids and service parts conforming tospecifications. See Capacities andSpecifications (page 520).
•Do not work on a hot engine.
•Make sure that nothing gets caught inmoving parts.
•Do not work on a vehicle with theengine running in an enclosed space,unless you are sure you have enoughventilation.
•Keep all open flames and other burningmaterial, such as cigarettes, away fromthe battery and all fuel related parts.
•Set the parking brake, shift thetransmission to park (P) and block thewheels.
OPENING AND CLOSING THE
HOOD
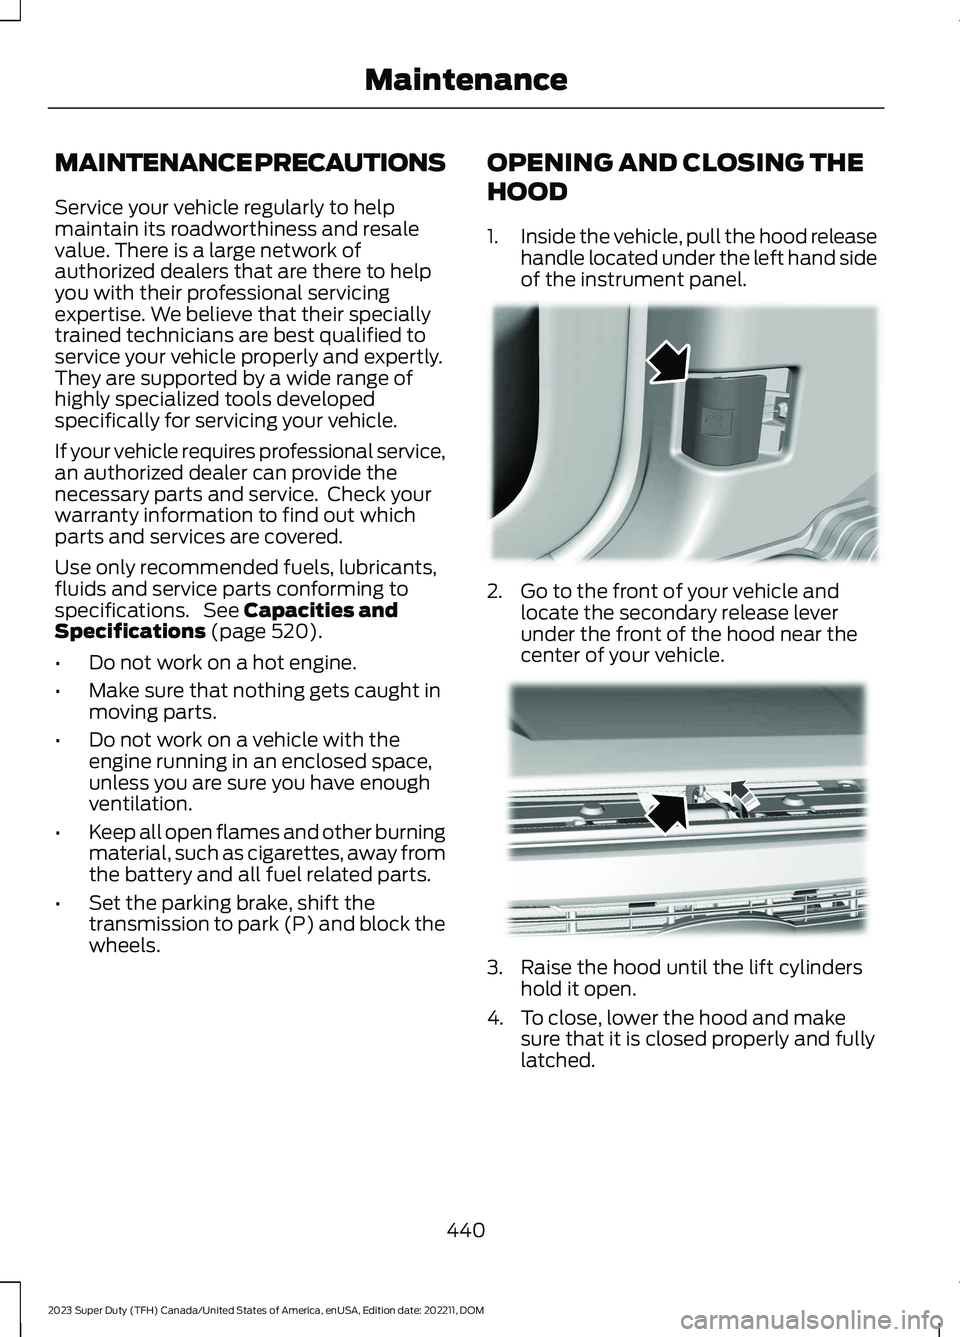
1.Inside the vehicle, pull the hood releasehandle located under the left hand sideof the instrument panel.
2.Go to the front of your vehicle andlocate the secondary release leverunder the front of the hood near thecenter of your vehicle.
3.Raise the hood until the lift cylindershold it open.
4.To close, lower the hood and makesure that it is closed properly and fullylatched.
440
2023 Super Duty (TFH) Canada/United States of America, enUSA, Edition date: 202211, DOMMaintenance E166491 E190266
Page 445 of 738
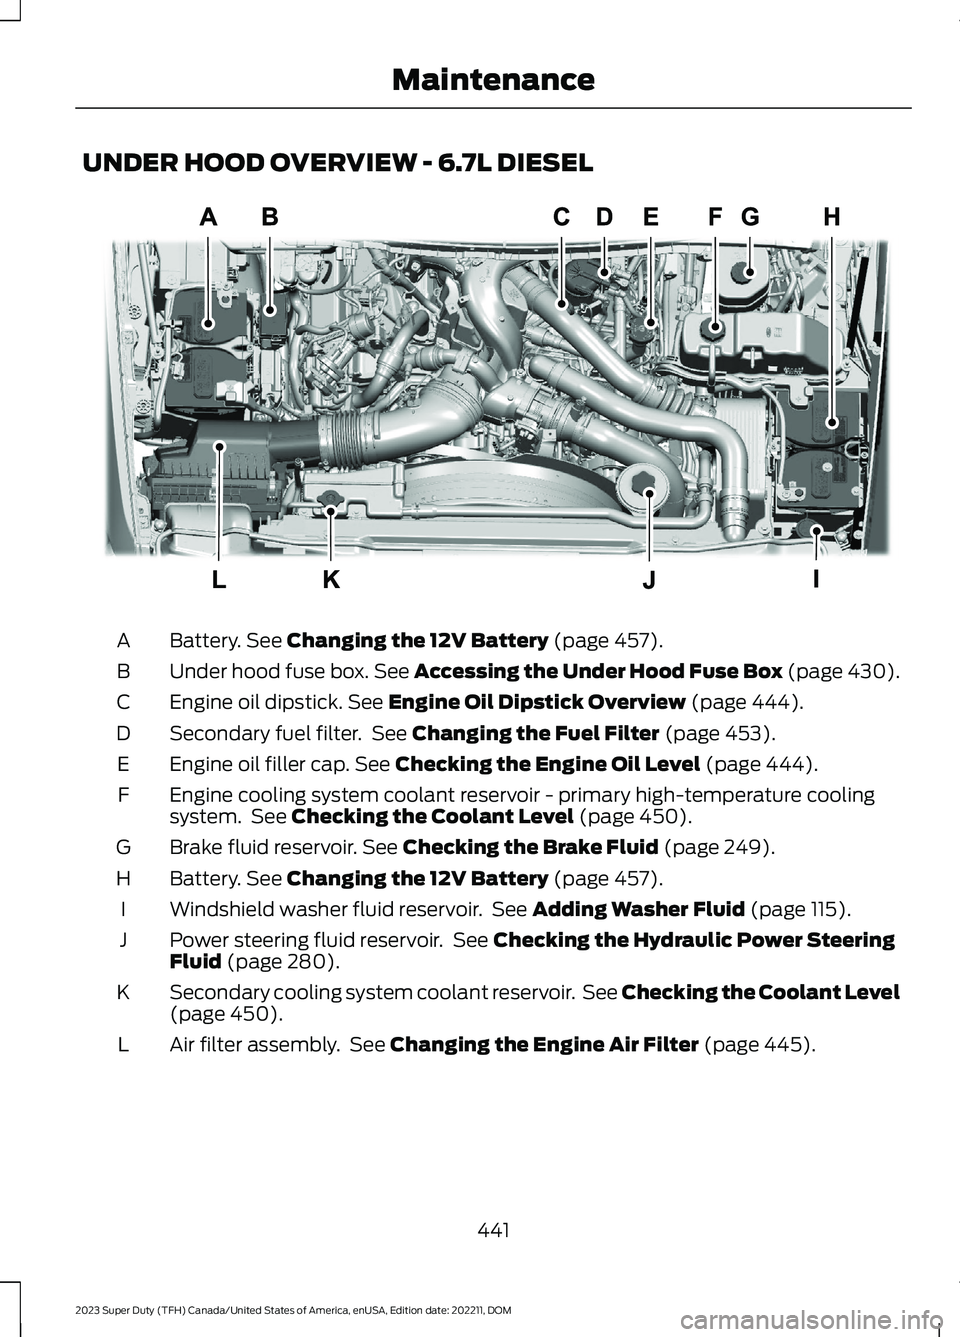
UNDER HOOD OVERVIEW - 6.7L DIESEL
Battery. See Changing the 12V Battery (page 457).A
Under hood fuse box. See Accessing the Under Hood Fuse Box (page 430).B
Engine oil dipstick. See Engine Oil Dipstick Overview (page 444).C
Secondary fuel filter. See Changing the Fuel Filter (page 453).D
Engine oil filler cap. See Checking the Engine Oil Level (page 444).E
Engine cooling system coolant reservoir - primary high-temperature coolingsystem. See Checking the Coolant Level (page 450).F
Brake fluid reservoir. See Checking the Brake Fluid (page 249).G
Battery. See Changing the 12V Battery (page 457).H
Windshield washer fluid reservoir. See Adding Washer Fluid (page 115).I
Power steering fluid reservoir. See Checking the Hydraulic Power SteeringFluid (page 280).J
Secondary cooling system coolant reservoir. See Checking the Coolant Level(page 450).K
Air filter assembly. See Changing the Engine Air Filter (page 445).L
441
2023 Super Duty (TFH) Canada/United States of America, enUSA, Edition date: 202211, DOMMaintenanceE350655
Page 446 of 738
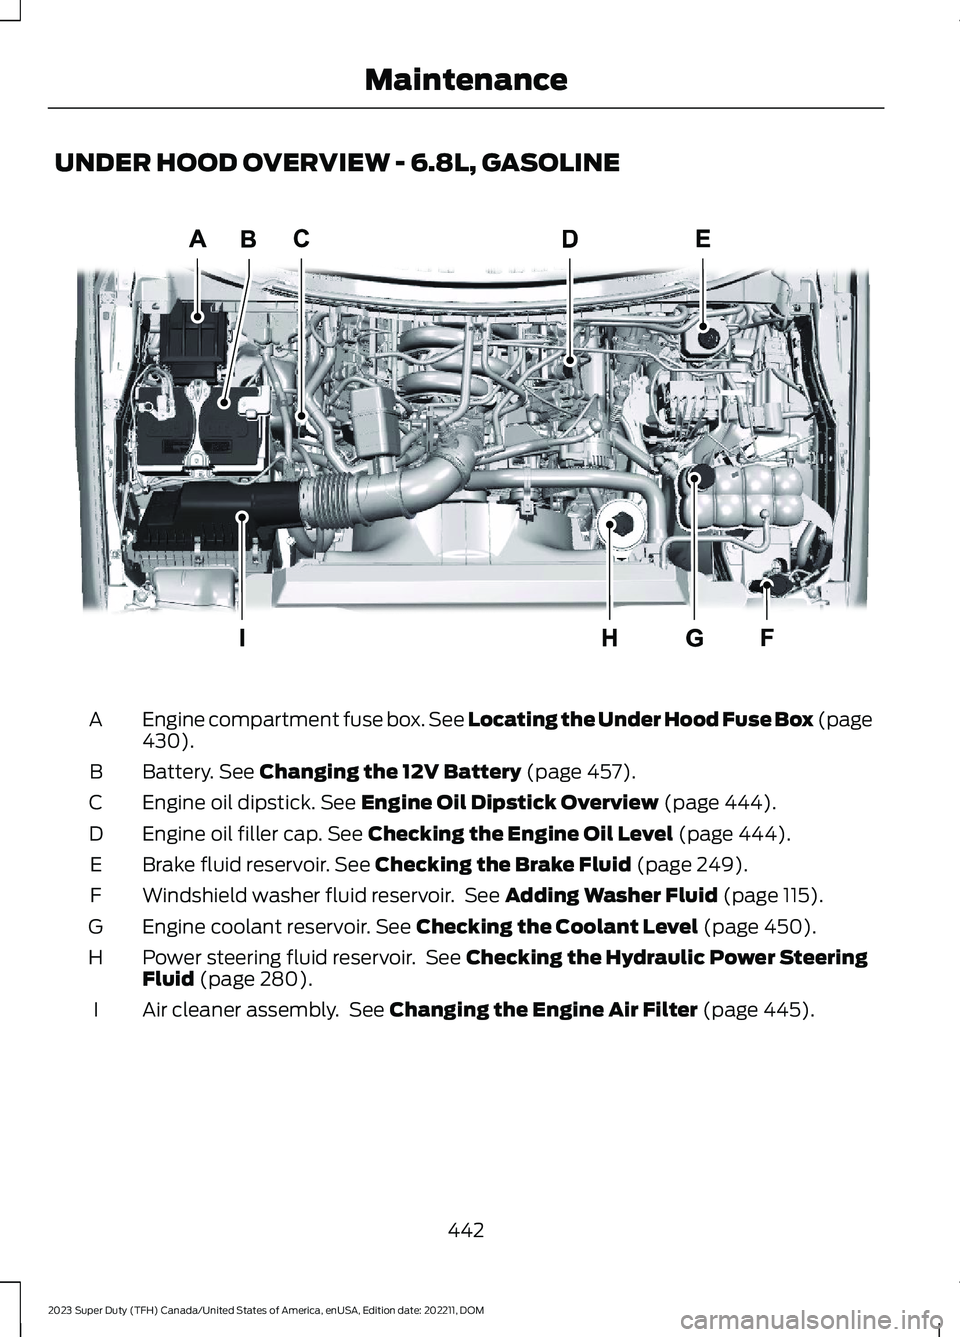
UNDER HOOD OVERVIEW - 6.8L, GASOLINE
Engine compartment fuse box. See Locating the Under Hood Fuse Box (page430).A
Battery. See Changing the 12V Battery (page 457).B
Engine oil dipstick. See Engine Oil Dipstick Overview (page 444).C
Engine oil filler cap. See Checking the Engine Oil Level (page 444).D
Brake fluid reservoir. See Checking the Brake Fluid (page 249).E
Windshield washer fluid reservoir. See Adding Washer Fluid (page 115).F
Engine coolant reservoir. See Checking the Coolant Level (page 450).G
Power steering fluid reservoir. See Checking the Hydraulic Power SteeringFluid (page 280).H
Air cleaner assembly. See Changing the Engine Air Filter (page 445).I
442
2023 Super Duty (TFH) Canada/United States of America, enUSA, Edition date: 202211, DOMMaintenanceE398419
Page 447 of 738
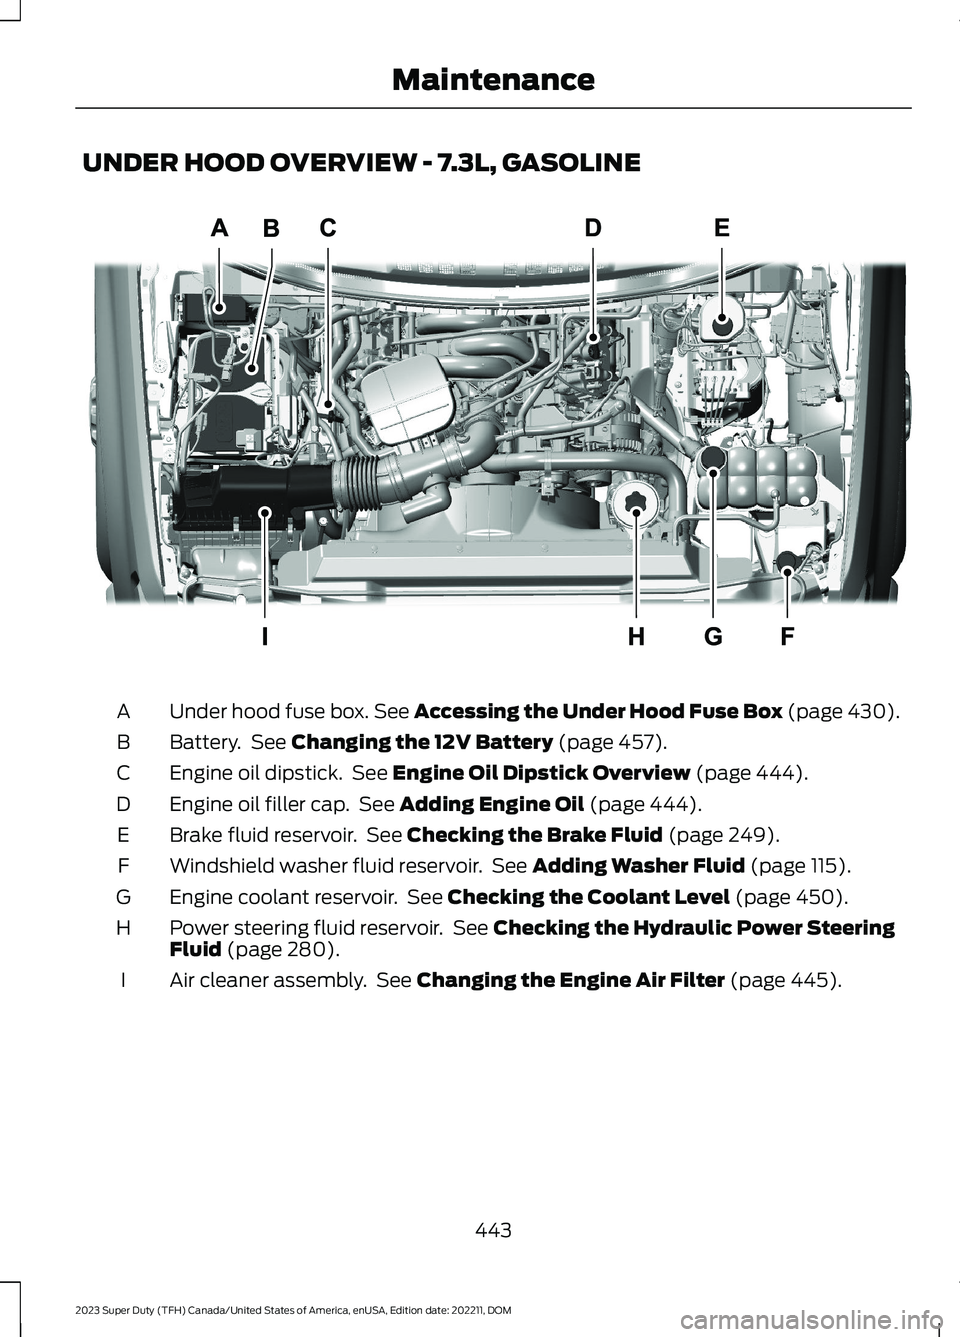
UNDER HOOD OVERVIEW - 7.3L, GASOLINE
Under hood fuse box. See Accessing the Under Hood Fuse Box (page 430).A
Battery. See Changing the 12V Battery (page 457).B
Engine oil dipstick. See Engine Oil Dipstick Overview (page 444).C
Engine oil filler cap. See Adding Engine Oil (page 444).D
Brake fluid reservoir. See Checking the Brake Fluid (page 249).E
Windshield washer fluid reservoir. See Adding Washer Fluid (page 115).F
Engine coolant reservoir. See Checking the Coolant Level (page 450).G
Power steering fluid reservoir. See Checking the Hydraulic Power SteeringFluid (page 280).H
Air cleaner assembly. See Changing the Engine Air Filter (page 445).I
443
2023 Super Duty (TFH) Canada/United States of America, enUSA, Edition date: 202211, DOMMaintenanceE351057
Page 448 of 738
ENGINE OIL
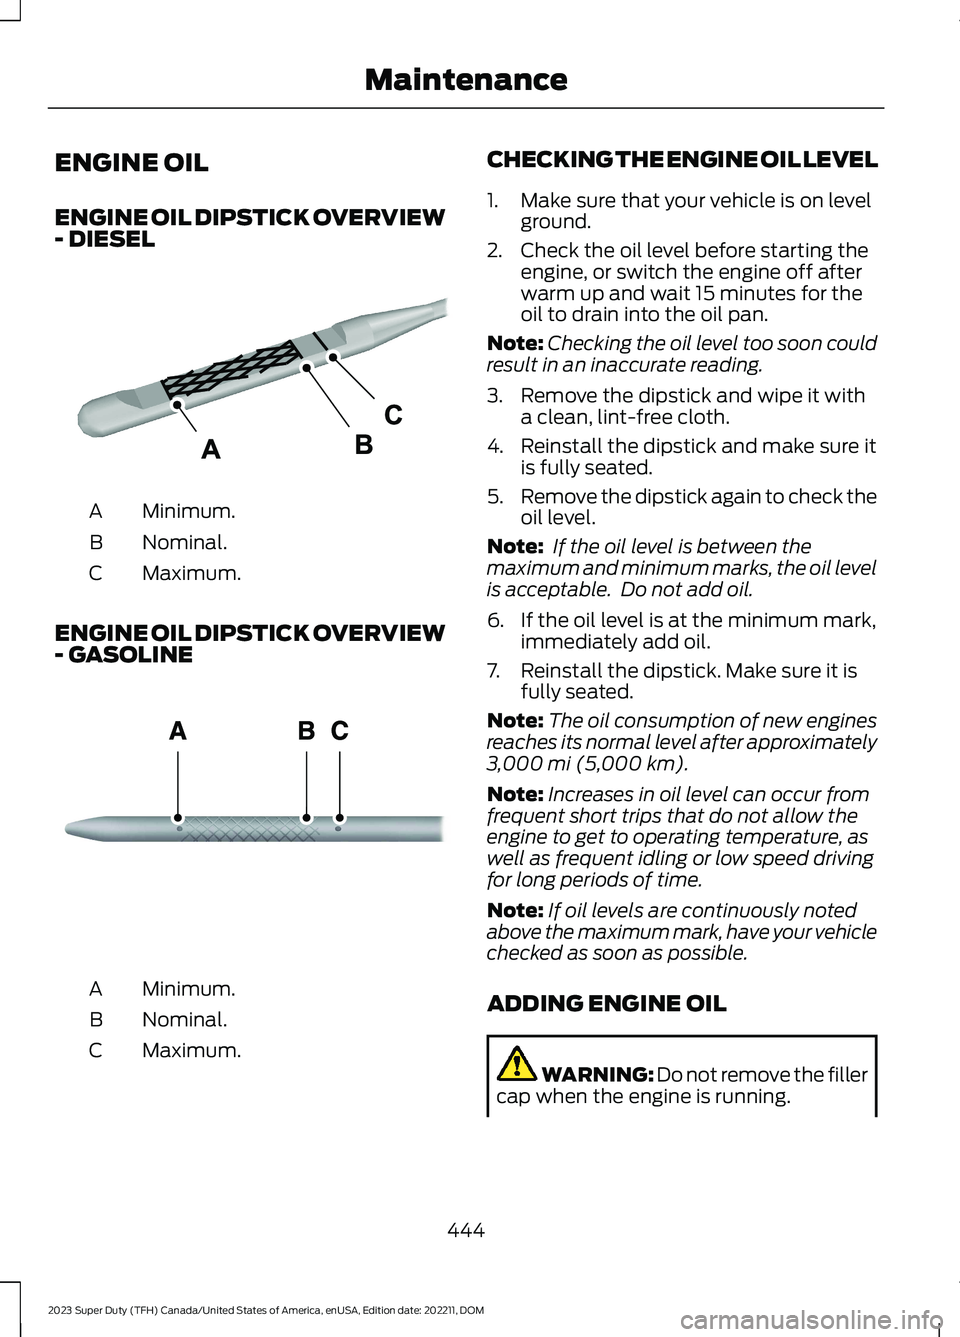
ENGINE OIL DIPSTICK OVERVIEW- DIESEL
Minimum.A
Nominal.B
Maximum.C
ENGINE OIL DIPSTICK OVERVIEW- GASOLINE
Minimum.A
Nominal.B
Maximum.C
CHECKING THE ENGINE OIL LEVEL
1.Make sure that your vehicle is on levelground.
2.Check the oil level before starting theengine, or switch the engine off afterwarm up and wait 15 minutes for theoil to drain into the oil pan.
Note:Checking the oil level too soon couldresult in an inaccurate reading.
3.Remove the dipstick and wipe it witha clean, lint-free cloth.
4.Reinstall the dipstick and make sure itis fully seated.
5.Remove the dipstick again to check theoil level.
Note: If the oil level is between themaximum and minimum marks, the oil levelis acceptable. Do not add oil.
6.If the oil level is at the minimum mark,immediately add oil.
7.Reinstall the dipstick. Make sure it isfully seated.
Note:The oil consumption of new enginesreaches its normal level after approximately3,000 mi (5,000 km).
Note:Increases in oil level can occur fromfrequent short trips that do not allow theengine to get to operating temperature, aswell as frequent idling or low speed drivingfor long periods of time.
Note:If oil levels are continuously notedabove the maximum mark, have your vehiclechecked as soon as possible.
ADDING ENGINE OIL
WARNING: Do not remove the fillercap when the engine is running.
444
2023 Super Duty (TFH) Canada/United States of America, enUSA, Edition date: 202211, DOMMaintenanceE249448 E270482
Page 449 of 738
WARNING: Do not add engine oilwhen the engine is hot. Failure to followthis instruction could result in personalinjury.
Do not use supplemental engine oiladditives because they are unnecessaryand could lead to engine damage that thevehicle warranty may not cover.
1.Clean the area surrounding the engineoil filler cap before you remove it.
2.Remove the engine oil filler cap.
3.Add engine oil that meets ourspecifications. See Capacities andSpecifications (page 520).
4.Reinstall the engine oil filler cap. Turnit clockwise until you feel a strongresistance.
Note: Do not add oil further than themaximum mark. Oil levels above themaximum mark may cause engine damage.
Note:Immediately soak up any oil spillagewith an absorbent cloth.
INTELLIGENT OIL LIFE MONITOR
Under certain conditions the vehicle’sintelligent oil life monitor may determineyour oil requires replacement prior to yourgeneral service. Should this occur it isrecommended you replace your oil withintwo weeks or 500 mi (800 km) of beingalerted.
Your authorized dealer will be able toadvise you whether only an engine oil andfilter change is recommended or whetheryou should complete your general serviceinclusive of oil and oil Filter.
RESETTING THE INTELLIGENT OILLIFE MONITOR
1.Press the Menu button on the steeringwheel to enter the instrument clusterdisplay main menu.
2.Select Vehicle Maintenance.
3.Select Oil Life.
4.Select Reset Oil Life.
5.Press and hold the OK button until thesystem reset confirmation appears.
ENGINE OIL CAPACITY ANDSPECIFICATION
For filling information, please refer to theCapacities and Specifications section ofyour owner's manual. See Capacities andSpecifications (page 520).
ENGINE AIR FILTER
CHANGING THE ENGINE AIRFILTER
WARNING: To reduce the risk ofvehicle damage and personal burninjuries, do not start your engine with theair cleaner removed and do not removeit while the engine is running.
Use the correct specification air filterelement. See Engine Air Filter (page 445).
Note: Failure to use the correct air filterelement may result in severe enginedamage. Resulting component damagemay not be covered by the vehicle Warranty.
445
2023 Super Duty (TFH) Canada/United States of America, enUSA, Edition date: 202211, DOMMaintenance
Page 450 of 738
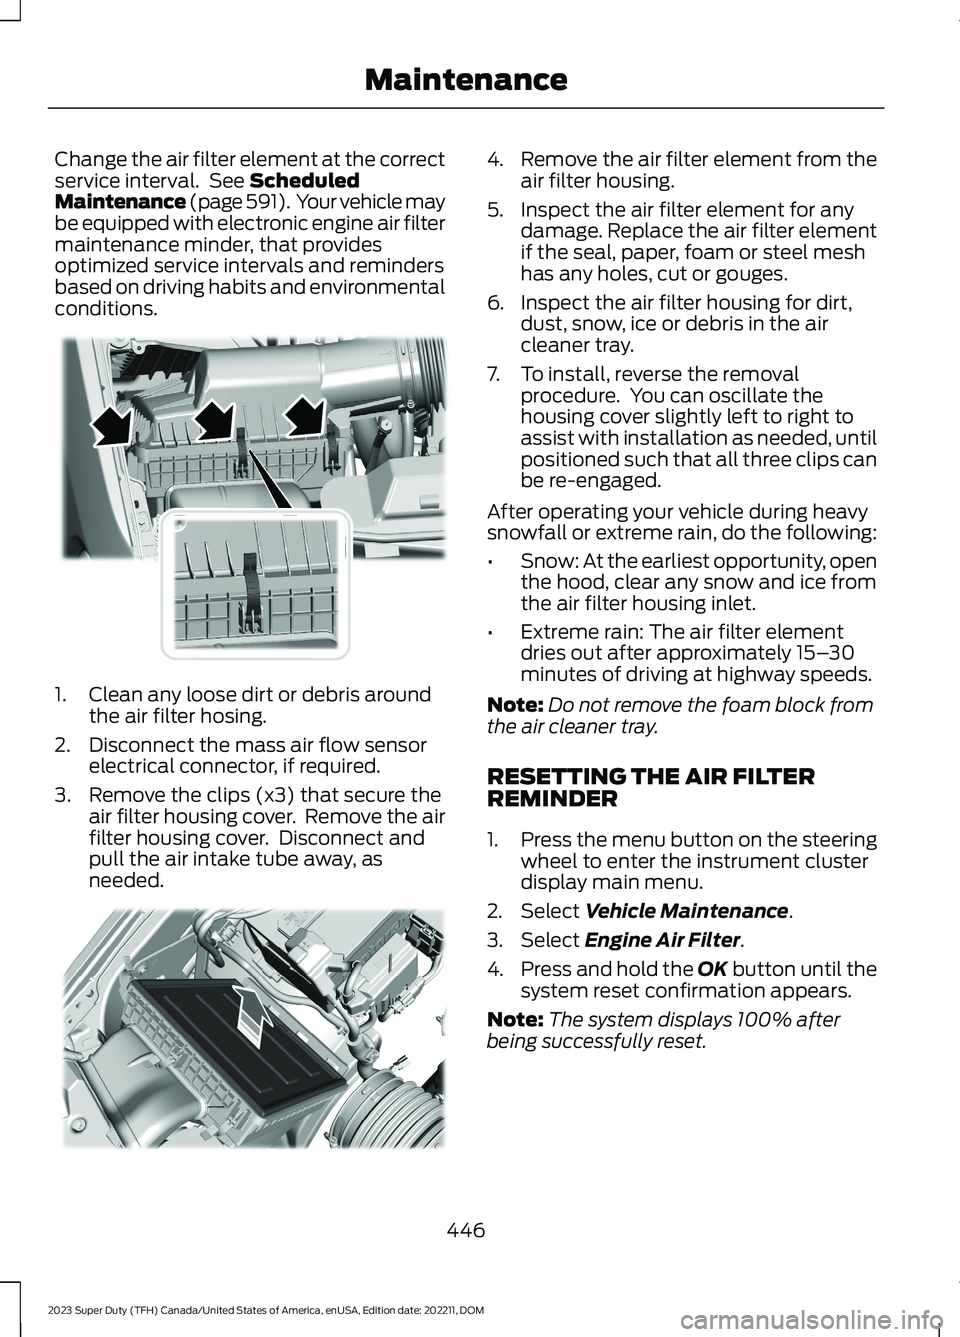
Change the air filter element at the correctservice interval. See ScheduledMaintenance (page 591). Your vehicle maybe equipped with electronic engine air filtermaintenance minder, that providesoptimized service intervals and remindersbased on driving habits and environmentalconditions.
1.Clean any loose dirt or debris aroundthe air filter hosing.
2.Disconnect the mass air flow sensorelectrical connector, if required.
3.Remove the clips (x3) that secure theair filter housing cover. Remove the airfilter housing cover. Disconnect andpull the air intake tube away, asneeded.
4.Remove the air filter element from theair filter housing.
5.Inspect the air filter element for anydamage. Replace the air filter elementif the seal, paper, foam or steel meshhas any holes, cut or gouges.
6.Inspect the air filter housing for dirt,dust, snow, ice or debris in the aircleaner tray.
7.To install, reverse the removalprocedure. You can oscillate thehousing cover slightly left to right toassist with installation as needed, untilpositioned such that all three clips canbe re-engaged.
After operating your vehicle during heavysnowfall or extreme rain, do the following:
•Snow: At the earliest opportunity, openthe hood, clear any snow and ice fromthe air filter housing inlet.
•Extreme rain: The air filter elementdries out after approximately 15–30minutes of driving at highway speeds.
Note:Do not remove the foam block fromthe air cleaner tray.
RESETTING THE AIR FILTERREMINDER
1.Press the menu button on the steeringwheel to enter the instrument clusterdisplay main menu.
2.Select Vehicle Maintenance.
3.Select Engine Air Filter.
4.Press and hold the OK button until thesystem reset confirmation appears.
Note:The system displays 100% afterbeing successfully reset.
446
2023 Super Duty (TFH) Canada/United States of America, enUSA, Edition date: 202211, DOMMaintenanceE350657 E310319