FORD SUPER DUTY 2023 Owners Manual
Manufacturer: FORD, Model Year: 2023, Model line: SUPER DUTY, Model: FORD SUPER DUTY 2023Pages: 738, PDF Size: 18.49 MB
Page 461 of 738
WHAT IS THE BATTERYMANAGEMENT SYSTEM
The battery management system monitorsbattery conditions and takes actions toextend battery life.
HOW DOES THE BATTERYMANAGEMENT SYSTEM WORK
If excessive battery drain is detected, thesystem temporarily disables someelectrical systems to protect the battery.
Systems included are:
•Heated rear window.
•Heated seats.
•Climate control.
•Heated steering wheel.
•Audio unit.
•Navigation system.
A message could appear in the informationdisplay to alert you that battery protectionactions are active. This message is only fornotification that an action is taking place,and not intended to indicate an electricalproblem or that the battery requiresreplacement.
BATTERY MANAGEMENT SYSTEMLIMITATIONS
After battery replacement, or in somecases after charging the battery with anexternal charger, the battery managementsystem requires eight hours of vehicle sleeptime to relearn the battery state of charge.During this time, your vehicle must remainfully locked with the ignition switched off.
Note:Prior to relearning the battery stateof charge, the battery management systemcould temporarily disable some electricalsystems.
Electrical Accessory Installation
To make sure the battery managementsystem works correctly, do not connect anelectrical device ground connectiondirectly to the battery negative post. Thiscan cause inaccurate measurements ofthe battery condition and potentialincorrect system operation.
Note:If you add electrical accessories orcomponents to the vehicle, it couldadversely affect battery performance anddurability. This could also affect theperformance of other electrical systems inthe vehicle.
CHANGING THE 12V BATTERY
The battery is in the engine compartment.See Maintenance (page 440).
Your vehicle has a maintenance-freebattery. It does not require additionalwater during service.
If the vehicle battery has a cover, makesure you correctly install it after cleaningor replacing the battery.
For longer, trouble-free operation, keep thetop of the battery clean and dry and thebattery cables tightly fastened to thebattery terminals. If any corrosion ispresent on the battery or terminals, removethe cables from the terminals and cleanwith a wire brush. You can neutralize theacid with a solution of baking soda andwater.
We recommend that you disconnect thenegative battery cable terminal from thebattery if you plan to store your vehicle foran extended period.
Note:If you only disconnect the negativebattery cable terminal, make sure it isisolated or placed away from the batteryterminal to avoid unintended connection orarcing.
457
2023 Super Duty (TFH) Canada/United States of America, enUSA, Edition date: 202211, DOMMaintenance
Page 462 of 738
If you disconnect or replace the batteryand your vehicle has an automatictransmission, it must relearn its adaptivestrategy. Because of this, the transmissionmay shift firmly when first driven. This isnormal operation while the transmissionfully updates its operation to optimumshift feel.
Removing the Battery
1.Apply the parking brake and switch theignition off.
2.Switch all electrical equipment off, forexample lights and radio.
3.Wait a minimum of two minutes beforedisconnecting the battery.
Note:The engine management system hasa power hold function and remains poweredfor a period of time after you switch theignition off. This is to allow diagnostic andadaptive tables to be stored. Disconnectingthe battery without waiting can causedamage not covered by the vehicleWarranty.
4.Disconnect and isolate the negativebattery cable terminal.
5.Disconnect and isolate the positivebattery cable terminal.
6.Remove the battery securing clamp.
7.Remove the battery.
If you disconnect or replace the vehiclebattery, you must reset the followingfeatures:
•Window bounce-back. See WindowBounce-Back (page 129).
•Clock Settings.
•Pre-set radio stations.
Replacing the Battery
Note:Before reconnecting the battery,make sure the ignition remains switched off.
You must replace the battery with one ofexactly the same specification.
To install, reverse the removal procedure.
Note:Make sure that you correctly installthe battery terminal covers, battery coverand battery cable terminals.
RESETTING THE BATTERYSENSOR
When you install a new battery, reset thebattery sensor by doing the following:
1.Switch the ignition on, and leave theengine off.
Note:Complete Steps 2 and 3 within 10seconds.
2.Flash the high beam headlamps fivetimes, ending with the high beams off.
3.Press and release the brake pedal threetimes.
The battery warning lamp flashes threetimes to confirm that the reset issuccessful.
RECYCLING AND DISPOSING OFTHE 12V BATTERY
Make sure that you dispose ofold batteries in anenvironmentally friendly way.Seek advice from your local authorityabout recycling old batteries.
458
2023 Super Duty (TFH) Canada/United States of America, enUSA, Edition date: 202211, DOMMaintenanceE107998
Page 463 of 738
12V BATTERY –
TROUBLESHOOTING
12V BATTERY – WARNING LAMPS
If it illuminates while driving, itindicates a charging systemerror. Switch off all unnecessaryelectrical equipment and have your vehicleimmediately checked.
12V BATTERY – INFORMATION MESSAGES
DetailsMessage
The charging system needs servicing. If the warning stays onor continues to come on, have your vehicle checked as soonas possible.
Charging System ServiceSoon
The charging system needs servicing. Have your vehicleimmediately checked.Charging System ServiceNow
The battery management system determines that the 12Vbattery is at a low state of charge. Start the engine to chargethe battery or charge the battery using an aftermarket batterycharger. Always use the vehicle ground point when connectingthe negative cable of the external battery charger. See JumpStarting the Vehicle (page 422). This message clears onceyou restart your vehicle and the battery state of charge hasrecovered. Do not switch on the ignition when a batterycharger is in use to charge the battery.
Battery State of ChargeLow
The battery management system determines that the batteryis at a low state of charge. Turn the ignition off as soon aspossible to protect the battery. This message will clear oncethe vehicle has been started and the battery state of chargehas recovered. Turning off unnecessary electrical loads willallow faster battery state-of-charge recovery.
Turn Power Off To SaveBattery
Displayed when the battery management system detects anextended low-voltage condition. Various vehicle features willbe disabled to help preserve the battery. Turn off as many ofthe electrical loads as soon as possible to improve systemvoltage. If the system voltage has recovered, the disabledfeatures will operate again as normal.
Electrical Power SaverActive Some FeaturesTurned Off See Manual
459
2023 Super Duty (TFH) Canada/United States of America, enUSA, Edition date: 202211, DOMMaintenanceE67021
Page 464 of 738
ADJUSTING THE HEADLAMPS
Vertical Aim Adjustment
The headlamps on your vehicle areproperly aimed at the assembly plant. Ifyour vehicle has been in an accident, haveyour vehicle checked as soon as possible.
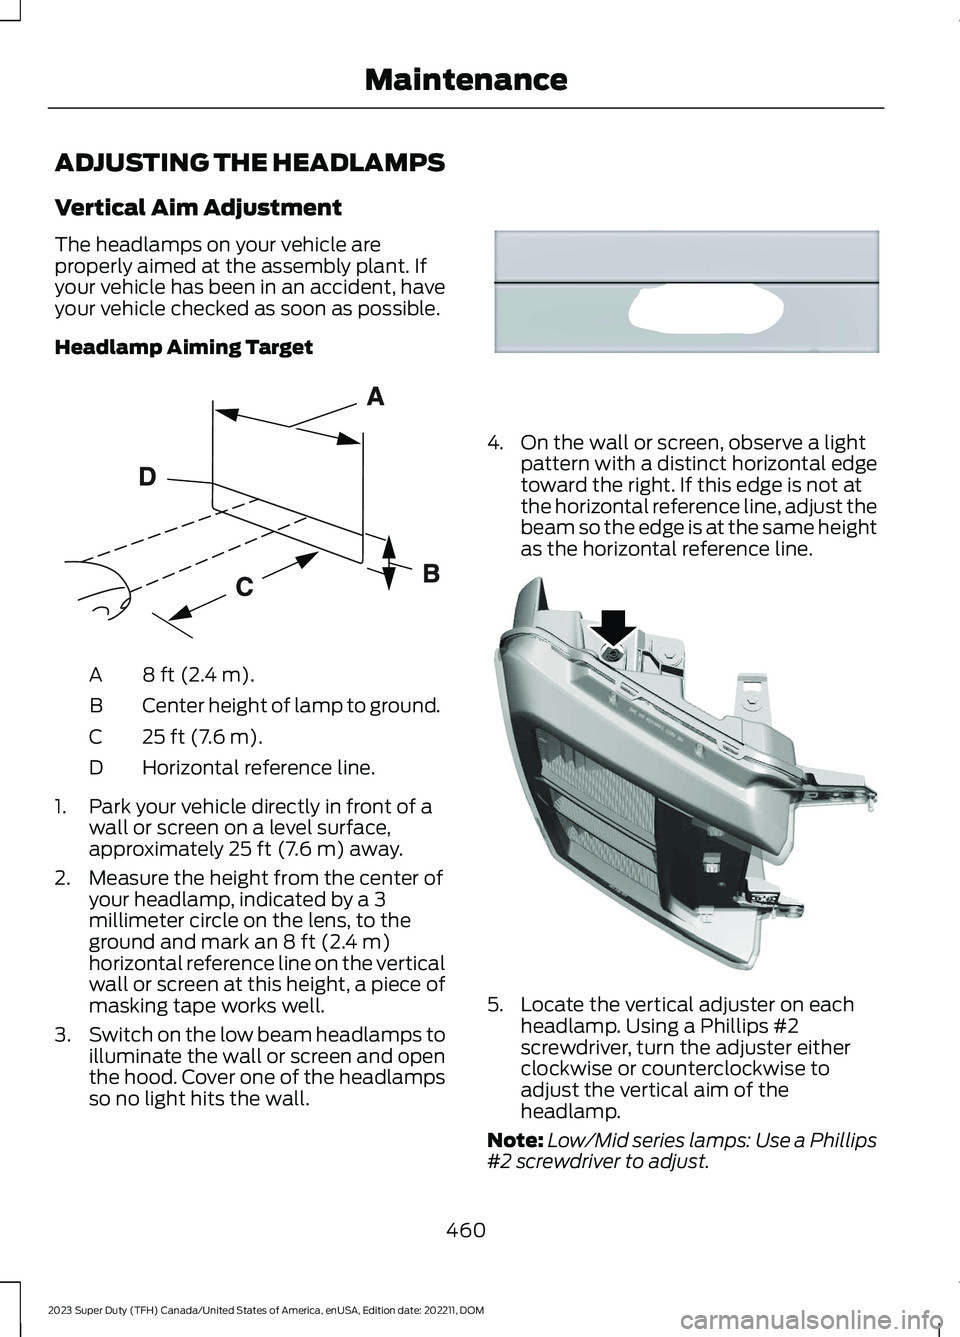
Headlamp Aiming Target
8 ft (2.4 m).A
Center height of lamp to ground.B
25 ft (7.6 m).C
Horizontal reference line.D
1.Park your vehicle directly in front of awall or screen on a level surface,approximately 25 ft (7.6 m) away.
2.Measure the height from the center ofyour headlamp, indicated by a 3millimeter circle on the lens, to theground and mark an 8 ft (2.4 m)horizontal reference line on the verticalwall or screen at this height, a piece ofmasking tape works well.
3.Switch on the low beam headlamps toilluminate the wall or screen and openthe hood. Cover one of the headlampsso no light hits the wall.
4.On the wall or screen, observe a lightpattern with a distinct horizontal edgetoward the right. If this edge is not atthe horizontal reference line, adjust thebeam so the edge is at the same heightas the horizontal reference line.
5.Locate the vertical adjuster on eachheadlamp. Using a Phillips #2screwdriver, turn the adjuster eitherclockwise or counterclockwise toadjust the vertical aim of theheadlamp.
Note:Low/Mid series lamps: Use a Phillips#2 screwdriver to adjust.
460
2023 Super Duty (TFH) Canada/United States of America, enUSA, Edition date: 202211, DOMMaintenanceE142592 E167358 E386873
Page 465 of 738
High Series Lamps: Use a 6 mm hex key orPhillips PH1 screwdriver to adjust.
6.Repeat Steps 3 through 5 to adjust theother headlamp.
Note:The vertical adjuster is in the samelocation for all headlamps.
7.Close the hood and turn off the lamps.
Horizontal Aim Adjustment
Horizontal aim is not required for thisvehicle and is not adjustable.
EXTERIOR BULBS
EXTERIOR BULB SPECIFICATIONCHART
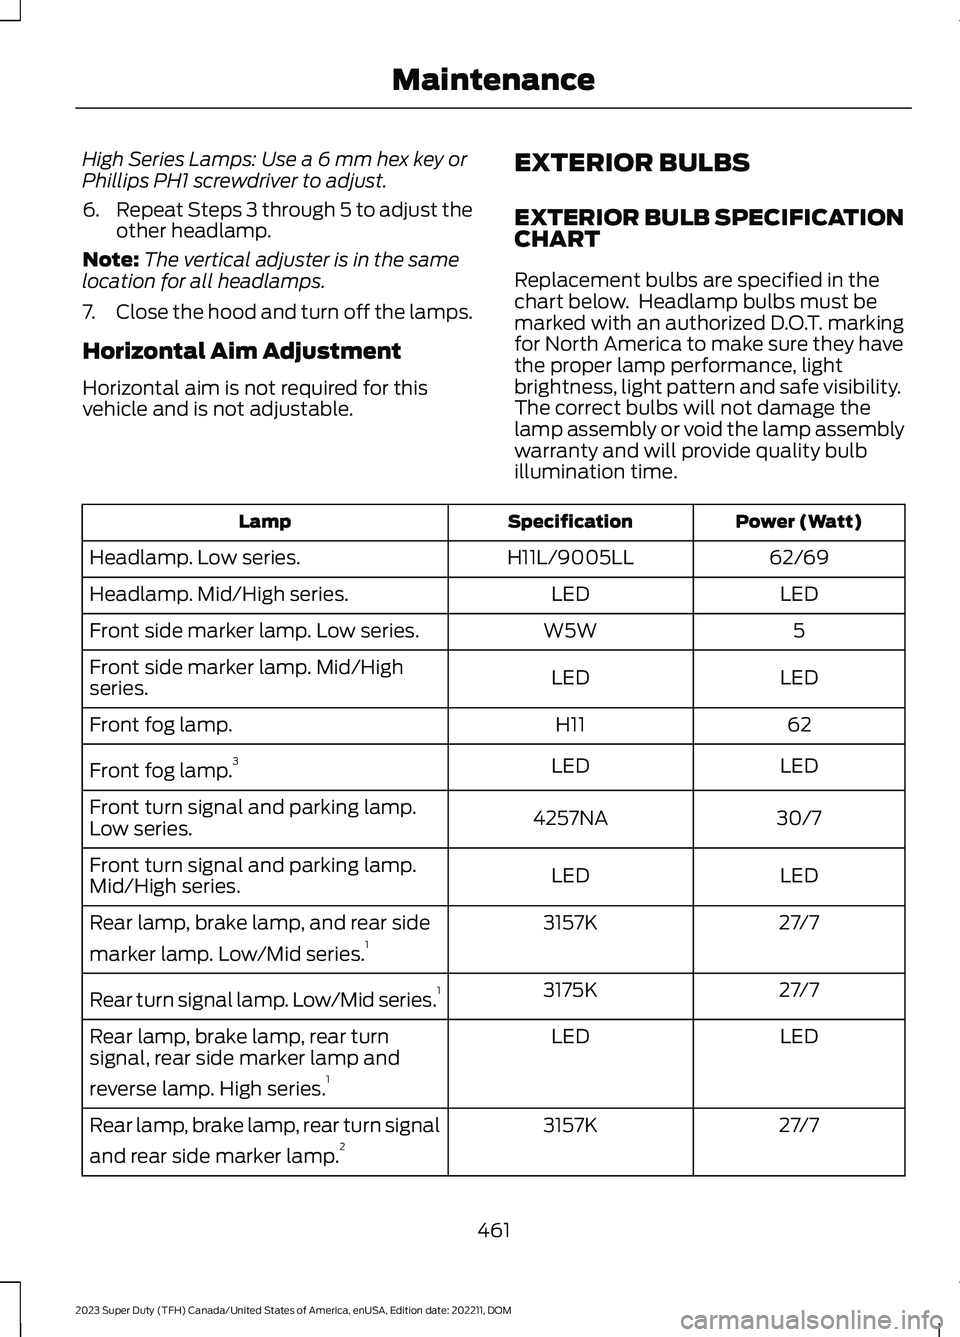
Replacement bulbs are specified in thechart below. Headlamp bulbs must bemarked with an authorized D.O.T. markingfor North America to make sure they havethe proper lamp performance, lightbrightness, light pattern and safe visibility.The correct bulbs will not damage thelamp assembly or void the lamp assemblywarranty and will provide quality bulbillumination time.
Power (Watt)SpecificationLamp
62/69H11L/9005LLHeadlamp. Low series.
LEDLEDHeadlamp. Mid/High series.
5W5WFront side marker lamp. Low series.
LEDLEDFront side marker lamp. Mid/Highseries.
62H11Front fog lamp.
LEDLEDFront fog lamp.3
30/74257NAFront turn signal and parking lamp.Low series.
LEDLEDFront turn signal and parking lamp.Mid/High series.
27/73157KRear lamp, brake lamp, and rear side
marker lamp. Low/Mid series.1
27/73175KRear turn signal lamp. Low/Mid series.1
LEDLEDRear lamp, brake lamp, rear turnsignal, rear side marker lamp and
reverse lamp. High series.1
27/73157KRear lamp, brake lamp, rear turn signal
and rear side marker lamp.2
461
2023 Super Duty (TFH) Canada/United States of America, enUSA, Edition date: 202211, DOMMaintenance
Page 466 of 738
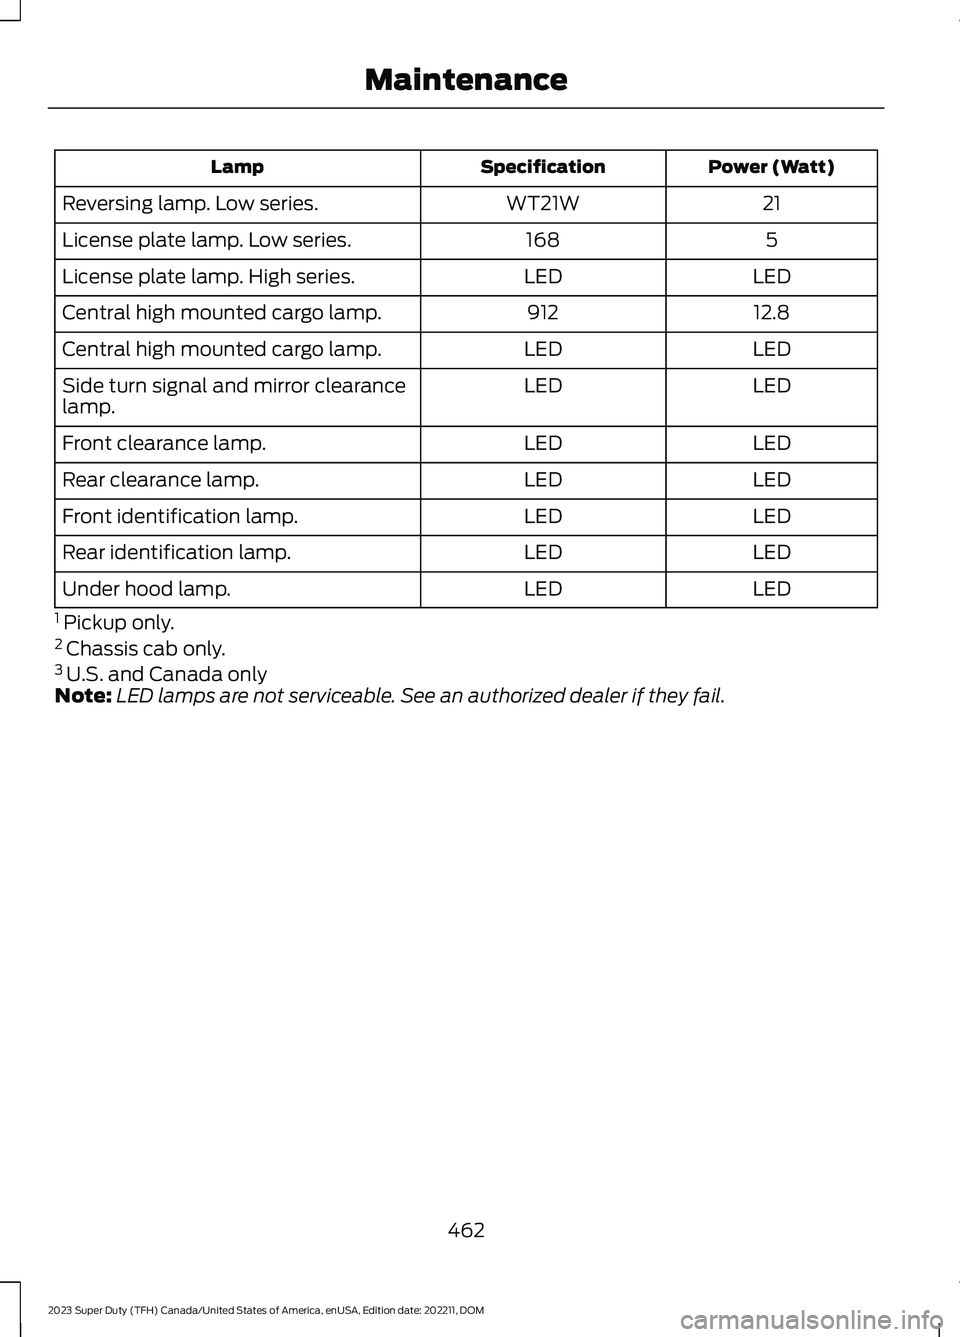
Power (Watt)SpecificationLamp
21WT21WReversing lamp. Low series.
5168License plate lamp. Low series.
LEDLEDLicense plate lamp. High series.
12.8912Central high mounted cargo lamp.
LEDLEDCentral high mounted cargo lamp.
LEDLEDSide turn signal and mirror clearancelamp.
LEDLEDFront clearance lamp.
LEDLEDRear clearance lamp.
LEDLEDFront identification lamp.
LEDLEDRear identification lamp.
LEDLEDUnder hood lamp.
1 Pickup only.2 Chassis cab only.3 U.S. and Canada onlyNote:LED lamps are not serviceable. See an authorized dealer if they fail.
462
2023 Super Duty (TFH) Canada/United States of America, enUSA, Edition date: 202211, DOMMaintenance
Page 467 of 738
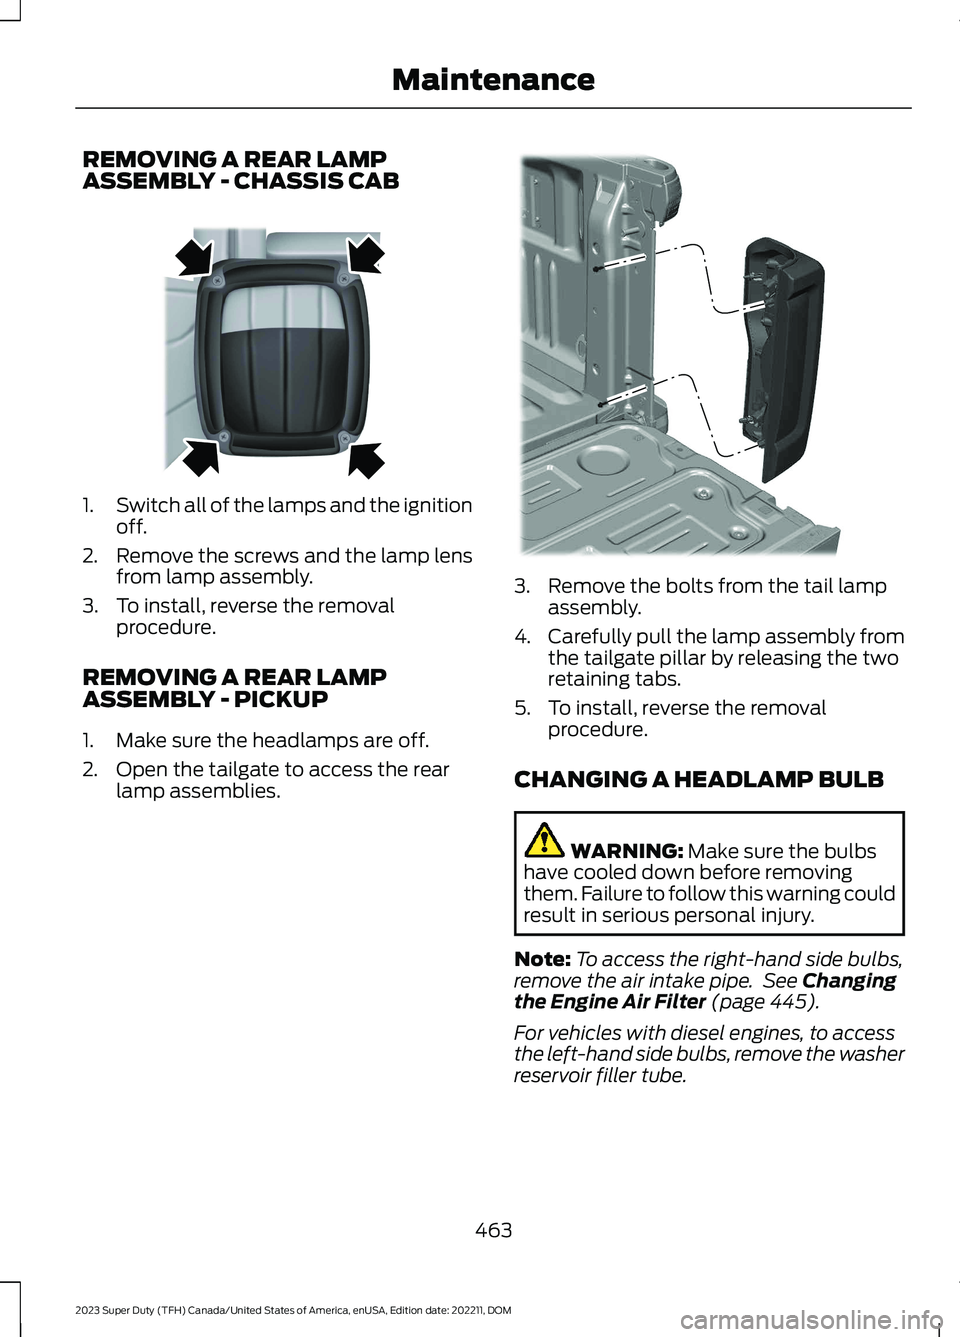
REMOVING A REAR LAMPASSEMBLY - CHASSIS CAB
1.Switch all of the lamps and the ignitionoff.
2.Remove the screws and the lamp lensfrom lamp assembly.
3.To install, reverse the removalprocedure.
REMOVING A REAR LAMPASSEMBLY - PICKUP
1.Make sure the headlamps are off.
2.Open the tailgate to access the rearlamp assemblies.
3.Remove the bolts from the tail lampassembly.
4.Carefully pull the lamp assembly fromthe tailgate pillar by releasing the tworetaining tabs.
5.To install, reverse the removalprocedure.
CHANGING A HEADLAMP BULB
WARNING: Make sure the bulbshave cooled down before removingthem. Failure to follow this warning couldresult in serious personal injury.
Note:To access the right-hand side bulbs,remove the air intake pipe. See Changingthe Engine Air Filter (page 445).
For vehicles with diesel engines, to accessthe left-hand side bulbs, remove the washerreservoir filler tube.
463
2023 Super Duty (TFH) Canada/United States of America, enUSA, Edition date: 202211, DOMMaintenanceE163828 E386885
Page 468 of 738
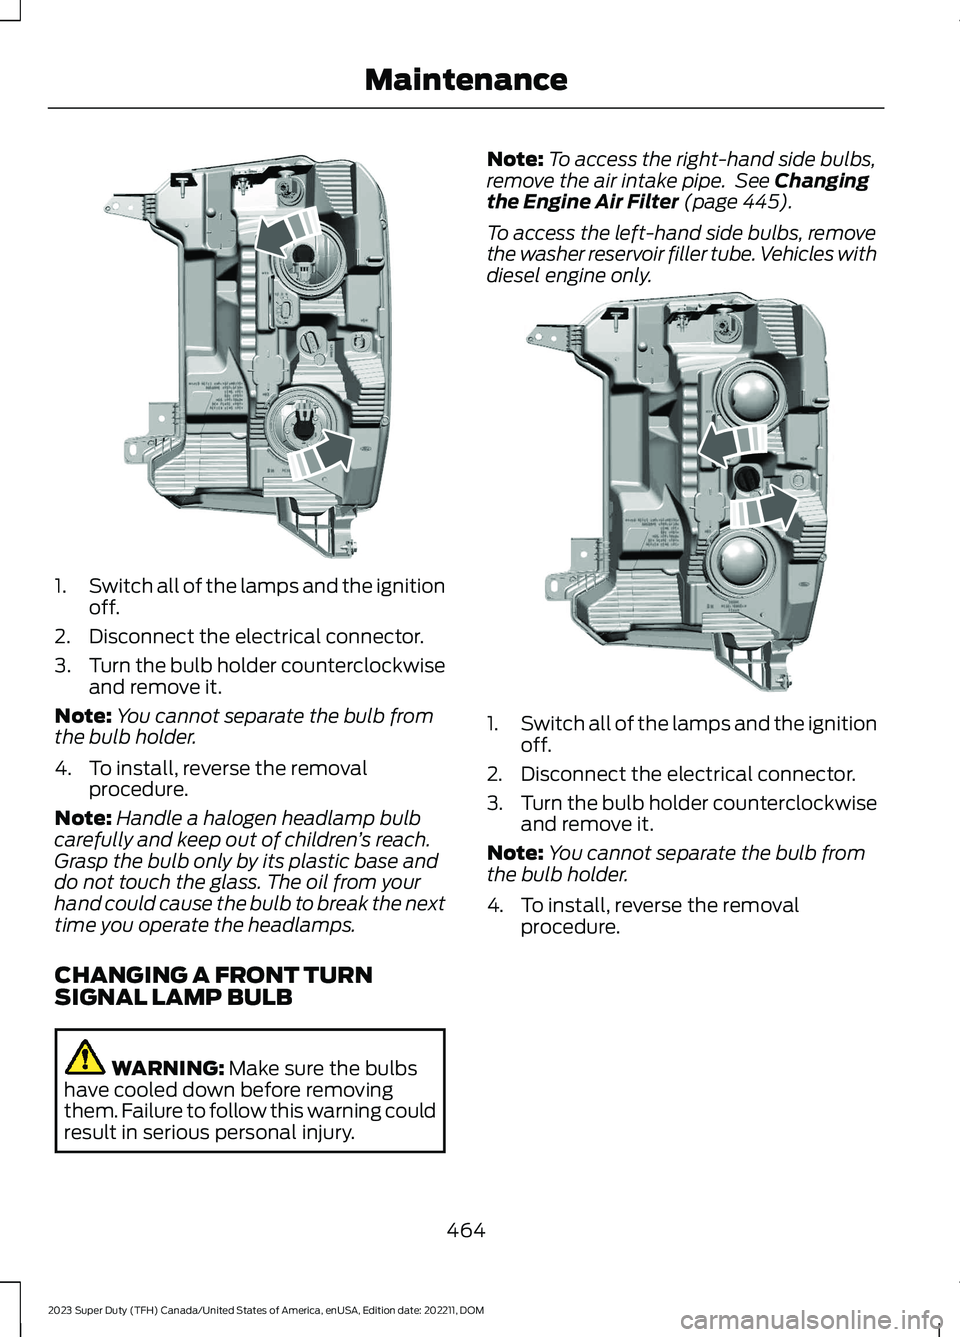
1.Switch all of the lamps and the ignitionoff.
2.Disconnect the electrical connector.
3.Turn the bulb holder counterclockwiseand remove it.
Note:You cannot separate the bulb fromthe bulb holder.
4.To install, reverse the removalprocedure.
Note:Handle a halogen headlamp bulbcarefully and keep out of children’s reach.Grasp the bulb only by its plastic base anddo not touch the glass. The oil from yourhand could cause the bulb to break the nexttime you operate the headlamps.
CHANGING A FRONT TURNSIGNAL LAMP BULB
WARNING: Make sure the bulbshave cooled down before removingthem. Failure to follow this warning couldresult in serious personal injury.
Note:To access the right-hand side bulbs,remove the air intake pipe. See Changingthe Engine Air Filter (page 445).
To access the left-hand side bulbs, removethe washer reservoir filler tube. Vehicles withdiesel engine only.
1.Switch all of the lamps and the ignitionoff.
2.Disconnect the electrical connector.
3.Turn the bulb holder counterclockwiseand remove it.
Note:You cannot separate the bulb fromthe bulb holder.
4.To install, reverse the removalprocedure.
464
2023 Super Duty (TFH) Canada/United States of America, enUSA, Edition date: 202211, DOMMaintenanceE386875 E386884
Page 469 of 738
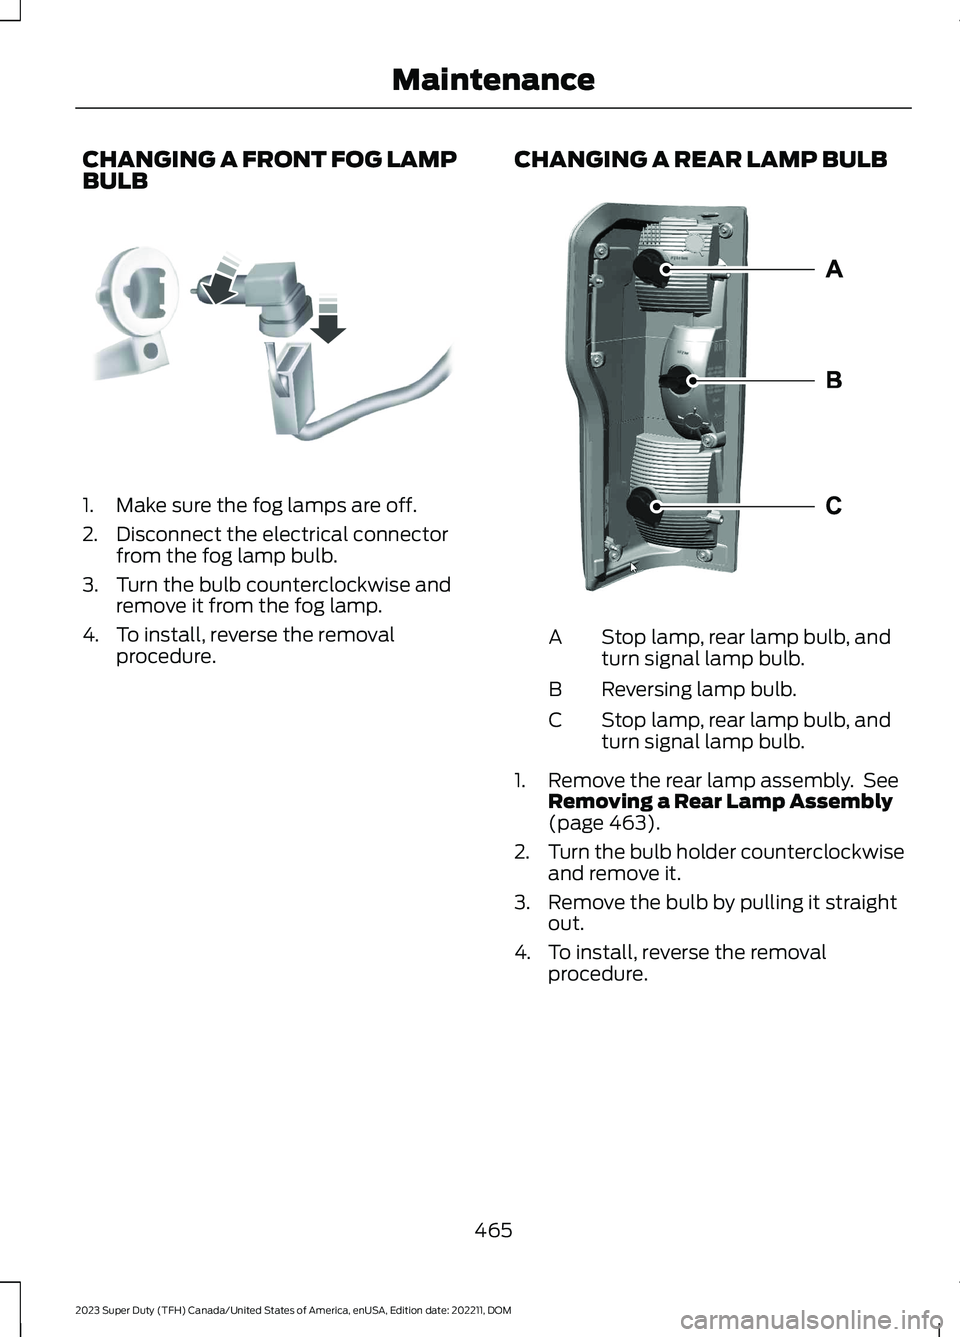
CHANGING A FRONT FOG LAMPBULB
1.Make sure the fog lamps are off.
2.Disconnect the electrical connectorfrom the fog lamp bulb.
3.Turn the bulb counterclockwise andremove it from the fog lamp.
4.To install, reverse the removalprocedure.
CHANGING A REAR LAMP BULB
Stop lamp, rear lamp bulb, andturn signal lamp bulb.A
Reversing lamp bulb.B
Stop lamp, rear lamp bulb, andturn signal lamp bulb.C
1.Remove the rear lamp assembly. SeeRemoving a Rear Lamp Assembly(page 463).
2.Turn the bulb holder counterclockwiseand remove it.
3.Remove the bulb by pulling it straightout.
4.To install, reverse the removalprocedure.
465
2023 Super Duty (TFH) Canada/United States of America, enUSA, Edition date: 202211, DOMMaintenanceE163826 E386886
Page 470 of 738
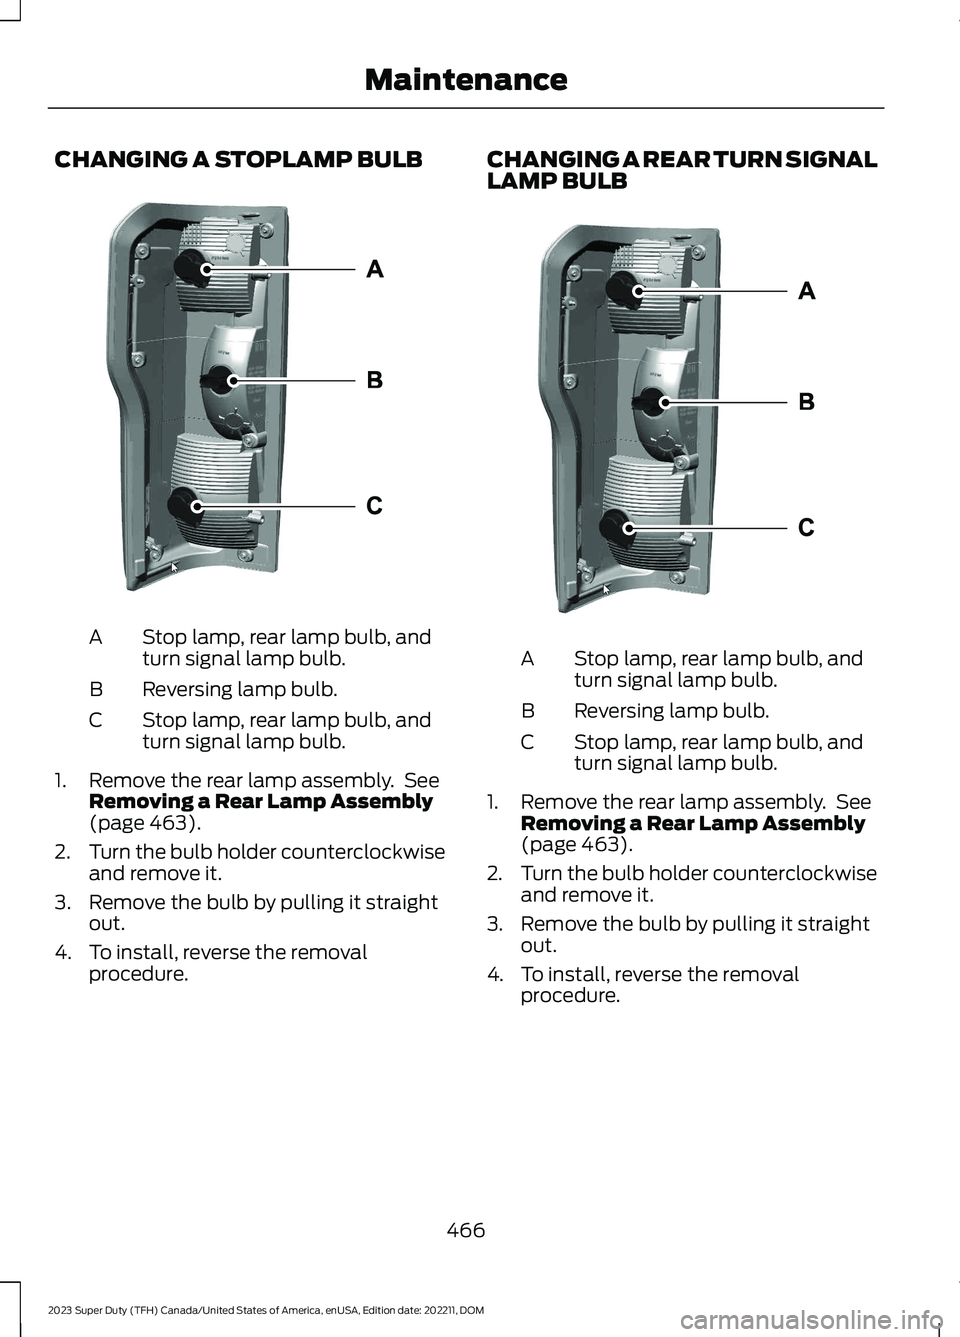
CHANGING A STOPLAMP BULB
Stop lamp, rear lamp bulb, andturn signal lamp bulb.A
Reversing lamp bulb.B
Stop lamp, rear lamp bulb, andturn signal lamp bulb.C
1.Remove the rear lamp assembly. SeeRemoving a Rear Lamp Assembly(page 463).
2.Turn the bulb holder counterclockwiseand remove it.
3.Remove the bulb by pulling it straightout.
4.To install, reverse the removalprocedure.
CHANGING A REAR TURN SIGNALLAMP BULB
Stop lamp, rear lamp bulb, andturn signal lamp bulb.A
Reversing lamp bulb.B
Stop lamp, rear lamp bulb, andturn signal lamp bulb.C
1.Remove the rear lamp assembly. SeeRemoving a Rear Lamp Assembly(page 463).
2.Turn the bulb holder counterclockwiseand remove it.
3.Remove the bulb by pulling it straightout.
4.To install, reverse the removalprocedure.
466
2023 Super Duty (TFH) Canada/United States of America, enUSA, Edition date: 202211, DOMMaintenanceE386886 E386886